1
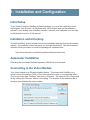
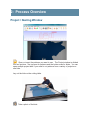
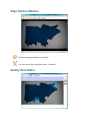
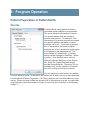
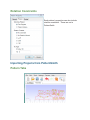
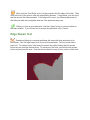
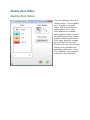
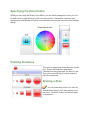
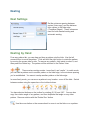
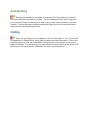
HIDESHOT
USER MANUAL
AMXMAN-10-01 REV 1
AUTOMETRIX, INC.
www.autometrix.com
[email protected]
PH: 530-477-5065
FX: 530-477-5067
1: Installation and Configuration
Initial Setup
To get started using the HideShot software package, you must first install and unlock
the program, then connect it to the Autometrix vision module and run the calibration
process. If you already have HideShot installed, unlocked, and calibrated, you can skip
to the Operation section of this manual.
Installation and Unlocking
To install HideShot, download and execute the installation package from the Autometrix
website. An installation wizard will guide you through the process. Use the Autometrix
software unlock procedure to unlock the package as explained here:
http://docs.autometrix.com/documentation/software/unlock.html
Autonester Installation
Unlocking the Autonester features requires a USB key from Autometrix.
Connecting to the Vision Module
Your vision module is an Ethernet enabled device. This means that HideShot only
needs to know the address (URL) of the vision module in order to communicate with it.
Click on the menu item ‘Settings, then click on ‘Camera’. The camera URL is found and
set by clicking the ‘Discover’ button in the dialog. The location of the calibration file is
set when you calibrate the vision module.
Calibration
The goal for the calibration process is to:
• Get the accurate scale for the photo.
• Remove all lens distortion.
• Correlate the location of any point in the photo to the correct point on the
table.
Your system was calibrated when it was installed. Normally, the only reason to recalibrate would be if the cutting table or vision system moved. Should you need to
re-calibrate, detailed calibration instructions are available from Autometrix Customer
Service.
Daisy Link
2: Process Overview
Project / Nesting Window
Open or import the patterns you want to use. The Project window is divided
into two sections - the top area for patterns and the bottom area for hides. You can
open multiple project tabs if you need to cut patterns from a variety of projects on
one hide.
Lay out the hide on the cutting table.
Take a photo of the hide.
Edge Capture Window
Find the nesting perimeter for the hide.
You can correct any perimeter errors, if needed.
Quality Zone Editor
Identify up to 16 quality zone levels on the hide and on your patterns.
Mask out flaws.
Identify the hide’s grain line direction. The grain line establishes zero
degrees for nesting purposes.
Nesting
Nest patterns manually or automatically with the auto-nesting plug-in.
Cutting
Cut out the patterns.
3: Program Operation
Pattern Preparation in PatternSmith:
Quotas
In PatternSmith, each pattern includes a
quota and quota multiplier in its properties.
The quota indicates the number of copies
of a specific pattern that are needed to
produce one product. For example, if the
construction of a product requires two copies
of a specific pattern, that pattern’s quota
would be set to two. If you want to produce
four of that product, the quota multiplier
would be set to four, allowing for eight copies
of the pattern to be nested and cut. Set
quota values in PatternSmith. If needed,
values can be changed in HideShot. Select
a pattern. From the Edit menu, click on
Pattern Properties and then on the Quotas
tab. Enter the Copies Required (quota)
and the Quota Multiplier. Checking “Do not
exceed quota” causes HideShot to prevent
you from nesting more than your quota.
You can continue to nest copies of a pattern
until you reach its quota. At that point, the pattern will fill with a color you have specified
in PatternSmith (Pattern Properties > Fill Colors) and you won’t be able make any more
copies. When you have fulfilled the quotas of all of the patterns on a tab, you can either
close that tab or reset the number of copies to zero from the tool button on the Nesting
toolbar???.
Rotation Constraints
Each pattern’s properties can also include
rotation constraints. These are set in
PatternSmith.
Importing Projects from PatternSmith
Pattern Tabs
When you click the ‘Open’ tool button, you create a pattern tab to hold all of the
patterns in the PatternSmith psxml file that you select. You can open multiple pattern
tabs for convenience.
You can also add all of the patterns in any psxml file to an open tab by using the
‘Import’ button.
Job Tab
When you click the ‘New’ tool button, you create a special pattern tab called the ‘Job
Tab’. This tab gives you a convenient way to pull patterns from a variety of open pattern
tabs, and set their quota multipliers at the same time. If you have a Job Tab open, the
hide area for all other pattern tabs will show drop targets. The number on the drop target
is used to set the quota multiplier for the patterns you drag and drop there. After you drop
any patterns on a drop target, you will find them on the Job Tab, with their newly assigned
quota multiplier.
When you have finished using the job tab, right click on the tab and then click ‘Close’.
Capturing Hide Information
Taking the Photograph and Finding the Edge
From the main window, click the ‘Take Picture’ tool button to take a photo of the
hide. The hide will appear in the Edge Finder window.
First, use the ‘Sample Colors’ tool to tell the program the color of the hide and
the background. Click and drag each sample box (table and pattern) to areas that allow
you to collect an accurate sample of color. (If the colors are the same as the last hide,
you can skip this step.)
Next, click the ‘Find Edge’ tool to let the program find the edge of the hide. Then
click to the left of the hide to start the edge-finding process. If successful, you will see a
red line around the hide perimeter. If the edge isn’t correct, try different placement of
the hide and table color samplers and see if the perimeter improves.
When you have a good perimeter, click the ‘Apply’ button to return the hide to
the main window. If you choose not to accept this perimeter, click ‘Cancel’.
Edge Repair Tool
Sometimes lighting or contrast problems will cause the hide perimeter to be
inaccurate. Use the edge repair tool to correct the perimeter. This tool works like a
paint tool. To subtract area, hold down the control key while holding the left mouse
button as you paint the desired area. To add area to the hide, just hold the left mouse
button as you paint the area. Use the mouse wheel to zoom in on a section of the hide.
Quality Zone Editor
Quality Zone Setup
From the ‘Settings’ menu, go to
‘Quality Zones’. You can define
up to 17 quality zone grade
levels. One level must be for
perfect areas (A or 1, clear
color) and one for unusable
flaws (highest number or letter).
Use the plus and minus buttons
to add or subtract grade levels.
Click ‘Apply Spectrum’ to apply
a pre-set spectrum of colors.
Choose your own colors by right
clicking on any identifier and
selecting another color. Under
‘Zone Labeling’, select numbers
or letters for zone identifiers.
Specifying the Zone Colors
While you are using the Quality Zone Editor, you can easily change the colors you use
for each zone by right clicking on the zone color button. Remember, however, that
changing the total number of quality zone identifiers can only be done from the ‘Settings’
dialog.
Painting the Zones
The tools for specifying zones work like a paint
tool. Select the brush size and shape.
Choose the zone grade level you want to use.
Then click and hold the left mouse button to
paint the zone area.
Erasing a Zone
You can erase any portion of a zone by
selecting the ‘Eraser’ tool, then painting over
the zone. Click the ‘Eraser’ tool button again
to de-select it.
Changing a Grade Level
Screen Shot TBD
To change a zone to another grade level, click
inside the zone and then click on a new grade level.
Grain Line
You can use the Grain Line tool to draw a grain line for the hide. For nesting purposes,
the grain line will be considered zero degrees. This means that when you drop a
pattern on the hide, it will start out aligned with the grain line. Use the various buttons
on the tool bar to rotate a pattern a given number of degrees. Click 0° to return the
pattern to the grain line (zero degrees) again.
Polygon Tool
After clicking the polygon tool, left click on points to create the shape you desire.
Double click on your last point to finalize the polygon. This tool can enable you to
quickly assign large areas to a quality zone. If you only want to nest on a half hide, for
example, assign the other half of the hide as “flawed”. Polygon Screen Shot
Apply
Click ‘Apply’ when you are satisfied with your zone assignments. This will return
you to the Main Window.
Click ‘Cancel’ to return to the Main Window without making zone assignments or
changes.
Pattern Quality Zones
Select a pattern. From the ‘Tools’ menu, click ‘Quality Zone Editor’. You will now
be able to assign specific quality zones on that pattern. When you nest that pattern,
HideShot will only allow it to go into areas of the hide with the same quality zone or
better. For example, a pattern section marked as Zone C could go into a section of the
hide zoned C, B, or A. QZ Screen Shot
Nesting
Nest Settings
Set the minimum spacing between
copies (‘Inter-copy’) and the distance
from copies to the hide edge
(‘Container Edges’). These values are
used for both manual nesting and
automatic nesting.
Nesting by Hand
From any pattern tab, you can drag and drop a pattern onto the hide. Use the left
mouse button to move the pattern. Click and hold the right button to rotate the pattern
by moving the mouse side to side. To remove any pattern, click inside to select it, and
then press the Delete key. The pattern will be returned to the Pattern View.
There are two nesting modes: ‘move freely’ and ‘nestle’. In nestle mode,
you can nest a pattern next to another pattern or the hide edge, to the minimum spacing
you’ve established. You cannot overlap another pattern or the hide edge.
In move freely mode, you can move a pattern to any location - even off the hide. Switch
between modes using the space bar or the toolbar buttons.
You have shortcut buttons on the toolbar for rotating 45, 90, and 180°. You can also
copy the rotation angle of any pattern, and then duplicate that angle on any other
pattern. Remove rotation with the ‘Rotate Zero’ button.
Use the zoom button or the mouse wheel to zoom in on the hide or on a pattern.
Auto-Nesting
Nesting automatically is as simple as selecting all of the patterns you want to
nest, then click the Auto-Nest tool button. The auto-nesting function will comply with
your quota and rotation constraints, as well as any quality zone information you have
entered. You can also place selected patterns by hand and then let the Auto-Nester
take over and nest remaining patterns.
Cutting
When you are ready to cut the patterns, click the ‘Plot and Cut’ tool. Control will
be transferred to PatternSmith, along with all pattern and hide information. Part of the
calibration process links the coordinates returned by the vision system to the actual
table coordinates. For that reason, you must always be positioned at global home (0,0)
before you start cutting a hide. Otherwise, cut as you normally would.