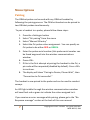
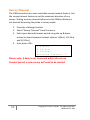
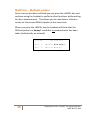
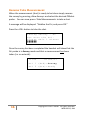
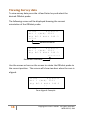
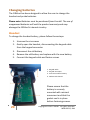
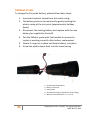
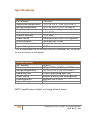
1
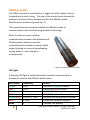
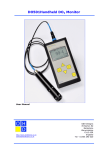
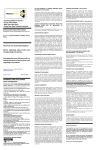
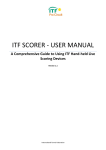
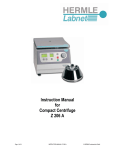
Appendix 5
2012 Material Testwork Results
Appendix 6
Orishot Manual
ORIshot
Multifunction Orientation
Instrument
USER MANUAL
CNPS100
This user manual explains how to use, configure and maintain
the ORIshot orientation system. Please read and ensure you
understand these guidelines before using the product.
Disclaimer
While every effort has been made to ensure that the information
contained in the guide is accurate and complete, no liability can be
accepted for any errors or omissions. Coretell reserves the right to
change the specifications of the system described herein at any time
without prior notice.
No part of this guide may be reproduced, transmitted, transcribed,
stored in a retrieval system, or translated into any language in any
form, by any means, without the prior written permission of
Coretell.
Coretell makes no warranties for damages resulting from corrupted
or lost data due to incorrect use or any malfunction of the ORIshot
system.
2
Copyright © 2011 Coretell. All rights reserved.
MRK-00012, RA4
Table of contents
ORIshot Multifunction Orientation Instrument ................................ 1
Disclaimer ........................................................................................... 2
Table of contents ................................................................................ 3
Introduction........................................................................................ 5
ORIshot System .................................................................................. 5
Handset .......................................................................................... 5
ORIshot probe ................................................................................ 6
Menu Options..................................................................................... 7
Pairing............................................................................................. 7
Display Settings .............................................................................. 8
ORIshot Settings ............................................................................. 9
Info ................................................................................................. 9
Date and Time .............................................................................. 10
Battery Level................................................................................. 10
Zero Roll Adjust ............................................................................ 11
Survey Timeout ............................................................................ 12
Main Screen...................................................................................... 13
Operating Modes.......................................................................... 13
Starting a new survey ....................................................................... 14
Multi Use – Multiple probes......................................................... 15
Resume Take Measurement ........................................................ 16
3
Copyright © 2011 Coretell. All rights reserved.
MRK-00012, RA4
Recovering Data................................................................................ 17
Viewing Survey data ......................................................................... 18
No Response message ...................................................................... 19
Changing batteries ............................................................................ 20
Handset......................................................................................... 20
ORIshot Probe............................................................................... 21
Calibration and Handling .................................................................. 22
Final Word ........................................................................................ 22
Specifications .................................................................................... 23
4
Copyright © 2011 Coretell. All rights reserved.
MRK-00012, RA4
Introduction
Congratulations! You are using the latest in digital survey
instrumentation for down-hole exploration.
This user guide provides all the information you will need to use and
care for your product.
ORIshot System
Handset
The ORIshot handset provides wireless connectivity to any ORIshot
probe. You can configure, start a survey and analyse survey data
effortlessly.
ORIshot handset layout and key button functions:
1.
2.
3.
4.
5.
6.
7.
8.
9.
5
Change system settings
Recover data from the probe
View survey data stored on the handset
Handset on/off button
Turn on LCD backlight
Navigation keypad
Take a survey (shot)
Start a new survey
Display
Copyright © 2011 Coretell. All rights reserved.
MRK-00012, RA4
ORIshot probe
The ORIshot probe is assembled as a single unit with a plastic sleeve
screwed into a steel casing. The top of the plastic sleeve houses the
wireless communications window and has the ORIshot probe
identification number engraved into it.
The communications window enables the ORIshot probe to
communicate to the handset using wireless technology.
Note: In order to ensure reliable
communication between the Handset and
ORIshot probe, please ensure the
communications window is clearly visible
when initiating a survey or downloading
survey data (i.e. not covered or
underground).
1. Wireless communications window
LED Light
A flashing LED light is visible behind the wireless communications
window to indicate the ORIshot probe status.
LED Colour
Green
RED
GREEN
RED
GREEN/RED
RED
None
6
Frequency
7 sec
7 sec
2 sec
2 sec
7 sec or > 1 sec
> 1 sec
0
Status
Paired as a GREEN ORIshot
Paired as a RED ORIshot
GREEN ORIshot has data
RED ORIshot has data
ORIshot not yet paired to handset
Please call technical support
Possible Flat Battery
Copyright © 2011 Coretell. All rights reserved.
MRK-00012, RA4
Menu Options
Pairing
The ORIshot probe can be used with any ORIshot handset by
following the pairing process. The ORIshot handset can be paired to
two ORIshot probes simultaneously.
To pair a handset to a probe, please follow these steps:
1.
2.
3.
4.
5.
6.
7.
8.
Press the <Settings> button
Select “Ori pairing” from the menu
Select “Manual SN entry”
Select the Ori probe colour assignment. You can specify an
Ori probe to be either RED or GREEN.
Enter the probe serial number (this probe serial number can
be found engraved into the wireless communications
window.
Press <OK>
If this is the first attempt at pairing the handset to the Ori, a
pin code will be requested (disabled by default). Press <OK>
to continue.
The display will show “Pairing to Device, Please Wait”, then
“Connection to Ori successful.”
The handset is now paired to the probe and can be used to conduct
surveys.
An LED light visible through the wireless communications window
will now flash red or green to indicate the colour assigned to it.
If you receive an error message while pairing, please go to the “No
Response message” section at the back of this user manual.
7
Copyright © 2011 Coretell. All rights reserved.
MRK-00012, RA4
Display Settings
The ORIshot system provides a number of options to customise how
the survey data is displayed. These options can be changed in the
“Display Settings” menu. This menu can be found by pressing the
<Settings> button and then scrolling down to “Display Settings”.
The optional display settings are:
Arrows: Shows the survey data as a series of arrows.
11:03
01/02/11
Ori 1 (Red) 2233
Downhole ROLL 340.3
>>>>>>>>>||<<<<<<<<<
Bars: Shows the survey data as a series of bars
11:03
01/02/11
Ori 1 (Red) 2233
Downhole ROLL 340.3
▓▓▓▓▓▓▓▓▓||▓▓▓▓▓▓▓▓▓
Real-time ROLL: Displays the survey and real-time ROLL of
the probe.
11:03
01/02/11
Ori 1 (Red) 2233
Downhole ROLL 340.3
ROLL: 55.1
This number will change as
you rotate the ORIshot
probe. Top dead centre is
located when the two ROLL
numbers match.
8
Copyright © 2011 Coretell. All rights reserved.
MRK-00012, RA4
ORIshot Settings
Enables the user to show or hide the DIP information when viewing
the survey data. Simply press the <Settings> button, then select
“Ori Settings” from the menu and select the desired setting.
Screen layout (Show DIP):
11:03
01/02/11
Ori 1 (Red) 2233
Dip 86.0 ROLL 340.3
>>>>>>>>>||<<<<<<<<<
Screen layout (Hide DIP):
11:03
01/02/11
Ori 1 (Red) 2233
Downhole ROLL 340.3
>>>>>>>>>||<<<<<<<<<
Info
To view the current software version of the handset or probe,
please follow these steps:
1. Press the <Settings> button
2. Select “Info” from the menu
3. Select “Handset” or “Ori device”
The following screen will be displayed (or similar):
Handset Info
SW VR: 5.4.9.0
HW VR: PRJ-01142.4
SN:102000222
9
Copyright © 2011 Coretell. All rights reserved.
MRK-00012, RA4
Date and Time
To set the date and time of the ORIshot system, please follow these
steps:
1.
2.
3.
4.
Press the <Settings> button
Select “Date and Time” from the menu
Set the date and time using the <Arrow> keys
Press <OK> when you have finished
The following screen will be displayed:
Set Date
dd mm yy
03/01/00
and Time
hh mm ss
20:46:52
Battery Level
To check the battery level of the ORIshot handset, please follow
these steps:
1. Press the <Settings> button
2. Select “Battery Level” from the menu
3. Battery level will be displayed
The following screen will be displayed:
Handset
remain:
10
battery
100%
Copyright © 2011 Coretell. All rights reserved.
MRK-00012, RA4
Zero Roll Adjust
The ORIshot probe can be zeroed to any roll angle. To zero the
ORIshot probe, please follow these steps:
1. Press the <Settings> button
2. Select “Zero Roll Adjust” from the menu
3. Select your Ori device using the up & down arrows, then
press <OK>
4. Press <OK> to perform a zero roll adjustment. The ORIshot
probe ROLL will now read zero at the current position.
Please note: The probe must be within communications distance
from the handset to perform this function. Ensure the handset is no
more than 2 meters from the probe.
11
Copyright © 2011 Coretell. All rights reserved.
MRK-00012, RA4
Survey Timeout
The ORIshot probe has a user selectable survey timeout feature. Use
the survey timeout feature to set the maximum duration of any
survey. Setting a survey timeout will ensure the ORIshot battery is
not drained by leaving the probe in survey mode.
1. Press the <Settings> button
2. Select “Survey Timeout” from the menu
3. Select your desired timeout period using the up & down
arrows to select between timeout options 1 (6hrs), 2 (12hrs)
and 3 (24hrs).
4. then press <OK>
1 6-hour
2 12-hour
3 24-hour
Selected Timeout:
2
Please note: If data is not recovered within the survey
timeout period, a new survey will need to be started.
12
Copyright © 2011 Coretell. All rights reserved.
MRK-00012, RA4
Main Screen
The ORIshot system allows the user to control two ORIshot probes
with a single handset.
The main screen indicates which ORIshot probes are paired to the
handset; it also indicates the operating mode of each ORIshot probe
(please see below for information on operating modes).
Main screen layout: The below screen shows this particular handset
is paired to two ORIshot probes. ORIshot probe 1 is ready to start a
new survey; ORIshot probe 2 is currently in survey mode.
11:22
Ori
Ori
1
2
01/02/11
(Red):Ready
(Grn):Survey*
Operating mode
Main screen: Example
Operating Modes
The Ori probes can be in one of three operational modes:
Ready: The Ori probe is not being used and is ready to start
a new survey.
Survey*: The Ori probe is currently being used to conduct a
survey. No measurement (shot) has been taken.
Survey: The Ori probe is currently being used to conduct a
survey. A measurement (shot) has been taken and the
ORIshot probe is ready for retrieval.
Data: The survey has been completed and data from the Ori
probe has been downloaded to the handset.
13
Copyright © 2011 Coretell. All rights reserved.
MRK-00012, RA4
Starting a new survey
To start a new survey simply press the <New Survey> button on the
handset and follow the on-screen instructions.
After pressing <New Survey>, please follow these steps:
1. Select the ORIshot probe you wish to use, and press <OK>
2. If the ORIshot probe has been used previously the handset
will display the following warning message “Are you sure
you wish to overwrite survey data on this Ori?”
3. Press <OK> to overwrite old data and continue
4. The handset will connect to the Ori probe and initiate survey
mode.
5. With the ORIshot probe in position on core, press <Take
Measurement> to take a shot. Do not move the Ori probe
while a shot is being taken. Moving the Ori probe will
reduce the reliability of the survey data.
To take shot press
TAKE MEASUREMENT to
view previous survey
press BACK
14
Copyright © 2011 Coretell. All rights reserved.
MRK-00012, RA4
Multi Use – Multiple probes
Once a survey has been initiated you can press the <BACK> key and
continue using the handset to perform other functions while waiting
to take a measurement. This allows you to view data or initiate a
survey on the second ORIshot probe at the same time.
When you press the <BACK> key the handset will show that the
ORIshot probe is in Survey* mode but no measurement has been
taken (indicated by an asterisk).
11:22
Ori
Ori
15
1
2
01/02/11
(Red):Survey*
(Grn):Ready
Copyright © 2011 Coretell. All rights reserved.
MRK-00012, RA4
Resume Take Measurement
When the measurement (shot) is ready to be taken simply resume
the survey by pressing <New Survey> and select the desired ORIshot
probe. You can now press <Take Measurement> to take a shot.
A message will be displayed: “Stabilse the Ori, and press OK.”
Press the <OK> button to take the shot.
Taking survey – do
not move the Ori.
Please wait 1 minute
▓▓▓▓▓▓
Once the survey has been completed the handset will show that the
Ori probe is in Survey mode and that a measurement has been
taken (i.e. no asterisk).
11:22
Ori
Ori
16
1
2
01/02/11
(Red):Survey
(Grn):Ready
Copyright © 2011 Coretell. All rights reserved.
MRK-00012, RA4
Recovering Data
When the survey has been completed pull the Ori probe out of the
hole and press <Recover Data>. The handset will now download
survey data from the selected ORIshot probe ready for viewing.
The handset will show that the ORIshot probe has Data ready for
viewing.
11:22
Ori
Ori
1
2
01/02/11
(Red):Data
(Grn):Ready
Please note: The probe must be within communications distance
from the handset to initiate a survey or to recover data, ensure the
handset is no more than 2 meters from the probe. Once the survey
has been initiated it is ready to be placed down the hole.
17
Copyright © 2011 Coretell. All rights reserved.
MRK-00012, RA4
Viewing Survey data
To view survey data press the <View Data> key and select the
desired ORIshot probe.
The following screen will be displayed showing the current
orientation of the ORIshot probe.
11:03
01/02/11
Ori 1 (Red) 2233
Dip 86.0 ROLL 340.3
>>>>>
Rotate clockwise
11:03
01/02/11
Ori 1 (Red) 2233
Dip 86.0 ROLL 340.3
<<<<<<<<
Rotate anti-clockwise
Use the arrows or bars on the screen to rotate the ORIshot probe to
the correct position. The screen will show two bars when the core is
aligned.
11:03
01/02/11
Ori 1 (Red) 2233
Dip 86.0 ROLL 340.3
||
Core aligned: Example
18
Copyright © 2011 Coretell. All rights reserved.
MRK-00012, RA4
No Response message
The ORIshot system uses wireless technology for communication
between the handset and the probe and avoids the need for wires,
direct line of sight or for the user to disassemble the probe to
download survey data.
In some circumstances the handset may not be able to
communicate to the probe. When this occurs the following screen is
displayed.
Error connecting
to Ori 2233.
Press OK to retry
BACK to cancel.
or
This may be caused by a number of reasons. If you see this message
please review the following checklist and press <OK> to retry:
Ensure the distance between the handset and the probe is
no more than 2 meters
Ensure there are no obstacles between the handset and the
probe
Ensure the communications window is clearly visible (i.e. not
covered or underground)
Check that the ORIshot probe LED is flashing, if no flashing
can be seen please check the batteries
19
Copyright © 2011 Coretell. All rights reserved.
MRK-00012, RA4
Changing batteries
The ORIshot has been designed to allow the user to change the
handset and probe batteries.
Please note: Batteries must be purchased from Coretell. The use of
unapproved batteries will void the product warranty and may
damage the ORIshot’s internal circuitry.
Handset
To change the handset battery, please follow these steps:
1. Unscrew the six screws
2. Gently open the handset, disconnecting the keypad cable
from the keypad connector
3. Disconnect the old battery
4. Remove the old battery and replace with the new battery
5. Connect the keypad cable and fasten screws
1.
2.
3.
4.
Keypad cable
Keypad connector
Area reserved for battery
Gasket seal channel
Please ensure that the
battery is securely
mounted with minimal
movement and that the
gasket seal is in place
before fastening screws.
20
Copyright © 2011 Coretell. All rights reserved.
MRK-00012, RA4
ORIshot Probe
To change the Ori probe battery, please follow these steps:
1. Unscrew the plastic sleeve from the metal casing
2. The battery pack can be removed by gently twisting the
plastic casing at the join point (approximately halfway
down)
3. Disconnect the existing battery and replace with the new
battery (as supplied by Coretell)
4. Pair the ORIshot probe with the handset to ensure the
system is working correctly after battery replacement
5. Ensure O-rings are in place and fasten battery into place
6. Screw the plastic sleeve back into the metal casing
1.
2.
3.
4.
5.
21
Coretell approved battery
Battery connector
O-Ring seals
Threaded housing (screwed into metal casing)
Wireless communications w i n d o w
Copyright © 2011 Coretell. All rights reserved.
MRK-00012, RA4
Calibration and Handling
The ORIshot probe has been calibrated to a high level of precision –
please see Specifications for more details.
The ORIshot probe is a precision instrument and therefore should be
treated with care. Extreme temperatures, heavy impacts, severe
vibrations or general rough handling will reduce the accuracy of the
probe and may damage the internal circuitry.
It is recommended that the Orishot probe be returned for
maintenance and recalibration every 12 months to ensure a high
level of precision and reliability is maintained in the field.
Final Word
Thank-you for choosing the Coretell ORIshot system.
The ORIshot system has been designed for accuracy, ease of use,
and low maintenance, ensuring you get the maximum return on
your investment.
If you have any queries or comments about the ORIshot system or
wish to learn more about our range of mining instrumentation,
please visit our website at www.coretell.com.au.
We hope you enjoy using the ORIshot camera system.
The Coretell Team.
22
Copyright © 2011 Coretell. All rights reserved.
MRK-00012, RA4
Specifications
ORIshot Probe
Part Number
Operational temperature
Storage temperature
Operating time
Inclination accuracy
Azimuth accuracy
Power source
Communication
Communication distance
Ingress Rating
CNPS100
-10°C to +70°C (+14°F to +158°F)
-10°C to +120°C (14°F to +248°F)
2 years (depending upon use)
± 0.4 RMS*
± 0.4 RMS*
Alkaline battery (Non-rechargeable)
Wireless ISM 2.4GHz
1.5 – 2.0 meters
IP67
*It is recommended that the ORIshot Camera is calibrated every 12 months
to ensure accuracy is maintained.
ORIshot Handset
Part Number
Operational temperature
Storage temperature
Operating time
Power source
Communication
Ingress Rating
CNH100
0°C to +60°C (+32°F to +140°F)
-10°C to +120°C (14°F to +248°F)
2 years (depending upon use)
Alkaline battery (Non-rechargeable)
Wireless ISM 2.4GHz
IP65
NOTE: Specifications subject to change without notice.
23
Copyright © 2011 Coretell. All rights reserved.
MRK-00012, RA4
Appendix 7
UNDERSTANDING YOUR
GEOLOGICAL REPORT
APPENDIX 7 – IMPORTANT INFORMATION ABOUT YOUR GEOTECHNICAL REPORT
These notes have been collated by Groundwork Plus. They are designed to help you in the interpretation of your
Report.
Geological studies are commissioned to gain information about environmental conditions on and beneath the surface of a
site. The more comprehensive the study, the more reliable the assessment is likely to be, but remember, any such
assessment is to a greater or lesser extent based on professional opinions about conditions that cannot be seen or tested.
Accordingly, no matter how much data is accumulated, risks created by unanticipated conditions will always remain. Work
with your geological consultant to manage known and unknown risks. Part of that process should already have been
accomplished, through the risk allocation provisions you and your geological professional discussed and included in your
contract’s general terms and conditions. This document is intended to explain some of the concepts that may be included
in your agreement and to pass along information and suggestions to help you manage your risk.
Beware Of Change; Keep Your Geological Professional Advised
The design of a geological study considers a variety of factors that are subject to change. Changes can undermine the
applicability of a reports findings, conclusions, and recommendations. Advise your geological professional about any
changes as you become aware of them. Geological professionals cannot accept responsibility or liability for problems that
occur because a report fails to consider conditions that did not exist when the study was designed. Ask your geological
professional about the types of changes you should be particularly alert to. Some of the most common include:
modification of the proposed development or ownership group;
sale or other property transfer;
replacement of or additions to the financing entity;
amendment of existing regulations or introduction of new ones; or
changes in the use or condition of adjacent property.
Should you become aware of any change, do not rely on an existing geological report. Advise your geological professional
immediately; follow the professional’s advice.
Prepare To Deal with Unanticipated Conditions
The findings, recommendations, and conclusions of a report typically are based on a review of historical information,
interviews, a site ‘walkover’ and other forms of non-invasive research. When site subsurface conditions are not sampled in
any way, the risk of unanticipated conditions is higher than it would otherwise be.
While borings, installation of monitoring wells, and similar invasive test methods can help reduce the risk of unanticipated
conditions, do not overvalue the effectiveness of testing. Testing provides information about actual conditions only at the
precise locations where samples are taken and only when they are taken. Your geological professional has applied that
specific information to develop a general opinion about environmental conditions. Actual conditions in areas not sampled
may differ (sometimes sharply) from those predicted in a report. For example, a site may contain an unregistered
underground storage tank that shows no surface trace of its existence. Even conditions in areas that were tested can
change, sometimes suddenly, due to any number of events, not the least of which include occurrences at adjacent sites.
Recognize too, that even some conditions in tested areas may go undiscovered, because the tests or analytical methods
used were designed to detect only those conditions assumed to exist.
Manage your risks by retaining your geological professional to work with you as the project proceeds. Establish a
contingency fund or other means to enable your geological professional to respond rapidly, in order to limit the impact of
unforeseen conditions. To help prevent any misunderstanding, identify those empowered to authorize changes and the
administrative procedures that should be followed.
Do Not Permit Any Other Party to Rely On The Report
Geological professionals design their studies and prepare their reports to meet the specific needs of the clients who retain
them, in light of the risk management methods that the client and geological professionals agree to, and the statutory,
regulatory, or other requirements that apply. The study designed for a developer may differ sharply from one designed for
a lender, insurer, public agency or even another developer. Unless the report specifically states otherwise, it was
developed for you and only you. Do not unilaterally permit any other party to rely on it. The report and the study
underlying it may not be adequate for another party’s needs and you could be held liable, for shortcomings your geological
professional was powerless to prevent or anticipate. Inform your geological professional when you know or expect that
someone else - a third-party will want to use or rely on the report. Do not permit third-party use or reliance until you first
confer with the Geological professional who prepared the report. Additional testing, analysis, or study may be required and
in any event, appropriate terms and conditions should be agreed to so both you and your geological professional are
protected from third-party risks. Any party who relies on a geological report without the express written permission of the
professional who prepared it and the client for whom it was prepared may be solely liable for any problems that arise.
Avoid Misinterpretation of the Report
Design professionals and other parties may want to rely on the report in developing plans and specifications. They need to
be advised, in writing, that their needs may not have been considered when the study’s scope was developed and even if
their needs were considered, they might misinterpret geological findings, conclusions, and recommendations. Commission
your geological professional to explain pertinent elements of the report to others who are permitted to rely on it and to
review any plans, specifications or other instruments of professional service that incorporate any of the report’s findings,
conclusions, or recommendations. Your geological professional has the best understanding of the issues involved,
including the fundamental assumptions that determined the study’s scope.
Give Contractors Access to the Report
Reduce the risk of delays, claims, and disputes by giving contractors access to the full report, providing that it is
accompanied by a letter of transmittal that can protect you by making it unquestionably clear that: I) the study was not
conducted and the report was not prepared for purposes of bid development and 2) the findings, conclusions and
recommendations included in the report are based on a variety of opinions, inferences, and assumptions and are subject
to interpretation. Use the letter to also advise contractors to consult with your geological professional to obtain
clarifications, interpretations, and guidance (a fee may be required for this service) and that-in any event, they should
conduct additional studies to obtain the specific type and extent of information each prefers for preparing a bid or cost
estimate. Providing access to the full report, with the appropriate caveats, helps prevent formation of adversarial attitudes
and claims of concealed or differing conditions. If a contractor elects to ignore the warnings and advice in the letter of
transmittal, it would do so at its own risk. Your geological professional should be able to help you prepare an effective
letter.
Do Not Separate Documentation from the Report
Geological reports often include supplementary documentation, such as maps and copies of regulatory files, permits,
registrations, citations, and correspondence with regulatory agencies. If subsurface explorations were performed, the
report may contain final boring logs and copies of laboratory data. If remediation activities occurred on site, the report may
include; copies of daily field reports, waste manifests and information about the disturbance of subsurface materials, the
type and thickness of any fill placed on site and fill placement practices, among other types of documentation. Do not
separate supplementary documentation from the report. Do not permit any other party to redraw or modify any of the
supplementary documentation for incorporation into other professionals’ instruments of service.
Realize That Recommendations May Not Be Final
The technical recommendations included in a geological report are based on assumptions about actual conditions and so
are preliminary or tentative. Final recommendations can be prepared only by observing actual conditions as they are
exposed. For that reason, you should retain your geological professional to observe construction and/or remediation
activities on site, to permit rapid response to unanticipated conditions. The geological professional who prepared the
report cannot assume responsibility or liability for the report’s recommendations if that professional is not retained to
observe relevant site operations.
Understand That Geotechnical Issues Have Not Been Addressed
Unless geotechnical engineering was specifically included in the scope of professional service, a report is not likely to
relate any findings, conclusions, or recommendations about the suitability of subsurface materials for construction
purposes, especially when site remediation has been accomplished through the removal, replacement, encapsulation, or
chemical treatment of on- site soils. The equipment, techniques, and testing used by geotechnical engineers differ
markedly from those used by Geological professionals; their education, training, and experience are also significantly
different. If you plan to build on the subject site, but have not yet had a geotechnical engineering study conducted, your
Geological professional should be able to provide guidance about the next steps you should take. The same firm may
provide the services you need.
Read Responsibility Provisions Closely
Geological studies cannot be exact; they are based on professional judgement and opinion. Nonetheless, some clients,
contractors, and others assume geological reports are, or certainly should be, unerringly precise. Such assumptions have
created unrealistic expectations that have led to wholly unwarranted claims and disputes. To help prevent such problems,
geological professionals have developed a number of report provisions and contract terms that explain who is responsible
for what and how risks are to be allocated. Some people mistake these for ‘exculpatory clauses’, that is, provisions whose
purpose is to transfer one party’s rightful responsibilities and liabilities to someone else. Read the responsibility provisions
included in a report and in the contract you and your Geological professional agreed to.
Appendix 8
Digital Data