1
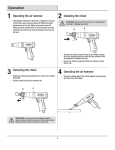
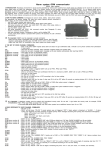
MODEL T10024
ACCESSORY KIT #2
FOR T10010/T10097
WET GRINDER
INSTRUCTION SHEET
Introduction
The Model T10024 Accessory Kit #2 for the Model
T10010/T10097 Wet Grinder helps sharpen chisels and dress grinding wheels.
Inventory (Figure 2)
A.Universal Sharpening Jig............................ 1
B. Jig Holder.................................................... 1
C. Universal Sharpening Jig Knobs................. 2
D. Chisel Jig..................................................... 1
E.Stone Dresser............................................. 1
B
A
D
C
E
Figure 1. T10024 Accessory Kit.
Figure 2. Inventory.
Unpacking
The Model T10024 Accessory Kit was carefully
packed when it left our warehouse. If you discover
any parts are damaged after you have signed
for delivery, please immediately call Customer
Service at (570) 546-9663 for advice. Save the
containers and all packing materials for possible
inspection by the carrier or its agent. Otherwise,
filing a freight claim can be difficult. When you
are completely satisfied with the condition of your
shipment, you should inventory the contents.
Adhere to all safety warnings outlined in
the Model T10010/T10097 Wet Grinder user
manual. If you are not familiar with the proper usage of the Model T10010/T10097 Wet
Grinder, review the procedures and safety
warnings covered in that manual. Failure to
do so could result in damage to the machine
or personal injury.
Copyright © November, 2007 By Grizzly Industrial, Inc. Revised MAY, 2011 (JB)
Warning: No portion of this manual may be reproduced in any shape
Or form without the written approval of Grizzly Industrial, inc.
(For models manufactured since 11/07) #jb10089 printed in CHINA
Operations
Stone Dresser
The stone dresser is used to clean the grinding
wheel when it is loaded with metal filings. It can
also be used to adjust the grit of the wheel to
approximately 220 or 1000.
To use the stone dresser:
1.DISCONNECT GRINDER FROM POWER!
2.Place the universal support in the vertical
mounts and position it approximately ½"
above the grinding wheel, then tighten both
mounting knobs.
3. Connect the grinder to power and turn it ON.
4. Wearing gloves, carefully place the stone
dresser against the universal support, then
lower it onto the grinding wheel (Figure 3).
—If you wish to change the grit of the wheel
to approximately 1000 grit, then place the
finer-grained surface against the wheel.
—If you wish to clean the surface of the wheel
or change the grit back to approximately
220 grit, then place the coarse-grained
surface against the wheel.
Stone Dresser
Universal Sharpening Jig
1.DISCONNECT GRINDER FROM POWER!
2.Place the universal support in either the vertical or horizontal mounts, depending on the
desired grinding action as described in the
Model T10010/T10097 user manual.
Note: Never place the universal support in
the vertical mounts when using the stropping
wheel. This will result in sharpening against
the rotation direction and will cause damage
to the leather wheel.
3.Slide the universal sharpening jig onto the
universal support and thread in the universal
sharpening jig knobs as shown in Figure 4.
Universal
Sharpening Jig
Universal
Support
Universal Sharpening
Jig Knob
Figure 4. Universal sharpening jig.
4.Adjust the grinding/sharpening angle by raising or lowering the universal support and tilting the universal sharpening jig as needed.
5. When the desired angle is achieved, tighten
the four knobs, then connect the grinder to
power and turn it ON.
Figure 3. Stone dresser.
5.Press the stone dresser against the grinding
wheel until the desired results are achieved.
Turn the grinder OFF when complete.
-2-
6.Place the workpiece onto the universal sharpening jig, as shown in Figure 4, then slide it
onto the surface of the wheel. Use a firm grip
on the workpiece, but do not use heavy pressure against the wheel. Be sure to move the
workpiece back and forth across the surface
of the wheel while grinding to prevent excessive wheel wear.
T10024 Wet Grinder Accessory Kit #2
The chisel sharpening jig is capable of accurately
sharpening a variety of chisels. The jig must be
assembled and used differently depending on the
tool you are sharpening and the way you want it
to be sharpened.
3. Clamp the chisel (bevel-side down) into the
jig using the knob, as shown in Figure 7.
Your exact clamping method may vary slightly
depending on your chisel.
To assemble the jig for beveled chisels:
1. Completely disassemble the chisel sharpening jig as shown in Figure 5.
Figure 7. Clamping bevel chisel (2-sided bevel).
4.Place the assembled jig onto the universal
support, as shown in Figure 8.
Figure 5. Jig disassembled.
2.Reassemble the jig and the jig holder as
shown in Figure 6.
Jig Holder
Figure 8. Grinding beveled chisels.
Chisel Sharpening Jig
Figure 6. Beveled chisel jig assembled.
To sharpen beveled chisels:
1.DISCONNECT GRINDER FROM POWER!
2.Place the universal support in either the vertical or horizontal mounts, depending on the
desired grinding action as described in the
Model T10010/T10097 owner's manual.
T10024 Wet Grinder Accessory Kit #2
5.Adjust the grinding angle by sliding the universal support in or out and by repositioning
the chisel in the jig. Once the desired angle is
achieved, tilt the chisel away from the grinding
wheel, then connect the grinder to power and
turn it ON.
6.Return the chisel onto the surface of the
wheel. Use a firm grip on the chisel, but do not
use heavy pressure against the wheel. Move
the chisel back and forth across the surface of
the wheel while grinding to prevent excessive
or uneven wheel wear.
-3-
To assemble the jig for hollow chisels:
1. Completely disassemble the chisel sharpening jig as shown in Figure 5.
Chisel
Clamp
Chisel
Pin
2.Re-assemble the jig as shown in Figure 9.
Wide Chisels
Narrow Chisels
Figure 10. Clamping hollow chisels.
4.Place the assembled jig onto the universal
support, as shown in Figure 11.
Chisel Sharpening Jig
Figure 9. Hollow chisel jig assembly.
To sharpen hollow chisels:
1.DISCONNECT GRINDER FROM POWER!
2.Place the universal support in either the vertical or horizontal mounts, depending on the
desired grinding action as described in the
Model T10010/T10097 owner's manual.
3. Clamp the chisel (bevel-side down) into the
jig, as shown in Figure 10. No single clamping method works best for all chisels and only
trial-and-error with each specific tool will give
the best clamping orientation.
-4-
Tip: For narrow chisels, use the chisel pin to
secure the chisel, as shown in Figure 10.
Figure 11. Grinding hollow chisels.
5.Adjust the grinding angle by sliding the universal support and repositioning the chisel in
the jig. Once the desired angle is achieved, lift
the chisel away from the grinding wheel, then
connect the grinder to power and turn it ON.
6.Return the chisel onto the surface of the
wheel. Use a firm grip on the chisel, but do not
use heavy pressure against the wheel. Rotate
the chisel to grind the entire edge.
T10024 Wet Grinder Accessory Kit #2
T10024 Parts Breakdown and List
2
1
5
14
13
3
1
12
4
7
6
8
9
11
10
REF PART #
DESCRIPTION
REF PART #
DESCRIPTION
1
2
3
4
5
6
7
KNOB M6-1 X 20
UNIVERSAL JIG
KNOB M8-1.25 X 40
CHISEL CLAMP
KNOB BOLT M6-1 X 16
CHISEL BED
CHISEL JIG
8
9
10
11
12
13
14
JIG HOLDER
FLAT HD SCR M6-1 X 16
PHLP HD SCR M8-1.25 X 10
STONE DRESSER
CHISEL PIN
THREADED SLEEVE M12-1.75 X 45
HEX NUT M6-1
PT10024001
PT10024002
PT10024003
PT10024004
PT10010010
PT10024006
PT10024007
PT10024008
PFH38M
PS39M
PT10024011
PT10024012
PT10024013
PN01M
Buy Direct and Save with Grizzly ® – Trusted, Proven and a Great Value!
~Since 1983~
Visit Our Website Today For
Current Specials!
ORDER
24 HOURS A DAY!
1-800-523-4777