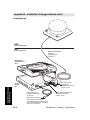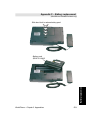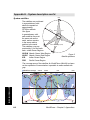
1
Nera WorldPhone
User’s Manual
RADIATION WARNING
RADIO FREQUENCY RADIATION
HAZARD - KEEP CLEAR
1 METRE MINIMUM
High levels of radio frequency radiation are considered health hazardous. Although no single value of
“safe radiation level” has been agreed upon by all
countries, the American National Standards Institute
(ANSI/LEEE C95.1-1992) recommends that people
should not be exposed to radiation stronger than
1 milliwatt per square centimetre at the frequencies
used in the WORLDPHONE terminal. Accordingly,
the operator of the terminal should ensure that the
area extending 1 metre from the front of the antenna
be kept clear of personnel when the terminal is transmitting.
OBTAINING LICENSING FOR INMARSAT TERMINALS
Under rights given under ITU Radio Regulations, local telecommunications
administrations establish and enforce national rules and regulations governing
types of emissions, power levels, and other parameters that effect the purity of
signal, which may be radiated in the various frequency bands of the radio spectrum.
To legally operate an Inmarsat terminal, it is necessary to obtain permission from
the local telecommunications regulatory authorities of the country you are operating within. Using your terminal in any country without permission causes you to
run the risk of confiscation of the terminal or legal action from local authorities.
Normal practice for taking telecommunications into another country is to apply for
a license before travel. If a license has not been obtained before travel, the
equipment may be put into storage by local authorities until such time as a license is obtained.
All specifications are subject to change without notice.
Chapter 1. Getting Started
Introduction ................................................................................ 1.1
Telephone Unit (TPU) .............................................................. 1.3
WorldPhone Portable ............................................................... 1.6
WorldPhone Provident ............................................................ 1.12
WorldPhone Marine ................................................................. 1.13
WorldPhone Voyager .............................................................. 1.16
Chapter 2. Operation
Introduction ................................................................................ 2.1
Making a call ............................................................................ 2.2
Call from telephone .................................................................. 2.8
Special calls .............................................................................. 2.9
Receiving a call ....................................................................... 2.10
Functions ................................................................................. 2.13
Last number redialing .............................................................. 2.15
Phone book ............................................................................. 2.16
Key lock ................................................................................... 2.18
Selecting default Net service provider ..................................... 2.19
User access ............................................................................. 2.20
Data/printer port setup ............................................................. 2.23
Phone setup ............................................................................ 2.26
Setting default contrast and ringing volume ......................... 2.27
Setting date and time ........................................................... 2.28
Setting key lock .................................................................... 2.29
Language setup .................................................................... 2.30
Language reset .................................................................... 2.31
Mailbox access numbers ...................................................... 2.32
Call charge setup ................................................................. 2.33
Traffic log ................................................................................. 2.34
Precharge ................................................................................ 2.37
Precharge on SIM card ........................................................ 2.42
Advanced functions:
Access control ......................................................................... 2.44
Restricted dialing .................................................................. 2.45
Restricted dialing setup ........................................................ 2.46
Access code ......................................................................... 2.47
Access code setup ............................................................... 2.48
Restricted SIM usage ........................................................... 2.49
Checking SIM restrictions ..................................................... 2.50
Setting SIM restrictions ......................................................... 2.51
Satellite setup .......................................................................... 2.52
Net service provider and terrestrial network ......................... 2.52
S/A operator and terrestrial network ..................................... 2.52
Configuration ........................................................................... 2.53
Port configuration ................................................................. 2.53
Net service providers ............................................................ 2.54
Power conservation .............................................................. 2.55
Set diagnostics ..................................................................... 2.55
Storing of Preferred/Allowed Net service provider
and Stand Alone operator on the SIM Card ......................... 2.56
Charge tone .......................................................................... 2.58
Information available ............................................................... 2.59
IMN numbers ........................................................................ 2.59
Misc. version ID information ................................................. 2.60
Oscillator compensation ....................................................... 2.60
Network status ...................................................................... 2.60
Installation ............................................................................... 2.61
Paid functions ....................................................................... 2.61
Phone name setup ............................................................... 2.61
Chapter 3. Telefax Service
Setting up ................................................................................. 3.1
Using telefax with the WorldPhone .......................................... 3.2
Chapter 4. Data Service
Setting up ................................................................................. 4.1
Chapter 5. Appendices / Index
Appendix A
Telephone country codes ...................................................... A-1
Service address codes .......................................................... A-5
Appendix B
Installation of Marine Antenna ............................................... B-1
Installation of Voyager Antenna ............................................. B-9
Installation of Provident Antenna ......................................... B-16
Optional antenna cable ....................................................... B-21
Connecting up optional equipment ...................................... B-22
Appendix C (WorldPhone Portable/Provident only)
Battery charging .................................................................... C-1
Charger ................................................................................. C-2
Battery replacement .............................................................. C-3
Appendix D
AT commands ........................................................................ D-1
DTE interface ...................................................................... D-17
Appendix E
Secure voice (option) ............................................................ E-1
Aero functions (option) .......................................................... E-2
Appendix F
Character map ....................................................................... F-1
Appendix G
List of terms ........................................................................... G-1
Appendix H
System description ................................................................ H-1
Appendix I
Troubleshooting ...................................................................... I-1
1. Getting Started
2. Operation
3. Telefax Service
4. Data Service
5. Appendices
WorldPhone – User’s Manual
Doc. No. QLZB 911084 Rev.B Copytema 04/99
Chapter 1. Getting Started
Introduction ................................................................................. 1.1
Telephone Unit (TPU) ................................................................. 1.3
WorldPhone Portable ................................................................. 1.6
WorldPhone Provident .............................................................. 1.12
WorldPhone Marine .................................................................. 1.13
WorldPhone Voyager ............................................................... 1.16
The design and specifications of the
equipment may be changed without notice.
WorldPhone – User’s Manual
GETTING STARTED
Contents
Chapter 1. Getting Started
General
The WorldPhone communication terminal provides access to the
international dial-up telephone, facsimile and data networks via the
INMARSAT satellite system.
• The terminal Telephone Unit
(TPU) can be operated with any of
the below six WorldPhone antennas:
• WorldPhone Portable antenna with
RF transceiver built into the lid.
The antenna also allows semi- or fixed
mounting on a flat surface, or tripod.
• WorldPhone Marine, a tracking
antenna designed for use on marine
crafts, leisure yachts and work boats
alike.
• WorldPhone Voyager, a tracking
antenna designed for use on vehicles,
trains or riverboats.
WorldPhone – Chapter 1. Getting Started
1.1
Introduction
Introduction
Introduction cont’d
Introduction cont’d
• WorldPhone Provident, a fixed
mounted antenna designed to provide
telecommunication services for remote
villages, farms, businesses, construction sites etc.
• WorldPhone Expander, which allows
simultanous operation of up to six
WorldPhone Telephone Units through a
one meter parabolic dish antenna.
See separate information.
• WorldPhone Aero, intended
for use on the small to medium
size aircraft.
See separate information.
Note!
It is advisable to turn off the equipment prior to switching antenna.
1.2
WorldPhone – Chapter 1. Getting Started
Connector panel (rear wall)
Telephone keypad
14.03.43
NT in AOR–E
Dial 00 + country
code
Book
470
ON/OFF key
+
subscriber
Last
Loudspeaker
for handsfree
operation
03 Dec 1996
Menu
no
Seek
Function keys
Esc
1!/?
2abc
3def
4ghi
5jkl
6mno
7pqr
8stu
9vwx
*
0yz
Help
SIM card
HELP key
Arrow keys
Telephone handset
8 lines x 40 character display
Net service provider
and satellite
Instruction
Battery indicator
DC replaces symbol
when adapter/power
Signal strength
NIMS/mail alert
Shows that SIM
card is inserted
ON/OFF key
Escape key
20 Sep 1998
15: 20
Telenor in AOR–E
Dial 00 + country code + subscriber no
470
SIM
Book
Last
Menu
Seek
Varying
functions
Function
keys
HELP
key
Number/letter keys
Arrow keys
Figure 1.1 WorldPhone Telephone Unit (TPU).
WorldPhone – Chapter 1. Getting Started
1.3
Telephone Unit (TPU)
Telephone Unit (TPU)
Telephone Unit (TPU) cont’d
Mail Message
Telephone Unit (TPU) cont’d
SIM card
The SIM card (Subscriber Identity Module) carries subscription information from your Inmarsat Service Provider (ISP) or Net service provider on
an integrated circuit. The WorldPhone used with the SIM card assumes
the identity of the SIM card.
The SIM card has its own set of numbers on which the user can be
contacted irrespective of the WorldPhone used. All outgoing calls will be
billed to the owner of the SIM card.
The SIM card is protected by means of a lock code. When buying a SIM card
you will receive a Personal Identification Number (PIN) that will contain up to
8 digits. Contact your dealer if you do not have your PIN code.
If the PIN code entered does not match the PIN code on the SIM
card, operation with that particular SIM card will lock-up after three
failed attempts. You must then use the SIM un-block code (PUK
code) provided by your ISP to un-lock the card. Contact your dealer if
you do not have the PUK code.
Note! When using the PUK, the SIM PIN is set to 1 2 3 4.
To change or disable the PIN code, see "User access" in chapter 2.
Operation.
The SIM card can store miscellaneous information, f.ex.:
• PIN code (Personal Identification Number)
• Last number list (previously called numbers)
• Phone book
• Allowed and preferred Net service providers
Note! When using SIM card, the accessibility of the functions described in this manual will depend on the card supplier.
PIN code
The user is prompted for the 4-8 digit Personal Identification Number
each time the WorldPhone is switched on:
• SIM PIN? (with SIM card).
• Phone PIN? (without SIM card).
Be aware that the PIN protection may have been disabled, see "User
access" in chapter 2. Operation.
Mail service
The Internet Messages Service (NIMS) allows a message of maximum 1024 characters to be sent to the WorldPhone from a website,
or from the WorldPhone to an e-mail address or another WorldPhone.
NIMS messages are addressed to a response NIMS IMN number.
See also appendix G.
1.4
WorldPhone – Chapter 1. Getting Started
Telephone
A DTMF telephone, cordless base station or PABX may be connected
to the WorldPhone. This additional telephone is assigned a separate
incoming call number.
Telefax service
The Telefax facility supports Group 3 fax transmission at a rate of
2.4 Kbps. The telefax is assigned a separate incoming call number.
Data service
10-32VDC:
WorldPhone Portable:
input for simultaneous
powering and charging
(min.12V) of internal
battery pack.
Polarity independent.
WorldPhone
Marine&Voyager:
input from Power
Supply
FAX:
2-wire RJ11
connector
for telefax.
Can be
reconfigured
for telephone
5 4 3 2 1
6
6 7 8 9
TEL:
2-wire RJ11
connector
for
telephone,
cordless
base
station or
PABX
ANT
1
DATA
6
TEL
1
FAX
10-32VDC
The built in Data Transmission Service is capable of transferring
data at 2.4 Kbps. It allows the WorldPhone to interface with a PC
without the aid of a modem or data card.
The Asynchronous Data (ASD) system provides data transfer between two WorldPhones, or between a WorldPhone and the fixed
international network.
The data facility is assigned a separate incoming call number.
DATA:
9-pin RS232
Hayes AT
compatible port
for 2.4 Kbps data
communication,
output to printer
or software
download
ANT:
connection
of coax
cable from
antenna
Figure 1.2 Telephone Unit connector panel
WorldPhone – Chapter 1. Getting Started
1.5
Telephone Unit (TPU) cont’d
Telephone Unit (TPU) cont’d
Case lock 8 lines x 40 character display Antenna coax cable Telephone lock (2)
Telephone keypad
ON/OFF key Telephone handset Connector panel
Compass Flat antenna
RF units Bag w/antenna cable Antenna connector Loudspeaker for handsfree
operation Function keys SIM card
HELP key
keys Car lighter cable
Universal
ACArrow
adapter
FAX TEL DATA ANT.
Coax
WorldPhone Portable
cable
WorldPhone Portable
General
The WorldPhone Portable terminal consists of two main units housed
in a lightweight and portable carrying case:
• The antenna and RF transceiver integrated into the lid.
• The Telephone Unit (and battery pack) that is detachable and rain
resistant.
The WorldPhone uses a coax cable to link the two units together. The
case is equipped with a handle for transport. The screw socket in the
lid allows the antenna to be tripod mounted, or attached to a window
using a suction fitting. The total weight of the WorldPhone is 2.7 kgs
(including battery pack).
The Telephone Unit can easily be shifted for operation with any of
the other WorldPhone antennas, see "Introduction" in this chapter.
Carrying
handle/
antenna
support
Lid w/antenna
and RF units
Case folded
Antenna coax cable
14.03.43
NT in AOR–E
Dial 00 + country
code
Book
470
+
03 Dec 1996
subscriber
Last
Menu
no
Seek
Telephone Unit
Esc
1!/?
2abc
3def
4ghi
5jkl
6mno
7pqr
8stu
9vwx
*
0yz
Help
Universal AC adapter
Figure 1.3 WorldPhone Portable, complete.
1.6
WorldPhone – Chapter 1. Getting Started
Internal battery
The battery indicator on the display
indicates the internal charge level:
The amount of shading represents
the current charge level.
A completely shaded indicator indicates a fully charged battery.
As the battery charge level decreases the amount of shading on the
battery indicator will also decrease.
A flashing battery indicator indicates that the battery level is low.
Compass
Case lock
Flat antenna
RF units
Antenna coax
cable
Bag with
antenna cable
Telephone lock
(2)
Antenna
connector
03 Dec 1996
14.03.43
NT in AOR–E
Dial 00 + country
code
Book
470
+
subscriber
Last
Menu
no
Seek
Battery pack
Esc
1!/?
2abc
3def
4ghi
5jkl
6mno
7pqr
8stu
9vwx
*
0yz
Help
TELEPHONE
UNIT
Lock tab (2)
Figure 1.4 WorldPhone Portable, identification.
WorldPhone – Chapter 1. Getting Started
1.7
WorldPhone Portable
cont’d
WorldPhone Portable cont’d
WorldPhone Portable
cont’d
WorldPhone Portable cont’d
The WorldPhone turns off automatically once the battery has discharged, to avoid damaging the cells. It must now be powered from
an external source for operation and recharging of the battery.
The WorldPhone may be connected to an AC source using the Universal AC Adapter, or directly to a 12-32 V rated DC source.
The battery is charged even if the WorldPhone is turned off.
The indicator shading increases as the battery re-charges.
For charging and replacement of the battery, see appendix C.
Warning! Problems with the transmission may occur when the battery
charge level is low.
Avoid exposing the WorldPhone to extreme heat or cold. Very high or
low temperatures reduce the battery capacity.
Punchout holes for
fixed mounting of
antenna
Standard
tripod
mount
Punchout opening
for charging with
antenna/lid closed
Telephone Unit with
support feet lowered
Antenna tightening
screws (coin size slots)
Antenna set up with
handle used as support
Figure 1.5 WorldPhone Portable connected up.
1.8
WorldPhone – Chapter 1. Getting Started
Setting up
1
Open the WorldPhone.
2 If needed, release the
telephone and lift it out.
Check that the antenna coax
cable is properly connected.
Swing out the handle in the lid
for antenna support.
The coax cable permits the
antenna to be placed up to
3 metres away from the
Telephone Unit.
14.03.43
14.03.43
1996
03 Dec 1996
AOR–E
NT
NT inin AOR–E
no
subscriber no
+ subscriber
code +
country code
00 ++ country
Dial 00
Dial
Book
Book
470
470
Last
Last
Menu
Seek
Seek
Esc
3
Insert the SIM card
(if SIM operated).
4 Press and hold
the ON/OFF key
for 2 seconds.
14.03.43
NT in AOR–E
Dial 00 + country
code
Book
470
+
2abc
3def
5jkl
6mno
7pqr
8stu
9vwx
*
0yz
Help
03 Dec 1996
subscriber
Last
1!/?
4ghi
Menu
no
Seek
Esc
1!/?
2abc
3def
4ghi
5jkl
6mno
7pqr
8stu
9vwx
*
0yz
Help
The display should light up.
5 Check for sufficient battery capacity.
If low, connect the WorldPhone for recharging from external source,
see appendix C.
6a
Enter the SIM
PIN code, and
press Ok:
If necessary,
adjust display
brightness:
WorldPhone
SIM PIN:
Press "Help" for an introduction.
470
Del
Eng
Ok
When selecting another display language,
Eng appears for easy restoring of English,
see "Phone setup: Language setup and
Language reset" in chapter 2. Operation.
6b If no SIM card is inserted, the "Phone PIN" will be prompted for.
Default Phone PIN: 1 2 3 4 5 6
WorldPhone – Chapter 1. Getting Started
1.9
WorldPhone Portable
cont’d
WorldPhone Portable cont’d
WorldPhone Portable
cont’d
WorldPhone Portable cont’d
7 During the satellite search, beep tones will be heard from the
loudspeaker (provided the Tone is ON, see next page):
slow intermittent tones when
searching for any satellite.
rapid intermittent tones when
searching for a specific satellite
(faster when searching for a single
satellite).
8 To find the correct
vertical angle to the
satellite, try with the
antenna adjusted to 60°,
30° or 0° as indicated.
9 Aim the antenna/lid
towards the estimated
position of satellite
with free line of
sight.
14.03.43
Telenor in AOR–E
Dial 00 + country code
Book
470
+
30°
0°
f
e o lite
lin atel
e
s
e
Fr ht to
sig
03 Dec 1996
subscriber
Last
60°
Menu
no
Seek
Esc
1!/?
2abc
3def
4ghi
5jkl
6mno
7pqr
8stu
9vwx
*
0yz
Help
Or make a slow
scan across the
hemisphere.
When receiving a
satellite signal, a short tone
will sound. If it is an Inmarsat
satellite, a continuous tone will sound with varying frequency
(provided the Tone is ON, see next page).
The WorldPhone always starts with Tone off and "any satellite"
search. See step 10.
When closing in on a satellite, turning the antenna/lid horizontally and
adjusting its vertical angle, the tone should increase in frequency.
1.10
WorldPhone – Chapter 1. Getting Started
10 A shaded signal strength bar will appear in the display.
The longer the signal bar or higher the signal strength indicator value,
the better the signal quality. The bar becomes solid when the signal
strength value reaches 400.
The maximum marker indicates the highest signal strength achieved
during the current search.
Satellite search
Maximum marker
Low
Found AOR-E. Accept this satellite?
high signal strength
Signal strength indication
Volume
470
Mute
SIM
Seek
New
Ok
Pressing Mute turns OFF the search tone.
(Mute Tone).
"Volume" indicator appears when the Tone is ON.
Adjust level with arrow keys.
11 Pressing the Seek function key starts the search again.
New allows selection of a specific
satellite:
Scroll down to
desired satellite
and select:
New search satellite
Satellite search
All
AOR-Wthis Satellite?
Found AOR-E. Accept
AOR-E
POR
IOR
470
Selct
SIM
Pressing Selct
enters chosen satellite
Note! Searching for a New satellite
should be done under special circumstances only.
Searching for any satellite is the normal mode of operation (default).
12 Pressing Ok initializes the system.
13
The equipment is
ready for use when the
Main window appears:
20 Sep 1998
15: 20
Telenor in AOR–E
Dial 00 + country code + subscriber no
470
SIM
Book
Last
Menu
Seek
Battery indicator
Replaced by DC symbol
when adapter power only
WorldPhone – Chapter 1. Getting Started
1.11
WorldPhone Portable
cont’d
WorldPhone Portable cont’d
WorldPhone Provident
WorldPhone Provident
General
WorldPhone Provident comprises:
• Outdoor Equipment – ODE
including fixed mounted antenna and RF transceiver.
• Indoor Equipment – IDE
including Telephone Unit and Power Supply.
A single coax cable links the ODE and IDE.
For installation, see appendix B.
For operation of the Telephone Unit, see "WorldPhone Portable:
Setting up" step 1 through 6.
Antenna Unit
Antenna coax cable
Telephone Unit
14.03.43
NT in AOR–E
Dial 00 + country
code
Book
470
+
03 Dec 1996
subscriber
Last
Menu
no
Seek
Esc
1!/?
2abc
3def
4ghi
5jkl
6mno
7pqr
8stu
9vwx
*
0yz
Help
Figure 1.6 WorldPhone Provident terminal.
1.12
WorldPhone – Chapter 1. Getting Started
General
WorldPhone Marine comprises:
• Above Deck Equipment – ADE
including stabilized antenna and RF transceiver.
• Below Deck Equipment – BDE
including Telephone Unit and Power Supply.
A single coax cable links the ADE and BDE.
For installation, see appendix B.
Antenna Unit
Antenna
coax cable
ADE
BDE
47
4ghi
7pqr
NT
Di al in
AO
00
R–
E
+
co
un
try
14
co
Bo
de
La
.0 3.
43
03
su
st
bs
cr ib
Me
3def
6mno
9vw
+
ok
2abc
5jkl
8stu
0yz
0
Esc
1!/?
er
De
c
19
96
no
nu
Se
ek
Telephone Unit
Help
x
Power Supply
Figure 1.7 WorldPhone Marine terminal.
WorldPhone – Chapter 1. Getting Started
1.13
WorldPhone Marine
WorldPhone Marine
WorldPhone Marine
cont’d
WorldPhone Marine cont’d
Setting up
1
Insert the SIM card (if SIM operated):
ON/OFF
2
Switch ON
the power supply:
3
47
Press and hold the
telephone ON/OFF
key for 2 seconds:
7pqr
NT
Di al in
AO
00
R–
E
+
co
un
try
14
co
Bo
de
5jkl
+
ok
La
2abc
8stu
0yz
0
Esc
1!/?
4ghi
.03
.43
03
su
st
bs
cr ibe
Me
9vwx
De
c
19
96
r no
nu
3def
6mno
Se
ek
Help
The display should light up.
4a Enter the SIM
PIN code, and
press Ok:
Adjust display
brightness:
WorldPhone
SIM PIN:
Press "Help" for an introduction.
Del
470 DC
Eng
Ok
When selecting another display language,
Eng appears for easy restoring of English,
see "Phone setup: Language setup and
Language reset" in chapter 2. Operation.
4b If no SIM card is inserted, the
"Phone PIN" will be prompted for.
5 A shaded signal strength bar will appear in the display.
The longer the signal bar or higher the signal strength indicator value,
the better the signal quality. The bar becomes solid when the signal
strength value reaches 400.
The maximum marker indicates the highest signal strength achieved
during the current search.
Satellite search
Maximum marker
Low
high signal strength
Signal strength indication
6
1.14
Found AOR-E. Accept this satellite?
470 DC
SIM
Tone
Seek
New
Ok
Pressing Ok initializes the system with the displayed satellite.
WorldPhone – Chapter 1. Getting Started
7 Pressing the Seek function key starts the search again.
New allows selection of a specific satellite:
Scroll down to
desired satellite
and select:
New search satellite
Satellite search
All
AOR-Wthis Satellite?
Found AOR-E. Accept
AOR-E
POR
IOR
Note! Searching
Selct
470 DC
SIM
for a New satellite
should be done under
Pressing Selct
enters chosen satellite
special circumstances only.
Searching for any satellite is the normal mode of operation (default).
8
The equipment is
ready for use when the
Main window appears:
20 Sep 1998 15: 20
Telenor in AOR–E
Dial 00 + country code + subscriber no
470 DC
WorldPhone – Chapter 1. Getting Started
SIM
Book
Last
Menu
Seek
1.15
WorldPhone Marine
cont’d
WorldPhone Marine cont’d
WorldPhone Voyager
WorldPhone Voyager
General
The WorldPhone Voyager comprises:
• Outdoor Equipment – ODE
including Antenna Unit and magnetic mounting bracket.
• Indoor Equipment – IDE
including Telephone Unit and Power Supply.
A single coax cable links the ODE and IDE.
For installation, see appendix B.
Setting up
Apply the setting up and satellite search procedure described for
WorldPhone Marine. See previous pages.
Antenna Unit
Power cable
Antenna
coax cable
470
14.
y
cod
Boo
k
2abc
5jkl
8stu
0yz
NT
in
Dia
l 00 AO R–
E
+
cou
ntr
Esc
1!/?
4ghi
7pqr
3def
6mno
9vwx
e
+
Las
03.
43
03
sub
t
scr
Me
ibe
De
c
199
6
r no
nu
See
k
Help
Telephone Unit
Power Supply
Figure 1.8 WorldPhone Voyager terminal.
1.16
WorldPhone – Chapter 1. Getting Started
Chapter 2. Operation
Introduction .................................................................................................. 2.1
Making a call ................................................................................................ 2.2
Call from telephone ..................................................................................... 2.8
Special calls ................................................................................................. 2.9
Receiving a call ......................................................................................... 2.10
Functions ................................................................................................... 2.13
Last number redialing ................................................................................ 2.15
Phone book ............................................................................................... 2.16
Key lock ..................................................................................................... 2.18
Selecting default Net service provider ....................................................... 2.19
User access ............................................................................................... 2.20
Data/printer port setup ............................................................................... 2.23
Phone setup .............................................................................................. 2.26
Setting default contrast and ringing volume ........................................... 2.27
Setting date and time ............................................................................. 2.28
Setting key lock ...................................................................................... 2.29
Language setup ...................................................................................... 2.30
Language reset ...................................................................................... 2.31
Mailbox access numbers ........................................................................ 2.32
Call charge setup ................................................................................... 2.33
Traffic log ................................................................................................... 2.34
Precharge .................................................................................................. 2.37
Precharge on SIM card .......................................................................... 2.42
Advanced functions:
Access control ........................................................................................... 2.44
Restricted dialing .................................................................................... 2.45
Restricted dialing setup .......................................................................... 2.46
Access code ........................................................................................... 2.47
Access code setup ................................................................................. 2.48
Restricted SIM usage ............................................................................. 2.49
Checking SIM restrictions ....................................................................... 2.50
Setting SIM restrictions .......................................................................... 2.51
Satellite setup ............................................................................................ 2.52
Net service provider and terrestrial network ........................................... 2.52
S/A operator and terrestrial network ....................................................... 2.52
Configuration ............................................................................................. 2.53
Port configuration ................................................................................... 2.53
Net service providers .............................................................................. 2.54
Power conservation ................................................................................ 2.55
Set diagnostics ....................................................................................... 2.55
Storing of Preferred/Allowed Net service provider
and Stand Alone operator on the SIM Card ........................................... 2.56
Charge tone ............................................................................................ 2.58
Information available ................................................................................. 2.59
IMN numbers .......................................................................................... 2.59
Misc. version ID information ................................................................... 2.59
Installation ................................................................................................. 2.60
Paid functions ......................................................................................... 2.60
Phone name setup ................................................................................. 2.60
The design and specifications of the
equipment may be changed without notice.
WorldPhone – User’s Manual
OPERATION
Contents
Chapter 2. Operation
Introduction
General
Function keys
The text in the display
shows the function
currently assigned to
each function key:
20 Sep 1998
15: 20
Telenor in AOR–E
Dial 00 + country code + subscriber no
470
SIM
Book
Last
Menu
Seek
Help
Whenever needed,
press the
key for assistance.
Example with window above displayed:
To make a call:
Dial 00 + country code + subscriber
number; press "Call" and wait for
answer.
(For an example, press )
470
Keys
Press Keys to go direct to the explanation
of the various tasks performed by the four function keys.
PIN code
The user is prompted for the 4-8 digit Personal Identification Number
each time the WorldPhone is switched on:
• SIM PIN? (with SIM card).
• Phone PIN? (without SIM card).
Be aware that the PIN protection may have been disabled, see "User
access" in this chapter.
Keying letters
The three letters on each number key are accessible when on display
lines requiring letters. Press the desired key for the first letter, and
continue rapid selection of following letters/numbers:
àáâãäåæç
For complete
character map,
see appendix F.
Variants of letters on the key
WorldPhone – Chapter 2. Operation
2.1
Introduction
The display and all controls on the WorldPhone are accessible via the
front telephone panel. See figure 1.1.
The light in the display and the screen picture may be timed for automatic
switching off for power saving. Pressing any key turns the display on again.
The display contrast can be altered using the arrow keys when the PIN
window or main window appears. See "Phone setup" for further details.
Handsfree
Volume Del Escape
Making a call
Procedure
1 Dial 00 and the country code, followed by the subscriber number
(max. 22 digits).
For explanation of call numbers and list of country codes, see appendix A.
Making a call
Key in:
See also
"Call via alternative
Net service provider
or terrestrial network".
Number: 004767244700
Net provider: Telenor
Terrestrial network: 00
470
SIM
Del
Call
Short
2 Pressing the Del
function key deletes the
digit to the left of cursor:
3 Pressing the Call function
key sends the dialed number:
(or press the
-key)
4 If the subscriber is listed
in the phone book, enter the
short number in the Number
field and press Short
to make the call:
The Short function key is only visible when less
than 3 digits have been entered (max short number).
5 Lift handset and wait for answer.
Handsfree mode with handset in place.
6 Pressing the Esc key restores number
field (if edited), or reverts to main window.
7 Use up/down
arrow keys to adjust
Volume during
the call.
Calling 004767244700
via Telenor in AOR-E
Status : Call setup
Handset
470
2.2
SIM
Volume
on
Mute
Menu
Clear
WorldPhone – Chapter 2. Operation
Handsfree
Volume Menu Book Clear Call to WorldPhone
Making a call cont’d
The call duration
is displayed when
connected.
00:07:15
Calling 004767244700
via Telenor in AOR-E
Status : Connected
Handset
470
SIM
Volume
on
Mute
Menu
Clear
8 Pressing Menu
displays IMN numbers:
Making a call cont’d
For handsfree mode,
Alt.: Handsfree,
Loudspeaker
and use of loudspeaker
etc, see "Modes of operation".
IMN numbers
Handset: 762420510
Phone: 762420511
Fax:
762420512
Data:
762420513
(ESC returns to previous window.)
470
Book then opens
phone book, allowing
selection
of subscriber:
SIM
Book
Phone book
Nera SatCom AS
102 Nera Ltd Croydon
470
SIM
New
Edit
Edit allows editing
subscriber data.
New allows entering new data:
See Phonebook
9
To disconnect the call, put down the handset.
In Handsfree mode, press Clear.
To call the WorldPhone
Dial the international prefix (normally 00) followed by
87X IMN number, f.ex. 00 871 762420510.
Depends on which satellite the WorldPhone is currently using:
1 – AOR-E (Atlantic Ocean Region East)
2 – POR
(Pacific Ocean Region)
3 – IOR
(Indian Ocean Region)
4 – AOR-W (Atlantic Ocean Region West)
Note! Some Net service providers support the common Ocean Region
access no. 870, which connects the call to the dialed WorldPhone
regardless of the Ocean Region the user currently communicates through.
WorldPhone – Chapter 2. Operation
2.3
Making a call cont’d
Modes of operation
Making a call cont’d
Call with handset lifted
The WorldPhone switches to handsfree
mode if the handset is put down with the
loudspeaker on (loudspeaker mode).
When in handset
mode, placing
handset down
terminates the
call.
Calling 004767244700
via Telenor in AOR-E
code
+
subscriber
Last
Book
Status : Call setup
Handset
03 Dec 1996
14.03.43
NT in AOR–E
Dial 00 + country
470
Menu
no
Seek
Esc
1!/?
Help
2abc
3def
4ghi
5jkl
6mno
7pqr
8stu
9vwx
*
0yz
470
SIM
Volume
on
Mute
Menu
Clear
Loudspeaker
when monitoring
Loudspeaker
on /
off
Pressing Clear
terminates call
Microphone muted/active (Mute/Mic)
Handsfree call mode
Calling 004767244700
via Telenor in AOR-E
14.03.43
Handset
in place
NT in AOR–E
Dial 00 + country
code
Book
470
+
03 Dec 1996
subscriber
Last
Menu
Esc
1!/?
2abc
3def
4ghi
5jkl
6mno
7pqr
8stu
9vwx
*
0yz
Help
no
Seek
Status : Call setup
Handsfree
470
SIM
Volume
Mute
Menu
Clear
Loudspeaker permanently On
Microphone muted/active (Mute/Mic)
2.4
Pressing Clear
terminates call
WorldPhone – Chapter 2. Operation
Terrestrial network
Making a call cont’d
Call via an alternative Net service provider
or terrestrial network
Although default settings normally can be used, a different Net service
provider, or an other terrestrial network, may be selected as follows:
1
Making a call cont’d
Alternative Net service provider:
Note! The WorldPhone must have been commissioned by the
selected provider; the call may otherwise be rejected.
Dial subscriber number.
Number: 004766844700
Net provider: Telenor
Terrestrial network: 00
470
SIM
Del
Call
2 Scroll down to Net provider and key in reference number,
or press right arrow to display list of accessible Net service
providers:
3 Scroll up/down
to wanted
Net:
Net service providers
Number: 004766844700
Default net
Net provider: NT 001 CMC
002 0BT
Terrestrial network:
003 KDD
470
4
Selct
SIM
and press Selct:
Alternative terrestrial network:
1 Scroll down to terrestrial network and key in reference
number.
Number: 004766844700
Net provider: Telenor
Terrestrial network: 00
470
SIM
Del
Call
Continue with "Making a call", step 3
NB! A Net service provider may also be specified by starting the
telephone number with its reference code, e.g. BT:
WorldPhone – Chapter 2. Operation
2.5
Out box Sending NIMS message
Making a call cont’d
Sending NIMS message
20 Sep 1998
code
Book
+
subscriber
Last
Menu
no
Seek
Es
1!/
2ab
3de
4gh
5jk
6mn
7pq
8st
9vw
*
0y
Hel
Telenor in AOR–E
Dial 00 + country code + subscriber no
470
Making a call cont’d
15: 20
03 Dec 1996
14.03.43
NT in AOR–E
Dial 00 + country
470
Note!
Sending and receiving
NIMS messages is
only possible through
service providers that
support the NIMS
service.
SIM
Book
Last
Seek
Function menu
001 Set default Net provider
Set access level
Data/printer port setup
Phone setup menu
Traffic log
470
Lock
SIM
Example:
Mail
Selct
Quit
Setup
Quit
Mail manager
You have received 6 messages,
3 are not read
In Box :
6
mail
3 unread
One message is not sent
Out Box : 2
mail
1 unsent
Pressing In opens In Box,
see Receiving a call:
Receiving NIMS message.
Menu
Press Menu
and then Mail
to open Mail manager.
You have new mail
470
In
SIM
Out
Indicates that the
message is not yet Sent
001
002
470
message
details
Out Box
Have a nice day
Happy Birthday
SIM
Remov Edit
New
Remov erases
selected message.
Print outputs message to
printer. Appears only if a
printer is enabled, see
"Data/printer port setup".
Print
See next page
Setup for sending mail
User name :
Kari Nordmann
NIMS center :
004767244445
470
SIM
Pressing Edit changes
the function keys to allow
modifications:
ABC/abc selects
lower/uppercase letters.
Save stores changes.
2.6
Edit
Ok
Ok reverts to
mail manager
Del
ABC
abc
Save
WorldPhone – Chapter 2. Operation
Making a call cont’d
Sending NIMS message cont’d
Note!
The @ character appears
after z on the
-key.
Out Box message details
To:
[email protected]
Subject: Have a nice day
SIM
Edit
Ok
abc
CR/LF Send
Making a call cont’d
Status : Unsent
470
New
To:
Subject :
470
SIM
Del
Edit
To :
hal @ nera. no
Subject : Have a nice day ! ! !
Hello, my friend !
How are you ?
Here in Norway the sun is shining and
this weekend I am going skiing in the
470
SIM
Del
abc
CR/LF Send
abc/ABC toggles between
lowercase and uppercase letters.
CR/LF provides carriage return
or line feed in the text
Send forwards mail
Note!
The IMN number of the
NIMS service must have
been entered into the
WorldPhone to allow
communication, see
Advanced functions:
Information available.
Send details
NIMS center : 004767244445
470
SIM
Del
Ok
Sending message
Calling NIMS center
at 004767244445
Status information,
changes during call.
Submitting message
470
SIM
Abort
Pressing Abort stops NIMS
call after confirmation.
WorldPhone – Chapter 2. Operation
2.7
Call from telephone
General
A telephone is used for basic telephone calls. Control of functions and
other facilities must be done from the WorldPhone.
Call from telephone
Call through default Net service provider
routes the call via
0 0 4 7 6 7 2 4 4 7 0 0
the default Net service provider for the satellite (Ocean Region) you
are using.
Call through selected Net service provider
4
0 0 4 7 6 7 2 4 4 7 0 0
call via the Net service provider Telenor (4) in Norway.
routes the
Last number redialing
0
retransmits the last number.
Last number redialing through selected Net service provider
retransmits the last number via the selected Net
4
0
service provider (Telenor=4).
Short number dialing (prefix 23)
2 3 1 0 5
fetches and sends the telephone number
stored on the SIM card under short number 105.
Short number dialing (prefix 23) through selected Net service
provider
fetches and sends the telephone
4
2 3 1 0 5
number stored under short number 105 via the selected Net service
provider (Telenor=4).
2.8
WorldPhone – Chapter 2. Operation
Terrestrial network
Special calls
Call through selected Net service provider and terrestrial network
Dialing via a terrestrial network is only possible using a selected Net
service provider.
The number may be in the range 0 to 127.
Example of a call through selected Net, e.g. Telenor, and terrestrial
network 1:
1
0
0
4
7
6
7
2
4
4
7
0
0
Special calls
4
NETWORK
NET PROVIDER
Service calls
Special information services are accessible with 2-digit service address code. See appendix A.
Example of obtaining assistance from the International Operator:
Dial: 1
WorldPhone – Chapter 2. Operation
1
2.9
Telefax service
Data service
Receiving a call
Telephone call
Incoming call.
Status : Ringing
Volume
470
SIM
Answr
Receiving a call
Pressing Answr
connects call
(handsfree mode)
MuteR
Pressing
MuteR turns
off ringing signal
Call duration
00:04:15
Incoming call.
03 Dec 1996
14.03.43
NT in AOR–E
Dial 00 + country
code
Book
470
+
subscriber
Last
Menu
Es
1!/
2ab
3de
4gh
5jk
6mn
7pq
8st
9vw
*
0y
Hel
no
Seek
Lifting handset
connects call
(handset mode)
Status : Connected
Handsfree
Volume
470
SIM
on
Mute
Menu
Clear
Loudspeaker
on / off
Pressing Clear
terminates call
Microphone muted/
active (Mute/Mic)
Fax call (and 2-wire telephone call)
20 Sep 1998
See also
chapter 3. Telefax Service
15: 20
Telenor in AOR–E
Busy with call
470
SIM
Book
Last
Menu
Seek
Data call
See also
chapter 4. Data Service
Data call in progress – Non–ARQ
Received bytes:
Transmitted bytes:
470
SIM
When in Keep mode, the
data call window willl remain
even if the call is cleared.
Pressing Hide or Esc
removes the window
Default: Hide mode.
2.10
12111
1433333
Keep / Hide
Clear
Pressing Clear
terminates call
WorldPhone – Chapter 2. Operation
Internet message NIMS Mail In box
Receiving a call cont’d
Receiving NIMS message
20 Sep 1998
15: 20
Telenor in AOR–E
Dial 00 + country code + subscriber no
03 Dec 1996
14.03.43
NT in AOR–E
Dial 00 + country
code
Book
470
+
subscriber
Last
Menu
Es
1!/
2ab
3de
4gh
5jk
6mn
7pq
8st
9vw
*
0y
Hel
no
Seek
SIM
Book
Last
Menu
Seek
Receiving a call cont’d
470
Press Menu
and then Mail
to open mail
manager.
Flashing symbol
indicates that NIMS
message or mail alert
has been received.
Function menu
001 Set default Net provider
Set access level
Data/printer port setup
Phone setup menu
Traffic log
470
SIM
Lock
Mail
Selct
Quit
Setup
Quit
Mail manager
In Box :
6
mail
3 unread
Out Box : 2
mail
1 unsent
You have new mail
470
In
SIM
Indicates that the
message is not yet Read
Out
See "Making a call:
sending NIMS message".
In Box
001
002
003
004
005
Hello !
Voice mailbox message
Fax mailbox message
Mail me !
Information from Service Provider
470
SIM
Print
Remov Read
Print outputs message
to printer. Appears only if
a printer is enabled, see
"Data/printer port setup".
Remov erases message
Type:
From:
Sent:
Arrived:
Status :
470
Get
See next page
In Box message details
NIMS
Knut Knutsen
03 Jan 1998 15:57
03 Jan 1998 15:58
Unread
SIM
Read
Ok
Ok reverts to In Box
See next page
WorldPhone – Chapter 2. Operation
2.11
Reply
Receiving a call cont’d
Receiving NIMS message cont’d
Get
Get new mail
Get calls the NIMS server
to read out stored NIMS
messages.
NIMS center : 004767244445
Receiving a call cont’d
470
SIM
Del
Ok
Modify the server
number if required:
Checking for new mail
Calling NIMS center
at 004767244445
Dialing the NIMS center
470
Read
SIM
Abort
Readout example: 001 Hello !
Date: 03 Jan 1998 15 : 57
From : Knut Knutsen
Reply - to : [email protected]
Subject : Hello !
How are you my friend ?
Here in Norway the sun is shining and
470
Reply Remov Next
SIM
Ok
Remov erases
message
Next displays next message
Ok reverts to In Box
To :
[email protected]
Subject : Re : Hello
470
SIM
Del
abc
CR/LF Send
abc/ABC toggles between lower and uppercase letters
CR/LF provides carriage return or line feed in the text
Send returns mail, see "Making a call: sending NIMS message".
Read
Readout example: 002 Voice mailbox message
Mailbox access
Voice mail at Telenor
Call to : 57
470
SIM
Del
Remov
Call
Ok
Remov erases alert
message
Call dials the mailbox to read out the voice message
Ok reverts to In Box
2.12
WorldPhone – Chapter 2. Operation
Book Last Seek Menu Default Net Provider Access level Data/printer port setup
Phone setup Battery manager Advanced functions User access Owner access CHV2
Functions
General
The WorldPhone
provides the
following
functions:
20 Sep 1998
15: 20
Telenor in AOR–E
Dial 00 + country code + subscriber no
470
Book
SIM
Last
Menu
Seek
Selct
Quit
see "Last number redialing"
Seek
see "Setting up" in chapter 1. Getting started
Functions
Book see "Phone book"
Last
Menu scroll up/down to select function:
or key in reference number for direct selection.
Function menu
001
002
003
004
006
008
470
009
Set default Net provider
Set access level
Data/printer port setup
Phone setup menu
Traffic log
Precharge
SIM
Lock Mail
Advanced functions
See also overview of functions on next page
Ref. Function
Features
001 Set default Net provider Allows changing Net service provider and
terrestrial network.
See "Selecting default Net service provider".
002 Set access level
Allows shifting between
• user level, and
• owner / CHV2 level
(non-SIM / SIM operation),
changing phone / SIM PIN code and
owner / CHV2 password.
See "User access".
003 Data/printer port setup Enables port for connection of printer or PC,
and sets transfer bit rate.
See "Data/printer port setup".
004 Phone setup menu
Sets display backlight and contrast, receive
volume, system clock, key lock code,
language and mailbox access numbers.
See "Phone setup".
006 Traffic log
Logs outgoing calls and provides detailed
printout. See "Traffic log".
008 Precharge
Allows preprogramming of total call duration.
See "Precharge".
009 Advanced functions
See overview on next page.
WorldPhone – Chapter 2. Operation
2.13
Functions cont’d
Overview of menu functions
20 Jan 1998
15: 20
Telenor in AOR–E
Dial 00 + country code + subscriber no
Functions cont’d
470
Function menu
001 Set default Net provider
002 Set access level
SIM
Book
Last
Menu
Seek
4 – Phone setup menu
91 – Access control menu
001 Backlight control
001 Restrict dial
002 Contrast control
002 Access code
003 Volume control
003 Restrict SIM usage
004 Set system clock
003 Data/printer port setup
004 Phone setup menu
006 Traffic log
005 Key lock code
97 – Configuration menu
006 Language setup
007 Mailbox access numbers
001 Port configuration
002 Net service providers
008 Call charge setup
003 Power conservation
004 Set diagnostics
008 Precharge
SIM+ 005 Set preferred Nets
009 Advanced functions
9 – Advanced functions menu
SIM+ 006 Set allowed Nets
001 Access control
SIM+ 007 Set S/A preferred Nets
006 Satellite setup
SIM+ 008 Set S/A allowed Nets
007 Configuration
Only appears
in OWNER level
(non-SIM operation).
Only editable
in OWNER level
(non-SIM operation).
SIM Only accessible
with SIM card.
SIM+ May be restricted
to higher SIM levels.
009 Charge tone
008 Information available
009 Install
98 – Information available
/
SIM+ 001 IMN numbers
002 Misc. version Id information
009 Network status information
99 – Installation menu
001 Paid functions
002 Phone name setup
2.14
WorldPhone – Chapter 2. Operation
Call Save Erase Apnd Call Del
Last
Last number redialing
The last 10 numbers called are stored in the WorldPhone memory or
on the SIM card. Each number may comprise up to 22 digits.
If the number is already stored in the phone book, the subscriber’s
name appears in the list.
Any extra telephone or fax can only redial its own most recent
number dialed.
The last used number list stored on the SIM card replaces that of the
phone when inserting the card. (It is restored when removing the SIM).
Redialing:
20 Jun 1998
1
Press the Last
function key to open
the last number
list window:
2 Scroll up/down
to the wanted
number:
3
Telenor in AOR–E
Dial 00 + country code + subscriber no
470
SIM
Book
Menu
Seek
Nera Ltd Redhill
Nera SatCom AS
Apnd
5 Erase
deletes all
the
wanted
entries in Last used
number:
number list.
Call
Erase
Save
Call sends
the selected
number
Number: 004767244700
Apnd
Net provider: Telenor
permits
network: 00
3modifying
Pressing Call sends theTerrestrial
selected number:
selected
470
SIM
number before
Del
4making
Pressthe
Corr.
to change the number:
Call:
7 Del deletes the digit
to the left of cursor:
Last
Last used number list
001 00441737648800
004766843120
004767244700
Call sends
the selected number:
SIM
1 Press the Last number470
function key:
4 Save copies the
number to the phone book.
willcop
be to
prompted.
2Name
Scroll
6
15: 20
Call
Modify using Del and
press Call key to send it.
8 Call sends the
modified number:
Note! To call via another net or network,
see "Making a call: Call via an alternative
Net service provider or terrestrial network".
WorldPhone – Chapter 2. Operation
2.15
Last number redialing
General
New entry Call Apnd Short number
Phone book
Book
General
Phone book
The following may be stored for abbreviated dialing:
• 99 entries with names of up to 29 characters in the WorldPhone.
• Up to 100 entries (no.100 and up) with names of up to 10 characters on the SIM card (varies with type).
The list is sorted by name. The SIM card entries and "phone" entries
merge when the card is inserted.
Abbreviated dialing
1
Press the Book
function key to open
the phone book:
2
20 Sep 1998
470
Scroll up/down or
search for first letter(s)
of subscriber
102
name:
3
Call sends
the selected
number:
470
SIM
Book
Last
SIM
Apnd
Call
Sends selected
telephone number
Seek
New
Edit
Short number
100 and up when
stored on SIM card
Name : Nera Ltd Redhill
Number: 00441737648800
Net provider: Default Net
Terrestrial network: 00
470
Menu
Phone book
Nera SatCom AS
Nera Ltd Redhill
4
Right arrow
displays all data:
15: 20
Telenor in AOR–E
Dial 00 + country code + subscriber no
SIM
Apnd
no. (SIM): 102
Call
New
Edit
See next
page
5
Apnd opens the
entry window for
modification before
making a Call:
Number: 004767244700
Net provider: Telenor
Terrestrial network: 00
470
SIM
Del
Call
Modify data using Del and
press Call key to send it.
2.16
WorldPhone – Chapter 2. Operation
Book
Phone book cont’d
Editing entry
6
New opens new
entry window:
New
Edit
7
8
Del deletes the
digit to left of cursor.
9 Save stores
phone book entry.
10 Remov deletes
phone book entry.
New entry in Phone book
Name :
Number :
Net provider: Default Net
Terrestrial network: 00
no. (SIM): 102
470
SIM
Del
Phone book cont’d
Edit opens existing entry window.
Save
Edit mode in Phone book
Name : Nera SatCom AS
Number : 004767244700
Net provider: Default Net
Terrestrial network: 00
no. : 4
470
SIM
Del Remov
New
Save
Copying entry from f.ex.
non-SIM book to SIM book
11 Press New with
entry in Edit mode.
The entry is assigned
the first free short
number on the SIM
card.
WorldPhone – Chapter 2. Operation
Edit mode in Phone book
Name : Nera SatCom AS
Number : 004767244700
Net provider: Default Net
Terrestrial network: 00
no. (SIM): 102
470
SIM
Del Remov
New
Save
2.17
Menu
Key lock
General
Key lock
The key lock function prevents unauthorized use when the
WorldPhone is on, but still allows reception of incoming calls.
When the lock is set no dial tone is produced, and PC AT commands
are unavailable.
Entering a login password (Phone PIN / SIM PIN) will still unlock the
phone. (If Phone PIN / SIM PIN is disabled, turning power off and
then on will not unlock the phone.)
The facility is only accessible when the WorldPhone is restricted for
use with a specific SIM, or with no SIM. See Advanced functions:
Access control.
To initiate the key lock and enter or change the unlock code, see
Phone setup: setting key lock.
Menu
Locking
1
Press the Menu
function key:
Function menu
001 Set default Net provider
Set access level
Data/printer port setup
Phone setup menu
Traffic log
470
SIM
Lock
Mail
Selct
Quit
and then Lock:
20 Sep 1998
A warning is displayed
in the main window:
470
Unlocking
Open
SIM
Open telephone
Enter unlock code:
470
SIM
Del
3
Pressing OK
opens the normal
main window:
Ok
20 Sep 1998
15: 20
Telenor in AOR–E
Dial 00 + country code + subscriber no
470
2.18
Seek
1 – 6 digits
2
Press Open and
enter the unlock code:
15: 20
Telenor in AOR–E
Phone locked, incoming calls only.
SIM
Book
Last
Menu
Seek
WorldPhone – Chapter 2. Operation
Selecting default Net service provider
Menu
The default Inmarsat Net service provider (ISP) for a satellite (Ocean
Region) is automatically used if the user does not select another one
when making a call.
When using SIM card, selection of an ISP is restricted to one of the
allowed Net service providers!
When the Restricted Net function is enabled, and with some SIM
cards, selection of default Net service provider is not possible. The
entry "001 Set default Net provider" will then not appear in the Function menu.
Setting default Net service provider
1 Press the Menu
function key:
20 Sep 1998
470
2
Selct or right
arrow opens Set
default Net
provider window:
470
6
7
Last
Menu
Seek
SIM
Lock
Mail
Selct
Quit
1 – Set default Net provider
Satellite : AOR–E
Default Net: KDD
Terrestrial network: 00
470
SIM
Del
Save
1 – Set default
provider
Net Net
service
providers
Satellite : AOR–E 001 CMC
002 BT
Default Net: KDD 003 KDD
Terrestrial network:
004 0Telenor
Scroll up/down
to select Net:
Selct enters
the chosen Net:
Book
Function menu
4
5
SIM
001 Set default Net provider
Set access level
Data/printer port setup
Phone setup menu
Traffic log
3
Key in Net service
provider code, or
press right arrow
to display list of
available Nets:
15: 20
Telenor in AOR–E
Dial 00 + country code + subscriber no
470
SIM
Selct
Return to step 3, scroll down and key in Terrestrial network code.
Save stores the selected Net service provider and Terrestrial
network as default.
WorldPhone – Chapter 2. Operation
2.19
Selecting default Net
service provider
General
Menu
User access
General
The WorldPhone user program is accessible from two levels:
• USER LEVEL – accessed by Phone PIN or SIM PIN.
User access
Note! If the Phone PIN is accidentally lost, it is possible to reset the
user’s password to default by logging in as owner:
"Phone PIN: * + owner’s password"
(Resetting is not possible on SIM card.)
• CHV2 LEVEL / OWNER LEVEL – accessed by CHV2 or owner
level passwords. With a SIM card inserted, the password allows
access to CHV2 level SIM functions. Without a SIM card the
password allows access to owner level phone resident functions.
Warning!
To prevent misuse, passwords other than default must be entered
before putting the WorldPhone in operation.
User level / changing PIN code (SIM or Phone PIN):
Menu
1
Press the Menu function key
and scroll down to Set
Set default
002 Set access
access level:
Data/printer
2 Selct or right
arrow opens the
Set access level
window:
3
Edit opens the
PIN code window:
Function menu
Net provider
level
port setup
Phone setup menu
Traffic log
Precharge
470
Lock
Mail
2 – Set access
Access level
Level
Access Level
level : : User
Operator
levellevel
570
470
Edit
SIM
Selct
Quit
08.31.43
Owner
Owner
Ok
Ok
Visible in non-SIM
mode only
4
Key in:
• Current PIN code
• New PIN code
• Retype to confirm
Press Ok following
each entry, and to
store new PIN code:
SIM
Edit Phone PIN
Old PIN:
New PIN:
Retype new PIN:
470
SIM
Del
Del
Ok
Pressing Ok without entering any
numbers for New PIN and Retype new
PIN disables SIM PIN/Phone PIN.
NB! "Old" PIN code must be entered
to reactivate the SIM PIN/Phone PIN.
To shift to CHV2/OWNER level and change password,
continue on following pages . . . . . . . . . . . . . . . . . . . . . . . . . . . . . .
2.20
WorldPhone – Chapter 2. Operation
User access cont’d
Menu
Shifting to CHV2 level / changing password:
20 Sep 1998
1
Press the Menu
function key:
15: 20
Telenor in AOR–E
Dial 00 + country code + subscriber no
470
SIM
Book
Last
Menu
Seek
Selct
Quit
Scroll down
to Set access
level:
3 Selct or right
arrow opens the
Set access level
window:
4
Function menu
Set default Net provider
002 Set access level
Data/printer port setup
Phone setup menu
Traffic log
Precharge
470
SIM
Lock
Mail
2 – Set access level
Access level: User level
Key in 2002 to
open the window
for entering
password:
470
5
470
Key in password.
Pressing OK activates
the CHV2 level:
User access cont’d
2
Edit
SIM
Ok
2 – Set access level
Access level: CHV2 level
Password:
SIM
Del
Ok
2 – Set access level
Access level: CHV2 level
Changing password:
6
Open set access
level window again:
470
Edit
SIM
User
Ok
7
Edit opens
password window:
Key in:
• Current password
• New password
• Retype to check
Edit password
Old password:
New password:
Retype new password:
470
SIM
Del
Ok
Press Ok following each entry:
To revert to User level, reselect the
"Set access level" function and press User
WorldPhone – Chapter 2. Operation
2.21
User access cont’d
Menu
Shifting to owner level / changing password:
1
Press the Menu
function key:
20 Sep 1998
15: 20
Telenor in AOR–E
Dial 00 + country code + subscriber no
470
Book
Last
Menu
Seek
Selct
Quit
2
User access cont’d
Scroll down
to Set access
level:
3 Selct or right
arrow opens the
Set access level
window:
4 Owner opens the
window for entering
the password:
Note! The default
password is:
1234567890
Function menu
Set default Net provider
002 Set access level
Data/printer port setup
Phone setup menu
Traffic log
Precharge
470
Lock
Mail
2 – Set access level
Access level: User level
Edit
470
Owner
Ok
2 – Set access level
Access level: Owner level
Password:
470
Del
Ok
5
Key in password.
Pressing OK activates
the Owner level:
Changing password:
2 – Set access level
Access level: Owner level
6
Open set access
level window again:
Edit
470
User
Ok
7
Edit opens
password window:
Key in:
• Current password
• New password
(10 – 12 digits)
Edit password
Old password:
New password:
Retype new password:
470
Del
Ok
• Retype to check
Press Ok following each entry:
To revert to User level, reselect the
"Set access level" function and press User
2.22
WorldPhone – Chapter 2. Operation
Data/printer port setup
Menu
General
Setup for data communication
• Speed as selected on next page, normally 9600 bps.
Note! The bit rate set between the PC and the WorldPhone must
be higher than the nominal 2400 bps WorldPhone-to-satellite bit
rate to ensure maximum speed transfer.
• No parity *
• 8 data bits *
• 1 stop bit *
* These parameters can only be changed using AT commands,
see appendix D.
Setup for output to printer
A printer must have serial interface, and is set as follows:
• Speed as selected on next page, i.e. the bit rate specified for the
printer to be connected.
• No parity
• 8 data bits
• 1 stop bit
WorldPhone – Chapter 2. Operation
2.23
Data/printer port setup
The DATA port may be set to operate with a PC or, for instance, to
output a Traffic log directly to a printer.
Note! The bit rate setting applies for both PC and printer transfer.
Menu
Data/printer port setup cont’d
Procedure
1
20 Sep 1998
Press the Menu
function key:
15: 20
Telenor in AOR–E
Dial 00 + country code + subscriber no
470
SIM
Book
Last
Menu
Seek
Selct
Quit
Data/printer port setup cont’d
2
Scroll down
to Data/printer
port setup:
Function menu
Set access level
003 Data/printer port setup
Phone setup menu
Traffic log
Precharge
Advanced functions
3 Selct or right
arrow selects the
Data/printer port
setup window:
470
SIM
Lock
Mail
3 – Data/printer port setup
Bit rate:
9600 bps
Printer
: Disabled
AT modem: Disabled
Hot Dial: Enabled
Initial mode: AT modem
Bit rate:
4
Edit or right
arrow opens list
of bit rates:
470
5
Scroll up/down
to required data/
printer bit rate:
SIM
Edit
Save
3 – Data/printer
port setup
Available bit rates
Bit rate:
9600 1200
bps bps
Printer
: Disabled
2400 bps
4800 bps
AT modem: Disabled
9600 bps
Hot Dial: Enabled
19200 bps
Initial mode: AT modem
38400 bps
6
Selct enters
470
the chosen rate:
Note! It is recommended to use
9600 bps for data communication.
Selct
SIM
Printer:
For output to printer, select bit rate according to printer specifications.
7 Scroll down to printer and
3 – Data/printer port setup
Enable/Disable the
Bit rate:
2400 bps
Printer
: Disabled
port for printing:
AT modem: Disabled
Hot Dial: Enabled
Initial mode: AT modem
AT modem:
470
SIM
Enab
Disab
Save
8
Scroll down and Enable/
Disable the port for AT modem:
Recommended port setup
Mode
Printer:
AT modem:
Hot dial:
2.24
Output to printer
Data com. (AT)
Enabled
Disabled
Disabled
Disabled
Enabled
Disabled
Data com. (DTR dialing)
Disabled
Disabled
Enabled
WorldPhone – Chapter 2. Operation
Menu
Data/printer port setup cont’d
Hot dial:
When enabled, this function monitors the DTR-pin on the DATA port.
When the DTR-pin is pulled high by equipment connected to the
DATA port, a data call is automatically initiated to a pre-programmed
number. The number is automatically stored under short number 99.
Scroll down to
Hot Dial:
470
SIM
Setup
Enab
Disab
Data/printer port setup cont’d
9
3 – Data/printer port setup
Bit rate:
9600 bps
Printer
: Disabled
AT modem: Disabled
Hot Dial: Enabled
Initial mode: AT modem
Save
10 Setup opens the
Phone book editing
window.
Enter name, f.ex. "Hot".
Fill in required number,
and change provider
and network, if needed.
Edit mode in Phone book
Name : Hot
Number : 004766779016
Net provider: Default Net
Terrestrial network: 00
Hot dial
470
SIM
Del
´
Save
Initial mode:
The mode is set to AT modem as default.
With a PC running a terminal program connected to the WorldPhone
(f.ex. Windows HyperTerminal), the menu is displayed on the screen.
When selecting any of the MMI (Man Machine Interface) settings, the
PC screen automatically displays the WorldPhone picture.
11 Scroll down to Initial mode (step 9).
Pressing Selct
allows choosing
MMI interface:
3 – Data/printer port setup
Initial mode
Bit rate:
9600 bps
AT modem
Printer
: Disabled
MMI (ASCII)
AT modem: Disabled
MMI (extended ANSI)
MMI (multilingual)
Hot Dial: Enabled
Initial mode: AT modem
470
Selct
SIM
3 – Data/printer port setup
Bit rate:
9600 bps
Printer
: Disabled
AT modem: Disabled
Hot Dial: Enabled
Initial mode: AT modem
470
SIM
Setup
Enab
Disab
Save
12 Save stores the chosen settings.
WorldPhone – Chapter 2. Operation
2.25
Menu
Phone setup
Phone setup
General
This function sets as follows:
• The ON-time of the display illumination and the screen picture.
When OFF, pressing any key turns the display back ON.
• Default display contrast, see following pages.
• Default level of ringing tone and loudspeaker, see following pages.
• Date and time, see following pages.
• Key lock, which prevents unauthorized use, see following pages.
• Language
• Mailbox access numbers
Procedure
Menu
1
Press the Menu function key
and scroll down to Phone
Function menu
Data/printer port setup
004 Phone setup menu
setup menu:
Traffic log
Precharge
Advanced functions
2
Selct or right arrow
opens the Phone setup
menu window:
470
3
001 Backlight control
Contrast control
Volume control
Set system clock
Key lock code
Press Selct or right
arrow again to open the
Backlight control
window:
Timing of display
light and screen
picture:
Lock
SIM
Mail
Selct
Quit
4 – Phone setup menu
470
SIM
Lock
Mail
Selct
Quit
41 – Backlight control
Light (battery): Light 10 / Screen 60
Light (external): Light on / Screen on
470
Pressing Edit or right
arrow opens the list of choices.
Example when powered by
battery pack:
(Light 30 / Screen 60 automatically
switches OFF display light after 30
secs, and screen picture after 60 secs.)
Example applicable when
powered by external adapter:
SIM
Edit
Save
Light / Screen duration
Light off / Screen 60
Light 30 / Screen 60
Light 90 / Screen on
Light off / Screen on
Light on / Screen on
Selct
Light / Screen duration
Light off / Screen on
Light on / Screen on
(Light and screen permanently ON).
Pressing Save stores the selected
settings and returns to phone setup menu.
2.26
Selct
WorldPhone – Chapter 2. Operation
Phone setup cont’d
Menu
Setting default contrast and ringing volume
1
Press the Menu
function key:
20 Sep 1998
15: 20
Telenor in AOR–E
Dial 00 + country code + subscriber no
470
SIM
Book
Last
Menu
Seek
Selct
Quit
Selct
Quit
Scroll down
to Phone
setup menu:
3
Selct or right arrow
opens Phone setup
menu window:
4
Scroll down to
Contrast control:
Function menu
Data/printer port setup
004 Phone setup menu
Traffic log
Precharge
Advanced functions
470
6
Repeat step 4 for
Volume control:
SIM
Lock
SIM
Lock
Mail
42 – Set default display contrast
Contrast
470
Save
SIM
43 – Set default volume
Ringing tone:
Loudspeaker:
Medium
Medium
Press Edit or right
470
SIM
arrow to set ringing
tone level.
Volume
Scroll up/down to required
Weak
Medium
setting and press Selct:
High
Very high
Repeat procedure for
loudspeaker volume.
Pressing Save stores the selected levels.
WorldPhone – Chapter 2. Operation
Mail
4 – Phone setup menu
Backlight control
002 Contrast control
Volume control
Set system clock
Key lock
Language setup
470
5 Press Selct or right
arrow to open the
Contrast control window:
Adjust with arrow keys.
Save stores the setting.
Phone setup cont’d
2
Edit
Save
level
Selct
2.27
Menu
Phone setup cont’d
Setting date and time
Phone setup cont’d
The date and time is set to UTC (GMT) at the factory. It is recommended to leave this setting if correct.
Warning!
The system is automatically restarted when accepting new time
settings. All calls will be disconnected.
Example
1
Press the Menu
function key:
20 Sep 1998
15: 20
Telenor in AOR–E
Dial 00 + country code + subscriber no
470
SIM
Book
Last
Menu
Seek
Selct
Quit
Selct
Quit
2
Scroll down
to Phone setup
menu:
3
Press Selct or
right arrow and
scroll down to Set
system clock:
4
Continue with
Selct or right arrow
to select function and
key in new data:
Move down using
down arrow.
5
Press OK and
confirm with Yes if
settings are correct.
Function menu
Data/printer port setup
004 Phone setup menu
Traffic log
Precharge
Advanced functions
470
SIM
Lock
Mail
4 – Phone setup menu
Volume control
004 Set system clock
Key lock
Language setup
Mailbox access numbers
Call charge setup
470
SIM
Lock
Mail
44 – Set system clock
Hour:
Minute:
Day:
Month:
Year:
470
13
02
20
09
1998
SIM
Del
Ok
New system clock setting
13:02:00
20 September 1998
Proceed to system reset?
470
SIM
Yes
No
Note! The WorldPhone
is now restarted.
2.28
WorldPhone – Chapter 2. Operation
Phone setup cont’d
Menu
Setting key lock
The WorldPhone must be set for use with a specific SIM, or with no
SIM. See Advanced functions: Access control.
Procedure
Press the Menu
function key:
20 Sep 1998
15: 20
Phone setup cont’d
1
Telenor in AOR–E
Dial 00 + country code + subscriber no
470
SIM
Book
Last
Menu
Seek
Selct
Quit
2
Scroll down
to Phone
setup menu:
3
Press Selct or
right arrow and
scroll down to
Key lock:
4
Function menu
Data/printer port setup
004 Phone setup menu
Traffic log
Precharge
Advanced functions
470
Lock
Mail
4 – Phone setup menu
Set system clock
005 Key lock code
Language setup
Mailbox access numbers
Call charge setup
470
Continue with
1 – 6 digits
Selct or right arrow
to Key lock window.
Enter unlock code:
(1 - 6 digits)
SIM
SIM
Lock
Mail
Selct
Quit
45 – Key lock
Enter unlock code:
470
SIM
Del
Ok
and press OK:
5
Repeat code to
confirm:
45 – Key lock
Confirm unlock code:
470
SIM
Del
Ok
and press OK again:
WorldPhone – Chapter 2. Operation
2.29
Menu
Phone setup cont’d
Language setup
The display language may be changed as described below.
Example
1
Phone setup cont’d
Press the Menu
function key:
20 Jan 1998
15: 20
Telenor in AOR–E
Dial 00 + country code + subscriber no
470
SIM
Book
Last
Menu
Seek
Selct
Quit
Selct
Quit
2
Scroll down
to Phone setup
menu:
3
Press Selct or
right arrow and
scroll down to
Language
setup:
4
Function menu
Data/printer port setup
004 Phone setup menu
Traffic log
Precharge
Advanced functions
470
SIM
Lock
Mail
4 – Phone setup menu
Key lock code
006 Language setup
Mailbox access numbers
470
Continue with
Selct or right arrow
to select function.
SIM
Lock
Mail
46 – Language setup
Language:
470
English
SIM
Edit
Save
5
Press Edit
and scroll up/down
to wanted
language:
Available
languages
46 – Language
setup
English
English
Deutsch
Español
Français
Portugués
Language:
Pressing Selct
470
SIM
reads out the
selected language in the setup window:
Pressing Save changes the display
text to the selected language.
Selct
To easy restore English, see next page.
2.30
WorldPhone – Chapter 2. Operation
Phone setup cont’d
Menu
Language reset
When starting the WorldPhone with the display language set to f.ex.
Portuguese, the Eng function key provides an easy way to restore the
default English display language:
Phone setup cont’d
Nera WorldPhone
PIN do SIM:
Tecle "Help" para uma apresentacão .
470
Apag
Eng
Ok
Do you want to reset the language to
English ? ( "SIM" = "Yes" and "Não " = "No" )
Quer substituir para língua inglesa ?
470
WorldPhone – Chapter 2. Operation
Sim
Não
2.31
Menu
Phone setup cont’d
Mailbox access numbers
Phone setup cont’d
When receiving a mail alert (voice, fax or data), the user must call the
server mailbox to retrieve the message. To call the mailbox, normally
the default number 57 can be used.
The mailbox dial-up number may be changed as described below.
Example
1
Press the Menu
function key:
20 Sep 1998
15: 20
Telenor in AOR–E
Dial 00 + country code + subscriber no
470
SIM
Book
Last
Menu
Seek
Selct
Quit
Selct
Quit
2
Scroll down
to Phone setup
menu:
3
Press Selct or
right arrow and
scroll down to
Mailbox access
numbers:
4
Continue with
Selct or right arrow
to select function
and key in new
numbers:
5
Pressing OK
stores the new
mailbox number(s).
2.32
Function menu
Data/printer port setup
004 Phone setup menu
Traffic log
Precharge
Advanced functions
470
SIM
Lock
Mail
4 – Phone setup menu
Language setup
007 Mailbox access numbers
Call charge setup
470
SIM
Lock
Mail
47 – Mailbox access numbers
Voice:
Fax:
Data:
57
57
57
Default numbers for mailbox access
470
SIM
Del
Ok
WorldPhone – Chapter 2. Operation
Phone setup cont’d
Menu
Call charge setup
Phone setup cont’d
With the Call charge function enabled the cost of the call will be
displayed during the call and for 10 seconds after the call is terminated. Later the charge can be fetched using the Traffic log function.
The price per unit and minimum charge time is set as described below.
Example
1
Press the Menu
function key:
20 Sep 1998
15: 20
Telenor in AOR–E
Dial 00 + country code + subscriber no
470
SIM
Book
Last
Menu
Seek
Selct
Quit
Selct
Quit
2
Scroll down
to Phone setup
menu:
3
Press Selct or
right arrow and
scroll down to Call
charge setup:
4
Continue with Selct
or right arrow to select
the Call charge function.
Enab activates the
values set below.
See Making a call
previously in this chapter.
Disab disables the
Call charge indication.
Function menu
Data/printer port setup
004 Phone setup menu
Traffic log
Precharge
Advanced functions
470
SIM
Lock
Mail
4 – Phone setup menu
Mailbox access numbers
008 Call charge setup
470
SIM
Lock
Mail
48 – Call charge
Charge time unit (s):
Price per charge unit:
Minimum charge time (s):
470
SIM
Setup
6
3.00
60
Enab
Disab Ok
Ok activates the call
charge indication.
5
Press Setup to
modify entries:
48 – Call charge
Charge time unit (s):
Price per charge unit:
Minimum charge time (s):
470
SIM
Del
6
3.00
60
Save
Save stores the new values:
WorldPhone – Chapter 2. Operation
2.33
Menu
Traffic log
General
This function logs all outgoing calls both with and without SIM card
inserted. Every call is logged with:
• subscriber number, start time and duration
• service (voice, fax, data, NIMS)
• Net provider and satellite
• user name (if access code is enabled) / SIM card FWD
Traffic log
The WorldPhone owner may set the log output mode as follows,
(see "Traffic log settings"):
• off (stops logging)
• cleared (stops logging and clears the log)
• for automatic printout after 1 or 10 calls (auto print limit).
• for display on the screen
• logging of incoming calls
Traffic log readout
Menu
1
Press the Menu
function key and
scroll down to
Traffic log:
2
Right arrow or
selct opens the
Traffic log window:
Function menu
Phone setup menu
006 Traffic log
Precharge
6 – Traffic log
Log mode :
Unprinted calls :
Auto print limit :
Log incoming calls :
470
3
View displays
the list of call data:
Scroll up/down
to wanted call:
Pressing right
arrow shows
detailed call data:
SIM
View
Only appears when log mode
is set for output to printer.
See next page.
Dialed number
* # 004767244700,
# 0044816865701,
* # 003963221800,
* # 00551155053008,
470
4
SIM
Ok
Minutes:seconds
Call start
01Sep 13:56,
15Aug 17:08,
18Aug 11:08,
03Jul 12:44,
Dur.
0:01
0:12
0:05
0:11
Quit
# : entry tagged for printout by owner
* : entry not yet printed
Dialed number :
Net provider
Satellite :
Service :
Reg. No :
Printed :
Tagged :
470
SIM
004767244700
Telenor
AOR-E
Voice User :
Nera
1 Start : 01Sep 13:56
Yes Duration :
0:00:02
No Charge :
90
Print Remov Tag
Quit
Appears when "Access code" is enabled.
(For SIM card call – SIM Id: ABCDF)
See Advanced functions:
Access control.
2.34
To printer
0
1
Enabled
When call charge is
enabled, the "Charge"
field appears showing the
cost of the viewed call.
WorldPhone – Chapter 2. Operation
Menu
Subscriber
number
Start date
and time
Call duration
in minutes
and seconds
Ref
Dialed number
Call start
001 # 004767243669
980711 09:20
002
0044222534555
980711 10:56
003 # 004722259024
980711 13:24
004
00494088251
980711 15:46
005 # 00871765421392
980712 08:45
006
Incoming call
980712 09:33
007 # 00494088251
980712 10:47
008 # 0044816865701
980712 13:55
009
004722259024
980712 16:09
010 # 044222534555
980712 16:53
Total duration is 2:05:28 (125.46 minutes)
10 records printed 98.07.12 17:34
Number of
records
Duration in
hours, minutes
and seconds
Accumulated time in
minutes and 1/100
of a minute
Port
Dur.
4:05
2:33
11:22
10:05
5:32
6:14
9:11
5:20
15:44
9:10
Net service
provider
Port
H.set
H.set
TEL
TEL
H.set
H.set
TEL
TEL
TEL
H.set
WorldPhone
user (only appears
when access code
is enabled)
Net
CMC
BT
Telenor
Teleglobe IDG
AOR-E
BT
Teleglobe IDG
BT
Telenor
BT
User
Aslaug
Bob
John
Franz
Charlie
Bob
Franz
George
John
Bob
Note! When call charge is
enabled, the duration field will
be replaced by a call charge field
showing the cost of each call.
Example of traffic log printout.
WorldPhone – Chapter 2. Operation
2.35
Traffic log cont’d
Ref. #: record printed
no. previously.
"No hash" when
printed first time.
Traffic log cont’d
Menu
Traffic log cont’d
Traffic log settings (owner level only)
1
Open the Traffic
log window:
Traffic log cont’d
Print outputs all
unprinted and
tagged entries.
See previous page.
2
6 – Traffic log
Log mode :
Unprinted calls :
Auto print limit :
Log incoming calls :
470
Print
To printer
0
1
Enabled
Edit
View
Ok
Only appears when
log mode is set for
output to printer.
Press Edit or right
arrow for setting of Log mode.
Scroll up/down and press
Selct at wanted output mode:
Log mode
Off
Cleared
Print after 1 call
Print after 10 calls
To screen
Selct
No calls are logged when set to
Off or Cleared. All existing entries
are deleted when set to Cleared.
Auto print limit can
easily be toggled between
1 and 10:
Print frequency
Print after each call
Print after 10 calls
Selct
Logging of incoming calls can
enabled/disabled:
Log incoming calls
Enabled
Disabled
Selct
3
2.36
View displays
Dialed number
Call
Start Dur.
# 004767244700,
01Sep 13:56, 0:01
the list of calls:
* # 0044816865701, 18Aug 17:08, 0:12
# 003963221800,
15 Aug 11:08, 0:05
Scroll to wanted
# 00551155053008, 03Jul 12:44, 0:11
*
call and press Tag
470
Print
Tag
Quit
to tag entry:
Tag for printout
Not printed
Press again to untag.
Pressing right arrow
Dialed number :
004767244700
shows detailed call data
Net provider
Telenor
Satellite :
AOR-E
of selected number:
Service :
Voice User :
Nera
Reg. No :
1 Start : 01Sep 13:56
Printed :
Yes Duration :
0:00:02
Print outputs the
Tagged :
No Charge :
90
selected entry to the
Print Remov Tag
Quit
470
printer without header
and footer.
Hours:minutes:seconds
Remove erases the
Appears when "Access code" is enabled.
entry from the log.
See Advanced functions: Access control.
Quit reverts to main window.
WorldPhone – Chapter 2. Operation
Precharge
Menu
For use with SIM, see "Precharge on SIM card".
The WorldPhone can be preprogrammed with a total call duration
limit of up to 44640 minutes (744 hours).
The owner stores a special telephone number under short number
00. This allows the user to call the owner to buy more time even when
having exceeded the time limit.
During a call the remaining time is displayed next to the call duration
in hours and minutes (seconds for the last minute).
For users, the Precharge function only appears in the menu when
enabled, i.e when bought time is loaded, see following pages.
Precharge readout
1
Press the Menu
function key:
20 Sep 1998
470
2
Scroll down
to Precharge:
3
Selct or right
arrow opens the
Precharge window
which displays the time
used and remaining
in hours, minutes
and seconds:
Book
Last
Menu
Seek
Selct
Quit
Code
Ok
Function menu
Traffic log
008 Precharge
Advanced functions
470
Lock
Mail
8 – Precharge
Time used:
2:33:45
Time remaining: 0:56:15
470
Example of call window with
call duration and remaining time
displayed in hours and minutes:
Time remaining
Call duration
0:37 / 0:56
Calling 004767244700
via Telenor in AOR-E
Status : Connected
Handset
470
WorldPhone – Chapter 2. Operation
15: 20
Telenor in AOR–E
Dial 00 + country code + subscriber no
Volume
on
Mute
Menu
Clear
2.37
Precharge
General
Menu
Precharge cont’d
Precharge cont’d
Buying more remaining time
There are three ways to load precharge time:
• Call the owner via short number 00 and get the buy code during
the conversation. (Calling short number 00 can be done even if exceeding
the remaining time limit and does not influence the limit value). See below.
• Fax or mail the Forward ID and Index to the owner who generates
the buy code and returns this by fax, mail, etc. See next page.
• The owner loads the new Precharge limit into the WorldPhone.
Buying time by calling the owner
1
Dial 00:
Number: 00
Net provider: Telenor
Terrestrial network: 00
Del
470
Call
Short
and press Short:
00:07 / 0:00
Calling Owner
via Telenor in AOR-E
Status : Connected
Handset
2
Pressing the Menu
function key displays
IMN numbers:
3
470
Volume
on
Mute
Menu
IMN numbers
Handset: 762420510
Phone: 762424333
Fax:
762445900
Data:
762430520
(ESC returns to previous window.)
Pressing Time opens
the Precharge window
Time
470
displaying the Forward
ID, Index and user code
entry field:
8 – Precharge
Read the Forward ID,
Forward ID: 6955B9
Index:
827660941
Index and the new call
Code: 123456
duration you want to buy
470
Del
to the owner.
Then key in the code he reads back to you.
The code contains the time information.
Pressing Ok loads the new
8 – Precharge
remaining time limit:
4
Press Ok again and
then Esc to return to the
conversation window:
2.38
Clear
Book
Ok
Time used:
2:33:45
Time remaining: 3:56:15
470
Code
Ok
WorldPhone – Chapter 2. Operation
Menu
Precharge cont’d
Buying time via fax or mail
Menu
1
2
Selct or right
arrow opens the
Precharge window:
3
Pressing Code opens
the Precharge window
displaying the Forward
ID, Index and user code
entry field:
Fax or mail the Forward
ID, Index and the new
call duration you want to
buy to the owner.
Function menu
Traffic log
008 Precharge
Advanced functions
470
Lock
Mail
Selct
Quit
Precharge cont’d
Press the Menu
function key
and scroll down
to Precharge:
8 – Precharge
Time used:
2:33:45
Time remaining: 0:56:15
470
Code
Ok
8 – Precharge
Forward ID: 6955B9
Index:
827660941
Code: 123456
470
Del
Ok
Key in the code he faxes or mails back to you.
The code contains the time information.
Pressing Ok loads the new remaining time limit.
WorldPhone – Chapter 2. Operation
2.39
Menu
Precharge cont’d
Owner loads Precharge time
The WorldPhone must be set in owner level.
Menu
1
Precharge cont’d
Press the Menu
function key
and scroll down
to Precharge:
2
Selct or right
arrow opens the
Precharge window:
Function menu
Traffic log
008 Precharge
Advanced functions
470
Lock
Mail
Selct
Quit
NewK
Ok
8 – Precharge
Time used:
2:33:45
Time remaining: 0:56:15
470
Clear
Buy
3
Pressing Buy
allows keying in a
new time limit:
8 – Precharge
Buy minutes: 250
470
4
Pressing Clear
disables the
Precharge function:
The Precharge menu
entry is now no longer
visible from user level.
Del
Ok
8 – Precharge
Precharge disabled.
470
Clear
Buy
NewK
Ok
Precharge is enabled when buying minutes.
NB! Remember to revert to user level.
2.40
WorldPhone – Chapter 2. Operation
Menu
Precharge cont’d
Key readout
The WorldPhone must be set in owner level.
Using the Precharge Administrator program (QPRG 9110039) to
generate a buyer’s Precharge code requires both the owners password and a "key" generated by the WorldPhone, as follows:
1
Menu
Precharge cont’d
Press the Menu
function key
and scroll down
to Precharge:
Function menu
Traffic log
008 Precharge
Advanced functions
Lock
470
Mail
Selct
Quit
NewK
Ok
2
Selct or right
arrow opens the
Precharge window:
8 – Precharge
Time used:
2:33:45
Time remaining: 0:56:15
470
Clear
Buy
8 – Precharge
3
A new "key" is
generated every time
NewK is pressed:
Time used:
2:33:45
Time remaining: 0:56:15
Key: 200 085 213 056 149 115 094
470
Clear
Buy
NewK
Ok
Precharge code handling:
OWNER
USER
• Before a WorldPhone may be rented, the owner
must derive its specific key (NewK) and store
it in the data base of the Precharge
Administrator program, which is used to
generate more precharge minutes for the user.
See above.
At changes, the NewK must be updated in the
data base.
The owner also needs to register the
WorldPhone’s owner password with the
Precharge Administrator program.
More call time is needed:
• The owner uses the Precharge Administrator
program to generate the Precharge code for
the user on basis of the above NewK, owner’s
password and the information received from
the user.
• the user calls the owner
via short number 00,
• or sends telefax or mail.
WorldPhone – Chapter 2. Operation
The user keys in the new
Precharge code
provided by the owner.
2.41
Precharge option cont’d
• The owner reads or sends the
new Precharge code to the user.
When wanting to buy
more call time, the user
conveys the Forward ID,
Index and the requested
call time to the owner:
Precharge on SIM card
Menu
Precharge cont’d
Precharge on SIM card
Precharge cont’d
When using SIM card, any Precharge set on the telephone itself is
overridden. If no Precharge is set on the SIM card, the WorldPhone
may be used freely.
Readout on SIM
The procedure is the same as described previously for the telephone
(except for the Code function which now is not required),
see "Precharge readout" :
8 – Precharge
Time used:
2:33:45
Time remaining: 0:56:15
470
SIM
Ok
Precharge on SIM card
During a conversation, the time remaining and call duration
are displayed as for calls without using SIM card.
Some SIM cards may have a prepaid option. Contact your SIM vendor for more information on how to upgrade your SIM card.
2.42
WorldPhone – Chapter 2. Operation
Advanced functions:
Menu
Advanced functions
Some of the Advanced functions are accessible from Phone OWNER
LEVEL or CHV2 LEVEL only.
The OWNER LEVEL and CHV2 levels are protected by passwords.
For shifting to owner/CHV2 level and assignment of password, see
"User access".
The Advanced functions include as follows:
• Access control:
Restrict dial
Access code
Restrict SIM usage
• Satellite setup
• Configuration:
Port configuration
Net service providers
Power conservation
Set diagnostics
Set preferred Nets
(with SIM card only)
Set allowed Nets
(with SIM card only; CHV2 level or higher)
Set S/A preferred Nets (with SIM card only)
Set S/A allowed Nets (with SIM card only; CHV2 level or higher)
Charge tone
• Information available:
IMN numbers
Misc. version Id information
Oscillator Compensation
(owner level, or in user level
Network status information when diagnostics is ON, see
Configuration: Set diagnostics)
• Install: Installation and debug menu:
Paid functions (owner level)
Phone name setup (owner level)
WorldPhone – Chapter 2. Operation
2.43
Advanced functions
Overview
Access control
Introduction
Menu
Advanced functions: Access control
Introduction
Access control
The following functions are available for controlling the use of the
WorldPhone:
• Restrict dial which allows the owner to establish a Barred list of
subscriber numbers that cannot be called, or set the WorldPhone
for dialing from Phone Book only.
See next page.
• Access code which opens the WorldPhone for up to 25 authorized
users. See following pages.
• Restrict SIM usage which permits controlling the use of SIM card
with the WorldPhone. See following pages.
The functions are editable in owner level only.
Procedure:
Press the Menu
function key and scroll
down to Advanced
functions:
Menu
1
2
Selct or right
arrow opens the
Advanced functions
menu:
Function menu
Precharge
009 Advanced functions
470
SIM
Lock
Mail
Selct
Quit
9 – Advanced functions menu
001 Access control
Satellite setup
Configuration
Information available
3
Pressing Selct or
right arrow again
opens the Access
control menu:
allowing selection
of the submenus:
470
SIM
Lock
Mail
Selct
Quit
91 – Access control menu
001 Restrict dial
Access code
Restrict SIM usage
470
SIM
Lock
Mail
Selct
Quit
Restricted dialing, see next page
Access code, see following pages
Restricted SIM usage, see following pages.
2.44
WorldPhone – Chapter 2. Operation
Advanced functions: Access control cont’d
Menu
The WorldPhone provides three choices of controlling calls:
• No restrictions.
• Barred list, which may contain up to 10 phone numbers or part of
numbers that can not be called. F.ex. the entry "0087" in the
barred list prevents all mobile-to-mobile calls.
• Dial from Book only, which restricts calls to the numbers in the
Phone Book (in the WorldPhone). It is still possible to append, i.e. a
short number entry with number field "0047" means that it is possible to dial all Norwegian numbers. When a SIM card is inserted, the
SIM entries will not be merged with the "phone" entries.
The function is active for non-SIM operation and for one specific SIM
card, see "Restricted SIM usage". It applies to all ports of the
WorldPhone. Only one of the lists can be activated at one time.
The list to be active is selected by the owner, see next page.
Checking the dialing setup:
1
Press Selct or
right arrow via
Advanced functions
to open the Access
control menu:
2
Pressing Selct
or right arrow again
opens the Restricted
dialing window which
shows the active list:
• No restrictions
91 – Access control menu
001 Restrict dial
Access code
Restrict SIM usage
470
SIM
Lock
Mail
Selct
Quit
911 – Restricted dialing
Current mode : No restrictions
470
SIM
Ok
Alternative
Current mode : Barred list
470
List
SIM
Ok
• Barred list
• Dial from Book
only
911 – Blocked numbers
001 004767244700
0044816865701
470
Ok
SIM
Alternative
Current mode : Dial from Book only
470
SIM
Book
Ok
Similar to Phone book, see this chapter.
WorldPhone – Chapter 2. Operation
2.45
Access control cont’d
Restricted dialing
Restricted dialing setup
Advanced functions: Access control cont’d
Menu
Restricted dialing setup (owner level only)
The "barred list" and the phone book are established as follows:
1
Access control cont’d
Press Selct or right arrow
via Advanced functions
to open the Access
001
control menu:
2
Pressing Selct
or right arrow again
opens the Restricted
dialing window which
shows the active list:
470
3
470
Press Edit to select
mode of restriction.
Scroll up/down
to select:
Selct enters
chosen mode.
91 – Access control menu
Restrict dial
Access code
Restrict SIM usage
Lock
Mail
Selct
Quit
List
Ok
911 – Restricted dialing
Current mode : Barred list
Edit
911 – Restricted
Type ofdialing
restriction
Barred list
Dial from Book only
Current mode : Barred
No list
restrictions
470
Selct
4
Pressing List displays
the blocked phone
numbers:
001 0047800xxx
0044816865701
5
470
Pressing Edit
allows the selected
number to be modified:
The field is empty when
pressing New to add
a phone number to the
barred list.
Remove deletes number.
Save stores the changes.
6
911 – Blocked numbers
Remov Edit
911 – Blocking number
Barred root : 0047800
470
When the restriction
Current
mode "Dial from Book
only" is selected,
470
pressing Book allows
short numbers to be entered:
Ok
Empty
field when
pressing
New
Del
Save
911 – Restricted dialing
mode : Dial from Book only
Edit
NB! Remember to revert to user level.
2.46
New
Book
Ok
Similar to Phone book
See this chapter.
WorldPhone – Chapter 2. Operation
Advanced functions: Access control cont’d
Menu
When the access code function has been enabled, the user is
prompted for a 1 - 8 digit personal code when making a call.
The code opens the WorldPhone for one call. Up to 25 authorized
users can be allocated access codes.
The function is active for non-SIM use and for one specific SIM card,
see "Restricted SIM usage". It applies to all ports of the WorldPhone.
The access code can only be entered from owner level, see next page.
Making a call:
1
At hook-off or when
attempting to dial a phone
number from the main
window, the Access
code login window opens,
prompting the user to
enter the access code:
2
Pressing Phone
opens the window for
entering the phone
number:
Pressing Fax or Data
shows which users
are allowed to make a
telefax or data call:
Checking the setup:
1
20 Sep 1998
470
SIM
Menu
470
Del
SIM
Phone
Fax
Data
See Making a call
in this chapter.
Number:
Net provider: Telenor
Terrestrial network: 0
470
SIM
Del
Book
or data call
Ready for fax call
Telephone is opened for User1
Please proceed with call.
470
Quit
SIM
91 – Access control menu
Restrict dial
002 Access code
Restrict SIM usage
2
470
SIM
Lock
Mail
Selct
Quit
912 – Access code
Access code: Enabled
470
WorldPhone – Chapter 2. Operation
Seek
Access code login
Access code:
Press Selct or right
arrow via Advanced
functions to open
the Access control
menu:
Pressing Selct
or right arrow again
opens the window which
indicates whether Access
code is Enabled or
Disabled:
12: 58
Telenor in AOR–E
Enter access code to call
SIM
Ok
2.47
Access control cont’d
Access code
Access code setup
Advanced functions: Access control cont’d
Menu
Calling from external phone
1
2
Lift handset; enter access code + "#" on external phone.
Access control cont’d
If access code is accepted, a dial tone is heard and the number to
be dialed can be entered. Press "#" to initiate the call.
Access code setup (owner level only)
Access code is edited or entered as follows:
1
Press Selct or right
arrow via Advanced
functions to open the
Access control
menu:
91 – Access control menu
Restrict dial
002 Access code
Restrict SIM usage
2
470
Pressing Selct
or right arrow again
opens the Access
code window:
Pressing Enab/Disab
enables/disables the
access code function.
Lock
Mail
Selct
Quit
912 – Access code
Access code: Enabled
Setup
470
Enab
Disab
Ok
3
Pressing Setup
displays the list of
authorized users:
Access codes
001 User1
User2
Scroll down to wanted
470
user and press Edit to
modify the code, or
press New to add a
Access
user to the list:
Name: Abc
Code:
Use Del to modify.
Press ABC or abc to
470
enter uppercase/
lowercase letters as required.
Ok stores the modified user name.
Remov
Edit
New
code edit
Del
Quit
Starts with
empty name
field when
pressing New.
Code is
prompted
when name is
entered.
ABC
abc
Ok
NB! Remember to revert to user level.
2.48
WorldPhone – Chapter 2. Operation
Menu
Advanced functions: Access control cont’d
Allowed SIM
The WorldPhone can be set to operate from:
• one specific SIM card. Any other SIM users will be rejected.
• no SIM card. All SIM users will be rejected.
• any SIM card.
Restricted SIM
The restrictions "Restrict dial" and "Access code" can be set to be
active for:
• one specific SIM card (in addition to non-SIM usage)
• no SIM card (only active for non-SIM usage).
The setting can only be made from owner level, see Setting SIM
restrictions. See also Restricted dialing and Access code.
When restricted to SIM provider
The service provider can lock the WorldPhone to a specific type of
card, e.g. a "MOBIQ" SIM card. The restrictions will then be
:
• any "MOBIQ" SIM card.
• one specific "MOBIQ" card.
• no SIM card at all.
WorldPhone – Chapter 2. Operation
2.49
Access control cont’d
Restricted SIM usage
Menu
Advanced functions: Access control cont’d
Checking SIM restrictions
Menu
1
Press the Menu
function key and scroll
down to Advanced
functions:
Function menu
Precharge
009 Advanced functions
Access control cont’d
9 – Advanced functions menu
2
Press Selct or
right arrow to open
the Access control
menu:
001 Access control
Satellite setup
Configuration
Information available
470
Lock
Mail
Selct
Quit
91 – Access control menu
003 Restrict SIM usage
3
Pressing Selct
or right arrow again
opens the SIM
restrictions window:
470
Lock
Mail
Selct
Quit
913 – SIM restrictions
Allowed SIM:
Any
Restricted SIM: No restrictions
SIM provider Id: 8012
Ok
470
Alternatives: see below
913 – SIM restrictions
Allowed SIM:
Locked to one
Card number:
89013000513658144571
Restricted SIM: Locked to one
Card number:
89013000513658144571
SIM provider Id: 8012
470
SIM
Ok
Appears if card is locked by SIM provider
Alternative restrictions:
When Allowed SIM is set to:
• Any, no restrictions apply
• No SIM, SIM cards are not accepted.
• Locked to one, one specific card is allowed.
When Restricted SIM is set to:
• No restrictions, Access code and Restricted dial only apply for
non-SIM operation.
• Locked to one, Access code and Restricted dial apply for nonSIM operation and operation with the specified SIM card.
2.50
WorldPhone – Chapter 2. Operation
Setting SIM restrictions
Advanced functions: Access control cont’d
Menu
Setting SIM restrictions (owner level only)
1
Press Selct or right
arrow via Advanced
functions to open the
Access control
menu:
003 Restrict SIM usage
2
470
* Restricted SIM:
3
Scroll down
to Restricted
SIM:
Lock
Selct
Quit
Open
Ok
913 – SIM restrictions
Allowed SIM:
Any
Restricted SIM: No restrictions
913 – SIM restrictions
Allowed SIM:
Any
Restricted SIM: No restrictions
470
4
Press Lock and
insert the actual SIM
card.
The WorldPhone can
now be operated with
that specific card only:
Mail
Access control cont’d
Pressing Selct
or right arrow again
opens the SIM
restrictions window:
91 – Access control menu
Lock
913 – SIM restrictions
Allowed SIM:
Any
Restricted SIM:
No restrictions
Please insert the actual SIM card.
470
913 – SIM restrictions
Allowed SIM: Any
Restricted SIM: No restrictions
Card number: 8980120000166470336
Please retract the SIM card.
470
When retracting the
card, the Id of the SIM
provider is displayed:
913 – SIM restrictions
Allowed SIM:
Any
Restricted SIM: Locked to one
Card number: 8980120000166470336
SIM provider Id: 8012
470
Lock
Open
Ok
Ok stores the settings.
Appears if card is locked
by SIM provider
* Allowed SIM:
Follow the same procedure as for Restricted SIM with the marker
remaining at Allowed SIM.
WorldPhone – Chapter 2. Operation
2.51
Satellite setup
Menu
Advanced functions: Satellite setup
General
Allows preprogramming of default Net service provider, S/A operator (Stand Alone operator) and terrestrial network for each satellite
region (Ocean Region).
Net service provider and terrestrial network
Menu
1
Satellite setup
Press the Menu function
key and scroll down to
Advanced functions:
2 Pressing Selct or
right arrow opens the
list of Satellites and
Default Net providers.
Scroll up/down to
wanted satellite:
Selct initiates search
for the specified satellite.
(and a new spot beam selection)
Function menu
Precharge
009 Advanced functions
9 – Advanced functions menu
Access control
006 Satellite setup
Configuration
Information available
470
Satellite
AOR-W
001 AOR-E
POR
IOR
Region 4
Region 5
470 Region 6
Region 7
Right arrow displays
satellite info:
470
Mail
Selct
Quit
Selct
Ok
Selct
Ok
Default Net provider
004 Telenor
003 KDD
001 CMC
002 BT
Edit
SIM
Edit
Satellite : AOR–E
Default Net : KDD
Terrestrial network : 00
S/A operator : CMC
Terrestrial network : 00
4
Right arrow
opens the list of available
Net service providers.
Lock
Satellite : AOR–E
Default Net : 003 KDD
Terrestrial network : 00
S/A operator : 001 CMC
Terrestrial network : 00
3
Edit opens the
setting window for the
selected satellite:
SIM
470
5
Scroll up/down
to wanted Net:
SIM
Del
Save
Satellite : AOR–E Net service providers
Default Net : KDD
001 CMC
Terrestrial network002
: 00
BT
003 KDD
S/A operator : CMC
Telenor
Terrestrial network004
: 00
470
Pressing Selct enters the
new default Net service provider:
SIM
Selct
6
Return to step 4, scroll down and key in Terrestrial network code.
Save stores the selected Net service provider and Terrestrial network
as the default for that particular satellite.
S/A operator and terrestrial network
Repeat steps 4 - 6 for selection of S/A operator and terrestrial network.
2.52
WorldPhone – Chapter 2. Operation
Port configuration
Configuration
Menu
Advanced functions: Configuration
Port configuration
Configuration
• Displays current configuration. Reconfiguration can be made in
"owner" level only (non-SIM operation).
• With Broadcast On, incoming calls initiate ringing on all ports
configured for voice communication.
• The secure voice function allows selected port(s) to be used with
encrypted telephone. See appendix E – Secure voice option.
Example
Menu
1
Press the Menu
function key and scroll
down to Advanced
functions:
Function menu
Precharge
009 Advanced functions
470
Lock
Mail
Selct
Quit
2
Press Selct or
right arrow and
scroll down to
Configuration:
3 Selct or right
arrow opens the
Configuration menu:
9 – Advanced functions menu
Satellite setup
007 Configuration
Information available
Lock
470
Mail
Selct
Quit
97 – Configuration menu
4
Pressing Selct or
right arrow again
displays the Port
configuration window
which shows the present
service of the
ports, and the incoming call response.
001 Port configuration
Net service providers
Power conservation
Set diagnostics
Set preferred Nets
470
Service
Handset: Voice
TEL:
Voice
FAX:
Fax
Broadcast: Off
470
For enabling/disabling of
secure voice, see appendix E.
Lock
Mail
Selct
Quit
Secure voice
Enabled
Auto Enab Disab Save
Ok
Secure voice appears
when bought.
For port details, see appendix B –
Connecting up optional equipment.
WorldPhone – Chapter 2. Operation
2.53
Menu
Advanced functions: Configuration cont’d
Net service providers
Each Net service provider has a station code. The "Net service provider" window displays a list which matches the codes to the station
owners. Names can be edited in "owner" level (non-SIM operation).
Configuration cont’d
Example:
Menu
1
Press the Menu
function key and scroll
down to Advanced
functions:
Function menu
Precharge
009 Advanced functions
470
SIM
Lock
Mail
Selct
Quit
2
Press Selct or
right arrow and
scroll down to
Configuration:
3 Selct or right
arrow selects the
Configuration menu:
Press Selct or right
arrow again for
Net service providers.
4
Scroll up/down to
wanted service
provider:
9 – Advanced functions menu
Satellite setup
007 Configuration
Information available
470
Lock
Mail
Selct
Quit
97 – Configuration menu
Port configuration
002 Net service providers
Power conservation
Set diagnostics
Charge tone
Set preferred Nets
470
SIM
Lock
Mail
Selct
Quit
972 – Net service providers
KDD
004 Telenor
Indosat
France Telecom
Station 12
Teleglobe IDB
470
2.54
SIM
SIM
Ok
WorldPhone – Chapter 2. Operation
Advanced functions: Configuration cont’d
Menu
Battery power can be conserved during voice calls and/or telefax
calls. The conservation can be enabled for voice and/or telefax.
When set in Auto mode, the conservation facility is automatically
enabled when using the internal battery supply and disabled when
connected to an external power supply.
The speech quality at the remote end may be slightly impaired with
power conservation enabled.
Example
Menu
1
Press the Menu
function key and scroll
down to Advanced
functions:
Press Selct or right
arrow and continue down
to Configuration:
2 Selct or right
arrow selects the
Configuration menu:
3
Scroll down
and press Selct
or right arrow to
open the Power
conservation window:
Function menu
Precharge
009 Advanced functions
9 – Advanced functions menu
Satellite setup
007 Configuration
Information available
470
SIM
Lock
Mail
Selct
Quit
Selct
Quit
97 – Configuration menu
Net service providers
003 Power conservation
Set diagnostics
Charge tone
Set preferred Nets
Set S/A preferred Nets
470
SIM
Lock
Mail
4
Enable/Disable
power reduction
during voice/fax
calls, as required.
Auto reduces drain
when using battery.
Save stores new
entries or modifications:
973 – Power conservation
Voice:
Fax:
470
Enabled
Disabled
SIM
Auto Enab Disab Save
Set diagnostics
Additional system
information is displayed
when diagnostics is
turned On.
Note! Not necessary for
normal telephone usage.
WorldPhone – Chapter 2. Operation
974 – Set diagnostics
Set diagnostics:
470
SIM
Off
On
Off
Ok
2.55
Configuration cont’d
Power conservation
Menu
Advanced functions: Configuration cont’d
Storing of Preferred/Allowed Net service provider
and Stand Alone operator on the SIM Card
Configuration cont’d
These functions allow you to store the preferred and allowed Net
service provider and preferred and allowed Stand Alone operator
for each satellite region on a SIM card. Note! The access level required to operate the functions depend on the SIM card supplier.
Preferred Net service provider
Menu
1
Press the Menu
function key and scroll
down to Advanced
functions:
Function menu
Precharge
009 Advanced functions
470
2
Press Selct or
right arrow and
scroll down to
Configuration:
470
Selct or right
arrow shows the
current Net and TNID
for the selected
satellite:
(TNID=Terrestrial
Network Identification Digits)
Remove deletes the
the Net entry.
SIM
470
SIM
Lock
Selct
Mail
Lock
Selct
Mail
975 – Set preferred Nets
AOR-W
001 AOR-E
POR
IOR
Region 4
Region 5
470 Region 6
Region 7
Quit
Quit
Selct
Quit
Selct
Ok
More information (preferred
Net for selected satellite)
975 – Set preferred Nets AOR–E
001 BT
CMC
Telenor
470
TNID:
TNID:
TNID:
SIM
Removes entry from list
2.56
Mail
97 – Configuration menu
Charge tone
005 Set preferred Nets
Set S/A preferred Nets
Selct or right arrow
opens the list of Set
preferred Net providers.
4
Lock
9 – Advanced functions menu
Satellite setup
007 Configuration
Information available
3 Selct or right
arrow selects the
Configuration menu:
Scroll down to Set
preferred Nets:
Scroll up/down to
wanted satellite:
SIM
00
09
44
Remov Edit
Ok
See next page
WorldPhone – Chapter 2. Operation
Advanced functions: Configuration cont’d
5
Edit opens list
of available Nets:
Edit
6
Scroll up/down
to wanted Net:
Selct enters new
default Net service
provider:
Net service
975 – SIM preferred
Nets providers
AOR–E
001 CMC
002 BTTNID: 00
TNID: 09
003 KDD
TNID: 44
004 Telenor
012 Station 12
001 BT
CMC
Telenor
470
SIM
: 45
: 00
: 53
: 44
: 07
Configuration cont’d
Menu
Selct
If the SIM card is not "restricted":
AOR-E preferred list (1)
5b Edit opens satellite
preferred list window:
Selct or right arrow
opens list of available
Nets.
Net provider: Telenor
Terrestrial network: 00
470
6b Scroll up/down
to wanted Net:
Selct enters new
default Net service
provider:
SIM
Selct
Net service
975 – SIM preferred
Nets providers
AOR–E
001 CMC
002 BTTNID: 00
TNID: 09
003 KDD
TNID: 44
004 Telenor
012 Station 12
001 BT
CMC
Telenor
470
SIM
Selct
Set S/A preferred Net (Stand Alone operator)
Repeat steps 3 through 6.
Set allowed Nets / Set S/A allowed Nets
Restricted to "CHV2" or higher, depending on Net service provider.
Repeat steps 3 through 6.
WorldPhone – Chapter 2. Operation
2.57
Menu
Advanced functions: Configuration cont’d
Charge tone
Configuration cont’d
When the charge tone function is enabled, a single frequency tone or
DTMF is transmitted once the call has been established. The tone
informs an external debiting system, f.ex. a pay phone (connected to
the TEL port), that charging can start.
Settings can only be made in owner level.
Setup:
Menu
1
Press the Menu
function key and scroll
down to Advanced
functions:
Function menu
Precharge
009 Advanced functions
9 – Advanced functions menu
Satellite setup
007 Configuration
Information available
2 Selct or right
arrow opens the
Configuration Menu:
3
Scroll down to Charge
tone, and press Selct or
right arrow to open the
Charge tone window:
470
Lock
Mail
Selct
Quit
Lock
Lock Mail
Mail Selct
Selct
Quit
97 – Configuration menu
Set diagnostics
009 Charge tone
470
SIM
979 – Charge tone
Tone type:
Single type
Frequency (Hz): 2400
Duration (ms): 1000
470
SIM
Setup Enab Disab Quit
4
Selecting Setup opens the
Charge tone setup window,
which allows setting the
required single frequency
Charge tone
tone or DTMF,
Tone type:
Single
and its duration
Frequency (Hz): 2400
Duration (ms): 1000
in milliseconds.
470
SIM
setup
type
Edit
Save
Key no. when
selecting DTMF.
Valid settings:
Frequency: 400 - 3400 Hz
Duration: 10 - 5000 ms
DTMF key: 0 - 15
Available tone types
Single tone
DTMF
Selct
Selct enters the chosen settings:
2.58
WorldPhone – Chapter 2. Operation
Information available
Advanced functions: Information available
Menu
General
Information available
The following information and facilities are provided:
• The IMN numbers assigned to the WorldPhone.
Access level must be set to "owner" or "CHV2" for editing of the
numbers on the telephone or SIM card respectively.
• Forward ID number which identifies your particular WorldPhone
and SIM card if installed.
• System version numbers of the internal software programs. See
next page.
• Restoring communication with the satellite when receiving the
alarm: Not available, see "Oscillator compensation" on next page.
(The function only appears when "Set diagnostics" is On).
• Network status information (only appears when "Set diagnostics"
is On, or the access level is set to "owner"), see next page.
IMN numbers
Menu
1
Press the Menu
function key and scroll
down to Advanced
functions:
009
Press Selct or
right arrow and continue
down to Information
008
available:
2
Selct or right
arrow opens the
Information
available window:
Function menu
Precharge
Advanced functions
9 – Advanced functions menu
Configuration
Information available
470
SIM
Lock
Mail
Selct
Quit
98 – Information available
001
002
007
009
3
Pressing Selct or
right arrow again
opens the IMN
numbers window:
470
SIM
Lock
Mail
See
next
page
Selct
Quit
981 – IMN numbers
Handset:
Phone:
Fax:
Data:
NIMS:
470
WorldPhone – Chapter 2. Operation
IMN numbers
Misc. version Id information
Oscillator compensation
Network status information
762420510
762424333
762445900
762430520
762445912
SIM
Ok
2.59
Menu
Advanced functions: Information available cont’d
98 – Information available
IMN numbers
002 Misc. version Id information
007 Oscillator compensation
009 Network status information
470
SIM
Lock
Mail
Selct
Quit
Information available cont’d
Misc. version ID information
4
Scroll down
and press Selct or
right arrow to open
Version information
window.
982 – Version information
001 Terminal forward Id
ABCDF
System version
Rel. 4. 3. 2
25 Aug 1998
470
SIM
Ok
Oscillator compensation
5
Scroll down and press
Selct or right arrow to
open Oscillator
compensation window:
Press Scan with the
antenna pointed towards
the satellite.
(Pointing is automatic on
Marine & Voyager antennas.
Will take 10-15 minutes.)
987 – Oscillator compensation AOR - E
Default compensation :
Field adjustment :
Current TDM offset :
Total compensation :
470
SIM
Scan Update Reset Ok
Possible oscillator offsets (IOR)
001 Offset:
0.180 kHz (Active NCSC)
SIM
If several choices, scroll 470
down to preferred frequency. Press Selct:
When Verification
succeeded is displayed,
press Save to update the
WorldPhone oscillator.
Not defined
0.000 kHz
Not available
--------Not available
Selct
Verification succeeded
The selected NCSC candidate seems to
be correct.
To accept this frequency and use it in
the future, press “Save”
470
SIM
Save
Network status
6
Scroll down and
press Selct or right
arrow for readout
of network data.
2.60
989 – Network status
1
2
3
4
5
Lk:00
Lk:00 Lk:00
Lk:00
Lk:00
Region registration:
Successful
Current ocean:
AOR-E
Active NCSC:
0
Active spot beam Id:
3
NSR
470
SIM
OReg
Cap
ChAdv P.Adv
WorldPhone – Chapter 2. Operation
Installation
Advanced functions: Installation
Menu
Paid functions
Only appears in owner level (non-SIM operation).
An enhanced WorldPhone function is activated by entering the
Menu
"Opening key" provided when purchased:
Press the Menu
function key
and scroll down
to Advanced
functions.
Function menu
Precharge
009 Advanced functions
9 – Advanced functions menu
Information available
009 Install
470
Lock
Mail
Selct
Quit
Selct
Quit
New
Ok
Installation
1
2
Selct or right
arrow opens
the Installation
menu window:
3
Pressing Selct
or right arrow again
opens the Paid
functions window:
The list only shows
purchased functions.
4
Pressing New
opens the Open new
paid functions window:
Enter the "Opening
key" and press Ok.
99 – Installation menu
001 Paid functions
Phone name setup
470
Lock
Mail
991 – Paid functions
001
002
003
004
005
006
470
007
008
009
010
011
012
Charge tone
Traffic log
Precharge
Restricted Net provider
Restricted dial
Secure voice
Access code
Data
Advanced service level
Fax
NIMS
Aero functions
991 – Open new paid functions
Code:
470
1234
Del
Ok
Phone name setup
Only appears in owner level (non-SIM operation).
Repeat steps 1 and 2
992 – Phone name setup
to open Phone name
Factory name: Nera
setup window:
Phone name: WorldPhone
Use Del to modify.
Del
ABC
470
Press ABC or abc to
enter uppercase/
lowercase letters as required.
Save stores the modified phone name.
WorldPhone – Chapter 2. Operation
abc
Save
2.61
Contents
Chapter 3. Telefax Service
TELEFAX SERVICE
Setting up ................................................................................... 3.1
Using telefax with the WorldPhone ............................................. 3.2
The design and specifications of the
equipment may be changed without notice.
WorldPhone – User’s Manual
Chapter 3. Telefax Service
Setting up
General
The WorldPhone provides access to a telefax service at a transmisson rate of 2.4 Kbps.
Limitations
The WorldPhone is fully compatible with the world’s leading telefax
machines and telefax software standards. However, transmission
may not be possible through some of the telefax machines available
on the market. Please check with your Net service provider before
purchasing a telefax for use with the WorldPhone.
Installation
Verify that the FAX port is configured for telefax service, see
"Advanced functions: Port configuration" in chapter 2. Operation.
6 7 8 9
ANT
5 4 3 2 1
6
DATA
1
TEL
6
FAX
10-32VDC
WorldPhone connector panel
1
Figure 3.1 Telefax communication with the WorldPhone.
WorldPhone – Chapter 3. Telefax Service
3.1
Setting up
Connect the telefax cable to the FAX port on the WorldPhone telephone unit. For wiring details, see appendix B – Connecting up
optional equipment.
Using telefax with the WorldPhone
Transmission
Telefax calls made by the WorldPhone are telefax only. Any telephone handset connected to the telefax machine is for dialing purposes only.
To send a fax, use the same dialing sequence as when making a call,
either through the default Net or a selected one.
See "Making a call" in chapter 2. Operation.
Note! On a telefax with keypad, enter
starting transmission.
as the last digit before
Using telefax with
the WorldPhone
Telefax transmissions normally take 1.5 minutes per standard text
page using standard resolution. Using superfine or halftone resolution
will double the transmission time. To save time, avoid using a separate cover page.
If a call failure should occur while sending a multi-page document, resend only the failed pages.
3.2
WorldPhone – Chapter 3. Telefax Service
Contents
Chapter 4. Data Service
DATA SERVICE
Setting up ................................................................................... 4.1
The design and specifications of the
equipment may be changed without notice.
WorldPhone – User’s Manual
Chapter 4. Data Service
Setting up
General
The WorldPhone provides access to asynchronous data services
through its built-in modem capability. The transmisson rate over the
satellite is 2.4 Kbps, and any standard PC with a serial port can be
used.
For configuration from the PC using AT commands, see appendix D.
Installation
Connect the RS-232 serial cable between the serial port on the PC
and the 9-pin DATA port on the WorldPhone telephone unit.
For configuration,
see chapter 2. Operation: "Data/printer port setup".
For wiring details,
see appendix B – Connecting up optional equipment,
or appendix D – DTE interface.
Setting up
6 7 8 9
ANT
5 4 3 2 1
6
DATA
1
TEL
6
FAX
10-32VDC
WorldPhone connector panel
1
PC serial port
Figure 4.1 The PC is connected to the DATA port.
WorldPhone – Chapter 4. Data Service
4.1
Setting up cont’d
Testing the installation
Use a PC terminal program.
Entering a command on the PC keyboard (f.ex. ATç) should
cause "OK" to be displayed on the screen.
Setting up cont’d
If there is no response, check that the baud rate setting is the same
both for the PC and the WorldPhone.
See chapter 2. Operation: "Data/printer port setup".
4.2
WorldPhone – Chapter 4. Data Service
Contents
Chapter 5. Appendices
Appendix A
Telephone country codes .......................................... A-1
Service address codes.............................................. A-5
Appendix B
Installation of Marine Antenna .................................. B-1
Installation of Voyager Antenna ................................ B-9
Installation of Provident Antenna ............................ B-16
Optional antenna cable ........................................... B-21
Connecting up optional equipment ......................... B-22
Appendix C (WorldPhone Portable/Provident only)
Battery charging ........................................................ C-1
Charger ..................................................................... C-2
Battery replacement .................................................. C-3
Appendix D
AT commands ........................................................... D-1
DTE interface .......................................................... D-17
Appendix E
Secure voice (option) ................................................ E-1
Aero functions (option) .............................................. E-2
Appendix F
Character map .......................................................... F-1
Appendix H
System description.................................................... H-1
Appendix I
Troubleshooting ..........................................................I-1
WorldPhone – User’s Manual
APPENDICES
Appendix G
List of terms .............................................................. G-1
Chapter 5. Appendices / Index Appendix
A
Telephone
country codes
Appendix A – Telephone country codes
Explanation with examples:
Mobile - to - fixed subscriber, telephone call
through default Net:
00 47 67244700 Call/
Automatic call prefix
Telephone country code
See list of telephone country
codes in this appendix.
Subscriber number
To send number
Mobile - to - fixed subscriber, telephone call
through selected Net service provider:
Selection of e.g. Net service
provider 004
4
00 47 67244700 Call/
Automatic call prefix
Telephone country code
See list of telephone country
codes in this appendix.
Subscriber number
To send number
Fixed/mobile - to - Mobile telephone call:
XX 871 765421392 Call/
Telephone satellite (Ocean Region) code:
871 – AOR-E
872 – POR
873 – IOR
874 – AOR-W
9-digit Inmarsat Mobile Number (IMN)
To send number
Note! Some Net service providers support the common Ocean Region
access no. 870, which connects the call to the dialed WorldPhone
regardless of the Ocean Region the user currently communicates through.
WorldPhone – Chapter 5. Appendices
A-1
Telephone country codes
International call prefix (normally 00)
Appendix A – Telephone country codes cont’d
Afghanistan (Islamic State of) ........................ 93
Cuba ............................................................... 53
Albania (Republic of) .................................... 355
Cyprus (Republic of) .................................... 357
Algeria (People’s Democratic Republic of) .... 21b1) Czech Republic ............................................ 420 c)
American Samoa ......................................... 684
Angola (Republic of) .................................... 244
Democratic People’s Republic of Korea ...... 850
Anguilla ............................................................ 1 a) Denmark ......................................................... 45
Antigua and Barbuda ....................................... 2 a) Diego Garda ................................................. 246
Argentine Republic ......................................... 54
Djibouti (Republic of) .................................... 253
Armenia (Republic of) .................................. 374 d) Dominican Republic ......................................... 1 a)
Aruba ............................................................ 297
Ascension ..................................................... 247
Ecuador ........................................................ 593
Atlantic Ocean East Region (AOR-E) (Inmarsat) ..... 871
Egypt (Arab Republic of) ................................ 20
Atlantic Ocean West Region (AOR-W) (Inmarsat) ... 874
El Salvador (Republic of) ............................. 503
Australia ......................................................... 61
Equatorial Guinea (Republic of) ................... 240
Australian External Territories ...................... 672
Eritrea ........................................................... 291
Austria ............................................................ 43
Estonia (Republic of) .................................... 372
Azerbaijani Republic .................................... 994
Ethiopia ........................................................ 251
Telephone country codes
Bahamas (Commonwealth of the) ................... 1 a)
Bahrain (State of) ......................................... 973
Bangladesh (People’s Republic of) .............. 380
Barbados .......................................................... 1 a)
Belarus (Republic of) ................................... 375 d)
Belgium .......................................................... 32
Belize ........................................................... 501
Benin (Republic of) ...................................... 223
Bermuda ........................................................... 1 a)
Bhutan (Kingdom of) .................................... 975
Bolivia (Republic of) ..................................... 591
Bosnia and Herzegovina (Republic of) ........ 387
Botswana (Republic of) ................................ 267
Brazil (Federative Republic of) ....................... 55
British Virgin Islands ........................................ 1 a)
Brunei Darussalam ...................................... 673
Bulgaria (Republic of) .................................. 859
Burkina Faso ................................................ 226
Burundi (Republic of) ................................... 257
Cambodia ..................................................... 355
Cameroon (Republic of) ............................... 237
Canada ............................................................ 1 a)
Cape Verde (Republic of) ............................ 238
Cayman Islands ............................................... 1 a)
Central African Republic .............................. 236
Chad (Republic of) ....................................... 235
Chile ............................................................... 56
China (People’s Republic of) ......................... 86 e)
Colombia (Republic of) .................................. 57
Comoros (Islamic Federal Republic of the) .. 269
Congo (Republic of the) ............................... 242
Cook Islands ................................................ 682
Costa Rica .................................................... 506
Croatia (Republic of) .................................... 385
A-2
Falkland Islands (Malvinas) ......................... 500
Faroe Islands (Denmark) ............................. 298
Fiji (Republic of) ........................................... 679
Finland ......................................................... 358
France ............................................................ 33 c)
French Poiynesia ........................................... 68
Gabonese Republic ..................................... 241
Gambia (Republic of the) ............................. 220
Georgia (Republic of) ....................................... 7 d)
Germany (Federal Republic of) ...................... 49
Ghana .......................................................... 233
Gibraltar ....................................................... 350
Greece ........................................................... 30
Greenland (Denmark) .................................. 299
Grenada ........................................................... 1 a)
Guadeloupe (French Department of) ........... 590
Guam ........................................................... 671
Guatemala (Republic of) .............................. 502
Guiana (French Department of) ................... 594
Guinea (Republic of) .................................... 224
Guinea-Bissau (Republic of) ........................ 245
Guyana ......................................................... 592
Haiti (Republic of) ........................................ 509
Honduras (Republic of) ................................ 504
Hongkong ..................................................... 852
Hungary (Republic of) .................................... 36
Iceland .......................................................... 354
India (Republic of) .......................................... 91
Indian Ocean Region (IOR)(Inmarsat) ......... 873
Indonesia (Republic of) .................................. 62
Iran (Islamic Republic of) ............................... 98
Iraq (Republic of) ......................................... 964
WorldPhone – Chapter 5. Appendices
Appendix A – Telephone country codes cont’d
Ireland .......................................................... 353
Israel (State of)............................................. 972
Italy ................................................................. 39
Ivory Cost (Republic of) ............................... 225
Jamaica ............................................................ 1 a)
Japan ............................................................. 81
Jordan (Hashemite Kingdom of) .................. 962
New Zealand .................................................. 64
Nicaragua...................................... ............... 505
Niger (Republic of the) ................................. 227
Nigeria (Federal Republic of) ....................... 234
Niue ........................................... .................. 683
Northern Mariana Islands (Commonwealth of the) .. 670
Norway ........................................................... 47
Oman (Sultanate of) ..................................... 968
Pacific Ocean Region (POR)(Inmarsat) ....... 872
Pakistan (Islamic Republic of) ....................... 92
Palau (Republic of) ...................................... 680
Panama (Republic of) .................................. 507
Papua New Guinea ............................... ...... 675
Paraguay (Republic of) ................................ 595
Peru ................................................................ 51
Philippines (Republic of the) .......................... 63
Poland (Republic of) ...................................... 48
Portugal ........................................................ 351
Lao People’s Democratic Republic .............. 856
Latvia (Republic of) ...................................... 371
Lebanon ....................................................... 961
Lesotho (Kingdom of) ................................... 266
Liberia (Republic of) ..................................... 231
Libya (Socialist People’s Ubyan Arab Jamahiriya) ... 21b2)
Liechtenstein (Principality of) ......................... 41 c) Qatar (State of) ............................................ 974
Lithuania (Republic of) ................................. 370
Luxembourg ................................................. 352
Reunion (French Department of) ................. 262
Romania ......................................................... 40
Macau .......................................................... 853
Russian Federation .......................................... 7 d)
Rwandese Republic ..................................... 250
Macedonia (the former Yugoslav Republic of) .. 389
Madagascar (Republic of) ............................ 261
Malawi .......................................................... 265
Saint Vincent and the Grenadines ................... 1 a)
Saint Luda ........................................................ 1 a)
Malaysia ......................................................... 60
Saint Kitts and Nevis ........................................ 1 a)
Maldives (Republic of) ................................. 960
Saint Helena ................................................ 290
Mali (Republic of) ......................................... 223
Saint Pierre and Miquelon (French Department of) . 508
Malta ............................................................ 356
San Marino (Republic of) ............................. 378
Marshall Islands (Republic of the) ....... ........ 692
Sao Tome and Principe (Democratic Repulic of) 239
Martinique (French Department of) .............. 596
Saudi Arabia (Kingdom of) ........................... 966
Mauritania (Islamic Republic of) ................... 222
Senegal (Republic of) .................................. 221
Mauritius (Republic of) ................................. 230
Seychelles (Republic of) .............................. 248
Mexico ............................................................ 52
Sierra Leone ................................................ 232
Micronesia (Federated States of) ................. 691
Singapore (Republic of) ................................. 65
Moldova (Republic of) .................................. 373
Monaco ........................................................ 377 c) Slovak Republic ........................................... 421 c)
Mongolia ....................................................... 976
Slovenia (Republic of) .................................. 386
Montserrat ........................................................ 1 a) Solomon Islands .......................................... 677
Morocco (Kingdom of) .................................... 21b3) Somali Democratic Republic ........................ 252
Mozambique (Republic of) ........................... 258
South Africa (Republic of) .............................. 27
Myanmar (Union of) ....................................... 95
Spain .............................................................. 34
Sri Lanka (Democratic Socialist Republic of) . 94
Namibia (Republic of) .................................. 264
Sudan (Republic of the) ............................... 249
Nauru (Republic of) ...................................... 674
Suriname (Republic of) ................................ 597
Nepal ............................................................ 977
Swaziland (Kingdom of) ............................... 268
Netherlands Antilles ..................................... 599
Sweden .......................................................... 46
Netherlands (Kingdom of the) ........................ 31
Switzerland (Confederation of) ...................... 41 c)
Syrian Arab Republic ................................... 963
New Caledonia ............................................. 687
WorldPhone – Chapter 5. Appendices
A-3
Telephone country codes
Kazakhstan (Republic of) ................................. 7 d)
Kenya (Republic of) ..................................... 254
Kiribati Republic of) ...................................... 686
Kuwait (State of) .......................................... 965
Kyrgyzstan (Republic of) .............................. 996 d)
Appendix A – Telephone country codes cont’d
Tajikistan (Republic of) .................................... 7 d)
Tanzania (United Republic of) ..................... 255
Thailand ......................................................... 66
Togolese Republic ....................................... 228
Tokelau ........................................................ 690
Tonga (Kingdom of) ..................................... 676
Trinidad and Tobago (Code actually used: +1) .. 296
Tunisia ............................................................ 21b4)
Turkey ............................................................ 90
Turkmenistan ............................................... 993 d)
Turks arid Caicos Islands ................................. 1 a)
Tuvalu .......................................................... 688
Uganda (Republic of) ................................... 256
Ukraine ......................................................... 380 d)
United Arab Emirates ................................... 971 h)
United States of America, + Puerto Rico, Virgin
Islands .............................................................. 1 a)
United Kingdom of Great Britain and Northern
Ireland ............................................................ 44
Uruguay (Eastern Republic of) ..................... 598
Uzbekistan (Republic of) .................................. 7 d)
Vanuatu (Republic of) .................................. 678
Vatican City State ........................................ 379
Venezuela (Republic of) ................................. 58
Viet Nam (Socialist Republic of) .................... 84
Wallis and Futuna ........................................ 681
Western Samoa (Independent State of) ...... 685
Yemen (Republic of) .................................... 967
Yugoslavia (Federal Republic of) ................. 381
Zaire (Republic of) ....................................... 243
Zambia (Republic of) .................................... 260
Zanzibar (Tanzania) ..................................... 259
Zimbabwe (Republic of) ............................... 263
Notes
a):
b1):
b2):
b3):
Telephone country codes
b4):
c):
d):
e):
h:)
Integrated numbering area.
Integrated numbering area with subdivisions: 213, 214 and 215 for Algeria.
Integrated numbering area with subdivisions: 218 and 219 for Libya.
Integrated numbering area with subdivisions: 210, 211, 212 (212 in service) for
Morocco.
Integrated numbering area with subdivisions: 216, 217 for Tunisia.
Integrated numbering plan.
Will form part of numbering zone 7.
Code 866 has been allocated to the province of Taiwan.
United Arab Emirates (U.A.E.) incl: Abu Dhabi, AJmna, Dubai, Fujeirah, Ras Al,
Khaimah, Sharjah, Umm al Oaiwain.
A-4
WorldPhone – Chapter 5. Appendices
Service address codes
Appendix A – Service address codes
Mail retrieval ................................................... 57
Maritime assistance ....................................... 39
Maritime enquiries .......................................... 31
Medical advice ............................................... 32
Medical assistance ......................................... 38
Meteorological reports ................................... 41
Collect call ...................................................... 35
Credit card call ............................................... 36
Commissioning tests ...................................... 92
Navigational hazards and warnings ............... 42
National operator ........................................... 13
National information service ........................... 14
Databases ...................................................... 70
Person-to-person call ..................................... 34
Faxmail ........................................................... 26
Ship position reports ...................................... 43
International outgoing operator ...................... 11
International information service .................... 12
Technical assistance (on network) ................. 33
Telephone call booking .................................. 17
Time and duration .......................................... 37
Time announcement ...................................... 50
Service address codes
Abbreviated dialing ........................................ 23
Access to maritime packet assembly/
disassembly ................................................... 20
Administration specialized use .................... 6(X)
Automatic ....................................................... 00
Automatic line test .......................................... 91
WorldPhone – Chapter 5. Appendices
A-5
Appendix B
Installation of Marine Antenna
Appendix B – Installation of Marine Antenna
Location of Antenna Unit
Avoid obstructions
The Antenna ideally requires a free line of sight in all directions above
an elevation angle of 5 degrees.
Any obstruction will cause blind sectors, and may result in degradation or even loss of communication with the satellite.
Degrading of the communication is only completely avoided by placing the antenna higher than any obstructions. This is often not feasible and a compromise must be made to reduce the number of blind
sectors.
The degree of communication degradation depends on the size of the
obstructions; the distance to them must therefore be considered.
Preferably, all obstructions within 3 m of the antenna should be
avoided. Obstructions less than 15 cm in diameter can be ignored
beyond this distance.
Installation of Antenna Unit on top of mast must be avoided.
Compass safe distance
For installation on Norwegian or British vessels, the Antenna Unit
should be located at a distance of at least 1.0 metre from the magnetic steering compass. Be aware that requirements may vary from
one country to another.
Installation of
Marine Antenna
Radiation precautions
Persons should not be near the antenna when transmitting for periods
of more than 1 hour per day.
MICROWAVE RADIATION !
NO ADMITTANCE WITHIN 1 M
WorldPhone – Chapter 5. Appendices
B-1
Appendix B – Installation of Marine Antenna cont’d
Avoid interference
The Antenna Unit should be separated as far as possible from other
communication and navigation antennas onboard such as Radar,
Satellite, HF/VHF/UHF, GPS antennas etc.. Preferably by 5 metres.
The Antenna Unit should be installed so that severe vibration and
shock are avoided. If installed on top of a pipe or signal/radar mast,
the mast must be supported by stays.
The equipment is supplied with gasket and a flange for mounting of
the Antenna Unit on top of a 42.4 mm outer diameter pipe.
Other installation bracket is optional.
Coax cable
A 12 metre coaxial cable type RG-223 (QRPM 911084-12000) is
supplied as standard.
For greater lengths, see "Optional antenna cable".
The coax cable should be secured by laying the cable in a tube and/
or by fastening the cable to avoid damage.
Telephone Unit (TPU) and Power Supply (PS)
The PS is provided with holes for mounting on desktop or bulkhead
with the TPU snapped on top of PS by fastening clips.
The TPU may be installed separately by using 3 metre extension
cables between PS and TPU:
• coaxial cable, QRPM 911087-3000
• DC cable, QRPM 911079-3000
Source of energy
Installation of Marine
Antenna cont’d
The equipment operates from 10 to 32 Volts DC from any 12V or 24V
battery.
Power supply for operation from 230 VAC may be supplied as an
option, QBMJ 101002.
Note!
B-2
The antenna has been delivered with 3 different types of radomes.
The latest version (type 3) is mounted as illustrated on page B-4.
The earlier versions (type 1 and 2) are mounted as shown on page
B-6. Be aware of the condensation drainage through the area around
the coax connector for these versions, see illustration.
WorldPhone – Chapter 5. Appendices
Coax cable
Appendix B – Installation of Marine Antenna cont’d
Connecting up
Radome
type 3
N-connector
Delivered
with approx.
50cm coax
cable for
connection
to antenna
N-connector
ADE
Above Deck Equipment
BDE
Below Deck Equipment
Antenna coax cable
Standard:
type RG223
Length 12 m.
For greater lenghts, see
“Optional antenna cable”.
RF cable to/from
WorldPhone
QRPM 911081-0150
Length: 15 cm
Power
Supply
PS
Power cable type
QRPM 911080-2000
10 - 32V DC
Power cable to WorldPhone
QRPM 911079-0150
Length: 15 cm
NB! Polarity dependent:
The positive lead is tagged.
(The NEGATIVE pole is connected
to the CENTRE PIN of the 3-pin plug.)
Fuse: 15 A slow blow
WorldPhone – Chapter 5. Appendices
B-3
Installation of Marine
Antenna cont’d
WorldPhone
Telephone Unit
TPU
Appendix B – Installation of Marine Antenna cont’d
Mounting the Antenna Unit with radome type 3
Procedure:
Thread coax cable through
sockets and tube prior to
final assembling and
installing Antenna Unit
Radome
type 3
Apply silicone
compound
Note!
Condensation
drainage.
Do not cover!
Gasket
Hexagon
screws/
washers (6)
Mounting flange
Lock screw (2)
Use 6 mm
unbrako key
Mounting flange dimensions:
72
Installation of Marine
Antenna cont’d
Dia 7
85.5
55
Tube (option)
Outer dia 42.4
DIMENSIONS IN MILLIMETRES
B-4
WorldPhone – Chapter 5. Appendices
Appendix B – Installation of Marine Antenna cont’d
Mounting the radome top of radome type 3
1 Place gasket on
radome base.
2 Lower radome top
down onto the base
with alignment mark
across for alignment
area on the base.
Radome top
3 Turn radome top
approx 30° clockwise
until the snap function
locks.
Alignment mark
Locking screw
Alignment area
WorldPhone – Chapter 5. Appendices
Snap lock function
Radome base
B-5
Installation of Marine
Antenna cont’d
Gasket
Appendix B – Installation of Marine Antenna cont’d
Mounting the Antenna Unit with radome type 1 and 2
Mounting:
Thread coax cable through
sockets and tube prior to
final assembling and
installing Antenna Unit
Radome
type 1 and 2
Sealed inside
with O-ring
Note!
Condensation
drainage.
Do not cover
this area!
Gasket
Hexagon
screws/
washers (6)
Mounting flange
Lock screw (2)
Use 6 mm
unbrako key
Mounting flange dimensions:
72
Installation of Marine
Antenna cont’d
Dia 7
85.5
55
Tube (option)
Outer dia 42.4
DIMENSIONS IN MILLIMETRES
B-6
WorldPhone – Chapter 5. Appendices
Appendix B – Installation of Marine Antenna cont’d
Mounting the Power Supply
230 mm
10 mm
Dia 10 mm
4.5 mm
198 mm
Standard tripod mount
Dia 4.5 mm
160 mm
Dia 4.5 mm
174 mm
Installation of Marine
Antenna cont’d
Underside view
WorldPhone – Chapter 5. Appendices
B-7
Appendix B – Installation of Marine Antenna cont’d
Outline dimensions
297
251
Antenna Unit
QUFF 911980
(antenna only)
Weight: 3.8 kg
Telephone Unit (TPU)
QUFC 911936
Weight: 1.0 kg
44
190
235
38
Power Supply (PS)
QUFC 911932
Installation of Marine
Antenna cont’d
Weight: 1.6 kg
Optional 230 VAC power
supply w/AC and DC cables
connected.
QBMJ 101002
Weight: 0.65 kg
B-8
198
230
52
168
100
WorldPhone – Chapter 5. Appendices
Installation of Voyager Antenna
Appendix B – Installation of Voyager Antenna
Antenna Unit
The Antenna Unit should be installed so that severe vibration and
shock are avoided.
The equipment is supplied with a magnetic mounting bracket for
installation on cars with magnetic-holding roof top.
Mounting option:
Load Carrier Base Assembly for installation on cars with nonmagnetic roof material, or for installation on trains.
See illustration on next page.
Coax cable
A 5 metre coaxial cable type GO2232D (QRPM 911086-5000) is
supplied as standard.
For greater lengths, see "Optional antenna cable".
Telephone Unit (TPU) and Power Supply (PS)
The PS is provided with holes for mounting on wall or dash board with
the TPU snapped on top of PS by fastening clips. A tripod mount
allows the unit to be mounted on the optional suction adapter.
The TPU may be installed separately by using 3 metre extension
cables between PS and TPU:
• coaxial cable, QRPM 911087-3000
• DC cable, QRPM 911079-3000
The equipment operates from 10 to 32 Volts DC from any 12V or 24V
battery.
WorldPhone – Chapter 5. Appendices
B-9
Installation of Voyager
Antenna
Source of energy
Coax cable
Appendix B – Installation of Voyager Antenna cont’d
Connecting up
ODE
Outdoor Equipment
IDE
Indoor Equipment
Antenna coax cable
Standard:
type GO2232D
Length 5 m.
Installation of Voyager
Antenna cont’d
WorldPhone
Telephone Unit
TPU
RF cable to/from
WorldPhone
QRPM 911081-0150
Length: 15 cm
Power
Supply
PS
Power cable to WorldPhone
QRPM 911079-0150
Length: 15 cm
Power cable type
QRPM 911080-2000
10-32V DC
NB! Polarity dependent:
The positive lead is tagged.
(The NEGATIVE pole is connected
to the CENTRE PIN of the 3-pin plug.)
Fuse: 15 A slow blow
B-10
WorldPhone – Chapter 5. Appendices
Appendix B – Installation of Voyager Antenna cont’d
Mounting on magnetic-holding surface
The Antenna Unit may be attached to the roof top with a magnetic plate inside
the antenna mounting bracket. On a flat, clean metal surface the antenna will
stay in place at highway speeds up to 150 km/hour.
Note! A protection plate is supplied to keep the magnetic plate clean during
shipment of the equipment. Remove the protection plate from the magnetic plate
prior to attaching the Antenna Unit.
See "Assembling the Antenna Unit for magnetic mount".
The antenna may be loosened by carefully bending a screwdriver as indicated.
Mounting on load carrier
The Antenna Unit may also be attached to the roof using load carrier as indicated. See "Assembling the Antenna Unit for load carrier mount".
Antenna Unit
mounted on
load carrier
Installation of Voyager
Antenna cont’d
Antenna Unit
attached with
magnetic plate
Power cable
with 10A fuse
Antenna coax cable
WorldPhone – Chapter 5. Appendices
Telephone Unit &
Power Supply
B-11
Appendix B – Installation of Voyager Antenna cont’d
Assembling the Antenna Unit for magnetic mount
While holding the
base plate in
place, lower the
magnetic plate
down and mount
the four hexagon
screws with
washers.
3
While holding
the base plate
in place, mount
the antenna
coax plug.
2
Lower the base
plate down onto
the antenna with
the mounting
holes positioned
across for the
screw holes.
Installation of Voyager
Antenna cont’d
4
1
B-12
Note!
Remove the protection plate
from the magnetic plate prior
to attaching the Antenna Unit.
The protection plate is
supplied to keep the magnetic
plate clean during shipment
of the equipment.
Place the antenna upside
down on a stable surface.
WorldPhone – Chapter 5. Appendices
Appendix B – Installation of Voyager Antenna cont’d
4
While holding the
base plate in
place, lower the
bracket down and
mount the four
hexagon screws
with washers.
3
While holding
the base plate
in place, mount
the antenna
coax plug.
2
Lower the base
plate down onto
the antenna with
the mounting
holes positioned
across for the
screw holes.
1
Installation of Voyager
Antenna cont’d
Assembling the Antenna Unit for load carrier mount
Place the antenna upside
down on a stable surface.
WorldPhone – Chapter 5. Appendices
B-13
Appendix B – Installation of Voyager Antenna cont’d
Mounting the Power Supply
230 mm
10 mm
Dia 10 mm
4.5 mm
198 mm
Standard tripod mount
Dia 4.5 mm
160 mm
Dia 4.5 mm
174 mm
Underside view
Outline dimensions
Power Supply
QUFC 911932
38
Installation of Voyager
Antenna cont’d
Weight: 1.6 kg
198
230
B-14
WorldPhone – Chapter 5. Appendices
Appendix B – Installation of Voyager Antenna cont’d
Outline dimensions
Telephone Unit
QUFC 911936
44
Weight: 1.0 kg
190
235
27
5
14
Antenna Unit
QUFF 911905
0
Weight: 3.0 kg
35
0
0
23
Load carrier mount (option)
QSXA 811990
46
37
Installation of Voyager
Antenna cont’d
35
1
4
WorldPhone – Chapter 5. Appendices
B-15
Installation of Provident Antenna
Appendix B – Installation of Provident Antenna
Satellite search
Before mounting the WorldPhone Provident antenna, look up the
relative position of the satellite, see coverage map in appendix H –
System description.
The antenna must be pointed at the satellite with free line of sight for
optimum receiving and transmitting conditions. The beam is perpendicular to the antenna.
When during adjustment of the antenna a satellite signal is received,
a short tone will sound. If it is an Inmarsat satellite, a continuous tone
will sound with varying frequency. When closing in on a satellite,
turning the antenna horizontally and adjusting its vertical angle, the
tone should increase in frequency.
See setup procedure for WorldPhone Portable in chapter 1. Getting
Started.
Coax cable
A 10 metre coaxial cable type RG-223 (QRPM 911091-10000) is
supplied as standard.
For greater lengths, see "Optional antenna cable".
A bracket is available with N-connector receptacle for connection of
extended antenna cable, see "Optional bracket".
Source of energy
Installation of
Provident Antenna
The equipment operates from 10 to 32 Volts DC from any 12V or 24V
battery, using the 2 m DC power cable, QRPM 911080-2000. The
positive lead of the power cable is tagged.
An adapter is included for operation from 90-264 VAC, QBMA 901001
(1.8 m mains cable).
A 2 m car lighter cable can also be supplied, QRPM 911090.
The TPU is delivered with an internal rechargeable battery pack, see
"Internal battery" in chapter 1. Getting Started.
B-16
WorldPhone – Chapter 5. Appendices
Appendix B – Installation of Provident Antenna cont’d
Connecting up
ODE
Outdoor Equipment
IDE
Indoor Equipment
Antenna coax cable
Standard:
QRPM 911091
Length 10 m.
WorldPhone
Telephone Unit
TPU
C
15
VD
Installation of Provident
Antenna cont’d
90-264 VAC Adapter
QBMA 901001
Car lighter cable
QRPM 911062
(option)
Power cable type
QRPM 911080-2000
10-32V DC
NB! Polarity dependent:
The positive lead is tagged.
(The NEGATIVE pole is connected
to the CENTRE PIN of the plug.)
Fuse: 15 A slow blow
WorldPhone – Chapter 5. Appendices
B-17
Appendix B – Installation of Provident Antenna cont’d
Mounting the Antenna Unit
Adjustment screws
(90 degree range)
U-bolt
Mast bracket
Coax connector
RF transceiver
Installation of Provident
Antenna cont’d
Max dia 120 mm
B-18
WorldPhone – Chapter 5. Appendices
Appendix B – Installation of Provident Antenna cont’d
Optional bracket
Fastened
using
existing
hexagon
screws
Rear side of antenna
Coax connector
N-connector
(female)
N-connector
(male)
Optional antenna cable
Installation of Provident
Antenna cont’d
N-connectors
“Pigtail” QRPM 911059.1000
WorldPhone – Chapter 5. Appendices
B-19
Appendix B – Installation of Provident Antenna cont’d
Outline dimensions
Telephone Unit
QUFC 911936
44
Weight: 1.0 kg
190
235
521
Antenna Unit
QUFC 911906
521
Installation of Provident
Antenna cont’d
Weight: 3.0 kg
(antenna only)
B-20
WorldPhone – Chapter 5. Appendices
Optional antenna cable
Appendix B – Optional antenna cable
General
Double screen 50 Ω coaxial cable must be used for connection between the TPU and the various Antenna Units.
The coax cable should be secured by laying the cable in a tube and/
or by fastening the cable to avoid damage.
A "pigtail" is normally required for connection to the TPU.
The maximum length of the coax cable is limited by the DC and RF
loss through the cable:
Maximum DC loss: R loop 0.6 ohm
Maximum RF attenuation at 1525-1660 MHz: < 10 dB
The table below lists suitable double screened coax cables:
Suitable coaxial connectors
max. length
for 10 dB/0.6
at the TPU
at the antenna
10.8 mm
25 m
11N-50-7-5
+ “pigtail”
11N-50-7-5
S 10172 B-10
(QTZC 502 012
12.9 mm
75 m
11N-50-10-4
+ “pigtail”
11N-50-10-4
RF 1/2” 50
16.0 mm
95 m
11N-50-12-115 11N-50-12-115
+ “pigtail”
RF 7/8” 50
27.5 mm
172 m
11N-50-23-101 11N-50-23-101
+ “pigtail”
*Antenna cable
RG214
Reference
MIL-C-17
N/female
Diameter
N/male
*Antenna cable
N/male
Pigtail QRPM 911059-1000
at the TPU
at the antenna
The following cable extensions are delivered with coax connectors
mounted:
10 m cable
QRPM 911091-10000
28 m cable
QRPM 911057-28000
80 m cable
QRPM 911058-80000
WorldPhone – Chapter 5. Appendices
B-21
Optional antenna cable
Ready-made cables
Connecting up optional equipment
1
5 4 3 2 1
6
6 7 8 9
ANT
6
DATA
1
TEL
Telephone
Unit, TPU
FAX
10-32VDC
Appendix B – Connecting up optional equipment
TELEFAX
TELEPHONE
TEL
1
NOT USED
6
TEL-1A LINE (YELLOW)
TEL-1B LINE (RED)
NOT USED
1 2
3
4
5
6
PC
Connecting up optional
equipment
CD (109)
RXD (104)
TXD (103)
DTR (108)
GND (102)
DSR (107)
RTS (105)
CTS (106)
RI (125)
B-22
DATA
1
2
3
4
5
6
7
8
9
WorldPhone – Chapter 5. Appendices
Appendix C (WorldPhone Portable/Provident
only)
Battery charging
Appendix C – Battery charging
(WorldPhone Portable/Provident only)
Handling
A new battery, or a battery that has not been used for a long time, will
require 2 - 3 charge/discharge cycles to achieve its maximum performance with normal use of the WorldPhone.
To discharge the battery use the phone until it shuts down.
Avoid charging a fully charged or nearly charged battery.
Never leave the battery in hot sunlight. Extreme temperatures may
cause permanent reduction of the battery capacity.
Charging
The charging starts automatically once the universal AC adapter or
the car lighter cable is connected to the power source, and terminates
automatically when the battery is fully charged.
Note! When running the WorldPhone on the universal adapter alone (no
battery installed), the battery symbol in the display is replaced by "DC".
Calibration
To ensure correct monitoring of the battery state, it must be fully
discharged before charging the battery pack for the first time.
Polarity
independent
5 4 3 2 1
6
6 7 8 9
ANT
1
DATA
6
TEL
1
FAX
10-32VDC
Internal power: NiMh rechargeable battery pack
Motor must be running to achieve
full charge of the battery pack
90 - 264 V AC
Battery charging
External power/charging
15 V DC
Universal AC Adapter
QBMA 101001-2
Car lighter cable
QRPM 911062
(option)
WorldPhone – Chapter 5. Appendices
C-1
Charger
Appendix C – Battery charging cont’d
Charger
The WorldPhone Charger allows separate charging of a single battery
pack.
Operation:
1
The indicator lights green when connecting the charger to the
power source without battery inserted.
No light indicates that power is not supplied to the charger: check
cables.
2
When inserting a battery that is not fully charged, red light indicates that charging takes place.
3
Green light indicates that the battery is fully charged. A fully discharged battery is charged in approximately 3 hours.
Note!
The battery may be stored or transported in the charger without any
risk of drainage apart from self-discharge.
WorldPhone battery pack
QSXK 911944-2
Indicator
WorldPhone Charger
QUFC 911943
(option)
Motor must be running to achieve
full charge of the battery pack
Battery charging cont’d
Polarity
independent
90 - 264 V AC
15 V DC
Universal AC Adapter
QBMA 101001-2
Car lighter cable
QRPM 911062
(option)
C-2
WorldPhone – Chapter 5. Appendices
Battery replacement
Appendix C – Battery replacement
(WorldPhone Portable/Provident only)
Slide back lock to release battery pack
Battery replacement
Battery pack
QSXK 911944-2
WorldPhone – Chapter 5. Appendices
C-3
Appendix D
AT commands
Appendix D – AT commands
General
The AT command set allows you to configure the WorldPhone ASD
function directly from your PC keyboard. The AT characters are a
prefix to the commands you issue to the WorldPhone’s ASD service.
Most communication applications do not require knowledge of AT
commands.
Every time you type AT, you are essentially asking for the
WorldPhone ASD’s ATtention. For instance, if you want to answer an
incoming data call, you would type ATA to answer: ATAç
When a value associated with a command is not entered, it is assumed to be 0, f.ex.: AT&D equals AT&D0.
Hanging up – escape sequence
Once the the WorldPhone ASD is online to another system, the only
command it recognises is an escape code that contains three typed
pluses, (+) which forces the WorldPhone ASD back to command
mode.
The following should be done, when issuing the escape command:
• Wait one second after sending the last item of data.
• Type +++ with less than one second between the characters.
• Wait one second, an "OK" response should appear.
Do not type the AT prefix or Carriage Return. The guard time of one
second before and after the code prevents the WorldPhone ASD from
misinterpreting the occurrence of +++ in the transmitted data stream.
• In response to +++, the WorldPhone ASD returns to command
mode.
• To hang up, key ATHç
• To return to online mode, key ATOç
WorldPhone – Chapter 5. Appendices
D-1
AT commands
If necessary, the character used in the escape code or the duration of
the guard time can be changed by altering Register S2 or S12,
see S-register commands.
Appendix D – AT commands cont’d
Operating modes
The WorldPhone ASD function may operate in three modes:
• Command mode
The WorldPhone ASD responds to AT commands. No remote
communication occurs.
• Online command mode
A data call is taking place and an escape sequence has been
initiated, after which the WorldPhone ASD will respond to AT
commands during the call.
AT commands cont’d
• Online data mode
Once the WorldPhone ASD is connected up, anything arriving from
the PC is interpreted as data and sent to the remote end and vice
versa.
D-2
WorldPhone – Chapter 5. Appendices
Appendix D – AT commands cont’d
Basic AT commands
Note! AT commands may be entered in either upper or lower case
(not mixed).
AT A ç
instructs the WorldPhone ASD to connect the line and
start the answer sequence of the incoming call. Used
when not configured for auto answer.
AT D 00 47 67 24 47 00 ç
instructs the WorldPhone ASD to dial the number
00 47 67 24 47 00 via the default Net service provider.
AT D 4* 00 47 67 24 47 00 ç
instructs the WorldPhone ASD to dial the number
00 47 67 24 47 00 via the selected Net service provider,
e.g. Telenor (Norwegian Telecom, code no.4).
AT D 23 11 ç dials the telephone number stored
under short number 11.
AT E[n] ç
sets local echo of keyboard commands on/off:
Default
AT E0 ç turns local echo OFF.
AT E1 ç turns local echo ON.
AT H ç
AT H ç sets the WorldPhone ASD ON-hook
when in Online Data Mode. Disconnects the line and
terminates the call.
AT O ç
returns to Online Data Mode when in Online Command
Mode during a data call.
WorldPhone – Chapter 5. Appendices
D-3
AT commands cont’d
hook control:
Appendix D – AT commands cont’d
AT Q[n] ç
sets responses sent by the WorldPhone ASD:
Default
AT Q0 ç : the WorldPhone ASD returns
responses like OK or ERROR.
AT Q1 ç : the WorldPhone ASD does not
return responses.
AT S
sets and displays S register values. See "S-Register
Commands".
AT V[n] ç
sets the WorldPhone ASD response format to words or
numbers:
Default
AT V0 ç selects numeric response.
AT V1 ç selects verbal response.
AT X[n] ç
selects CONNECT result code format
(dial tone detection – busy detection):
AT X0 ç
basic message set: OK, CONNECT, RING, NO CARRIER, ERROR.
AT X1 ç
basic message set extended with CONNECT xxxx-yyyy.
AT X2 ç
AT commands cont’d
basic message set extended with NO DIALTONE.
AT X3 ç
basic message set extended with BUSY.
Default
AT X4 ç
basic message set extended with all of the above.
D-4
WorldPhone – Chapter 5. Appendices
Appendix D – AT commands cont’d
AT Z ç
resets the WorldPhone ASD configuration to last saved
command. Also clears the call if used when in Online
Command Mode.
repeats last command.
Re-executes the last AT command string issued to
the WorldPhone ASD, including redialing a telephone
number.
AT commands cont’d
A/
WorldPhone – Chapter 5. Appendices
D-5
Appendix D – AT commands cont’d
Extended AT commands
AT & C[n] ç
determines the Data Carrier Detect (DCD) behaviour:
Default
AT & C0 ç sets DCD always ON.
AT & C1 ç sets DCD, only when connected.
AT & D[n] ç
selects the Data Terminal Ready (DTR) behaviour:
AT & D0 ç the WorldPhone ASD ignores
DTR.
AT & D1 ç the WorldPhone ASD enters
Online Command Mode when DTR goes inactive.
Default
AT & D2 ç the WorldPhone ASD clears call
when DTR goes inactive.
AT & F ç
resets the WorldPhone ASD to factory default. The
factory default is not saved as with the AT&W command,
so ATZ revokes to last saved values.
AT & S[n] ç
selects the Data Set Ready (DSR) behaviour:
Default
AT & S0 ç sets DSR permanently ON.
AT & S1 ç sets DSR ON when satellite link
is established.
AT commands cont’d
AT & V ç
displays stored configuration profile.
AT & W ç
saves active configuration profile.
(May be recalled using AT Z ç).
D-6
WorldPhone – Chapter 5. Appendices
Appendix D – AT commands cont’d
Extended AT+I, +G and +W commands
The extended AT+I, AT+G and AT+W commands are non-standard
features some of which are designed specially for the Inmarsat
Mini-M system.
AT +GCAP ç
displays capabilities supported by WorldPhone terminals.
AT +GMI ç
displays manufacturer identification.
AT +GMM ç
displays equipment identification.
AT +GMR ç
displays software revision.
AT +ICF =[n<format>] [,m<parity>] ç
specifies the local serial port start-stop (asynchronous)
character framing between the PC and the WorldPhone.
AT +ICF ? ç
displays current settings.
AT +ICF =? ç
Default
AT commands cont’d
displays available settings.
Format reference number n :
1 = 8 data bits, 2 stop bits
3 = 8 data bits, 1 stop bit
4 = 7 data bits, 2 stop bits
5 = 7 data bits, 1 parity bit, 1 stop bit
WorldPhone – Chapter 5. Appendices
D-7
Appendix D – AT commands cont’d
Default
Parity reference number m :
0 = odd
1 = even
2 = mark
3 = space
Example:
AT +ICF =3,3 ç
specifies a data format of 8 data bits,1 stop bit and space
parity.
AT +IFC =[n<WP-to-PC>] [,m<PC-to-WP>] ; ç
specifies the local flow control between the PC and the
WorldPhone.
AT +IFC ? ç
displays current settings.
AT +IFC =? ç
displays available settings.
AT commands cont’d
Default
Default
WorldPhone - to - PC, reference number n :
0 = no flow control
1 = XON/XOFF (software flow control stripped of control
characters.)
2 = RTS (hardware flow control)
3 = XON/XOFF (software flow control with pass-through
of control characters.)
PC - to - WorldPhone, reference number m :
0 = no flow control
1 = XON/XOFF (software flow control)
2 = CTS (hardware flow control)
AT +IPR =[r(PC-to-WP rate)] ç
specifies the data rate at which PC - WorldPhone interface accepts commands.
D-8
WorldPhone – Chapter 5. Appendices
Appendix D – AT commands cont’d
AT +IPR ? ç
displays current settings.
AT +IPR =? ç
displays available settings.
Selectable data rates, r :
1200 bps
2400 bps
4800 bps
9600 bps
19200 bps
38400 bps
Example:
AT +IPR =9600 ç
specifies a data rate of 9600 bps between the PC and the
WorldPhone telephone unit.
AT +W ç
indicates which PCCA standard the WorldPhone ASD
complies with.
AT +WKSIZE =[n] ç
sets the maximum ARQ window size for subsequent data
calls using ARQ mode. The ARQ window determines the
size of the buffer that keeps in memory data not yet
acknowledged by the other end.
AT +WKSIZE ? ç
AT commands cont’d
displays current settings.
AT +WKSIZE =? ç
displays available settings.
Valid value of n = 1 - 63
Default
WorldPhone :
WorldPhone – Chapter 5. Appendices
n = 15
D-9
Appendix D – AT commands cont’d
AT +WINMARSAT ç
lists Inmarsat specific functions supported by the WorldPhone ASD.
AT +WLES =[n] ç
selects the Net service provider for the next outgoing call.
The parameter nnn specifies the Net service provider
Access Code. Three digits must be keyed in. If omitted,
the default Net service provider set from the WorldPhone
is selected.
Range = 0 - 255
nnn = 000, default Net service provider.
AT +WNERAHSHAKE =[n] ç
Default
selects handshake setup.
n = 1 fills the WorldPhone buffer before handshaking with
the Net service provider.
n = 0 routes handshake transitions from the PC directly to
the Net service provider. Minimizes transmission
delays when handshake is used seldom.
AT +WRATE =[<sat_rate>] [,<ter_rate>] ç
AT commands cont’d
sets the wanted satellite data rate, and the terrestrial data
rate used for outgoing data calls.
AT +WRATE ? ç
displays selected rates.
AT +WRATE =? ç
displays available rates.
Sat_rate, i.e. requested data rate to use over satellite
channel, for WorldPhone permanently set to:
2400 bps
D-10
WorldPhone – Chapter 5. Appendices
Appendix D – AT commands cont’d
Default
Ter_rate, i.e. data rate to use on terrestrial modem:
1200 bps
2400 bps
4800 bps
9600 bps
14400 bps
Example:
AT +WRATE =2400,2400 ç
sets both the satellite rate and the terrestrial modem rate
to 2400 bps.
AT +WRTL =[<low>] [,<high>] ç sets the lower
and upper threshold level in bytes of the buffer used in the
Net service provider-to-WorldPhone direction
(WorldPhone receive buffer).
AT +WRTL ? ç
displays selected threshold levels.
AT WRTL =? ç
displays available threshold levels.
The high parameter specifies the upper threshold at
which point the WorldPhone ASD should issue an RNR
(Receiver Not Ready) packet signalling that it is not ready
to receive any more data from Net service provider:
Valid value: 1-512
Default value: 240
Note! The high value must be larger than the low value.
When the high value is omitted, it becomes low value +
120.
WorldPhone – Chapter 5. Appendices
D-11
AT commands cont’d
The low parameter specifies the lower threshold at which
point the WorldPhone ASD should issue an RR (Receiver
Ready) packet signalling that it is ready to receive data
from Net service provider:
Valid value: 0-511
Default value: 120
Appendix D – AT commands cont’d
AT +WS45 =[n] ç
sets the requested satellite and terrestrial error correction
scheme for data calls.
AT +WS45 ? ç
displays current setting.
AT WS45 =? ç
displays available setting.
Parameter reference number
Default
n:
Sat. err.corr. Terr. err.corr.
End-to-end
0
non-ARQ
non-V.42
NARQ
1
ARQ
V.42
ARQ
200
non-ARQ
V.42
NARQ
201
ARQ
non-V.42
NARQ
AT +WS46 ? ç
shows that the Inmarsat Mini-M ASD standard is to be
used for data communication. This is fixed and may not
be changed.
AT +WTNID =[<nnn>] ç sets the terrestrial
network for the next outgoing data call.
AT commands cont’d
AT +WTNID ? ç
displays selected TNID.
AT +WTNID =? ç
displays available TNIDs.
The parameter nnn specifies the terrestrial network ID. If
omitted, it is set to 000.
Range = 0 - 255
nnn = 000, terrestrial network unspecified.
D-12
WorldPhone – Chapter 5. Appendices
Appendix D – AT commands cont’d
AT +WTTL =[<low>] [,<high>] ç sets the lower
and upper threshold level in bytes of the buffer used in the
WORLDPHONE-to-Net service provider direction
(WorldPhone transmit buffer).
AT +WTTL ? ç
displays selected threshold levels.
AT WTTL =? ç
displays available threshold levels.
The low parameter specifies the lower threshold at which
point the WorldPhone ASD should issue an XON, or raise
the CTS line signalling that it is ready to receive data from
the PC:
Valid value: 0-511
Default value: 120
The high parameter specifies the upper threshold at
which point the WorldPhone ASD should issue an an
XOFF, or lower the CTS line signalling that it is not ready
to receive data from the PC:
Valid value: 1-512
Default value: 240
Note! The high value must be larger than the low value.
When the high value is omitted, it becomes low value +
120.
AT +WXR =[n] ç
determines the format of a CONNECT response from the
WorldPhone ASD.
AT commands cont’d
AT +WXR ? ç
displays selected format.
AT +WXR =? ç
displays available formats.
Format reference number n :
0 = CONNECT <see below* >
WorldPhone – Chapter 5. Appendices
D-13
Appendix D – AT commands cont’d
Default
1 = +WXSR:<satellite rate>,<ARQ I NARQ>
+WXTR:<terrestrial rate>,<ARQ I NARQ>
+WXKR:<ARQ window size>
CONNECT <PC-WP rate>
2 = CONNECT <see below* >,<ARQ I NARQ>
3 = CONNECT <ARQ I NARQ>
* The lowest value of PC-WP rate, satellite rate and
AT commands cont’d
terrestrial rate.
D-14
WorldPhone – Chapter 5. Appendices
Appendix D – AT commands cont’d
S-Register commands
S-registers are special memory locations in the WorldPhone for
storing specific configuration and operating parameters.
AT S0 =[n] ç
specifies automatic answer at the nth ring.
0=OFF, 1-255=ON.
AT S0 =<n> ç
sets value of register.
AT S0 ? ç
displays current value of register.
Default
AT S0 =0 ç turns automatic answer OFF.
AT S0 =1 ç answers after 1 ring.
the WorldPhone ASD will terminate incoming calls
after 95 secs.
AT S2 =[n] ç
stores the ASCII decimal code for the escape character.
Authorized codes within: 0 to 255.
n≥128 disables the escape sequence.
AT S2 =<n> ç
sets value of register.
AT S2 ? ç
displays current value of register.
Default
AT S2 =43 ç sets the ESCAPE code to
AT commands cont’d
43 (+-key).
AT S3 = [n] ç
stores the ASCII decimal code for the carriage return
character. Authorized codes within: 0 to 127.
AT S3 =<n> ç
sets value of register.
AT S3 ? ç
displays current value of register.
WorldPhone – Chapter 5. Appendices
D-15
Appendix D – AT commands cont’d
Default
AT S3 =13 ç sets the CARRIAGE
RETURN code to 13 (ç -key).
AT S4 =[n] ç
stores the ASCII decimal code for the line feed character.
Authorized codes: 0 to 127.
AT S4 =<n> ç
sets value of register.
AT S4 ? ç
displays current value of register.
Default
AT S4 =10 ç sets the LINE FEED code
to 10.
AT S5 =[n] ç
stores the ASCII decimal code for the editing character.
Authorized codes: 0 to 127.
AT S5 =<n> ç
sets value of register.
AT S5 ? ç
displays current value of register.
Default
AT S5 =8 ç sets the BACK SPACE code
to 8.
AT S25 =[n] ç
AT commands cont’d
sets delay before examining DTR (108/2) after dialing and
when online with a WorldPhone-to-Net call.
Range: 0-255 hundredths of a second.
AT S25 =<n> ç
sets delay value.
AT S25 ? ; ç
displays current delay value.
Default
AT S25 =5 ç sets delay to 5 (corresponding to 50 milliseconds).
D-16
WorldPhone – Chapter 5. Appendices
DTE interface
Appendix D – DTE interface
Pin assignments
Pin
Mnenumber monic
CCITT Signal
circuit source
Circuit DIN
Description
1
CD
109
DCE
Carrier detect
2
RXD
BB
D1
104
DTE
Received Data
3
TXD
BA
D2
103
DCE
Transmitted Data
4
DTR
108
DTE
Data terminal ready
5
GND
102
6
DSR
107
DCE
Data set ready
7
RTS
CA
S2
105
DTE
Request To Send
8
CTS
CB
M2
106
DCE
Clear To Send
9
RI
125
DCE
Ring indicator
Signal ground
Signal source DTE means the signal goes from the PC to the WorldPhone.
Signal source DCE means the signal goes from the WorldPhone to the PC.
5 4 3 2 1
try
14.
co
Bo
de
+
ok
Las
2abc
5jkl
8stu
0yz
E
un
Esc
1!/?
4ghi
7pqr
NT
in
Dia
l 00 AO R–
+
co
3def
6mno
9vwx
03.
43
03
su
t
DTE interface
6 7 8 9
470
bs
cri
Me
be
De
c
199
6
r no
nu
Se
ek
Help
DCE
WorldPhone – Chapter 5. Appendices
DTE
D-17
Appendix D – DTE interface cont’d
Signal descriptions
102 Signal Ground
Digital ground, return line.
103 Send Data
Data transmitted from DTE (PC) to DCE (WorldPhone).
104 Receive data
Data Received from DCE (WorldPhone) to DTE (PC).
105 Request To Send
OFF requests DCE (WorldPhone) to suspend transmission to DTE (PC).
ON requests DCE (WorldPhone) to resume transmission to DTE (PC).
106 Clear to send
OFF indicates that DCE (WorldPhone) cannot accept data from DTE (PC).
ON indicates that DCE (WorldPhone) is prepared to accept data from DTE
(PC).
DTE interface cont’d
107 Data Set Ready
Signal from WorldPhone that when ON indicates that a data call setup is in
progress.
108 Data Terminal Ready
Signal from PC. This signal is used in the Hotline mode and indicate when
going from OFF to ON that the PC wants to make a data call. The PC
clears the call by setting the signal from ON to OFF.
109 Receive Signal Indicator
Signal from WorldPhone that when ON indicates that connection is
established and received data will be delivered on circuit 104, Received
Data.
125 Ring Indicator
Signal from WorldPhone. This signal is used in the Auto answer OFF
mode and when ON indicates that an incoming call is in progress. The
signal will go OFF when the call is answered by the PC by turning circuit
108 Data Terminal Ready ON.
D-18
WorldPhone – Chapter 5. Appendices
Secure voice (option)
Appendix E
Appendix E – Secure voice (option)
General
The WorldPhone can be programmed to allow operation of encrypted
speech through the TEL port and the FAX port when this is
configured for voice service. Settings can only be made in Owner level.
The STU IIB/III is enabled as default on ports configured for voice service.
STU enabling/disabling
Menu
1
Press the Menu function
key and scroll down to
Advanced functions:
2
Press Selct or
right arrow and
scroll down to
Configuration:
3 Selct or right
arrow opens the
Configuration menu:
Function menu
Precharge
009 Advanced functions
470
Lock
SIM
Mail
Selct
Quit
9 – Advanced functions menu
Satellite setup
007 Configuration
Information available
Install
470
Lock
SIM
Mail
Selct
Quit
97 – Configuration menu
5
Press Edit or right
arrow for enabling/
disabling secure voice.
Scroll up/down and
press Selct at
wanted mode:
470
Service
Handset: Voice
TEL:
Voice
FAX:
Fax
Broadcast: On
470
Repeat steps 4 and 5
to select mode for fax port:
WorldPhone – Chapter 5. Appendices
Mail
Selct
Quit
Secure voice
Enabled
AutoEdit
Enab Disab Save
Save
Broad
SIM
Broadcast: On/Off
Service Service
Secure
voice voice
/ Secure
Handset: Voice Voice / Enabled
TEL:
Voice Voice
Enabled
/ Disabled
FAX:
Fax
Broadcast: Off
470
6
Lock
SIM
SIM
Secure voice
4 Pressing Selct or
right arrow again
displays which ports
are enabled/disabled
for use with secure
voice:
001 Port configuration
Net service providers
Power conservation
Set diagnostics
Selct
Service / Secure voice
Fax
Voice / Enabled
Voice / Disabled
E-1
Aero functions (option)
Appendix E – Aero functions (option)
Magnetometer calibration
Menu
1
Press the Menu function
key and scroll down to
Advanced functions:
2 Selct or right arrow
opens the Advanced
functions menu:
3
Scroll down to
Aero functions and
press Selct or right
arrow to open
the Aero functions
window:
Function menu
Precharge
009 Advanced functions
470
SIM
Lock
Mail
Selct
Quit
9 – Advanced functions menu
Access control
005 Aero functions
Satellite setup
Configuration
Information available
470
SIM
Lock
Mail
Selct
Quit
95 – Aero functions
001 Magnetometer calibration
002 Configure landing speed
003 Satellite locations
4 Selct or right
arrow opens the
Magnetometer
calibration window:
Start initiates calibration.
Abort stops the procedure.
470
SIM
Lock
Mail
Selct
Quit
951 – Magnetometer calibration
Press "Start" to initiate the
calibration process for the
aeronautical antenna magnetometer.
470
SIM
Start
Abort
Configure landing speed
5
Scroll down in the menu
and press Selct or right
arrow to open the
Configure landing speed
window:
Key in anticipated speed.
952 – Configure landing speed
Landing speed (m/s): 50
470
SIM
Del
Send
Ok
Save
Ok
Aero functions
Satellite locations
6
Scroll down in the menu
and press Selct or right
arrow to open the
Satellite locations
window:
Prev/Next lists the position
of available satellite regions.
953 – Satellite locations
AOR-W
Longitude:
Location:
470
54
WEST
SIM
Prev
Next
(For possible new satellites, key in position and scroll down to select location)
E-2
WorldPhone – Chapter 5. Appendices
Character map
Appendix F
Appendix F – Character map
Latin languages
Key strokes: 1
2 3 4 5 6 7 8 9 10 11 12
Lower case
!
/
? ¡
¿ 1
UPPER CASE
!
/
? ¡
¿ 1
a b c à á â ã ä å æ ç 2
A B C À Á Â Ã Ä Å ÆÇ 2
d e f
∂ è é ê ë 3
D E F D È É Ê Ë 3
g h i
ì
í
î
ï
4
G H I
Ì
Í
Î
Ï
4
j
5
k l
J K L 5
m n o ñ ò ó ô õ ö ø 6
M N O Ñ Ò Ó Ô Õ Ö Ø 6
p q r P 7
P Q R P 7
s t
u ß u ù ú û ü 8
S T U Ù Ú Û Ü 8
v w x 9
.
,
(
*
.
,
(
*
Character map
V W X 9
y z @y 0
Y Z @Y 0
Space
– + )
#
– + )
#
WorldPhone – Chapter 5. Appendices
F-1
Appendix F – Character map cont’d
Cyrillic
Key strokes: 1
!
Lower case
2 3 4 5 6 7 8 9 10 11 12
/
? ¡
¿ 1
Character map cont’d
UPPER CASE
Space
F-2
WorldPhone – Chapter 5. Appendices
List of terms
Appendix G
Appendix G – List of terms
AOR-E Atlantic Ocean Region East, see map in appendix H.
AOR-W Atlantic Ocean Region West, see map in appendix H.
ARQ automatic repeat request, protocol for error detection and automatic
retransmission of defective blocks of data.
ASD asynchronous data transmission
ASD function/service the built-in capability of the WorldPhone for asynchronous data transmission.
AT command used to control modem functions from the PC keyboard
(ATtention).
AT modem the built-in modem of the WorldPhone that performs the modulation and demodulation required for data communication.
Azimuth horizontal direction angle between north and, e.g. the direction to
the satellite.
Bit rate the number of bits transmitted per second (bps).
Bps Bits per second
CHV2 higher access level on the SIM card, corresponding to WorldPhone
"owner" level.
DC Direct Current
DCE data circuit terminal equipment
Deg degrees
DTE data terminal equipment
DTMF Dual-Tone Multifrequency Dialing, pulsing in which each digit is
represented by a specific pair of audio frequencies (one tone below 1000 Hz
and another above 1200 Hz).
Elevation vertical angle to the satellite, e.g. the height of the satellite above
the horizon.
FWD ID forward Id, telephone network identity
IMN Inmarsat Mobile Number, a unique 9-digit number which identifies each
port of the WorldPhone.
List of terms
Inmarsat International Maritime Satellite Organisation.
IOR Indian Ocean Region, see map in appendix H.
ISN Inmarsat Serial Number, individual number assigned to each
WorldPhone terminal.
ISP Inmarsat Service Provider
Kbps Kilobits per second
WorldPhone – Chapter 5. Appendices
G-1
Appendix G – List of terms cont’d
LES Land Earth Station, a station that interconnects fixed telecommunications networks with the Inmarsat system; may also be called a CES (Coast
Earth Station) or a GES (Ground Earth Station).
MES Mobile Earth Station, a user terminal for an Inmarsat system; the
WorldPhone terminal is an MES for the Inmarsat Mini-M system; MES may
also be called SES (Ship Earth Station) or, if on aircraft, AES (Aeronautical
Earth Station).
NCS Network Coordination Station, station that supervises all messages and
signals sent in the Inmarsat system; one in each Ocean Region.
NIMS Nera Internet Messages Service, allows a message of maximum 1024
characters to be sent to the WorldPhone from a website, or to an e-mail
address from the WorldPhone.
Non-ARQ non-automatic repeat request, see ARQ
Ocean Region the coverage area of an Inmarsat satellite within which the
WorldPhone may communicate, see map in appendix H.
PABX private automatic branch exchange
PCCA Portable Computer & Communications Association Modem Standards Committee.
PIN Personal Identification Number
POR Pacific Ocean Region, see map in appendix H.
PUK Personal Unblocking Key, code that allows unblocking a SIM card.
RF Radio Frequency
RNR Receiver Not Ready data signal
RR Receiver Ready data signal
S/A operator StandAlone operator who maintains connectivity in the event
of Network Coordinating Station failure.
SIM Subscriber Identity Module
SMS Short Message System
List of terms cont’d
Spot Beam an Ocean Region is divided into sub-regions, each “spotlighted”
by a beam from the region satellite.
Terrestrial Network a fixed telecommunications network, such as a telephone network or a data network, which connects to the Inmarsat system at
an LES/NCS.
TNID Terrestrial Network Identification Digits
UTC Coordinated Universal Time, referenced to Greenwich Mean Time
(GMT)
G-2
WorldPhone – Chapter 5. Appendices
System description
Appendix H
Appendix H – System description
Inmarsat Mini-M system
Inmarsat Mini-M is a satellite communications system that provides
highly-reliable telephone, data and facsimile communication to and
from mobile subscribers anywhere within the worldwide coverage
area of the Inmarsat 3 Spot Beam system, see map on next page.
NCS:
LES:
MES:
R
P 7
– 4 8
1 5
S 2 69
0 3
#
R
Network Coordinating Station
Land Earth Station
(w/Net service providers)
Mobile Earth Station
(WorldPhone terminal)
TELEPHONE
NETWORKS
DATA
NETWORKS
LES
NCS
MES
MES
MES
WorldPhone – Chapter 5. Appendices
System description
Figure 1 Overwiew of the Inmarsat Mini-M system.
H-1
Appendix H – System description cont’d
System satellites
178°E
The satellites are positioned
in a geostationary orbit
above the equator at
approximately
35700 km altitude.
See figure.
35
70
Pacific Ocean Region
0k
m
EQUAT
OR
12
00
In geostationary orbit,
0k
m
each satellite moves at
the same rate as the
Indian Ocean Region
Atlantic Ocean Region (West)
earth, and so remains
in the same relative
position to the earth.
Atlantic Ocean Region (East)
The satellites cover approximately 1/4 of the earth
each, called Ocean Regions:
15.
5°W
AOR-W Atlantic Ocean West Region
Figure 2
AOR-E Atlantic Ocean East Region
Satellite positions
IOR
Indian Ocean Region
POR
Pacific Ocean Region
RT
H
°W
54
64.
5°E
EA
The coverage area of the satellites for WorldPhone (Mini-M) is shown
on the map below.Communication is possible in areas marked with
grey.
System description cont’d
WorldPhone coverage
AOR-W
AOR-E
IOR
POR
Equator
H-2
WorldPhone – Chapter 5. Appendices
Appendix H – System description cont’d
General
The WorldPhone terminal provides direct telephony, telefax, NIMS
and data connection to international public networks via the
Inmarsat 3 Spot Beam satellite system.
The WorldPhone terminal consists of:
• Telephone Unit (TPU).
• Universal AC adapter (WorldPhone Portable only).
• Antenna Unit (AU) including RF transceiver.
• Power Supply (WorldPhone Marine and Voyager only).
The operating functions are conducted on the telephone panel.
Only a single coax cable links the Telephone Unit and the Antenna.
Net service provider
The Net service provider issues your user licence and an IMN
(Inmarsat Mobile Number) phone number. It is also responsible for
the billing of calls (charges).
To make an outgoing call, you use a standard international telephone
number with the 00 prefix. The WorldPhone terminal receives incoming calls via the IMN phone number.
PC/modem
Public
Telephone
Network
Telephone
Telefax
PC
Additional equipment
Figure 3 Communication path.
WorldPhone – Chapter 5. Appendices
H-3
System description cont’d
Telefax
Path established by
the WorldPhone
terminal via satellite.
WorldPhone
Portable
Appendix H – System description cont’d
Calls from Mobiles
To make an outgoing call, you use a standard international telephone
number with the 00 prefix. The mobile automatically includes information to identify the MES and the particular port that originates the call.
The WorldPhone has four ports: the basic Telephone Unit w/handset,
and three connectors that are configured for telephone, data and
telefax.
The LES uses the end terminal identifying information (OI) for billing
purposes.
The mobile transmits the dialing information on a channel specially
assigned by the NCS, to the LES, which also has been instructed to
tune to the same channel. LES routes the call over the public telecommunications networks to the intended destination. When the
called party responds, the call proceeds.
Calls to Mobiles
System description cont’d
The WorldPhone terminal receives incoming calls via the IMN phone
numbers. IMN numbers are assigned to the following ports:
• Basic Telephone Unit (handset)
• Telephone (TEL port)
• Telefax service (FAX port)
• Data service (DATA port)
• NIMS service
Calls are made as ordinary international (Satellite) calls where each
Ocean Region has an international country code. If an area is covered by more than one satellite, it is necessary that the caller knows
which satellite (Ocean Region) the mobile is tuned to, or if not known
try the other satellite(s).
The international codes to the four Ocean Regions are as follows:
• Atlantic Ocean East Region:
871
• Pacific Ocean Region:
872
• Indian Ocean Region:
873
• Atlantic Ocean West Region:
874
Note! Some Net service providers support the common Ocean Region
access no. 870, which connects the call to the dialed WorldPhone regardless
of the Ocean Region the user currently communicates through.
Services
•
•
•
•
H-4
Telephone calls – basic telephony services.
Telefax – CCITT Group 3 facsimile services, 2.4 kbps.
Data communication – Hayes compatible 2.4 kbps data service.
Mail service – NIMS
WorldPhone – Chapter 5. Appendices
Appendix I
Troubleshooting
Appendix I – Troubleshooting
1.
The WorldPhone display does not light up:
Portable/Provident:
• Is the Telephone Unit turned on?
Press the ON/OFF key for 2 seconds.
• Does the battery need recharging? If needed, connect the universal adapter for powering/charging.
• Is the battery inserted properly, or contacts dirty or damaged?
Check the battery (accessible underneath the telephone unit).
Marine/Voyager:
• Is the Power Supply turned on?
• Is the Telephone Unit turned on?
Press the ON/OFF key for 2 seconds.
• Is the Power Supply properly connected?
2.
The access PIN code appears to be invalid:
• The code may have been changed. The access Phone PIN is
reset to default by logging in as owner:
* + owner’s password
Note! The SIM card can only be unblocked using a PUK code (Pin
Unblock Key). Contact the agent.
The WorldPhone cannot find the satellite:
• Check for correct position of the antenna. Check that no obstacles
block the free sight to the satellite.
Be aware that a window glass may reduce the signal level significantly. The signal strength indicator should preferably exceed 415.
• Check that the coax cable is connected properly.
• If accessible, try another antenna unit.
• The warning "Not available" appears in the display.
To restore communication with the satellite,
see chapter 2. Operation: Advanced functions: Information
available: Oscillator compensation.
4.
The WorldPhone functions abnormally:
• Turn off power and disconnect power cable/battery.
• Connect power cable/battery, and switch on again.
WorldPhone – Chapter 5. Appendices
I-1
Troubleshooting
3.
Appendix I – Troubleshooting cont’d
5.
Unsuccessful call attempt:
• The called party is busy ("Subscriber busy" appears on the
display).
• Call the Net service provider. If unsuccessful, wait for some time
and try again.
• The WorldPhone is not properly commissioned. Check with the
Net service provider.
6.
Problems with telefax:
• Remember to press "#" as last digit before starting transmission.
• Verify that the service is commissioned, see step 5.
• Connect an external standard telephone to the FAX port and verify
that you have a dial tone.
• Be aware of system transmission delays. The OFF-HOOK time
should therefore be as long as possible (e.g. 2 minutes).
When the fax machine is called, ringing time should be set to
minimum (e.g. immediate answer).
• Try a different fax machine.
• Check that the port is configured for telefax service (and not voice),
see chapter 2. Operation: Advanced functions: Configuration.
7.
Problems with data communication:
• Verify correct bit rate on PC and telephone unit,
see chapter 2. Operation: Data/printer port setup.
• Try to connect to the server through a terminal emulator.
Troubleshooting cont’d
• Check the PC program settings, and if necessary extend the
timeout intervals.
• Contact the PC applications vendor for help.
I-2
WorldPhone – Chapter 5. Appendices
Index
Above Deck Equipment 1.12, 1.13
Access
code 2.44
control 2.49, 2.50
level 2.13, 2.20
Adapter 1.6, 2.26, C-1
ADE
Above Deck Equipment 1.12, 1.13
Advanced functions 2.13, 2.43
Aero functions E-2
configure landing speed E-2
magnetometer calibration E-2
satellite locations E-2
Allowed SIM 2.49
Answer call 2.10, 2.11, 2.12
Antenna 1.6, 1.10
coax cable 1.6
connector 1.6
Antenna Unit
location B-1
Marine B-1, B-16
mounting B-4, B-6, B-11, B-12, B-13
Voyager B-9
Apnd 2.15, 2.16
Arrow keys 1.6
AT commands D-1
AT modem 2.24
Azimuth G-1
B
Bag w/antenna cable 1.6
Battery 1.7
charging C-1, C-2
indicator 1.7
pack 2.26, C-2, C-3
replacement C-2, C-3
Baud rate 2.23, 4.2
BDE
Below Deck Equipment 1.12, 1.13
Bit rate 2.23, 4.1
Book 2.3, 2.13
Brightness 2.27
Buying more time 2.38
C
Cable
coax 1.6
Call 2.15, 2.16
charge 2.33
country codes A-2
data 2.10, D-1
explanation A-1
WorldPhone – User’s Manual
fax 2.10, 3.2
from telephone 2.8
from/to mobiles H-4
making a call 2.2
receiving 2.10, 2.11, 2.12
service address codes A-5
to WorldPhone 2.3
voice 2.2
Calls
service 2.9
Case lock 1.6
Character map F-1, F-2
Charge tone 2.58
Charger C-2
Charging C-1, C-2
CHV2 2.13, 2.20, G-1
Clear 2.3
Coax cable 1.6, B-2, B-3, B-9, B-10, B-16
Compass 1.6
Compass safe distance B-1
Configuration 2.43, 2.53
Connecting up
Marine Antenna B-3
optional equipment B-21, B-22
Voyager Antenna B-10
Connector panel 1.6
Contrast 2.27
Country codes A-1, H-4
D
Data 1.5
bits 2.23
networks 1.1
service 2.10, 4.3
DATA connector 1.6, 4.1
Data/printer port setup 2.13, 2.23
Date and time 2.28
Default Net service provider 2.13, 2.19
Del 2.2
Diagnostics 2.55
Dimensions B-8, B-14, B-15, B-20
Display 1.6
contrast 2.27
DTE interface D-17, D-18
DTMF telephone
call from 2.8
E
Editing entry in phone book
Elevation G-1
Eng(lish)-key 2.31
Equipment 1.1
Erase 2.15
Escape 2.2
2.17
Index
A
Index
F
Facsimile 1.1
Fax call 2.10
FAX connector 1.6, 3.1
Flat antenna 1.6
Forward ID 2.59
Function keys 1.6
Functions 2.13
overview 2.14
FWD 2.60, G-1
G
Geostationary orbit
H-2
H
Handset 1.6
Handsfree 2.2, 2.3
Help 2.1
HELP key 1.6, 2.1
Hot dial 2.25
I
IMN
Inmarsat Mobile Number 2.59, G-1
In box 2.11
Incoming call 2.10
Information available 2.59, 2.60
Inmarsat G-1
Mini-M system H-1
Installation
Marine Antenna B-1, B-16
Voyager Antenna B-9
Interference B-2
Internal battery 1.7, C-1, C-2, C-3
International
codes A-2, H-4
dial-up telephone 1.1
Internet message 2.11
ISN G-1
K
Key lock 2.18, 2.29
Keypad 1.6
Index
L
Land Earth Station, LES
description G-2
Language 2.30
reset 2.31
setup 2.30
Last number
list 1.4, 2.15
redialing 2.13, 2.15
Letters 2.1
Level
CHV2 2.20, G-1
owner 2.22
user 2.13, 2.20
Lock 2.18, 2.29
Loudspeaker 1.6
Lowercase 2.48, 2.61
M
Mail 1.4, 2.11
Mailbox access numbers 2.32
Making a call 2.2
Menu 2.3, 2.13
MES
description G-2
Mobile Earth Station G-2
Mobile-to-LES Call H-4
Modem 4.1
Mounting
Antenna Unit B-4, B-6, B-11, B-12, B-13
Power Supply B-5, B-7, B-14
Mute 1.11, 1.14
N
Net service
provider 1.4, 2.5, 2.19, 2.52, 2.54, 2.56, H3
Network 1.1
Network status 2.60
NIMS 1.4, 2.11
mail service 1.4
Numbers. See IMN numbers
O
Ocean Region 2.19, 2.52
codes H-4
ON/OFF key 1.6
Oscillator compensation 2.60
Out box 2.6
Owner
access 2.13
level 2.20
level password 2.22
setting level 2.22
P
Paid functions 2.61
Parity 2.23
Password 2.21, 2.22
PCCA D-9, G-2
Phone
name setup 2.61
setup 2.13, 2.26
WorldPhone – User’s Manual
Index
Phone book 1.4, 2.16, 2.17
new entry 2.16
PIN code 1.4, 2.1, 2.20
Port configuration 2.53
Power
conservation 2.55
reduction 2.55
Supply B-2, B-9
Precharge 2.37
on SIM card 2.42
Printer 2.23
Spot beam
term G-2
Stand Alone operator 2.56, G-2
Stop bit 2.23
STU E-1
System
description H-1
information 2.55, 2.59, 2.60
satellites H-2
R
TEL 1.6
Telefax
service 2.10, 3.1
Telephone
handset 1.6
keypad 1.6
lock 1.6
unit B-2, B-9
Terms
list of G-1
Terrestrial network 2.5, 2.9, 2.52
Text message 1.4, 2.11
Time 2.28. See also Date and time
TNID G-2
Traffic log 2.34
Transceiver 1.6, 1.12, 1.13
Transmission rate
data 1.5, 4.1
telefax 1.5, 3.1
S
Satellite
altitude H-2
coverage H-2
find 2.13
geostationary positions H-2
Ocean Region 2.19
positions H-2
setup 2.52
Secure voice E-1, F-1
Seek 2.13
Sending NIMS message 2.6
Service
address codes A-5
calls 2.9
Services
list of H-4
Set diagnostics 2.55
Setting
date and time 2.28, 2.29, 2.32
key lock 2.29
Short number 2.16
SIM
card 1.4, 1.6, 1.9, 2.44, 2.56
restrictions 2.49, 2.51
WorldPhone – User’s Manual
U
Universal AC adapter 1.6
Uppercase 2.48, 2.61
User
access 2.13
level 2.20
V
Volume
2.2, 2.3, 2.27
W
WorldPhone
Voyager 1.16
Index
Radiation precautions B-1
Receiving a call 2.10
Redialing 2.15
Reply 2.12
Restricted
dialing 2.44
SIM 2.49
RF transceiver 1.6
Ringing volume 2.27
T
Nera SatCom AS
Marine & Mobile
P.O.Box 91, N-1375 BILLINGSTAD, Norway
Phone: +47 67 24 47 00
Telex: 71721 umeb n
Telefax: +47 67 24 46 21
Website: http://www.nera.satcom.no