1
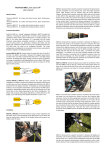
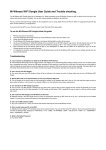
Accessories l Receiver Ink Refill ● USB Cable(Mini + Micro) ● Refill Extractor ● Digital Pen Electropen 2 ● User Manual Overview of Receiver Receiver A. B. C. D. E. Clip- Holds paper of A4 Size (default). Reset hole- Reset the device. Power button- Press to turn on/off the device. Micro USB port- Connects to Micro USB cable for charging. LED indicator- Indicate the various working status of the device. Note: For the sake of power saving, usually only one LED indicator will light to indicate related status at one time: Power on: two LEDs blink once; Charging : red LED blinks briefly; Fully charged : red LED lights for a while Low battery: red LED blinks slowly Standby : green LED blinks slowly Writing : green LED blinks briefly 1 Digital Pen F Mini USB port Connects to PC via Mini USB cable for charging. Note Disconnect the USB cable when the device has charged for about 2 hours. G Charging indicator: Lights red when charging is going on and goes out when charging completes; blinks once the battery is low. Note Please use the dedicated USB cable provided together with this pen to connect the Receiver and the pen. How to Use the Digital Pen WARNING: Do not attempt to open the pen. This may cause the pen to malfunction. 1. Getting prepared 1) Installing an Ink Rell into the Pen Note: Make sure you use a refill that is similar to the original (standard refill (67.0mm long X 2.35mm diameter). To insert a new refill a. Slide the new refill into the tip of the pen. b. Gently press the new refill until it is lodged securely in place. 2) Taking out the rell with the extractor a. Remove the cap off the pen; b. Use the extractor to hold the refill; c. Slightly pull the old refill out. 2 2. Software Application 1 System requirements iPhone 4s /iPad3 or above with iOS7.0 or above Android 4.3 or above, with Bluetooth 4.0 LE 2) Run the application “Cloudwrite” a. User can download the application “Cloudwrite ” to your mobile devices from AppStore, Google Play, Android Market or by scanning the QR code (for Android devices) and install it. b. Find the “Cloudwrite ” icon on the app menu screen of the Android or iOS device before tapping to open it. c. After opening the app, tap the “Scan” button on the top right corner to search the BT device you are using. Electropen2 3 d. Tap on the device name which is also showing on the device barcode from device list to pair. “ Device is connected, Start writing” will appear at bottom area to notify the note-taking mode. e. Clip the receiver on the top- center of A4 size paper. Hold the pen and write as usual. Whatever you write or draw with the pen will be displayed on the screen of your mobile device. Note: a). Do not block the signal transmission between the pen tip and the receiver. b).Make sure the pen is at least 1.5cm away from the receiver so that the sensor can work normally.。 c). Be sure to write with proper force to guarantee the high identification of the writing. f. After writing or drawing, tap on “Save” button to save your note. Electropen2 Cancel 4 Ok g. Tap on “Note” icon on the top right corner to check your recent notes. 3. Description of the interfaces Notes Management Upload Management Modify the name of device or get back to device list. Note Check all notes that have been saved or uploaded. Share : Upload your notes to social networks. 5 Remarks: To share your notes, please make sure your mobile device is connected to the Internet. Pen: Change the width of your pen. Wall: Change the wallpaper (background) of your notes. Erase : Erase paticular part of your writing or drawing, or clear the whole page. Color: Change the color of your ink. Camera: Take photos or load an existing picture for editing or to set as wallpaper. Save Save your current note. 6