1
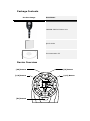
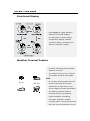
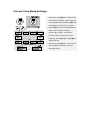
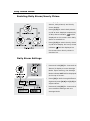
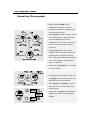
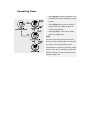
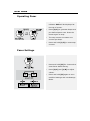
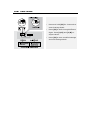
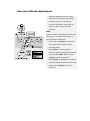
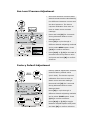
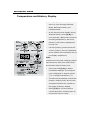
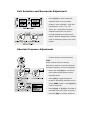
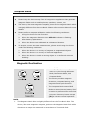
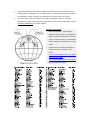
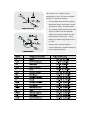
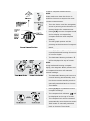
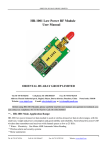
TABLE OF CONTENTS INTRODUCTION 3 SAFETY PRECAUTIONS 3 PACKAGE CONTENTS 4 DEVICE OVERVIEW 4 BUTTON OPERATION SUMMARY 5 BASIC OPERATION 6 CURRENT TIME MODE 7 FUNCTIONAL DISPLAY 7 WEATHER FORECAST FEATURE 7 CURRENT TIME MODE SETTINGS 8 DAILY ALARM MODE 9 ENABLING DAILY ALARM/HOURLY CHIME 9 DAILY ALARM SETTINGS 9 CHRONOGRAPH MODE 10 OPERATING CHRONOGRAPH 10 TIMER MODE 11 QUICK SET VALUE AND USER PRESET VALUE 11 USER PRESET VALUE SETTINGS 11 OPERATING TIMER 12 PACER MODE 13 OPERATING PACER 13 PACER SETTINGS 13 LINKING WITH CHRONOGRAPH 14 DUAL TIME MODE 15 ALTIMETER MODE 16 TEMPERATURE AND HISTORY DISPLAY 16 UNIT SELECTION AND ALTIMETER ADJUSTMENT 17 ZERO ALTITUDE ADJUSTMENT 17 ABSOLUTE ALTITUDE ADJUSTMENT 18 SEA LEVEL PRESSURE ADJUSTMENT 19 FACTORY DEFAULT ADJUSTMENT 19 BAROMETER MODE 20 TEMPERATURE AND HISTORY DISPLAY 20 UNIT SELECTION AND BAROMETER ADJUSTMENT 21 ABSOLUTE PRESSURE ADJUSTMENT 21 FACTORY DEFAULT ADJUSTMENT 22 COMPASS MODE 23 MAGNETIC DECLINATION 23 CALIBRATING COMPASS 25 Thank you for purchasing CANYON CNS-DC3, a multi-functional watch device with weather forecast function developed from advanced sensor technology. You have made an excellent choice and we hope you will enjoy all of its exciting features. To fully utilize the functions and features of CANYON CNS-DC3, please read through the user manual carefully before using the product, and follow all of the procedures in the manual to fully enjoy all features of the product. Introduction Safety Precautions Please observe all safety precautions before using the device. Please follow all procedures outlined in this manual to properly operate the device. The device and its accessory, like most electronic or magnetic devices, may be at interference with pacemaker. Please consult doctor or other professionals before using the product. Do NOT attempt to disassemble or alter any part of the device that is not described in this guide. Do NOT place the device near a heat source or directly expose it to flame. Never place the device in vicinity of equipments generating strong electromagnetic fields. Exposure to strong magnetic fields may cause malfunctions. Avoid exposing the device to extreme temperatures or chemicals such as gasoline and alcohol. Avoid strong impacts for it will damage the device permanently. Store device and its accessory at a dry and well ventilated location when they are not in use. Package Contents Product Image Item Name CANYON CNS-DC3 Main Unit Quick Guide Documentation CD Device Overview [SR] Button [L/R] Button [EL] Button [M] Button [S/S] Button Button Operation Summary Mode Button [M] Press to cycle through 6 functional modes. Press and hold to enter/exit Setting Mode. During Settings Mode, press to cycle through different settings. Sensor Button [SR] Press to cycle through Altimeter, Barometer, and Compass modes. Start/Stop Button [S/S] Press to show current date at Current Time Mode. Press to toggle between functional displays within the same mode. Press to start/stop time counting at Chronograph Mode. Press to toggle between options. Press to increase values at Settings Mode. Lap/Reset Button [L/R] Press to reset time counting at Chronograph Mode. Press to move cursor during History recalling display. Press to toggle between options. Press to decrease values at Settings Mode. Light Button [EL] Press to turn on back light for 3 seconds Basic Operation CANYON CNS-DC3 is a multi-functional watch device that contains 9 functional modes including Current Time Mode, Daily Alarm Mode, Chronograph Mode, Timer Mode, Pacer Mode, Dual Time Mode, Altimeter Mode, Barometer Mode, Compass Mode. Press [M] to cycle through 6 Timekeeping modes and press and hold [SR] to activate and cycle through 3 Sensor Modes as shown above. Current Time Mode Functional Display Press [S/S] to toggle between different functional displays including Day of Week display, Temperature display, Altitude Tendency display, and Sea Level Pressure Tendency display Weather Forecast Feature The device provided 4 different symbols indicating the forecasted weather as shown. The feature only occurs in Current Time Mode and Dual Time Mode. NOTE: Sunny Cloudy with sun It is highly recommended that the device to be kept at the same altitude for at least 24 hours to achieve higher accuracy predication. Cloudy Raining The device presents weather forecast function by adopting general weather forecasting principles. Dramatic weather changes within a very short period of time will not be reflected by device. Current Time Mode Settings Press and hold [M] for 2 seconds to enter Settings Mode. Upon entering, the Settings Mode indicator SET will be displayed at the top of screen. Press [M] to shift through different digits and settings including month-day format, 12/24 hour format, LCD contrast level, and beeping. Press [S/S] and [L/R] to adjust values. Press and hold [M] for 2 seconds to save modified settings and exit Settings Mode. Daily Alarm Mode Enabling Daily Alarm/Hourly Chime Press [S/S] to switch between daily alarm1, daily alarm2, and hourly chime display. Press [L/R] to switch daily alarms on/off at their displays respectively. A daily alarm indicator will be displayed on the screen when daily alarm is switched on. Press [L/R] to switch hourly chime on/off at its display. An hourly chime indicator will be displayed on the screen when hourly chime is switched on. Daily Alarm Settings Press and hold [M] for 2 seconds at Alarm1/2 display to enter Settings Mode. Upon entering, the Settings Mode indicator SET will be displayed at the top of screen. Press [M] to shift through different digits and press [S/S] and [L/R] to adjust values. Press and hold [M] for 2 seconds to save modified settings and exit Settings Mode. Chronograph Mode Operating Chronograph Upon entering, the Chronograph Mode indicator CHR will be displayed at the top of screen. The device measures elapsed time and current lap time. Press [S/S] to start counting. Press the button again to stop counting and the elapsed time will be displayed on the screen. Press the button the third time to resume counting. Press [L/R] while counting to display current lap time. Press the button again to display next lap time. The lap time display will return to counting display automatically after 10 seconds. Press and hold [L/R] for 2 seconds to reset counter. During split time display, press and hold [M] to recall all lap times and total lap times accumulated. Press [S/S] and [L/R] to review each lap time and total lap times accumulated. Press and hold [M] to exit lap time display and back to chronograph display. Timer Mode Quick Set Value and User Preset Value Upon entering, the Timer Mode indicator TMR will be displayed at the top of screen. Press [L/R] to cycle through quick set values of countdown timer. User Preset Value Settings Press and hold [M] for 2 seconds to enter target time setting. The Settings Mode indicator SET will be displayed at the top of screen. Press [M] to switch between hour, minute, and second digits. Press [S/S] and [L/R] to adjust values. Press and hold [M] to save modified settings and exit Settings Mode. Operating Timer Press [S/S] to start countdown. The residual time will be displayed on the screen. Press [S/S] during count-down to pause. Press the button again to resume countdown. Press [L/R] to reset count-down timer to target time. NOTE: The device will beep once per minute when the timer reaches last 10 minutes, once every 10 seconds when timer reaches last one minute, and once every second in the last 5 seconds. It will also beep for another 30 second when timer reaches target time. Pacer Mode Operating Pacer Upon entering, the Pacer Mode indicator PCR will be displayed at the top of screen. Press [S/S] to generate beeps at a pre-defined pacer rate. Press the button again to stop. The step counter increases one counter per beep. Press and hold [L/R] to reset step counter. Pacer Settings Press and hold [M] for 2 seconds to enter Pacer Mode setting. Press [S/S] and [L/R] to adjust values. Press and hold [M] again to save modified settings and exit Settings Mode. Linking with Chronograph During Pacer Mode, press [M] to select Chronograph Mode. At Chronograph Mode, press [S/S] to start counting and beeping simultaneously. Press the button again to stop counting and beeping. Dual Time Mode Press and hold [M] for 2 seconds to enter Settings Mode. Press [M] to shift through different digits. Press [S/S] and [L/R] to adjust values. Press [M] to save modified settings and exit Settings Mode. Altimeter Mode Temperature and History Display Press [SR] anytime during main menu to cycle through Altimeter Mode, Barometer Mode, and Compass Mode. At the device screen display during Altimeter Mode, 1 of 2 Altimeter functions, temperature or history, will be displayed at the top row. Current (history) altitude and the current (history) time are displayed at the middle row and bottom row of the display respectively. NOTE: To obtain more accurate readings, please keep the device away from body which will minimize effect of body heat. Press and hold [L/R] to obtain immediate readings. The temperature is displayed in degree Celsius (˚C) or degree Fahrenheit (˚F). The device automatically records the altitude reading every 60 minutes and plots the data into an altitude bar graph as History display. Press [L/R] to review altitude records and their recording time of the last 23 hours in order. Unit Selection and Altimeter Adjustment Press [S/S] to switch between measurement units including altitude units meter(m)/feet(ft) and temperature units (˚C)/ (˚F). There are 4 methods to adjust/ calibrate altimeter functions including Zero Altitude, Absolute Altitude, Sea Level Pressure and Factory Default Adjustment. Please refer to following sections for more details. NOTE: The device is equipped with automatic Sea Level Pressure comparison feature which does not display fluctuating altitude readings when staying at the same altitude. Zero Altitude Adjustment Zero Altitude function takes relative altitude measurement by setting the current altitude as reference point with value of “zero”. An “r” reference point indicator will be displayed. Press and hold [M] for 2 seconds during Altimeter Mode to enter Settings Mode. Press [M] to cycle through 4 different altitude adjusting methods and to select ZERO option. Press [S/S] to confirm selection. Press [S/S] or [L/R] to toggle between YES/NO options and press and hold [M] to confirm selection. Absolute Altitude Adjustment Absolute Altitude function takes altitude measurement calculated from air pressure. The device requires calibration from time to time to obtain more accurate readings. NOTE: A precise altitude indication such as sea level (0m) or an altitude sign pole is required before calibration. Press and hold [M] for 2 seconds during Altimeter Mode to enter Settings Mode. Press [M] to cycle through 4 different altitude adjusting methods and to select ALTI option. Press [S/S] to confirm selection. Press [S/S] or [L/R] to increase or decrease absolute altitude value and press and hold [M] to confirm selection. Sea Level Pressure Adjustment Sea Level Pressure function takes altitude measurement calculated by the difference between current and sea level pressure. The device requires calibration from time to time to obtain more accurate readings. Press and hold [M] for 2 seconds during Altimeter Mode to enter Settings Mode. Press [M] to cycle through 4 different altitude adjusting methods and to select SEAP option. Press [S/S] to confirm selection. Press [S/S] or [L/R] to increase or decrease sea level pressure value and press and hold [M] to confirm selection. Factory Default Adjustment Factory Default adjustment function restores factory default value (1013.2mb). The device requires calibration from time to time to obtain more accurate readings. Press and hold [M] for 2 seconds during Altimeter Mode to enter Settings Mode. Press [M] to cycle through 4 different altitude adjusting methods and to select F.DEF option. Press [S/S] to confirm selection. Press [S/S] or [L/R] to toggle between YES/NO options and press and hold [M] to confirm selection. Barometer Mode Temperature and History Display Press [SR] anytime during main menu to cycle through Altimeter Mode, Barometer Mode, and Compass Mode. At the device screen display during Altimeter Mode, press [S/S] to cycle through 3 Barometer functions including temperature, Sea Level Pressure, and history displayed at the top row. Current (history) pressure and the current (history) time are displayed at the middle row and bottom row of the display respectively. NOTE: To obtain more accurate readings, please keep the device away from body which will minimize effect of body heat. Press and hold [L/R] to obtain immediate readings. The temperature is displayed in degree Celsius (˚C) or degree Fahrenheit (˚F). The device automatically records the pressure reading every 60 minutes and plots the data into a pressure bar graph as History display. Press [L/R] to review pressure records and their recording time of the last 23 hours in order. Unit Selection and Barometer Adjustment Press [S/S] to switch between measurement units including pressure units mb/hPa / inHg and temperature units (˚C)/ (˚F). There are 2 methods to adjust/ calibrate barometer functions including Absolute Pressure and Factory Default Adjustment. Please refer to following sections for more details. Absolute Pressure Adjustment Absolute Pressure function takes relative pressure measurement. NOTE: Please consult with the nearest observatory station to get the ambient barometric pressure of current position. Press and hold [M] for 2 seconds during Barometer Mode to enter Settings Mode. Press [M] to toggle between 2 pressure adjusting methods and to select AIRP. option. Press [S/S] to confirm selection. Press [S/S] or [L/R] to increase or decrease pressure value and press and hold [M] to confirm selection. Factory Default Adjustment Factory Default adjustment function restores factory default value. The device requires calibration from time to time to obtain more accurate readings. Press and hold [M] for 2 seconds during Altimeter Mode to enter Settings Mode. Press [M] to toggle between 2 pressure adjusting methods and to select F.DEF option. Press [S/S] to confirm selection. Press [S/S] or [L/R] to toggle between YES/NO options and press and hold [M] to confirm selection. Compass Mode Precautions: Please keep the device away from all magnets or appliances that generate magnetic fields such as mobile phones, speakers, motors, etc. The device, like most magnetic compass, points to the magnetic North which is slightly different from the true North. Please refer to section below for more details. Please perform compass calibration under the following conditions: 1. Using the device for the first time. 2. When the magnetic distortion icon OFF CAL indicator is flashing. 3. After battery replacement. 4. When the device was calibrated at a distanced location. To acquire a more accurate measurement, please avoid using the device under the following conditions: 1. When the device is in vicinity of magnets or magnetized objects. 2. When the device is in vicinity of electrical appliances. 3. When the device is inside a moving object or a reinforced concrete building. Magnetic Declination Press [SR] anytime during main menu to cycle through Altimeter Mode, Barometer Mode, and Compass Mode. The device provides magnetic directions, compass bearing, and magnetic North pole direction. The Compass Mode enters IDLE Mode to extend device battery life if no action is performed for more than 1 minute. Press any button except [EL] to resume normal operation. NOTE: 1. The Magnetic North Pole is slightly different from the True North Pole. The device, like most magnetic compass, points to the Magnetic North Pole while directions on maps are measured in accordance to True North Pole. 2. The angular difference between Magnetic North Pole and True North Pole is called magnetic declination. Its magnitude (in units of degrees and minutes) and direction (East or West) are dependent on the location of device. 3. For users who intend to perform accurate navigations, device must be adjusted to compensate magnetic declination. Please refer to following section Compass Calibration for more details. Magnetic Declination: Most topographic maps display Magnetic North Pole or information about magnetic declination. Please refer to chart below for information about magnetic declination at major cities. Please refer to below websites for those cities not included in the chart: http://www.geolab.nrcan.gc.ca/geo mag/mirp_e.shtml http://www.ngdc.noaa.gov/seg/geo mag/declination.shtml Calibrating Compass NOTE: Please observe Precautions section and check up magnetic declination values from chart above or websites provided before perform compass calibration. To calibrate compass function, press and hold [M] for 2 seconds to enter compass calibration settings. Upon entering, the magnetic declination indicator CAL will be displayed at the top of screen. Place the device on a flat surface or parallel to horizon, then press [S/S] to start rotating the pointer. Rotate the device in accordance to the direction of rotation pointer for more than 2 times. Press [S/S] or [L/R] to stop the calibration process when 2-turn rotation is complete and press [M] to proceed to magnetic declination settings. Upon entering, the magnetic declination indicator DEC will be displayed at the top of screen. Press [S/S] or [L/R] to adjust magnetic declination value (from -90 to 90). Please refer to previous section for magnetic declination values in major cities. Press [M] to save modified settings and exit Settings Mode. The direction of an object can be represented in term of either compass direction or compass bearing. The compass directions are North, Northeast, East, Southeast, South, Southwest, West, and Northwest. The compass bearing direction of an object is defined as the angular difference between North and the object while assuming 0˚ being North and measuring range from 0˚ to 359˚. Please refer to below table to convert between compass direction and compass bearing. To take a compass measurement: NOTE: Please make sure that the device is parallel to horizon to acquire the most accurate measurement. Turn the device until the navigation arrow is pointing at the direction of desired object for measurement. Press [L/R] to enter Compass mode and to display corresponding compass direction and compass bearing. The bar graph pointer will be pointing at the direction of magnetic North. Press [S/S] to toggle display of normal/backward bearing directions of current object. The backward bearing indicator will be displayed at top of screen. NOTE: During backward bearing compass display, the magnetic North pointer and the compass direction will maintain forward readings. The backward bearing will return to normal bearing automatically once the device enters standby mode or manually switched back to Current Time Mode. Press [L/R] to fix/release current compass readings. The compass lock indicator will be displayed at the top of screen. The compass lock will be released automatically once the device enters IDLE mode or manually switched back to Current Time Mode.