1
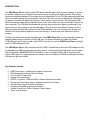
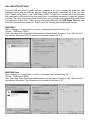
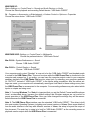
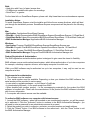
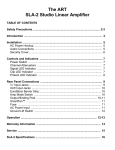
U S B P h o n o P lu s
User’s Manual
IMPORTANT SAFETY INSTRUCTION – READ FIRST
This symbol, whenever it appears,
alerts you to the presence of uninsulated
dangerous voltage inside the enclosure-voltage
that may be sufficient to constitute a risk of shock.
This symbol, wherever it appears, alerts you
to important operating and maintenance
instructions in the accompanying literature.
Please read the manual.
Read instructions:
Retain these safety and operating instructions for future reference. Heed all warnings printed here and on the
equipment. Follow the operating instructions printed in this user manual.
Do not open:
There are no user serviceable parts inside. Refer any service work to qualified technical personnel only.
Power sources:
Connect the units power supply to mains power only of the type described in this user manual or marked on
the power supply.
Power supply:
Use the power supply with sealed mains plug appropriate for your local mains supply as provided with the
equipment. If the provided supply does not fit into your outlet consult your service agent. Route the power cord
so that it is not likely to be walked on, stretched or pinched by items placed upon or against it.
Grounding:
Do not defeat the grounding and polarization means of the power supply.
Moisture:
To reduce the risk of fire or electrical shock do not expose the unit to moisture or use in damp or wet conditions. Do not place container of liquid on unit.
Heat:
Do not locate the unit close to excessive heat or direct sunlight, as this could cause a fire hazard. Locate the
unit away from any equipment, which produces heat such as: power supplies, power amplifiers and heaters.
Environment:
Protect from excessive dirt, dust, heat, and vibration when operating and storing. Avoid tobacco ash, drink
spillage and smoke, especially that associated with smoke machines.
Handling:
Protect the controls from damage during transit. Use adequate padding if you need to ship the unit. To avoid
injury to yourself or damage to the equipment, take care when lifting, moving, or carrying the unit.
Servicing:
Unplug power immediately if equipment is exposed to moisture, the power supply becomes damaged during a
lightning storm or if smoke odor or noise is noted. Refer servicing to qualified technical personnel only.
Installation:
Install the unit in accordance with the instructions printed in the user manual.
2
INTRODUCTION:
The USB Phono Plus is a high quality USB audio interface with a built-in phono preamp. It acts as
an interface between your computer and a wide variety of analog and digital sources. The analog
inputs are switchable between Phono and Line level signals and a Low Cut filter removes rumble and
wind noise while leaving the audio pristine. The front Gain Trim control and Signal/Clip LED allow you
to optimize the analog to digital converter for a wide range of input sources. The front panel USB
Monitor/headphone jack and the Optical Output on the rear panel can monitor the audio output from
your computer. The USB Monitor/headphone jack can also provide zero latency monitoring of the
input source for easy cueing of records and tapes. The built-in low noise Phono Preamp circuit is
highly accurate and precisely conforms to the RIAA standard. The Line Out jacks are always connected to the input preamp signal for source monitoring or to allow use as a stand-alone phono
preamp.
Housed in an all aluminum black anodized case, the USB Phono Plus can be powered by either an
external power source or directly off the USB port, so remote recording is a snap. An Optical
TOSLINK Input and Output as well as an S/PDIF Input let you use the USB Phono Plus as a digital
audio to USB interface as well.
The USB Phono Plus is fully compliant with the USB 2.0 specification and uses USB adaptive mode
for playback and USB asynchronous mode for record. It will work with the USB audio device drivers
built into Windows 98SE/ME/2000/XP/Vista/Win7, Linux, and Apple OS9.1/OS-X computers with
native USB support. No special drivers are needed. We’ve included a CDROM containing SoundSaver Express to get you started!
Key Features Include:
•
•
•
•
•
•
•
•
•
•
USB Connectivity to Desktop and Laptop Computers
RIAA Accurate Low Noise Phono Preamp
Up to 45 dB of Clean Gain
Latency Free Monitoring
S/PDIF or optical to USB and USB to Optical Interfaces Included
Preamp Line Out Allows Use as a Stand-alone Phono Preamp
Includes Recording & Production Software
Compact, Stackable all Aluminum Chassis
Flexible Power from USB or External Power Supply
Three Year Warranty
3
CONNECTIONS:
The Preamp Phono/Line In connections are RCA-type jacks and are used to connect your turntable,
tape, CD, MP3 player, or other analog stereo audio device to the USB Phono Plus.
The Ground terminal connection on the rear is used to connect the separate ground wire from your
turntable to reduce hum. (This connection is unnecessary for digital output turntables).
The Preamp Line Out connections are RCA-type jacks that are always connected to the analog input
preamp signal for source monitoring or to allow use as a stand-alone phono preamp.
The S/PDIF In To USB RCA-type connection is a digital input that overrides the Opto In and analog
preamp signal connections whenever there is a valid digital signal present that is in S/PDIF format.
This digital signal input is routed to the your computer USB interface for S/PDIF to USB connectivity
only. Note: You cannot connect S/PDIF to analog or analog to S/PDIF with this product.
The OPTO In To USB and OPTO Out From USB connections provide for Optical digital connections
direct to your computer via USB. When there is valid TOSLINK digital signal at the OPTO In connection it overrides the analog preamp signal connection to the USB interface.
The 1/8-inch Headphone Monitor Output jack on the front is stereo unbalanced and can accommodate a wide variety of headphone models. Maximum output level is +6dBu (1.4Vrms).
The USB bus from your computer normally powers the USB Phono Plus. A power connector on the
rear allows you to use an optional external power source to reduce the power drawn from your computer. The USB Phono Plus operates from any external power source that provides 150mA or more
@ 7 Volts to 12 Volts DC (either polarity at the tip will work with our unit) or 9 Volts to 12 Volts AC.
The USB To Computer connector is USB 2.0 compliant and should be used to connect directly to
one of the USB connections on your computer. This connection also powers the USB circuitry inside
the USB Phono Plus and will power the whole product if no other power source is available. This
connection looks like a standard “USB Audio CODEC” to your computer, and your computer then
controls the sample rate.
Since the USB connection will be carrying high quality digital audio to and from your computer as well
as bus powering the USB interface, we suggest that you use a high quality shielded USB cable for
best performance. Ideally you should connect directly to one of the USB inputs on your computer.
Connecting through a shared hub can reduce power and bandwidth that is available for each USB
device and should be avoided when possible. Though the USB Phono Plus is compatible with both
USB 1.1 and 2.0 standards, USB 2.0 is preferred for the cabling and computer connection as it allows
for more system bandwidth. If you must use a hub, it should be a powered USB 2.0 compliant hub for
best results. This is especially important if you plan on using multiple units for more channels of
simultaneous digital audio input over USB connections.
4
CONTROLS:
The Input switch sets the gain and equalization of the analog preamp. If using a phono turntable, set
the switch to Phono. Otherwise set the switch to Line for other types of audio sources.
The Filter switch, when in the Low Cut position, adds a filter for removing turntable rumble or other
low frequency noise.
The Gain Trim control adjusts the overall analog preamp gain. The Clip/Signal LED indicator, located to the right of the Gain Trim control, lights green when there is signal present and red if the
signal level is near clipping. Adjust the Gain Trim while noting the Signal/Clip LED so that green is
on most of the time (with music playing) and red is on rarely during signal peaks. By doing this you
optimize the dynamic range of the analog preamp and USB interface.
The Monitor Source switch selects what signal is sent to the Monitor Output Level control and
Monitor Output jack. In the Preamp position you are directly monitoring the analog preamp signal
before it is sent to your computer, for zero latency monitoring and cueing of the audio source. In the
CPU position you are monitoring the digital audio signal that is coming back from your computer, on
playback. The Both position provides a mix of the preamp and computer signals.
The Monitor Output Level control adjusts the signal level available at the Monitor Output jack.
The red Power LED indicator lights whenever the USB Phono Plus is being powered either through
the USB connection from your computer or via the external power connection on the rear.
5
INSTALLATION:
1. Connect your turntable, tape player, CD player or other analog audio device cables to the RCA
input connectors or connect your digital audio device to the S/PDIF or OPTO inputs on the USB
Phono Plus.
a. If you are using a turntable and it has a separate ground wire, attach it to the ground terminal on the USB Phono Plus. This will help to reduce hum.
b. Select LINE or PHONO input for the analog source type. Use the LOW CUT Filter for removing turntable rumble or other low frequency noise if you find it is desirable.
2. Connect the USB Phono Plus USB connection to the appropriate USB input on your computer.
3. USB BUS POWER: No external power connection is needed. Power is supplied over the USB
connection. The front panel POWER LED will indicate that USB power is present when the USB
cable is connected to a live USB jack. It is best to connect directly to a computer USB input or to a
powered USB hub, to ensure ample power for the USB Phono Plus.
NOTE: EXTERNAL POWER will automatically override USB BUS POWER. This can be useful for
reducing power drain when connecting to battery powered laptop computers.
MONITORING WHAT YOU RECORD:
Set the front MONITOR SOURCE switch to PREAMP in order to monitor the analog audio coming
directly from the preamp. This is useful for auditioning and cueing records or tapes prior to recording.
This signal has no delay or latency.
Set the front MONITOR SOURCE switch to CPU in order to monitor the digital audio coming back
from the computer. This is useful for playback from the computer and software configuration. See
discussion below.
A third position on the MONITOR SOURCE switch is labeled BOTH and it provides a mix of the
preamp and computer signals. During typical operation either a record (or tape) is playing back, or the
computer is playing back, but not both at the same time. You can listen to either the preamp, or the
computer, without changing any settings. You will also be able to hear any computer alert signals
while you are listening to the record or tape if the alerts are also routed to the USB CODEC in your
computer’s sound setting control panel.
Some recording programs and computer systems provide what is called a “Play-Through” function.
This can be performed through software or hardware. When Play-Through is set to ON, the computer
will output the audio that is being recorded, at the same time that it is actually being recorded. There
is a short delay, or latency, with this audio signal. There is also a potential for the computer’s audio
inputs and outputs to be inadvertently connected together thereby forming a feedback loop. This can
accidentally create very loud and disturbing sounds. Therefore Play-Through is usually set to OFF as
the default setting in both software and hardware.
If Software/Hardware Play-Through is set to ON and the MONITOR SOURCE switch is in the BOTH
position, then you will most likely hear the original preamp signal together with the computer audio
signal slightly delayed, thereby creating an echo effect. This is normal behavior, so while using the
BOTH setting it may be preferable to leave the Play-Through set to OFF.
6
USB COMPUTER SETTINGS:
Once the USB connection is made and your computer is on, your computer will power the USB
interfaces circuitry over the USB bus and the unit will automatically connect and try to set your computer “Default Audio Device” to be “USB Audio CODEC”. Usually the computer will do this automatically whenever a USB device is first connected, but it is sometimes necessary to make the selection
manually. The same settings may need to be made in your particular audio application as well (Check
your application instructions). These settings should be made while the USB Phono Plus and computer are connected and powered on. Select one of the following Operating System choices:
WINDOWS 7:
Start=> Settings => Control Panel => Sound => Playback Tab and Recording Tab
Choose: “USB Audio CODEC”
Then: Recording Tab=>Properties=>Advanced and change Default Format to: “2ch, 16bit, 44.1kHz”
Also choose: Recording Tab=>Properties=>Levels and set the level to “4”
WINDOWS VIsta:
Start=>Settings => Control Panel => Sound => Playback Tab and Recording Tab
Choose: “USB Audio CODEC”
Then: Recording Tab=>Properties=>Advanced and change Default Format to: “2ch, 16bit, 44.1kHz”
Also choose: Recording Tab=>Properties=>Levels and set the level to “25”
7
WINDOWS XP:
Start=>Settings => Control Panel => Sounds and Audio Devices => Audio
Choose the Sound playback and recording Default device: “USB Audio CODEC”
Or Programs =>Accessories =>Entertainment =>Volume Control=> Options=> Properties
Choose the mixer device: “USB Audio CODEC”
Or
WINDOWS 98SE: Settings => Control Panel => Multimedia
Choose the preferred device: “USB Audio Device”
Mac OS10+: System Preferences => Sound.
Choose: “USB Audio CODEC”
Mac OS9.1+: Control Panels => Sound.
Choose: “USB Audio CODEC”
Your computer audio output “Speaker” is now set to be the “USB Audio CODEC” and playback audio
is routed to the USB Phono Plus. This must be done while the USB Phono Plus is connected to the
computer and powered on. If you prefer, you can have the computer output routed to your computer
speakers instead of the USB Phono Plus monitor output jack, by selecting your computer speakers
for “OUTPUT” instead of “USB Audio CODEC” in the above setup procedures. After the above settings are made, your computer will automatically reconfigure itself back to these settings every time
the USB Phono Plus is reconnected to the computer. Your recording software may also select which
inputs or outputs are being used.
Note 1: If running Windows 7 or Vista it is important that you set the Default Format and Microphone
Level, as described above, because the default settings that Windows assigns are not correct for
proper operation of the USB Phono Plus. Once you have changed the settings they will be remembered whenever the USB Phono Plus is connected.
Note 2: The USB Phono Plus interface uses the standard “USB Audio CODEC”. This driver is built
into most modern Operating Systems, including most current versions of Linux. Since some details of
how the audio interface is set vary with different versions of Linux, the setup is beyond the scope of
this document. The main key in setup is to look for “USB Audio CODEC” as the recording source or
playback monitor output while the USB Phono Plus is connected.
8
BIAS RECORDING SOFTWARE:
Included with this version of the USB Phono Plus is a CDROM containing SoundSaver Express
Recording software. SoundSaver Express easily records your audio collection with unparalleled
results. Simply connect, record, clean, and export – directly to iTunes, as MP3, or uncompressed
WAV files for CD / DVD burning! Archiving your LPs and tapes has never been easier – SoundSaver
Express delivers pro-quality results.
First install the USB Phono Plus, then insert the BIAS CD and choose Mac or Windows.
Click on: BIAS SoundSaver Express.dmg for Mac installation.
Click on: BIAS_SoundSaver_Express_Insta.exe for Windows installation.
Note: The above files will run the installer program to install directly from the disk. Read Me files,
quick start, and software manual are included with each install version. Your computer should have
internet access to authorize the software after installation. For the latest information on BIAS
products and further support, go to www.bias-inc.com/products
The following pages are OPTIONAL READING but may help when installing the BIAS software and
is part of the Readme file that is included on the installer disk:
SoundSaver Express is an application designed for home recording enthusiasts interested in easily
digitizing their LPs and cassettes. Once recordings have been made, they can be cleaned to improve
sound quality, by removing/reducing broadband noise, clicks, crackles, and hum (50/60 Hz) using
simple controls. Recorded files can be automatically and/or manually divided into separate tracks,
which can then be delivered in a variety of popular digital file formats.
SoundSaver Express Features:
• Records LPs and cassettes at CD-quality via your computer’s audio input (or through compatible
third-party audio hardware)
• Removes/reduces broadband noise, clicks, crackles, and 50/60 Hz hum
• Automatically or manually split recordings into separate tracks
• Deliver digital files as project files (for later editing), WAV (for burning audio CDs), MP3 (for portable
media players) – or send directly into iTunes.
Users interested in upgrading to the full version of SoundSaver – or test-driving other BIAS audio
software products can learn more at: http://www.bias-inc.com/products
Minimum System Requirements:
Mac:
• G4, G5, or Intel-based Mac (1 GHz or faster processor recommended)
• Mac OS X v. 10.5 or later
• 1.25 GB RAM
• 25 MB available disk space
Windows:
• Intel CPU (P4 or greater), or AMD Athlon CPU, with SSE instructions (1.5 GHz or faster processor
recommended)
• Windows 7/Vista/XP (SP3)
• 2 GB RAM for Windows 7 or Vista; 1 GB RAM for XP
• 55 MB available disk space
9
Both:
• Hard drive with 8 ms (or faster) access time
• 10 MB/minute available disk space for recordings
• QuickTime 7 or greater
For the latest info on SoundSaver Express, please visit: http://www.bias-inc.com/soundsaver express
Installation Notes:
To install SoundSaver Express, start the installer and follow the on-screen directions, which will lead
you through the installation process. SoundSaver Express components will be placed in the following
locations:
Mac:
• Application /Applications/SoundSaver Express
• Read Me /Library/Documentation/BIAS/SoundSaver Express/SoundSaver Express 1.0 Read Me.rtf
• QuickStart Guide /Library/Documentation/BIAS/SoundSaver/SoundSaver 1.0 QuickStart Guide.pdf
• BIAS Authorization Manager /Applications/BIAS Authorization Manager/
Windows:
• Application \Program Files\BIAS\SoundSaver Express\SoundSaver Express.exe
• Read Me \Program Files\BIAS\SoundSaver Express\SoundSaver Express 1.0 Read Me.rtf
• User Guide \Program Files\BIAS\SoundSaver\SoundSaver 1.0 QuickStart Guide.pdf
• BIAS Authorization Manager \Program Files\BIAS\BIAS Authorization Manager.exe
Product Registration & Authorization:
The BIAS registration and authorization system is designed to give users the utmost in flexibility.
BIAS software uses a serial number-based system, which allows authorization of up to two computers
for example, a desktop computer at home, and a laptop computer for mobile use.
While your BIAS software may be authorized on up to two computers, it may only be used on one
computer at a time.
Requirements for authorization:
1. The software must be installed.
2. Your serial number must be available. Depending on how you obtained the BIAS software, the
serial number will be provided in various ways:
• In new retail or upgrade packages – on the Owner's Certificate.
• In downloaded purchases – In an email receipt from BIAS
• When bundled with another product – In the accompanying materials for the product the BIAS
software is bundled with. Check with the manufacturer of the product the BIAS software is bundled
with for more information.
3. A computer with internet access must be available.
To authorize BIAS software on a computer with internet access:
1. Launch the BIAS software – when first launched on an unauthorized computer, you will be prompted to authorize it. Click the "Authorize" button to continue to the BIAS Authorization Manager – you
will need to enter a password for an administrator account to proceed.
2. Select the product you wish to authorize, and enter your serial number and email address.
3. Click the "Submit" button. Your BIAS software is now authorized – click the "Done" button to exit
the BIAS Authorization Manager.
10
If the computer on which you plan to run the BIAS software does not have internet access,
you may use another computer to aid in the authorization process:
1. Launch the BIAS software – when first launched on an unauthorized computer, you will be prompted to authorize it. Click the "Authorize" button to continue to the BIAS Authorization Manager – you
will need to enter a password for an administrator account to proceed.
2. Select the product you wish to authorize, and enter your serial number and email address.
3. Click the "Alternate Authorization" button.
4. In the Alternate Authorization dialog, click the "Generate Authorization Request" button to generate
an Authorization Request File.
5. Transfer the Authorization Request File that is generated to a computer with internet access (via
LAN, CD-ROM, flash drive, iPod, etc.).
6. After transferring the Authorization Request File to the internet-equipped computer, double-click
the Authorization Request File – doing so will automatically open your web browser, transmit the
Authorization Request File to the BIAS server, and download your Authorization File to the computer's default download directory.
7. Locate the downloaded folder containing the Authorization File (called "BIAS <Software
Name>.baf"), and transfer it back to the host computer on which it the BIAS software will be used.
8. In the BIAS Authorization Manager's Alternate Authorization dialog, go directly to the "To Finalize
the Alternate Authorization Process" section and click the "Open Authorization File" button.
9. Locate the Authorization File that was transferred back to the host computer in Step 7, and click
the "Open" button. Your BIAS software is now authorized – click the "Done" button to
exit the BIAS Authorization Manager.
If you do not have internet access on any computer, please contact BIAS for assistance at:
US Toll-Free: 1-800-775-2427
International: +1-707-782-1866
The BIAS Authorization Manager can be found in the following location, should you later need
to de-authorize or re-authorize any of your BIAS software:
Mac:
• /Applications/BIAS Authorization Manager
Windows:
• \Program Files\BIAS\BIAS Authorization Manager\BIAS Authorization Manager.exe
BIAS Product Support:
Unlimited Complimentary Self-Help Options:
If you have questions about installing or using your BIAS products, please check the manual or user
guide first, you will find answers to most of your questions there. If you need further assistance,
please check support at: http://www.bias-inc.com/support.html
Here you will find tutorials, frequently asked questions, troubleshooting tips, and more.
Limited Complimentary Technical Assistance:
Ninety days of technical support assistance for up to three incidents are available with the initial
purchase of Type 1 BIAS products (Peak Pro, SoundSoap Pro, Master Perfection Suite).
Ninety days of technical support assistance for a single incident are available with the initial purchase
of Type 2 BIAS products (SoundSaver, Peak Express, Peak LE, SoundSoap, PitchCraft EZ, individual plug-ins from Master Perfection Suite).
11
Type 3 products (OEM versions) and legacy products (Deck, Deck LE, Deck SE) are ineligible for
complimentary technical assistance.
Thirty days of technical support assistance for a single incident are available with the purchase of
paid upgrades to Type 1 and Type 2 BIAS products. The support period begins when the product has
been authorized.
To receive email or telephone technical support, you will need a valid serial number and must be
registered for a current BIAS product. Please keep your original product serial number in a safe
place, as it will be required for support, future upgrades, and updates.
For customers preferring email assistance, please use the email form available on our website at:
http://www.bias-inc.com/support/contact.php
For customers preferring telephone assistance, (connect and toll charges apply), please have your
computer running and close by the phone. Please call: +1-707-782-1865
9AM-5PM Monday-Friday PST, excluding BIAS holidays
Fee-based Technical Support Options:
Fee-based support is available for those customers whose support period has expired or for Type 3
(OEM version) customers. Please call: +1-707-782-1865 9AM-5PM Monday-Friday PST, excluding
BIAS holidays
For customers living outside of North America, please check the BIAS website for your local distributor at: http://www.bias-inc.com/distributors.html
BIAS support policy and hours are subject to change without notice.
Sales and Non-Technical Customer Service:
For product information, sales, and other non-technical customer service, please email or call:
Email: [email protected]
US Toll-free: 1-800-775-BIAS (2427)
International: +1-707-782-1866
(9AM-5PM Monday-Friday PST - excluding BIAS holidays)
For orders, call:
US Toll-free: 1-800-775-2427, International: +1-707-782-1866, Berkley Integrated Audio Software,
Inc. 121 H Street, Petaluma, CA 94952 USA http://www.bias-inc.com
© 2011 Marin Audio Technology, LLC. All Rights Reserved Worldwide. Exclusively licensed to Berkley Integrated Audio Software, Inc. ("BIAS"). "Apple" and "Mac" are registered trademarks of Apple,
Inc. All other trademarks property of their respective holders.
All features, prices, specificationns, and offers are subject to change. Certain features such as the
number of simultaneous plug-ins or tracks are dependent on specific versions of BIAS software,
along with CPU, operating system requirements and capabilities.
BIAS assumes no responsibility for or guarantees of third-party software or hardware specifications,
features, or compatibility with BIAS products.
SoundSaverExpress uses: TagLib (http://developer.kde.org/~wheeler/taglib.html),
LAME (www.mp3dev.org), and libsndfile, released under the GNU Lesser General Public License,
either version 2.1 or optionally version 3 (http://www.gnu.org/copyleft/lesser.html).
12
USB PHONO PLUS BLOCK DIAGRAM AND SIGNAL FLOW:
13
WARRANTY INFORMATION:
Limited Warranty
Applied Research and Technology will provide warranty and service for this unit in accordance with
the following warrants:
Applied Research and Technology, (A R T) warrants to the original purchaser that this product and
the components thereof will be free from defects in workmanship and materials for a period of three
years from the date of purchase. Applied Research and Technology will, without charge, repair or
replace, at its option, defective product or component parts upon prepaid delivery to the factory
service department or authorized service center, accompanied by proof of purchase date in the form
of a valid sales receipt.
Exclusions
This warranty does not apply in the event of misuse or abuse of the product or as a result of unauthorized alterations or repairs. This warranty is void if the serial number is altered, defaced, or removed.
A R T reserves the right to make changes in design or make additions to or improvements upon this
product without any obligation to install the same on products previously manufactured.
A R T shall not be liable for any consequential damages, including without limitation damages resulting from loss of use. Some states do not allow limitations of incidental or consequential damages, so
the above limitation or exclusion may not apply to you. This warranty gives you specific rights and you
may have other rights, which vary from state to state.
For units purchased outside the United States, an authorized distributor of Applied Research and
Technology will provide service.
SERVICE:
The following information is provided in the unlikely event that your unit requires service.
1) Be sure that the unit is the cause of the problem. Check to make sure the unit has power, all
cables are connected correctly, and the cables themselves are in working condition. You may want to
consult with your dealer for assistance in troubleshooting or testing your particular configuration.
2) If you believe the ART unit is at fault, go to www.artproaudio.com. You may contact Customer
Service for more assistance, or directly request a Return Authorization for service in the “resources”
area of the website.
3) If you are returning the unit for service, pack the unit in its original carton or a reasonable substitute. The original packaging may not be suitable as a shipping carton, so consider putting the packaged unit in another box for shipping. Print the RA number clearly on the outside of the shipping box.
4) Include, with your unit, a note with the RA number and your contact information including a daytime
phone number, preferably attached to the top of the unit.
14
SPECIFICATIONS:
Frequency Response:
10 Hz – 50 kHz, +/- 0.5%
THD:
<0.01% typical @ 1 kHz
Hum and Noise:
>90 dB below clipping
Input Impedance:
47k Ohms/100pf (phono), 270k Ohms (line)
Maximum Input Level:
40 mV rms @ 1 kHz (phono), +19dBu (line)
Maximum Gain:
45dB @ 1 kHz (phono), 6dB (line)
Analog Input Connections:
RCA (preamp / phono/line output)
Analog Output Connection:
RCA (preamp line output)
1/8” (monitor/headphone output)
Maximum Output Level:
+6dBu (1.4V rms)
Filter Type / Response:
Switchable, high pass (low cut) –3dB @ 22 Hz
A/D-D/A:
16 bit, 44.1 kHz or 48 kHz, USB selectable from computer
0.4 ms A/D latency @ 44.1 kHz
Digital Audio Interface
TOSLINK Opto In to USB,
TOSLINK Opto Out from USB,
S/PDIF coax (RCA) In to USB
Computer Interface:
USB 2.0 compliant
Chassis Type:
All aluminum black anodized with integral rubber sides
Power Requirements:
USB bus powered or
7-12V DC or 9-12V AC @ 150mA (external)
Either polarity of the tip will work with DC power
Dimensions:
1.85 x 4.6 x 4.5 (in)
47 x 117 x 114 (mm)
Weight:
1.35 lbs, 0.61 kg
Note: 0 dBu = 0.775Vrms
ART maintains a policy of constant product improvement.
Therefore, specifications are subject to change without notice.
Go to www.artproaudio.com for the latest information and on the Project Series USB Phono Plus.
15
www.artproaudio.com
E-mail: [email protected]
Project Series USB Phono Plus
16
169-5004-101