1
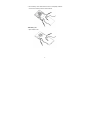
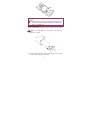
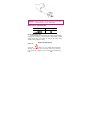
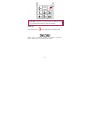
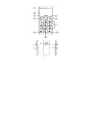
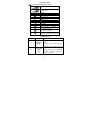
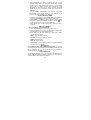
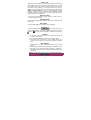
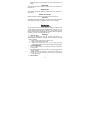
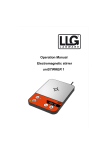
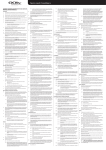
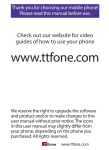
Senior Phone
GSP-100
www.facebook.com/denverelectronics
User Guide
1
··················································································· 4
Put in/Take out battery······························································ 4
Insert/Take out SIM card··························································· 7
Battery Charging ······································································ 8
Switch On /Off phone································································ 9
·················································································10
Stand by Mode ······································································10
Key Functions··········································································12
Voice Volume Key····································································14
···················································································14
Dial out ····················································································14
Emergency Dial ·······································································14
Make an International Call ·······················································15
Dial extension No. of a Fixed line ·············································16
Speed Dial···············································································16
Receiving a Call ······································································16
Reject a Call ············································································16
Conference Call·······································································16
Adjust volume ··········································································17
·····················································································17
Write and send message ·························································17
Read and Reply SMS ····························································18
Inbox and Outbox ····································································18
Emergency ··············································································18
Delete Message ······································································18
Voice mail ················································································19
Service center ·········································································19
Storage status ·········································································19
Store path ················································································19
·······················································································19
Search·····················································································19
New Contact ············································································19
Delete contact ·········································································19
Copy contact ···········································································20
Emergency number ·································································20
Spd.dial ···················································································20
Settings ···················································································20
······················································································20
Received call ···········································································20
Dialed call················································································21
Missed call ··············································································21
Delete all records·····································································21
Talk time ·················································································21
······················································································21
2
Silent mode ·············································································21
Settings ···················································································21
Network setting········································································22
PIN ··························································································23
Calculator ················································································23
Alarm ······················································································24
Birthday reminder ····································································24
Restore factory ········································································24
·····················································································24
················································································25
English Letters Input Method ···················································25
Numeral input method ·····························································25
Punctuation input method ························································25
Care and Maintenance ·································································25
3
Put in/Take out battery
Put in battery
1. Open the battery cover
2. Put battery into the battery slot. Keep three metal points of battery
facing downward and matching with the three metal connection
points on phone.
4
3. Put on battery cover. Make sure that cover is completely matched
and the cover matching sound could be heard.
Take battery out
1. Open battery cover.
5
2. Press the battery side and lift it up to take it out from battery slot.
3. Close the cover. Make sure that cover is completely matched and
the cover matching sound could be heard.
6
Remark:
:Shut down all devices and cut the connection with
charger when removing battery. Please use battery which is
matched with this phone only.
Insert/Take out SIM card
1. Insert SIM card:
:Remove battery cover;Insert and slide the SIM
card with the metal part facing downward by following below
arrow direction at battery slot until SIM card is completely
inserted in right position.
2. Take out SIM card:
:Hold the notch of SIM card and lift it slightly
up by the other hand to take card out.
7
Remark:
:Phone must be power off when put in and take out
battery.
SIM card and the contact point will be easily damaged due to
scratch and bending. Please be careful when inserting and
taking out the SIM card.
Battery Charging
Phone could be charged when phone is power off or power
on.
Make sure that battery is inserted in phone before
charging.
1. Plug in the charger.
2. Plug out the charger from power jack first after it is charged.
Then unplug charger from phone.
8
Remark:
: Battery indication will be displayed after several
minutes if battery is over-discharged.
Battery Level Indication Bar
Charging
Charged
Not enough battery alert
Phone will give alert when battery is not enough and display a
message of low battery on screen. Please charge battery. Please
charge battery when you receive the alert of low battery during
calling in order to keep the calling.
Switch On /Off phone
Switch On
Long press
to switch on. If you already set the PIN code
ON, then you need to type in PIN code. Type in the code and
press green key to enter. Then phone will be on.( default PIN
code
is
1234
)
9
Warning:
:SIM card will be locked if you type wrong code for three
times. And it will inform you to type in PUK code. (Please contact
your network service vendor to unlock it if needed.)
Switch Off
Long press this key
to switch off the phone at standby mode.
Stand by Mode
When phone is ready to use but no operation is done on
phone, then phone is under stand by mode.
10
11
Icons on Screen
Icons might be displayed on screen.
Battery status
Signal status
Alarm
Unread message
Message Full
Call transfer
Missed call
Silent mode
Roaming
Keypad Lock
Headset
Lock keypad
New message indication at
keypad lock mode.
Missed
call
indication
at
keypad lock mode.
New message and missed call
indication at keypad lock mode.
Key Functions
Key No
Key Name
Functions
3
Navigation
Up key
Standby mode:press to enter main
menu
Operating:press to move cursor up
4
Answer Key
(Green
key)
Press to call out: press to pick up
phone when there is incoming call.
Standby mode:press to enter call list
Operating : Press to confirm the
function you choose.
12
5
Navigation
Down key
Standby mode : press to enter
phonebook
Operating : press to move cursor
down
Phone Off:Long press to switch on;
Phone On:Long press to switch off;
6
End Key
(Red Key)
7
Numeric key
8
* key
9
# key
10
Voice
Volume
Key
Operating : Press to go back to
previous menu
Long press it at non-editing screen to
go back to standby screen.
Press to input numbers or letters
Standby mode:Long press to call the
set number directly; Short press to
type in *,P.
Editing mode: Press to use normal
symbol.
Standby mode:Long press to set
phone silent mode, short press to
type in #.
Editing mode:Press to switch typing
method.
Press to add up volume directly at
what you set level during calling
and in handsfree mode; Short press
to type in 0,+.
11
Volume Key
Press volume key + to increase
volume and press volume key – to
decrease sound
(It is able to use during calling, radio
and volume adjusting.)
12
FM Key
Push up to open FM;Push down to
close it.
13
Torch Key
Push up to open torch;Push down to
close it.
13
14
15
Keypad
Lock
Push up to unlock keypad and push
down to lock keypad
Emergency
Call
Emergency Call is ON:Long press to
dial emergency call
Emergency Call is OFF:Long press
this key. It will prompt out a
message Reopened? Then press
answer key to set it on.
Voice Volume Key
When you are during a call and in handsfree mode, you can long
press this key to increase the volume at you set volume level if you
think current volume is not enough.
How to set the aid volume level:
1. Press navigation up key to enter main menu to select
Settings
Volume adjustment
Voice Volume.
settings
2. Press navigation key up and down or volume key to adjust.
Press up key or volume key + to increase volume and press
down key or volume key - to decrease volume. Press answer
key to save the set volume.
Dial out
1. Enter area code and phone number and press Send/Green key
to dial out.
2. Use End key to delete if there is wrong input. Press and hold
End key to clear all characters.
Obstacles give lots of effects on calling quality. Moving around
in a small range will improve signal strength effectively.
Emergency Dial
How to set emergency dialing status : Contact Emergency
number Status. Set it as ON or OFF.
When SIM card is inserted:
1. When emergency call is set ON: you can long press SOS button
at phone back side to dial the emergency number if you already
set it.
2. When emergency call is set OFF: you can long press SOS button
14
at phone back side. It will prompt a message on phone screen:
Reopened? Then you can press answer key to set it on.
3. When emergency call is set ON: phone will send a message to set
emergency numbers and then call those numbers one by one if
you already set the emergency call number. There will be 3
calling cycles. It will call next number if previous number is failed
to connect. Phone will call to local emergency number such as
112 if you don’t set the emergency number in advance.
4. Phone will send out alerting sound when it is sending message
and calling to set emergency numbers.
5. If all emergency numbers are dialed but without answering, then
phone will be in emergency mode within one hour. In this case,
phone will pick up incoming call and activate hand free mode
automatically (only pick up one incoming call). After that, phone
will go back to normal status. That means you need to press green
key to pick up incoming calls. During dialing emergency calls, if
one of calls is connected, then phone will return to normal status
after this call is end.
When SIM card isn’t inserted:Long press SOS button at phone back
side to directly call to 112.
Hang up the call:Long press End button to hang up the call during
calling out or in.
Long pressing SOS button at any condition will let phone
return to standby mode automatically. Long pressing the button will
not activate the emergency call during Keypad lock mode .
Remark: In every country where it can use GSM network, you can
use emergency dialing service if you are in network covering range
(you can check the network strength indicator on left upside of phone
screen to know whether you are in the range or not). If your network
provider doesn’t provide roaming service at that area, then it will
show EMERGENCY CALLS ONLY on phone screen. That means
you can only call emergency numbers. If you are in the range of
network covering, you can dial emergency number without SIM card.
Make an International Call
1. Press 0 key for twice times and sign “+ ” will come out. Then
enter country code, area code and phone number (without a zero
in front of mobile phone number) Press Send key to enter voice
dial to call out.
2. Dial a fixed line: “+”country code + entire phone number + Send
key.
15
Dial extension No. of a Fixed line
Some extension numbers of fixed line couldn’t be dialed directly. You
need to dial telephone exchange first and then dial the extension
number. Type in a P symbol between telephone exchange number
and extension number, this phone will dial the extension number
automatically. Follow below method to make a symbol P: short press
* key for twice times. Then it will display a P symbol on screen.
Speed Dial
If you already set the speed dial numbers, then you can long press
number key 2 to 9,* key to dial set numbers out under standby
mode. Long pressing number key 1 is to dial to voice mailbox if you
already set the mailbox number.
Receiving a Call
Press Send key
to receive incoming call
During a call, you can do below operations by pressing
answer key: switch calls; mute; unmute; speaker On/OFF,
search contact; Phone will play sound to inform that there is
a new incoming cal. If you pick up the new call, then
previous call will be hold.
Press end key to end a call.
Reject a Call
Press end key
to reject an incoming call.
Conference Call
This phone supports conference call function and supports 3parties
(three partied on two connection path). This function requires
network support. Please consult your network service provider to
activate this function.
Conference Call: Method One(one party is incoming side and the
other party is calling out side)
:
1. Pick up first call
2. Dial another call out:type in phone number directly to dial out
another call;Or press answer key to enter option menu to
select browse in order to use record in phonebook directly.
When you dial out another call, previous incoming call will be
hold.
3. When the second call is connected, you can press answer key
16
to enter menu and select [Make session].
Conference Call: Method(two sides are incoming calls)
:
1. Pick up first call
2. Pick up second call:When the second call is coming, it will
show the message of this incoming call (phone will hold current
call automatically). You can press answer key to pick up the
second call.
3. When the second call is connected, press answer key to enter
menu list to select [Make session]. Then you can have a
conference call.
Remark:
: When two parties in conference call are incoming calls,
then you need to activate call waiting function to allow two
incoming calls get through at the same time.
Adjust volume
You can press volume key+, - to adjust volume during the call. You
also can use Voice Volume Key to set volume level as you like.
This function provides text message service which could receive and
send text message. When there is
on screen, then it means
on screen when
there is a new message. It will show
mail box is full. Please delete message that it is no use.
Write and send message
1. Select【SMS】【New message】 to enter message editing.
Write the message content directly.
2. Type in message at editing page. Please refer to Input Method.
3. Switch input method:Press “#” key to switch or press answer
key to enter option menu to select.
17
4.
Send message(to one person):Press answer key to enter
[option] send. Then you can press answer key to enter
number typing in page to type in the number or you can press
answer key to choose number from phonebook (press
navigation up and down key to search contacts and press
answer key to get it). Finally press answer key to send out the
message.
5. Save the message:Select SAVE to save it to draft; It will prompt
out message sending failed. Resent or not? Message will be
automatically saved in Outbox if you select no.
Read and Reply SMS
1. Check to read message. Press answer key to read message
directly. Press end key to exit if you want to read it later.
2. Select [SMS] [Inbox] to check message. Press up and
down key to select the message you want. It will have
sign
at standby window if you have unread message.
3. Press answer key to enter option menu when you read a
message.
Inbox and Outbox
Save and manage received messages.
1. Inbox:Show messages in sorting of received time.
2. Press navigation up and down key to browse messages and
press answer key to check message content
3. Press green key to enter option menu: Dial, reply, delete,
Transfer and use number.
Reply:reply message to sender
Transfer:forward that message to others.
Delete: delete message
Dail:
:call back to sender
: Get the sender number or numbers in message
Use number:
out and save to phonebook.
Emergency
Select [SMS] [SMS setting]
[Emergency]
[On].You can set
this function to let phone send out the emergency message while
dialing emergency call. You can pre-set one emergency message.
You can modify the message.
Delete Message
You can delete SMS with this function, including messages of inbox,
outbox, draft, all messages. Please be careful when you operating
on this function to avoid improperly deleting.
18
Voice mail
Voice box is a kind of network service,you must apply for the service
before using it. If you want to get more information about your voice
box, please consult your network service operator. You can dial
voice box by long pressing 1 (if it is set as voice box number in
advance). If you want to reset your voice box number, please select
[SMS] [Voice mail].There will be prompt message “change
number?”, press green key to enter into number editing interface,
input the invoice box number which you want to listen to and then
press green key for confirmation.
Service center
You can set the SMS service center number in order to send or
receive messages normally.
Storage status
You can check SMS memory status of the phone or SIM card with
this function.
Store path
You can choose SIM card or phone to store messages.
You can save the name and phone number of contact to the phone
memory and SIM card. The contact information in phone memory is
shown by
, and the contact information in SIM card is shown by
.
Search
1. In the main menu, select [Contact] [Search] to browse all
records in phone book.
2. Type in the first character of the name you want to search.
3. The system will stop the cursor on the related record. The
cursor can be scrolled up and down by pressing navigation
key.
New Contact
1. Select [Contact] [New contact] to add new phone number
record.
2. Switch typing methods by pressing # key during adding record.
3. According to your set saving position (Contact Settings Store path), the added record will be saved automatically to the
set position.
Remark: To save new record, the phone number must be filled in.
Delete contact
19
If you want to delete the contact information in phone or SIM card,
you can select menu [Contact] [Delete contact] delete or
delete all. If you select delete all, then you need to choose whether
delete from SIM card or cell phone. You can also enter phone book
and press answer key to go to option delete contact to delete the
record one by one.
Copy contact
Select [Contact] [copy contact] To phone directly, all of the
contact information will be copied. You also can do it in reverse. You
also can copy contact information separately by : enter into phone
book and select the contact you want to copy, press answer key to
enter option, select Copy contact, and then press answer key to
confirm. This option includes copying the contact information from
phone to SIM card or from SIM card to phone.
Emergency number
By selecting [Contact] [Emergency number] [new], you can add
a maximum of 4 emergency phone numbers. You can also change
and delete the set emergency numbers, and set emergency dialing
status.
Spd.dial
You can set 9 speed dialing numbers from 2 to 9, *.you can dial the
related numbers by long pressing related key under standby mode.
You can set speed dials directly in phone book by selecting [Contact]
[Spd. dial]. You also can edit, dial, and delete the speed dialing
number.
Settings
Store path: Set the default saving position for the numbers
you want to save: SIM card, cell phone.
Storage State:
: Let you know more about the phonebook
memory status on the phone and SIM card.
To record the recent dialed call, missed call and received call. For
each function, it can store a maximum of 20 records.
Received call
Show recent 20 received phone call numbers.
1. Select “call log” “received call”, press the navigation key up
or down to browse the call log.
2. Press answer key to enter option menu. You can Dial, Reply,
20
delete records, Indicate number and save number which you
select.
Dialed call
Show recent 20 dialed numbers. Please refer to the operation of
received call.
Missed call
Show recent 20 missed numbers. Please refer to the operation of
received call.
Delete all records
Delete all history of dialed call, missed call and received call.
Talk time
View detail call duration information for last call, all calls, dialed call,
and received call. Select all durations clear to clear all records.
Silent mode
You can make your phone under silence by setting it as Silent mode
or long press # in Standby mode. If silent mode is chosen, you can
set the duration of silent mode according to your requirement. The
silent mode will switch automatically to normal mode if time duration
is expire. (“0” is for permanent silent mode)
Settings
Ring tone type
You can set desired ring tone for Incoming call, Alarm ring,
Message alert tone, Birthday reminder, key tone, Vibration alert and
Power on/off ring.
1. Select ring tone style that you want to use;
2. Enter corresponding ring tone list;
3. Select your favorite ring tone, the ring tone may play
automatically when the cursor stop over it (except keypad).
Volume adjustment
You can adjust volume for Incoming call, Call volume and
Voice volume.
1. Select the desired volume and enter into corresponding volume
adjust interface.
2. Press navigation key up/down or volume key to adjust. Up or
volume key “+” is for increasing volume, down or volume key
“-”is for decreasing.
Disp Contrast
21
You can adjust the brightness of the screen according your
demands. Press navigation key up, you can get high contrast
while down for low contrast.
Language: Select language for phone.
Date&Time setting: you can set the time and date with this
function, including setting date format.
Network setting
Call waiting: At this interface, you can carry out operation such
as Search, Activate and cancel. Once call waiting is chosen, if
there is new call during talking, network service center will
send busing signal through the phone. You can decide to
answer the call or not according to your situation. If this
function is closed, there will be no busy signal to prompt new
incoming call, while the caller will hear busy signal.
Call transfer: if call divert is started, the incoming call will be
diverted automatically to designated numbers. There’re
various status of call divert. You can carry out the operation of
Search, Activate and cancel with this function.
Search: To check whether the function of call divert is on or
off.
Activate: to start up corresponding calls divert. Once start-up is
chosen, you can input the phone numbers that you
want to divert to and save it to start up this function.
Cancel: to close relative calls divert
A.Divert all calls: to divert all incoming calls to designated
number.
B.Divert when busy: to divert incoming call to designated
number if phone is busy.
C.Divert when no reply: to divert incoming call to designated
number if you do not answer.
D . Divert when out of service: to divert incoming call to
designated number when the phone is switched off or you
are out of network coverage.
E.Cancel all: You could select this function to cancel all call
diverting when you don’t need.
Call restrict: this function includes restricted outgoing calls (all
calls, international calls, call barring call out intern except) and
restricted incoming calls (all calls, restricted incoming calls
when roaming). If you want to cancel, the code is needed.
When these functions are running, there should be relative
service provided by network server.
22
A.Restricted outgoing calls: all of the outgoing call is forbidden
(except emergency call)
B.Restricted Incoming calls: all of the incoming call is forbidden
Network select: you can set the mode of network searching of
cell phone by this function: choose automatic search or manual
search.
PIN
You can set code for phone with this function. It will protect your
phone from unauthorized using and private information leakage,
once your phone has been stolen or the other situation.
If PIN code is set, you need to input correct PIN code each
time when you power on phone.
If this function is off, PIN code is not necessary when power
on.
If you want to change PIN code, you should input the old one
first, input the new one and then confirm the new code once
again, thus the PIN code can be changed successfully.
Remark: The default PIN code is: 1234
Calculator
There is calculating function in the phone. You can carry out the
operation for plus, minus, multiply, and divide. Step for using as
below:
1. Input the first numeral: when “0” shown at the screen, you can
input the numeral you want to calculate.
2. Input operation symbol: press navigation key up/down to
choose the operation symbol like +, -, *, /, and then press call
key to confirm.
3. Input the second numeral.
4. Calculate: press navigation key up/down to choose “=”, and
then press call key to confirm.
(ending key). If you are inputting the
5. Clear: press
calculated numeral or operation symbol, only the numeral or
operation symbol will be cleared. If“0”shown in the display,
please press ending key for exiting. You can clear all of the
content by pressing ending key after you have the calculating
result.
Remark: the accuracy is limited and round-off error may occurred
23
Alarm
The phone is with alarm clock function, you can set up alarm time
and alarm ring tone according to your requirement. (Settings
Settings Ring tone type Alarm ring).
1. Enter into the alarm clock setup interface. The cursor has been
set to stay over the area for time on hour. Press navigation key
up and down to set. You also can input time directly.
2. Press call key for confirming. The cursor will be positioned on
minutes automatically. Press navigation key up/down to set, or
input numeral directly. And then press call key for confirming.
Birthday reminder
This function can operate ten birthday clock to remind the date for
somebody’s birthday that you want to keep in mind.
Restore factory
You can restore the current function or your phone to default factory
setting. Select the options that you want to be restored and press
Answer key for confirmation.
Remark:
:Restore Setup: restore all the functions under "Setup" to
factory mode; Restore all: restore all the functions under "Setup"
to factory mode and clear up all the contents stored in the phone.
Then antenna, which not including wireless antennas, used
for radio. No matter you insert earphone or not, you can
listen to the radio. If earphone is inserted, the sounds will
come out from earphone. But if you do not use earphone, the
sounds come from speaker of cell phone.
1. Turn on radio: when cell phone is in standby mode, push radio key
up to make radio on.
2. Turn off radio: during the listening, push radio key down to make
radio off.
3. Operating process: turn on radio to enter into the listening page,
press navigation up/down to set the channel, or you can input
channel directly. Press answer key (green key) to move cursor
and press “*” to start auto search. Press end key to exit from auto
search. It will prompt out a message of finding out a channel and
remind user whether to continue searching or not. Then press
green key to continue and press end key to go back to radio page.
(press * again to search again when you go back to radio page.)
4. Stop listening in by pressing end key (red key). But it will not exit
24
radio page. Press end key (red key) to continue.
5. Long press # key to lock keypad and press it again to unlock.
6. Volume adjust: when listening, press volume key “+,-” to adjust
radio volume.
7. Plug in earphone. Then long press volume + key to listen to FM
from outside, Long press volume - key to listen from earphone.
Remark:The quality of listening is related to the signal quality
where you locate
English Letters Input Method
English letter input method includes initials capital letter, capital letter
and small letter which is a kind of input method with single letter unit.
English letters are set in number key 2 to 9. Press number
key one time to show the first letter on number key and twice
for the second letter on number key.
Click letters on screen directly or write down letters by using
stylus on screen.
Press number key 1 to type in normal symbol and press
number key 0 to type in number 0 or blank at letter input
mode.(You cannot input a blank by pressing 0 key under
intelligent English input method mode.)
Press * key to switch initials capital letter, capital letter and
small letter under English letters input method mode.
Numeral input method
When input method icon shows “123”, then you can type in numbers
by clicking on numbers on screen or use stylus pen to write numbers
directly on screen.
Punctuation input method
Press * to enter into punctuation selection list under writing short
message mode, move the cursor up/down/left/right by pressing
numeral key 2,8,4 and 6. Press numeral key 5 or answer key to get
the selected punctuation.
Care and Maintenance
The suggestions below will help you protect your warranty coverage
and enjoy your device for many years.
Keep the device dry. Rainwater, humidity and all types of
liquids or moisture can contain minerals that can corrode
electronic circuits. If your device does get wet, remove the
25
battery and allow the device to dry completely before replacing
the battery in it.
Do not use or store the device in dusty, dirty areas. Its moving
parts and electronic components can be damaged.
Do not store the device in hot areas. High temperatures can
shorten the life of electronic devices, damage batteries, and
warp or melt certain plastic parts.
Do not store the device in cold areas. When the device returns
to its normal temperature, moisture can form inside the device
and damage electronic circuit boards.
Use the supplied antenna with device or approved antenna
only. Non approved antenna or revised antenna or other
accessories may damage the device and offend wireless
device management methods.
Please use charger indoor.
All of the above suggestions apply equally to your device, battery,
charger, or any enhancement. If any device is not working properly,
take it to the nearest authorized service facility for service.
Additional Safety Information
Operating Environment
Remember to follow any special regulations in force in any area and
always switch off your phone whenever it is forbidden to use it, or
when it may cause interference or danger. When connecting the
phone or any accessory to another device, read its user’s guide for
detailed safety instructions. Do not connect incompatible products.
As with other mobile radio transmitting equipment, users are advised
that for the satisfactory operation of the equipment and for the safety
of personnel, it is recommended that the equipment should only be
used in the normal operating position (held to your ear with the
antenna pointing over your shoulder).
Vehicles
RF signals may affect improperly installed or inadequately shielded
electronic systems in motor vehicles such as electronic fuel injection
systems, electronic antiskid (antilock) braking systems, electronic
speed control systems, air bag systems. For more information,
check with the manufacturer or its representative of your vehicle or
any equipment that has been added. Only qualified personnel should
service the device, or install the device in a vehicle. Faulty
installation or service may be dangerous and may invalidate any
warranty that may apply to the device. Check regularly that all
wireless device equipment in your vehicle is mounted and operating
properly. Do not store or carry flammable liquids, gases, or explosive
materials in the same compartment as the device, its parts, or
enhancements. For vehicles equipped with an air bag, remember
that an air bag inflates with great force. Do not place objects,
including installed or portable wireless equipment in the area over
26
the air bag or in the air bag deployment area. If in-vehicle wireless
equipment is improperly installed and the air bag inflates, serious
injury could result.
Wireless phones can cause interference. Using them in aircraft is
both illegal and dangerous.。
Potentially Explosive Atmospheres
Switch off your phone when in any area with a potentially explosive
atmosphere and obey all signs and instructions. Sparks in such
areas could cause an explosion or fire resulting in bodily injury or
even death. Users are advised to
switch off the phone while at a refueling point (service station). Users
are reminded of the need to observe restrictions on the use of radio
equipment in fuel depots (fuel storage and distribution areas),
chemical plants or where blasting operations are in progress. Areas
with a potentially explosive atmosphere are often but not always
clearly marked. They include below deck on boats, chemical transfer
or storage facilities, vehicles using liquefied petroleum gas (such as
propane or butane), areas where the air contains chemicals or
particles, such as grain, dust or metal powders, and any other area
where you would normally be advised to turn off your vehicle engine.
Emergency call:
Important: Wireless phones, including this phone, operate using
radio signals, wireless networks, landline networks, and
user-programmed functions. Because of this, connections in all
conditions cannot be guaranteed. You should never rely solely on
any wireless phone for essential communications like medical
emergencies.
Please refer to this user manual or consult your supplier to get more
data. When you make an emergency call, please provide as much
detailed necessary information as possible. Your wireless phone
may be the only communication device when there is accident. Call
only can be end when there is hang up command.
Radio frequency (RF) exposure and SAR
THIS DEVICE MEETS INTERNATIONAL GUIDELINES FOR
EXPOSURE TO RADIO WAVES
Your mobile device is a radio transmitter and receiver. It is designed
and manufactured not to exceed the limits for exposure to radio
frequency (RF) recommended by international guidelines (ICNIRP).
These limits are part of comprehensive guidelines and establish
permitted levels of RF energy for the general population. The
guidelines were developed by independent scientific organizations
through periodic and thorough evaluation of scientific studies. The
guidelines include a substantial safety margin designed to assure
the safety of all persons, regardless of age and health.
27
The exposure standard for mobile devices employs a unit of
measurement known as the Specific Absorption Rate, or SAR. The
SAR limit stated in the international guidelines is 2.0 watts/kilogram
(W/kg)*. Tests for SAR are conducted using standard operating
positions with the device transmitting at its highest certified well
below the maximum value. This is because the device is designed to
operate at multiple power levels so as to use only the power required
to reach the network. In general, the closer you are to a base station,
the lower the power output of the device. power level in all tested
frequency bands.
Although the SAR is determined at the highest certified power level,
the actual SAR of the device while operating can be well below the
maximum value. This is because the device is designed to operate
at multiple power levels so as to use only the power required to
reach the network. In general, the closer you are to a base station,
the lower the power output of the device.
SAR values may vary depending on national reporting and testing
requirements and the network band. Use of device accessories and
enhancements may result in different SAR values.
* The SAR limit for mobile devices used by the public is 2.0 W/kg
averaged over 10 grams of body tissue. The guidelines incorporate a
substantial margin of safety to give additional protection for the
public and to account for any variations in measurements. SAR
values may vary depending on national reporting requirements and
the network band.
The highest SAR value for this model phone tested for use is 0.873
mW/g
28
Electric and electronic equipment and included batteries contains
materials, components and substances that can be hazardous to
your health and the environment, if the waste material (discarded
electric and electronic equipment and batteries) is not handled
correctly.
Electric and electronic equipment and batteries is marked with the
crossed out trash can symbol, seen below. This symbol signifies that
electric and electronic equipment and batteries should not be
disposed of with other household waste, but should be disposed of
separately.
As the end user it is important that you submit your used batteries to
the approriate and designated facility. In this manner you make sure
that the batteries are recycled in accordance with legislature and will
not harm the environment.
All cities have established collection points, where electric and
electronic equipment and batteries can either be submitted free of
charge at recycling stations and other collection sites, or be collected
from the households. Additional information is available at the
technical department of your city.
ALL RIGHTS RESERVED
DENVER ELECTRONICS A/S
WWW.DENVER-ELECTRONICS.COM
Importer:
DENVER ELECTRONICS A/S
29
Stavneagervej 22
DK-8250 EGAA
DENMARK
30