1
DENVER IR-100
SAFETY PRECAUTIONS
Read all the instructions carefully before using the unit and keep them for future reference.
Check that the voltage marked on the rating label matches your mains voltage.
Location of Unit
The unit must be placed on a flat stable surface and should not be subjected to vibrations.
Do not place the unit on sloped or unstable surfaces as the unit may fall off or tip over.
The mains socket must be located near the unit and should be easily accessible.
Avoid extreme degrees of temperature, either hot or cold Place the unit well away from heat sources
such as radiators or gas/electric fires. Avoid exposure to direct sunlight and other sources of heat.
Never place any type of candle or naked flame on the top of or near the unit.
To reduce the risk of fire, electric shock or product damage, do not expose this unit to rain, moisture,
dripping or splashing. No objects filled with liquids, such as vases, should be placed on the unit.
If you spill any liquid into the unit, it can cause serious damage. Switch it off at the mains
immediately. Withdraw the mains plug and consult your dealer.
To prevent the risk of electric shock or fire hazard due to overheating, ensure that curtains and other
materials do not obstruct the ventilation vents.
Do not install or place this unit in a bookcase, built-in cabinet or in another confined space, ensure
that a minimum of 10cm should be kept around the apparatus for ventilation.
Safety
Always disconnect the unit from the mains supply before connecting/disconnecting other devices or
moving the unit.
Unplug the unit from the mains socket during a lightning storm.
This unit will become warm when used for a long period of time. This is normal and does not
indicate a problem with the unit.
CAUTION
CAUTION
RISK OF ELECTRIC SHOCK
DO NOT OPEN
RISK OF ELECTRIC SHOCK
DO NOT OPEN
DANGEROUS VOLTAGE
Conductor dangerous voltage, that may be of sufficient magnitude to constitute a risk of electric
shock to persons is present within this product's enclosure.
ATTENTION
The owner's manual contains important operating and maintenance instructions, for your
safety, it is necessary to refer to the manual.
Mains Cable
Make sure the unit is not resting on top of the mains cable, as the weight of the unit may damage the
mains cable and create a safety hazard.
If the mains cable is damaged it must be replaced by the manufacturer, its service agent, or similarly
ENG-1
qualified persons in order to avoid a hazard.
Interference
The normal function of the product may be disturbed by Strong Electro Magnetic Interference. If so,
simply reset the product to resume normal operation by following the instruction manual. In case the
function could not resume, please use the product in other location.
This unit includes micro-processors which may malfunction as a result of external electrical
interference/noise or electrostatic discharge. If the unit is not working properly, disconnect the power
source and then reconnect it.
Supervision
Children should be supervised to ensure that they do not play with the unit.
Never let anyone especially children push anything into the holes, slots or any other openings in the
case-this could result in a fatal electric shock.
Service/Maintenance
To reduce the risk of electric shock, do not remove screws. The unit does not contain any
user-serviceable parts. Please leave all maintenance work to qualified personnel.
Do not open any fixed covers as this may expose dangerous voltages.
Ensure to unplug the unit from the mains socket before cleaning.
Do not use any type of abrasive pad or abrasive cleaning solutions as these may damage the unit's
surface.
Do not use liquids to clean the unit.
ENG-2
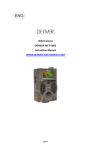
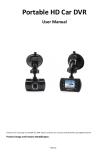
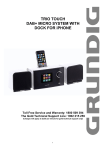
FEATURES AND CONTROLS
1.
2.
3.
4.
5.
6.
SPEAKER
BUTTON
LCD DISPLAY
SCROLL CONTROL/
SELECT BUTTON
VOLUME+ BUTTON
IR SENSOR
7.
8.
9.
10.
11.
12.
13.
MEMORY BUTTON
MODE BUTTON
INFO BUTTON
BACK BUTTON
MENU BUTTON
VOLUME- BUTTON
ROD ANTENNA
14.
15.
16.
17.
18.
HEADPHONE JACK
AUX IN JACK
USB DEVICE IN PORT
NETWORK SOCKET
DC CORD SOCKET
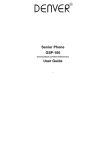
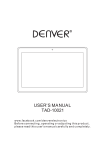
REMOTE CONTROL
1.
2.
3.
4.
5.
6.
7.
8.
9.
10.
11.
12.
13.
14.
15.
16.
17.
18.
BUTTON
MENU BUTTON
BUTTON
BUTTON
BUTTON
BUTTON
BUTTON
MUTE BUTTON
VOLUME- BUTTON
MODE BUTTON
INFOBUTTON
SLEEP/SNOOZE BUTTON
BUTTON
SELECT BUTTON
BUTTON
ALARM BUTTON
MEMORY BUTTON
VOLUME+ BUTTON
REMOTE SENSOR
To operate the unit with the remote control, point the remote at the Remote Sensor on the front of the
main unit and press the appropriate button. The remote control has an effective operating range of
approximately 20 feet and an angle of no more than 30º.
NOTE: Bright sunlight may interfere with the operation of the remote control.
ENG-3
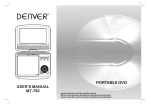
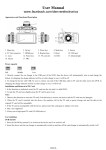
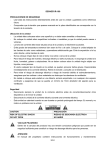
PUTTING THE BATTERY INTO THE REMOTE CONTROL
1. Press the battery compartment gently according to the direction indicated in the illustration.
2. Slide to open the battery compartment.
3. Insert the supplied CR2032 battery into the compartment according to the polarity markings ("+" and
"-") inside the compartment and on the battery. Replace the battery compartment until it clicks.
**BATTERY INCLUDED**
**BATTERY INCLUDED**
PLEASE REMOVE SAFETY STRIP BEFORE
USING THE UNIT
PLEASE REMOVE SAFETY STRIP BEFORE
USING THE UNIT
CHANGE OF BATTERY
CHANGE OF BATTERY
BATTERY COMPARTMENT OPEN/CLOSE
BATTERY COMPARTMENT OPEN/CLOSE
BATTERY PRECAUTIONS
Follow these precautions when using a battery in this device:
1. Warning-Danger of explosion if battery is incorrectly replaced. Replace only with the same or
equivalent type.
2. Use only the size and type of battery specified.
3. Be sure to follow the correct polarity when installing the battery as indicated in the Battery
Compartment. A reversed battery may cause damage to the device.
4. If the device is not to be used for a long period of time, remove the battery to prevent damage or
injury from possible battery leakage.
5. Do not try to recharge a battery not intended to be recharged; it can overheat and rupture. (Follow
battery manufacturer's directions.)
6. Battery shall not be exposed to excessive heat such as sunshine, fire or the like.
SUMMARY OF CONTROLS-UNIT AND REMOTE
Control
Function
Press to turn on or back to standby mode (showing clock and date).
MODE
Press to cycle through the modes: Internet radio, Music player, DAB radio, FM
radio, Aux in.
INFO
Press to view more information about the station or track playing. Press again
to cycle through further information screens then return to the normal Now
playing screen.
MENU
Press to show menu for the current mode. Press again to show Now playing
screen.
BACK
Press to return to previous screen. In play mode, this button may be used to
return to the last track list or station list.
ALARM
Press to enter alarm wizard, turn off alarm (when alarm is sounding) and
ENG-4
toggles between alarms in standby.
SLEEP/SNOOZE
When playing, standby after a set time.
When alarm is sounding, snooze for a set time.
MEMORY
Press for the Preset recall/Save menu, Scroll up/down to select the preset
number then press Select to confirm.
SCROLL/SELECT
On unit, Turn to scroll through a menu or station list. The chosen option is
highlighted in reverse text (white characters on a dark background). Press to
select.
Press to previous track or hold to scan down/rewind.
Press to next track or hold to scan up/fast forward.
Press to play or pause.
VOLUME+
Press to increase volume.
VOLUME-
Press to decrease volume
MUTE
Press to mute audio output.
Press to scroll up through a menu or station list.
Press to scroll down through a menu or station list.
Press to scroll back screen.
Press to scroll forward screen.
SELECT
On remote, press to select the chosen option.
Most of the functions of this unit can be operated by pressing the buttons on the front panel or the
corresponding buttons on the remote control handsel.
ENG-5
SET UP & CONNECTION
Mains Connection
1. Connect the AC power cord to the unit via the AC socket at the back.
2. Plug the AC power cord to the AC mains outlet.
Network Connection
Wired network
1. Check first of all whether the control lamps (LINK/ACT) of your LAN connection or your router light
up.
2. Use an Ethernet cable with RJ45 connector to connect the NETWORK socket of the radio with the
LAN port of your router.
3. Proceed for the operation as described in the below "GETTING STARTED". But no need to run
through the setup wizard
Note: Information on the LAN connection can be obtained from the user manual of the router
manufacturer.
Wireless network
1. Check first of all whether the control lamps (LINK/ACT) of your WLAN connection or your router light
up.
2. Proceed for the operation as described in the below "GETTING STARTED". It is highly
recommended to run through the setup wizard in the system settings section.
Note: Information on the WLAN/WiFi network connection can be obtained from the user manual of the
router manufacturer.
Walls or other obstacles may influence the WiFi range. Try to find the best location to avoid interruption
and interference while operating.
GETTING STARTED
Press the
button once to switch on the radio, the display will show the main menu. To go to a function
or open a sub-menu, rotate the SELECT control followed by pressing on it to confirm. Each function is
selected via a menu consisting of several levels.
Main menu
The following modes can be selected in the main menu:
Internet radio, Music player, DAB radio, FM radio, AUX in, Sleep, Alarms, System settings.
To select your desired function, rotate the SELECT control followed by pressing on it to confirm.
System settings
Setup wizard
The setup wizard is available in the system settings section, you can run through this to configure
settings for date/time and network, once this has finished, your radio is ready to use.
Note: No need to run through the setup wizard if a wired network is used.
12/24 hour display
To select your preference between 12 or 24 hour clock display format-rotate the SELECT control
followed by pressing on it to confirm.
Time/Date
The time and date can be manually set or automatically via the network, DAB or FM.
ENG-6
Auto update
The auto update works with data sent over DAB, FM or the Internet. The clock is only updated when in a
corresponding mode, so it is recommended to select a mode that you use regularly.
1. Select auto update from DAB, FM or Network.
2. Select the appropriate time zone if the auto update is done by the Internet.
3. If your country uses daylight saving, the automatically update time may be wrong by one hour. Set
the daylight savings to ON when daylight savings are in effect.
Manual set
1. If "No update" is selected, the wizard will prompt you to set the time
and date manually. The date and time are displayed in dd-mm-yyyy
and hh:mm AM/PM format.
2. The value to be set will flash, rotate the SELECT control to adjust the
value followed by pressing on it to go for the next setting, firs set the
date then finally the time.
Network
The unit is compatible to all standard network protocols and encryption methods, including Wi-Fi
Protected Setup (WPS). In case of an unencrypted network, the unit will automatically establish
connection and no further settings are necessary.
ENG-7
Standard encrypted network
1. To enter the network key (password), rotate the SELECT control to move the cursor through the
characters to be selected and press on it to confirm.
2. The key that is entered will be displayed in the upper part of the display.
WPS-encrypted network
WPS-encrypted networks are identified by their network names as soon as the unit starts searching for
available network connection. Select one of the following connection methods:
Push button
The radio prompts you to press the connection button on the router, it then scans for a
corresponding network and establishes the connection.
Pin (code number)
The radio generates an 8-digit code number. Enter this code number into the wireless router or
access device.
WPS
Enter the network key for a standard encrypted network.
Note: Additional information on setting up the WPS-encrypted networks can be obtained in the user
manual of your WPS router.
Completion
The radio establishes connection with the selected network.
If connection is failed, the radio returns to the previous display and prompts you to retry.
If an existing network connection is lost, it would automatically attempt to retry for reconnection.
Equaliser
Several preset EQ modes are available: Normal, Flat, Jazz, Rock, Movie, Classic, Pop, News.
In addition, user-defined settings are possible you can set up the equalizer with bass, treble and
loudness according to your personal taste.
Network
View settings
You can check the following information on the currently connected network:
Active connection, MAC address, WLAN region, DHCP.SSID, IP address, subnet mask, gateway
address, first and second DNS.
WLAN region
Select a WLAN region for optimal WLAN connectivity:
Most of Europe, USA, Canada, Spain, France, Japan, Singapore, Australia, Republic of Korea.
Manual settings
Select either a wireless or wired connection and activate/deactivate DHCP.
Network profile
The radio stores the last four wireless networks that were connected and attempts each time to
reconnect to one of them. You can view a list of the registered networks. From here you can delete
unwanted networks by turning the SELECT control followed by pressing on it to confirm delete.
Language
The default language is English.
To select other languages, rotate the SELECT control followed by pressing on it to confirm.
ENG-8
Factory reset
Perform a factory reset returns the unit to factory settings. All manual settings such as time, date,
network configuration and presets are deleted.
The radio's current software version is not affected and remains as it was registered in the
Internet-Radio- Portal. Favourites in the Internet radio remain until newly registered with another account
in the Internet portal.
Software update
Software updates are made available from time to time. You can either check manually or let the radio to
check automatically. If a new software version is found, the radio prompts you to confirm. The new
software will be downloaded and Installed upon getting your confirmation. User settings are maintained.
Note: Before downloading software, ensure that the radio is plugged into a stable mains power
connection. Interrupting the mains supply during a software download can lead to functional
disturbances and/or damage to the unit!
Info
Displays the firmware version and the Radio ID
ENG-9
Internet Radio
This radio can play thousands of radio stations and podcasts from all over the world via a broadband
internet connection. When the Internet Radio mode is selected, the radio connects with the Frontier
Silicon Internet radio portal to download a list of stations. Once a station is selected, the radio will
connect directly to that station.
To enter Internet Radio mode, either press MODE until the display
shows "Internet radio" or select "Internet radio" In the main menu by
the use of the SELECT control.
Note: The station list menu is provided from the Internet radio
portal, so it is only accessible when the radio is connected to the
Internet.
Station lists and submenus may change from time to time.
Last listened
When Internet radio is restarted, a list of the last-listened stations is automatically selected.
For a list of stations that are occasionally selected, active the "Station list" function. These stations then
appear at the beginning of the list.
Station list
Stations
Select the stations from various categories in the menu: Location, Genre, Popular, New.
You can also search stations using various keywords.
The name and a description of the current station is displayed when it is tuned. To view further
information, press the INFO button upon each press, another set of information is displayed cycling
through name/description, genre/location, reliability, codec/sampling rate, playback buffer and current
date.
Podcasts
Select podcasts from the categories in the menu: Location, Genre.
You can also select a particular episode by entering keywords to search podcasts.
My favourites
Favourites are stored in the Internet radio portal and are available to all Internet radios that are
registered with the same account. You must register the radio in the Internet radio portal before making
use of the favourites.
To register you radio with the portal, first get your radio's unique portal access code.
1. To get the access code, go to the "Station list>Help>Get access code" menu. Then write down th
access code.
2. Visit the portal website at www.wifiradio-frontier.com.
3. Register yourself to obtain an account by entering the following information:
Access code, Email address, Password, Wi-Fi radio model or Radio ID (optional)
Note: The Radio ID is a combination of numbers and letters and is permanently assigned to this radio, it
is displayed in the menu of the "Internet radio" function under ">System settings> Info>".
To store a playing station as a favourite, press and hold the SELECT control until the display shows
"Favourite added". The station will then appear in the list of favourites.
My added stations
Even though the Internet radio portal contains thousands of stations, you may want to listen to stations
not listed. You can add your own stations via the portal. These added stations are accessible by
ENG-10
selecting "Station list>My added stations>[Station]"
Presets
Presets are stored in the radio and cannot be accessed from other radios.
To store an Internet radio preset, press and hold the MEMORY button until the display shows the "Save
to Preset" screen. Select one of the 10 presets to store the current station.
To select a preset, press the MEMORY button once, then select one of the listed preset stations. When a
preset station is playing, "Pn" (P1, P2 etc...) will appear in the lower part of the display.
Note: Operation of presets is identical for Internet radio, DAB and FM.
ENG-11
Music Player
The Music Player mode plays audio files such as MP3s, AACs, WMAs or FLACs from a computer on the
local network. In order for the radio to play music files from a computer, the computer must be set up to
share files or media.
UPnP media sharing allows devices like you radio to play music from a shared media library, navigating
through tag menus such as Artist, Album or Genre. If you are running a suitable server system such as a
PC with Windows Media Player 10 or later (WMP), and you music library is well-tagged, then it is
recommended to use media sharing. Only the UPnP server needs to be set up. To set up WMP for
media sharing, perform the following steps:
1. Ensure that the PC is connected to the network.
2. Ensure that the radio is powered on and connected to the same network.
3. In WMP, add to the media library the audio files and folders you want to share with your radio.
(Library>add to Library...).
4. In WMP, enable media sharing (Library>Media sharing...).
5. Make sure that the radio has access to the shared media by selecting it and clicking "ALLOW". You
can also set a name for the shared media in "Settings...". Click "OK" to close the dialogue boxes.
6. The PC is now ready to stream the music to the radio, The WMP UPnP service runs in the
background; there is no need to start WMP explicitly.
Note: iTunes does not currently work as a UPnP media server, but there are add-ons available to work
with an iTunes library.
To enter Music Player mode, either press MODE until the display shows
"Music player" or select "Music player" in the main menu by the use of
the SELECT control.
Press the BACK button to quickly move back to the previous menu
during playback of a title.
Press the
or
button to select previous or next track.
Press and hold the
or
button to rewind or fast forward.
Press the
button to interrupt playback or resume playback.
The name of the track/title and the artist is displayed during playback A progress bar indicating the
elapsed and total playing time is also displayed. An icon in the lower part of the display indicates the
selected resource. To view further information, press the INFO button-upon each press, another set of
information is displayed cycling through track or title//artist/progress/track or title duration, album,
codec/sampling rate, playback buffer and current date.
Shared media
If you have set up shared media, you should see an entry consisting of <computer name>: <Shared
media name>. If you have more than one computer sharing media, the alternatives are listed. Select the
shared media you want to play.
From this point on, the shared files menus are generated by the server. The first menu shows a list of
media types, e.g. music, videos, images and playlists. The radio can playback titles from music and
playlist sections,
There is a also search function for finding tracks or titles which is similar to the Internet radio search.
For music, a large number of options is available for selecting tracks or titles which including genre, artist,
ENG-12
album, composer and rating.
Once you have located a track you want to play, press on the SELECT control,
USB Playback
-A.
1. Insert the USB into the port at the rear.
2. The display will show:
"USB disk attached-open folder? (Yes or No)
3. Select "Yes".
4. Select your music, then press select button to playback.
- B.
1. Select "Music player" mode.
2. Select "USB playback"
3. Select your music, then press select button to playback.
ENG-13
Prune servers
From time to time it may be necessary to remove servers displaying question marks in front of the server
name from the server list. To perform this function, go to the "Prune servers" section and select YES.
Repeat/Shuffle
You can repeat tracks or play them in random order by selecting "Repeat play" or "Shuffle play" to "On".
DAB Radio
DAB radio mode receives DAB/DAB+ digital radio and displays
information about the station, stream and track playing.
To enter DAB mode, either press MODE until the display shows "DAB
radio" or select "DAB radio" in the main menu by the use of the
SELECT control.
Scanning for stations
The first time you select DAB radio mode, or the station list is empty, the radio will automatically performs
a full scan to see what stations are available. You may also need to run a scan manually to update the
list of stations for the following reasons:
Available stations might change from time to time.
If the reception is not good for the original scan, this may result in an empty or incomplete list of
available stations.
Once the scan is completed, the radio shows a list of available stations.
Selecting stations
To listen or change a station, rotate the SELECT control followed by pressing on it to confirm. The
information of the station selected will be displayed.
To view further information, press the INFO button - upon each press, another set of information is
displayed cycling through DLS text, programme type, ensemble name/frequency, signal strength/error
rate, bit rate/codec/channels and current date.
Presets
To store a DAB preset, press and hold the MEMORY
button until the display shows the "Save to Preset" screen.
Select one of the 10 presets to store the current station.
To select a preset, press the MEMORY button once, then
select one of the listed preset stations. When a preset
station is playing, "Pn" (P1, P2 etc...) will appear in the
lower part of the display.
Other Settings
Prune invalid
To remove stations that are listed but unavailable, press the MENU button and select "Prune
invalid>[YES]" by the use of the SELECT control.
Manual tune
1. To select manual tune, press the MENU button and select "Manual tune".
2. Rotate the SELECT control to move through the DAB channels, the display will show "5A to 13F"
ENG-14
and their associated frequencies.
When your desired frequency appears in the display, press on the SELECT control to confirm.
DRC (Dynamic range compression)
If you are listening to music with high dynamic range in a noisy environment, you may wish to compress
the audio dynamic range. To change DRC, press the MENU button then enter into the "DRC" section,
and select DRC high, low, or off by the use of the SELECT control.
Station order
You can choose the order of the DAB station list to be either alphanumeric, ensemble or valid.
To change station order, press the MENU button then enter into the "Station order" section, and select
Alphanumeric, Ensemble or Valid by the use of the SELECT control.
3.
FM Radio
FM radio mode receives analogue radio from the FM band and
displays RDS information about the station if available.
To enter FM mode, either press MODE until the display shows "FM
radio" or select "FM radio" in the main menu by the use of the SELECT
control.
ENG-15
Selecting stations
To search for a station, press on the SELECT control once, the radio will start to scan up the frequency
band, and it will stop automatically once a station has been found. Alternatively, you can also press and
hold the
or
button to scan up or down the frequency band.
To tune manually, rotate the select control for your desired frequency.
Presets
To store a FM preset, press and hold the MEMORY button until the display
shows the "Save to Preset" screen. Select one of the 10 presets to store
the current station.
To select a preset, press the MEMORY button once, then select one of the
listed preset stations. When a preset station is playing, "Pn" (P1, P2 etc...)
will appear in the lower part of the display.
Display information
While the radio is playing, the frequency will be displayed, and if RDS information is available, station
name and any further RDS information such as programme name, track title and contact details can be
displayed. Stereo broadcasts are indicated with an icon at the top of the screen. To view further
information about the broadcast, press the INFO button.
Other Settings
Scan settings
FM scan is defaulted to stop at any available station, this would result the poor reception from weak
stations. To change the scan settings to stop only at stations with good signal strength, press the MENU
button then enter into the "Scan setting" section and select YES by the use of the SELECT control.
Audio settings
The radio will automatically switch between FM stereo and mono reception, but you can override this
and switch this function manually which is helpful for poor signal reception.
To select listening in mono, press the MENU button then enter into the "Audio setting" section and select
YES by the use of the SELECT control.
Note: During FM stereo reception, the received L/R stereo sound will be automatically combined to one
single channel to suit the single speaker design of this radio.
AUX in
AUX in mode plays audio from an external audio source such as MP3
player. To play audio with Aux in mode:
1. Decrease the volume level on both the radio and the audio source
device.
2. Connect the external audio source to the AUX IN (3.5mm) stereo
socket.
3. Either press MODE until the display shows "AUX in" or select "AUX
in" in the main menu by the use of the SELECT control,
4. Set the desired volume on the radio and the external audio device if
necessary.
Note: To further enhance energy saving, unit will go into standby mode
after about 15 minutes from Aux in mode if without signal input.
ENG-16
ALARMS AND SLEEP
Alarms
There are two wake-up alarms with snooze function and one sleep function to turn the radio off after a
set period. Each alarm can be set to start in a particular mode. To set or change an alarm:
1. Select either Alarm 1 or 2 in the main menu or press the ALARM button on the remote control.
2. Select the Alarm number (1 or 2) and set the following parameters:
Enable: Off, Daily, Once, Weekends, Weekdays
Time:
Mode: Buzzer, Internet radio, DAB, FM
Preset: Last listened or 1-10
Volume: 0-32
3. To activate the new settings, scroll down the menu using the SELECT control and select "Save".
The display will show the active alarms with an icon at the bottom left.
4. The alarm will be triggered at the preset time. To temporarily silence it, press the SNOOZE button.
The Radio will switch to standby for the set period, and the silenced alarm icon flashes in the
display.
5. During alarm, you can change the snooze period by repeatedly pressing on the SNOOZE button.
ENG-17
Sleep
To activate the sleep function, either select it in the main menu by the use of the SELECT control or
repeatedly pressing on the SLEEP button. The display will show the sleep time and you can choose from:
Sleep Off, 15, 30, 45, 60, 75, 90 minutes.
Once the sleep time has been set, it will return to the main menu.
MUTE FUNCTION (remote control only)
Press the MUTE button on the remote to stop the sound from the speakers temporarily, the sound stops
and the display will show the mute icon and "Muted".
To cancel mute and restore the sound, press the MUTE button again or press the VOLUME+/-.
HEADPHONE JACK
A3.5mm type stereo headphone jack is located at the back of the unit. Connect a set of stereo
headphones (not included) to this jack for private listening without disturbing others. The speakers are
automatically disconnected when the headphones are in use.
IMPORTANT: When using headphones always set the volume to a low level before you put the
headphones on. Then insert the headphones and gradually increase the volume to a comfortable
listening level.
SPECIFICATIONS
Power Supply: AC/DC ADAPTOR
INPUT: 100-240V~60/50Hz
Output Power: 5W
USB port charging: 5V
1A
Unit Dimension: 180 (L) x 117.3 (W) X 110 (H) mm
Temperature: 5°C to 35°C; Humidity: 5% to 90%
Radio Section
Tuning range: DAB/DAB+ 174-240 MHz
FM 87.5-108 MHz
Aerial: Rod antenna
General
Terminals-Output: 3.5mm stereo headphone
Aux In: 3.5mm Jack
*** Specifications subject to change without notice ***
ENG-18
OUTPUT: 12V 1.5A
ALL RIGHTS RESERVED, COPYRIGHT DENVER ELECTRONICS A/S
Electric and electronic equipment and included batteries contains materials, components and
substances that can be hazardous to your health and the environment, if the waste material (discarded
electric and electronic equipment and batteries) is not handled correctly.
Electric and electronic equipment and batteries is marked with the crossed out trash can symbol, seen
below. This symbol signifies that electric and electronic equipment and batteries should not be disposed
of with other household waste, but should be disposed of separately.
As the end user it is important that you submit your used batteries to the approriate and designated
facility. In this manner you make sure that the batteries are recycled in accordance with legislature and
will not harm the environment.
All cities have established collection points, where electric and electronic equipment and batteries can
either be submitted free of charge at recycling stations and other collection sites, or be collected from the
households. Additional information is available at the technical department of your city.
Hereby, Inter Sales A/S, declares that this product BTS-20 is in compliance with the essential
requirements and other relevant provisions of Directive 1999/5/EC. A copy of the Declaration of
conformity may be obtained at: Inter Sales A/S, Stavneagervej 22, DK-8250 Egaa, Denmark.
Imported by:
DENVER ELECTRONICS A/S
Stavneagervej 22
DK-8250 Egaa
Denmark
www.facebook.com/denverelectronics
ENG-19