1
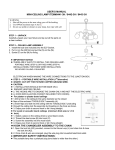
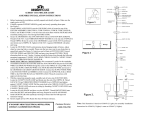
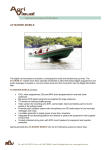
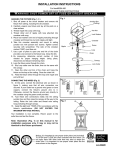
USER’S MANUAL
CHANDELIER ITEM#8444-5H
WARNING
1. Shut off the power to the area where you will be booking.
2. Use 60Watt maximum type A bulb.
3. Do not use polish or cleaner on your lamp. Just wipe with soft
STEP 1 -- UNPACK
Carefully unpack your new fixture and lay out all the parts on
a clear surface.
STEP 2 – CEILING LAMP ASSEMBLY
1. Install the bulb (not included) into the E27 bulb Socket.
2. Place shade(L) in (U) and (N) and screw tightly.
3. Place shade(M) beneath (R) and screw tightly.
4. Connect(P) with (T) and screw tightly.
5. Place shade(S) beneath (Q) and screw tightly.
6. Place (A-1) beneath shade (S) and place (A-2)under (A-1)
and screw all there components(A-1,A-2,A-3) together tightly.
l IMPORTANT NOTICE
l THERE ARE 2 WAYS TO INSTALL THIS CEILING LAMPPORTABLE WIRE (STEP 3) OR FIXED WIRE (STEP 4)
INSTALLATIONS. FOR FIXED WIRE INSTALLATION,
WE ADVISE CALLING A QUALIFIED
l
l
l
l
l
l
l
l
l
l
l
l
l
l
l
l
l
l
l
ELECTRICIAN WHEN MAKING THE WIRE CONNECTIONS TO THE JUNCTION BOX.
STEP 3 -- PORTABLE WIRE INSTALLATION (1STalternative)
※NOTE: CUT OFF THE FIXTURE COPPER GROUND WIRE.
CAUTION:
1. INSTALLATION SHOULD NOT BE MADE ON A
RADIANT-HEATING CEILING.
2. THE HOOKS ARE TO ENGAGE THE CHAIN ONLY AND NOT THE ELECTRIC WIRE.
A. HOOK INSTALLATION (PACKET INCLUDED TWO HOOKS)
For plaster or plaster board ceilings
1.Drill a hole in the ceiling to the same diameter as the closed
flaps of the enclosed TOGGLE BOLT assembly (A).
2.Insert flaps and bolt into the ceiling with the TOGGLE BOLT protruding
through the ceiling lock the assembly by threading on the hook as shown.
3. Drape your chain to second hook or let it hang straight.
For wood or acoustic board ceilings (minimum thick size is 1-1/2
Inch).
1. Select a place on the ceiling where a wood beam exists.
2. Thread the steel screw (B) into hook (C).
3. Screw the assembly into the wood beam.
4. Drape your chain to second hook or let it hang straight.
l HOOK THE CHANDELIER ASSEMBLY TO THE CHAIN
l 1. Open the lock link (K2) provided, connect to the fixture Loop (J) and chain link & close
the lock link (K2).
U
L
N
R
M
T
P
Q
S
A-1
A-2
A-3
l 2. Once chain & wire are arranged, plug the wire plug into household electrical outlet.
l IMPORTANT SAFETY INSTRUCTIONS:
l This portable lamp has a polarized plug (one blade is wider than the other.)
l STEP 4 --- FIX WIRE INSTALLATION (2ND alternative)
We advise contacting a qualified electrician for this step.
l Thread Nipple (C) into Loop (F) until snug.
l Thread other end of Nipple (C) with loop attached into Crossbar (D) until snug.
l Place lock Washer (B) over end of nipple protruding through crossbar
and thread hex nut (A) onto nipple until tight.
l Take this crossbar assembly and mount to ceiling junction box
with Junction box threads (E), Tighten thread securely with screwdriver.
l Open the lock link (K2) provided, connect to the fixture Loop (J)
and chain link & close the lock link (K2).
l Lace the fixture wires through the chain. Slip loop collar (H) over the chain,
Then do the same with Canopy (G).
l Open the end link (K1) of the chain and hang the fixture on the loop (F),
& close the link (K1).
Cut the wire plug off, Feed the fixture wires through the Loop (F), and Nipple
(C) and pull until taut.
l Connect fixture wire to the wire from junction box with wire connectors.
See paragraph below.
l Push canopy (G) up against ceiling and secure with loop collar (H).
l WIRE CONNECTION
FOR WIRE CONNECTION, BE SURE TO CONNECT,
FIXTURE SMOOTH WIRE TO THE BLACK HOUSE WIRE,
RIBBED WIRE TO THE WHITE HOUSE WIRE AND FIXTURE
GROUND WIRE TO SUPPLY GROUND WIRE WITH WIRE
CONNECTORS OR THE FIXTURE GROUND WIRE
FROM THE FIXTURE TO THE GREEN GROUND
SCREW ON THE MOUNTING BRACKET.
l Your installation is now complete. Turn power on.