1
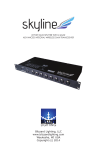
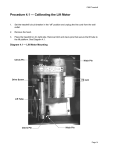
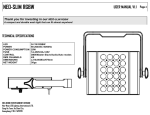
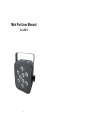
Mini Par User Manual
Tri-LED 9
1
Please read over this manual before operating the light.
Introduction
Unpacking: Thank you for purchasing the Mini PAR. Every Mini PAR has been thoroughly tested and has
been shipped in perfect operating condition. Carefully check the shipping carton for damage that may have
occurred during shipping. If the carton appears to be damaged, carefully inspect your fixture for any damage
and be sure all accessories necessary to operate the unit have arrived intact. In the case damage has been
found or parts are missing, please contact the manufacturer or your dealer for further instructions. Do not
return this unit to your dealer without first contacting.
Introduction: The Mini PAR is a DMX intelligent LED par light. This par light is lightweight and compact
which makes it a great piece for mobile DJ’s and clubs.
Warning! To prevent or reduce the risk of electrical shock or fire, do not expose this unit to rain or moisture.
Caution! There are no user serviceable parts inside this unit. Do not attempt any repairs yourself; doing so
will void your manufactures warranty. In the unlikely event your unit may require service please contact the
manufacturer or your dealer.
PLEASE recycle the shipping carton whenever possible.
General Instructions
To optimize the performance of this product, please read these operating instructions carefully to familiarize
you with the basic operations of this unit. These instructions contain important safety information regarding
the use and maintenance of this unit. Please keep this manual with the unit, for future reference.
Features
Safety Precautions
● To reduce the risk of electrical shock or fire, do not expose this unit to rain or moisture.
● Do not spill water or other liquids into or on to your unit.
●
Be sure that the local power outlet match that of the required voltage for your unit.
● Do not attempt to operate this unit if the power cord has been frayed or broken. Do not attempt to
remove or break off the ground prong from the electrical cord. This prong is used to reduce the risk of
electrical shock and fire in case of an internal short.
●
Disconnect from main power before making any type of connection.
●
Do not remove the cover under any conditions. There are no user serviceable parts inside.
●
Never operate this unit when it’s cover is removed.
●
Never plug this unit in to a dimmer pack.
●
Always be sure to mount this unit in an area that will allow proper ventilation. Allow about 6” (15cm)
between this device and a wall.
●
Do not attempt to operate this unit, if it becomes damaged.
●
This unit is intended for indoor use only; use of this product outdoors voids all warranties.
●
During long periods of non-use, disconnect the unit’s main power.
●
Always mount this unit in safe and stable matter.
●
Power-supply cords should be routed so that they are not likely to be walked on or pinched by items
placed upon or against them, paying particular attention to the point they exit from the unit.
2
●
Cleaning -The fixture should be cleaned only as recommended by the manufacturer. See “Cleaning”
for details.
● Heat -The appliance should be situated away from heat sources such as radiators, heat registers, stove,
or other appliances (including amplifiers) that produce heat.
● The fixture should be serviced by qualified service personnel when:
A. The power-supply cord or the plug has been damaged.
B. Objects have fallen, or liquid has been spilled into the appliance.
C. The appliance has been exposed to rain or water.
D. The appliance does not appear to operate normally or exhibits a marked change in performance
●
Fuse standard is 2A/250V
●
Grounded using yellow/green line
●
The ambient temperature must always be under +35° C
Set Up
Power Supply: Before plugging your unit in, be sure the source voltage in your area matches the required
voltage for your MINI PAR. The MINI PAR is workable in 100-220V/50~60Hz.
Because line voltage may vary from venue to venue, you should be sure your unit voltage matches the wall
outlet voltage before attempting to operate you fixture.
DMX Linking: To ensure proper DMX data transmission, when using several DMX fixtures tries to use the
shortest cable path possible. The order in which fixtures are connected in a DMX line does not influence the
DMX addressing. For example; a fixture assigned a DMX address of 1 may be placed anywhere in a DMX
line, at the beginning, at the end, or anywhere in the middle. When a fixture is assigned a DMX address of 1,
the DMX controller knows to send DATA assigned to address 1 to that unit, no matter where it is located in
the DMX chain.
Operating Instructions
Operating Modes: You can use the Mini PAR in 4 ways:
● Sound activation – The unit will activated by the sound signal.
● Static display – The unit will display the pattern in static way.
● Auto Mode - The unit will automatically chase through the different patterns.
● DMX control mode - This function will allow you to control each individual fixtures traits with a standard
DMX 512 controller.
DMX Mode: Operating through a DMX controller give the user the freedom to create their own programs to
their own individual needs. This function also allows you to use your fixtures as pattern changing lights.
1. This function will allow you to control each individual fixture’s traits with a standard DMX 512 controller.
2. The Mini PAR uses 6 DMX channels to operate. Please see “DMX Values and Functions” for the DMX
traits.
3. To run your fixture in DMX mode, plug in the fixture via the XLR connections to any standard DMX
controller. Set your desired DMX address following the setup specifications that come with your DMX
controller.
4. The unit can automatically recognize the DMX signal once the DMX connection is done.
Touch Buttons
There are four touch buttons under the LED display: Menu, Down, Up, Enter. Normally, the LED will display
the current DMX address code of the fixture. At this time, presses Menu to choose the function you want to
set up. Press and hold Up or Down to fast scrolling within the menu options. When an option is flashing the
LED display, press Enter to confirm and Menu to exit.
LED Operation Menu:
After initialization, the unit is ready for setting and working. Please see the following table for setting
information.
3
DMX Values and Functions
For Battery Function and Charge
The unit has the function of battery powered. The button for battery and charge is set on the rear panel. It is
showed as the following picture, and the function is described as below.
4
(1) Alpha-numeric display
(2) Touch switches
(3) Microphone
(4) DMX-In socket
(5) DMX-Out socket
(6) Power switch
(7) Battery switch
(8) GND
(9) Power socket and fuse holder
(10) Fixation screw
(11) Mounting bracket
There are two buttons on the rear panel of the lighting. One is for power, and the other is for battery. ●
●
●
When use the fixture with DMX, not battery, please switch the button for power to “on”, and switch the
button for battery to “bat off”.
When use the fixture with battery instead of DMX, please switch the button for power to “off”, and also
switch the button for battery to “bat on”.
When charge the light, please switch the button for battery to “charge”. At the same time, if the switch
for power is “on”, the light will be at work during the process of charge, but will consume some power
from the charge; if the switch for power is “off”, the light will be blackout and not be at work.
Tip for the battery and charge:
● The battery can last for 6 hours when all LEDs on after full charge, and can last for more than 10 hours
on auto running mode.
● It is suggested to charge the battery for at least 8 hours, which will extend the life span of the battery.
● At the bottom of the fixture, there is a little hole, which is the indicating light for the charge. When charge
the light, the indicating light will be in red, and when charged full, it will be in green.
Wireless Module of DMX512
MODE:PCB-WI-DMX
Brief:
DMX512 wireless receiver/transmitter transmits standard DMX512 protocol data (generated by console )by
wireless way, which solves lighting control issues of wireless transmitting completely between console and
lighting, lighting and lighting and so on, It get rid of connecting cable limited completely
And also can ensure without any time delay when signal data is transmitting, signal data is real time and
reliably.
This product adopt 2.4G ISM frequency section (global opening section) without permission limited
High effective GFSK modulate ,communication design ; 126 channels jumping frequency automatically,high
anti-jamming ability.
5
Application: Upgrade DMX512 stage lighting
PCB Hole:
Product feature:
Product name:2.4G wireless DMX512 R/T molding board
Small size,Easy to suit for interior of accessed lighting
Single key to operate,tricolor LED displaying
Transmitting standard DMX512 protocol data of console,also can transmitting lighting and lighting DMX512
protocol data.
126 channels jumping frequency automatically,high anti-jamming ability. to ensure works reliability
7 groups ID code settable,User can use 7 groups individual wireless net without any interfere each other in
the same place..
Input voltage:5VDC
Work frequency section:2.4G ISM,126 channels frequency section
Max transmitting power rate:20dBm
Receiver sensitive:-94dBm
Signal port:RS485 or CPU series port AURT
6
LCD-WI-DMX (ID:0-15)
RAD-WI-DMX (ID:1-7)
XRL-WI-DMX(ID:1-7)
Operating manual:
ID code and LED color corresponding relationship:
1. RED
2. GREEN
3. RED+GREED
4. BLUE
5. RED+BLUE
6. GREEN+BLUE
7. RED+GREED+BLUE
Press key 1 time to indicate ID setting,,Press again to set ID,then ID value adding 1 each time by press
Working condition:
LED constant lit up:no DMX or wireless signal.
Red LED flash:transmitting.
Green LED flash:receiving
RF frequency- -2. 400-2. 525 G,total 126 channels,it’s searching automatically,
ID Code- - - -“1-7” groups ID code,press ”KEY” for setting,it only can works under same ID code of
transmitter and receiver.
Establishing Communication:
Power on DMX512 wireless received board and transmitted board.
Press “Key” button to set same ID value of transmitted board and received board., please use different ID
value if you need use more than 1 group wireless net at same time in same place.
The red LED flashes when transmitter transmits DMX data by no interfered frequency section, then receiver
changes communicated frequency section. Green LED flash till received corrected same ID value, LED flash
faster once DMX data more fast.
Communication was established correctly then
Cleaning
Due to fog residue, smoke, and dust cleaning the internal and external optical lenses must be carried out
periodically to optimize light output.
1. Use normal glass cleaner and a soft cloth to wipe down the outside casing.
2. Clean the external optics with glass cleaner and a soft cloth every 20 days.
3. Always be sure to dry all parts completely before plugging the unit back in.
4. Cleaning frequency depends on the environment in which the fixture operates (i.e. smoke, fog residue, dust
).
7
Trouble Shooting
Listed below are a few common problems the user may encounter, with solutions.
Unit not responds to DMX:
1. Check that the DMX cables are connected properly and are wired correctly (pin 3 is “hot”; on some other
DMX devices pin 2 may be ‘hot’). Also, check that all cables are connected to the right connectors; it does
matter which way the inputs and outputs are connected.
Unit does not respond to sound:
1. Quiet or high-pitched sounds will not activate the unit. If problems are not resolved, contact your dealer for
service.
Specifications
Model: Mini PAR
Working Position: Any safe working position
Power Supply: Switching power supply
Voltage: AC 100-220V /50~60Hz
Power Consumption: 30W
Colors: RGB Color Mixing
LED: 9 pcs (3in1)
Gross Weight: 1.3Kgs
Dimensions: 200(L) x 100(W) x 200(H) mm
Note: All information is subject to change without prior notice.
2011-01-01
8