1
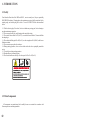
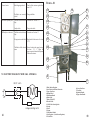
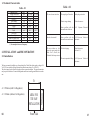
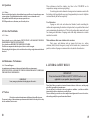
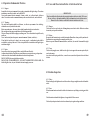
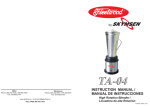
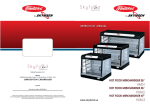
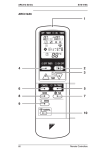
METALÚRGICA SIEMSEN LTDA.
INSTRUCTION MANUAL
METALÚRGICA SIEMSEN LTDA.
METAL RGICA SIEMSEN LTDA.
Rua Anita Garibaldi, nº 262 – Bairro: Sn
o Luiz – CEP: 88351-410
Brusque – Santa Catarina – Brasil
Fone: +55 47 3255 2000 – Fax: +55 47 3255 2020
www.siemsen.com.br - [email protected]
LINHA DIRETA
SKYMSEN
Ramais 2011
Bone Saw Models
2012
2013
SKG and SKLG
E-mail: [email protected]
- ALÉM DESTAS MÁQUINAS, FABRICAMOS UMA LINHA COMPLETA DE EQUIPAMENTOS. CONSULTE SEU REVENDEDOR.
- ESTE PRODUTO CONTA COM ASSISTÊNCIA TÉCNICA, REPRESENTANTES E REVENDEDORES EM TODO TERRITÓRIO NACIONAL.
DEVIDO À CONSTANTE EVOLUÇÃO DOS NOSSOS PRODUTOS, AS INFORMAÇÕES AQUI CONTIDAS PODEM SER MODIFICADAS SEM AVISO PRÉVIO.
22827.3 - Março/2011
SUMMARY
1. INTRODUCTION
02
1.1 Safety
1.2 Main Components
1.3 Technical Characteristics
02
02
04
2. INSTALLATION and PRE OPERATION
04
2.1 Installation
2.2 Pre Operation
04
05
3. OPERATION
05
3.1 Operation Process
3.2 Cleaning
05
05
4. GENERAL SAFETY RULES
07
4.1
4.2
4.3
4.4
4.5
4.6
4.7
08
09
09
10
10
10
10
Operation Fundamentals Practices
Cares and Observations before to Switch On the Saw
Routine Inspection
Operation
After the Work Ends
Maintenance Performance
Notices
5. PROBLEMS ANALYSIS and SOLUTIONS
11
5.1 Problems , Causes and Solutions
5.2 Adjustement and Components Substitution
5.3 Electrical Diagram Models SKG and SKLG
11
11
14
01
1. INTRODUCTION
1.1 Safety
If and when the Bone Saws Mod. SKG and SKLG , are not correctly used , they are potentially
DANGEROUS machines . Cleaning and any other maintenance service shall be carried out by duly
trained people , and with the plug off its socket . To avoid ACCIDENTS follow the instructions
below :
1.1.1Take the electric plug off its socket , before to withdraw any moving part , before cleaning or
any other maintenance operation .
1.1.2Never use any kind of tools , not belonging to the saw to help cutting .
1.1.3Never touch the saw blade No 07 ( Pct.01) , even with the saw switched off , because the blade
has sharp edges .
1.1.4Never adjust the blade guide No.06 (Pct.01) , nor the cut regulator No.14(Pct.01) with the saw
blade in movement .
1.1.5Never use water sprays directly on the saw .
1.1.6During cutting operation , never use loose clothes with wide sleeves principally around the
wrists .
1.1.7Use steel gloves during cutting operation .
1.1.8Keep hands away from moving parts .
1.1.9Never switch on the saw with any of its doors open No.03 or No. 16(Pct.01) .
1.2 Main Components
All components are manufactured with carefully chosen raw materials in accordance with
Siemsen experience and testing standards .
02
Unusual noises
Blade slipping on wheels
Turn the blade tension regulator.See
item 5. 2. 2
Picture - 01
01
The blade frequently tears
Difficulty to cut the meat
The blade is not correctly
welded
Change the blade
The blade or the wheels are
dirty
Clean the saw . See item 3. 2
Faulty wheels
Change the wheels
The blade or the wheels are
dirty
10
03
02
19
04
05
12
Clean the saw . See item 3. 2
06
13
Wrong tension on the blade
.
Regulate the blade tension. See item
5. 2. 2
07
18
The blade is off the wheels
center
Proceed to adjust the upper bearing.
See item
5. 2. 5 . When no
improvement is obtained call Skynsen
Technical Assistance .
08
14
15
16
09
04
10
5.3 ELECTRIC DIAGRAM . MOD. SKG AND SKLG
11
17
ON/Off Switch
M
Voltage Selecting Switch
14
1.Blade Tension Regulator
2.On/off Switch with Plastic Protection
3.Upper Front Door
4.400 mm Wheel
5.M8x30 mm Handle
6.Blade Guide
7.Blade ( Width 5/8”)
8.Movable Table
9.110/220 Volts Selecting Switch
10.Staple
11.Rack
12.Frame
13.M8x30 mm Handle
14.Cut Regulator ( Cut thickness Regulator)
15.Fixed Table
16.Lower Front Door
17.Trash Box
18.Spherical Handle
19.Upper Door Handle
03
1.3 Technical Characteristics
Table - 02
Table - 01
Characteristics
Average Production
Voltage
Frequency
Power Rating
Consumption
Height
Width
Depth
Net Weight
Gross Weight
Maximun Cutting Width
Maximun Cutting Height
Unit
kg/h
V
Hz
Hp
kW/h
mm
mm
mm
kg
kg
mm
mm
SKG (Painted) SKLG(Stainless)
up to 1000 up to 1000
110 / 220
110 / 220
50 or 60 (*) 50 or 60 (*)
1,5
1,5
1,1
1,1
1850
1850
915
915
824
824
103
103
125
125
390
390
430
430
The saw does not switch on
The saw plug is off its socket
Put the plug on its socket
Electric energy shortage
Check other sources
Some problem with the Call
internal circuits of the saw
Skymsen Technical
Smoke , or burnt smell
Some problem with the Call Skymsen Technical
internals or externals circuits
Assistance
The saw switches on , but
when the meat touches the
blade No.07 (Pict.01) the
Technical blade stops or turns
The belt is slipping
(*) See nameplate for correct frequency.
2. INSTALLATION and PRE OPERATION
2.1 Installation
Adjust belt tension .
See item 5. 2. 1
The motor capacitor is failing . Call Skymsen Technical
Assistance
The bone saws must be installed over a firm working floor .Check if the electric supply voltage is 110
V or 220 V then switch the Voltage Selection Switch on the same voltage No. 9 ( Pict. 01 ) .
The electric supply cord is fitted with a plug wich has a ground connection . The ground connection
may be a pin or a earth wire . Be sure that the ground connection is actually grounded before to use the
saw .
A
A = 1100mm (without Cut Regulator)
04
AREA FOR
THE SAW
INSTALLATION
Front Side
900mm
A = 1500mm (with Cut Regulator)
13
5. 2. 4 Blade Guide Adjustment
The Blade Guide No.06 (Pict.01) shall be adjusted in accordance with the height of the product to be
cut . Its purpose is to keep the blade inflexible and perpendicular to the table .
To adjust the blade guide No.06 (Pict.01) the blade must be still and the saw switched off . Proceed as
follows :
Turn the handle No.05 (Pict.01) counterclockwise to allow the vertical movement .
Adjust the guide as near as possible to the upper height of the product to be cut . However the guide
shall not impeach the free product movement .
To end it, turn the handle No.05(Pict.01) clockwise to block the blade guide at the selected height .
5. 2. 5 Upper Bearing Adjustment No.03(Pict.03)
Upper Bearing Adjustment aiming to centralize the Blade No.07 on wheels No. 04 avoiding the
Blade to fall off .
To adjust the Upper Bearing proceed as follows with the saw disconnected from electricity source :
Loosen the Blade No.07(Pict.01) using the Blade Tension Regulator No.01 (Pict.01) , turning it
counterclockwise .
Take away the upper back lid Code 14200.0 , loosening the screws Codes 14174.7 with a 10 mm
spanner ( see the exploded drawing Pag. … )
Loose the three nuts No.01 (Pict.03) with a 10 mm spanner .
2.2 Pre Operation
IMPORTANT
Be sure that the Blade No. 07 (Pct.01) has the right tension before to operate the saw .
Turn clockwise the Blade Tension Regulator No.01 (Pict.01) handle until it begins to
snap .
First of all check if the machine is firmly standing in its position . Before to use it clean the Blade
No 07 , the wheels No. 03 and the doors No. 16 (Pict. 01) with water and neutral soap .
To regulate ( stretch ) the blade No.07 (Pict.01) , turn clockwise the Regulator No. 01 (Pict.01)
handle , until it starts to snap , so the Blade No. 07 (Pict.01) tension will be optimal , as recommended
by the manufacturer .
3. OPERATION
3.1 Operation Process
IMPORTANTunder no circumstances your hand is to be placed in front of the Blade to
push the meat to be cutted .
Check the position of the blade : if it is displaced towards the front of the saw, using a screwdriver
make a ¼ turn on the screw No.02 (Pict.03) counterclockwise . If the blade is displaced towards the
back side of the saw, turn the screw ¼ turn clockwise .
Tight the three Nuts No.1 (Pict.03) with the 10 mm spanner .
Adjust the blade as instructed at item 5. 2. 2 .
Using your hand make the wheel No. 04 (Pict.01) turn and check if the Blade is centralized on the
wheel . Proceed the same way until the Blade stays in the central position .
Figura - 02
With the machine switched off , regulate the Blade Guide No. 06 (Pict.01) and the Cut Regulator
No. 14 (Pict.01) .
To switch on the saw , put the On/Off switch on the upper side to the "On" position .
Put the product to be processed on the Movable Table No.08 (Pict.01) , and push it towards the
Blade No.07 (Pict.01) leaning it on the Cut Regulator No. 14 (Pict.01) to have a uniform thickness
slice .
Withdrawing the MEAT , do be careful that it does not touch on the back side ( smooth side ) of the
Blade No.07 (Pict.01) , doing such the Blade will have no risk to jump out of the wheels No.04
(Pict.01) .
Figura - 03
01
02
3.2 Cleaning
To clean the saw , first switch it off from electric source . All the parts in direct contact with the
meat have to be cleaned .
To remove the movable parts , please proceed as follows :
03
01
12
02
05
3. 2. 1 Remove the Upper Door No. 03 (Pict.01) , pull the door Handle No. 19 (Pict.01) , and lift the
door .
3. 2. 2 Remove the Lower Door No. 16 (Pict.01) as above explained .
3. 2. 3 Loose the Blade , turning the Regulator N. 01 (Pict.01) counter clockwise and take the Blade
off the Wheels No. 04(Pict.01) .
3. 2. 4 Take away the staples No. 10 (Pict.01) that tie the Wheels No 04 (Pict.01) , and take the Wheels
away pulling them out .
3. 2. 5 Wash all the parts with water and neutral soap , then dry them .
3. 2. 6 Never use hard or sharp objects such as : KNIVES, HOOKS, or similar, to clean meat hanging
on the saw Doors . Use a plastic brush to remove it and to clean .
3. 2. 7 To assemble the several parts removed , proceed the inverse path .
IMPORTANT
Put Vaseline in the Wheels No. 04 (Pict.01) hole each 15 days . Check the Blade No. 07
(Pict.01) position . The right position is with its teeth towards the front side of the saw,
with the points looking down .
3.2.8 Cautions with Stainless Steel:
The Stainless Steel may present rust signs, which ARE ALWAYS CAUSED
BY EXTERNAL AGENTS, especially when the cleaning or sanitization is not
constant and appropriate.
The Stainless Steel resistance towards corrosion is mainly due to the
presence of chrome, which in contact with oxygen allows the formation of a very
thin protective coat. This protective coat is formed through the whole surface of the
steel, blocking the action of external corrosive agents.
When the protective coat is broken, the corrosion process begins, being
possible to avoid it by means of constant and adequate cleaning.
Cleaning must always be done immediately after using the equipment. For
such end, use water, neutral soap or detergent, and clean the equipment with a soft
cloth or a nylon sponge. Then rinse it with plain running water, and dry immediately
with a soft cloth, this way avoiding humidity on surfaces and especially on gaps.
The rinsing and drying processes are extremely important to prevent stains
and corrosion from arising.
IMPORTANT
Acid solutions, salty solutions, disinfectants and some sterilizing solutions
(hypochlorites, tetravalent ammonia salts, iodine compounds, nitric acid
and others), must be AVOIDED, once it cannot remain for long in contact
with the stainless steel:
06
5. PROBLEMS ANALYSIS and SOLUTIONS
5. 1 Problems , Causes and Solutions
The Bone Saws have been designed to need minimum maintenance , however, some performance
failures may happen due mainly to natural worn out , caused by the use of the saw .
If some problem arises with your Bone Saw , check Table 02 in the next pages , where there are
detailed some possible solutions .
Besides the Company is ready to assist you through your Dealer and the Company Technical
Assistance network .
5.2 Adjustment and Components Substitution
5. 2. 1 Belt Adjustment
To obtain a long life for the Belt , and to achieve the saw best performance , the Belt shall be perfectly
regulated . If the belt is loose it will slip during operation .
Do be careful to not over tighten it because the bearing will worn out to fast.
To adjust the belt proceed as follows :
Take away the lower back lid ( Exploded Drawing Code Number 14458.4 ) loosening the Screws
Code Number 12384.6 with a 10 mm spanner.
Loose the motor No. 01 (pict.02 ) nuts using a 13 mm spanner .
With the help of a wooden lever, move the motor No. 01 (Pict.02) to tighten the Belt, keep it in the
new position and tight the nuts No. 02 (Pict.02) .
5. 2. 2 Blade Regulation
With daily use the saw Blade may suffer a light stretching , because the blades are elastic. Therefore
check the blade tension before to start to work . Turn clockwise the Blade Tension Regulator No.01
(Pict.01) until you ear it snap , then the blade will be at the right working tension .
OBSERVATION
When adjusting the belt check the wheels alignment .
5. 2. 3 Cut Regulator Adjustment
The Cut Regulator is an optional accessory , developed to help cutting and for the operator safety .
Its main purpose is to produce meat slices with an even thickness .
To adjust the Cut Regulator proceed as follows :
Turn the handle No.13 (Pict.01) counterclockwise to move the Cut Regulator.
Using the Spherical Handle No.18 (Pict.01) move the Cut Regulator on the fixed table No. 15
(Pict.01) , increasing or decreasing the distance from the blade , as it is needed.
Finally turn the handle No. 18 (Pict.01) clockwise to block it at the selected position .
11
4.4 Operation
4. 4. 1 Notices
Do not work with loose long hair , that could touch any part of the saw , because they may cause
serious accidents . Thigh them behind and above the head , or cover them with a scarf .
Only qualified and well trained operator may operate the saw .
NEVER operate the saw , without any one of its safety devices .
4.5 After the Work Ends
4. 5. 1 Cares
Always clean the saw , to do the cleaning SWITCH IT OFF , AND TAKE OUT THE PLUG
FROM THE ELECTRICITY SUPPLY SOCKET .
Never clean the saw BEFORE IT IS COMPLETELY STOPED .
Fit all the saw components in their due places , before to switch it on again .
When checking the belt tightness , do be careful to not have a finger caught between the belt and
the wheel .
These substances attack the stainless steel due to the CHLORINE on its
composition, causing corrosion spots (pitting).
Even detergents used in domestic cleaning must not remain in contact with
the stainless steel longer than the necessary, being mandatory to remove it with plain
water and then dry the surface completely.
Use of abrasives:
Sponges or steel wool and carbon steel brushes, besides scratching the
surface and compromising the stainless steel protection, leave particles that rust and
react contaminating the stainless steel. That is why such products must not be used
for cleaning and sanitization. Scrapings made with sharp instruments or similar
must also be avoided.
Main substances that cause stainless steel corrosion:
Dust, grease, acid solutions such as vinegar, fruit juices, etc., saltern
solutions (brine), blood, detergents (except for the neutral ones), common steel
particles, residue of sponges or common steel wool, and also other abrasives.
4.6 Maintenance Performance
4. 6. 1 Cares and Dangers
Any maintenance performance is dangerous if made with the saw in movement .
SWITCH IT OFF AND , AND TAKE OUT THE PLUG FROM THE SOCKET , DURING ALL
THE MAINTENANCE OPERATION .
IMPORTANT
In any emergency situation take the plug out of its socket .
4.7 Notices
Electrical or mechanical maintenance shall be made by qualified persons .
The person in charge of the maintenance performances shall check the saw for perfect safety
devices conditions , before to start .
10
4. GENERAL SAFETY RULES
IMPORTANT
If any item from the GENERAL SAFETY NOTIONS section is not
applicable to your product, please disregard it.
These Safety Rules were made to orient and to instruct the users of the saws , and the people
who will be responsible for its maintenance .
The saw shall only be delivered to the user in good use conditions , and the user shall be
instructed by the dealer , about how to use safely the saw .
The user shall only operate the saw after complete knowledgement of the cares to be taken ,
after reading carefully the present Instructions Manual .
07
4.1 Operation Fundamental Practices
4. 1. 1 Dangers
Some of the electric parts commands , have points or terminals with high voltages . Those when
touched may cause electric shock , and even DEATH .
Never touch a manual electric command ( button , switch , etc ) with wet hands , clothes or
shoes . To not observe such recommendation may also cause electric shock , and even Death .
4. 1. 2 Warnings
The on/off switch position shall be well known , to allow at any moment a fast switching ,
without the necessity to look for the switch .
Before any maintenance , take away the cord plug from the electricity network socket .
Have enough working space around the saw to avoid dangerous falls .
Water or oil may turn the floor slippery and dangerous . To avoid accidents keep the floor dry
and clean .
Never inadvertently touch or operate a manual command ( button , switch, etc).
If any kind of work has to be done by two or more people , coordination signals shall be
accorded for each step of the work . The next step shall not be started unless the signal is given
and acknowledged .
4. 1. 3 Notices
In case off an electric energy supply failure , switch off the on/off switch .
Avoid mechanical shocks , since they may cause failures or wrongs to the saw good operation.
Avoid water , dirt or dust inside the mechanical or electrical components .
DO NOT ALTER , the saw original characteristics .
DO NOT SOIL , TEAR OR REMOVE , ANY SAFETY OR IDENTIFICATION LABEL . If a
label is illegible or lost , ask your Technical Assistant to supply a new one .
4.2 Cares and Observations Before to Switch on the Saw
IMPORTANTE
Read carefully and with attention the present instructions before to switch ON the saw .
Be sure to have a right understanding of all the information given in the Instruction
Manual . In case of doubt , consult the Technical Assistant or the Seller .
4. 2. 1 Danger
The electric cord or any electric wire if damaged may cause electric shock . Before to use them
be sure they are in perfect conditions .
4. 2. 2 Notices
Be sure that the Instructions given in the Instruction Manual have been perfectly understood .
Each function or operation process must be perfectly clear.
Before to operate a Manual Command ( button , switch etc ) ,be sure the Command is the right
one .
4. 2. 3 Cares
The electricity supply source , shall have the right size to support the current required by the
saw electric motor .
Any electric cable laying on the floor , or near the saw , must be well protected to avoid short
circuits .
4.3 Routine Inspection
4. 3. 1 Notice
When checking the belt tightness be careful to not have a finger caught between the belt and the
wheel .
4. 3. 2 Cares
When abnormal noises are heard check the electric motor or any sliding or rotating part of the
saw .
Check from time to time the belt tightness , change the belt if it is worn out .
Check safety and protections devices to have them always in good working conditions .
08
09