1
Nero Burning ROM Manual
Nero AG
Copyright and Trademark Information
This Nero Burning ROM manual and all its contents are protected by copyright and are the
property of Nero AG. All rights are reserved. This manual contains materials which are protected by internationally recognized copyright laws. This manual may not - in whole or in part
- be copied, transmitted, or otherwise reproduced without the express written permission of
Nero AG.
All trade names and trademarks are the property of their respective owners.
Nero AG rejects any claims that transcend the clauses of the guarantee rights. Nero AG
does not undertake any liability for the correctness of the content of the Nero Burning ROM
manual. The contents of the software supplied, as well as of the Nero Burning ROM manual,
may be changed without prior warning.
The trademarks mentioned here are listed for information purposes only.
© 2007 Nero
REV 1.0, SW: 7.5.0.2
Contents
Contents
1
General information
6
1.1
About the manual
6
1.2
About Nero Burning ROM
6
1.3
Versions of Nero Burning ROM
7
2
System requirements
8
3
Supported formats
9
4
Launching the program
10
4.1
Launching Nero Burning ROM via Nero StartSmart
10
4.2
Launching Nero Burning ROM directly
10
5
Working with Nero Burning ROM
11
5.1
Main screen
11
5.2
Basic steps
13
6
New compilation
14
6.1
6.1.1
6.1.2
6.1.3
6.1.4
6.1.5
6.1.6
6.1.7
6.1.8
6.1.9
6.1.10
New Compilation window
Multisession tab
ISO tab
UDF tab
Title tab
Audio CD tab
CDA Options tab
CD EXTRA tab
Video CD tab
Menu tab
Boot tab
14
17
18
19
20
20
21
21
22
23
23
6.2
Creating a new compilation
24
7
Selecting a file
25
7.1
Selection screen
25
7.2
Selecting files
26
7.3
7.3.1
7.3.2
7.3.3
7.3.4
File selection details
Audio CD
Mixed Mode CD and CD EXTRA
Video CD/Super Video CD
miniDVD
27
27
27
28
29
Page 3
Contents
7.3.5
Audiobook CD
29
7.4
7.4.1
7.4.2
7.4.3
Audio Track Properties window
Track Properties tab
Indexes, Limits, Split tab
Filters tab
29
30
30
31
8
Burning a compilation
32
8.1
Choose recorder
32
8.2
Burn Compilation window
33
8.3
Burn tab
34
8.4
Starting the burn process
35
9
Bootable disc
36
9.1
Booting requirements
36
9.2
Bootable disc template
36
9.3
Creating and burning a bootable disc
37
10
Image file
38
10.1
Creating an image file
38
10.2
Burning an image file
38
11
Copying discs
40
11.1
11.1.1
11.1.2
On-the-fly copying versus copy over image
On-the-fly copying
Copy over image
40
40
41
11.2
11.2.1
11.2.2
11.2.3
Compilation window
Image tab
Copy Options tab
Read Options tab
41
42
42
43
11.3
Copying a disc
44
12
Audio database
46
12.1
12.1.1
12.1.2
Creating an audio database
Creating a program database
Creating a user database
46
46
47
12.2
Database window
47
12.3
Nero's Title and CD Database window
48
12.4
Create a New CD Entry window
50
12.5
Changing a database entry
51
12.6
Adding a database entry
52
12.7
Defining database usage
53
12.8
Using a database
54
Page 4
Contents
13
Saving and converting audio files
56
13.1
Save Tracks window
56
13.2
Saving audio files
57
13.3
Encode Files window
58
13.4
Converting audio files
59
14
LightScribe®
61
14.1
CD Label Editor window
61
14.2
Printing labels
62
15
LabelFlash™
65
15.1
Burn Label window
65
15.2
Printing LabelFlash™ labels and DiskT@2
66
16
Erasing a rewritable disc
69
16.1
Erase Rewritable Disc window
69
16.2
Erase Disc
70
17
Advanced operations
71
17.1
Saving data tracks
71
17.2
Updating the virus scanner
71
18
Configuration
73
18.1
Configuration options
73
18.2
Expert Features
74
18.3
18.3.1
Customize window
Customizing the work environment
75
76
19
List of figures
77
20
Glossary
78
21
Index
84
22
Tab Matrix
87
23
Contact
88
Page 5
General information
1
General information
1.1
About the manual
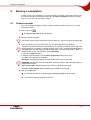
This manual is intended for all users who want to learn how to use Nero Burning ROM. It is
therefore structured according to operations and provides step-by-step instructions for what
you want to do.
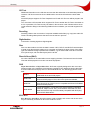
In order to make best use of this manual, please note the following conventions:
Symbol
Meaning
Indicates warnings, preconditions or instructions that have to be
followed strictly.
Indicates additional information or advice.
1. Start …
Æ
Indicates an intermediate result.
Î
Indicates a result.
OK
Indicates text passages or buttons that appear in the program
interface. They are shown in bold print.
Chapter
Indicates references to other chapters. They are executed as
links and are shown in red and underlined.
[…]
1.2
A number at the beginning of a line indicates a request for action. Carry out these actions in the order specified.
Indicates keyboard shortcuts for entering commands.
About Nero Burning ROM
Nero Burning ROM is a high-performance software application with a user-friendly interface
for burning data, music and videos on CD and DVD.
Nero Burning ROM enables advanced users to customize their work. You will have full control of your CD burning project. For example, you can define the file system used, assign a
name for the disc or customize the toolbar to suit your requirements.
Despite the scope and the vast ability of Nero Burning ROM, it remains an easy-to-use burning program which creates your own discs in just three easy steps. First select the desired
disc type and the disc format (depending on the installed recorder and your requirements),
compile the files for burning and then start the burn process. It is just as quick and easy to
copy discs (not copy-protected discs).
Page 6
General information
1.3
Versions of Nero Burning ROM
Two different versions of Nero Burning ROM are available:
Nero Burning ROM Retail and Nero Burning ROM Essentials.
The full Nero Burning ROM Retail version provides full functionality.
Nero Burning ROM Essentials differs from the full version in the following ways:
No crossfade for audio tracks (see Audio Track Properties window)
No virus scanner (see Updating the virus scanner)
No simultaneous burning with multiple recorders (see Burn tab for example.)
No plug-ins
Page 7
System requirements
2
System requirements
Nero Burning ROM is installed together with the Nero suite - the system requirements are
the same. You can find more detailed information on the system requirements in the Nero
QuickstartGuide. In addition, the following requirements apply:
Optical device: CD and/or DVD-RAM recorder
Extra: 16-bit Windows® compatible sound card and speakers
Optional:
LightScribe® recorder and LightScribe® disc
Using LightScribe® Direct Disc Labeling
Your computer requires the latest LightScribe® System Software if you are using a CD/DVD
drive which supports LightScribe®.
Please install the LightScribe® System Software separately if you have installed a newer
version of Nero 7 from the Nero website. You can find the latest version under
www.nero.com/link.php?topic_id=93.
LabelFlash™ recorder and Labelflash™ disc
Blu-ray recorder and Blu-ray disc
HD DVD recorder and HD DVD
Installation of the latest WHQL certified device drivers is recommended. WHQL stands for
Windows® Hardware Quality Labs and means that the device driver certified by Microsoft®
is compatible with Microsoft® Windows® and the respective hardware.
Page 8
Supported formats
3
Supported formats
Nero Burning ROM supports the following disc types:
CD
DVD
HD DVD
Blu-ray Disc
The recorder installed determines which disc type (CD, DVD, HD DVD and/or Blu-ray
Disc) can be burned.
With Nero Image Recorder which is installed in Nero Burning ROM you will still be able to
create an image (see Creating an image file) even if you have not installed a recorder.
Nero Image Recorder is also suitable for creating an image of a disc type not supported by
the installed recorder (see
Expert Features). You can therefore create a DVD image for instance without having installed a DVD recorder.
Nero Burning ROM also supports burning and label printing using a recorder that supports
LightScribe® or LabelFlash™ technology.
You can use Nero Burning ROM to burn the following formats:
Disk formats
Audio formats
Video formats
Image formats
Data disc:
AIFF/AIF
Audible
AVI
ASF
DV-AVI
MP4 (video)
MPEG-1
MPEG-2
Nero Digital
BMP
GIF
JPEG
PNG
TIFF
CD/DVD-ROM (ISO)
CD/DVD/HD DVDROM/ Blu-ray disc
(UDF)
CD/DVD-ROM
(UDF/ISO)
Audio CD
Mixed Mode CD
CD EXTRA
Video CD and Super
Video CD
miniDVD
Audiobook CD
DVD-Video
Bootable disc
Audiobook
HE-AAC
mp3PRO
MP4 (audio)
Nero Digital
Audio
PCM
WAV
WMA
Video
WMV
Xvid
(CD/DVD-ROM
(Boot))
Page 9
Launching the program
4
Launching the program
4.1
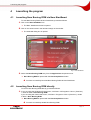
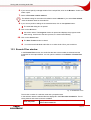
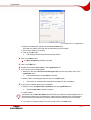
Launching Nero Burning ROM via Nero StartSmart
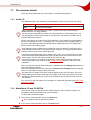
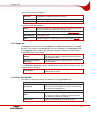
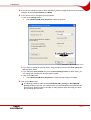
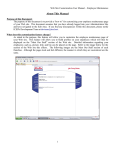
To start Nero Burning ROM via Nero StartSmart, proceed as follows:
1. Click on the Nero StartSmart icon.
Æ The Nero StartSmart window is opened.
2. Click on the arrow button in the left-hand margin of the window.
Æ The extended dialog box is opened.
Fig. 1: Nero StartSmart
3. Select the Nero Burning ROM entry from the Applications drop-down menu.
Æ Nero Burning ROM is opened with the New Compilation window.
Î You have successfully launched Nero Burning ROM via Nero StartSmart.
4.2
Launching Nero Burning ROM directly
To launch Nero Burning ROM directly, proceed as follows:
1. If you are using the Windows XP Start menu, click Start > All Programs > Nero 7 (Premium)
> Audio or Data > Nero Burning ROM.
If you are using the classic Start menu, click Start > Programs > Nero 7 (Premium) > Audio
or Data > Nero Burning ROM.
Æ Nero Burning ROM is opened with the New Compilation window.
Î You have successfully started Nero Burning ROM.
Page 10
Working with Nero Burning ROM
5
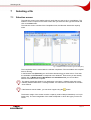
Working with Nero Burning ROM
5.1
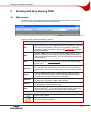
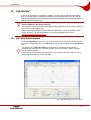
Main screen
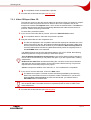
The main screen in Nero Burning ROM is the starting point for all actions. It consists of a
menu bar and a toolbar with buttons and a drop-down list.
Fig. 2: Nero Burning ROM menu bar and toolbar
The main screen contains the following options:
Menu Bar
File
Opens the File menu containing file functions such as opening, saving
and closing that you are already familiar with from Windows®. You can
also show the configuration options for the compilation, update the
compilation, define configuration options (see Configuration) and start
Nero CoverDesigner.
Edit
Opens the Edit menu which contains the file editing functions in the
selection screen such as cutting, copying and deleting that you are already familiar with from Windows®. You can also display the properties
of a selected file.
View
Opens the View menu where you can customize the toolbar and the
Browser Area (see Customize window). You can also refresh the file
browser here.
Recorder
Opens the Recorder menu which contains functions for the recorder.
You can select the recorder here, start the burn process and erase a
rewritable disc. You can also display information on the disc and eject
it.
Extras
Opens the Extras menu which contains audio file editing functions.
You can convert audio files into a different format, save audio files to
an Audio CD and display information on audio files.
Database
Opens the Database menu which contains familiar database editing
functions such as opening, creating and importing.
Window
Opens the Window menu which enables you to alter the position of
the Aompilation Area and Browser Area.
Help
Opens the Help menu which contains the help options you are familiar
with from Windows®. You can also launch Nero Express, update your
antivirus scanner and enter a new serial number if necessary.
Toolbar
Opens the New Compilation window where you can set options for a
burn or copy process.
Opens an existing compilation.
Page 11
Working with Nero Burning ROM
Saves the active compilation.
Cuts selected elements in the compilation (selection).
Copies selected elements in the compilation (selection).
Pastes a selection that was cut or copied beforehand.
Launches Nero CoverDesigner with which you can create labels and
covers. Information about a current compilation such as title, number
and names of the files is incorporated into the document data. For further information refer to the Nero CoverDesigner manual.
Launches Nero Express. Nero Express is a wizard supported application based on Nero Burning ROM. For further information refer to the
Nero Express manual.
Starts the burn process by opening the Burn Compilation window
containing the Burn tab.
Starts the copy process by opening the New Compilation window
containg the Burn tab.
Displays information on the disc inserted such as the contents (if any)
and capacity for instance.
Opens the selected recorder.
Shows or hides the file browser.
Drop-down
menu
Displays available recorders.
Opens the Choose recorder window by selecting from a list a recorder available for the burn process.
Opens the Burn Label window where you can create or load a label to
print on the label or data side of a LabelFlash™ DVD (see
LabelFlash™).
The button is only available if a recorder that supports LabelFlash™ is
connected.
Starts Nero CoverDesigner to create or load a label which is to be
printed to the label side of a LightScribe® disc (see LightScribe®).
The button is only available if a recorder that supports LightScribe® is
connected.
Displays information on program and version number.
Opens the help.
Page 12
Working with Nero Burning ROM
5.2
Basic steps
The main task of Nero Burning ROM is to select files and folders and to burn them to a disc.
This is done in three basic steps:
In the New Compilation window select a disc type and the disc format and set the options in the tabs (see New compilation).
In the selection screen select files that you want to burn (see Selecting a file).
Start the burn process (see Burning a compilation).
Page 13
New compilation
6
New compilation
6.1
New Compilation window
In the New Compilation window select the disc type and configure the options for the disc
format in the tabs. The window basically looks the same for all disc types. The only difference is the tabs that are available.
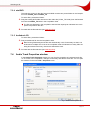
When you launch Nero Burning ROM, the New Compilation window opens automatically. If
the window is not open, click on the New button. In the default setting, CD-ROM (ISO) is selected and the Multisession tab is on top. If you have not installed a recorder, the ISO tab is
on top.
Fig. 3: New Compilation window, CD-ROM (ISO) disc type
The window consists of a drop-down menu, a selection list, various tabs and four buttons.
The drop-down menu can contain the entries CD, DVD, HD DVD and Blu-ray Disc . The selection list will contain different entries depending on the entry selected.
The recorder installed will determine which disc type (CD, DVD, HD DVD and/or Blu-ray
Disc) is displayed and burned. If the recorder can only burn CDs, the drop-down list is
grayed out.
Using Nero Image Recorder which is installed in Nero Burning ROM you will always be
able to create an image (see Creating an image file) even if you have not installed a recorder. Nero Image Recorder is also suitable for creating an image from a disc type that
the installed recorder does not support (see
Expert Features). You can therefore create a DVD image for instance without having installed a DVD recorder.
Page 14
New compilation
The following entries are available in the selection list:
Entry
Description
CD/DVD-ROM (ISO)
Creates a data CD/DVD, each file type can be burned. The
burned data complies with the ISO standard.
Audio CD
Creates a standard Audio CD that can play audio files on all
Audio CD players.
Mixed Mode CD
Creates a CD with data and audio files in a single session.
Usually a data file is followed by one or more audio files for
instance (e.g. sound track in PC games).
Older Audio CD players are often not capable of recognizing
the data file as such and attempt to play it.
CD EXTRA
Copy CD/DVD/HD
DVD/Blu-ray Disc
Creates a multisession CD with audio and data files that are
stored in two sessions. The first session contains the audio
files and the second session the data.
Popular CD players play the first session as Audio CDs. The
second session can only be used by PCs with a CD-ROM
drive, it cannot be 'seen' by a normal CD player.
Copies a source disc to a CD/DVD/HD DVD/Blu-ray disc
(see Copying discs).
Creates a CD that can play video and/or picture files on almost all VCD and DVD players.
Video CD
Super Video CD
While the Video CD (VCD) is being burned, Nero Burning
ROM automatically converts the files into the MPEG-1 format required by the Video CD.
Creates a CD that can play video and/or picture files on almost all SVCD and DVD players. The resolution is higher
than for the VCD, and so the quality of the image is mostly
superior.
When burning the Super Video CD (SVCD), Nero Burning
ROM uses the DVD Video plug-in to automatically convert
the files into the MPEG-2 format required by the Super
Video CD.
Creates a CD that uses the specifications of a DVD. The
miniDVD has the same technical options and qualities as a
DVD. It can easily be played on a PC whereas there is no
guarantee that it can be played in all DVD players.
miniDVD
You can use Nero Burning ROM to burn a miniDVD if the
DVD video title, i.e. a complete DVD folder structure is already available. However, if you want to convert video files
into a DVD video title, you can do so with Nero Vision but
not with Nero Burning ROM.
CD/DVD-ROM (Boot)
Creates a bootable CD (see Bootable disc).
CD/DVD-ROM/HD
DVD/Blu-ray Disc
(UDF)
Creates a data disc, all file types can be burned. The burned
data complies with the UDF standard.
CD/DVD-ROM
(UDF/ISO)
Creates a data disc; all file types can be burned. The burned
data complies with ISO and UDF standards.
Page 15
New compilation
Audiobook CD
Creates CDs from an audiobook. The file format of the original audiobook file may be either Audible Audio (extension
.aa) or MP3. The burned audiobook CD can be read and
played by CD players. Since audiobooks can play for several hours, Nero Burning ROM saves the audiobook to multiple Audio CDs.
DVD-Video
Creates a DVD that can play high-quality video and/or picture files on DVD players. You can use Nero Burning ROM
to burn a DVD if the DVD video title, i.e. a complete DVD
folder structure is already available. However, if you want to
convert video files into a DVD video title, you can do so with
Nero Vision, but not with Nero Burning ROM.
The Nero Vision program works best for creating Video CDs and Super Video CDs. Nero
Vision is an application in the Nero 7 suite and is automatically installed during the main
installation procedure. You will find more information in the Nero Vision manual.
The following buttons are available:
Button
Meaning
Nero Express
Launches Nero Express. Nero Express is a wizard supported application based on Nero Burning ROM. For further information refer to
the Nero Express manual.
Open
Opens a file browser where you can find and open a saved compilation.
New
Opens the selection screen where you can select the files for burning.
Cancel
Closes the New Compilation window.
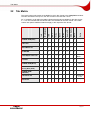
You can set the options for the respective disc format in the tabs on the Compilation window. Refer to the matrix in the appendix for information on which tab is available for which
disc type (see Copying discs). The following tabs are available:
Tab
Description
Info
Shows statistical information on the compilation.
Multisession
Contains options for configuring multisession discs (see Multisession
tab).
The tab is only available if a recorder is installed.
ISO
Contains options for configuring the ISO file system (see ISO tab).
UDF
Contains options for configuring the UDF file system (see UDF tab).
Title
Defines the title of the CD.
Date
Allows you to define the date of the compilation and of the associated
files. You can also specify a validity period for the disc. (You can access the data regardless of the validity period specified)
Misc
Defines whether and which files are stored in the buffer memory. If
you have a LightScribe® recorder, you can create or select the label
that is to be printed in this tab. For the CD-ROM (ISO) disc type, you
can convert the code for an AVI video to make it compatible with
Xvid/MPEG-4 or DivX. We recommend that you only convert the
code if you have experience with FourCC codes and AVI videos.
Page 16
New compilation
Audio CD
Contains options for configuring audio files. You can also enter additional information about the CD (see Audio CD tab).
CDA Options
Defines the strategy used by Nero Burning ROM for handling CD-DA
files from a source Audio CD (see CDA Options tab).
CD EXTRA
Contains options for configuring albums (see CD EXTRA tab).
Video CD
Contains general options for the Video/Super Video CD (see Video
CD tab ).
Menu
Contains the option for configuring the look and content of the menu
for the Video/Super Video CD (see
Menu tab).
Audiobook
CD
Displays statistical information on the Audiobook CD such as the
number of CDs required for instance.
Boot
Contains options for configuring a bootable disc (see Bootable disc
and Boot tab).
Burn
Contains options for configuring burning (see Burn tab).
6.1.1 Multisession tab
The Multisession tab provides the option to create multisession discs for data discs. Multisession discs can be burned in multiple sessions until you have reached the maximum disc
capacity. A session is a self-contained data area that is burned using a single process, and
consists of a lead-in (with the table of contents), and one or more tracks and a lead-out.
Discs without the multisession option, e.g. Audio CDs, are burned in a single session.
Multisession discs are particularly suitable for backing up important files burned on a regular basis.
If a new multisession disc is being started, Nero Burning ROM also saves (if possible) the
point of origin for the files. This information is used when continuing the multisession disc.
If a multisession disc is being continued, Nero Burning ROM automatically sets a cross reference to the imported session, i.e. the table of contents for the imported session is copied
to the table of contents for the current session. You must define which session is being imported at the start of the burn process. The files in the previous sessions are retained and
continue to take up space.
In the case of unchanged files, a cross reference is set to the file of the same name in the
previous session. Enable the Replace files in compilation and Add new files to compilation check boxes to ensure that changed and new files are incorporated into the table of
contents and burned again. The boxes are checked by default. In this case Nero Burning
ROM automatically verifies whether the correct multisession disc has been inserted for continuation. If not, the disc is ejected.
If you disable the Finalize disc check box on the Burn tab, you can always burn additional
sessions on the disc, but then only the last session will be visible and you will only be able
to access data from the final session.
The Multisession tab contains the following check boxes in the Multisession area:
Burns the selected compilation in one session to the
disc.
Start Multisession disc
If the disc already contains sessions, you can also select
this option. Sessions are then not imported and cross
references are not set.
Page 17
New compilation
Continue Multisession
disc
Continues a multisession disc by burning an additional
session to a disc with at least one session. Cross references to imported sessions are set in the process.
No Multisession
Creates a disc without a multisession.
The Options area is only enabled if the Continue Multisession disc check box is enabled.
It contains the following configuration options:
Refreshes the session by creating a cross reference to
the imported session.
Refresh compilation
when importing session
This function is practical if backups are always being
burned from the same folder in which most of the files
are the same. The cross reference saves space.
If you want to burn totally different files, we recommend
that you disable the check box.
Burns files of the same name again. This enables you to
ascertain when the file should be burned again:
Replace files in compilation
Archive bit set
File date or length changed
File content changed
Always
If the check box is disabled, Nero Burning ROM sets a
cross reference to the file in the previous session.
We recommend that you disable this check box for
backup discs.
Remove deleted files
from compilation
Removes deleted files of the same name from the table
of contents in the new session. A cross reference is not
set to the file in the previous session, so you cannot access it anymore. (However the "removed" files are still
on the disc and continue to take up space).
We recommend that you disable this check box for
backup discs.
Add new files to compilation
Burns new files that have been added.
We recommend that you enable this check box for
backup discs.
6.1.2 ISO tab
The ISO tab provides options for configuring the ISO file system.
ISO 9660 is a system-independent standard. It can be read on all operating systems. The
following features apply:
Permits eight characters (Level 1) and/or 31 characters (Level 2) for the file name.
Permits eight characters for the folder name.
Restricts the maximum directory depth to eight levels (including root folder).
The characters A-Z, 0-9 and the underscore (_) are allowed.
Page 18
New compilation
Joilet is a standard that has been designed for Microsoft® Windows® 95 and Microsoft® Windows® NT. Up to 64 characters are supported in the file name (8 characters in DOS). The
characters A-Z, a-z as well as foreign language characters such as the German umlaut may
be used.
The following configuration options are available in the Data and File area:
Data mode
Selects the mode for the data. Mode 1 and Mode 2/XA are
available. The latest drives can easily read Mode 1 and Mode
2. Some older drives however cannot read Mode-1 discs correctly. If the disc is always to be readable on older drives, you
should select the Mode-2/XA format.
Selects the file system that is used for the data. ISO 9660 only
and ISO 9660 + Joilet are available.
File system
ISO 9660 only: pure ISO format is used.
ISO 9660 + Joilet: the ISO format is used and is enhanced by
the Joilet standard.
File name length
Defines the possible length of the file name. Level 1 and
Level 2 are available. In Level 1 the file name can be eight
characters long and the file name extension (e.g. *.doc) three
characters. In Level 2 the file name can be 31 characters long.
Font
Defines the font that is used.
In the Relax restrictions area, restrictions imposed on the selected file system are relaxed.
For example, you can allow a higher path level or more than 64 characters for the Joilet
name.
In the Hints area an advisory message appears if the disc cannot be read on all operating
systems.
If it should be possible to read the disc on all operating systems, select ISO 9660 as the file
system and disable all check boxes in the Relax restrictions area.
If the disc is to be used mainly on Windows® computers and you want to use lowercase letters and foreign language characters such as the German umlaut in the file names, select
ISO 9660 + Joilet as the file system.
6.1.3 UDF tab
The UDF tab provides options for configuring the UDF file system. The UDF standard was
developed by Osta (Optical Storage Technology Association) in response to the requirements of DVDs. The standard works on all platforms.
The following entries are available in the Options drop-down menu:
Automatic settings
Sets options automatically for the UDF file system.
We recommend that you select this entry.
Manual settings
Enables you to manually define the UDF partition
type and the file system version.
Enable Xbox™ compatibility mode
Creates a disc that is compatible with Xbox™.
Page 19
New compilation
6.1.4 Title tab
The Title tab provides options for configuring the name of the disc. The Automatic area is
always available. The Manual area is only available if multiple file systems have been selected for the disc type, e.g. the ISO 9660 + Joilet entry on the ISO tab for instance.
The following configuration options are available in the Automatic area:
Automatic
Enables the Disc name text box
Disc name
Defines the name of the disc.
Add Date
Opens the Date window containing option fields for selecting a
date.
Add Counter
Opens the Counter window which contains various configuration options. In addition, you can define the counter type.
There are two options:
Compilation counter: increments the counter for a new compilation.
Disc counter: increments the counter after burning.
The Manual area enables you to enter a unique disc name for each file system. The restrictions for this file system also apply in connection with the given character set. Characters not
allowed are replaced by underscores. The following text boxes are available:
Manual
Enables the text boxes in the Manual area.
ISO 9660
Defines the name for the ISO 9660 file system.
Joliet
Defines the name for the Joliet file system.
UDF
Defines the name for the UDF file system.
The following button is available in the Advanced area:
More Labels
Opens the More Labels window where you can enter additional information on the disc such as the Publisher for instance.
6.1.5 Audio CD tab
The Audio CD tab provides options for configuring the Audio CD.
The following check boxes are available in the General area:
Normalize all audio files
No pause between
tracks
Enables a filter that brings the volume of the audio files to be
burned into line with one another. This is particularly recommended if the audio files originate from different sources.
Allows the audio files to merge into one another on the Audio
CD without a pause (just like in live recordings).
If the check box is disabled, there are pauses of two seconds
between the audio files.
The following check box is available in the CD Text area:
Write on CD
Enables the option for writing CD Text. With CD players that
support CD Text, the title of the CD, the name of the audio file
as well as of the artist appear in the display.
In the Additional Information area you can enter additional information about the Audio CD
such as the producer or comments for instance.
Page 20
New compilation
6.1.6 CDA Options tab
The CDA Options tab provides options for configuring CD-DA files on the Audio CD.
The CDA file strategy area allows you to select the strategy that Nero Burning ROM should
use for handling selected audio files from a source Audio CD. In general there are two methods:
Read the audio file and store it in the buffer temporarily. The Audio CD can be burned in
disc-at-once mode, which supports CD Text.
Create a reference to the audio file and read it shortly before burning (track reference).
The Audio CD can only be burned using the track-at-once mode.
The CDA file strategy area provides the following options in the drop-down menu:
Diskspace strategy
Saves the audio files temporarily to the Nero Burning ROM
buffer. If there is no space available, a reference is created to
the audio file and read just shortly before it is burned. This entry is selected by default.
Tempfile strategy
Saves audio files temporarily in the Nero Burning ROM buffer.
If there is no space available, an error message is displayed.
Reference strategy
Creates a reference to the audio file and reads it shortly before
burning. The source disc can only be a CD/DVD drive, not a
recorder. The disc can only be burned using track-at-once
mode.
Device dependent
strategy
Creates a reference to the audio file if a CD/DVD drive is available. Otherwise the tempfile strategy is used.
The Info button displays more detailed information on the CDA file strategy.
The Drive area provides a list of all detected drives and recorders. The following configuration options are available:
Read speed
Selects the speed at which the CD is read.
Cache track on
hard drive before
burning
Saves the audio file in the cache before burning.
6.1.7 CD EXTRA tab
The CD EXTRA tab provides configuration options for albums. The following configuration
options and buttons are available:
Album Identification
Defines a name for the album. This is particularly useful when
the album is to comprise several CDs.
Number of Volumes
in Album
Defines the number of discs that the compilation should contain.
Album set sequence number
Defines the album number for the current disc.
Pictures
Opens the CD EXTRA Pictures window where you can select
the pictures for the front and flipside of the CD and define the
picture format.
Languages
Displays the languages available for the album. When you select a language, you can add the title for the album in the Album title text box. Each language can contain a different title.
Page 21
New compilation
Add
Opens the New Language window where you can select a
new language. The setting for Germany is "DE Germany". The
country list is sorted alphabetically according to countries.
Delete
Deletes the selected language.
Album title
Adds an album title to the language highlighted in the Languages selection list.
6.1.8 Video CD tab
The Video CD tab provides the following configuration options for Video CD (VCD) and Super Video CD (SVCD):
Create standard compliant CD
Generates a VCD/SVCD, which can be played in a DVD
player.
Store source pictures in
Generates an extra directory in the VCD/SVCD folder
structure where the source formats of the pictures are
stored automatically. You can assign a separate name for
the extra directory.
Encoding resolution
Defines the color format to which the video files will be
converted: the option buttons PAL and NTSC are available.
The PAL option - the main color format in Europe - is selected by default.
Creates a VCD that can be played in a CD-i player.
Use CD-i application
The check box is only available when the disc format
Video CD is selected.
Automatically adjusts the bit rate to the disc size entered.
Try to fit to disc size
The option button is only available when the disc format
Super Video CD is selected.
Selects a bit rate.
User defined
Compatibility
The option button is only available when the disc format
Super Video CD is selected.
Opens the Super Video CD Compatibility Options window where you can set non-standard parameters for the
SVCD. We recommend that you only use this option if
you are familiar with standard formats and the creation of
SVCDs.
The button is only available when the disc format Super
Video CD is selected.
When adding pictures to a VCD/SVCD Nero Burning ROM automatically creates a slide
show. The picture files contained in it are stored in a DAT file. This kind of file can no
longer be modified or viewed using an image processing program. If you would like to save
the original formats as well, enable the Store source pictures in check box.
Page 22
New compilation
6.1.9 Menu tab
The following check box is available on the Menu tab for Video CD (VCD) and Super Video
CD (SVCD):
Enable menu
Enables the menu for the VCD/SVCD and the grayed-out
Menu and Text areas.
The following drop-down menus are available in the Menu area:
Layout
Selects the menu layout.
Background mode
Defines how the wallpaper is inserted, or how it should be
maximized or minimized for instance.
Wallpaper
Selects the wallpaper. You can also select none or load
your own picture. You can also define the color of the
wallpaper.
You can enter text content for headers and footers in the Text area and define the look (font,
shading) of the header and footer, elements and references. The following configuration options are also available:
Preview first page
Opens the Menu Preview window which displays a preview of the menu.
Set as Default
Saves the current menu settings as default values.
6.1.10 Boot tab
The Boot tab provides configuration options for the bootable disc. The following configuration options are available in the Source of boot image data area:
Bootable logical drive
Selects a logical drive for the template data.
Image file
Selects an image file for the template data.
Browse
Opens the Open window where you can select an image
file.
Boot locale
Selects the language that appears when the drive boots
You can configure expert settings in the Advanced area. It may be necessary to make
changes for certain image files. Refer to the documentation for relevant information on the
boot image. We recommend that you only change the settings if you are familiar with creating bootable discs and boot images. The following configuration options are available:
Enable expert features
Enables the following configuration options.
Emulation type
Selects an emulation type.
Boot message
Defines the message that opens when the drive boots.
Load segment of sectors
Defines where the boot image starts and how the sectors
behave after booting.
Number of loaded sectors
Defines how many sectors will be loaded.
Page 23
New compilation
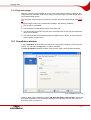
6.2
Creating a new compilation
To create a new compilation, proceed as follows.
1. Select the disc type you want from the drop-down menu in the New Compilation window.
The recorder you have installed will determine which disc type (CD, DVD, HD DVD and/or
Blu-ray Disc) can be burned. If the recorder can only burn CDs, the drop-down menu is
grayed out. But with Nero Image Recorder which is installed in Nero Burning ROM you will
always be able to create an image (see Image file) even you have not installed a recorder.
Æ The drop-down menu displays the disc formats that can be burned using this disc type.
2. Select the disc format you want from the drop-down menu.
Æ The tabs for this disc format are displayed.
Select the Copy CD and Copy DVD entries to go to the copy process (see Copying discs).
3. Configure the options you want in the tabs (see New Compilation window).
4. Click on the New button.
Æ The New Compilation is closed and the selection screen is opened.
Î You have successfully created a new compilation. Now you can add files to the compilation (see Selecting a file).
Page 24
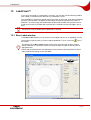
Selecting a file
7
Selecting a file
7.1
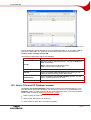
Selection screen
The selection screen is the starting point for work that you want to do on compilations. The
selection screen is opened in the main screen after you select the disc type and format and
click on the New button.
The selection screen consists of the Compilation Area, the Browser Area and a capacity
scale.
Fig. 4: Selection screen for the disc type CD-ROM (ISO)
The Compilation Area is named after the relevant compilation. Files and folders are compiled
here for burning.
In the Browser Area (Browser) you can find the elements that you want to burn. Four tabs
are available: the File Browser corresponds to the Windows® file browser you are already
familiar with. In Media Search, Web Search and Saved Searches you can use Nero
Search to find files on the computer.
The search wizard Nero Search is an application in the Nero 7 software suite and is automatically installed while Nero 7 is being installed. You will find more information in the Nero
Scout manual.
If the Browser Area is hidden, you can show it again using the
button.
The bottom margin of the screen contains a capacity scale in MB (for data discs) or min (for
Audio CDs). The exact magnitude of the scale will depend on which disc type you have selected.
Page 25
Selecting a file
When you are compiling files, a capacity bar indicates how much space the files need on the
disc. The color of the capacity bar indicates whether the data will fit on the disc or not:
Green capacity bar
The data will fit on the disc.
Yellow capacity bar
(from the yellow mark on
the scale)
The data might fit on the disc. The size of the disc that
has been inserted will determine whether the data will fit
or not.
Red capacity bar
(from the red mark on the
scale)
The data will not fit on the disc.
(unless you have inserted an oversize disc.)
The yellow and red marks are set by default for discs that are commercially available. The
disc type you have selected will determine the exact scale value.
For example, blank CDs are available with a capacity of 650 MB or 700 MB. Therefore the
yellow mark is set for CDs at 650 MB and the red at 700 MB.
If the capacity scale is hidden, you can show it again by clicking on the menu File > Options > Show compilation size and by enabling the check box Show compilation size in
the Nero status bar.
7.2
Selecting files
You can select files by dragging them from the browser to the compilation area in the selection screen. The same principle is used for all disc formats.
To select and compile files, proceed as follows:
1. Select the files/folders that you want to burn from the Browser Area.
2. Drag the required files/folders into the compilation area.
Æ The files/folders are displayed in the compilation area and the capacity bar indicates how
much space is being used on the disc.
3. If you want to save the compilation with the selected files:
1. Click on the
Æ
icon.
The Save As window is opened.
2. Select a file name and a storage location and click on the Save button.
Æ
The compilation is saved and the Save As window is closed.
Î You have successfully selected the files for burning and can now start the burn process
(see Burning a compilation).
Page 26
Selecting a file
7.3
File selection details
There are certain details that you need to bear in mind when selecting files.
7.3.1 Audio CD
Two additional buttons are available in the Compilation Area for the Audio CD disc format:
Play
Plays the selected audio file.
Edit
Opens Nero WaveEditor.
Nero WaveEditor is an application in the Nero 7 software suite and is automatically installed while Nero 7 is being installed.
You can use Nero WaveEditor to create your own audio files or to edit existing ones. You
can also digitize records and store them on the hard drive. For further information refer to
the Nero WaveEditor manual.
Source audio files for an Audio CD may be contained on your hard drive as compressed audio files, or originate from one or more Audio CDs. You can also select an M3U playlist as
the source; Nero Burning ROM automatically finds the MP3 audio files for burning whose
paths are stored in the M3U playlist.
Audio CDs have been available on the market with a copy protection for some time now. It
is not possible to either play or copy these using a computer. The copy protection is identifiable by a notice on the cover of the original CD.
If you select audio files directly from an Audio CD in a drive, you cannot specify a CD Text
for the CD because audio files that have a drive as the source can only be burned in trackat-once mode. CD Text can only be burned in disc-at-once mode.
If you want to specify a CD Text for the audio files you have selected from the Audio CD,
save the audio files to your hard drive (see Saving audio files) and then add them to the
compilation.
When you drag the required audio file into the compilation area, the Adding file(s) window is
opened and the file analyzed.
If you have selected a file from an Audio CD, the Enter Source CD Name window is opened
where you are asked to assign a name to this CD.
The name that you assign to the CD is used by default as part of the file name. The name
is also important if you select audio files from multiple Audio CDs. During the burn process
Nero Burning ROM requests you to insert the required CD and quotes the name of the CD
you selected.
You can work on the audio files in the compilation or change the properties (see Audio Track
Properties window).
7.3.2 Mixed Mode CD and CD EXTRA
The selection screen for the disc formats mixed mode CD and CD EXTRA contains one
compilation area for audio tracks and one for data files.
To select files, proceed as follows:
1. If you want to insert data files, click on the Data button.
Æ The compilation area for data files is opened.
2. If you want to insert audio files, click on the Audio button.
Page 27
Selecting a file
Æ The compilation screen for audio files is opened.
3. Proceed with the file selection (see Selecting files).
7.3.3 Video CD/Super Video CD
The selection screen for the disc formats Video CD and Super Video CD contains a compilation area for video and picture files and an area for data. The compilation area for videos/pictures contains the Playback button, which shows the selected video. The Data area
contains data files that have been automatically added and the folder structure that is required to create a functioning VCD/SVCD.
To select files, proceed as follows:
1. If you want to insert video files or pictures, click on the Videos/Pictures button.
Æ The compilation area for video files and pictures is opened.
2. Drag the desired files into the compilation area.
Æ The files are displayed in the compilation area and the capacity bar indicates how much
space is required on the disc. Nero Burning ROM automatically generates a slide show
from the pictures that have been inserted. If you enabled the Store source pictures in
check box beforehand, Nero Burning ROM automatically saves the original pictures in
the PICTURES folder in the data area.
If an MPEG file does not have the appropriate features of a VCD or SVCD, Nero Burning
ROM recognizes the wrong format and you have three options:
Turn Off Standard Compliance and Continue: burns the file without making changes to
the CD. We recommend that you only select this option if you are experienced in creating
VCD/SVCDs.
Re-Encode the Video File: decodes the existing file, converts it to the correct resolution
and frame rate and encodes it again. Re-encoding is done before burning. This process
requires both time and temporary memory space.
Cancel: interrupts the addition of the video file, i.e. it is not added to the compilation.
3. If you want to view the data area, click on the Data button.
Æ The data area is opened. The area contains red folders generated by Nero Burning
ROM. This preset folder structure is required to create a VCD/SVCD. If you have enabled the Store source pictures in check box beforehand, you will also find the
PICTURES folder in the data area.
Do not change the folder structure in the Data area in any way and do not drag any files
into the preset folder. The folder structure is required as preset in order to create a functional VCD/SVCD.
4. Proceed with the file selection (see Selecting files).
Page 28
Selecting a file
7.3.4 miniDVD
The selection screen for the disc format miniDVD contains two preset folders in the Compilation Area: AUDIO_TS and VIDEO_TS.
To select files, proceed as follows:
1. Drag the existing DVD folder structure of the video title ("Video_TS" folder) from the Browser
Area into the VIDEO_TS folder in the Compilation Area.
Æ The files are displayed in the compilation area and the capacity bar indicates how much
space is required on the disc.
2. Proceed with the file selection (see Selecting files).
7.3.5 Audiobook CD
To select files, proceed as follows:
1. Drag an audiobook file into the Compilation Area.
Æ Nero Burning ROM analyzes the file and automatically cuts it if necessary so that it can
be burned to multiple CDs. A list in the compilation area will indicate how many CDs are
being burned and how many minutes are allocated to each.
2. Proceed with the file selection (see Selecting files).
7.4
Audio Track Properties window
In the Audio Track Properties window you can view the properties of a selected audio file,
i.e. of a track, in the compilation, change it if necessary and edit the audio file. You can open
the window via the menu Edit > Properties menu.
Fig. 5: Audio Track Properties window
Page 29
Selecting a file
The window contains the following tabs:
Track Properties
Contains general options for configuring the audio file
(see Track Properties tab).
Indexes, Limits, Split
Contains the option for splitting the audio file and for setting indexes. You can also play back the audio file (see
Indexes, Limits, Split tab).
Filters
Contains different filters that can be applied to the audio
file. Different options are also available for configuring
each filter (see Filters tab).
The audio file is edited using a non-destructive procedure. In other words, the actual recording is not changed, but marks are simply set. The steps in the editing process can be
undone at any time and no additional audio data is generated. The audio file is not actually
changed until it is burned.
7.4.1 Track Properties tab
The Track Properties tab contains general options for configuring the audio file.
General information on the selected audio file is displayed in the Source information area.
The Properties area offers the following configuration options:
Title
Defines a title which is saved as CD Text.
Artist
Defines the artist which is saved as CD Text.
Pause
Defines the length of the pause between this and the subsequent audio file. You can specify the length of the pause
in seconds or in sectors.
International Standard
Recording Code
Identifies the CD title using a 12-figure digital code. The
ISRC is entered in the subcode and included silently. If you
do not know the ISRC, you should leave this text box blank.
Copy Protection
Enables copy protection.
Crossfade
Defines a crossfade between this and the previous audio
file. You can specify the length of the crossfade in seconds
or in sectors.
7.4.2 Indexes, Limits, Split tab
The Indexes, Limits, Split tab provides options for editing the audio file.
The Oscilloscope area displays a graphical representation of the audio file. You can mark
sections here to edit them.
The Positions area contains the following buttons:
New Index
Sets a new index position at the selected position. For the
CD player this is the position from which a new number
starts and the player can also jump to it directly. However,
not all CD players support this function.
Edit
Opens the Edit split position window where you can enter
the precise position of a split.
Delete
Deletes a marked index position or the position for a split
audio file.
Page 30
Selecting a file
Split
Physically splits the audio file into two separate audio files
at the marked position.
Play
Plays the audio file from the marked position. During playback, the Stop button is shown.
Stop
Stops playback of the audio file. If playback is stopped, the
Play button is shown again.
Split at Index Positions
Splits the audio file at the set index positions.
Zoom In
Enlarges the graphical representation of the file.
Zoom Out
Reduces the graphical representation of the file.
Full View
Displays the graphical representation of the file to fit precisely into the oscilloscope area.
7.4.3 Filters tab
The Filters tab offers different filters that are applied to the audio file. The following check
boxes are available:
Normalize
Sets the volume of the audio file to a specific level. The filter is suitable for bringing the volume of audio files from different sources into line with one another.
Decklick
Removes clicking and scratching noises, like the noises on
old LPs for example.
Hiss Reduction
Reduces or removes the hiss on a audio file. All frequencies below a certain threshold (hiss level) are removed.
Fade In
Fades in the the volume of an audio file from zero to full
volume. The filter can be useful for shortening files.
Fade Out
Fades out the volume of an audio file from full volume to
silence. This filter can be useful for shortening files.
Stereo Widening
Increases/reduces the stereo effect of an audio file. The
filter only works if the original file was recorded in stereo.
Karaoke
Removes the vocal component of an audio file by removing
audio components that are identical on both channels.
Echo
Contains options for echo effects.
Equalizer
Opens an equalizer so you can change the volume in different frequency ranges.
The Test Selected Filters button plays the audio file and applies the activated filters. During
playback you can change the configuration options for the filters and so control the effect.
Page 31
Burning a compilation
8
Burning a compilation
In order to burn your compilation, you must first select a recorder. Then start the burn process. Before Nero Burning ROM burns the disc, the Burn Compilation window is opened
where you can select or check burn options.
8.1
Choose recorder
If you have installed multiple recorders, select a suitable recorder for burning. To do this,
proceed as follows:
1. Click on the icon
.
Æ The Choose recorder window is opened.
2. Mark the relevant recorder.
The window shows useful information on the recorder, e.g. which disc types are supported.
3. If you would like to burn to a blank DVD, you can define the Book Type settings.
The Book Type determines which specification is recognized by the DVD player. With Nero
Burning ROM you can define or change the Book Type. This is recommended particularly if
your DVD player has difficulties with self-burned DVDs of the specification DVD-, DVD+ or
DVD-RW. In this case, set the Book Type to DVD-ROM.
1. Click on the Options button.
2. Select the required option from the Book Type Settings drop-down menu.
Four Book Type settings are available:
Automatic: automatically selects the most suitable Book Type for this DVD.
DVD-ROM: sets the Book Type to DVD-ROM. Select this option if the DVD should play on
multiple DVD players.
Physical disc type: selects the Book Type which is specified on the DVD.
Current recorder setting: leaves the Book Type setting to the recorder.
4. Click on the OK button.
Æ The selected recorder is accepted and the Choose recorder window closed.
Î You have successfully selected a recorder.
Page 32
Burning a compilation
8.2
Burn Compilation window
In the Burn Compilation window you can set or check the required burn options and then
start the actual burn process.
The Burn Compilation window consists of a drop-down menu, a selection list, various tabs
and buttons.
Fig. 6: Burn Compilation window for the disc type CD-ROM (ISO)
The selected disc format is displayed in the selection list. If multiple disc types are available
for this disc format, and if you have installed a suitable recorder, you can select another disc
type from the drop-down menu.
The following buttons are available:
Disc Info
Burn
Displays information on the disc inserted such as contents (if available) or available capacity for instance.
Starts the burn process if a recorder is connected.
If a recorder is not connected, the Save Image File window is
opened (see Creating an image file).
This button is only available if the Burn check box is enabled.
OK
Cancel
Accepts all changes and closes the window.
This button is only available if the Burn check box is disabled.
Closes the Burn Compilation window.
Page 33
Burning a compilation
8.3
Burn tab
The Burn tab provides options for the burn process.
The following check boxes are available in the Action area:
Determine maximum
speed
Determines how quickly the compiled files can be accessed.
Simulation
Simulates burning. In the process the simulation performs
all steps that are also carried out during burning with the
exception of setting the laser beam. A test determines
whether there is a constant flow of data.
Write
Enables the Burn button.
Finalize disc
Closes or fixes the disc so that you cannot write to this
disc anymore. Depending on the disc format, finalizing
may be necessary.
Nero Burning ROM automatically enables the check box
for the relevant disc formats.
The speed test and simulation are not required for recorders that have a function for protecting against buffer underruns.
The following configuration options are available in the Write method area:
Selects the method used to burn the disc. Disc-at-once
and track-at-once are available.
Write method
Disc-at-once: burns the entire disc in one go without having to switch off the laser between individual audio files.
Track-at-once: burns each audio file (track) separately
onto the disc, i.e. that the laser is switched off and
switched on again after each audio file.
Number of copies
Buffer underrun protection
Use Multiple Recorders
Defines the number of discs that are to be burned. The
default is set to one disc.
Provides buffer underrun protection.
The check boxes are only available if the selected recorder supports a method for protecting buffer underruns.
When you click on the Burn button, a window is opened in
which you can select the desired recorders. The burn
process is then carried out simultaneously on the selected
recorders.
This check box is not available for the disc type
Audiobook CD.
Do a virus check before
burning
Checks the files in the compilation for possible viruses before burning.
The check box is not available for the disc types AudioCD, VCD, SVCD and Audiobook CD.
Audio, Video and Super Video CDs should always be burned using the disc-at-once
method. This entry is selected by default for these disc formats.
Page 34
Burning a compilation
8.4
Starting the burn process
To start the burn process, proceed as follows:
1. Click on the Burn button in the main screen.
Æ The Burn Compilation window is opened; the Burn tab is on top.
2. Check or select the options in the individual tabs.
3. Insert a corresponding blank disc and click on the Burn button.
Many CD players cannot read rewritable CDs (CD-RW). You should therefore use normal
CD-ROMs for burning Audio CDs.
Æ The burn process starts.
On the screen a progress bar indicates the progress being made by the burn process.
During the burn process two check boxes are available:
Automatically shut down the PC when done: shuts down the computer after the burn
process has finished (as long as this is technically feasible).
Verify written data: checks the data written to the disc after the burn process. You can use
this option particularly when burning backups to ensure that all data has been written correctly.
Æ When the burn process has finished, a dialog box is opened.
Fig. 7: "Burn process completed successfully" dialog box
4. If you would like to display the extended area with the event log, click on the Details button.
5. If you would like to start another burn process with the same compilation, click on the Burn
Again button.
6. Click on the OK button.
Æ The dialog box is closed.
Î You have successfully burnt a disc.
Page 35
Bootable disc
9
Bootable disc
Using Nero Burning ROM you can create a bootable disc with which the computer can be
started without having to access the hard drive. For this reason a bootable CD is often used
as an "emergency disc" to start the computer if it is not possible to access the hard drive.
Bootable discs are created in accordance with the "El Torito" standard, an extension to the
ISO-9660 standard, which defines the structure of data discs. The CD contains a boot image
and an ISO part. The boot image contains all files that are required to load the operating system and to start the computer. The ISO part can contain any number of data files that you
can back up using this method.
9.1
Booting requirements
To ensure that a computer can boot from disc, the start sequence must be set in the BIOS of
the computer in such a way that the drive is addressed first as the boot drive (start sequence
CD-ROM, C, A for instance). In the case of a SCSI CD-ROM drive, this must be connected
to a SCSI adapter with a separate BIOS whose settings can be modified accordingly. (This
will only work when there are no IDE hard drives present as these precede the SCSI adapter
in the boot sequence).
When booting from a disc, you can only start an operating system that does not write to the
disc, such as "MS DOS" or "Linux". During booting Microsoft® Windows® 2000 and Microsoft® Windows® XP write to the disc from which they are being booted. This is not possible
with a disc and so the process is canceled and the PC cannot be started.
9.2
Bootable disc template
For Nero Burning ROM the template for creating a bootable disc can be either a logical drive
(e.g. the C: drive) or a drive image file, which contains the contents of a drive as a file sector
for sector. If the template for the bootable disc is a logical drive, the boot disc will emulate
this when the system is booting. There are three emulation types:
Floppy emulation: this requires a bootable floppy disk for creating the boot disc. At startup
the bootable disc emulates a floppy disk in drive A:. In the process, the drive letters increment, so that Drive A: corresponds to the bootable disc. Floppy disk drive A: can be
accessed as B: after booting. The volume of the start data is limited by the capacity of the
floppy disk (e.g: 1.44 MB).
Hard drive emulation: a bootable hard drive is required to create the bootable disc. At
startup the disc emulates Drive C:. All drive letters from Drive C: increment by one. The
volume of the start data is limited by the capacity of the CD (e.g. 700 MB) or DVD (8.5
GB). If, for instance, you own a 200 GB hard drive with only one (200 GB) partition, you
cannot create a bootable disc from it without re-partitioning your hard drive accordingly
beforehand.
No emulation: in this process the drive names are not changed. This type is used for
bootable installation CDs. This setting is intended for users who do not require any floppy
or hard drive emulation and who want to install their own device driver.
Page 36
Bootable disc
9.3
Creating and burning a bootable disc
To create a bootable disc, proceed as follows:
1. Click on the New button in the main Nero Burning ROM screen.
Æ The New Compilation window is opened.
2. If you want to create a bootable CD, select the option CD from the drop-down menu and the
option CD-ROM (Boot) from the selection list.
If you want to create a bootable DVD, select the option DVD from the drop-down menu and
the option DVD-ROM (Boot) from the selection list.
Æ The tabs for the bootable CD are displayed; the Boot tab is on top.
3. If the template data for the bootable disc should originate from a logical drive:
1. Select the Bootable logical drive option button in the Source of boot image data area.
2. Select the option you want from the drop-down menu.
If the logical drive you want does not appear in the drop-down menu, the reason for this is
that the drive is bigger than the space available on the disc. Please note furthermore that
for operating systems as of Microsoft® Windows® 2000 you need to have administrator
rights in order to be able to access drives directly, which you will need to do if you are to
create bootable discs.
4. If the template data for the bootable disc should originate from an image file:
1. Select the Image file option button in the Source of boot image data area.
2. Click on the Browse button and select the desired image file.
3. Select the language that should appear while the system is booting from the Boot locale
drop-down menu.
4. Enable the Enable expert features check box and select the emulation type for the image
file from the Emulation type drop-down menu.
5. Select any other options required in the tabs (see New Compilation window).
6. Click on the New button.
Æ The selection screen is displayed.
7. Select the files/folders that should be written to the ISO part of the bootable disc and drag
them into the Compilation Area.
Æ The files/folders are displayed in the compilation area and the capacity bar indicates how
much storage space is required on the disc.
8. Start the burn process (see Starting the burn process).
Î You have successfully burnt a bootable disc.
Page 37
Image file
10
Image file
You can use Nero Burning ROM and Nero Image Recorder to create an image file. Nero Image Recorder is automatically installed while Nero Burning ROM is being installed. An image
file is an individual file on the hard drive that contains an image of a complete disc. You can
burn copies of this image file as often as you like. The image file is exactly the same size as
the original files.
The following estimate applies to Audio CDs: the image file requires a capacity of approximately 10 MB for every minute of audio data.
10.1 Creating an image file
To create an image file, proceed as follows:
1. Click on the New button.
2. Create a new compilation of your choice (see New compilation).
Using Nero Burning ROM you can also create image files for disc types that the installed
recorder cannot burn. You can enable this function via the File > Options > Expert Features menu, Enable all supported recorder formats for image recorder check box. The
drop-down menu in the Compilation window then makes available all supported disc types
(CD, DVD, HD DVD and Blu-ray disc).
3. Select the files that you want to burn (see Selecting files).
4. If you have installed multiple recorders, select Nero Image Recorder from the drop-down
menu.
5. Click on the Burn button.
Æ The Burn Compilation window is opened, the Burn tab is on top.
6. Click on the Burn button.
Æ The Save Image File window is opened.
7. Specify a file name and a storage location for the image file and click on the Save button.
Æ
The image file is created and saved in the selected storage location. On the screen,
a progress bar indicates the progress made while the file is being created. Once the
create process is over, a dialog box is opened.
8. Click on the OK button.
Î The dialog box is closed, you have successfully created the image file.
10.2 Burning an image file
To burn a saved image file, proceed as follows:
1. Select a recorder from the drop-down menu (not Nero Image Recorder).
2. Click on the
button in the main screen.
Æ The Open browser window is opened.
3. Select the desired image file and click on the Open button.
Page 38
Image file
Æ The Burn Compilation window with the Burn tab is opened.
4. Proceed with the burn process (see Burning a compilation).
Î You have successfully burnt an image file.
Page 39
Copying discs
11
Copying discs
You can copy discs using Nero Burning ROM. There are two methods for this:
On-the-fly copying
Copy over image
Each method has advantages and disadvantages which will depend on your requirements.
11.1 On-the-fly copying versus copy over image
11.1.1 On-the-fly copying
When using the on-the-fly method, insert the original disc into a drive and a blank disc into
the recorder. The original disc in the drive is copied immediately without any time delay to
the blank disc in the recorder. The on-the-fly method allows you to copy very fast and does
not require any additional space on the disc.
In order to be able to use the on-the-fly method, you will need at least two drives: one for
reading the disc and a recorder for burning. The following requirements apply to the drive
and recorder:
The recorder must have a function for protecting against buffer underruns or the drive
must be capable of delivering the data sufficiently fast. The read speed must be at least
as high as the write speed to ensure that a buffer underrun does not occur. It is more reliable when the read speed is twice as fast as the write speed.
The drive must be capable of delivering information on the number and type of sessions,
otherwise Nero Burning ROM may not be able to produce an exact copy.
On-the-fly copying can have the following disadvantages:
If the recorder does not have a function for protecting against buffer underruns, the onthe-fly method is highly sensitive to read errors. The reason for this is as follows:
if errors occur while the disc is being read because it is scratched, it is not possible to try
to eliminate the error by reading the disc several times for example because, in contrast
to the copy-over-image method, there is not enough time (danger of buffer underrun).
Index positions in audio files get lost. The reason for this is as follows:
index positions only become identifiable if the corresponding position on the CD is read.
However, quick copies can only be burned using the disc-at-once method. With this
method the information on the index positions must be available before the burn process
begins. This means that Nero Burning ROM cannot copy over index positions.
The quality of audio data read in may suffer. The reason for this is as follows:
Nero Burning ROM reads several megabytes of data at a time from the drive, transfers
the data to the Nero Burning ROM buffer and writes the data to the recorder. If the data
transfer slows down because the buffer in Nero Burning ROM is full for instance, the
reading head of the drive has to jump back to a previous position. Some drives cannot
position the reading head precisely for Audio CDs, which means that corrupt audio data
may be transferred sometimes.
Page 40
Copying discs
11.1.2 Copy over image
With the copy-over-image method, an image of the original disc is saved to a file first. The
image file is then burned to a blank disc. Copying using an image copy takes longer, but often produces better results.
You must have sufficient space on the disc to use the copy-over-image method (see Image
file).
Copying using an image copy is particularly suitable in the following situations:
Only one drive is available
You would like to make several copies of the same CD
You think it likely that read errors may have occurred on the source CD (for example because it is scratched)
You appreciate the best possible reproduction (particularly in relation to index positions
and the quality of Audio CDs).
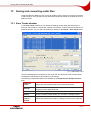
11.2 Compilation window
In the Compilation window, define the options for copying at the beginning of the copy procedure. You can use the Copy button to open the window.
The New Compilation window consists of a drop-down menu, various buttons and tabs.
Fig. 8: Compilation window, Copy
The drop-down menu contains the options CD, DVD, HD DVD and Blu-ray Disc. Only those
disc types supported by the recorder are displayed. If the recorder can only burn CDs, the
drop-down menu is grayed out.
Page 41
Copying discs
The following buttons are available:
Disc Info
Displays information on the disc inserted such as contents (if
available) or available capacity for instance.
Copy
Starts the copy process.
Cancel
Closes the New Compilation window.
The following tabs are available:
Image
Displays the path to the temporary image file and provides information on the speed of the hard drive (see Image tab).
Copy Options
Contains options for configuring copying (see Copy Options tab).
Read Options
Contains options for configuring reading of the original disc (see
Read Options tab).
Burn
Contains options for configuring the burn process (see Burn tab).
11.2.1 Image tab
The Image tab provides the two areas Image file and Hard drive speed info. The Image
file area is only enabled, if the On-the-fly check box is disabled on the Copy Options tab.
In the Image file area the path to the temporary image file is displayed and the following
configuration options are available:
Browse
Opens the Save As window where you can specify a
file name and a directory where the temporary image
file should be stored.
Delete image file after
disc copy
Deletes the temporary image file when the copy process is finished.
In the Hard drive speed info area the available drives or hard drives are shown in a list. The
following button is available:
Test Speeds
Tests the speeds of the available drives and adds the
speed found to the list.
11.2.2 Copy Options tab
The following configuration options are available on the Copy Options tab:
General area
Creates the copy using the on-the-fly method.
On-The-Fly
If the check box is disabled, the copy is created using
the copy-over-image method.
Source area
Selects the drive for reading the disc.
Drive
If a copy over image is created, we recommend that
you select the recorder for reading in.
Read speed
Defines the speed at which the disk is read in.
Page 42
Copying discs
11.2.3 Read Options tab
You can select options for reading the original disk on the Read Options tab. The following
options are available:
Profile area
Profile selection
Selects predefined copy options or a user-defined setting. In
the case of predefined copy settings Nero Burning ROM sets
the configuration options automatically. You can select the
configuration options yourself in the case of a customized
setting.
Data Track area for the disc type CD
Ignore read errors
Ignores read errors on the original disc and continues the
read process.
If the check box is disabled, Nero Burning ROM may interrupt
the burn process depending on the type of error that occurs.
Write defect sectors
Still passes on corrupt sectors (that have caused read errors)
for burning.
If the check box is disabled, corrupt sectors are not passed
on and remain blank.
Read sectors in raw
mode
Reads PQ subchannel data.
Read all subchannel data Reads all subchannel data.
Audio tracks area for disc type CD
Ignore read errors
Read indexes of audio
data
Ignores read errors on the original disk and resumes the read
process.
If the check box is disabled, Nero Burning ROM may interrupt
the burn process depending on the type of error.
Reads the audio file indexes.
Read all subchannel data Reads all subchannel data.
Advanced area for the disc type CD
Read Media Catalog
Number and ISRC
Reads the media catalog number, a unique number worldwide for compilations and the ISRC (International Standard
Recording Code), a unique number worldwide for audio recordings.
Use jitter correction
Removes scratches from audio and video files.
Error correction area for disc type DVD
Read with error correction
Performs error correction while reading. In the process, the
checksum of a corrupt sector is adjusted so that the sector in
itself is consistent.
Read retry count
Establishes the number of attempts that are made to correct
errors.
Fast reading without
error correction
Performs fast reading without error correction.
Handling of non-correctable read errors area for disc type DVD
Ignore read errors
Ignores read errors on the original disc.
If the check box is disabled, Nero Burning ROM may interrupt
the burn process depending on the type of error.
Page 43
Copying discs
With certain disc formats such as Video CD and Audio CD for instance, read errors often
have little or no impact because they are not perceptible when the CD is played.
Subchannel data contains additional information such as CD Text or information on positions for instance.
11.3 Copying a disc
If you are not in possession of the copyright of the relevant disc and do not have authorization from the owner of the copyright, unauthorized copying violates national and international legislation.
Copy-protected Audio CDs cannot be copied using Nero Burning ROM.
To copy a disc, proceed as follows:
1. Click on the Copy button in the main screen.
Æ The New Compilation window is opened
2. Select the disc type you want from the drop-down menu.
Your installed recorder or drive will determine which disc type (CD, DVD, HD DVD and/or
Blu-ray Disc) you can select. If the recorder can only burn CDs, the drop-down menu is
grayed out. But with Nero Image Recorder, which is installed in Nero Burning ROM, you
will always be able create an image (see Image file) even if you have not installed a recorder.
3. Select the options required in the tabs (see Compilation window).
4. If you want to copy discs using the copy-over-image method:
1. Disable the On-the-fly check box on the Copy Options tab.
2. Insert the disc that you want to copy into the recorder.
3. Click on the Copy button.
Æ
A screen is displayed and a progress bar indicates the progress made while the temporary image file is being created. When the image file has been created, the disc is
ejected. The recorder name: Waiting for Disc window is opened.
4. Remove the ejected original disc and insert the blank disc.
Æ
The burn or copy process starts.
On the screen a progress bar indicates the progress being made during the burn or
copy process.
5. If you want to copy using the on-the-fly method:
1.
2.
3.
4.
5.
Enable the On-the-fly check box on the Copy Options tab.
Select the drive that is to contain the disc to be copied from the Drive drop-down menu.
Insert the disc that you want to copy into the selected drive.
Insert a blank disc.
Click on the Copy button.
Page 44
Copying discs
Æ
The burn or copy process starts.
On the screen a progress bar indicates the progress being made during the burn or
copy process.
6. Proceed with the burn process (see Starting the burn process).
Î You have successfully copied a disc.
Page 45
Audio database
12
Audio database
In Nero Burning ROM you can create, edit and use audio databases. The database files contain information on the title, artist and audio files of an Audio CD. You can also use the database from the www.freedb.org web page; Nero Burning ROM provides an interface for this.
12.1 Creating an audio database
In order to be able to use a database in Nero Burning ROM, you must first create it. Nero
Burning ROM provides two types of database:
Program database
User database
12.1.1 Creating a program database
You can use Nero Burning ROM to create a program database. The program database is
filled with entries from the Internet database on the www.freedb.org web page. Once you
have created the program database, it is located locally on your hard drive.
The advantage over use of the interface is that you have fast read access to the database
and can also change the entries in the database. The disadvantage however is that the program database cannot be updated automatically. In order to record information on recently
issued Audio CDs, you must re-import the database or add the Audio CD to the database
manually (see Adding a database entry).
There are two steps involved in the creation of a program database in Nero Burning ROM:
Download a database from the Internet
Import this database to Nero Burning ROM
In order to create the program database, proceed as follows:
1. Download the database from the www.freedb.org web page and save the database on your
hard drive.
The database is at least 160 MB. The database is not downloaded in Nero Burning ROM.
Nero AG is not responsible for the www.freedb.org web page, but just provides an interface
to it.
2. Click on the on the Database > Import Internet Database menu in the main Nero Burning
ROM screen.
Æ A dialog box is opened informing you that the import may take several hours.
The length of time taken by the import is explained by the sheer size of the database and
the numerous cross references that Nero Burning ROM creates.
Although you can cancel the procedure at any time, we advise against it because the procedure cannot be resumed. The database would have to be imported again, which would
involve duplicate entries.
3. Click on the Yes button.
Æ A dialog box is opened which prompts you to download the database files from
wwww.freedb.org.
4. Click on the OK button.
Æ The Browse Folder window is opened.
Page 46
Audio database
5. Specify the directory containing the downloaded database files and click on the OK button.
Æ The Browse Folder window is opened.
6. Specify the directory in which Nero Burning ROM should create the database, and click on
the OK button.
Æ The Current Operation window is opened and the database is created.
Once the database has been created, the window is closed and a dialog box prompts
you to confirm the database as your new program database.
7. Click on the Yes button.
Æ The dialog box is closed.
Î You have successfully imported the Internet database. The Database menu contains
the options Open Program CD Database and Open Program Title Database.
12.1.2 Creating a user database
Using Nero Burning ROM you can create a user database and fill it with your own entries.
The user database is often used to store information on your own Audio CD collection and to
record information on self-burned Audio CDs.
In order to create the user database, proceed as follows:
1. In the main Nero Burning ROM screen click on the Database > Create New User Database
menu.
Æ The Browse Folder window is opened.
2. Select a destination path for the user database and click on the OK button.
Æ The Current Operation window is opened. After the database has been created, the
window is closed and a dialog box prompts you to confirm this database as your new
user database.
3. Click on the Yes button.
Æ The dialog box is closed.
Î You have successfully created a user database. The Database menu contains the options Open User CD Database and Open User Title Database.
12.2 Database window
The Database window is the starting point for editing an entry in the database or adding a
new entry. Nero Burning ROM has two database windows:
The Nero CD Database window with the imported database files in the program database.
The User CD Database window with customized database files from the user database.
Both database windows look the same and have the same functions.
The Database window consists of two lists and different input options. You can open the
window via the Database > Open Program/User CD Database menu.
Page 47
Audio database
Fig. 9: Nero CD Database window
The top list displays artists and titles on a CD in alphabetical order. You can select initial letters with the aid of tabs. The audio files of the marked CD are shown in the bottom list
Tracklist of the currently selected CD.
The following configuration options are available:
Search string
Sort by
Displays the relevant tab after you enter a letter.
Sorts the top list in alphabetical order. The options Artist and
Title are available:
Artist: sorts the list according to the artist.
Title: sorts the list according to title.
Delete CD
Deletes the selected CD entry from the database.
Edit CD...
Opens the Create a New CD Entry window where you can
view and change the entry for the selected CD.
Add New CD...
Opens the Nero's Title and CD Database window. You can
select, create and edit an entry here.
Close
Closes the window.
12.3 Nero's Title and CD Database window
The Nero's Title and CD Database window always refers to an inserted Audio CD. It contains the search result and is opened if you want to add a new entry to the database in the
Database window. It is also opened with one of the following actions if you have set the database usage accordingly (see Defining database usage):
When copying an Audio CD
When saving audio files on an Audio CD
When adding an audio file to an audio compilation
Page 48
Audio database
Nero Burning ROM searches in the program database, the user database and the Windows® Media Player database as well as in the Internet database on request.
During the search, either multiple CDs may be found, a "wrong" CD or no CDs at all.
Multiple CDs are found if different CDs have the same "fingerprint". This "fingerprint" is obtained from the start positions on the individual audio files, the number of audio files and
the playing time of the CD. Occasionally, different CDs may have the same characteristics.
It is then not possible to distinguish them.
If a wrong CD is found, or no CD at all, the Audio CD is not yet stored in the database.
The window contains editing and selection functions for the database entries found and two
lists. The search result (always performed before the window is opened) is shown in the List
of corresponding CD entries in the Nero CD database. A small icon always indicates the
origin of an entry. The audio files of the selected CD are shown in the Tracklist of the currently selected CD list.
Fig. 10: Nero's Title and CD Database window
Page 49
Audio database
The window contains the following buttons:
Opens the Options window with the Database tab
Database settings...
where you can specify the paths for the databases.
Create a New CD Entry...
Opens the Create a New CD Entry window where
you can create a new entry.
Edit CD Entry...
Opens the Create a New CD Entry window where
you can view and change the entry for the selected
CD.
Access Internet Database
Establishes a connection with the Internet database
www.freedb.org and performs a search for the Audio CD that has been inserted.
Opens Nero CoverDesigner.
Print CD Cover
The information on the selected entry such as title,
number and names of the audio files is added to the
document data.
Cancel
Closes the window.
Add selected CD...
Selected CD
Adds the selected entry to the database and closes
the window.
This button is only available if the window was
opened via the database window.
Adds the information on the selected entry and
closes the window.
This button is only available if the window was
opened with an action (see Using a database).
12.4 Create a New CD Entry window
The Create a New CD Entry window refers to a database entry. Information on the CD title
and the individual audio files is displayed for the database entry. The window is opened if
you want to edit an existing database entry or add a new entry to the database. With the latter the input fields are still empty.
Fig. 11: Create a New CD Entry window
Page 50
Audio database
The window consists of a drop-down menu, six text boxes, six check boxes and buttons.
The drop-down menu contains the options CD Title and Track. The track entries correspond
to the audio files of the CD.
In the text boxes you can enter the relevant information on the CD title or on an audio file.
The text boxes each refer to the entry which is selected in the drop-down menu.
The area Autocopy the following information from the CD title entry to the track entries is only available if you selected the CD Title entry from the drop-down menu. In this
area you can define which of the entries you made for the CD title are added to the text
boxes for the audio files.
The following buttons are available:
Back
Jumps back one entry in the drop-down menu and offers the text
boxes for this entry.
Next
Jumps forward one entry in the drop-down menu and offers the text
boxes for this entry.
OK
Adds the changes to the databases and closes the window.
Cancel
Cancels the procedure and closes the window.
The database entry can only be stored when the text boxes for title, artist and genre have
all been filled in for the CD title.
12.5 Changing a database entry
To change an entry, proceed as follows:
1. If you want to open the program database, click on the Database > Open Program CD Database menu.
Æ The Nero CD Database window is opened.
2. If you want to open the user database, click on the Database > Open User CD Database
menu.
Æ The User CD Database is opened.
3. Click on the Edit CD... button.
Æ The Create a New CD Entry window is opened. The CD Title entry is selected in the
drop-down menu. The text boxes for the CD title are displayed.
4. Edit the information in the text boxes Title, Artist, Producer, Comment, Genre and Year
according to your requirements.
5. Use the check boxes to define what information is to be added to the text boxes for the individual audio files.
6. Click on the Next button.
Æ The entry Track 1 is selected in the drop-down menu. The text boxes for the first audio
file are displayed.
7. Edit the information in the text boxes according to your requirements.
8. Repeat both of the previous steps for all audio files.
Page 51
Audio database
The database entry can only be saved if the text boxes for title, artist and genre have been
filled in for the CD title and all audio files.
9. Click on the OK button.
Æ The changes are incorporated and the window is closed.
Î You have successfully changed an entry in the database.
12.6 Adding a database entry
Using Nero Burning ROM you can add a new entry to your database. The new entry always
refers to an Audio CD that has been inserted. To add an entry to the program or user database, proceed as follows:
1. If you want to open the program database, click on the Database > Open Program CD Database menu.
Æ The Nero CD Database database window is opened.
2. If you want to open the user database, click on the Database > Open User CD Database.
Æ The User CD Database database window is opened.
3. Insert the Audio CD to which the entry is to refer.
4. Click on the Add New CD... button.
Æ A dialog box is opened reminding you that Nero Burning ROM requires access to a CD
for this function.
5. Click on the OK button.
Æ The Waiting for Disc window is opened. Nero Burning ROM performs a search in the
background to find an entry for a corresponding Audio CD. When Nero Burning ROM
has finished searching the Nero's Title and CD Database is opened. The search result
is shown in the List of corresponding CD entries in the Nero CD database list.
6. If you want to search through the Internet database www.freedb.org as well, click on the Access Internet Database button.
Æ Nero Burning ROM performs the search in the Internet database and adds the search
result.
7. If the Audio CD does not appear in the List of corresponding CD entries in the Nero CD
database list, you can create a new entry:
1. Click on the Create a New CD Entry button.
Æ
The Create a New CD Entry window is opened. The entry CD Title is selected in the
drop-down menu. The text boxes for the CD title are displayed.
2. Enter the required information in the text boxes Title, Artist, Producer, Comment, Genre
and Year.
3. Define in the check boxes what information will be added to the text boxes for the individual audio files.
4. Click on the Next button.
Page 52
Audio database
Æ
The entry Track 1 is selected in the drop-down menu. The text boxes for the first audio file are displayed.
5. Enter the required information in the text boxes.
6. Repeat the two previous steps for all audio files.
7. Click on the OK button.
Æ
The Create a New CD Entry window is closed and the new entry created is added to
the List of corresponding CD entries in the Nero CD database in the Nero's Title
and CD Database window.
8. Select the required entry and click on the Add selected CD... button.
Æ
The Nero's Title and CD Database window is closed and the new entry is added to
the database. A dialog box containing the message "The new entry has been successfully added to the database" is opened.
9. Click on the OK button.
Æ
The dialog box is closed.
Î You have successfully added an entry to the database.
12.7 Defining database usage
The information from the databases can be used for various actions:
When copying an Audio CD
When saving audio files on an Audio CD
When adding an audio file to an audio compilation
In addition, an entry that you added to the database can also be uploaded to the Internet database www.freedb.org.
In order to define when the database is used, you must define usage on the Misc tab in the
Options window. To do this, proceed as follows:
1. Click on the File > Options menu.
Æ The Options window is opened.
2. Click on the Misc tab.
Æ The Misc tab is opened with the display area Options.
3. Scroll down to the Database entry.
4. Define whether the database is to be used when copying an Audio CD with the subentry Retrieve artist/title information from the Nero/Internet CD database when copying an Audio CD:
1. If you want the databases to be searched, select the option button Always.
2. If you want Nero Burning ROM to be asked whether the databases should be searched,
select the option button Prompt.
3. If you do not want the databases to be searched, select the option button Never.
5. Define whether the database should be used when you are saving audio files on an Audio
CD with the subentry Retrieve artist/title information from the Nero/Internet CD database when saving audio tracks:
Page 53
Audio database
1. If you want the databases to be searched, select the option button Always.
2. If you want Nero Burning ROM to ask whether the databases should be searched, select
the option button Prompt.
3. If you do not want the databases to be searched, select the option button Never.
6. Define whether the database should be used when adding audio files to an audio compilation with the subentry Retrieve artist/title information from the Nero/Internet CD database when adding a track to the audio compilation:
1. If you want the databases to be searched, select the option button Always.
2. If you want Nero Burning ROM to ask whether the databases should be searched, select
the option button Prompt.
3. If you do not want the databases to be searched, select the option button Never.
7. Define what happens when you have added a new entry to the database with the subentry
Submit new entries:
1. If you want the new entry to be uploaded to the Internet database www.freedb.org, select
the option button Always.
2. If you want Nero Burning ROM to ask whether the new entry should be uploaded to the
Internet database www.freedb.org, select the option button Prompt.
3. If you do not want the new entry to be uploaded to the Internet database www.freedb.org,
select the option button Never.
We recommend that you only make available new entries to the general public on the
Internet if they involve original CDs acquired by purchase and not Audio CDs that you have
compiled yourself. In addition, the information about the CD should be complete and correct.
Nero AG is not responsible for the Internet database www.freedb.org, but only provides an
interface to it.
8. Click on the OK button.
Æ The changes will be accepted and the Options window closed.
Î You have successfully configured database usage.
12.8 Using a database
You can use the databases for the following actions:
When copying an Audio CD
When saving tracks on an Audio CD
When adding a track to an audio compilation
Requirements:
You have defined the usage types Always or Prompt (see Defining database usage).
1. You are performing one of the above actions.
Æ The Nero's Title and CD Database window is opened, which displays the search result.
2. If you want to search the Internet database www.freedb.org as well, click on the Access
Internet Database button.
Æ Nero Burning ROM searches the Internet database and adds the search result.
Page 54
Audio database
3. If the Audio CD does not appear in the List of corresponding CD entries in the Nero CD
database you can create an entry for this CD:
1. Click on the Create a New CD Entry... .
Æ
The Create a New CD Entry window is opened. The CD Title option is selected in
the drop-down menu. The text boxes for the CD title are displayed.
2. Enter the required information in the text boxes Title, Artist, Producer, Comment, Genre
and Year.
3. Define in the check boxes which information is to be added to the text boxes for the individual audio files.
4. Click on the Next button.
Æ
The Track 1 entry is selected in the drop-down menu. The text boxes for the first audio file are displayed.
5. Enter the required information in the text boxes.
6. Repeat both of the previous steps accordingly for all audio files.
7. Click on the OK button.
Æ
The Create a New CD Entry window is closed and the new entry is added to the
List of corresponding CD entries in the Nero CD database in the Nero's Title
and CD Database window.
4. Select the required entry and click on the Selected CD button.
Æ
The Nero's Title and CD Database window is closed and the information for the entry is accepted.
Î You have successfully used the database.
Page 55
Saving and converting audio files
13
Saving and converting audio files
Using Nero Burning ROM you can convert an Audio CD into a format you require and save it
to the hard drive. You can also convert (transcode) audio files saved on the hard drive into a
different format.
13.1 Save Tracks window
In the Save Tracks window you can define the settings for the audio files that are to be
stored on the hard drive. The window consists of a track list, control buttons and various configuration options. You can open the window by clicking on the Extras > Save Tracks menu.
Fig. 12: Save Tracks window
The track list displays the audio files on the Audio CD. The functions of the control buttons
correspond to the familiar control buttons on CD players.
The following configuration options are available in the Properties for multiple selection
area:
Output file
format
Selects the output audio format for the selected audio file.
Settings...
Opens a window where you can define options such as bit rate and
frequency for the output audio file.
Path
Selects the storage location for the output file.
Browse
Opens a browser window where you can select a storage location.
File name
creation
method
Selects the method to be used for creating the name of the output file.
Page 56
Saving and converting audio files
The following buttons are available:
Select All
Selects the entire track list, i.e. all audio files.
Drive...
Opens a selection list containing the entries Refresh, Change drive
and Eject.
Close
Closes the window.
Go
Starts the save process.
Options >>
Opens the extended area.
The following configuration options are available in the extended area.
Jitter Correction
Synchronizes data information by overlapping sectors.
This prevents gaps from occurring.
Remove silence
Removes silence from the end of an audio file.
Automatically generate
an M3U playlist of stored
audio tracks
Generates a playlist of the audio files that are stored on
the hard drive.
The M3U file format compiles media files into a list.
Read speed
Defines the speed at which the drive reads the files.
13.2 Saving audio files
Using Nero Burning ROM you can store audio files from an Audio CD on the hard drive. In
the process, the files are encoded, i.e. converted into a format that the computer can read.
Mostly, the audio file is compressed.
Audio files from copy-protected Audio CDs cannot be saved using Nero Burning ROM.
To save audio files, proceed as follows:
1. Insert the desired Audio CD into a drive.
2. Click on the Extras > Save Tracks button.
Æ The Save Tracks window is opened.
3. Select the audio files that you want to save in the Track list.
If you want to save all tracks, simply click on the Select All button.
4. Select the required output format from the Output file format drop-down menu.
5. If you want to define the encoding options:
1. Click on the Settings... button.
Æ
A window is opened.
2. Depending on the selected output form, define the encoding options such as bit rate, encoding quality and frequency.
3. Click on the OK button.
Æ
The window is closed and the changes accepted.
Page 57
Saving and converting audio files
6. If you want to specify a storage location for the output files, click on the Browse... button and
select a path.
7. Select a File name creation method.
The default setting for the method for default names is Manual. If you select User defined,
enter the desired name for the audio file.
8. If you want to perform settings in the extended area, click on the Options button.
Æ The extended dialog box is opened.
9. Click on the Go button.
Æ Conversion starts. The Progress window is opened and displays the progress made
while saving. At the end of the save process, it is closed automatically.
10. Click on the Close button.
Æ The Save Tracks window is closed.
Î You have saved individual audio files or an entire Audio CD to your hard drive.
13.3 Encode Files window
In the Encode Files window, the audio files that are to be encoded are selected and the
properties for the output defined. You can open the window via the Extras > Encode Files
menu.
Fig. 13: Encode Files window
The window consists of a selection area and a properties area.
In the selection area the selected files are displayed in the Files to be encoded list. The following buttons and check boxes are available:
Show full paths
Displays the full source and destination paths for the files in the
Files to be encoded list.
Page 58
Saving and converting audio files
Add...
Opens the browser window where you can select a file to add it to
the list of files to be encoded.
Remove
This removes the selected file.
Remove All
Removes all files from the list of Files to be encoded.
Reset Status
Resets the status of the selected file to "to do".
Go
Starts the encode process.
Close
Closes the window.
The following configuration options are available in the Properties area:
Output file format
Selects the output audio format for the selected audio file.
Settings
Opens a window where you can define options such as bit rate
and frequency for the output audio file.
Target file/ Target
directory
Displays the storage location of the output file or output files.
Browse...
Opens a browser window where you can select a storage location.
Source file info
Displays information on the selected audio file.
13.4 Converting audio files
Using Nero Burning ROM you can transcode, i.e. convert audio files that are stored on the
hard drive into a different format.
To transcode a file, proceed as follows:
1. Click on the Extras > Encode Files menu.
Æ The Encode Files window is opened.
2. Click on the Add button.
Æ The familiar browser window Open is opened.
3. Select the required file and click on the Open button.
4. Repeat the two previous steps for each file that you want to convert.
5. Select the required output format from the Output file format drop-down menu.
6. If you want to define encoding options:
1. Click on the Settings... button.
Æ
A window is opened.
2. Depending on the output format, define the encoding options such as bit rate, encoding
quality and frequency.
3. Click on the OK button.
Æ
The window is closed and the changes accepted.
7. If you want to specify a storage location for the output files, click on the Browse... button and
select a path.
8. Click on the Go button.
Page 59
Saving and converting audio files
Æ The Progress window is opened and displays the progress made while saving. At the
end of the save process, the window is closed automatically. The status of the file that
was transcoded is set to "Finished".
9. Click on Close.
Æ The Encode Files window is closed.
Î You have successfully transcoded your audio files.
Page 60
LightScribe®
14
LightScribe®
If you have connected up a LightScribe recorder, you can also use Nero Burning ROM to
print on the label side of a LightScribe® CD/DVD. The label side of the disc has a special
color or thermal layer, which is altered by the heat from the laser in the recorder allowing images and text to be printed on it.
This function is only available with a LightScribe® recorder.
Using LightScribe® Direct Disc Labeling
Your computer requires the latest LightScribe® System Software if you are using a CD/DVD
drive which supports LightScribe®.
Please install the LightScribe® System Software separately if you have installed a newer
version of Nero 7 from the Nero website. You can find the latest version under
www.nero.com/link.php?topic_id=93.
14.1 CD Label Editor window
In the CD Label Editor window you can create or load a label. The window is opened when
you click on the Create button on the Misc tab for the current compilation in the LightScribe
area.
The interface in the CD Label Editor window works on the same principle as Nero
CoverDesigner. Basically, it is irrelevant whether you print the label on paper or directly
onto an appropriate disc.
Please see the separate Nero CoverDesigner User's Guide for full instructions on how to
make professional looking covers and labels.
Fig. 14: CD Label Editor window for LightScribe
®
Page 61
LightScribe®
The following options are available:
Inner radius
Defines the distance between the label and the inner edge.
Outer radius
Defines the distance between the label and the outer edge.
Width
Defines the width of the print area.
Label templates
Contains a selection of different templates for designing the
label.
You can continue to edit and customize a selected template.
New
Generates a new label document.
Open...
Opens an existing label, which was created using Nero
CoverDesigner.
Save As...
Saves the label you have created.
OK
Adds the label you created to the compilation and closes the
window.
Preview...
Opens the Print Preview window that shows how the label
should appear on the LightScribe® disc.
Cancel
Cancels the procedure and closes the window.
14.2 Printing labels
The process for printing the label is integrated into the usual burn process. First, burn the
compilation, flip the disc over and then burn the label.
To print a label, proceed as follows:
1. Create a compilation (see Creating a new compilation) and select the files to burn (see
Selecting files).
2. Select a LightScribe® recorder from the drop-down menu in the toolbar.
3. If you want to set the print options for LightScribe®:
1. Click on the File > Options menu
Æ
The Options window is opened.
2. Click on the LightScribe tab.
Æ
The configuration options for LightScribe® are displayed.
Page 62
LightScribe®
Fig. 15: Options window - LightScribe tab
3. Select the desired print quality from the Print contrast area.
The better the quality, the longer the recorder takes to print the label.
4. Set the other options you require.
5. Click on the OK button.
Æ
The changes will be saved and the window closed.
4. Click on the Burn button
Æ The Burn Compilation window is opened.
5. Click on the Misc tab.
6. Enable the check box Print Label in the LightScribe area.
7. If you want to use an existing label:
1. Select from the entry Use Nero CoverDesigner files from the drop-down menu in the
LightScribe area.
Æ
The familiar browser window Open is opened.
2. Select a Nero CoverDesigner file and click on the Open button.
Æ
The window is closed and the selected file accepted for this compilation.
8. If you want to create a label for this compilation:
1. Select the entry Use label from compilation from the LightScribe area.
Æ
The CD Label Editor window is opened.
2. Create a label.
The interface in the CD Label Editor window and the procedure for creating labels work on
the same principle as Nero CoverDesigner. Please see the separate Nero CoverDesigner
User's Guide for full instructions on how to make professional looking covers and labels.
3. If you want to change the label you have created, click on the Edit button.
Page 63
LightScribe®
9. Set the options you require in the tabs.
10. Insert a blank LightScribe® CD with the data side facing down and click on the Burn button.
Æ The burn process starts and the compilation is burned. On the screen, a progress bar indicates the progress being made by the burn process. When the burn process is complete the disc is ejected. A dialog box is opened with the message "Please insert a
LightScribe disc into the drive with the label side facing down".
11. Insert the blank LightScribe® disc into the recorder with the label side facing down and click
on OK.
Æ The LightScribe Print Properties window is opened and the print process starts. In the
LightScribe Print Properties window a progress bar indicates the progress being
made. When the print process has finished, a dialog window is opened with the message
"Burn process completed successfully".
12. Click on the OK button.
Æ The disc is ejected.
Î You have printed a LightScribe® label.
Page 64
LabelFlash™
15
LabelFlash™
If you have connected up a LabelFlash™ recorder, you can also use Nero Burning ROM to
print a label on the label and/or data side of a LabelFlash™ DVD.
The LabelFlash™ DVD has a special layer in the center of each side; when this is heated by
the laser in the recorder it is altered so that images and text are printed on the DVD. LabelFlash™ is a technology that enables both the label and the data side of DVDs in the recorder to be printed. If the data side is printed, this is referred to as the DiscT@2™ procedure.
This function is only available with a LabelFlash™ recorder.
15.1 Burn Label window
In the Burn Label window you can create or load a label and print on a LabelFlash™ DVD.
The window is opened when you insert a blank LabelFlash™ CD or click on the
the toolbar.
icon in
The interface in the Burn Label window works on the same principle as Nero CoverDesigner. Basically, it is irrelevant whether you print the label on paper or directly onto an
appropriate disc.
Please see the separate Nero CoverDesigner User's Guide for full instructions on how to
make professional looking covers and labels.
Fig. 16: Burn Label window for LabelFlash™/DiscT@2™
Page 65
LabelFlash™
Information on the selected printing quality and rotation speed for instance is displayed on
the right-hand side of the screen. Under Disc type, you can see whether the blank disc has
been inserted with the label or data side. Either the LabelFlash™ or the DiscT@2™ logo is
displayed in the Burn Label window depending on which side is inserted.
The following configuration options are available:
Inner radius
Defines the distance between the label and the inner edge.
Width
Defines the width of the print area.
Opens the LabelFlash™ – Print Properties window.
Printing quality
This is where you can change the printing quality and the contrast level and display the changes made directly in the print
preview.
Preview
Opens the Print Preview window that shows how the label
should appear on the LabelFlash™ disc.
Label templates
Contains a selection of different templates for designing the
label. You can continue to edit and customize a selected template.
Burn
Starts the print process.
Cancel
Cancels the process and closes the window.
If you are creating a DiscT@2, Nero Burning ROM displays only the available print area for
creating the label by default, i.e. the area on the data side of your DVD that is not already
taken up by data. You cannot increase the radius of the print area.
15.2 Printing LabelFlash™ labels and DiskT@2
Basically, it is irrelevant whether you print on the label or the data side when creating labels.
The label is actually printed outside the normal burn process.
You can always print on the label side of the DVD.
We recommend that you print on the data side first when you have burned the compilation.
It is not possible to burn data on a printed data side. When you insert a DVD on which data
has already been burned, Nero Burning ROM automatically identifies the space that is still
available on the data side and on which you can print.
To print a LabelFlash™ label on the front or a DiscT@2™ label on the flipside, proceed as
follows:
1. If you want to print a LabelFlash™ label on the label side, insert a blank LabelFlash™ disc
into the recorder with the label side facing down.
Æ The Burn Label window is opened with the LabelFlash™ logo.
2. If you want to print a DiskT@2 on the data side, insert a blank LabelFlash™ disc with the
data side facing down into the recorder.
Æ The Burn Label window is opened with the DiskT@2™ logo.
3. Create a label according to your requirements or open a label (File > Open menu) that you
have already created with Nero CoverDesigner.
The interface in the Burn Label window and the process for creating a label work on the
same principle as Nero CoverDesigner. Please see the Nero CoverDesigner User's Guide
for full instructions on how to make professional looking covers and labels.
Page 66
LabelFlash™
4. If you want to change the area in which the label is printed, change the print area accordingly
using the text boxes Inner Radius and Width.
5. If you want to view or change the print properties:
1. Click on the Change button.
Æ
The LabelFlash(TM) Print Properties window is opened.
Fig. 17: LabelFlash™-Print Properties window
2. If you want to change the printing quality, select a quality level from the Print quality profile drop-down menu.
3. If you select the User defined entry from the Print quality profile drop-down menu, you
can change the contrast level and the rotation speed.
4. Click on the OK button.
Æ
The LabelFlash(TM) Print Properties is closed and the changes accepted.
6. Click on the Burn button.
Æ The labeling procedure starts and the LabelFlash(TM) - printing or DiscT@2(TM) printing window is opened. The window shows you the estimated printing time and the
print progress. When printing is complete, a dialog window opens informing you about
the successful print process.
Page 67
LabelFlash™
Fig. 18: LabelFlash™- printing window
7. Click on OK.
Æ The dialog window is closed and the disc ejected.
Î You have successfully printed a label.
Page 68
Erasing a rewritable disc
16
Erasing a rewritable disc
Using Nero Burning ROM you can erase rewritable discs, i.e. discs with the RW specification, as long as your recorder supports this function.
16.1 Erase Rewritable Disc window
Fig. 19: Erase Rewritable Disc window
This window contains the following drop-down menus and configuration options:
Choose recorder
Selects a recorder.
Use multiple recorders
Erases multiple recorders.
Selects an erase method. Two options are available:
Select erase method to be
used
Quick-erase rewritable disc: does not physically
erase the disc fully, but only the references to the
existing contents. The disc will appear to be empty
even though the data is still physically available.
Erasing a disc using this method takes between
one and two minutes.
Full-erase rewritable disc: physically erases all
data from the disc. The contents cannot be restored. Erasing the disc using this method takes
longer than the other method depending on the
type of disc involved.
Erase speed
Selects the speed at which the disc is erased.
Erase
Starts the erase process.
Cancel
Cancels the action and closes the window.
Page 69
Erasing a rewritable disc
16.2 Erase Disc
To erase a rewritable disc, proceed as follows:
Requirement: your recorder must support this function.
1. Insert the disc that you want to erase.
2. Select the Recorder > Erase Rewritable Disc menu from the main Nero Burning ROM
screen.
Æ The Erase Rewritable Disk window is opened.
3. If you have installed multiple recorders, select the desired recorder from the Choose recorder drop-down menu.
4. If you want to erase data on multiple recorders simultaneously, enable the check box Use
multiple recorders and select the desired recorder.
5. Select an erase method from the Select erase method to be used drop-down list.
If you want to erase confidential data, use the "full-erase" method to physically erase all of
the data from the disc. Otherwise third parties could restore the contents.
6. If required, select the erase speed from the Erase speed drop-down menu.
7. Click on the Erase button.
Æ The erase process starts. A progress bar in a window informs you about the progress
being made by the erase process. When all data has been fully erased, the window is
closed and the disc ejected.
Î You have successfully erased a rewritable disc and can now write to the disc again.
Page 70
Advanced operations
17
Advanced operations
17.1 Saving data tracks
In addition to the option for saving audio files on an Audio CD, Nero Burning ROM enables
you to save data files on a disc. The result is an image file that can be burned to a blank disc
later on. Using the Save Tracks command in Nero Burning ROM has the following advantages:
Existing files can also be saved in non-standard formats, e.g. files that are available in the
Apple Macintosh HFS format.
If required a copy of multisession CDs can be created.
Requirement: the table of contents for the sessions does not contain any cross references to previous sessions (see Multisession tab).
If you use the Save Tracks command to select formats other than ISO or HFS, such as native Unix file systems for instance, we recommend that you burn the new image file on a
blank disc.
To save files from a data disc, proceed as follows:
1. Insert a data disc into a drive or a recorder.
2. Select Save Tracks from the Extras menu.
Æ The Save Tracks window is opened. Basically, the window is identical to the window
used for saving audio files (see Saving audio files). The CD player controls area is
grayed out. The track list displays the data files found on the disc.
3. Select the files that you want to save. If you want to save all files, click on the Select All button.
4. Set the desired options:
1. Select the desired output format from the Output file format drop-down menu.
2. If you want to specify a storage location for the image file, click on the Browse... button
and select a path.
3. Set other options as required.
5. Click on the Start button.
Æ The Progress window is opened; a progress bar displays the progress being made by
the save process. When the save process is complete, the window closes automatically.
6. Click on Close.
Æ The Save Tracks window is closed.
Î You have successfully created an image file starting from a data disc. Now you can
burn the image file to a disc (see Burning an image file).
17.2 Updating the virus scanner
A virus scanner that checks the data to be burned is integrated in Nero Burning ROM. This
ensures that infected data will not be burned. We recommend that you update the virus
scanner database regularly. The database is updated via an Internet connection.
Page 71
Advanced operations
To update the virus scanner, proceed as follows:
Requirement: you must have an active Internet connection.
1. Click on the menu Help > Update Antivirus Scanner.
Æ A dialog window is opened which reminds you to connect to the Internet.
2. Click on OK.
Æ Nero Burning ROM is connected to the FTP server av.nero.com and the antivirus files
are downloaded. The Downloading File window is opened; a progress bar indicates the
progress being made by the update process. When the database has been updated, a
dialog window is opened with a message indicating that the database is now updated.
3. Click on OK.
Æ The dialog window is closed.
Î You have successfully updated the virus scanner database.
Page 72
Configuration
18
Configuration
18.1 Configuration options
You can define options for working with Nero Burning ROM in the Options window. Open
the window by click on the Options entry in the File menu.
Fig. 20: Options window
The Options window contains the following tabs:
Tab
Description
Compilation
Contains options for compilation and the selection screen.
Cache
Contains options for the cache.
Language
Contains selection options for language and font.
Sounds
Contains selection options for sounds in connection with burn
tasks.
Audio
Displays the directory for the audio plug-ins.
Contains options for configuring overburning and burning (see
Expert Features
Expert Features).
We recommend that you retain the default settings.
Database
Shows the path to the local Audio CD database and offers the
option to use the Internet database.
Page 73
Configuration
Ultrabuffer
Defines the size of the RAM buffer.
File Browser
Contains options for configuring the file browser.
Misc
Contains options for configuring compilations, burning, the database, the user interface as well as advanced settings for
Nero Burning ROM.
LightScribe
Contains options for configuring LightScribe® recorders such
as the print contrast (quality), default drive and default template for instance.
The tab is only available if a LightScribe® recorder has been
installed.
18.2 Expert Features
The Expert Features tab in the Options window provides you with further configuration options for burning and overburning for instance. You can restore the default feature at any
time by simply clicking on the Restore button.
Using Nero Burning ROM you can overburn a disc beyond the specified capacity. You can
button. Tolerances in the manufacturing process
display the capacity of a disc using the
often cause the actual rewritable area on the disc to exceed the maximum specified capacity. This additional area is often 2-3 minutes long, but may also be shorter or longer. It is
not technically possible to establish the precise extent of the excess capacity prior to burning.
During the overburn process, the following difficulties may arise:
Read errors, sound errors, incorrectly written data and error messages during the burn
process.
Theoretically the recorder could be damaged.
The following configuration options are available:
Enable Disc-at-once
CD overburning
Enables overburning for CDs in disc-at-once mode.
Relative maximum
overburning size:
Defines the relative maximum overburning size. The position
of the yellow mark on the capacity indicator also changes.
Caution: this is only a visual signal and does not create any
extra space on the disc.
Absolute maximum
overburning size:
Defines the absolute maximum overburning size. The position of the red mark on the capacity indicator also changes.
Caution: this is only a visual signal and does not create any
additional space on the disc.
Enable DVD overburning
Enables overburning for DVDs. If the check box is enabled,
you can specify the maximum DVD size in the text box.
Enable generation of
short lead-out
Writes a short lead-out for CDs that are being burned in discat-once mode. This creates additional capacity of about 12
MB.
Do not eject disc after
the burn is complete
Does not eject the disc after the burn process is complete.
Page 74
Configuration
Allow to disable finalizing for burning a
disc image
Disables finalizing when an image file is saved.
Enable all supported
recorder formats for
image recorder
Enables all supported recorder formats for Nero Image Recorder. It is now possible to create compilations that the installed recorder cannot burn. You can therefore create a
DVD compilation without a DVD recorder for instance and
create an image file using Nero Image Recorder. The same
applies for HD DVD and Blu-ray discs.
The Restore button resets all options in the Options window to the default setting.
18.3 Customize window
In the Customize window you can adjust the work environment in Nero Burning ROM to suit
your own individual requirements. You can open the window via the View > Customize
menu.
Fig. 21: Customize window
The window contains the following tabs:
Tab
Description
Commands
Contains the option for adding commands to a toolbar.
Toolbars
Contains the option for creating, renaming, removing toolbars or for
canceling changes.
You cannot rename or remove the default Menu Bar and Standard
toolbars.
Keyboard
Contains the option for defining keyboard shortcuts for commands.
Menu
Contains the option for animating the menus in the menu bar and for
selecting shading.
Options
Contains the options Show ScreenTips on toolbars, Show shortcut keys in ScreenTips and Large icons
Page 75
Configuration
18.3.1 Customizing the work environment
In Nero Burning ROM you can customize your work environment to suit your individual requirements. To do this, proceed as follows:
1. Click on the View > Customize menu.
Æ The Customize window is opened.
2. If you want to create a new toolbar:
1. Click on Toolbars tab.
2. Click on the New button.
Æ
The Toolbar Name window is opened.
3. Enter a name in the Toolbar Name text box and click on the OK button.
Æ
The Toolbar Name window is closed and the new toolbar, which is still empty, is
created. This is now in the Toolbars selection list.
3. If you want to add commands to a toolbar:
1. Click on the Commands tab.
2. Select a category from the Category selection list and then a command from the Commands selection list.
3. Drag the command to the desired toolbar.
Æ
The command is inserted.
4. If you want to change the display for the picture and/or text, show the context menu and
select the desired display type.
5. If you want to remove a command from the toolbar, drag the relevant icon out of the toolbar.
4. If you want to define keyboard shortcuts for commands:
1. Click on the Keyboard tab.
2. Select a category from the Category selection list and then a command from the Commands selection list.
Æ
In the Current Keys area the current key combination is displayed for this command,
if it is available.
3. Enter the new key combination in the Press New Shortcut Key text box.
4. Click on Assign.
Æ
The new key combination is assigned to the command. You can now use it in Nero
Burning ROM.
5. Define the other settings.
6. Click on Close.
Æ The changes are accepted and the window closed.
Î You have successfully customized your work environment.
Page 76
List of figures
19
List of figures
Fig. 1: Nero StartSmart.....................................................................................................................................10
Fig. 2: Nero Burning ROM menu bar and toolbar ............................................................................................11
Fig. 3: New Compilation window, CD-ROM (ISO) disc type ..........................................................................14
Fig. 4: Selection screen for the disc type CD-ROM (ISO)................................................................................25
Fig. 5: Audio Track Properties window..........................................................................................................29
Fig. 6: Burn Compilation window for the disc type CD-ROM (ISO) ...............................................................33
Fig. 7: "Burn process completed successfully" dialog box .........................................................................35
Fig. 8: Compilation window, Copy ..................................................................................................................41
Fig. 9: Nero CD Database window ..................................................................................................................48
Fig. 10: Nero's Title and CD Database window .............................................................................................49
Fig. 11: Create a New CD Entry window ........................................................................................................50
Fig. 12: Save Tracks window ..........................................................................................................................56
Fig. 13: Encode Files window .........................................................................................................................58
Fig. 14: CD Label Editor window for LightScribe® ..........................................................................................61
Fig. 15: Options window - LightScribe tab.....................................................................................................63
Fig. 16: Burn Label window for LabelFlash™/DiscT@2™..............................................................................65
Fig. 17: LabelFlash™-Print Properties window.............................................................................................67
Fig. 18: LabelFlash™- printing window .........................................................................................................68
Fig. 19: Erase Rewritable Disc window..........................................................................................................69
Fig. 20: Options window ..................................................................................................................................73
Fig. 21: Customize window .............................................................................................................................75
Page 77
Glossary
20
Glossary
Blue Book
Standard for CDs created in the formats CD Extra and Enhanced CD.
Blu-ray Disc
Abbreviated to BD. The Blu-ray disc or Blu-ray is a possible successor to the DVD. The BD
was developed by the BDA (Blu-ray-Disc Association) in response to high-definition video
requirements. Their storage capacity is practically five times that of DVDs. Single-layer discs
can store data volumes of up to 20 GB and dual-layer discs up to 50 GB. In BD recorders a
blue-violet laser is used, which can write the data "more tightly" on the disc. The protective
layer is also thinner.
Book Type
The Book Type defines the specification (e.g. DVD-, DVD+, DVD-ROM) of a DVD and is
stored in the lead-in. Even burned DVDs are sometimes not read by DVD players. This may
be due to the fact that the players either cannot read or have difficulty in reading DVD-,
DVD+ or DVD-RW. Using Nero Burning ROM you can set the book Type of the self-burned
DVD on DVD-ROM to guarantee playback.
Bootable CD
Boot refers to the loading of the operating system on the computer when it starts up. This is
normally done from the hard drive. If you do not want to or cannot boot from your hard drive,
you can use a bootable CD to boot from the disc drive.
Cache
Fast temporary storage (buffer), which is used in different areas in a computer.
CD
Compact Disc. Widely used disc type. The following types of CD are available:
CD-ROM
Compact Disc-Read Only Memory. Various computer readable forms of
data such as programs, picture or audio data, for instance, can be stored
in this format.
CD-R
Compact Disc - Recordable. Write-once disc.
CD-RW
Compact Disc - ReWritable. A disc that can be written to more than once.
CD-DA
Compact Disc - Digital Audio. The first standard for Audio CDs. An Audio CD consists of
multiple audio files whereby one file generally corresponds to one title/song; in addition, each
file is subdivided into sectors.
CD-i
Compact Disc-Interactive. Format for multimedia CDs that combine video, audio, and data
and can only be played using a CD-i player or CD-ROM drive that supports CD-i technology.
Page 78
Glossary
CD Text
Additional information on the CD that can store the title and artists of the individual pieces for
instance. CD Text is stored in the so-called lead-in area of the CD before the audio data
starts.
Not all CD players support CD Text. Despite this a CD with CD Text can still be played in the
player.
You must have a CD recorder which supports CD Text to enable the CD Text to be written to
a CD. In particular, CD Text can only be written in disc-at-once mode. Please refer to the recorder selection dialog in Nero Burning ROM to find out whether your recorder supports CD
Text.
Decoding
Decoding refers to the conversion of computer readable audio files (e.g. mp3) into Audio CD
format. Decoding takes place at the same time as the burn process.
Digitalization
Conversion of analog signals to digital signals.
Disc
Disc is a data medium to which the data is saved. CD-R, DVD-R, and DVD+R are examples
of write-once discs that are written to by a recorder and read by a player. Discs of the same
type with different storage capacities are available, e.g. for DVD-R with 4.38 GB or as DVDR DL (Dual Layer, with two data layers) with 7.95 GB.
Disc-At-Once (DAO)
An entire CD/DVD is recorded without ever stopping the laser. This format is best for Audio
CDs that will be played in home and car stereo equipment.
DVD
Digital Versatile Disc or Digital Video Disc. DVD was originally designed for the movie and
games market. In the meantime it has become possible to burn data and certain video films
to a DVD-Video disc and play them on all DVD-ROM drives. The following types are available:
DVD-R
The DVD-R is a non-rewritable format that is compatible with most
DVD-ROM drives and DVD players.
DVD-RAM
Format of rewritable media that is compatible with most DVD-ROM
drives and DVD players. Files cannot be copied and deleted.
DVD-RW
DVD ReWriteable. The DVD-RW is a rewritable disc that fulfills the
same functions as a DVD-R, but is compatible with fewer DVD-ROM
drives and DVD players.
DVD+R/RW
Format developed in cooperation with Hewlett-Packard, Mitsubishi
Chemical, Philips, Ricoh, Sony, and Yamaha. DVD+RW is a rewritable format that is fully and immediately compatible with DVD players and DVD-ROM drives.
EDC/ ECC
Error Detection Code/Error Correction Code. Used to identify and correct scan errors which
may be caused by scratches or dirt on the surface of a CD.
Page 79
Glossary
Emulation
Simulation of the structure and function of a system, e.g. a bootable disc can "emulate" a
floppy drive.
Encode
Encoding is the conversion of audio files that are located on an Audio CD into an audio format that the computer can read (e.g. mp3).
Finalizing
Definitive conclusion of the process of writing to a CD/DVD. After this it is not possible to
write to the CD/DVD anymore. However, a finalized rewritable disc can still be deleted. A
disc is automatically finalized if it is burned using the disc-at-once method.
Firmware
The firmware in recorders functions as the operating system of the drive and contains instructions which determine how the drive reacts to commands from the PC. Generally the
firmware in modern recorders can be updated, improving the support for discs from other
manufacturers for instance.
HD DVD
High Definition DVD. A possible successor to the DVD with greater storage capacity. The
format is recognized by the DVD Forum. The HD DVD was developed in response to highdefinition video requirements. Single-layer discs can store data volumes of up to 15 GB. In
HD DVD recorders blue-violet laser is used, which can write the data "more tightly" on the
disc. This makes it possible to store large quantities of data.
HFS CD
File system used by Apple© Macintosh systems. This format is only suitable for Macintosh
discs.
Image File
An individual file on the hard drive that contains an image of a complete disc. An image can
be used if problems occur during the burn process or if there is no recorder connected to the
PC. You will need free space on your hard drive to create an image.
Index Position
You can set index positions within an audio track. You can "jump" to these using a suitable
CD player. Currently, only very few CD players can handle index positions.
Table of Contents (T.O.C.)
Indicates the content of each session. The table of contents is stored in the lead-in.
Jitter Control
Many CD-ROM drives cannot read an individual sector on an Audio CD, which means that
small gaps may occur in the data stream. Audio correction synchronizes the data stream by
overlapping the sectors and so gaps do not occur.
Crossfade
A crossfade is a merging between two audio tracks. The start of the new track begins softly,
while the current track is still playing. The two tracks merge without a pause.
Page 80
Glossary
Label
Most CDs have an imprint or label. You can use different methods, such as screen printing
for example, to apply a label to the CD.
Lead-in
The initial area of every session is known as the lead-in. This is where the “table of contents”
for your disc and additional information concerning the CD is stored.
Lead-out
The final area in a session. This area is located at the end of the disc. If the disc has not yet
been finalized, the reference to the next session is stored here.
M3U Playlists
An M3U playlist is a file that contains a list of paths to MP3 files. Nero Burning ROM can
process M3U playlists, i.e. when creating an Audio CD, all you need to do is drag an M3U
playlist into the Compilation Area. You can also save information on the artist and the title of
an audio file to the M3U playlist.
MP3
MPEG-1 Audio Layer 3. Audio format often used to compress audio files to a fraction of their
original size (ratio 1:10) without any loss of quality.
MPEG
Motion Picture Experts Group. Standard that was developed for videos compressed at a
higher ratio (e.g. SVCD and VCD).
MPEG-1
This format which is a part of the MPEG compression family has the
highest compression rate.
MPEG-2
There are only minor differences between MPEG-1 and MPEG-2.
MPEG-2 works better with TV sets with interlacing and is a broadcasting standard.
MPEG-3
Standard for defining High Definition TV.
MPEG-4
This standard is the next generation of MPEG-2.
NTSC
Standard for video and television in the United States and Japan. NTSC has more frames
per second than PAL, but has fewer horizontal lines.
PAL
Video and TV standard in Europe. PAL has more horizontal lines than NTSC, but has fewer
frames per second.
Photo-CD
CD which is used for storing images, photos, slides, and other visual data. A photo CD generally consists of multisessions. The standard originates from Kodak and Philips.
Plug-in
Software used to add other features to a program (software) or to support troubleshooting.
Page 81
Glossary
Buffer Underrun
Buffer underruns are caused when there is an interruption to the flow of data to the internal
buffer of the recorder. This can be the fault of the software or the hardware itself. When recording, data is fed continuously to the recorder’s buffer in order to keep a steady flow of
data which is required when recording. When something interrupts that steady flow, it can
cause a buffer underrun and your disc is no longer useable.
Most modern recorders have a protective mechanism against buffer underruns.
Red Book
This standard describes the CD-DA.
Recorder
A recorder writes to discs. A recorder is commonly referred to as a "burner".
SCSI
Small Computer System Interface. Bus system to which different terminal devices such as a
SCSI hard drive, streamers or a CD recorder may be connected. At this time, SCSI is the
only possibility of operating a CD recorder on a typically used computer system.
Sector
Smallest addressable information unit on a CD. A sector is composed of 2,352 bytes of
which - depending on the type of CD used - differing amounts are available as user data. A
sector generally consists of a header, synchronization bits and user data. It may also have
error recognition and correction data. A drive with a simple read speed of 1/75 seconds is
required to read a sector.
Session
Discs such as CDs and DVDs are divided into tracks and sessions. A session is a selfcontained data area that is burned using a single process, and consists of a lead-in, one or
more tracks, and a lead-out. In principle, a session is comparable to the partition on a hard
drive. A multisession disc can contain multiple sessions.
Simulation
Performs all steps in a burn process without using the laser beam. We recommend running a
simulation if you are decompressing data before burning, e.g. when burning an Audio CD
from MP3 files. You can assume that if simulation is successful, the burn process will also be
successful.
SVCD
Super Video CD
Track
Data unit that joins successive sectors on a disc. On an Audio CD a track corresponds to a
piece of music. Several tracks together with the lead-in and lead-out build a session.
Track-At-Once (TAO)
Writing method in which each track is written individually to the CD. The writing process is interrupted briefly after each track, i.e. the laser switches off. With this writing method, it is only
possible to continue writing to a CD sometimes and at a later stage.
Page 82
Glossary
Transcoding
Transcoding is the conversion from one audio format to another, e.g. WAV files to MP3 files.
VCD
Video Compact Disc, Video-CD. Movies, audio, and video data is stored using the MPEG
compression standard. VCDs can be played by the majority of CD-ROMs, DVD players, and
DVD-ROM drives with the appropriate software for processing this video format.
Volume Descriptor
Area at the beginning of a CD containing the structure of the file system. It may also contain
additional and optional information about the CD (e.g. the name of the CD, the publisher, the
copyright notice).
Yellow Book
The Yellow Book is the standard for the format of CDs used for data storage.
Page 83
Index
21
Index
Showing
A
CD Entry
Album
21
Creating
Audio CD
15
CD EXTRA
29
Compiling
Audio File
Compiling
27
CD Text
Configuration Options
20
Code
Audio Database
Creating
26
46
Converting
46
Compilation
Audio File
50
15, 21
27
20, 27
16
Burning
32
Converting
59
Creating
24
Editing
11
Compilation
26
Compilation Area
25
Configuration Options
73
Contact
88
Normalizing
20, 31
Properties
29
Saving
57
Splitting
31
Audio Filters
31
Audio Formats
9
Audiobook CD
16
Compiling
29
Conventions
6
Copy Over Image
40, 41
Copy Protection
27, 30
Copying
40
Crossfade
30
B
Backups
Verifying Data
17, 18
35
Blu-ray Disc
14
Booktype
32
Boot Disc
15, 23
Bootable Disc
36
Burning
37
Template
36
Browser Area
25
Buffer Underrun
34
Burn
32
Burn Options
34
Starting
35
Virus Check
34
Write Method
34
D
Data Disc
15
Data Mode
19
Data Tracks
Saving
71
Database
46
Using
53
Database Entry
Adding
52
Changing
51
Creating
50
Date
Defining
C
Declick
16
31
Disc
Copying
44
Fixing
34
Capacity Bar
26
Disc Format
Capacity Scale
25
Selecting
24
Page 84
Supported
Tabs
Disc Formats
9
16
Enable Recorder Formats
Index
9
Disc Type
Selecting
24
Supported
9
Disc-at-Once
34
DiscT@2™
65
DVD-Video
Reading
43
Setting
30
ISO
18
ISO 9660
19
ISRC
30
J
DVD
Book Type Setting
75
32
Jitter Correction
43
16
Joilet
19
K
E
Echo Effect
31
Karaoke
Emulation
36
Keyboard Shortcuts
Equalizer
31
Expert Features
74
Defining
Kopy Options
31
76
42
L
F
File Name Length
19
File System
19
Files
Selecting
26
Font
Defining
19
Burning
12, 65
Printing
62, 66
Label Editor
61
LabelFlash™
65
Launching the Program
10
Lesefehler
Format
Supported
Label
9
ignorieren
43
LightScribe®
61
H
HD DVD
14
HFS Format
Saving
71
I
Image File
38
Burning
38
Creating
38
Image Formats
9
Image Recorder
9
Image Recorder
14
Image Recorder
38
Image Recorder
M
Main Screen
11
Menu Bar
11
Toolbar
11
miniDVD
15
Compiling
Mixed Mode CD
Compiling
Multisession Disc
29
15
27
17
Continuing
18
Starting
17
N
Nero Burning ROM
Page 85
Essentials
7
Launching Directly
10
Launching via Nero StartSmart
10
Retail
7
Steps
13
Nero CD Database
Nero CoverDesigner
Adding Information
Simulation
34
Super Video CD
15
Compiling
System Requirements
WHQL Certified Device Driver
61, 65
8
50
T
Title
25
Nero WaveEditor
27
Title and CD Database
New Compilation
14
Toolbar
Adding
Creating
O
on-the-fly
40
On-the-Fly Copying
40
Overburning
74
P
46
R
Read Speed
8
47
Nero Search
Program Database
28
20
48
76
Track Properties
30
Track-at-Once
34
U
UDF
19
User CD Database
47
User Database
47
V
42
Video CD
Recorder
Compiling
28
Choosing
32
Video formats
Selecting
12
Video-CD
15
35
Virus Scanner
71
Rewritable CD
Rewritable Disc
Updating
Erase Method
69
Erasing
69
71
W
WHQL Certified Drivers
S
9
8
Work Environment
Search
Performing
Selection Screen
Customizing
25
Session
Importing
76
49
X
Xbox™
17
Creating a Compatible Disc
19
Page 86
Tab Matrix
Tab Matrix
This matrix shows which tabs are available for which disc format in the Compilation window.
The tabs are listed in the top row; the disc formats in the left-hand column.
Multisession
ISO
UDF
Title
Date
Misc
Audio CD
CDA Options
Burn
Extra
An "x" entered in a cell within the table indicates that the tab is available for this disc format.
A "-" in a cell indicates that the relevant tab is not available for this disc format. The "Extra"
column lists specific additional tabs that apply to the respective disc format.
Info
22
CD/DVD-ROM (ISO)
x
x
x
-
x
x
x
-
-
x
-
Audio CD
x
-
-
-
-
-
-
x
x
x
-
Mixed Mode CD
x
-
x
-
x
x
x
x
x
x
-
CD EXTRA
-
-
x
-
x
x
x
x
x
x
-
Video/Super Video CD
-
-
x
-
x
x
x
-
-
x
Video CD
Menu
miniDVD
x
-
x
-
x
x
x
-
-
x
-
CD/DVD-ROM (Boot)
x
-
x
-
x
x
x
-
-
x
Boot
CD/DVD/HD DVD-ROM/
Blu-ray Disc (UDF)
x
x
-
x
x
x
x
-
-
x
-
CD/DVD-ROM
(UDF/ISO)
x
x
x
x
x
x
x
-
-
x
-
Audiobook CD
-
-
-
-
-
-
-
-
-
x
Audioboo
k CD
DVD-Video
x
-
x
-
x
x
x
-
-
x
-
Page 87
Contact
23
Contact
Nero Burning ROM is a Nero AG product.
Nero AG
Im Stoeckmaedle 13 - 15
76307 Karlsbad
Germany
Web:
www.nero.com
Help:
http://support.nero.com
E-mail:
[email protected]
Fax:
+49 724 892 8499
© 2007 Nero
Page 88