1
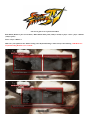
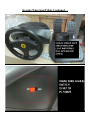
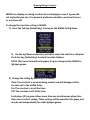
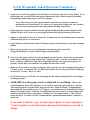
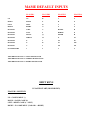
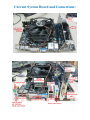
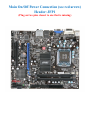
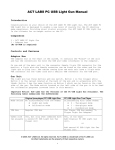
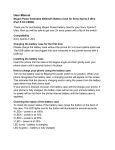
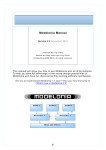
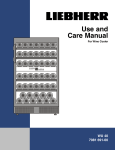
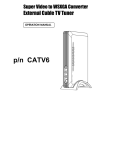
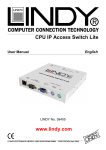
System Instructions Customers with 4 player panels (or wider 2 player panels) may need to remove the panels to get your machines through standard (34”) doorways. To easily remove and turn the control panel: Remove the two SILVER OR Black Phillips screws (2.5” Long) that hold your top control panel to the box of the panel, lift panel like the hood of your car (hinged in back on pedestals) or for an upright lifting from the part of the panel closest to the monitor glass (hinged in front). Then remove the 4 screws (2 on bottom and 2 on back) that hold the control panel box to the main cabinet. Lower the top of the control panel back on the control panel box and return the 2 Silver or Black Phillips screws to hold the top panel to securely to the bottom control panel box. This way you can turn (carefully) the control panel assembly sideways (use wrapping materials or a friend to turn and hold the panel to get the machine through your doorway and then return the panel back to normal position making sure not to pinch any wires as you screw the box and main panel back into normal position on the main machine body. * Please, before plugging in your new Dream Machine take the time to remove the back door (upright), open the rear door (table top), or pull out the locked sliding drawer (cocktail table) and double check all parts are seated tightly in place. Shipping is very hard on our large machines and things do come loose sometimes. * The main power switch is located on the TOP LEFT of every upright and table top Dream Machine * To Credit 2 and 4 Player machines you just push and hold Player 1’s start button and push the first button on player 1’s side (top left button), you can credit player 2, 3, and 4 this way as well… Just push and hold their start button and push the first button on that player's side. When You turn the machine on for the first time you will notice a few things as the Dream Machine boots up. For about 20 seconds you will see our operating system logo followed by Jaguar Eyes and the word “Loading” The Jaguar Eyes Loading screen will appear for about 7 seconds before our colorful Hyperspin intro movie begins. You can skip this intro video to go directly to the main menu screen by pressing any joystick or button on the control panel (note: this will bring up the menu but it may be sluggish as background drivers are still loading…) After the into movie plays you will be presented with the main game menu screen that looks something like this: On the right side you will the various emulation systems (MAME, Lynx, MUGEN, Nintendo, etc) To select an emulation system just press 1 or 2 player start On the left is a static screen shot or movie depending on system and game selected showing what the game looks like after it is loaded. To select the game you can press either 1 or 2 player start and it will load up, some games take longer than other but the overall load time is between 1 second to 2 minutes (MUGEN) To EXIT from any game you can push and hold player 2 start button and then push player 1’s start button (Arcade games) or push and hold Player 1’s Start button and then push player 2’s Start Button (All other systems) Menu Functions Player 1 or Player 2’s joystick: Selects games and moves thru game lists Player 1 or Player 2’s start button: Loads Game or Next Menu Player 1 or Player 2’s 5th button will bring up the Genre filtering list, Used exclusively for MAME this will help narrow the game list down by different types of games (example: Fighting, Shooting, Sports Themes, Vertical Shooters, etc) Player 1 or Player 2’s 6th button will bring up the Favorites Menu, here you can add the selected game to the favorites list or your own liking and switch the menu to show just your selected (and saved) favorite games. In Game Functions (MAME) Pause Game: Hold player 1 start button and push player 1’s joystick down *This will pause the game and now bring up the informational window that will show you the button layout as well as tips and tricks and other interesting game information… On Screen Menu: Hold player 1 start button and push player 1’s joystick right Special Advanced Menu: Hold player 1 start button and push player 1’s joystick up Specific Emulators Super Nintendo Emulator You don’t need to credit Super Nintendo games, just push player 1 start or player 2 start To EXIT Super Nintendo games you must push the RED button on the bottom of your control panel or if you have no RED button (4 Player Machines) then push and hold player 1 start button and push player 2’s start button, this will bring you back to the main game menu. Nintendo Emulator You don’t need to credit Nintendo games, just push player 1 start or player 2 start To EXIT Nintendo games you must push the RED button on the bottom of your control panel or if you have no RED button (4 Player Machines) then push and hold player 1 start button and push player 2’s start button, this will bring you back to the main game menu. Sega Genesis/MegaDrive You don’t need to credit Sega Genesis games, just push player 1 start or player 2 start To EXIT Sega Genesis games you must push the RED button on the bottom of your control panel or if you have no RED button then push and hold player 1 start button and push player 2’s start button, this will bring you back to the main game menu. Daphne (laser disc emulator) To credit Daphne Games push the #6 button on player 1’s side To Exit Daphne Games push the #4 button on player 1’s side Our newest game to be requested and added. Back Button (Return to prior screen/menu) = Black button under panel (2 Player models) or player 1 start + player 1 button 1 (4 Player panel) Select = Player 2 Button 1 Make sure your Options for the “Button Config” and “Keyboard Settings” match exactly to the following. IMPORTANT!: Keyboard setting MUST be set to “NONE” Nintendo 64 You don’t need to credit Nintendo 64 games, just push player 1 start or player 2 start To EXIT Nintendo 64 games you must push the RED button on the bottom of your control panel or if you have no RED button then push and hold player 1 start button and push player 2’s start button, this will bring you back to the main game menu. Player 1 Player 2 A = Button 1 B = Button 2 C UP = Button 3 C Down = Button 4 C Left = Button 5 C Right = Button 6 Z = Button 7 Same order as Player 1 Pinball Emulation You must credit pinball machines using the special black button below your panel or push and hold player 1’s start button and push the first button on player 1’s side (4 Player Machine) , then press player 1’s Start button to Add Players Pinball Buttons are located on the sides or your machine, if your machine does not have these side buttons you can use Player 1’s Button 1 (left flipper) and Player 1’s 3rd button (Right Flipper) To nudge table you can use Player 1’s button: 4 = Nudge Left 5 = Nudge Center 6 = Nudge Right To EXIT pinball games just push the special RED button on the bottom of your control panel or if you don’t have the bottom RED button push and hold player 1’s start button and push player 2’s start button (4 Player Machines). House of the Dead 2 and 3 We’ve taken the PC versions and adapted them nicely to our systems. Player 1 can use a light gun or trackball and player 2 must use the joystick. To exit just hit the RED button under the control panel. Bejeweled 2 A fun game we added because of our wives! They love to play this Tetris like game on their computers at home so we adapted it to play on our systems as well. For tricks and game play instructions please see http://en.wikipedia.org/wiki/Bejeweled_2 Online. To EXIT this game you must select “menu” button and then select “Exit” to return to game menu. Please do not change the settings under the “settings” menu or game will be unplayable! Special Joysticks Our Joysticks are custom made in England just for our systems! They function in both 4 way (no diagonals) and 8 way (diagonals). To switch just pull up on the handle of the joystick(fairly hard) and twist clockwise for 4 way and counter clockwise for 8 way. You will feel a special cam turn, it will only turn about 1/8 revolution and the handle will stop when it’s reached it’s limit. If the handle just keeps turning then you’re not pulling up hard enough. When the handle stops turning just let go and a spring snaps it into position. Arcade Games On Screen Menu Input General: Used to change all game functions at once – Best to NOT mess with this menu unless you want to change all game functions at once. Input this Game: Use this menu to select and change the games functions that you currently playing. To change a function, highlight it and push the 3rd button on player 2’s side, this will clear that function and you can push the button or joystick function that you want to change it to. If you make a mistake exit one menu and come back and fix it. If you don’t exit the menu you will continue to stack inputs on the same input (useful if you want to assign more than one button to that function in the game) Game Information: Displays game info Dip Switch Settings: Change game difficulty, # of lives, etc. - Will be saved when you exit the game. Sound: Adjust the sound functions here, factory set but can be altered. Video: Change aspect ratio, game artwork, resolution and other video related options here. *In Menu use player 2’s 3rd button to enter a menu* Special Controls Steering Wheel and Pedals Because the steering wheel and pedals are a custom control (add on) they need to be manually set up in the Arcade (MAME) emulation. The wheel is a plug and play device but as a rule of thumb should be hooked up when you turn on your Dream Machine. Load up a driving game and then bring up the in game menu by holding player 1 start and pushing the player 1’s joystick to the right. Go to “Input This Game” and select using the 3rd button on player 2’s controls (Enter button). Look for the function “Dial Analog” or “Paddle Analog” and highlight it and clear it (enter button) then move the wheel to the right or left, this should come up with an input of “Joy 1 Wheel Axis”. Then to set up the gas and brake pedals select “Pedal 1 Analog” and clear it (enter button) (Pedal 1 = Gas Pedal function) and push the Gas pedal down. This should enter “Joy 1 Axis 1”, The Pedal 1 DEC should automatically enter “Joy 1 Down” and the Pedal 1 INC will automatically enter “Joy 1 UP” We will then do the same (but opposite) for the brake pedal functions. Select “Pedal 2 Analog” (if there is a brake in the game, some games do not have a brake function) clear the function (enter button) and push the brake pedal down. This should enter “Joy 1 Axis 1” The Pedal 2 DEC should automatically enter “Joy 1 UP” and the Pedal 1 INC will automatically enter “Joy 1 DOWN” To Set up Shift Functions (if available for that particular game) just highlight the shift function, clear it (enter button) and then push your shift paddle or shifter stick, if you wish to program more than one shift function just clear it (enter button) again and push the other control so you can use both for the shift function. Steering Wheel and Pedals Continued… Tron (Trigger) Joystick (Digital) There isn’t a lot of setup on this control because it is wired directly to the player 1’s joystick and buttons 1, 2, and 3. You can custom assign the buttons to Tron or Discs of Tron by loading up that particular game and bringing up the in game menu (see above for steering wheel) and then selecting player 1 button 1, or player 1 button 2 or player 1 button 3 clearing it (enter button) and then pushing the button on the trigger joystick you want to use. Dance Dance Revolution Dance Pad Controller This controller is only used in the Dance Dance Revolution emulation (not in MAME section) This controller should be set up from the factory if it was ordered with your Dream Machine build, if you ordered it seperatly please call 715-212-8063 and we’ll help you set it up. Wireless Analog Controllers Make sure your light guns are unplugged and restart your Machine to make sure they are recognized properly These are a plug and play controller. Just turn them on, if you have 2 of them one will be the player 1’s controller and one will be player 2’s controller. These controllers can be used with all Playstation, N64, and Gamecube games and set up to work with the MAME (arcade) emulation as well. If you need assistance configuring these controls in MAME (arcade) please call us at 715-212-8063 and we’d be happy to help you out. Special Controls Continued… Tron Joystick (Analog) For the Analog Stick when you go into a game you want to use go to "Input this Game" Find "Ad Stick X Analog", clear the function and move your analog joystick to the left or right, this should bring up Joy 1 X Do the same for "Ad Stick Y Analog" but move the joystick Up or Down, this will bring up Joy 1 Y. Then go to Analog Controls (back out 1 menu and select) and turn Everything (digital speed, auto center speed, and sensitivity) to 0 and 1. This will make the stick function as it should, make sure to exit the game (to save these settings) by pushing FIRST player 2 start and then Player 1 Start. Rotational Joysticks To set up your heavy barrel and other rotational games: Starting from the top of the list in "Input this Game" Change 1 Player Start to 3 Player Start Change 2 Player Start to 4 Player Start Change Player 1's UP/Down/Left/Right to Player 3's Up/Down/Left/Right Change Player 2's UP/Down/Left/Right to Player 4's Up/Down Left/Right Select "Positional Analog DEC" (player 1's rotational controls) and clear it and then on player 3's rotational joystick rotate the joystick 1 click CLOCKWISE, this should enter the [ symbal Select "Positional Analog INC" (player 1's rotational controls) and clear it and then on player 3's rotational joystick rotate the joystick 1 click COUNTER CLOCKWISE, this should enter the ] symbal Do the same (if you want to set up the player 2's controls) for player 4's rotational joystick After this, exit one menu and then select "Analog Controls" Here's what we want to change: Positional Speed (Change to 0) Positional Sensitivity (Change to 100) Do the same for Positional 2 functions for the second player’s controls Remember to Exit the Game by pushing and holding player 2's start FIRST and then Player 1's start to save these settings you make... Spinner To re-assign your spinner: Go to "Input General" and then "Player 1 Controls", look for "Dial Analog" (will be set to Mouse 3X), clear it and turn your spinner - this will enter the correct function "Mouse 4X" Do the same for "Paddle Analog” F.A.Q (Frequently Asked Questions) Light Gun Setup (THESE ARE CALIBRATED FOR UPRIGHT MACHINES FROM THE SHOP) Calibration – This should be done while holding the Light Gun in your normal “shooting” position. If you intend to look through the gun‐sights when playing you must do this when calibrating. Likewise, if you “shoot from the hip” you must do this when calibrating as well. Pedestal’s that come with lightguns will need to be calibrated for the size HDTV you have. If you have a HDTV over 50” you will need to purchase our High Output Lightbar Calibration: (make sure you stand back about 3 feet from screen) Load up Buck Hunter (main wheel – Any Buck Hunter 1-4 will work) • Hold the trigger for 5 seconds (see image on next page for aiming points) • The mouse cursor will eventually start to move and come to rest, pointing at a location near the top left corner of the screen, and begin to flash. Aim the Light Gun at the cursor and pull the trigger again. The timing is not important as the cursor is only an indicator. The aim is the only important factor. • The cursor will then point to a location near the top right corner. Aim at the cursor and pull the trigger. • The cursor will then point near the lower edge of the screen. Aim at this point and pull the trigger. Note the position to aim is offset to the left of the screen centerline. The gun should track well (curser follows your guns aiming) Light Gun Calibration Points on Screen (follow the mouse pointer) Customers with Pedestals (HDTV or PROJECTOR Setup) Plug the LED strip into an available USB port (if you have one on your HDTV) or use our included USB Power Adapter and place it centered above your monitor. For best results, the strip should be centered left‐to‐right and as close to the top of the picture screen as possible. 1) As an initial check, point the gun at the screen with the tip of the gun about 2 to 3 feet (60 to 100cm) from the screen. The cursor should move as you move the gun. 2) Calibration – This should be done while holding the Light Gun in your normal “shooting” position. If you intend to look through the gun‐sights when playing you must do this when calibrating. Likewise, if you “shoot from the hip” you must do this when calibrating as well. NOTE: The cursor may not move all the way to the edges of the screen, or may not track precisely with your movement yet. You still need to perform an initial calibration (See previous calibration page) Simple steps to EASY Light Gun Calibration Make sure you stand back about 5-6 feet from a 50" HDTV, a bit less for smaller and a bit more for larger HDTV's Make sure your light bar is in the center of your HDTV (top if preferred) and aimed so it's at eye level or slightly LOWER. If your HDTV is over 50" you will need a High Powered Light Bar (ask us for this part) Start with player 1's gun and load up Big Buck Hunter on the main wheel (there are 4 version, any will do) Hold down player 1's trigger on the gun and in 5-8 seconds the cursor on the screen will move up and to the far left corner of your monitor. Aim there and pull the trigger once, the sight should now move to the upper right corner of the screen. Aim at the cursor and pull the trigger again, the cursor should move down to the bottom middle of the screen, Aim the gun at this cursor and pull the trigger. If all calibration points were "seen" by the gun you should be able to move the cursor accurately around the screen. If the cursor goes back to any other location on the screen after pulling the trigger you need to try the calibration again. Make sure there are no other sources of IR light in the room that may throw off your guns sensors. Dimmable lights, security cameras, motion detectors, etc... Light Guns Continued…. 1) Launch Arcade Classics Game “Area 51” 2) Push and Hold Player 1 start and push player 1’s joystick to the right to bring up the MAME Config Menu 3) Use the Up/Down on player 1’s joystick to move the selection, and press the Enter key (player 2’s button 3) to select Input (general) 4) Use the Up/Down on player 1’s joystick to move the selection, and press the Enter key to select Player 1 Controls 5) Use the Up/Down on player 1’s joystick to move to the Lightgun X Analog input, but before you select it make sure you hold the Light Gun steady and point it at your screen. 6) Press the Enter key to select the Lightgun X Analog menu item and move your AimTrak Light Gun steadily to the right, in a horizontal motion. 7) This should assign “GUN # X” to the Lightgun X Analog input where # is the number assigned to your AimTrak by MAME. If “GUN # X or GUN # Y” is assigned instead, try again but keep the motion of the Light Gun as horizontal as possible. Move the menu selection up then down again to Lightgun X Analog and repeat step 6. 8) Repeat steps 5 and 6 for the Lightgun Y Analog input, using a vertical movement instead of horizontal. 9) If you have two AimTrak Light Guns installed, repeat steps 4 through 9 above with your second Light Gun, selecting Player 2 Controls instead in step 4. 10) Move the menu up to P1 Button 1. This should be assigned by default as shown: The AimTrak Light Gun trigger will be seen by MAME as “Joy # Button 0”, but it may not be “Joy 1 Button 0” as in the default. 11) Press the Enter key to select P1 Button 1 and then press the trigger on the AimTrak Light Gun. NOTE: The trigger can be assigned to different buttons when aimed on and off the screen. Make sure you point the Light Gun at the screen when you assign this input. Showing/Hiding Crosshairs MAME can display an aiming crosshair for each lightgun, even if a game did not originally have one. It is personal preference whether you leave them on or turn them off. To change the crosshair setting in MAME: 1) Press the Tab key (default key) to bring up the MAME Config Menu 2) Use the Up/Down arrows (or joystick) to move the selection, and press the Enter key (default key) to select Crosshair Options. NOTE: This menu item will only appear for guns recognized by MAME as lightgun games. 3) Change the setting by selecting P1 Visibility. Auto: The crosshair is on when being moved, and will disappear after the time set in the Visible Delay. On: The crosshair is on all the time. Off: The crosshair is off all the time. Each player (if the game allows more than one simultaneous player) has their own crosshair setting. These settings will be saved for this game, and may be set independently for other lightgun games. F.A.Q (Frequently Asked Questions Continued…) Joysticks: You will need to pull up and twist these to make them work the way they should. If you pull up and twist you will feel the cam engage and then lock (only 1/8th of a turn) if the handle keeps spinning and nothing stops it you're not engaged. o If you still can't get it to lock, open the panel (remove the two top screws) and look underneath at the cam function. It's easier to see what your're trying to do, once you have the feel of the mechanism you'll have no problem switching from 4-8way. If playing Q-bert you must remeber that the original machine had the joystick mounted on the diagnal axis (like an X) so there was no straight up/down left/right like normal joysticks have. Daphne: Credit button is #6, Exit to menu is #4. You must wait for the loading sequence and then credit and push player 1's start button. Super Nintendo: the Red button is the Exit button for this system and many of the other including pinball. Make sure the joystick is in 4 way (no diagnals) when playing older classics like Frogger/Pacman/Q-bert or play will feel sloppy and unresponsive... Some 2 joystick games will need to be programmed to use both sticks. Go into the in-game menu (as discussed with lightgun setup) and go under "Input this game" and clear each function for Player 1 right/up, right/down, right/left and right/right and move the right joystick (player 2's joystick) to enter the correct functions (see manual for more info on this) Make sure if you want to save these settings for future play that you exit the game using the player 2’s start + player 1’s start and NOT the EXIT button under the control panel (2 Player machines) or the Player 1’s start + Player 2’s Start. If you exit this way you will NOT save the settings and the original settings will be restored upon reloading the game. All MAME (arcade) games can be configured to your liking. When in the Arcade Emulation, Push and hold player 1’s start button then push right on player 1’s joystick. This will bring up the “in game menu” and you can select “Input this Game” by highlighting it and pushing the enter button (player 2’s 3rd button). You can then select the function you want to change for example “player 1’s button 1”, highlight this function and clear it (enter button) then push any button you want to make player 1’s button one, for example button 3. This will now remap the player 1’s button 1 from it’s normal button 1 position and make button 3 function as button one. If you make a mistake or get stuck just press player 2’s start and player 1’s start together to exit and return and correct the function you wish to change. MAME DEFAULT INPUTS PLAYER 1 PLAYER 2 PLAYER 3 PLAYER 4 UP UP R I Y DOWN DOWN F K N LEFT LEFT D J V RIGHT RIGHT G L U BUTTON 1 CTRL A RCTRL B BUTTON 2 LALT S RSHIFT E BUTTON 3 SPACE Q ENTER H BUTTON 4 LSHIFT W O M BUTTON 5 Z I F6 F9 BUTTON 6 X K F7 F10 BUTTON 7 C J F8 F11 PLAYER START 1 2 3 4 TRACKBALL BUTTON 1 = LEFT MOUSE CLICK TRACKBALL BUTTON 2 = MIDDLE MOUSE CLICK TRACKBALL BUTTON 3 = RIGHT MOUSE CLICK SHIFT KEYS 1 PLAYER START (HOLD DOWN) PLAYER 1 JOYSTICK UP = CONFIG MENU (`) DOWN = PAUSE GAME (P) LEFT = RESET GAME (1 + LEFT) RIGHT = IN GAME MENU (TAB OR 1 + RIGHT) CUSTOM RGB TRACKBALL LIGHT CONTROLLER CUSTOM RGB TRACKBALL LIGHT CONTROLLER (CONTINUED…) Machine Dimensions Classic and Stealth Uprights (29” CRT Monitor) 2 Player Single Piece Upright: 28.5”W X 42”D X 72”H Weight: 225 lbs. 2 Player Two Piece (36”W Panel) Upright: 36”W X46”D X 72”H Weight: 250 lbs. 4 Player (48”W Panel) Upright: 48”W X 48”D X 72”H Weight: 275 lbs. 4 Player Stealth MEGACADE (43” LED Monitor) 4 Player Stealth MegaCade: 48”W X 29”D X 72”H Weight: 195 lbs. Stealth Pedestals 2 Player Stealth Pedestal: 36”W X 32”D X 39”H Weight: 80 lbs. 4 Player Stealth Pedestal: 48”W X 32”D X 39”H Weight: 90 lbs. Cocktail Table (29” CRT Monitor) 2 Player Cocktail Table: 30”W X 34”D X 31”H Weight: 225 lbs. Shut Down To shut the machine down properly you should exit the game you’re in and return to the main menu. Then push the BLACK shutdown button located on the Top Left of the machine or the back of your machine (pedestal cabinets, Table Top cabinets) Current System Board and Connections: Main On/Off Power Connection (see red arrow) Header: JFP1 (Plug on two pins closest to one that is missing) Questions??? Call us anytime 9am to Midnight CST 715-212-8063 DREAM HOME ARCADES 1121 SCHOOL ROAD MOSINEE, WI 54455 Warranty Policy The Purpose of Warranty Warranty assures the purchaser that should a defect in material or workmanship occur during the warranty period (1 Year), (Dream Home Arcades LLC) will assume specific repair responsibilities, as listed in the warranty statement. The warranty statement is to be provided to each purchaser of each piece of new (custom) equipment. Subject to the respective provincial law warranty begins on the date the product is delivered to the original purchaser of the product. Once the warranty period has begun, it cannot be stopped or interrupted. Dream Home Arcades LLC Responsibilities The following responsibilities are to be performed when the dealer delivers a product to the purchaser or otherwise places it into warranty service: Review warranty statement, operator’s manual and understanding of purchaser’s responsibilities as related to warranty, service and the proper and safe operation of the product. Purchasers should be advised to have failed parts repaired or replaced immediately upon failure and that continued use will result in additional damage and excessive wear. Contact manufacturer (Dream Home Arcades LLC) prior to beginning repair or replacement of failed parts to make certain that the cost of repairs are consistent with the value of the product when sold. Warranty requests for units in dealer’s inventory may be submitted to (Dream Home Arcades LLC) when defects are noted in products prior to the retail sale of the unit. Provide warranty and service repairs as directed by (Dream Home Arcades) Service Repair bulletins or other instructions. No warranty will be allowed on units delivered to the retail customer prior to the full payment of that unit to the manufacturer by the dealer. Reimbursement for parts used in warranty repair will be credited only when the parts are purchased from (Dream Home Arcades LLC). Labor is not paid on the warranty associated with repair parts purchased by the retail customer that are used on a product that is not currently in warranty time frame. Limited Warranty Statement (Dream Home Arcades LLC) warrants each new custom product to be free from defects in material and workmanship. This warranty is applicable only for the normal service life expectancy of the product or components, not to exceed 12 consecutive month’s from the date of delivery or the date of the first use of the new custom product to the original purchaser. Genuine (Dream Home Arcades LLC) replacement parts and components will be warranted for 90 days from the date of purchase, or the remainder of the original equipment warranty period, whichever is longer. Under no circumstances will it cover any merchandise or components thereof, which, in the opinion of the company, has been subject to misuse, unauthorized modification, alteration, and accident or if repairs have been made with parts other than those obtainable through (Dream Home Arcades LLC). (Dream Home Arcades LLC) in no way warrants customers household wiring, electrical outlets or other trade accessories since these items are warranted separately by their respective manufacturer. Our obligation under this warranty shall be limited to repairing or replacing, free of charge to the original purchaser, any part that, in our judgment, shall show evidence of such defect, provided further that such part, if so requested shall be returned within forty-five (10) days from date of failure to (Dream Home Arcades LLC) shipping charges prepaid. This warranty shall not interpret to render (Dream Home Arcades LLC) or dealer liable for injury or damages of any kind or nature to person or property. . Except as set forth above, (Dream Home Arcades LLC) shall have no obligation or liability of any kind on account of any of its equipment and shall not be liable for special or consequential damages. (Dream Home Arcades LLC) makes no other warranty, expressed or implied. This warranty is subject to any existing conditions of supply which may directly affect our ability to obtain materials or manufacture replacement parts. (Dream Home Arcades LLC) reserves the right to make improvements in design or changes in specifications at any time, without incurring any obligation to owners of units previously sold. No one is authorized to alter, modify or enlarge this warranty nor the exclusion, limitations and reservations. Return Policy Dream Home Arcades LLC does NOT accept any returns of any custom made products unless agreed upon by both Dream Home Arcades LLC and the buyer of our custom products. Because Dream Home Arcades LLC builds every machine to our customers’ requests we cannot accept any returns unless an agreed upon cost has been determined prior to the custom product being returned for modification/repair. Dream Home Arcades LLC reserves the right to inspect any returned custom products for damage caused by either the customer or the return shipper and will charge the customer for these repairs. Credit to the customer will be determined after the custom product has been returned and inspected and the terms agreed upon by Dream Home Arcades LLC and the customer have been met (resale or repair).