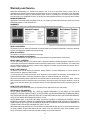
1
This .pdf document is bookmarked
Operating Instructions and Parts Manual
Woodturning Lathe
Model 3520B
WALTER MEIER (Manufacturing) Inc.
427 New Sanford Road
LaVergne, Tennessee 37086
Ph.: 800-274-6848
www.powermatic.com
Part No. M-1352001
Revision B1 04/2010
Copyright © 2010 Walter Meier (Manufacturing) Inc.
Warranty and Service
Walter Meier (Manufacturing) Inc., warrants every product it sells. If one of our tools needs service or repair, one of our
Authorized Service Centers located throughout the United States can give you quick service. In most cases, any of these Walter
Meier Authorized Service Centers can authorize warranty repair, assist you in obtaining parts, or perform routine maintenance
and major repair on your POWERMATIC® tools. For the name of an Authorized Service Center in your area call 1-800-274-6848.
MORE INFORMATION
Walter Meier is consistently adding new products to the line. For complete, up-to-date product information, check with your local
Walter Meier distributor, or visit powermatic.com.
WARRANTY
POWERMATIC products carry a limited warranty which varies in duration based upon the product.
WHAT IS COVERED?
This warranty covers any defects in workmanship or materials subject to the exceptions stated below. Cutting tools, abrasives
and other consumables are excluded from warranty coverage.
WHO IS COVERED?
This warranty covers only the initial purchaser of the product.
WHAT IS THE PERIOD OF COVERAGE?
The general POWERMATIC warranty lasts for the tim e period specified in the product literature of each product.
WHAT IS NOT COVERED?
The Five Year Warranty does not cover products used for commercial, industrial or educational purposes. Products with a Five
Year Warranty that are used for commercial, industrial or education purposes revert to a One Year Warranty. This warranty does
not cover defects due directly or indirectly to misuse, abuse, negligence or accidents, normal wear-and-tear, improper repair or
alterations, or lack of maintenance.
HOW TO GET SERVICE
The product or part must be returned for examination, postage prepaid, to a location designated by us. For the name of the
location nearest you, please call 1-800-274-6848.
You must provide proof of initial purchase date and an explanation of the complaint must accompany the merchandise. If our
inspection discloses a defect, we will repair or replace the product, or refund the purchase price, at our option.
We will return the repaired product or replacement at our expense unless it is determined by us that there is no defect, or that the
defect resulted from causes not within the scope of our warranty in which case we will, at your direction, dispose of or return the
product. In the event you choose to have the product returned, you will be responsible for the handling and shipping costs of the
return.
HOW STATE LAW APPLIES
This warranty gives you specific legal rights; you may also have other rights which vary from state to state.
LIMITATIONS ON THIS WARRANTY
WALTER MEIER (MANUFACTURING) INC., LIMITS ALL IMPLIED WARRANTIES TO THE PERIOD OF THE LIMITED
WARRANTY FOR EACH PRODUCT. EXCEPT AS STATED HEREIN, ANY IMPLIED WARRANTIES OR MERCHANTABILITY
AND FITNESS ARE EXCLUDED. SOME STATES DO NOT ALLOW LIMITATIONS ON HOW LONG THE IMPLIED WARRANTY
LASTS, SO THE ABOVE LIMITATION MAY NOT APPLY TO YOU.
WALTER MEIER SHALL IN NO EVENT BE LIABLE FOR DEATH, INJURIES TO PERSONS OR PROPERTY, OR FOR
INCIDENTAL, CONTINGENT, SPECIAL, OR CONSEQUENTIAL DAMAGES ARISING FROM THE USE OF OUR PRODUCTS.
SOME STATES DO NOT ALLOW THE EXCLUSION OR LIMITATION OF INCIDENTAL OR CONSEQUENTIAL DAMAGES, SO
THE ABOVE LIMITATION OR EXCLUSION MAY NOT APPLY TO YOU.
Walter Meier sells through distributors only. The specifications in Walter Meier catalogs are given as general information and are
not binding. Members of Walter Meier reserve the right to effect at any time, without prior notice, those alterations to parts,
fittings, and accessory equipment which they may deem necessary for any reason whatsoever.
2
Table of Contents
Warranty and Service..........................................................................................................................2
Table of Contents ...............................................................................................................................3
Warning .............................................................................................................................................4
Introduction ........................................................................................................................................6
Specifications .....................................................................................................................................6
Unpacking ..........................................................................................................................................7
Contents of the Shipping Container ..................................................................................................7
Assembly ...........................................................................................................................................8
Comparator Rear Bracket ................................................................................................................9
Tool Caddy .....................................................................................................................................9
Guard .............................................................................................................................................9
Bed Extension (Optional Accessory) ............................................................................................... 10
Shelf Assemblies (Optional) ........................................................................................................... 11
Grounding Instructions ...................................................................................................................... 12
Single Phase Operation ................................................................................................................. 13
Three Phase Operation.................................................................................................................. 13
Extension cords............................................................................................................................. 13
Adjustments ..................................................................................................................................... 13
Headstock and Tailstock Movement ............................................................................................... 13
Cam Tightness .............................................................................................................................. 14
Tool Support ................................................................................................................................. 14
Locking Handles............................................................................................................................ 14
Live Center and Cone .................................................................................................................... 15
Indexer ......................................................................................................................................... 15
Centers – Installing and Removing ................................................................................................. 15
Face Plate – Installing and Removing ............................................................................................. 16
Comparator – Installing and Using .................................................................................................. 16
Speed Change .............................................................................................................................. 17
Sheave and Belt Alignment ............................................................................................................ 18
Checking Spindle Play ................................................................................................................... 18
Sheave/Drive Belt Replacement ..................................................................................................... 18
Operating Controls............................................................................................................................ 20
Operation ......................................................................................................................................... 20
Turning Tools ................................................................................................................................ 21
Spindle Turning ............................................................................................................................. 22
Cutting Techniques........................................................................................................................ 23
Face Plate and Bowl Turning ......................................................................................................... 25
Bowl Turning Techniques............................................................................................................... 26
Maintenance .................................................................................................................................... 27
Indexer Positions .............................................................................................................................. 28
Troubleshooting ................................................................................................................................ 29
Recommended Lathe Speeds (per diameter of workpiece) .................................................................. 30
Replacement Parts ........................................................................................................................... 30
Headstock Assembly ..................................................................................................................... 31
Parts List: Headstock Assembly ..................................................................................................... 32
Stand and Bed Assembly ............................................................................................................... 34
Parts List: Stand and Bed Assembly ............................................................................................... 35
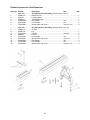
Optional Accessories: Bed Extensions ............................................................................................ 36
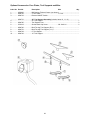
Optional Accessories: Outboard Turning Stand ............................................................................... 37
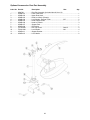
Optional Accessories: Face Plates, Tool Supports and Misc. ............................................................ 38
Optional Accessories: Dust Port Assembly ...................................................................................... 39
Electrical Connections....................................................................................................................... 40
Electrical: Remote ON/OFF Switch (Optional Accessory) .................................................................... 41
3
Warning
1. Read and understand the entire owners manual before attempting assembly or operation.
2. Read and understand the warnings posted on the machine and in this manual. Failure to comply with
all of these warnings may cause serious injury.
3. Replace the warning labels if they become obscured or removed.
4. This Lathe is designed and intended for use by properly trained and experienced personnel only. If
you are not familiar with the proper and safe operation of a Lathe, do not use until proper training and
knowledge have been obtained.
5. Do not use this Lathe for other than its intended use. If used for other purposes, Walter Meier
(Manufacturing) Inc., disclaims any real or implied warranty and holds itself harmless from any injury
that may result from that use.
6. Always wear approved safety glasses/face shields while using this machine. Everyday eyeglasses
only have impact resistant lenses; they are not safety glasses.
7. Before operating this Lathe, remove tie, rings, watches and other jewelry, and roll sleeves up past the
elbows. Remove all loose clothing and confine long hair. Non-slip footwear or anti-skid floor strips are
recommended. Do not wear gloves.
8. Wear ear protectors (plugs or muffs) during extended periods of operation.
9. Some dust created by power sanding, sawing, grinding, drilling and other construction activities
contain chemicals known to cause cancer, birth defects or other reproductive harm. Some examples
of these chemicals are:
• Lead from lead based paint.
• Crystalline silica from bricks, cement and other masonry products.
• Arsenic and chromium from chemically treated lumber.
Your risk of exposure varies, depending on how often you do this type of work. To reduce your
exposure to these chemicals, work in a well-ventilated area and work with approved safety
equipment, such as face or dust masks that are specifically designed to filter out microscopic
particles.
10. Do not operate this machine while tired or under the influence of drugs, alcohol or any medication.
11. Do not expose this machine to rain, or operate machine in damp locations.
12. Make certain the switch is in the OFF position before connecting the machine to the power supply.
13. Make certain the machine is properly grounded.
14. Make all machine adjustments or maintenance with the machine unplugged from the power source.
15. Remove adjusting keys and wrenches. Form a habit of checking to see that keys and adjusting
wrenches are removed from the machine before turning it on.
16. Keep the safety guard in place at all times when the machine is in use. If removed for maintenance
purposes or for turning procedures which do not permit its use, exercise extreme caution and replace
the guard immediately after the operation is complete.
17. Check damaged parts. Before further use of the machine, a guard or other part that is damaged
should be carefully checked to determine that it will operate properly and perform its intended
function. Check for alignment of moving parts, binding of moving parts, breakage of parts, mounting
and any other conditions that may affect its operation. A guard or other part that is damaged should
be properly repaired or replaced.
18. Provide for adequate space surrounding work area and non-glare, overhead lighting.
19. Keep the floor around the machine clean and free of scrap material, oil and grease.
20. Keep visitors a safe distance from the work area. Keep children away.
21. Make your workshop child proof with padlocks, master switches or by removing starter keys.
4
22. Give your work undivided attention. Looking around, carrying on a conversation and “horse-play” are
careless acts that can result in serious injury.
23. Maintain a balanced stance at all times so that you do not fall or lean against the centers, workpiece
or other moving parts. Do not overreach or use excessive force to perform any machine operation.
24. Use the right tool at the correct speed and feed rate. Do not force a tool or attachment to do a job for
which it was not designed. The right tool will do the job better and safer.
25. Use recommended accessories; improper accessories may be hazardous.
26. Keep turning tools sharp and clean for the best and safest performance, and position the tools
properly in relation to the workpiece.
27. Turn off the machine before cleaning. Use a brush or compressed air to remove chips or debris — do
not use your hands.
28. Do not stand on the machine. Serious injury could occur if the machine tips over.
29. Never leave the Lathe running unattended. Turn the power off and do not leave the machine until it
comes to a complete stop.
30. Remove loose items and unnecessary work pieces from the area before starting the machine.
31. Check the workpiece carefully for splits, knots or other obstructions which may cause a safety risk
while turning.
32. Adjust the tool support to the proper height and position for the work. Rotate the workpiece by hand to
check clearance with the tool support.
33. Select the appropriate speed for the turning job at hand. Start at low speed and allow the Lathe to
ramp up to operating speed.
34. Never stop a rotating workpiece with your hand.
35. If gluing up a workpiece, always use a high-quality glue of the type necessary for that particular
workpiece.
Familiarize yourself with the following safety notices used in this manual:
This means that if precautions are not heeded, it may result in minor injury and/or
possible machine damage.
even death.
This means that if precautions are not heeded, it may result in serious injury or possibly
- - SAVE THESE INSTRUCTIONS - -
5
Introduction
This manual is provided by Walter Meier (Manufacturing) Inc., covering the safe operation and
maintenance procedures for a Model 3520B Lathe. This manual contains instructions on installation,
safety precautions, general operating procedures, maintenance instructions and parts breakdown. This
machine has been designed and constructed to provide years of trouble free operation if used in
accordance with instructions set forth in this manual. If there are any questions or comments, please
contact either your local supplier or Walter Meier. Walter Meier can also be reached at our web site:
www.waltermeier.com.
Specifications
Model Number ............................................................................................................................ 3520B
Stock Number .........................................................................................................................1352001
Working distance between centers (in.) ........................................................................................ 34-1/2
Working distance between centers, 18” bed extension mounted (in.) .................................................... 48
Maximum distance between spindle face and tailstock quill (in.)........................................................... 36
Swing over bed (in.) .......................................................................................................................... 20
Swing over toolrest base (in.) ............................................................................................................ 17
Maximum overall length (in.) .............................................................................................................. 73
Overall height to top of headstock (in.) ......................................................................................... 49-1/2
Distance from floor to centerline of spindle (in.).................................................................44 (adjustable)
Spindle speeds (RPM) ................................................................................ high 125-3200; low 50-1200
Motor .............................................................................................................. TEFC, 2HP, 220V, 60Hz
Lathe power requirements .......................................................................................... 220V, 3Ph or 1Ph
Spindle thread size (in.)......................................................................................................1-1/4 x 8 TPI
Outboard External threads (in.) .....................................................................................1-3/16 – 18 UNC
Headstock spindle taper .......................................................................................................... #2 Morse
Tailstock quill taper ................................................................................................................. #2 Morse
Hole through tailstock spindle, diameter (in.)...................................................................................... 3/8
Hole through headstock spindle, diameter (in.) .................................................................................. 5/8
Drive system ...................................................................................................Poly V belt, inverter drive
Tailstock quill travel (in.) ................................................................................................................ 4-1/2
Footprint of stand (in.) ......................................................................................................... 50 L x 24 W
Spindle direction ........................................................................................................... forward/reverse
Net Weight (lbs.) ............................................................................................................................. 630
Shipping Weight (lbs.) ..................................................................................................................... 682
The above specifications were current at the time this manual was published, but because of our policy of
continuous improvement, Walter Meier reserves the right to change specifications at any time and without
prior notice, without incurring obligations.
6
1
1
1
1
1
1
1
1
1
4
12
12
10
2
1
Unpacking
Open shipping container and check for shipping
damage. Report any damage immediately to
your distributor and shipping agent. Do not
discard any shipping material until the Lathe is
assembled and running properly.
Compare the contents of your container with the
following parts list to make sure all parts are
intact. Some parts can be found in separate
boxes packed around the Lathe. Missing parts, if
any, should be reported to your distributor. Read
the instruction manual thoroughly for assembly,
maintenance and safety instructions.
Contents of the Shipping Container
1
2
1
Lathe Bed, with Headstock, Tailstock, &
Tool Support Base – (A)
Leg Assemblies – (B)
Guard – (C)
1
1
Tool Support, 14” – (D)
Face Plate, 3” – (E)
Live Center – (F)
Spur Center, 1” – (G)
Index Pin – (H)
Live Center Pin – (J)
Knockout Rod – (K)
Face Plate Wrench – (L)
Tool Caddy – (M)
Levelers – (N)
Socket Hd. Cap Screws, 3/8” x 1-1/4” – (O)
Lock Washers, 3/8” – (P)
Flat Washers, 3/8” – (R)
Comparator Centers – (S)
Comparator Rear Bracket with
Lock Handle – (T)
Owner's Manual
Warranty Card
Read and understand the entire contents of this manual before attempting set-up
or operation! Failure to comply may cause serious injury.
7
Assembly
Tools required for assembly
14mm wrench
4mm and 8mm hex wrenches
The Lathe should be
disconnected from power during assembly.
1. Remove any screws or straps that hold the
Lathe parts to the pallet, and remove
protective wrapping. Set all the boxes
containing legs and accessories to the side.
2. Before assembling the legs, decrease the
weight on the Lathe bed: Remove the stop
bolt at each end of the bed, and slide off the
headstock, tailstock and tool support base
(Refer to “Headstock and Tailstock
Movement” on pages 13-14 for any
clarification on removing these).
The headstock is heavy; use
caution when removing it from the lathe bed.
3. Turn the lathe bed upside down on the
shipping pallet (make sure there is nothing
beneath that would scratch the bed ways).
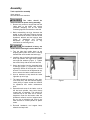
4. Install the legs to the bed using eight socket
head cap screws with eight lock washers
and eight flat washers (Figure 1). Tighten
the screws firmly with an 8mm hex wrench.
5. Screw the levelers into the threaded holes
of the legs (Figure 1). Tighten the hex nuts
against the bottom of the legs with a 14mm
wrench. The levelers can be adjusted at any
time to ensure the Lathe is stable and level.
6. Use an assistant to help stand the Lathe
right side up on its legs.
7. The Lathe should be located in a dry area,
on a sturdy floor, and with sufficient lighting.
Leave plenty of space around the machine
for operations and routine maintenance
work.
Figure 1
8. Exposed metal areas of the Lathe, such as
the bed and spindles, have been factory
coated with a protectant. This should be
removed with a soft cloth and a cleanerdegreaser. Clean the bed areas under the
headstock, tailstock and tool support base.
Do not use an abrasive pad, and do not
allow solvents to contact painted or plastic
areas.
9. Re-install headstock, tool support base,
tailstock and stop bolts.
8
Comparator Rear Bracket
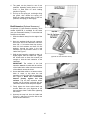
Mount the comparator rear bracket (A, Figure 2)
to the back of the tailstock with two 3/8 x 1-1/4
socket head cap screws, two 3/8 lock washers
and two 3/8 flat washers (B, Figure 2). The
bracket has a slot so it can be aligned with the
bracket on the headstock. (See “Comparator –
Installing and Using” for further information.)
Tool Caddy
Figure 2
The tool caddy, shown in Figure 3, can be
mounted to the left end or right end of the Lathe.
The left end, near the headstock area, is
generally preferred for convenience. Use two
socket head cap screws and two lock washers
with an 8mm hex wrench to secure the tool
caddy to the threaded holes in the Lathe.
The tool caddy has holes for placing the
knockout rod, spur center, live center, live center
pin, comparator centers, and faceplate wrench.
Accessories can also be stored in the tailstock,
as shown in Figure 4.
Figure 3
Guard
The guard must always be
used in operations that will allow its use.
Figure 4
1. On the guard, loosen the set screw on the
outer collar (shown in Figure 5) with a 4mm
hex wrench. Slide the outer collar off the
guard support rod.
2. Insert the guard support rod into the
mounting bracket at the rear of the
headstock, as shown in Figure 5. You will
have to lift up on the spring pin, as shown,
to slide the guard support rod into the
mounting bracket. Release the spring pin
and it will snap into position as you slide the
support rod farther in.
3. Install the outer collar and tighten the set
screw.
Figure 5
9
4. The guard can be pivoted to one of two
positions: Operating mode (shown on front
cover) or tilted back for stock loading
(shown in Figure 6).
5. Pull up on the spring pin, and begin tilting
the guard, then release the spring pin.
When the guard reaches either of the two
positions, the spring pin will engage.
Bed Extension (Optional Accessory)
Figure 6
An optional 18” bed extension assembly, stock
number 6294727B, is available for the Lathe
(see your Powermatic dealer). To mount the bed
extension to the Lathe:
1. Slide the tailstock away from the edge of the
bed.
2. Have an assistant hold the bed extension
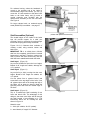
flush to the end of the Lathe bed, and insert
three 3/8 x 1-3/4 socket head cap screws,
three 3/8 lock washers and three 3/8 flat
washers, through the holes in the bed
extension into the threaded holes on the
Lathe. See Figure 7.
3. Shift the bed extension upward so that it is
slightly higher than the Lathe bed. Tighten
the screws with an 8mm hex wrench just
enough to hold the bed extension to the
Lathe bed.
Figure 7
(optional 18” bed extension shown)
IMPORTANT: The surface of the bed
extension must be leveled with the surface
of the Lathe bed to allow smooth movement
of the tailstock across the seam.
4. Use a dead blow mallet, or a hammer with a
block of wood, to tap down the bed
extension until it is flush with the Lathe bed.
See Figure 8. Never use a steel-faced
hammer directly against the bed
surfaces. Tap the bed extension where
needed until its surface is aligned with the
Lathe bed, and the inside ways are aligned.
5. Firmly tighten the three socket head cap
screws. Make sure your alignment of the
bed surfaces doesn’t shift while tightening
the screws.
Figure 8
6. Unscrew the stop bolt from the Lathe bed
(Figure 7), and screw it into the hole at the
end of the bed extension.
10
For outboard turning, where the headstock is
moved to the opposite end of the Lathe to
accommodate large bowl blanks, you can (1)
mount the 18” bed extension to the three lower
holes on the Lathe frame, and (2) mount a
vertical extension post [included with the
optional bed extension] to the tool rest base.
See Figure 9.
For large outboard work, an outboard turning
stand (# 6294732) is available – see page 37.
Figure 9
(shown with optional accessories)
Shelf Assemblies (Optional)
The double ledges on the inside of the Lathe
legs will provide support for a shelf (not
provided), which is convenient for storing larger
items while keeping them easily accessible.
Figures 10-11-12 illustrate three methods of
creating a shelf, using common lumber and
basic tools.
IMPORTANT TIP: It is unlikely that a full-size
shelf can be completely built and then inserted
between the Lathe legs. Therefore, construct the
shelf in pieces and insert screws only after the
shelf has been established beneath the Lathe.
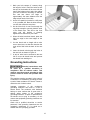
Shelf Style 1 (Figure 10)
Figure 10
Lay two 2x6 boards flat upon the inner ledges.
Boards of 48” length are suitable, although 481/2” is optimal.
Shelf Style 2 (Figure 11)
Lay two 2x4’s (or 2x6’s) on edge into the outer
ledges. Boards of 48” length are suitable, 481/2” optimal.
Cut two pieces from a plywood board, and
screw them to the top edges of the 2x4’s. (One
48” plywood piece will not fit through the legs of
the Lathe; use at least two pieces.) Make the
plywood pieces flush with the outside edge of
the 2x4’s.
Shelf Style 3: (Figure 12)
Figure 11
This is a basket-style shelf consisting of two
2x6’s and dowel rods. The advantage of this
design is that most wood chips will fall through
the shelf instead of accumulating on it. The
instructions below are for building the shelf
shown in Figure 12.
Materials used:
2 – 2x6’s (48” suitable, 48-1/2” optimal).
8 – wood dowels, 4’ length, 5/8” diameter.
11
1. Mark your hole centers (2” centers) along
the length of a 2x6. Place the holes so that
the tops of the dowels will be even with the
tops of the ledges on the Lathe. Also, adjust
your hole centers as necessary so that the
first and last dowel will begin at
approximately the same distance from the
ledge at both ends of the Lathe.
2. Use a 5/8” spade bit chucked in a drill press
or in a portable drill. Bore the holes through
one 2x6; this will be the rear piece.
3. On the other 2x6, do not bore through but
only deep enough to securely hold the ends
of the dowel rods. This will be the front
piece and will provide a pleasing
appearance at the front of your Lathe.
Figure 12
4. When all holes have been bored, place the
2x6’s on edge in the outer ledges of the
Lathe.
5. Cut the dowel rods to length with a miter
saw or hand saw, so that after insertion the
rods will be flush with the back of the rear
2x6.
6. Insert the dowel rods through the holes in
the rear 2x6, as shown in Figure 12.
7. A strip of wood can be screwed to the rear
2x6 to cover the dowel holes and prevent
the dowels from working out.
Grounding Instructions
Electrical connections must
be made by a qualified electrician in
compliance with all relevant codes. This
machine must be properly grounded to help
prevent electrical shock and possible fatal
injury.
This machine must be grounded. In the event of
a malfunction or breakdown, grounding provides
a path of least resistance for electric current to
reduce the risk of electric shock.
Improper connection of the equipmentgrounding conductor can result in a risk of
electric shock. The conductor, with insulation
having an outer surface that is green with or
without yellow stripes, is the equipmentgrounding conductor. If repair or replacement of
the electric cord or plug is necessary, do not
connect the equipment-grounding conductor to a
live terminal.
Check with a qualified electrician or service
personnel if the grounding instructions are not
completely understood, or if in doubt as to
whether the tool is properly grounded.
12
Repair or replace a damaged or worn cord
immediately.
The Lathe will operate on single phase or three
phase, 230 volt power supply. The Lathe should
be connected to a dedicated circuit. Make sure
the characteristics of your power supply match
the specifications on the motor plate of the
Lathe.
Single Phase Operation
A three wire pigtail for use on 230 volt single
phase power is attached to the inverter and may
be “hard-wired” to the power source, or
connected to a UL/CSA listed receptacle plug.
Connect the 230 volt supply to the black and
white leads and ground the green lead.
If you are hard-wiring the Lathe to a panel, make
sure a disconnect is available for the operator.
During hard-wiring of the Lathe, make sure the
fuses have been removed or the breakers have
been tripped in the circuit to which the Lathe will
be connected. Place a warning placard on the
fuse holder or circuit breaker to prevent it being
turned on while the machine is being wired.
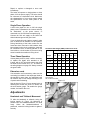
Recommended Gauges (AWG) of Extension Cords
Extension Cord Length *
Three Phase Operation
If three phase power is used, it will be necessary
to replace the pigtail wire attached to the
inverter with a 12/4 wire and connect the three
hot leads to the inverter at R, S, T as shown in
the wiring diagram on page 40. Always connect
the ground lead.
Extension cords
If an extension cord is necessary, make sure the
cord rating is suitable for the amperage listed on
the machine’s motor plate. An undersized cord
will cause a drop in line voltage resulting in loss
of power and overheating.
Amps
25
feet
50
feet
75
feet
100
feet
150
feet
200
feet
<5
16
16
16
14
12
12
5 to 8
16
16
14
12
10
NR
8 to 12
14
14
12
10
NR
NR
12 to 15
12
12
10
10
NR
NR
15 to 20
10
10
10
NR
NR
NR
21 to 30
10
NR
NR
NR
NR
NR
*based on limiting the line voltage drop to 5V at 150% of the
rated amperes.
NR: Not Recommended.
Figure 13
Use the chart in Figure 13 as a general guide in
choosing the correct size cord. If in doubt, use
the next heavier gauge. The smaller the gauge
number, the heavier the cord.
Adjustments
Headstock and Tailstock Movement
To slide the headstock or tailstock, swing the
locking handle (A, Figure 14) backward or
forward until the headstock/tailstock can slide
freely. When the headstock/tailstock is
positioned, rotate the locking handle to tighten it
securely.
Figure 14
13
To remove headstock, tailstock or toolrest base
from the bed, unscrew and remove either of the
stop bolts (B, Figure 14). After re-mounting
these items on the Lathe, re-insert the stop bolt.
For most turning operations, except outboard
turning, the headstock should be positioned at
the left end of the bed, and only the tailstock
moved to accomodate the workpiece.
Cam Tightness
If the headstock, tailstock or tool rest base does
not tighten properly down against the Lathe bed
when the locking handle is tightened, it may
need adjusting. Figure 15 uses the tailstock as
the example:
1. Unscrew and remove the stop bolt on the
end of the lathe bed (B, Figure 14) and slide
the tailstock off the end of the bed.
2. Turn the tailstock on its side, and tighten the
lock nut with a wrench. See Figure 15.
3. Mount tailstock on bed and insert the stop
bolt.
Figure 15
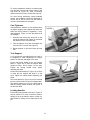
Tool Support
A 14” tool support is provided with your Lathe. It
is designed to allow adjustment for height,
position on the bed, and angle to the work.
Loosen the locking handle on the tool support
base (C, Figure 16) to slide the support base
forward or back, and to angle it to the bed.
Tighten the locking handle firmly before
operating the Lathe.
Loosen the small handle (D, Figure 16) to raise
or lower the tool support and angle it to the
work. Tighten the handle before operating the
Lathe.
The small handle (D, Figure 16) can be inserted
into one of three holes on the tool support base.
The position shown in Figure 16 is preferred so
that the locking handle contacts the groove in
the tool rest shaft.
Figure 16
Locking Handles
Each small locking handle such as D, Figure 16
can be rotated to a more convenient position.
Simply lift up on the handle, rotate it on the pin,
then release it, making sure it seats itself on the
pin.
14
Live Center and Cone
The live center cone, shown in Figure 17,
screws clockwise onto the threads of the live
center body.
To remove the cone from the live center, first
insert the live center pin through the hole in the
live center body as shown in Figure 17. If the pin
will not insert at first, rotate the cone until the pin
can be inserted. The cone can now be removed
by holding the body stationary while unscrewing
the cone.
Figure 17
Indexer
The indexer allows you to cut evenly spaced
features in a workpiece while keeping the Lathe
headstock spindle locked; for example, when
cutting flutes on a spindle blank with a router,
while the spindle blank is secured within the
Lathe centers.
There are 12 holes in the spindle collar spaced
30° apart, and 4 holes in the headstock casting
which accept the index pin (see Figures 18 and
19). The combination of holes will allow you to
mark your workpiece for evenly spaced features.
1. To use the indexer, thread the index pin
(Figure 18) into one of the four holes until
the index pin engages the spindle and
prevents it from turning. This will be your
first indexing position.
Figure 18
2. Unscrew and remove the index pin, and
look down the hole, carefully counting the
number of holes as you rotate the spindle
using the handwheel. Continue to rotate the
spindle until you reach the hole needed for
your second flute cutting, then re-insert the
index pin.
3. Refer to the more detailed instructions and
chart on page 28 to determine in whic h
holes to place the index pin relative to the
number of flutes desired in your workpiece.
Figure 19
NOTE: Remove index pin before turning on
the Lathe.
Centers – Installing and Removing
1. Disconnect Lathe from power source.
2. To install a spur center or live center (the
spur center should first be mounted to your
workpiece; see under “Operation” for more
details), clean the tapered end of the center
and the inside of the headstock taper
spindle, then push the center into the
headstock spindle.
15
3. To remove a spur center or live center, first
remove the workpiece from the Lathe. Insert
the knockout rod (Figure 20) through the
hole in the handwheel and firmly tap the
tapered end of the spur center. The sliding
collar on the knockout rod helps give the
necessary impact without having to use a
mallet against the end of the rod.
IMPORTANT: Hold the center by either placing
your thumb and forefinger on the outside
diameter of the spur center, or wrapping the
center with a rag. The center can be damaged if
allowed to fall.
Figure 20
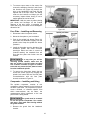
Face Plate – Installing and Removing
1. Disconnect Lathe from power source.
2. Mount the face plate to your bowl blank.
3. Push in the spindle lock button (Figure 21)
and rotate the handwheel slightly until the
spindle locks. Keep the spindle lock button
pushed in.
4. Install the face plate onto the threads of the
headstock spindle and rotate clockwise
hand-tight. When the Lathe is turned on
(forward rotation), the rotational force will
snug the face plate even further onto the
threads.
Figure 21
If at any time you will be
reversing spindle rotation, make sure the
two set screws in the face plate are tight!
One of these is shown in Figure 22. Failure
to do this may cause the face plate to loosen
from the headstock spindle.
5. To remove the face plate, loosen the two
socket set screws (Figure 22). Engage the
spindle lock button and turn the face plate
counterclockwise with the face plate
wrench, as shown in Figure 21.
Comparator – Installing and Using
Figure 22
The spindle comparator consists of two
comparator centers inserted into the brackets at
the back of the Lathe. The comparator is used to
mount a finished, or “reference spindle” from
which measurements can be taken, the
measurements being transferred to the new
piece which is being turned.
The guard must be removed
to use the spindle comparator. Use caution
and wear a face mask when turning without
the guard installed.
1. Remove the guard from the headstock
bracket.
16
2. Install the comparator spur center into the
headstock bracket, by lifting up on the
spring pin and inserting the comparator spur
center until its point is about even with the
point of the spur center in the headstock
spindle. See Figure 23. The spring pin in the
bracket should engage one of the holes in
the comparator center at this position.
3. Install the rear comparator center in the
tailstock bracket and tighten the bracket
handle. See Figure 24.
4. Mount the spur center with the spindle blank
that you will be turning. Loosen the tailstock
locking handle, and slide the tailstock until
the live center is about 1-inch from the
spindle blank, then tighten the locking
handle. Advance the live center using the
tailstock handwheel, until the live center is
secured in the spindle blank.
Figure 23
5. Mount the reference spindle between the
comparator centers, as shown in Figure 24.
NOTE: The reference spindle should be
mounted last after all adjustment of the
tailstock and ram has been accomplished
with the spindle blank. Likewise, when
turning operation is complete, remove the
reference spindle first.
Figure 24
(shown with optional 18” bed extension)
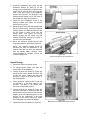
Speed Change
1. Disconnect Lathe from power source.
2. To change speed ranges, pull open the
access door on the headstock.
3. Loosen the pivot lock handle (A, Figure 25)
and lift up the tension handle (B, Figure 25)
to raise the motor. Tighten the pivot lock
handle (A, Figure 25) to hold the motor in
the raised position.
4. There should be sufficient slack in the belt
to reposition it to the other steps on the
sheaves. The label on the access door
shows the required belt position.
5. Loosen the pivot lock handle (A, Figure 25)
and lower the motor to tension the belt. Be
sure that the Poly-V grooves of the belt seat
properly in the corresponding groove of the
sheave. Do not overtension; a very light
pressure on the tension handle (B, Figure
25) is adequate to prevent belt slippage.
Figure 25
Belt shown in LOW speed range position
6. Tighten the pivot lock handle (A, Figure 25).
17
Sheave and Belt Alignment
The motor and spindle sheaves are aligned with
each other at the factory, but if any service is
performed that affects their alignment it is very
important that they be realigned. To realign
them, loosen the two set screws on the spindle
sheave (C, Figure 25) with a hex wrench, and
slide the spindle sheave into the proper position.
Re-tighten set screws.
When sheaves and belt are properly aligned,
there should be no unusual pulsing sounds or
noise coming from the belt.
Checking Spindle Play
The spindle bearing has been set at the factory
for general turning applications. There should be
no "end play" or looseness along the spindle’s
axis. If any looseness should ever occur, it may
be rectified by carefully tightening the bearing
lock nut on the spindle, as follows. (See Figure
26).
1. Use a screwdriver to carefully bend back
any tabs on the tabbed lock washer (C,
Figure 26) that interfere with the insets on
the bearing lock nut (B, Figure 26).
2. Place the end of a flat head screwdriver
down against one of the insets of the
bearing lock nut (B, Figure 26).
Figure 26
3. Tap the handle of the screwdriver with a
mallet so that it turns the bearing lock nut
(B, Figure 26) tighter in a clockwise
direction. Rotate the bearing lock nut only
about 1/16” at a time.
Do not over tighten the
bearing lock nut or the spindle bearings will
overheat.
4. The bearing lock nut should be tightened
just enough to remove the end play and the
spindle should still rotate very freely. Run
the lathe for a time, and check for heat from
the spindle bearings. If the bearings are
running hot, the bearing lock nut is too tight
and should be loosened slightly.
5. After the bearing lock nut (B, Figure 26) has
been properly adjusted, carefully bend back
into place any tabs on the tabbed lock
washer (C, Figure 26).
Sheave/Drive Belt Replacement
Replacing the spindle sheave can be a difficult
procedure; it is recommended that the
headstock be taken to an authorized service
center for this.
18
1. Disconnect Lathe from power source.
2. Loosen the pivot lock handle (A, Figure 27)
and lift up the tension handle (B, Figure 27)
to raise the motor.
3. Tighten the pivot lock handle (A, Figure 27)
to hold the motor in the raised position. Slip
the belt off the pulleys.
4. Loosen the two set screws on the
handwheel (A, Figure 26) with a hex
wrench, and pull the handwheel off the
headstock spindle.
5. Loosen and remove the bearing lock nut (B,
Figure 26) and tabbed lock washer (C,
Figure 26).
6. Slide the spindle a little way out of the
headstock, just enough to remove sheave or
belt.
NOTE: You may have to tap the end of the
spindle with a wood block to move it. (Do
NOT use a steel face hammer directly
against the spindle.)
Figure 27
7. If replacing the spindle sheave, loosen the
two set screws (C, Figure 27), and slide the
sheave off the spindle.
8. Install the new spindle sheave, loosely
securing the two set screws. Make sure the
sheave is oriented properly.
9. Slide the spindle back into place, install
tabbed lock washer (C, Figure 26), and
bearing lock nut (B, Figure 26). Check for
any spindle play at this point (See
“Checking Spindle Play”).
10. Re-install the handwheel and tighten the set
screws (A, Figure 26).
11. Align the new sheave (see “Sheave and Belt
Alignment”) then tighten the two set screws
(C, Figure 26) securely on the sheave.
12. Loosen the pivot lock handle and lower the
motor using the tension handle. Re-tighten
the pivot lock handle.
19
Operating Controls
See Figure 28.
(A) On/Off Button: Push in to stop the Lathe;
pull out to start.
NOTE: If there is a power outage while
operating the Lathe, the Lathe will not
automatically restart once power is restored.
Cycle the on/off switch in order to restart the
machine.
(B) Forward/Reverse
Figure 28
When turning with a face
plate, make sure both set screws on the face
plate are tight (see Figure 22) before
reversing the spindle. Failure to comply may
cause the face plate to spin loose from the
spindle.
(C) Speed Control Dial: Always start the Lathe
at the lowest speed, with the dial rotated all the
way counterclockwise.
A.C. Inverter (mounted to rear of headstock)
The 3520B Lathe uses the latest technology in
A.C. inverter drives to provide infinitely variable
spindle speeds within the specified ranges
(shown under “Specifications” on page 6). The
inverter controls the speed of the motor by
varying the frequency of the voltage supplied to
the motor. The inverter provides an acceleration
ramp that eliminates the shock of normal
starting. Also, a braking feature eliminates long
coasting periods after the Lathe is turned off.
The 2 horsepower motor is specially designed
for use with inverter drives, and is balanced to
reduce noise and minimize vibration.
The A.C. Inverter does not require any
programming – it is pre-programmed from the
factory. The buttons on the face of the
inverter should never be pushed at any time.
Use only the controls on the front of the
headstock.
If you suspect there is a problem with the
inverter or the inverter settings, contact Walter
Meier (Manufacturing) Inc., technical service at
1-800-274-6848.
Operation
The information which follows is general in
nature and is not intended to be a complete
course in wood turning. Nothing can replace the
knowledge gained by talking with experienced
woodturners or consulting books, articles, etc.
Above all, simple trial and error will aid in
developing proficiency in the craft.
20
Inspection
Before operating the lathe, check that everything
is in proper working order:
1. Level your machine; use the adjustable
levelers to help reduce vibration.
2. Check bearings; adjust only if endplay
exists.
3. Check belt; it should be snug but not overly
tight.
4. Bed ways; keep clean, use steel wool to
remove any rust spots, and apply paste wax
to prevent buildup of rust and finishes.
5. Tool support; use a mill file to remove nicks
and dings.
6. Spindle tapers; should be clean and free of
dust and chips for proper seating of tapers.
7. Tailstock; clean and lubricate ram and
locking device.
8. Lighting; proper lighting is essential to
eliminate shadows and reduce eye strain.
Turning Tools
If possible, select only quality, high-speed steel
turning tools. High-speed steel tools hold an
edge and last longer than ordinary carbon steel.
As one becomes proficient in turning, a variety
of specialty tools for specific applications can be
acquired. The following tools provide the basics
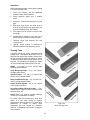
for most woodturning projects (see Figure 29):
Skews – 1-1/2" and 1" or 1-1/4", used to make
finishing cuts and details.
Large Roughing Gouge – 1" to 1-1/4", used to
eliminate waste wood.
Spindle Gouges – 1/4", 3/8", 1/2", used to turn
beads, coves and other details.
Deep Fluted Bowl Gouge – 1/4", 3/8" and 1/2",
used for turning bowls & plates.
Square Scraper (Bedan) – 3/8” or 1/2", used to
create square shoulders.
Large Round Nose (Domed) Scraper – 1-1/2",
used to reduce ridges on interior of bowls, round
edges of bowls, etc.
Parting Tool - 1/8", used for scraping, making a
cut-off, or to set diameters for sizing.
For safety and best performance, keep tools
sharp. If a tool stops cutting or requires
excessive pressure to make a cut, it needs to be
sharpened. A number of brand name
sharpening jigs and fixtures are available;
however, a woodturner should learn to sharpen
tools freehand.
Figure 29
Basic Turning Tools
21
For best results, use a slow speed grinder (1800
rpm) fitted with a 60-grit aluminum oxide wheel
(for shaping) and a 100-grit alum. oxide wheel
(for final sharpening and touchup). The grinder
should be located near your lathe and at a
comfortable height. A diamond dresser will keep
the wheels true and eliminate glazing.
Never allow the tool to rest in one place on the
wheel, keep it moving and use a light touch.
Carbon steel tools can overheat easily and
should be cooled frequently. If the edge turns
blue, it has lost its temper and should be ground
past the blue area. High-speed steel tools are
not as likely to overheat, but can be damaged if
allowed to get red hot. High-speed steel tools
should not be quenched for cooling. Honing with
a diamond lap or slipstone will save trips to the
grinder and keep the edge fresh.
Spindle Turning
Spindle turning takes place between the centers
of the lathe. It requires a spur or drive center in
the headstock and a live or dead center in the
tailstock. A cup center rather than a cone center
in the tailstock will often reduce the risk of
splitting the stock.
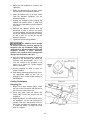
Figure 30
Figure 30 shows the basic profile shapes in
spindle turning.
Stock Selection
Stock for spindles should be straight grained
and free of checks, cracks, knots and other
defects. It should be cut 1/8" to 1/4" larger than
the finished diameter and may require additional
length so the ends can be removed later. Larger
stock should have the corners removed to
produce an octagon making the piece easier to
rough down to a cylinder.
1. With a combination square, or plastic center
finder for round stock, locate and mark
center on each end of the workpiece.
Accuracy is not critical on full rounds but
extremely important on stock where square
sections are to remain. Put a dimple in the
stock with an awl or nail, or use a springloaded automatic center punch.
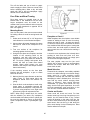
Figure 31
2. Extremely hard woods may require kerfs cut
into the ends of the stock (Figure 30) using
a band saw, so the wood will accept the
spur center and the live center.
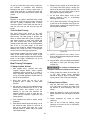
3. Drive the spur center about 1/4” into the
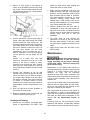
workpiece, using a wood mallet or dead
blow hammer as shown in Figure 32. Be
careful that you do not split the workpiece.
Never use a steel face hammer and never
drive the workpiece onto the spur center
while it is mounted in the Lathe spindle.
Figure 32
22
4. Make sure the headstock is locked to the
Lathe bed.
5. Clean the tapered end of the spur center
and the inside of the headstock spindle.
6. Insert the tapered end of the spur center
(with the attached workpiece) into the
headstock spindle.
7. Support the workpiece while bringing the
tailstock into position about 1” away from
the end of the workpiece. Lock the tailstock
to the bed.
8. Advance the tailstock spindle with the
handwheel in order to seat the live center
into the workpiece. Use enough pressure to
secure the workpiece between the centers
so that it won’t fly off, but do not use
excessive pressure.
9. Tighten the spindle locking handle.
The tailstock ram is capable
of exerting excessive pressure against the
workpiece and the headstock. Apply only
sufficient force with the tailstock to hold the
workpiece securely in place. Excessive
pressure can overheat center bearings and
damage both workpiece and Lathe.
10. Move tool support into position. It should be
parallel to the workpiece, just below the
centerline and approximately 1/8" to 1/4"
from the corners of the workpiece to be
turned, as in Figure 33. Tighten support
base to Lathe bed.
11. Rotate workpiece by hand to check for
proper clearance.
12. Start lathe at lowest speed and bring it up to
the appropriate RPM for the size of
workpiece used. Consult digital readout on
the headstock.
Figure 33
Cutting Techniques
Roughing Out
1. Begin with a large roughing gouge. Place
the tool on the tool support with the heel of
the tool on the surface to be cut.
2. Slowly and gently raise tool handle until
cutting edge comes into contact with the
workpiece.
3. Beginning about 2” from the tailstock end of
the workpiece, roll the flute (hollowed-out
portion) of the tool in the direction of the cut.
See Figure 34. Make long sweeping cuts in
a continuous motion to rough the piece
down to a cylinder.
Figure 34
23
4. Keep as much of the bevel of the tool as
possible in contact with the workpiece to
ensure control and avoid catches. NOTE:
Always cut down-hill, or from large diameter
to small diameter. Always work toward the
end of a work-piece, never start cutting at
the end.
"V" Cuts
1. Use the long point of the skew. (NOTE: Do
not press the long point of the skew directly
into the workpiece to create the "V"; this will
result in a burned or burnished "V" with
fibers being rolled up at both sides.)
2. Lightly mark the center of the "V" with the tip
of the skew.
5. Once the workpiece is roughed down to a
cylinder, smooth it with a large skew. Keep
the skew handle perpendicular to the spindle
and use only the center third of the cutting
edge for a long smoothing cut (touching one
of the points of the skew to the spinning
workpiece may cause a catch and ruin the
workpiece).
3. Move the point of the skew to the right half
of the desired width of your cut.
4. With the bevel parallel to the right side of the
cut, raise the handle and push the tool in to
the desired depth, as shown in Figure 36.
6. Add details to the workpiece with skew,
parting tool, scraper or spindle gouge.
Beads
1. Make a parting cut for what is to be a bead
to the desired depth. Place the parting tool
on the tool support and move tool forward to
make the full bevel of the tool come into
contact with the workpiece. Gently raise
handle to make cut to the appropriate depth.
2. Repeat for other side of the bead.
3. Using a small skew or spindle gouge, start in
the center between the two cuts and cut
down each side to form the bead. Roll the
tool in direction of cut.
Figure 36
5. Repeat from the left side. The two cuts
should meet at the bottom and leave a clean
"V" cut.
Coves
6. Additional cuts may be taken to add
either the depth or width of the cut.
1. Use a spindle gouge. With the flute of the
tool at 90 degrees to the workpiece, touch
the point of the tool to the workpiece and roll
in towards the bottom of the cove. See
Figure 35. Stop at the bottom; attempting
to go up the opposite side may cause the
tool to catch.
to
Parting Off
1. Use parting tool.
2. Adjust lathe speed to lower RPM for parting
through a workpiece.
3. Place tool on tool support and raise the
handle until it starts to cut and continue to
cut toward the center of the workpiece.
4. Loosely hold on to the piece in one hand as
it separates from the waste wood.
Sanding and Finishing
Leaving clean cuts will reduce the amount of
sanding required. Move the tool support out of
the way, adjust the lathe to a low speed, and
begin with fine sandpaper (120 grit or finer).
Coarser sandpaper will leave deep scratches
that are difficult to remove, and dull crisp details
on the spindle. Progress through each grit
without skipping grits (for example, do not jump
from 120 grit to 220 grit). Fold the sandpaper
into a pad; do not wrap sandpaper around your
fingers or the workpiece.To apply a finish, the
workpiece can be left on the lathe.
Figure 35
2. Move the tool over the desired width of the
cove.
3. With the flute facing the opposite direction,
repeat step 1 for other side of cove. Stop at
bottom of cut.
24
Turn off the lathe and use a brush or paper
towel to apply the finish. Remove excess finish
before restarting lathe. Allow to dry and sand
again with 320 or 400 grit sandpaper. Apply
second coat of finish and buff.
Face Plate and Bowl Turning
Face plate turning is normally done on the
inboard side of the headstock over the bed.
Larger workpieces must be turned on the
outboard side (remove tailstock and tool support
base, and move headstock to opposite end of
bed - see Figure 9).
Mounting Stock
Use of a face plate is the most common method
for holding a block of wood for turning bowls and
plates:
Figure 37
Faceplate or Chuck?
While faceplates are the simplest, most reliable
method of holding a block of wood for turning,
chucks can also be used. As there are dozens
of chucks to choose from, the woodturner should
first consider all the different types of turning that
will be done, and read reports or discuss with
other turners who own chucks before making a
decision.
1. Select stock at least 1/8" to 1/4" larger than
each dimension on the finished workpiece.
2. Always select the largest diameter face plate
that can be used for the workpiece to be
turned.
3. True one surface of the workpiece for
mounting against the face plate.
A chuck is not a requirement, but is handy when
working on more than one piece at a time.
Rather than removing screws, you simply open
the chuck and change workpieces.
4. Using the face plate as a template, mark the
location of the mounting holes on the
workpiece, and drill pilot holes of the
appropriate size. Face plates are drilled for
No. 12 screws. (Phillips and square drive
screws will hold up better than slotted
screws. Sheel metal screws are case
hardened with deeper and sharper threads
than wood screws.)
The most popular ones are four jaw scroll
chucks with a variety of jaws to accommodate
different size tenons. Most also come with a
screw chuck as well.
Wood Selection
If the mounting screws on the face plate
interfere with the workpiece, a glue or waste
block can be used:
Firewood is the cheapest, most widely available
stock to use while learning to turn bowls. Simply
waste wood for a while practicing turning
techniques. Develop skill with each tool before
attempting to make a finished piece. It is best to
start with dry wood, without worrying about
drying or distortion. Once turning becomes
comfortable, try green wood which cuts very
easily. As the turner gains experience, he or she
will find extraordinary grain and figure in the
form of burls, crotches and bark inclusions.
5. Make a block the same diameter as the face
plate, Figure 37. Both waste block and
workpiece should have flat surfaces for
gluing.
6. Glue the block to the workpiece. Avoid using
brown paper or newspaper between the
waste block and workpiece. It may work fine
if you are using scrapers, but a slight catch
with a bowl gouge can separate the two.
Checks and Cracks
Green wood will check and crack. For best
results, leave logs in as long a length as you can
handle. As the material starts to dry, surface
cracks will develop on the ends of the log. Cut
off two to three inches and you should find good,
sound wood. Also cut the log in half along the
pith to avoid having it in the finished piece. Most
checks radiate from the pith.
NOTE: When using a waste block, be careful
with the adhesive you select. Dry workpieces
can be bonded with ordinary white or yellow glue
but must be clamped to ensure a good bond.
Green workpieces require cyanoacrylate type
glue.
25
6. Rough out the outside of the bowl with the
1/2" deep fluted bowl gouge, holding the
handle of the tool firmly against your hip. For
best control, use your whole body to move
the gouge through the workpiece.
As you turn bowls from green wood, make sure
you maintain a consistent wall thickness
throughout the piece. Leaving a piece thick in
some areas and thin in others will cause the
wood to dry unevenly and promote checks and
cracks.
7. As the bowl takes shape, work on the
bottom (tailstock end) to accomodate
attaching a face plate.
Distortion
Distortion is a problem associated with turning
green wood. It will vary from one type of wood to
the next. Typically, fruitwoods tend to distort
more than others. It also varies with the time of
year the tree was cut and how the logs are
stored.
8. Turn a short tenon (about 1/8" long) the size
of the hole in the faceplate. See Figure 38.
This will allow centering the workpiece when
the faceplate is attached.
Tools for Bowl Turning
The deep fluted bowl gouge is the most
essential and versatile tool for most bowl and
plate turning. The bowl gouge is heavier and
easier to control than other types of gouges. It
also allows removal of wood much faster and
with less vibration than other gouges. Most
average sized bowl work can be accomplished
with a 3/8" or 1/2" bowl gouge. A 1/4" bowl
gouge is best suited for smaller bowls and light
finishing cuts. Larger 3/4" and 1" bowl gouges
are only used for extremely large pieces.
Figure 38
Large domed scrapers can also be used to help
clean up the interior surfaces of bowls. A light
touch with the scraper slightly tilted will eliminate
some of the ridges occasionally left by an
inexperienced bowl gouge.
9. (NOTE: If you plan to use a chuck, turn a
tenon of the appropriate length and diameter
to fit your chuck.)
10. Stop the lathe, remove workpiece and attach
face plate or chuck (see "Mounting Stock"
on page 25).
Bowl Turning Techniques
To Shape Outside of Bowl
The surfaces of faceplate and
workpiece should mount flush to each other.
1. Odd shaped burls, crotches and other
irregular shaped blanks require special
preparation before mounting in a chuck or
onto a faceplate. Remove the bark, if there
is any, from what appears to be the center of
the top of the workpiece.
11. Finish turning the outside of bowl with 1/2"
or 3/8" bowl gouge. Leave additional
material at base of bowl for support while
turning interior. This will be removed later.
2. Drive spur center into the top of the
workpiece with a mallet or dead blow
hammer.
To Shape Interior of Bowl
1. Stop the lathe and move tailstock away.
(You may want to remove the center from
the tailstock to avoid bumping it with your
elbow.)
3. Slip the spur center into the headstock taper
and bring the tailstock with a live or ball
bearing center into position. Lock the
tailstock to the bed and advance the
tailstock spindle in order to seat the cup
center into the workpiece. Tighten the ram
locking handle.
2. Adjust tool support in front of the bowl just
below centerline, at a right angle to the lathe
ways.
3. Rotate workpiece
clearance.
4. Turn workpiece by hand to ensure proper
clearance.
by
hand
to
check
4. Face off top of bowl by making a light
shearing cut across the top of workpiece,
from rim to center.
5. Start lathe at lowest speed and bring it up to
the maximum safe speed for the size of
work to be turned (see page 30). If the
machine starts to vibrate, lower the speed
until vibration stops.
26
speed can build friction while sanding and
cause heat check in some woods.
5. Place 1/2" bowl gouge on tool support at
center of the workpiece with the flute facing
top of bowl. The tool handle should be level
and pointed toward the four o'clock position,
as shown in Figure 39.
2. Begin with fine sandpaper (120 grit) and
progress through each grit, using only light
pressure. Coarser sandpaper tends to leave
deep scratches that are hard to eliminate.
Use power-sanding techniques to avoid
concentric sanding marks around your
finished piece. Avoid rounding over the rim
and foot with sandpaper; try to keep details
crisp. Finish sanding with 220 grit.
3. Remove sanding dust with tack rags or
compressed air and, with lathe turned off,
apply first coat of finish. Let stand for several
minutes, wipe off excess. Allow to dry before
sanding again with 320 or 400 grit
sandpaper.
Figure 39
4. Turn lathe back on and continue the
separation cut almost all the way through
the base. Stop at about 3" and use a small
fine tooth saw to separate the bowl from the
waste.
6. Use the left hand to control cutting edge of
gouge, while right hand swings tool handle
around toward your body (Figure 38). The
flute should start out facing top of workpiece,
and rotate upward as it moves deeper into
the bowl to maintain a clean even curve. As
the tool goes deeper into the bowl,
progressively work out toward the rim. It
may be necessary to turn the tool support
into the piece as you get deeper into the
bowl.
5. Apply second finish coat and allow to dry
before buffing.
Maintenance
Before doing maintenance on
the Lathe, disconnect it from the electrical
supply by pulling out the plug or switching
off the main switch. Failure to comply may
cause serious injury.
(NOTE: Try to make one, very light
continuous movement from the rim to the
bottom of the bowl to ensure a clean,
sweeping curve through the piece. Should
there be a few small ridges left, a light cut
with a large domed scraper can even out the
surface.)
Maintenance on the 3520B Lathe should be
performed at periodic intervals to ensure that the
machine is in proper working order, that all
fasteners are tight, and all necessary
adjustments have been made. Inspection and
maintenance should be performed at least twice
a year, but more frequently if the Lathe receives
constant use.
7. Develop wall thickness at the rim and
maintain it as you work deeper into the bowl
(Once the piece is thin toward the bottom,
you cannot make it thinner at the rim). When
the interior is finished, move the tool support
to exterior to re-define bottom of bowl.
(General rule of thumb: the base should be
approximately 1/3 the overall diameter of the
bowl).
Clean and oil the lathe bed(s) so that headstock,
tailstock and tool support base will slide easily.
Clean any rust spots that may develop on the
bed with a commercial rust remover.
8. Work the tight area around faceplate or
chuck with 1/4" bowl gouge.
Use compressed air to blow out the interior of
the headstock, in order to keep sawdust and
chips from accumulating on belts and sheaves.
Also blow off debris that accumulates on the
inverter. Do not disassemble inverter to
clean!
9. Begin the separation with a parting tool, but
do not cut all the way through yet.
Sanding and Finishing
Frequently clean out the morse tapers on both
headstock and tailstock. Commercially available
taper cleaners may be acquired from tool stores.
1. Remove the tool support and adjust lathe
speed to approximately 500 RPM. High
27
Indexer Positions
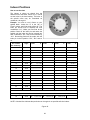
How to use the chart
The indexer is shown as viewed from the
tailstock end of the Lathe. Points A, B, C and D
are the holes in the head casting. The holes in
the spindle collar may be considered as
numbered 1 through 12.
Example: You wish to rout 9 flutes on your
spindle blank. Locate the “9” in the “No. of
Flutes” column; each flute angle will be 40°. The
index pin should first be inserted into hole
combination “A-1”. Make your first flute at this
position. Back off the index pin and rotate the
spindle until the index pin can be inserted into
hole combination “A-5”; this will be followed by
“A-9”. Succeeding flutes will be made with the
index pin in the B position: “B-2”, “B-6” and so
on.
No. of Flutes
360° divided by...
Angle
Letter
#
Letter
#
Letter
#
1
360.00
A
1
2
180.00
A
1,7
3
120.00
A
1,5,9
4
90.00
A
1,4,7,10
5
72.00
-----------------------
6
60.00
A
1,3,5,7,9,11
8*
45.00
A
1,4,7,10
9
40.00
A
1,5,9
10
36.00
-----------------------
12
30.00
A
15
24.00
-----------------------
16
22.50
-----------------------
18
20.00
A
20
18.00
-----------------------
24 *
15.00
A
30
12.00
-----------------------
36
10.00
A
1 to 12
B
1 to 12
C
1 to 12
A
1,3,5,7,9,11
B
1,3,5,7,9,11
C
1,3,5,7,9,11
B
2,6,10
C
4,8,12
B
2,4,6,8,10,12
C
2,4,6,8,10,12
Letter
D
2,5,8,11
D
1 to 12
1 to 12
1,3,5,7,9,11
1 to 12
other interesting patterns....
18
20.00
#
NOTE: A dashed line indicates that particular set of angles is not possible with the indexer.
Figure 40
28
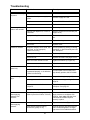
Troubleshooting
Trouble
Probable Cause
Remedy
Motor fails to develop
full power.
Power line overloaded.
Correct overload condition.
Undersize wires in power supply
system.
Increase supply wire size.
Faulty inverter.
Contact WMH Technical Service.
Worn motor.
Replace motor.
Excessive cut.
Reduce depth of cut.
Improper belt adjustment, or worn or
broken belt.
Adjust or replace belt as needed (see
pages 18-19).
Improper cooling of motor.
Blow out sawdust from motor housing
fan.
Worn spindle bearings.
Replace bearings.
Worn motor.
Replace motor.
Workpiece warped, out of round, has
major flaw, or was improperly
prepared for turning.
Correct problem by planing or sawing
workpiece, or discard entirely and use
new workpiece.
Worn spindle bearings.
Replace spindle bearings.
Worn drive belt.
Replace drive belt. See pages 18-19.
Motor mount lock handle is loose.
Tighten lock handle (A, Figure 25).
Lathe on uneven surface.
Adjust levelers.
Potentiometer faulty.
Replace potentiometer.
Electronic AC inverter is not
programmed properly, or is defective,
or there is loose wiring.
Contact WMH Technical Service to
help identify problem; 800-274-6846.
Dull tools.
Keep tools sharp (see page 21).
Tool support set too low.
Reposition tool support height. See
page 23.
Tool support set too far from
workpiece.
Reposition tool support closer to
workpiece. See page 23.
Improper tool being used.
Use correct tool for operation.
Headstock moves
when applying
pressure with
Tailstock.
Excessive pressure being applied by
tailstock (more than 500 lbs. of force).
Slide headstock to the left end, then
apply pressure to workpiece with
tailstock. Apply only sufficient force
with tailstock to hold workpiece
securely in place.
Tailstock moves
when applying
pressure.
Cam lock nut needs adjusting.
Tighten cam lock nut (Figure 15).
Lathe bed and tailstock mating
surfaces are greasy or oily.
Remove tailstock and clean surfaces
with a cleaner/degreaser. Re-apply
light coat of oil to Lathe bed surface.
Motor or spindle
stalls or will not start.
Excessive vibration.
Lathe runs at one
speed only.
Tools tend to grab or
dig in.
29
Recommended Lathe Speeds (per diameter of workpiece)
Diameter of Work
Roughing RPM
General Cutting RPM
Finishing RPM
Under 2”
1520
3000
3000
2” to 4”
760
1600
2480
4” to 6”
510
1080
1650
6” to 8”
380
810
1240
8” to 10”
300
650
1000
10” to 12”
255
540
830
12” to 14”
220
460
710
14” to 16”
190
400
620
16” to 20”
175
325
500
20” to 24”
175
260
400
Replacement Parts
Replacement parts are listed on the following pages. To order parts or reach our service department, call
1-800-274-6848, Monday through Friday (see our website for business hours, www.powermatic.com).
Having the Model Number and Serial Number of your machine available when you call will allow us to
serve you quickly and accurately.
30
Headstock Assembly
31
Parts List: Headstock Assembly
Index No. Part No.
Description
Size
Qty
1 .............. 6294736 ..................Faceplate .........................................................3” .............................. 1
2 .............. 6295796 ..................Nyloc Insert Socket Set Screw...........................1/4-20x3/8” ................ 4
3 .............. 6294725 ..................Spur Center......................................................MT2 .......................... 1
4 .............. 3520B-204 ..............Spindle .............................................................................................. 1
5 .............. 3520B-205 ..............Key ..................................................................8x8x75 ....................... 1
6 .............. 3520B-206 ..............Key ..................................................................8x8x45 ....................... 1
7 .............. BB-6207ZZ ..............Bearing ............................................................6207ZZ ...................... 2
8 .............. 3520B-208 ..............Bushing.............................................................................................. 1
9 .............. 3520B-209 ..............Cushion ............................................................................................. 1
10 ............ 3520B-210 ..............Headstock .......................................................................................... 1
11 ............ BB-6206V V .............Bearing ...........................................................6206VV ..................... 1
12 ............ 6864006 ..................Bearing Lock Washer .......................................................................... 1
13 ............ 6549006 ..................Bearing Nut ........................................................................................ 1
14 ............ 3271081 ..................Handwheel ......................................................................................... 1
15 ............ TS-0270011 ............Socket Set Screw .............................................5/16-18x1/4” ............... 6
16 ............ 6143004 ..................Collar Retaining .................................................................................. 2
17 ............ 6644005 ..................Plunger ............................................................................................. 1
18 ............ 3064711 ..................Lathe Guard Bracket ........................................................................... 1
19 ............ 6294728 ..................Safety Guard ...................................................................................... 1
20 ............ JWL1642-164A ........Inverter, VFD015S21A ......................................2HP, 220V ................. 1
21 ............ 6710015 ..................Socket Head Cap Screw ...................................#10-24x1/2” .............. 10
22 ............ JWL1642-170 ..........Signal Cord ........................................................................................ 1
23 ............ 3520B-223 ..............Headstock Clamping Shaft .................................................................. 1
24 ............ TS-0640091 ............Nylon Lock Hex Nut ..........................................3/8”-16 ....................... 1
25 ............ 6095038 ..................Bushing.............................................................................................. 1
26 ............ 6430045 ..................Knob .................................................................................................. 2
27 ............ 3268219 ..................Handle, Headstock ............................................................................. 1
28 ............ 3719189 ..................Motor Sheave ..................................................................................... 1
29 ............ 2595036 ..................Motor Assembly Plate ......................................................................... 1
30 ............ TS-0720091 ............Lock Washer ....................................................3/8 ............................. 3
31 ............ TS-0209061 ............Socket Head Cap Screw ...................................3/8-16x1-1/4” .............. 3
32 ............ 3520B-232 ..............Motor ...............................................................2HP, 220V, 60Hz ........ 1
................ PM2000-MF ............Motor Fan .......................................................................................... 1
................ 70-4101-2................Motor Fan Cover................................................................................. 1
33 ............ JWL1642-166 ..........Bracket .............................................................................................. 1
35 ............ TS-0680042 ............Flat Washer......................................................3/8 ............................. 2
36 ............ 6350031 ..................Motor Plate Locking Handle................................................................. 1
37 ............ JWL1642-130A ........Digital Readout ................................................................................... 1
38 ............ 3520B-238 ..............Plate .................................................................................................. 1
39 ............ 3520B-239 ..............DRO Cover ........................................................................................ 1
40 ............ JWL1642-127 ..........Tap Screw........................................................M3x10........................ 4
41 ............ TS-0253031 ............Socket Head Button Screw ................................#10-24x1/2” ................ 4
42 ............ JWL1642-134 ..........Tap Screw........................................................1/4”x1/2” .................... 2
43 ............ TS-1540011 ............Nut ..................................................................M3 ............................. 2
44 ............ TS-2361031 ............Lock Washer ....................................................M3 ............................. 2
45 ............ JWL1642-135 ..........Bracket .............................................................................................. 1
46 ............ 6295717 ..................Knob .................................................................................................. 1
47 ............ 3520B-247 ..............Door Panel ......................................................................................... 1
48 ............ 3520B-248 ..............Speed Label ....................................................................................... 1
49 ............ 6708019 ..................Socket Head Cap Screw ...................................#8-32x5/8”.................. 2
50 ............ 6365012 ..................Door Hinge ......................................................................................... 1
51 ............ 6295911 ..................Pad.................................................................................................... 1
52 ............ 6860704 ..................Flat Washer......................................................#8 .............................. 2
53 ............ 6508007 ..................Nut ..................................................................#8-32 ......................... 2
54 ............ 3520B-254 ..............Control Panel ..................................................................................... 1
55 ............ 6295839 ..................Push/Pull Switch ................................................................................. 1
56 ............ 6821492 ..................Switch Fwd/Rev .................................................................................. 1
32
57 ............ 6295915 ..................Control Pot Assembly.......................................................................... 1
58 ............ 6813062 ..................Spring ................................................................................................ 1
59 ............ 3601006 ..................Spindle Lock Plunger .......................................................................... 1
60 ............ 3520B-260 ..............Control Label ...................................................................................... 1
61 ............ 6294786 ..................Spindle Lock Bracket .......................................................................... 1
62 ............ 6077228 ..................Micro V-Belt .....................................................260J .......................... 1
63 ............ 3719188 ..................Spindle Sheave .................................................................................. 1
64 ............ 3520B-264 ..............Locking Collar .................................................................................... 1
65 ............ 3058001 ..................Clamp Bolt ......................................................................................... 1
66 ............ 3092095 ..................Clamp ................................................................................................ 1
67 ............ 6520009 ..................Nylon Lock Hex Nut ..........................................5/8”-11 ....................... 1
68 ............ 6294787 ..................Power Cord ........................................................................................ 1
69 ............ 6294790 ..................Motor Cord ......................................................................................... 1
70 ............ JWL1642-165 ..........Strain Relief ....................................................................................... 3
71 ............ 3520B-271 ..............Index Pin ..............................................................................................
72 ............ 6294744 ..................Face Plate Wrench ............................................................................. 1
73 ............ 3520B-273 ..............Set Screw ........................................................#10-24x1”................... 1
74 ............ 6716139 ..................Flat Head Socket Screw ....................................3/8-16×1” ................... 4
75 ............ 3520B-275 ..............Spindle Comparator Spur Center ......................................................... 1
76 ............ JWL1642-183 ..........Cable Clamp ...................................................................................... 2
77 ............ TS-0560071 ............Hex Nut............................................................#10-24 ....................... 2
78 ............ TS-081C082 ............Phillips Pan Head Machine Screw .....................#10-24x1-1/2” ............. 2
79 ............ TS-069204 ..............Washer ............................................................#10 ............................ 2
80 ............ JWL1642-169 ..........Braking Resistor ................................................................................. 1
81 ............ 6430047 ..................Knob .................................................................................................. 1
82 ............ 3520B-282 ..............Bracket .............................................................................................. 1
83 ............ 6295838 ..................Phillips Round Head Machine Screw ..................M3x20........................ 2
84 ............ TS-1490021 ............Hex Cap Screw ................................................M8x16........................ 1
85 ............ TS-0267021 ............Socket Set Screw .............................................1/4-20x1/4” ................. 2
................ 6294754 ..................Knockout Rod Assembly (includes index # 86 thru 92) .......................... 1
86 ............ TS-0270031 ............Socket Set Screw .............................................5/16-18x3/8” ............... 1
87 ............ 3520B-287 ..............Slide Hammer .................................................................................... 1
88 ............ 3520B-288 ..............Slide Handle ....................................................................................... 1
89 ............ 6295796 ..................Nyloc Insert Socket Set Screw...........................1/4-20x3/8 .................. 2
90 ............ 3520B-290 ..............Rod ................................................................................................... 1
91 ............ 3520B-291 ..............Retaining Collar .................................................................................. 1
92 ............ 3520B-292 ..............Brass Tip............................................................................................ 1
93 ............ 3520B-293 ..............Inverter Label ..................................................................................... 2
94 ............ 3520B-294 ..............Warning Label .................................................................................... 1
95 ............ 3520B-295 ..............Cord Snap Ring .................................................................................. 1
96 ............ 3520B-296 ..............Phillips Pan Head Machine Screw......................M3-0.5Px10................ 3
33
Stand and Bed Assembly
34
Parts List: Stand and Bed Assembly
Index No. Part No.
Description
Size
Qty
1 .............. 3520B-101 ..............Bed.................................................................................................... 1
2 .............. 3520B-102 ..............Leg .................................................................................................... 2
3 .............. 6295754 ..................Stop Bolt ............................................................................................ 2
................ 6294797 ..................Tool Rest Support Assembly (includes index #4 thru #12) ..................... 1
4 .............. 3520B-104 ..............Tool Rest Support Base ...................................................................... 1
5 .............. 3520B-105 ..............End Cover .......................................................................................... 1
6 .............. 3520B-106 ..............C-Ring .............................................................S-22........................... 1
7 .............. 6710015 ..................Socket Head Cap Screw ...................................#10-24x1/2” ................ 4
8 .............. 3520B-108 ..............Tool Support Rod ............................................................................... 1
9 .............. 6294763 ..................Locking Handle................................................................................... 2
10 ............ 3520B-110 ..............Bolt .................................................................................................... 1
11 ............ 6294770 ..................Clamp ................................................................................................ 1
12 ............ TS-0650081 ............Nylon Lock Hex Nut ..........................................3/4”-10 ....................... 1
13 ............ 6294742 ..................Tool Support ....................................................14” ............................. 1
................ 6295902 ..................Live Center Assembly (includes index #14 thru #17) ............................. 1
14 ............ 6295905 ..................Live Center Cone................................................................................ 1
15 ............ 6295904 ..................Live Center Tip ................................................................................... 1
16 ............ 6295903 ..................Live Center Body ................................................................................ 1
17 ............ 6295906 ..................Live Center Rod ................................................................................. 1
18 ............ 3520B-118 ..............Quill ................................................................................................... 1
19 ............ 6295909 ..................Lead Screw ........................................................................................ 1
20 ............ TS-0560071 ............Hex Nut............................................................#10-24 ....................... 1
21 ............ 3520B-121 ..............Set Screw ........................................................#10-24x3/4” ................ 1
22 ............ 6295910 ..................Lock Handle ....................................................................................... 1
23 ............ 3728005 ..................Quill Lock Sleeve ................................................................................ 1
24 ............ 3520B-124 ..............Tailstock ............................................................................................ 1
25 ............ 3520B-125 ..............Tailstock Handwheel ........................................................................... 1
26 ............ 3520B-126 ..............Tailstock Handle ................................................................................. 1
27 ............ 6430045 ..................Knob .................................................................................................. 1
28 ............ 3268217 ..................Handle ............................................................................................... 1
29 ............ 3092095 ..................Clamp ................................................................................................ 1
30 ............ 6095038 ..................Bushing.............................................................................................. 1
31 ............ 3708012 ..................Tailstock Clamping Shaft ..................................................................... 1
32 ............ TS-0640091 ............Nylon Lock Hex Nut ..........................................3/8”-16 ....................... 1
33 ............ TS-1490021 ............Hex Cap Screw ................................................M8x16........................ 1
34 ............ 3520B-134 ..............Cover Plate ........................................................................................ 1
35 ............ 6295717 ..................Lock Knob .......................................................................................... 1
36 ............ TS-081C022 ............Phillips Pan Head Machine Screw......................#10-24x3/8” ................ 2
37 ............ TS-0270011 ............Socket Set Screw .............................................5/16x1/4” .................... 2
38 ............ 3096003 ..................Collar ................................................................................................. 1
39 ............ 6760102 ..................Set Screw ........................................................#10-32x1”................... 1
40 ............ 3520B-140 ..............Powermatic Nameplate ...................................................................... 1
41 ............ 3058001 ..................Bolt .................................................................................................... 1
42 ............ 6294773 ..................Warning Label .................................................................................... 1
43 ............ 3520B-143 ..............Shelf .................................................................................................. 1
44 ............ TS-0720091 ............Lock Washer ....................................................3/8” .......................... 12
45 ............ TS-0209061 ............Socket Head Cap Screw ...................................3/8x1-1/4”................. 12
46 ............ TS-0570031 ............Hex Nut............................................................3/8”-16 ....................... 4
47 ............ 6442000 ..................Adjustable Leveler .............................................................................. 4
49 ............ 3520B-149 ..............I.D Label ............................................................................................ 1
50 ............ 3520B-150 ..............Comparator Rear Bracket.................................................................... 1
51 ............ 3520B-151 ..............Comparator Rear Center ..................................................................... 1
52 ............ 6520009 ..................Nylon Lock Hex Nut ..........................................5/8”-11 ....................... 1
53 ............ TS-0680042 ............Flat Washer......................................................3/8” .......................... 10
54 ............ 3520B-154 ..............Backer Plate ....................................................................................... 1
55 ............ TS-0680021 ............Flat Washer......................................................1/4” ............................ 2
56 ............ TS-0207061 ............Socket Head Cap Screw ...................................1/4”-20x1” .................. 2
57 ............ 3520B-157 ..............Stripe ................................................................................................. 1
58 ............ 3520B-158 ..............Stripe ................................................................................................. 1
35
Optional Accessories: Bed Extensions
Index No. Part No.
Description
Size
Qty
................ 6294727B................18” Bed Extension Assembly (includes items 1 thru 6)
1 .............. 3520B-310 ..............Extension Post ................................................................................... 1
2 .............. 6294763 ..................Locking Handle................................................................................... 1
3 .............. 3520B-311 ..............18” Bed Extension .............................................................................. 1
4 .............. TS-0680042 ............Flat Washer......................................................3/8” ............................ 3
5 .............. TS-0720091 ............Lock Washer ....................................................3/8” ............................ 3
6 .............. TS-0209081 ............Socket Head Cap Screw ...................................3/8-16x1-3/4” .............. 3
................ 6294726B................50” Bed Extension Assembly (includes items 7 thru 15)
7 .............. 3520B-101 ..............50” Bed .............................................................................................. 1
8 .............. 3520B-102 ..............Leg .................................................................................................... 1
9 .............. TS-0570031 ............Hex Nut............................................................3/8-16x1”.................... 2
10 ............ 6442000 ..................Leveler............................................................................................... 2
11 ............ TS-0720091 ............Lock Washer ....................................................3/8” ............................ 4
12 ............ TS-0209061 ............Socket Head Cap Screw ...................................3/8”x1-1/4” ................. 4
13 ............ TS-0680042 ............Flat Washer......................................................3/8” ............................ 3
14 ............ TS-0720091 ............Lock Washer ....................................................3/8” ............................ 3
15 ............ TS-0209081 ............Socket Head Cap Screw ...................................3/8-16x1-3/4” .............. 3
36
Optional Accessories: Outboard Turning Stand
Index No. Part No.
Description
Size
Qty.
................ 6294732 ..................Heavy Duty Outboard Turning Stand Assembly (items 1 thru 7) ...............
1 .............. 3042503 ..................Turning Stand Base ............................................................................ 1
2 .............. 6295897 ..................Offset Tool Support Pin .........................1.00” diameter ........................ 1
3 .............. 6295898 ..................Offset Tool Support Casting ..................1.00” hole ............................... 1
4 .............. 2695026 ..................Screw Lock Assembly ......................................................................... 3
5 .............. 3423055 ..................Turning Stand Leg .............................................................................. 1
6 .............. 6861700 ..................Lock Washer ........................................5/8” ........................................ 2
7 .............. 6769002 ..................Socket Head Cap Screw .......................5/8”-18 x 2”............................. 2
37
Optional Accessories: Face Plates, Tool Supports and Misc.
Index No. Part No.
Description
Size
Qty.
1 .............. 6295902 ..................Ball Bearing Tailstock Center (not shown) ..............................................
2 .............. 6294736 ..................3” Face Plate ........................................1-1/4-8 .....................................
3 .............. 6294733 ..................Remote ON/OFF Switch........................................................................
................ 6294731 ..................26” Tool Support Assembly (includes items 10, 11, 12) ........................
4 .............. ...............................26” Tool Support ................................................................................. 1
5 .............. 6294795 ..................Tool Support Post ............................................................................... 2
6 .............. 6716219 ..................Socket Head Cap Screw .......................3/8-16x6-1/4 ........................... 2
7 .............. 6294740 ..................Bowl Turning Tool Support (R.H.) ..........................................................
8 .............. 6294751 ..................Bowl Turning Tool Support (L.H.) ...........................................................
9 .............. 6294739 ..................6” Tool Support.....................................................................................
10 ............ 6294742 ..................14” Tool Support ...................................................................................
38
Optional Accessories: Dust Port Assembly
Index No. Part No.
Description
Size
Qty
................ 6294796 ..................Dust Port Assembly (includes index #1 thru 12)
1 .............. 3520B-401 ..............Lower Dust Hood ................................................................................ 1
2 .............. 3520B-402 ..............Upper Dust Hood ................................................................................ 1
3 .............. 3520B-403 ..............Hood Lock Knob (Female) ................................................................... 1
4 .............. 3520B-404 ..............Lock Washer, External Tooth.............................M7 ............................. 2
5 .............. 3520B-405 ..............Hood Support Collar ........................................................................... 1
6 .............. 3520B-406 ..............Hood Lock Knob ................................................................................. 3
7 .............. 3520B-407 ..............Support Rod ....................................................................................... 1
8 .............. 3520B-408 ..............Rod Holder ......................................................................................... 1
9 .............. TS-1482021 ............Hex Cap Screw ................................................M6x12........................ 4
10 ............ TS-2361061 ............Lock Washer ....................................................M6 ............................. 4
11 ............ 3520B-411 ..............Support Bracket.................................................................................. 1
12 ............ 3520B-412 ..............Lock Handle ....................................................................................... 2
39
Electrical Connections
40
Electrical: Remote ON/OFF Switch (Optional Accessory)
NOTE: The Lathe can only operate when both the headstock and remote switches are in the “ON”
position.
To mount the remote switch to your Lathe, proceed as follows.
1. Disconnect all electrical power to the Lathe.
2. Remove the two screws from the control panel. Do NOT disconnect control panel from wiring
harness.
3. Run the remote switch’s wiring harness through the opening in the back of the headstock and out
through the front of the headstock.
4. Connect the remote switch’s wiring harness to the back of the Push/Pull switch (refer to the electrical
schematic on page 40).
5. Reinstall the control panel to the headstock. From the back of the headstock, lightly pull out any
excess wire that may be inside the headstock.
6. The magnetic back on the remote switch will allow the switch to be placed anywhere on the Lathe.
7. Connect electrical power to the Lathe and resume operations.
41
NOTES
42
43
WALTER MEIER (Manufacturing) Inc.
427 New Sanford Road
LaVergne, Tennessee 37086
Phone: 800-274-6848
www.powermatic.com
www.waltermeier.com
44