1
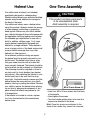
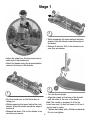
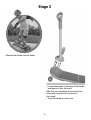
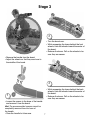
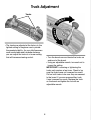
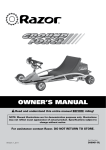
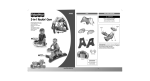
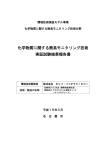
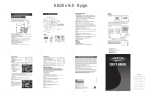
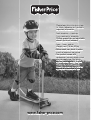
• Please keep this instruction sheet
for future reference, as it contains
important information.
• Adult assembly is required.
• Tools required for assembly:
Phillips screwdriver and adjustable
wrench (both not included)
• Ages: 4 years and up;
Weight Limit: 110 lbs (50 kg)
• Before each use, check to make
sure the fasteners are secure.
• Your product comes with
replacement warning labels which
you can apply over the factory
applied warning label if English
is not your primary language.
Select the warning label with the
appropriate language for you.
www.fisher-price.com
Consumer Information
IMPORTANT! Please take a few moments to
review the following safety tips:
• Please use with caution as this product
requires skill to operate safely to avoid falls,
collisions, and injuries to yourself (the rider)
and others.
• Adult supervision is required.
• Wear shoes or sneakers that provide good
support. Do not wear open-toe shoes.
• Keep loose laces and pant legs away from
the wheels.
• Choose areas for riding that are free of
obstacles.
• Ride on smooth, paved surfaces away from
motor vehicles.
• Avoid wet or uneven surfaces; sharp bumps,
drainage grates, and other sudden surface
changes, as this product may suddenly stop.
• Towing riders with bicycles or cars is unsafe.
• Never ride at night.
• Avoid colliding with pedestrians.
• Learn to stop safely.
• Avoid excessive speed associated with
downhill rides.
• Do not use in a skateboard park or in any
setting where more advanced skills and
equipment are needed to perform trick and/
or aerial maneuvers.
WARNING
To avoid serious injury:
• Keep away from cars and other
motor vehicles, streets, steep
inclines, steps, sloped driveways,
hills, roadways, alleys, swimming
pools and other bodies of water.
• Protective equipment should be
worn. Use helmet, wrist guards,
kneepads and elbow pads.
• Always wear shoes.
• Never allow more than 1 rider.
• Never ride at night.
• Not for children with a body weight
of more than 50 kg (110 lbs).
• Running or jumping onto
skateboards can be dangerous.
2
Helmet Use
One-Time Assembly
Your child needs a helmet (not included)
specifically designed for skateboarding.
Skateboarding helmets can withstand multiple
impacts and provide additional coverage for
the back of the head.
Your child must always wear a helmet when
using this product. Helmets reduce the energy
of some impacts, minimizing or preventing
head injuries. Make sure your child’s helmet
has a label stating/certifying conformance with
the applicable certifying agency and includes
the intended age requirement for use with a
child. In addition, children ages 1 to 5 years
require helmets specifically designed and
labeled for younger children. These helmets
cover a larger portion of the head and provide
more protective coverage than any other
helmets for older persons.
For maximum protection during an impact,
the helmet must be properly secured to your
child’s head. The helmet must have a strap
that goes under the chin with a buckle that
stays securely fastened. The helmet should be
worn level/low on the forehead, not tilted back.
The chinstrap should be adjusted so there is
no slack and it is firmly buckled (see helmet
instructions). After securing the helmet to your
child’s head, test to be sure that the strap
stays tight, the buckle remains secure and the
helmet cannot be removed from your child’s
head by twisting or pulling the helmet. Remind
your child to remove the helmet when playing
on any kind of playground equipment or any
place where the helmet may present a risk
of strangulation.
If the helmet is involved in a crash, replace
it or have it examined by the manufacturer
before reuse.
CAUTION
This product contains small parts
in its unassembled state.
Adult assembly is required.
Screws
M5 x 25 mm Screw x 4
• Insert four M5 x 25 mm screws into the base
of the handle.
• Hand-tighten the screws.
• Turn the handle upside-down to be sure the
screws are attached to the base.
Hint: Once the screws are attached to the
base of the handle, they cannot be removed.
3
Stage 1
2
• While squeezing the levers behind the back
wheels, slide the wheels toward the edge of
the board.
• Release the levers. Pull on the wheels to be
sure they are secure.
• Adjust the wheels so that they are closer to
each end of the skateboard
• Attach the handle using the pre-assembled
screws in the base of the handle.
3
1
• Turn the board over so that the bottom is
facing you.
• While squeezing the levers behind the front
wheels, slide the wheels toward the edge of
the board.
• Release the levers. Pull on the wheels to be
sure they are secure.
• Turn the board upright.
• Align the screws on the base of the handle
with the holes in the front of the board.
Hint: The handle is designed to fit on the
board one way. If it does not seem to fit, turn it
around and try again.
• Tighten the screws with a Phillips screwdriver.
Do not over-tighten.
4
Stage 2
• Remove the handle from the board.
• Loosen the screws in the base of the handle
and remove it from the board.
Hint: The pre-assembled screws cannot be
completely removed from the base of
the handle.
• Store the handle for future use.
5
CONSUMER ASSISTANCE
1-800-432-5437 (US & Canada)
1300 135 312 (Australia)
Fisher-Price, Inc., 636 Girard Avenue, East Aurora, NY 14052.
Hearing-impaired consumers: 1-800-382-7470.
Outside the United States:
Canada: Mattel Canada Inc., 6155 Freemont Blvd.,
Mississauga, Ontario L5R 3W2; www.service.mattel.com.
Great Britain: Mattel UK Ltd, Vanwall Business Park,
Maidenhead SL6 4UB. Helpline: 01628 500303.
www.service.mattel.com/uk
Mattel Europa, B.V., Gondel 1, 1186 MJ Amstelveen, Nederland.
Australia: Mattel Australia Pty. Ltd., 658 Church Street,
Locked Bag #870, Richmond, Victoria 3121 Australia.
New Zealand: 16-18 William Pickering Drive,
Albany 1331, Auckland.
Care
• Periodically inspect this product for wear or damage. Check all nuts and bolts, and tighten
as needed.
• Replace worn or broken parts immediately.
• Wipe clean with a mild soap and water solution and a damp cloth. Rinse clean with water to
remove soap residue.
Fisher-Price, Inc., a subsidiary of Mattel, Inc., East Aurora, NY 14052 U.S.A.
©2010 Mattel, Inc. All Rights Reserved. ® and ™ designate U.S. trademarks of Mattel, Inc.
PRINTED IN CHINA
V7608pr-0920
Stage 3
2
• Turn the board over.
• While squeezing the levers behind the front
wheels, slide the wheels toward the center of
the board.
• Release the levers. Pull on the wheels to be
sure they are secure.
• Remove the handle from the board.
• Adjust the wheels so that they are closer to
the middle of the board.
3
• While squeezing the levers behind the back
wheels, slide the wheels toward the center of
the board.
• Release the levers. Pull on the wheels to be
sure they are secure.
1
• Loosen the screws in the base of the handle
and remove it from the board.
Hint: The pre-assembled screws cannot be
completely removed from the base of
the handle.
• Store the handle for future use.
7
Truck Adjustment
T
Trucks
h
ig
ten
L o ose
n
• The trucks are adjusted at the factory to the
tightest setting for beginner use to provide
the greatest stability. As your child becomes
more comfortable and has better balance,
you can adjust the trucks to a looser setting
that will increase steering control.
• Turn the board over and locate the trucks on
each end of the board.
• Using an adjustable wrench, turn each nut to
loosen the setting.
IMPORTANT! Loosening or tightening the
trucks only requires a few turns. Check to be
sure the trucks were not loosened too much!
Pull on both trucks to be sure they are secured
to the board. If you can remove either truck,
it was loosened too much. Replace the truck
on the board and tighten the nut with an
adjustable wrench.
8