1
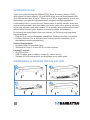
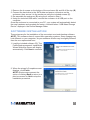
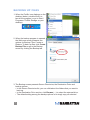
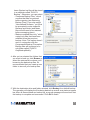
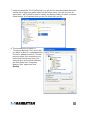
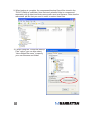
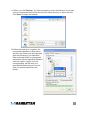
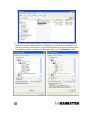
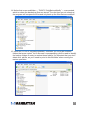
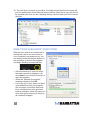
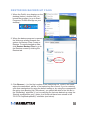
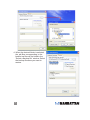
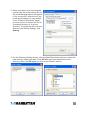
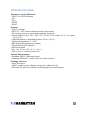
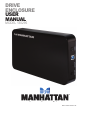
DRIVE
ENCLOSURE
USER
MANUAL
MODEL 130295
MAN-130295-UM-0812-02
INTRODUCTION
Thank you for purchasing this MANHATTAN® Drive Enclosure, Model 130295.
With support for large-capacity 3.5-inch SATA drives and with SuperSpeed USB
(3.0) data transfer rates of up to 5 Gbps (up to 3 TB for large-capacity drives), this
device helps you optimize high-performance computer storage applications.
A convenient built-in, one-touch copy feature helps to quickly transfer, share and
archive important data, while its durable, two-piece construction protects sensitive
drives from exposure and daily hazards. It’s a versatile and portable data solution
without bulky external power supplies or annoying cables and adapters.
By following the instructions in this user manual, you’ll soon be enjoying these
popular features:
• Plug and Play and hot-swappable capabilities; Windows and Mac compatible
• Lifetime Warranty (For a complete list of country-specific warranties, go to
manhattan-products.com/warranty.)
System Requirements
• Available USB 3.0 Standard-A port
• Windows XP/Vista/7; or Mac OS 8.6 or later versions
Package Contents
• Drive Enclosure
• USB 3.0 cable, power adapter, screws (8), rubber feet (4)
• Software CD with user manual; multilanguage quick install guide
HARDWARE & DRIVER INSTALLATION
A
B
C
D
2
1.Remove the 4 screws on the bottom of the enclosure (A) and lift off the top (B).
2.Connect the hard drive to the SATA data and power connectors on the
enclosure, then secure it to the enclosure using the included screws (C).
3.Re-assemble the enclosure (D) using the 4 screws in Step 1.
4.Using the included USB cable, connect the enclosure to a USB port on the
computer.
Once the enclosure is connected to your PC, your system will automatically detect
the new hardware and complete the setup, confirmed when “USB Mass Storage
Device” displays in the Device Manager folder.
SOFTWARE INSTALLATION
These steps are for the installation of the convenient one-touch backup software.
NOTE: This software doesn’t support Mac operating systems. Some images may
look different on your computer, as your software version may be slightly different
than the one represented here.
1. Load the included software CD. The
Prolific Backup program’s InstallShield
Wizard Welcome screen will display
automatically. Click Next to continue.
2. When the wizard’s Complete screen
displays, click Finish.
NOTE: Most screens present the
option of clicking Back to return to a
previous screen or Quit to stop the
installation procedure.
3
BACKING UP FILES
1.When the Prolific icon displays on the
desktop (below), double-click it to
launch the program (or go to Start /
Programs / Prolific Storage on your
desktop).
2.When the backup program is opened,
the Welcome screen presents two
options for Backup Files: Create or
Restore. To back up files, click Create
Backup Files or go to the Backup
screen by clicking the Backup tab.
3. The Backup screen presents Source Directories, the Destination Drive and
backup options.
• In the Source Directories list, you can click/select the folders that you want to
back up.
• In the Destination Drive section, click Browse (...) to select the external drive. • The default setting among the backup options is to simply copy all selected
4
items. Backed-up files will be stored
in a subfolder called “PL2X7X
Backup.” Otherwise, you can select:
- “Compress Backup Files,” which
requires that files be restored
before opening (see Restoring
Backup Files). If you also select
“User-defined file name,” you’ll first
be prompted to enter a specific
filename and folder (and these
files will still need to be restored
before accessing them).
- “Backup modified files only,” which
copies only files that have been
modified since the previous
backup. Note: This option doesn’t
work in conjunction with the
Compressed Backup Files option.
Backup files will be stored on a
sub-folder called “PL2X7X
OnlyBackupModify.”
4. After you’ve selected the folders that
you want to back up, click Browse to
select the external drive where you’ll
be saving the backed-up files. It’s
recommended that you create a new
folder to store all your backup files.
5.With the destination drive and folder selected, click Backup for a default backup. The operation will display the files being backed up as well as a status progress
bar. After all files selected are backed up, a pop-up message will announce that
the backup is complete and successful. Click OK to finish.
5
6. Go to your USB storage drive (“MyUSBDrive” in the example below, which
represents the backup HDD in the drive enclosure), and check the “MyBackup”
files. A small utility program called PLBackup is also added into the “MyBackup”
folder so you can execute it if the external drive is connected to another PC that
doesn’t have the Prolific Backup software installed. You will also see the
subfolder “PL2X7X Backup” in which the backup files are stored.
6
7. Inside the subfolder “PL2X7X Backup” you will find the selected folders that were
copied with a date-time prefix added on the folder name. You will also see an
associated “.pbi” file that is used to identify the backup folders in order to restore
those folders. It is important that you do not delete this .pbi file.
8. The second backup option is
“Compress Backup Files,” which lets
you back up files to a compressed file
format for added protection. This will
prevent others from accessing your
backed-up files directly from your
external drive without first restoring
the files. Select the “Compress
Backup Files” option and click
Backup.
7
9. When backup is complete, the compressed backup files will be stored in the
“PL2X7X Backup” subfolder. Note that each selected folder is compressed
separately with a date-time folder name prefix used as a filename. Note also the
associated .pbi file that you need in order to restore these files.
10. When using the “Compress Backup
Files” option, you can also select
“User-defined file name” to specify
your own filename and folder.
8
11. When you click Backup, you’ll be prompted to enter the filename to be used
for the compressed backed-up files and the folder directory to store the files.
Click Save to begin the backup.
12.When the backup is complete, the
compressed backed-up files will be
stored in the folder you specified and
with the filename(s) you specified.
Each selected folder is compressed
separately with the specified filename
used as a prefix. Again, note the
corresponding .pbi file with your
specified filename that you need in
order to restore these files (see
below).
9
13. The “Backup modified files only” option lets you save time by just backing up
those files on the folders that were modified from your previous backup. For a
first-time backup, a full backup of the selected folders in a special backup folder
is needed in order to compare the files (see Step 14). Click Backup to start.
10
14. Notice that a new subfolder — “PL2X7X OnlyBackupModify” — was created,
which is where the backed-up files are stored. The next time you do a backup,
the program will compare the files and only back up the files that are modified.
15. Inside the “PL2X7X OnlyBackupModify” subfolder you’ll find the selected
folders that were copied. You’ll also see a corresponding .pbi file used to identify
the backup folders in order to restore those folders. It’s important that you don’t
delete this .pbi file, as you’ll need to point to this file/folder when running the
restore operation.
11
16. The next time you back up your files, the folder where the files are stored will
just be updated with those files that were modified. Note that a new .pbi file will
be created each time you do a backup. Always use the latest .pbi file to restore
the files.
ONE-TOUCH BACKUP FUNCTION
With the drive enclosure loaded with a
backup hard drive and connected to
your computer (and powered on), you
can simply press the Backup button on
the enclosure to launch the software
and begin backing up selected files.
• Allow the backup to continue while
the status screen is displayed. (Or
click Abort if you need to interrupt or
stop the process.)
• When the “Backup Succeeded!”
message displays, click OK.
• If you last set to your options to back
up modified files only, the program
will only back up the files that have
been modified since your previous
backup operation, which will save you
more time without having to back up
all needed files again.
12
RESTORING BACKED-UP FILES
1.When the Prolific icon displays on the
desktop (below), double-click it to
launch the program (or go to Start /
Programs / Prolific Storage on your
desktop).
2.When the backup program is opened,
the Welcome screen presents two
options for Backup Files: Create or
Restore. To restore backed-up files,
click Restore Backup Files or go to
the Restore screen by clicking the
Restore tab.
3. Click Browse (...) to find the location of the backed-up file. Click on the folder
where the associated .pbi file of the backed-up file is found. If you’re restoring
a file that was backed up using the default setting or by using the compressed file option (see Backing Up Files above), you should be able to find the file in
the “MyBackup” subfolder. If you’re restoring file that was backed up using the
“Backup modified files only” option, the file should have been stored in the
“PL2X7X OnlyBackupModify” subfolder (see below).
13
4. When the desired folder is selected,
the .pbi files corresponding to the
backed-up files will be listed in the
“Select a backup file” window. Select
the backup filename you want to
restore.
14
5. When you select one of the backed up files (.pbi file) in the backup file list,
the actual backup folders will appear
in the “source file” window to let you
know which folders you can restore.
In the “Restore Directories” panel,
you can choose to restore the file to
its original directory or to a new
directory. To restore the file to a new
directory (the default setting), click
Setting.
6. On the Directory Setting screen, click the New Directories column to select the
new directory folder you want. Click OK after you have selected the new
directory, then click OK again to return to the Restore screen.
15
7. Once your preferences have been set,
click Restore to begin restoring the
backed-up files. The files will be
shown being restored to your desired
restore directory.
8.After all backed-up files are restored
and the “Restore succeeded!”
message displays, click OK to finish
and go to the intended directory folder
to confirm that the restored are there.
UNINSTALLING THE BACKUP SOFTWARE
1. In the Control Panel, go to “Add or Remove Programs” or “Programs and
Features” to uninstall “Prolific Backup.” Click Uninstall or Remove to continue,
then click Yes.
2. When the uninstall is complete, you’ll be prompted to restart your computer.
Close all programs and click Finish to restart your computer.
16
SPECIFICATIONS
Standards and Certifications
• USB 3.0 to SATA interface
• CE
• FCC
• WEEE
• RoHS
General
• P12771 chipset
• SATA 7P + 15P internal data and power connections
• DC single-post power input (power adapter included)
• Power adapter: input, 100 – 240 V, 50 – 60 Hz, 0.8 A; output, 12 V / 2 A; cable,
1.5 m (5 ft.)
• USB Standard-A to Standard-B cable, 60 cm (1.97 ft.)
• Working temperature: 0 – 45ºC
• ABS (top)/metal construction (base)
• Power/activity LED indicator
• Enclosure stand
• 20 x 13 x 3.2 cm. (7.9 x 5.1 x 1.3 in.)
• 342 g (12.1 oz.) without hard drive
System Requirements
• Available USB 3.0 Standard-A port
• Windows XP/Vista/7; or Mac OS 8.6 or later versions
Package Contents
• Drive Enclosure
• USB 3.0 cable, power adapter, screws (8), rubber feet (4)
• Software CD with user manual; multilanguage quick install guide
17
WASTE ELECTRICAL & ELECTRONIC EQUIPMENT
Disposal of Electric and Electronic Equipment
(applicable in the European Union and other European countries with separate collection systems)
ENGLISH
This symbol on the product or its packaging indicates that this product shall not be
treated as household waste. Instead, it should be taken to an applicable collection
point for the recycling of electrical and electronic equipment. By ensuring
this product is disposed of correctly, you will help prevent potential negative
consequences to the environment and human health, which could otherwise
be caused by inappropriate waste handling of this product. If your equipment
contains easily removable batteries or accumulators, dispose of these
separately according to your local requirements. The recycling of materials will
help to conserve natural resources. For more detailed information about recycling
of this product, contact your local city office, your household waste disposal service or
the shop where you purchased this product. In countries outside of the EU: If you wish
to discard this product, contact your local authorities and ask for the correct manner
of disposal.
DEUTSCH
Dieses auf dem Produkt oder der Verpackung angebrachte Symbol zeigt an, dass
dieses Produkt nicht mit dem Hausmüll entsorgt werden darf. In Übereinstimmung
mit der Richtlinie 2002/96/EG des Europäischen Parlaments und des Rates über
Elektro- und Elektronik-Altgeräte (WEEE) darf dieses Elektrogerät nicht im normalen
Hausmüll oder dem Gelben Sack entsorgt werden. Wenn Sie dieses Produkt entsorgen
möchten, bringen Sie es bitte zur Verkaufsstelle zurück oder zum RecyclingSammelpunkt Ihrer Gemeinde.
ESPAÑOL
Este símbolo en el producto o su embalaje indica que el producto no debe tratarse
como residuo doméstico. De conformidad con la Directiva 2002/96/CE de la UE
sobre residuos de aparatos eléctricos y electrónicos (RAEE), este producto eléctrico no
puede desecharse con el resto de residuos no clasificados. Deshágase de este
producto devolviéndolo a su punto de venta o a un punto de recolección municipal
para su reciclaje.
FRANÇAIS
Ce symbole sur Ie produit ou son emballage signifie que ce produit ne doitpas être
traité comme un déchet ménager. Conformément à la Directive 2002/96/EC sur les
déchets d’équipements électriques et électroniques (DEEE), ce produit électrique ne
doit en aucun cas être mis au rebut sous forme de déchet municipal non trié.
Veuillez vous débarrasser de ce produit en Ie renvoyant à son point de vente ou au
point de ramassage local dans votre municipalité, à des fins de recyclage.
18
ITALIANO
Questo simbolo sui prodotto o sulla relativa confezione indica che il prodotto non
va trattato come un rifiuto domestico. In ottemperanza alla Direttiva UE 2002/96/EC
sui rifiuti di apparecchiature elettriche ed elettroniche (RAEE), questa prodotto
elettrico non deve essere smaltito come rifiuto municipale misto. Si prega di smaltire
il prodotto riportandolo al punto vendita o al punto di raccolta municipale locale per
un opportuno riciclaggio.
POLSKI
Jeśli na produkcie lub jego opakowaniu umieszczono ten symbol, wówczas w czasie
utylizacji nie wolno wyrzucać tego produktu wraz z odpadami komunalnymi. Zgodnie z
Dyrektywą Nr 2002/96/WE w sprawie zużytego sprzętu elektrycznego i elektronicznego
(WEEE), niniejszego produktu elektrycznego nie wolno usuwać jako nie posortowanego
odpadu komunalnego. Prosimy o usuniecie niniejszego produktu poprzez jego
zwrot do punktu zakupu lub oddanie do miejscowego komunalnego punktu zbiórki
odpadów przeznaczonych do recyklingu.
19
WARRANTY INFORMATION
ENGLISH: For warranty information, go to www.manhattan-products.com/warranty.
DEUTSCH: Garantieinformationen finden Sie unter www.manhattan-products.com/warranty.
ESPAÑOL: Si desea obtener información sobre la garantía, visite www.manhattan-products.
com/warranty.
FRANÇAIS: Pour consulter les informations sur la garantie, visitez www.manhattan-products.
com/warranty.
POLSKI: Informacje dotyczące gwarancji znajdują się na stronie www.manhattan-products.
com/warranty.
ITALIANO: Per informazioni sulla garanzia, accedere a www.manhattan-products.com/
warranty.
EN MÉXICO: Póliza de Garantía MANHATTAN — Datos del importador y responsable
ante el consumidor IC Intracom México, S.A. de C.V. • Av. Interceptor Poniente # 73, Col.
Parque Industrial La Joya, Cuautitlán Izcalli, Estado de México, C.P. 54730, México. •
Tel. (55)1500-4500
La presente garantía cubre los siguientes productos contra cualquier defecto de
fabricación en sus materiales y mano de obra.
A. Garantizamos los productos de limpieza, aire comprimido y consumibles, por 60 dias
a partir de la fecha de entrega, o por el tiempo en que se agote totalmente su
contenido por su propia función de uso, lo que suceda primero.
B. Garantizamos los productos con partes móviles por 3 años.
C.Garantizamos los demás productos por 5 años (productos sin partes móviles),
bajo las siguientes condiciones:
1. Todos los productos a que se refiere esta garantía, ampara su cambio físico,
sin ningún cargo para el consumidor.
2. El comercializador no tiene talleres de servicio, debido a que los productos
que se garantizan no cuentan con reparaciones, ni refacciones, ya que su
garantía es de cambio físico.
3. La garantía cubre exclusivamente aquellas partes, equipos o sub-ensambles
que hayan sido instaladas de fábrica y no incluye en ningún caso el equipo
adicional o cualesquiera que hayan sido adicionados al mismo por el usuario
o distribuidor.
Para hacer efectiva esta garantía bastará con presentar el producto al distribuidor
en el domicilio donde fue adquirido o en el domicilio de IC Intracom México, S.A. de
C.V., junto con los accesorios contenidos en su empaque, acompañado de su
póliza debidamente llenada y sellada por la casa vendedora (indispensable el sello
y fecha de compra) donde lo adquirió, o bien, la factura o ticket de compra original
donde se mencione claramente el modelo, número de serie (cuando aplique) y
fecha de adquisición. Esta garantía no es válida en los siguientes casos: Si el
producto se hubiese utilizado en condiciones distintas a las normales; si el producto
no ha sido operado conforme a los instructivos de uso; o si el producto ha sido
alterado o tratado de ser reparado por el consumidor o terceras personas.
20
REGULATORY STATEMENTS
FCC Class B
This equipment has been tested and found to comply with the limits for a Class B
digital device, pursuant to Part 15 of Federal Communications Commission (FCC)
Rules. These limits are designed to provide reasonable protection against harmful
interference in a residential installation. This equipment generates, uses and can
radiate radio frequency energy, and if not installed and used in accordance with the
instructions may cause harmful interference to radio communications. However,
there is no guarantee that interference will not occur in a particular installation. If this
equipment does cause harmful interference to radio or television reception, which
can be determined by turning the equipment off and on, the user is encouraged to
try to correct the interference by one or more of the following measures:
• Reorient or relocate the receiving antenna.
• Increase the separation between the equipment and the receiver.
• Connect the equipment to an outlet on a circuit different from the receiver.
• Consult the dealer or an experienced radio/TV technician for help.
CE / R&TTE
ENGLISH
This device complies with the requirements of the R&TTE Directive 1999/5/EC.
DEUTSCH
Dieses Gerät enspricht der Direktive R&TTE Direktive 1999/5/EC.
ESPAÑOL
Este dispositivo cumple con los requerimientos de la Directiva R&TTE 1999/5/EC.
FRANÇAIS
Cet appareil satisfait aux exigences de la directive R&TTE 1999/5/CE.
POLSKI
Urządzenie spełnia wymagania dyrektywy R&TTE 1999/5/EC.
ITALIANO
Questo dispositivo è conforme alla Direttiva 1999/5/EC R&TTE.
21
All trademarks and trade names are the property of their respective owners.
Alle Marken und Markennamen sind Eigentum Ihrer jeweiligen Inhaber.
Todas las marcas y nombres comerciales son propiedad de sus respectivos dueños.
Toutes les marques et noms commerciaux sont la propriété de leurs propriétaires respectifs.
Wszystkie znaki towarowe i nazwy handlowe należą do ich właścicieli.
Tutti i marchi registrati e le dominazioni commerciali sono di proprietà dei loro rispettivi proprietari.
© IC INTRACOM. All rights reserved. MANHATTAN is a trademark of IC INTRACOM, registered in the U.S. and other countries.