1
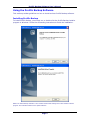
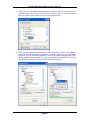
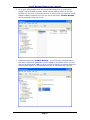
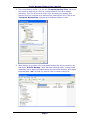
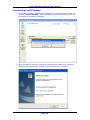
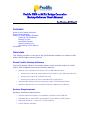
Prolific USB to SATA Bridge Controller Backup Software User’s Manual For Windows XP/Vista/7 For Software version 3.9.2.00 (6/28/2011) Contents About Prolific Backup Software System Requirements Using the Prolific Backup Software Installing Prolific Backup Backing up Files One Button Backup Restore Backup Files Uninstalling Prolific Backup Disclaimer Overview This chapter provides an overview of the Prolific Backup software for external Prolific USB-to-SATA bridge enclosure devices. About Prolific Backup Software The Prolific Backup software is a backup software utility specially written for Prolific USB to SATA bridge devices with the following features: Back up your computer files easily to your USB external drive: Allows you to back up exact copies of your files to your USB external drive Allows you to back up modified files only Allows you to back up files to standard ZIP compression Automatically backup files by pressing the One Touch Backup Button Restore backup files to any computer without installing the software System Requirements Hardware & Software Requirements: Pentium based and higher or compatible computers with USB port USB Hard Drive with Prolific chip and One Touch Button (OTB) feature Microsoft Windows 7, Vista, XP (32-bit & 64-bit) Prolific Backup Software Prolific Backup Software User’s Manual Using the Prolific Backup Software This section provides guidelines on how to install and use Prolific Backup software. Installing Prolific Backup To install Prolific Backup, you simply run or double-click the Prolific Backup installer program in Windows. Follow the succeeding instructions to finish the installation. NOTE: The Prolific Backup software is also included inside Prolific Storage All-in-One Software installer program. Check Prolific website for the update software. Page 1 Prolific Backup Software User’s Manual Running Backup Files Before you run the backup software, you may need to power on the Prolific USB storage device first and plug to your computer to be detected. Follow the steps below: 1. You can easily open the Prolific Backup software by double-clicking on the Prolific PL2X7X OneButton icon found on the system tray of your taskbar. You can also click Start-Programs-Prolific Storage-PLBackup to quick launch the Prolific Backup software. Click Start-Programs-Prolific Storage-One Button to restore the Prolific Backup icon on the taskbar system tray. 2. The Prolific Backup software will then pop-out with two main options (Backup and Restore) on the Welcome folder. To create backup files, click on the Create Backup Files button or click the Backup folder tab. Page 2 Prolific Backup Software User’s Manual 3. The Backup menu folder consists of the Source Directories, the Destination Drive, and the backup option. Under the Source Directories, you can click the folders that you want to back up. Then on the Destination Drive, click the browse button to select the external drive. Then choose the way you want to back up the selected folders. There are three ways to back up your files: • Copy exact files (default) – this will simply copy all the selected folders to your designated backup drive folder. You can also access these files directly from your backup drive. Backup files will be stored on a sub-folder called “PL2X7X Backup”. • Compress Backup Files – this option will compress all the backed up files. You will need to restore these files first in order to access them. Backup files will be stored on a sub-folder called “PL2X7X Backup”. If you also click the User-defined file name option, it will first prompt you for a specific filename and folder. You will need to restore these files first in order to access them. • Backup modified files only – this option allows you to back up only those files that were modified since the last backup. Note that this option does not work on compressed backup files option. Backup files will be stored on a sub-folder called “PL2X7X OnlyBackupModify”. The succeeding steps will show you how to do these three backup methods. Let us first select the default backup method. Page 3 Prolific Backup Software User’s Manual 4. After you have selected the folders that you want to back up, click browse on the destination drive where you will save the backup files. It is recommended that you make a new folder to store all your backup files. 5. After you have selected the destination drive and folder, click on the Backup button to do a default backup operation. The backup operation will start and will show you the files being backed up as well as a status progress bar. After all files selected were backed up, a pop-up message will appear to inform you that backup is complete and successful. Click OK to finish. Page 4 Prolific Backup Software User’s Manual 6. Go to your USB storage drive and check the backup files. A small utility program called PLBackup is also added into the backup folder so you can execute it if the drive is plug into another PC which does not have the Prolific Backup software installed. You will also see a sub-folder “PL2X7X Backup” where the backup files are stored. 7. Inside the sub-folder “PL2X7X Backup”, you will find the selected folders that were copied with a date-time prefix added on the folder name. You will also see an associated “.pbi” file that is used to identify the backup folders to restore those folders. It is important that you do not delete this .pbi file. Page 5 Prolific Backup Software User’s Manual 8. The second backup option is to use the “Compress Backup Files” which you can choose to back up your files to a compressed file format for added protection. This will not prevent others from accessing your backup files directly from your external drive without first restoring the files. Click on the “Compress Backup Files” option and click Backup button to start. 9. When backup is complete, the compressed backup files will be stored on the sub-folder “PL2X7X Backup”. Note that each selected folder is compressed separately with a date-time-foldername prefix used as a filename. Note again the associated “.pbi” file that you need to refer to restore these files. Page 6 Prolific Backup Software User’s Manual 10. For the “Compress Backup Files” option, you can also choose to click the “User-defined file name” option to specify your own filename and folder. 11. When you click on the Backup button, it will first prompt you for the filename to be used for the compressed backup files and the folder directory to store the files. Click the Save button to begin backup. Page 7 Prolific Backup Software User’s Manual 12. When backup is complete, the compressed backup files will be stored on the folder you specified. It also uses the filename you specified. Note that each selected folder is compressed separately with the specified filename used as a prefix. Note again the associated “.pbi” file using your specified filename that you need to refer to restore these files. Page 8 Prolific Backup Software User’s Manual 13. Lastly, you can choose to use the “Backup modified files only” option. This lets you save more time by just backing up those files on the folders that were modified from your previous backup. For first-time backup, it will need to do a full backup of the selected folders in a special backup folder in order to compare the files. Click Backup button to start. 14. Notice that a new sub-folder “PL2X7X OnlyBackupModify” was created and here is where the backup files is stored. The next time you do a backup, it will compare the files and only backup the files that are modified. Page 9 Prolific Backup Software User’s Manual 15. Inside the sub-folder “PL2X7X OnlyBackupModify”, you will find the selected folders that were copied. You will also see an associated “.pbi” file that will be used to identify the backup folders to restore those folders. It is important that you do not delete this .pbi file. You will need to point to this file/folder when running the restore operation. 16. The next time you back up your files, the folder where the files are stored will just be updated with those files that were modified. Note that a new .pbi file will be created each time you do a backup. Always use the latest .pbi file to restore the files. Page 10 Prolific Backup Software User’s Manual One Button Backup Control Your Prolific USB Storage device may come with a one touch backup button which will call the Prolific Backup software and instantly do backup file operation based on the current settings. 1. Attached the Prolific USB storage device to your computer and press the one touch backup button. The Prolific Backup software will immediately pop-out and will run the Backup operation. 2. If you last set to backup modified files only, the backup software will then only back up the files that has been modified since your previous backup operation. This will save you more time without having to back up all needed files again. Page 11 Prolific Backup Software User’s Manual Restoring Backup Files Follow the steps below to restore your backup files to your computer: 1. You can easily open the Prolific Backup software by double-clicking on the Prolific PL2X7X OneButton icon found on the system tray of your taskbar. You can also click Start-Programs-Prolific Storage-PLBackup to quick launch the Prolific Backup software. Click Start-Programs-Prolific Storage-One Button to restore the Prolific Backup icon on the taskbar system tray. 2. The Prolific Backup software will pop-out. To restore backup files, click on the Restore Backup Files button or click the Restore folder tab. Page 12 Prolific Backup Software User’s Manual 3. Click the browse button to select the location of the backup file location. Click on the folder where the associated “.pbi” file of the backup files is found. If you are restoring a backup file done by default or compressed option, the file should be found under the “PL2X7X Backup” subfolder. If you are restoring a backup file using the “backup modified files only”, the file is stored under the “PL2X7X OnlyBackupModify” sub-folder. 4. After selecting the correct folder, the .pbi files associated to the backup files will be listed on the backup file select box. Select the backup filename you wish to restore. Page 13 Prolific Backup Software User’s Manual 5. When you click one of the backup file (.pbi file) on the backup file list, the actual backup folders will appear on the source file box to let you know what folders you can restore. Under the Restore Directories option, you can choose to restore the files to its original directories or to new directories. Click the Setting button if you want to restore to new directories. 6. Inside the Directory Setting, click on the New Directories column to select the new directory folder you want. Click OK after you have set the new directory to return to the Restore folder tab menu. Page 14 Prolific Backup Software User’s Manual 7. When set, click the Restore button to begin restoring the backed up files. The files will be shown being restored to your desired restore directory. After all backed up files were restored, a message will pop-up to inform you that restore is complete and successful. Click OK to finish. 8. Go to the directory folder where you restore the files to double check. Page 15 Prolific Backup Software User’s Manual Uninstalling Prolific Backup 1. Go to Control Panel – Add/Remove Programs or “Programs and Features” to uninstall “Prolific Backup”. Click Uninstall or Remove to continue. Click Yes to confirm to uninstall the software. 2. When uninstall is complete, you will be prompted to restart your computer. Please close all programs and click Finish to restart your computer. Page 16 Prolific Backup Software User’s Manual Disclaimer Information in this document is subject to change without notice. The manufacturer does not make any representations or warranties (implied or otherwise) regarding the accuracy and completeness of this document and shall in no event be liable for any loss of profit or any other commercial damage, including but not limited to special, incidental, consequential, or other damages. No part of this document may be reproduced or transmitted in any form by any means without the express written permission of the manufacturer. All brand names and product names used in this document are trademarks or registered trademarks of their respective holders. Prolific Technology Inc. 7F, No. 48, Sec. 3, Nan Kang Rd. Nan Kang, Taipei 115, Taiwan, R.O.C. Tel: 886-2-2654-6363 Fax: 886-2-2654-6161 Email: [email protected] URL: http://www.prolific.com.tw Page 17