1
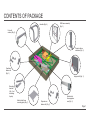
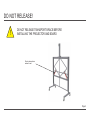
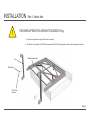
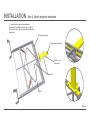
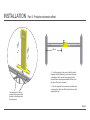
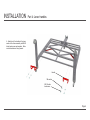
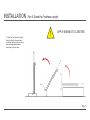
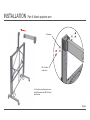
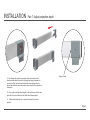
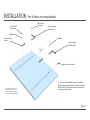
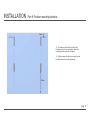
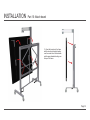
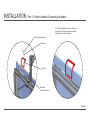
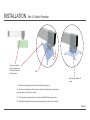
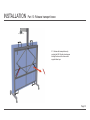
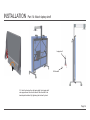
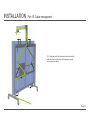
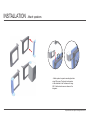
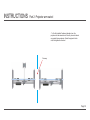
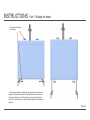
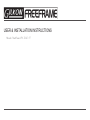
USER & INSTALLATION INSTRUCTIONS
Hitachi StarBoard FX DUO 77
CONTENTS OF PACKAGE
Handles (Qty: 4)
IWB frame assembly
(Qty: 1)
Foot with
castors (Qty: 2)
Projector frame
extension (Qty: 1)
Freeframe
fastener kit
(Qty: 1)
Laptop shelf (Qty: 1)
Mounting
brackets
(Qty: 1 set
containing
6 parts)
Hitachi short throw
mounting plate (Qty: 1)
Projector arm
fastener kit (Qty: 1)
Hitachi short
throw projector
arm (Qty: 1)
Page 1
DO NOT RELEASE!
!
DO NOT RELEASE TRANSPORT BRACE BEFORE
INSTALLING THE PROJECTOR AND BOARD
Do not release brace
marked in red.
Page 2
INSTALLATION
Part 1: Attach feet
TWO MEN OPERATION. WEIGHT EXCEEDS 15kg.
!
1 - Use carton supplied as a support for the frame assembly
2 - Attach feet to the uprights of the IWB frame assembly with M10-35 bolts supplied in fastener kit using supplied allen key.
Foot
IWB frame assembly
M10 washer
M10-35 hex
head bolt
Page 3
INSTALLATION
Part 2: Attach projector extension
3 - Loosely attach projector frame extension
attachment to the IWB frame assembly with M8-40
socket head screws, M8 nut and washers supplied in
fastener kit.
IWB frame assembly
Projector frame extension
M8-40 socket
head screw
M8 washer
M8 nut
Page 4
INSTALLATION
Part 3: Projector extension offset
690mm
4 - To set the projector to the correct offset for perfect
alignment with the StarBoard, use the holes as shown
in the diagram (left), and set the upright part of the
projector frame extension approximately 690mm from
the edge of the frame (as shown).
Use these holes to set the
projector to the correct offset
position for the Hitachi short
throw projector.
5 - Once the projector frame extension is position in the
correct position, tighten the M8 socket head screw with
supplied allen key.
Page 5
INSTALLATION
Part 4: Lower handles
6 - Attach two of the handles to the lower
section of the frame assembly with M8-16
button head screws and washers . Make
sure the handles are facing forward.
Handle
M8 washer
M8-16 button
head screw
Page 6
INSTALLATION
7 - Stand the Freeframe unit upright
from the carton for the next step of
installation. Make sure all the castors
have the brakes applied before
proceeding to the next step.
Part 5: Stand the Freeframe upright
!
APPLY BRAKES TO CASTORS
Page 7
INSTALLATION
Part 6: Attach projector arm
M8 washer
M8-16 button
head screw
8 - Attach the supplied projector arm
using M8 washers and M8-16 button
head screws
Page 8
INSTALLATION
Part 7: Adjust projection depth
Tangent to hole
9 - The distance the projector is mounted on the arm relative to the
interactive white board is crucial for the projection image to appear the
correct size. First, loosen the screw that holds the mounting clamp to
allow it the slide freely along the projector arm, using allen key supplied in
fastener kit.
10 - Line up the mounting clamp tangent to the small hole on the arm as a
guide for the correct distance for the Hitachi short throw projector.
11 - Tighten screw with allen key to secure the clamp in the correct
position.
Page 9
INSTALLATION
M6-16 button
head screw
Part 8: Attach mounting brackets
M8-16 button
head screw
upper mounting
bracket (left)
M6 washer
Lower mounting
bracket
M8 washer
upper mounting
bracket (right)
upper mounting nut plate
The board shown in
the diagram is not a
12 - Attach mounting brackets as shown using M6-16
button head screws and washers for the lower mounting
bracket and M8-16 button head screws with washers for
the upper mounting bracket.
direct representation
of a Hitachi StarBoard.
Page 10
INSTALLATION
Part 9: Position mounting brackets
86mm
13 - To make sure the board is mounted to the
Freeframe unit in the correct position, attach the
mounting brackets as shown in diagram.
14 - Tighten screws with allen key to make sure the
brackets does not move after positioning.
494mm
Page 11
INSTALLATION
Part 10: Attach board
15 - Hook the board on to the frame
with the lower hook bracket hooking
over the center tube of the freeframe
and the upper brackets hooking over
the top of the frame.
Page 12
INSTALLATION
Part 11: Attach handles & securing the board
16 - Attach the handles and secure the board
using the M8-16 screws and washer through
threaded inserts in the Freeframe.
M8-16 button head screw
M8 washer
Handle
Board with
mounting brackets
Page 13
INSTALLATION
Projector mounting
plate is screwed onto
the Hitachi ultra short
throw projector
Part 12: Attach Projector
Pivot
Held in place with M6-16
screw.
17 - Attach the mounting plate onto Hitachi ultra short throw projector.
18 - Hook the mounting plate with the projector onto the mounting clamp on projector arm,
using the screws on the clamp as a pivot.
19 - Pivot the projector upwards and secure in place with M6-16 button head screws.
20 - Tighten with supplied allen keys to ensure the projector does not move out of place.
Page 14
INSTALLATION
Part 13: Release transport brace
21 - Release the transport brace by
undoing the M8-16 button head screws
holding the brace to the frame wiuth
supplied allen keys.
Page 15
INSTALLATION
Part 14: Attach laptop shelf
Laptop shelf
M8 tri-wheel
22 - Undo the tri-wheel from the laptop shelf. Hook laptop shelf
onto support beam. Re-attach tri-wheel. Slide the shelf to the
desired position before fully tightening the tri-wheel by hand.
Page 16
INSTALLATION
Part 15: Cable management
23 - Cables are tied to the frame and scissor system with
cable ties. Use the path show in the diagram as a guide
in securing loose cables.
Page 17
INSTALLATION
Attach speakers
- Attach speaker to speaker mounting brackets
using M4 screws. The bracket and speaker
is then attached to the Freeframe unit using
M8-16 button head screws as shown in the
diagrams..
All specifications are subject to change without notice.
INSTRUCTIONS
Part 2: Projector arm swivel
- To fit a fully installed Freeframe through a door, the
projector must be swiveled out of the way. Loosen tri-wheel
on projector frame extension. Swivel the projector to the
side, then tighten the tri-wheel.
Doorway
Page 19
INSTRUCTIONS
Part 1: Raising the board
Use handles for raising
and lowering
- The raising mechanism is operated by gas springs that assists the user
making the raising action simple. Use the handles provided for smooth
raising and lowering. It is also advised the user do not stand directly in
the centre to avoid injury due to collision with the Hitachi ultra short throw
projector.
Page 18