1
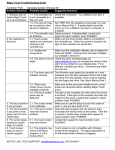
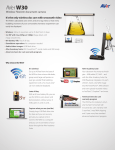
Magic-E-Board
User Manual
KEYTEC, INC. Magic-E-Board
User Manual
Magic-E-Board
User Manual
Magic-E-Board..................................................................................................................................2
1) Included Parts and Optional Accessories...............................................................................4
1.1) Package Checklist ...................................................................................................................4
1.2) Optional Accessories ...............................................................................................................4
2) Magic-E-Board Software Installation .......................................................................................5
3) Magic-E-Board Connection Setup............................................................................................6
3.1) USB Model Connection Diagram .............................................................................................6
3.2) Wireless Model Connection Diagram.......................................................................................6
4) Electronic Stylus .......................................................................................................................7
4.1) Basic Controls ........................................................................................................................7
5) Configuration .............................................................................................................................7
5.1) Configuration Main Menu .......................................................................................................7
5.1.1) Calibration ....................................................................................................................... 8
5.1.2) User Profile ..................................................................................................................... 8
5.1.3) Settings ............................................................................................................................ 8
5.1.4) Wireless Settings (for Wireless version only) ..................................................................8
6) Magic-E-Board Software (Version 5.0).....................................................................................9
6.1) Icon Guide .............................................................................................................................9
6.2) Full Screen Toolbar ..............................................................................................................11
6.3) Edit Object ...........................................................................................................................12
6.3.1) Group Objects ...............................................................................................................12
6.3.2) Ungroup Objects ...........................................................................................................12
6.3.3) Order .............................................................................................................................12
6.3.4) Hyperlink ........................................................................................................................13
6.4) Property ................................................................................................................................14
6.4.1) Line Property .................................................................................................................14
6.4.2) Fill Property ...................................................................................................................14
6.5) Google Search .....................................................................................................................14
6.6) Handwriting Recognition ......................................................................................................15
6.6.1) Handwriting Recognition Installation (For XP Users) ....................................................15
6.6.2) Tablet PC Setup (For Windows 7 Users) .......................................................................16
6.7) Video Player .........................................................................................................................16
6.8) Screen capture ....................................................................................................................16
6.9) Screen Record .....................................................................................................................16
Page 2 of 25
KEYTEC, INC. Magic-E-Board
User Manual
6.10) Ruler, Compass and Protractor ..........................................................................................17
6.11) Timer ..................................................................................................................................17
6.12) Curtain ................................................................................................................................18
6.13) Spotlight .............................................................................................................................18
6.14) Enlarge ...............................................................................................................................18
6.14.1) Magnifier .....................................................................................................................18
6.15) Camera ..............................................................................................................................19
7) Lite Touch Board Software ......................................................................................................20
Page 3 of 25
KEYTEC, INC. Magic-E-Board
User Manual
1) Included Parts and Optional Accessories
1.1) Package Checklist
BASIC SYSTEM
Item
Description
Quantity
1
Magic-E-Board Sensor
1
2
Electronic Stylus (excludes battery)
1
3
USB Cable
1
4
Software CD-ROM
1
1.2) Optional Accessories
Optional Accessories
USB Wireless Receiver
USB Extension Cable
Micro-USB cable for portable battery (* portable battery is not
included)
Projector Mount
Voting System (including ARS Receiver)
Page 4 of 25
KEYTEC, INC. Magic-E-Board
User Manual
2) Magic-E-Board Software Installation
Install Magic-E-Board software
1) To run the Installation Program, double-click
the file “Magic-E-Board”.
2) Click “Next” to continue.
3) Choose destination location.
4) Click “Next” to continue.
5) Click “Install” to install the software.
6) Click “Finish” to complete the installation.
Page 5 of 25
KEYTEC, INC. Magic-E-Board
User Manual
3) Magic-E-Board Connection Setup
3.1) USB Model Connection Diagram
•
Connect the Magic-E-Board to a PC / laptop using the USB cable provided.
•
Connect the PC / laptop to a projector using a VGA cable.
3.2) Wireless Model Connection Diagram
•
Connect the Power Adaptor to the Magic-E-Board using the USB cable provided. Insert the plug of the
Power Adaptor into the power outlet.
•
Connect the USB Wireless Receiver to a PC / laptop.
•
Connect the PC / laptop to a projector using a VGA cable.
Page 6 of 25
KEYTEC, INC. Magic-E-Board
User Manual
4) Electronic Stylus
4.1) Basic Controls
Single-clicking
Y To click (select) an item, tap the item using the
electronic stylus.
Double-clicking
Y Quickly tap the item twice using the electronic stylus
or press
Right-clicking
twice.
Y Using the electronic stylus, tap and hold until a
complete circle appears. Lift the electronic stylus and
then a shortcut menu will appear.
Y
Or simply press
button on the electronic stylus.
Dragging
Y Tap and hold an item using the electronic stylus,
move it to a new location and then release the stylus.
5) Configuration
5.1) Configuration Main Menu
•
User Profile
•
Calibration
•
Settings
•
Wireless Settings (Wireless Version only)
•
Exit
Remarks:
(a) Double-click the “Magic-E-Board 5 Driver”.
(b) Right-click the “Magic-E-Board” icon on the Desktop Toolbar.
Page 10 of 25
KEYTEC, INC. Magic-E-Board
User Manual
5.1.1) Calibration
Remarks:
(a) Make sure to calibrate the Magic-E-Board for the first time installation.
(b) Re-calibration is required if the projector has been adjusted or relocated.
Step 1
Y Open the Configuration Main Menu.
Y Select “Calibration”.
Y Point the center of the red target using a stylus pen.
Y Lift the pen up and move to the next red target.
Y Continue until all red targets have been calibrated.
Step 2
Y Click “Yes” to save the calibration setting.
Step 3
Y
Input a user profile name.
Y Click “OK”.
5.1.2) User Profile
Remarks: (a) Different User Profiles can be created for different
locations and/or hardware setup.
(b) Re-calibrate if the projection size is changed or the
projector is relocated.
5.1.3) Settings
Device Information
User can check the device information in “Settings” menu.
Select Language
• Select the language from the drop-down menu.
• Click “OK”.
Auto Run
• Click on the “Checkbox” to enable/disable auto run.
• Click “OK”.
Page 11 of 25
KEYTEC, INC. Magic-E-Board
User Manual
5.1.4) Wireless Settings (for Wireless version only)
Scan
•
Click “Scan” to search the IWB available.
Pair
•
Select the IWB Name and click “Pair” to make pairing for the
Receiver and the eBoard.
Assign IWB Name
•
It is recommended to rename the Sensor unit after pairing.
Remark: IWB = Interactive White Board
Select Channel
•
30 wireless channels are available for selection.
•
Change the channel when the signal is weak.
Unpair
•
Click “Unpair” to release the channel lock.
•
Click “Unpair” and re-do pairing if the Sensor unit or Wireless receiver has been changed.
6) Magic-E-Board Software (Version 5.0)
Remark:
Please make sure to run “Magic-E-Board 5 Driver” before using the software.
6.1) Icon Guide
Icon
Functions
Description
New Document
Create a new document.
Open Document
Open a Dual-Touch file (*.tbd).
Save Document
Save a document in Dual-Touch file format or other support types (e.g.
jpq, bmp, wmf, html, pdf, etc.).
Undo
Undo changes.
Redo
Redo changes.
Cut
Cut the selected object(s).
Copy
Copy a selected object(s).
Page 12 of 25
KEYTEC, INC. Magic-E-Board
User Manual
Paste
Paste the copied object(s).
Delete
Delete the selected object(s).
Full screen
Lite version
Play Back
Curtain
Spotlight
Select object
Move Page
Marker
Switch to full screen mode.
Switch to Lite version mode.
Playback content for the selected page.
Hide / Unhide a portion of the selected page.
Brightness and size of spotlight can be adjusted by users’ preference.
Select object / Resize /Rotate.
Move the current page.
Draw lines and write words.
Stationery
A Shortcut menu of different writing and drawing tools.
Input text
Insert a textbox.
Eraser
Video Player
Screen Capture
Camera
Select an eraser (shape and size) to erase objects.
Play video(s) or other support files.
Capture the screen and paste it into the Dual-Touch Program.
Switch on the webcam/document camera.
Tools
A shortcut menu of different tools.
Vote
Vote function is available when voting system (Optional) is connected.
Move
Toolbar
Page
Library
Move the Toolbar to the top/bottom.
A page list shows all the pages created.
Insert backgrounds and/or images from Library.
Property
To manage the “Line Property” and “Fill Property” in the file.
Hyperlink
To manage the hyperlink(s) created in the file.
Google Search
Search images from Google website.
Page 13 of 25
KEYTEC, INC. Magic-E-Board
Move
Property Bar
Add Page
Previous Page
User Manual
Move the Property Bar to the left/right.
Add a blank page in the existing document.
Switch to previous page.
Next Page
Switch to next page
clear all
Clear all in the page.
6.2) Full Screen Toolbar
Page 14 of 25
KEYTEC, INC. Magic-E-Board
User Manual
6.3) Edit Object
1.
Select an object
2.
Click “Menu Icon” to show the dropdown menu.
3.
Click “Photo Editor” to edit the photo.
Remarks:
•
“Show/Hide Angle” function is only available for
drawing Triangle/ Parallelogram/ Trapezoidal.
•
Click “Export” to save the selected object to the
computer.
•
Click “Hyperlink” to create a link to follow the desired
location.
6.3.1) Group Objects
•
•
Select the objects, and then click on the “Menu Icon”.
Click “Group” to group the selected objects.
6.3.2) Ungroup Objects
•
•
Click on “Menu Icon”.
Click “Ungroup” to ungroup the selected objects.
6.3.3) Order
•
Select the object and click on
“Menu Icon”.
•
Click “Order” to change the
order of the selected object
when overlapping with others.
Page 15 of 25
KEYTEC, INC. Magic-E-Board
User Manual
6.3.4) Hyperlink
•
Select the object, and then click “Menu Icon”.
•
Click “Hyperlink” to create a link.
URL
1) Click “URL”.
2) Input the URL.
3) Choose the Launch Type.
4) Click “OK”.
Page
1) Click “Page”.
2) Choose the desired page to follow.
3) Choose the Launch Type.
4) Click “OK”.
Local File
1) Click “Local Page”
2) Input the File Path / Click the “Browse Button” to choose
the file.
3) Choose the Launch Type.
4) Click “OK”.
Page 16 of 25
KEYTEC, INC. Magic-E-Board
User Manual
6.4) Property
6.4.1) Line Property
6.4.2) Fill Property
6.5) Google Search
•
Click “Google Search” button.
•
Search the keyword.
•
Double-click / Drag to insert an image.
Note:
1) Make sure the Internet connection is active when using Google Search.
Page 17 of 25
KEYTEC, INC. Magic-E-Board
User Manual
6.6) Handwriting Recognition
•
Write on the Dual-Touch eBoard.
•
Select the words to be recognized.
•
Click “Menu Icon” and choose the word.
Note:
Make sure Handwriting Recognition (For XP users) or Table PC in Control Panel (For Windows &Vista users) is installed.
6.6.1) Handwriting Recognition Installation (For XP Users)
Remark:
1) Installation Pop-up Reminder will automatically appear if Handwriting Recognition is not installed.
2) Click “Yes” to continue Installation Setup.
3) Click “Yes” to continue the installation.
4) Accept the License Agreement
Click “Yes” to continue the installation.
5) Click “Yes” to continue the installation.
6) Click “Finish” to exit the installation.
Page 18 of 25
KEYTEC, INC. Magic-E-Board
User Manual
6.6.2) Tablet PC Setup (For Windows 7 Users)
•
Open “Control Panel” in the “Start Menu”.
•
Open “Programs and Features”.
•
Click “Turn Windows features on or off”.
•
Check off “Tablet PC Components” and click “OK”.
•
Click “Restart Now” to reboot the computer.
6.7) Video Player
•
Click
to open a video.
•
Click
to capture the screen.
•
Click
to write on the video screen.
•
Click
to clear the writing on the video screen.
•
Click
to change the line color.
6.8) Screen capture
•
Rectangular capture
•
Area capture
•
Full screen capture
6.9) Screen Record
Keyboard
Shortcuts
Exit
Audio Record
Play
Stop
Remark:
It is required to install a microphone for audio recording.
Page 19 of 25
KEYTEC, INC. Magic-E-Board
User Manual
6.10) Ruler, Compass and Protractor
Icon
Functions
Setting
Ruler
Icon
Set the unit and transparency of the ruler.
Rotation
Rotate the ruler.
Measure
Adjust the length of ruler.
Functions
Description
Zoom in
Change size
Exit
Protractor
Description
Exit protractor
Zoom out
Change size
Rotation
Rotate protractor
Angle
Capture the degree of protractor
Description
Change Compass size
Exit Compass
Rotate Compass
Compass
Adjust Radius
6.11) Timer
•
Select “Settings” to setup the timer.
Start
Page 20 of 25
KEYTEC, INC. Magic-E-Board
User Manual
6.12) Curtain
•
Drag
to move the curtain up / down.
•
Click
to rotate the curtain.
•
Click
to exit.
6.13) Sportlight
•
Drag
to change the spotlight size.
•
Click
to change the spotlight style.
6.14) Enlarge
6.14.1) Magnifier
•
Use the magnifier to enlarge the photo.
Rectangle Magnifier
Change the magnifier to rectangle
Ellipse Magnifier
Change the magnifier to ellipse
Transparency
Adjust the transparency of the background
Zoom in / Zoom out
Zoom in or zoom out magnifier
Page 21 of 25
KEYTEC, INC. Magic-E-Board
User Manual
6.15) Camera
•
Click
to capture the screen.
•
Click
to write on the video screen.
•
Click
to clear the writing on the video screen.
•
Click
to change the line color.
•
Click
to zoom in / out.
•
Click
to adjust the contrast.
•
Click
to adjust the brightness.
7) Lite Touch Board Software
Icon
Functions
Description
Windows Mode
Switch to Windows mode / Lite Touch Board Program.
Marker
Marker pen.
Clear All
Clear all items from the current page.
Thickness
Change Line thickness.
Eraser
Eraser.
Color
Choose pen color.
Transparent
Change the background to transparent.
Save
Save the file to computer.
Zoom Out
Zoom out page and objects
Zoom In
Zoom in page and objects
Page One
Switch to page one.
Page Two
Switch to page two.
Minimize
Minimize the menu.
Restore
Restore the menu.
Page 22 of 25