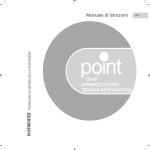
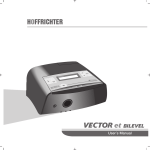
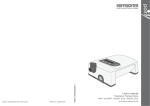
1
User's Manual CPAP Respiratory Therapy Device as of device software 2.120 point Quality makes the Difference SERIAL NUMBER Every HOFFRICHTER GmbH device is supplied with a serial number for traceability purposes. Please enter your device's serial number here. You will find the serial number on the rating plate on the back of the device. Serial number: ..................................... Please always quote the serial number for all queries and complaints. CONFORMITY The device complies with the requirements of Directive 93/42/EEC. 2 Info CONTENTS Scope of Delivery ................................................... 6 General .................................................................. 7 Information on User's Manual .............................. 7 Symbols used in this User's Manual .................... 8 Symbols on the Rating Plate ............................. 10 Safety Information ................................................ 11 General Safety Instructions................................ 11 Electrical Safety ................................................ 13 Installation Requirements and Transport ............ 15 Instructions before Commissioning .................... 17 Intended Use .................................................... 18 Contraindications .............................................. 19 Side Effects ...................................................... 20 How the Device Works ......................................... 21 General ............................................................. 21 Power Supply ................................................... 22 Description of the Device .................................. 24 Using the Device .................................................. 25 Commissioning ................................................. 25 Turning on and off in Battery Mode .................... 27 Standby Mode .................................................. 27 Automatic pressure sensor zero-point calibration ......................................................... 28 Contents 3 Power Failure .................................................... 29 Using Oxygen ................................................... 30 Device Functions ................................................. 32 Language ......................................................... 36 Operating Times ............................................... 37 Date ................................................................. 38 Time ................................................................. 39 Wake up Time ................................................... 40 Pressure ........................................................... 41 Calibration ........................................................ 42 Ramp ............................................................... 44 Mask Test ......................................................... 46 Automatic ......................................................... 47 Brightness ........................................................ 49 Display Messages ............................................. 50 Alarm Functions of Device .................................... 52 Mask Alarm....................................................... 52 Pressure Alarm ................................................. 52 Wake up Alarm ................................................. 53 Changing the Filter, Cleaning ................................ 54 Changing and Cleaning the Filter ....................... 54 Cleaning the Mask ............................................ 56 Cleaning the Therapy Tube ................................ 56 Cleaning the Device .......................................... 57 4 Contents Cleaning the Headgear...................................... 58 Cleaning the Humidifier .................................... 58 Troubleshooting ................................................... 59 Maintenance ........................................................ 61 Preparing the Device when Changing Patient .... 62 Disposal............................................................... 63 Device .............................................................. 63 Packaging......................................................... 63 Accessories ......................................................... 64 Technical Data ..................................................... 65 Manufacturer's Declaration on Electromagnetic Compatibility ........................................................ 68 Disclaimer ............................................................ 73 Contents 5 SCOPE OF DELIVERY 1 2 3 8 6 7 5 9 4 10 1 2 3 4 5 6 7 8 9 10 6 Scope of Delivery point respiratory therapy device Mains cable (approx. 2.30 m) Power supply (cable approx. 1.93 m) Therapy tube (1.80 m) Ventilation mask (optional) with exhalation valve Different sorts of mask systems are available. Headgear User's manual Brief instruction Spare filter (2 pack) Carrying case GENERAL INFORMATION ON USER'S MANUAL Read this user's manual through carefully before using your therapy device for the first time. Follow the safety and cleaning instructions in particular. Keep the manual in a safe place close to the device so that you can refer to it immediately if necessary. General 7 SYMBOLS USED IN THIS USER'S MANUAL Important information is denoted by symbols in this user's manual. Be sure to follow these instructions in order to avoid accidents, personal injury and material damage. In addition, the local accident prevention regulations and general safety regulations in force in the area of use must be observed. This symbol denotes general safety instructions. Follow these instructions to avoid accidents, personal injury or material damage. This symbol denotes hazardous situations that lead to serious injuries or death. This symbol denotes hazardous situations that may lead to serious injuries or death. 8 General This symbol denotes hazardous situations that may lead to moderately severe injuries. This symbol denotes situations that may lead to material damage or damage to the device. This symbol denotes information, tips and instructions for the efficient, error-free use of the device. General 9 SYMBOLS ON THE RATING PLATE Observe the warning and safety instructions in the user's manual. BF application part Protection class II (protective insulation) CE conformity declaration Manufacturer Follow the user's manual. Do not dispose of the device in the household waste. Please contact the relevant customer services department to find out how to dispose of the device properly. 10 General SAFETY INFORMATION GENERAL SAFETY INSTRUCTIONS • Only use the device for your own CPAP therapy prescribed by the physician. • Only use accessories and spare parts approved by us for use with the device. • Only use masks that have been prescribed for your treatment by a physician. • Only use the mask together with a respiratory therapy device and when the device is switched on. • Only use the mask after instruction by a qualified medical person and clarify in particular the intake of medicines and possible contraindications and side effects associated with the use of the mask. • Observe the mask manufacturer's instructions. Safety Information 11 12 • Do not wear the mask if the therapy device is switched off because this could lead to breathing in air that has already been exhaled. Observe the respiratory mask manufacturer's instructions. • Always ensure that the small aperture in the mask or the connecting piece between the mask and the tube is clear so that the CO2 laden exhaled air can escape. • If you are using oxygen with the CPAP therapy, observe all fire protection and safety regulations for using oxygen. • Unless specified otherwise, the mask and therapy tube must only be used by one patient. Safety Information • Please see your physician immediately if dryness of the mucous membranes in the nose and throat, sinus discomfort, ear ache, runny nose, over sensitive reactions of the skin, irritability, loss of voice, orientation or memory impairment occur when using the device. • Inform your specialist dealer immediately if the device is not working properly. • Check the device's alarm functions regularly (see page 52). ELECTRICAL SAFETY • Do not use the device if the housing or the cable of the device or the power supply are damaged. • Do not open the device housing under any circumstances. Inform your specialist dealer if the device develops a fault. Safety Information 13 14 • The use of accessories or power supplies not approved by us for the device may lead to increased emission of electromagnetic radiation or reduced resistence to interference. • Protect the device from water and dampness. • Never operate the device in damp places or in a bathroom. • Do not put any containers full of liquid on the device. • Do not reach for the device under any circumstances should it fall into water. • Do not put the device near water containers (baths). • Always unplug it from the mains before cleaning. Safety Information INSTALLATION REQUIREMENTS AND TRANSPORT • Place the device near the bed. Ideally a firm, level surface on your bedside cabinet is suitable. • Never put the device on a cupboard shelf or under the bed. • Do not put the device with its back to a wall. Ensure that the filter system and the grid covered pressure aperture are not covered. • Ensure that the device is in a horizontal position, especially if it is connected to a humidifier. • Ensure that the air can circulate properly round the device. Air circulation, particularly under and behind the device, must not be obstructed by furniture, curtains or cushions. • Do not put the device close to a source of heat. Safety Information 15 16 • Place the device in such a way that the mains plug is easily accessible so that it can be unplugged quickly in the event of a hazard. • Place the device and accessories in such a position that they are not exposed to direct sunlight. • The device must never be put near other devices or equipment such as defibrillators, diathermy units, mobile phones, microwaves, remote controlled toys, etc. Electromagnetic fields that exceed 3 V/m may adversely affect the operation of the point. • When used as a mobile unit, it must also be placed on a level, firm surface that has a raised edge so that the device cannot fall. • During mobile use of the device, only operate it when the vehicle is stationary. Safety Information INSTRUCTIONS BEFORE COMMISSIONING • Do not switch the device on if it has previously been in a very cold environment. Wait about 1 hour until the temperature has balanced out. • Check the air filter regularly. Clean the filter regularly as described on page 55. Never use the device without the air filter. • Clean your mask system regularly and check all accessories, particularly the therapy tube, mask and headgear. When doing this, observe the manufacturer's safety and cleaning instructions. Safety Information 17 INTENDED USE The point is used to treat obstructive sleep apnea in patients weighing more than 30 kg. The device creates continuous, positive airway pressure to keep the upper respiratory tracts open. The device is not suitable for use with patients undergoing artificial respiration. This therapy device is not a life-supporting system. The therapy pressure is administered via a breathing mask which must be fitted with an exhalation valve to ensure that the exhaled air is discharged. If an aquapoint humidifier is connected to the device, the water in the humidifier must not contain any additives such as medicines, salts, aromatic oils or other substances. 18 Safety Information CONTRAINDICATIONS Respiratory therapy may be contraindicated for certain pre-existing conditions. Therefore, always talk to the physician treating you before starting the therapy. Pre-existing conditions include: • bullous lung diseases • pneumothorax • very low blood pressure • pneumocephalus after open craniocerebral injury or other head injuries Inflammation of the paranasal sinuses or the middle ear may be an indication to stop the treatment. Please speak to your physician about this. Safety Information 19 SIDE EFFECTS There is the possibility of undesirable side effects occurring with respiratory therapy. Reasons for side effects occurring could be unsuitable therapy settings, not using the device properly or not following the cleaning instructions. Normally the side effects disappear when the causes have been eliminated. You will find suitable counter measures for some side effects in the section "Troubleshooting" on page 59. The following side effects may occur during therapy: • Pain in the nose, the paranasal sinuses and the ears • Dryness and irritation in the nose and throat • Nose bleeds, runny nose, sneezing, colds • Irritated or dry eyes • Reddening of the skin, swelling of the skin and pressure points in the mask area • Difficulty breathing, claustrophobia • Stomach problems because of air accumulating in the stomach Please contact your physician for an explanation of the causes should these complaints persist. 20 Safety Information HOW THE DEVICE WORKS GENERAL The point is a CPAP therapy device to treat obstructive sleep apnea. Air inlet Filter Control unit The point has an electronically controlled blower to create the pressure. In order to make things as easy as possible for the patient, the blower has been fitted with high levels of power reserves and a rapid control response. The air ducts for respiratory air (patient) and convection air (electronics) are separate in the point. Blower Pressure sensor Internal pressure measuring tube Air outlet The point has an inbuilt microcontroller to control all functions. An integrated quartz alarm clock increases the comfort level when using the device. Further comfort functions include a soft start ramp function, automatic start / stop function and the adjustable display brightness. When air goes through the device it is warmed slightly. It therefore has a higher water absorption capacity. The mucous membranes in the mouth and nose can dry out, particularly in winter when the ambient air is dry. This is unpleasant and in some cases may also lead to infections. Therefore, a respiratory air humidifier may be necHow the Device Works 21 essary in conjunction with a CPAP treatment. The plug-in aquapoint humidifier is available as an accessory to humidify respiratory air. You will find more information on the humidifier in the aquapoint user's manual or contact your specialist dealer. POWER SUPPLY The point's power can be supplied from 3 sources: 1 An external switching power supply (included in the scope of delivery) 2 DC vehicle cable (optional) 3 powerpackpoint battery pack (optional) External switching power supply For mains operation the point has an external switching power supply with a wide input range of 100 - 240 V alternating current (AC), 50 - 60 Hz. Thus it is possible to connect it to an energy supply anywhere in the world. 22 How the Device Works DC vehicle cable For mobile use of the point, e.g., in a truck or a caravan, it is possible to operate it with a 24 V direct current (DC). For this you will need the optionally available DC vehicle cable. Only use the optional DC vehicle cable to connect the device to a DC power supply and do not connect the device to a PC while it is being used. Battery pack To use it when travelling and if the power fails, the point can be operated with the optionally available powerpackpoint battery pack. With the battery pack, you can use the device for up to 8 hours. Before using the battery pack, ensure that you have read the powerpackpoint user's manual. How the Device Works 23 DESCRIPTION OF THE DEVICE J10C02020 1 2 3 4 5 Keyboard and display Therapy tube connection Cover of contact sockets for humidifier Rating plate Pressure balance aperture (grid covered pressure aperture) 6 Power socket 7 RS232 interface 8 Filter or connection port for the filtersystempoint 9 Display 10 ON / OFF key 11 Programing keys 12 Enter key 24 How the Device Works USING THE DEVICE COMMISSIONING 2 Before commissioning the device, read the section "Safety Information" (from page 11). The device must not be operated without a filter because this could damage your health. 1. 5a 2. 3. 4. 5b 5. 6. Set the device up according to the installation instructions (see page 15). Connect the power supply to the device. Connect the mains cable to the power supply and plug into a power socket. The device starts up and displays a welcome text, the software version and the current number of therapy hours and then switches to the date and time display. Connect the therapy tube a) to the air outlet and b) to the mask. Calibrate the device as described in the section "Calibration" on page 42. Using the Device 25 7. Put the mask on. If automatic mode has been selected, the device is turned on by the patient breathing powerfully. In manual mode, press the ON / OFF key to start the device. 8. The device first of all runs for the time selected by you for the mask test and at the prescribed pressure. You should now ensure that the mask is fitted correctly to ensure that it does not leak. 9. Place the tube in such a way that it does not exert any strain on the mask when you lie down. 10. Now breath deeply and calmly, still just through your nose. If the soft start function has been selected, the device first of all reduces its pressure after the mask test has been performed and then increases it automatically gradually up to the prescribed value while you can go to sleep under reduced pressure. In the section "Device Functions" (from page 32) read how you can adapt the times for soft start and the mask test to suit your personal requirements. 26 Using the Device 8+9 TURNING ON AND OFF IN BATTERY MODE If the device is powered by the optionally available powerpackpoint, press the ON / OFF key to switch it on. To switch the device off, press and hold the ON / OFF key for more than 3 seconds. In standby mode the device automatically switches itself off after 1 min. STANDBY MODE If the turbine is switched off, the device switches to standby mode (discernable on the lit display with date and time). The point can be kept in standby mode permanently. This does not harm it. If the powerpackpoint battery pack is fitted on the device, the batteries are charged in standby mode. Using the Device 27 AUTOMATIC PRESSURE SENSOR ZERO-POINT CALIBRATION The automatic zero-point calibration system sets the pressure sensor to the zero point (0 hPa) depending on the ambient temperature. The pressure sensor in the device is already precisely calibrated at the factory. In order to guarantee increased pressure accuracy when used with patients the device has an automatic zero-point calibration system. This zero-point calibration system is necessary because pressure sensors are prone to measuring errors caused by the physical environment. In practice the device continually measures the ambient temperature and determines a correction factor that is used as a basis for the pressure sensor's zero-point calibration system. This also takes into consideration the ageing effect on the pressure sensor and on other electronic components. In order to determine an applicable correction factor, the device requires a certain amount of time in standby mode. We therefore recommend that the device is operated in standby mode at least once a month between nightly therapies. 28 Using the Device The zero-point calibration system is particularly recommended if the device is used in a new location (e.g., when travelling) or if there are significant temperature fluctuations in the room. For the patient the automatic zero-point calibration system means that the device is always optimally adjusted, leading to even better therapy. +3!.%(1.! !0/./1.%*! POWER FAILURE After power failure recovery, the motor re-starts automatically and you will see a message on the display about the power failure and the turbine re-start. If you are using the optionally available powerpackpoint, the batteries provide the power for the device in the event of a power failure. Using the Device 29 USING OXYGEN Oxygen supports combustion. Therefore, observe the fire protection regulations applicable for using oxygen. Ensure that there is no grease on the oxygen fittings. Do not smoke and do not handle naked flames. Please be sure to observe the user's manual of the manufacturer or distributor from whom you obtain the oxygen. Have your distributor advise you about the use of oxygen. Mask Tube In any case, follow your physician's instructions. When feeding oxygen directly into the mask, please use a kink-resistant tube made of a medically approved material. Oxygen can also be fed in via an adapter fitted onto the air outlet. Adapter 30 Using the Device Proceed as follows when using oxygen: If the device is in standby mode or switched off, the oxygen supply must always be switched off. 1. Before starting the treatment, check that the tube connections are fitted correctly. 2. First of all, switch the device on and then the oxygen supply. 3. Check whether the "Auto off" automatic mode is active. If not, program it as described on page 48. 4. Switch off the oxygen supply before switching the device off. Using the Device 31 DEVICE FUNCTIONS There are three keys for programing the point's functions. = Programing key = Programing key = Enter key If the Enter key ( ) is pressed for a prolonged time, you return to programing mode and the menu appears on the display. 32 Device Functions Q'!%)!MM;BL;; 4%/!*1 Example: Wake up time The display has two rows. If you press and you can select the top or bottom row. A triangle symbol in front of a row means that this row has been selected. The point has two different menus: • Standard menu • Complete menu To switch between the menus, first of all press . Then hold and down at the same time for a prolonged period. The display shows the message: /* . !*1 /%2! or +),(!/!!*1 /%2! Device Functions 33 You reach the menu items in the menus by pressing . The order of the menu items is shown in the following two tables. Complete menu Selection options Language DEU, ENG, ELL, SPA, FRA, ITA, NLD, TUR, PLK, POR Display Time display in hours Time display in hours Time display in hours Time display in hours Operating times Turbine Filter Therapy Date Day, Month, Year Time Hour, minute Wake up time Hour, minute Pressure (PIN protected) 4 - 20 hPa in 0.5 hPa increments Ramp 0 - 30 min in 10 min increments P-Ramp 4 - 20 hPa in 0.5 hPa increments Mask Test 0 - 90 s in 5 s increments Auto OFF Start / Stop Start Brightness 0 - 100% Calibration 34 Device Functions in 10% increments Standard menu Selection options Calibration Date Day, Month, Year Time Hour, minute Wake up time Hour, minute If during programing you have not pressed a key for 30 seconds, the standard or complete menu exits automatically for security reasons. If a modified value is not confirmed by pressing the Enter key and the standard or complete menu has exited, the original value is retained. Device Functions 35 LANGUAGE The device can display messages in German (DEU), English (ENG), Greek (ELL), Spanish (SPA), French (FRA), Italian (ITA), Dutch (NLD), Turkish (TUR), Polish (PLK) and Portuguese (POR). Other languages can be implemented. Setting the language 1. Select the complete menu (see page 33). 2. Press and to select Language. 3. Set the desired language by pressing . 36 Device Functions Q*#1#!MMMMMMMM 4%/!*1 Q,!./%+*MMMM=@;$ 4%/!*1 OPERATING TIMES Under this menu item you will find the total operating time including standby mode of the device, the turbine running time, the operating time of the filter and the therapy time. Calling up the device operating times 1. Select the complete menu (see page 33). 2. Press and to select Operation. The total operating time including standby appears. 3. Press and the running time of the turbine appears. 4. Press again and the operating time of the filter appears. 5. Press again and the therapy time appears. Device Functions 37 DATE The day (1 - 31), the month (Jan. - Dec.) and the year (00 - 99) can be set. Setting the date 1. Press . 2. Press and to select Date. 3. Press and set the year by pressing and . Confirm your setting by pressing . 4. Press and to set the month. Confirm your setting by pressing . 5. Press and to set the day. Confirm your setting by pressing . 38 Device Functions Q/!MMMM=@ 5 ;D 4%/!*1 Q%)!MMMMMMMMMMMM<>L;; 4%/!*1 TIME The device has an internal clock. In the event of a power failure, the clock operates on inbuilt battery power. The hour (00 - 24) and minutes (00 - 59) can be set. The clock is used to give the correct date and the right alarm function. Setting the time 1. Press . 2. Press and to select Time. 3. Press and set the hour by pressing and . Confirm your setting by pressing . 4. Press and to set the minutes. Confirm your setting by pressing . Device Functions 39 WAKE UP TIME The wake up time is the time when the device sounds an alarm if the alarm is set. To set the alarm press . For checking purposes, the programed wake up time is displayed for a short time. To unset the alarm press . If the alarm is set, a bell symbol appears before the time on the display. There are two ways to switch the alarm off: 1. By pressing the ON / OFF key the device switches to slumber mode. After 5 minutes, you are woken again. To stop slumber mode prematurely, press the ON / OFF key. 2. Press to unset the alarm. Setting the wake up time 1. Press . 2. Press and to select Wake Time. 3. Press and set the hour by pressing and . Confirm your setting by pressing . 4. Press and to set the minutes. Confirm your setting by pressing . 40 Device Functions Q'!%)!MM;BL;; 4%/!*1 .!00EH =@ 5 ;D <=L =; .!00EH (1)!.MMMMMMMMMM?L ?@ Q.!00MMMMMMB @$ 4%/!*1 PRESSURE The therapy pressure setting is PIN code secured. Settings may only be performed by physicians and qualified personnel. Please do not try to crack the PIN code. Speak to your physician if you doubt the correctness of the pressure prescription. Setting the pressure by the physician 1. Select the complete menu (see page 33). 2. Press and to select Press. 3. Press and set the PIN code with and . Press after each digit. 4. Press and to select the required therapy pressure. Confirm the setting by pressing . Device Functions 41 CALIBRATION Calibration guarantees optimum operation of the automatic function and the mask test. It must be performed when: • the device is used initially, • the mask is changed or • the humidifier is (re)connected. Calibration is only possible when operated at mains supply and not in battery mode. Calibrating the device 1. Connect the mask, the therapy tube and, if necessary, the humidifier to the device. Ensure that the air and exhalation apertures in the mask are clear and the tube is not kinked. Do not put the mask on. 2. 3. 4. 5. 42 Press . Press and to select Calibration. Press . Start appears on the display. Press . If you Device Functions Q(%./%+* 4%/!*1 do not press the key within 5 s, the display jumps back (see point 2). 6. The turbine starts and calibration begins. Calibration active appears on the display. Calibration takes 20 - 70 s. The turbine switches off when calibration is finished. 7. If calibration has been successful, Successful appears on the display and if it has failed, Failed appears on the display. 8. In both cases press . The old values will be retained if calibration has failed. Start calibration again. Device Functions 43 RAMP After every turbine start, the device's microcontroller checks whether a soft start ramp has been programed. The soft start function slowly increases the pressure in the time programed by you starting with a programable initial ramp pressure (P-ramp) up to the prescribed pressure in order to make it easier for you to get to sleep. The soft start can bring relief particularly if you are not yet quite used to the respiratory therapy. The device enables delay time settings from zero (prescribed therapy pressure starts immediately) to 30 minutes (prescribed therapy pressure is built up gradually within 30 minutes). The initial ramp pressure (P-Ramp) can be set between 4 hPa and the prescribed pressure. Setting the ramp 1. Select the complete menu (see page 33). 2. Press and to select Ramp. 3. Press and set the minutes (ramp) by pressing and . Confirm your setting by pressing . 4. Press and to set the initial pressure (P-Ramp). Confirm your setting by pressing . 44 Device Functions Q),MMMMMMMMMMMM=;)%* 4%/!*1 Q ),MMMMMM? @$ 4%/!*1 Pressure in hPa Prescribed pressure: 10 hPa (mbar) The pressure is increased gradually to the prescribed therapy pressure. 0 - 90 s Time in min Mask test Programed soft start (0 - 30 min) Device Functions 45 MASK TEST This ensures that the mask is impermeable during the slow pressure increase in the soft start ramp and also at higher pressures. A mask test can be programed from 5 - 90 seconds in 5 second increments. This mask test is performed before the ramp starts and tests the impermeability under maximum therapy pressure. Setting the mask test 1. Select the complete menu (see page 33). 2. Press and to select Mask Test. 3. Press and set the seconds by pressing and . Confirm your setting by pressing . 46 Device Functions Q0'!0/MMMMMM>;0 4%/!*1 AUTOMATIC The automatic mode has three settings: OFF, Start/Stop, Start 1. Q1/+MMMMMMMMMMMMMMMM 4%/!*1 0'(.)MMMMMM<;0 $!'0'H Q1/+MM/./E/+, 4%/!*1 Q1/+MMMMMMMMMMMM/./ 4%/!*1 Auto OFF (with mask alarm) With the "Auto OFF" setting, you must switch the device on with the ON / OFF key when therapy starts and off with the same key when therapy ends. Should the mask slip from your face or should a leak occur that cannot be compensated for, you will be given an acoustic and visual warning. 2. Auto Start/Stop With the "Auto Start/Stop" setting, you only have to put the mask on. As soon as you begin breathing powerfully, the point turbine switches on. If you take the mask off, the turbine switches off automatically after a 5 second delay. The turbine also switches off if the mask slips off your face or a leak that cannot be compensated for occurs. 3. Auto Start (with mask alarm) With the "Auto Start" setting, you only have to put the mask on. As soon as you begin breathing powerfully, the point turbine switches on. If you take the mask off or the mask slips off your face or a leak occurs which cannot be compensated Device Functions 47 for, the turbine does not switch off but you receive an acoustic and visual warning. The turbine can only be switched off by pressing the ON / OFF key. Setting automatic mode 1. Select the complete menu (see page 33). 2. Press and to select Auto. 3. Press to set the required automatic mode. The device can be switched on or off in any operating mode by pressing the ON / OFF key. 48 Device Functions 0'(.)MMMMMM<;0 $!'0'H Q.%#$/*!00MM<;;N 4%/!*1 BRIGHTNESS You can set the brightness of the display from 0% to 100%. The value set determines the brightness of the display that appears 30 seconds after the last key was pressed. When a key is pressed, the display brightness is always 100%. Setting the brightness 1. Select the complete menu (see page 33). 2. Press and to select Brightness. 3. Press and set the required brightness by pressing and . 4. Confirm your setting by pressing . Device Functions 49 DISPLAY MESSAGES The most important display messages are listed below. All further messages will be clarified from the given context. The values shown here are examples. You still have 15 seconds to ensure that the mask is fitted correctly. When the time is up, the device starts with the soft start function or the therapy. There are still 8 minutes and 40 seconds until full therapy pressure is reached. The mask has slipped off your face or a leak that cannot be compensated for has occurred or you have not put the mask on in the Auto OFF or Auto Start automatic modes and when the blower is running. In normal mode you have pressed and get the message that you will be woken up at 7 a.m. In normal mode you have pressed and receive the message that the alarm clock has now been switched off. 50 Device Functions C @$ 0'!0/MMMMMMMM<@0 C @$ ),MMMMMMMMMMMMMMMMCL ?; 0'(.)MMMMMM<;0 $!'0'H C @$ (.) ;BL;; C @$ (.) (+' .!00EH '!(.);BL;; .!00EH (1)!.MMMMMMMMMM<L <C .!00EH '!(.) @ ;$ ==L <@ +3!.%(1.! !0/./1.%*! The wake up alarm has been triggered. Press the ON / OFF key 1 x to start the slumber phase. Press it once more to switch the alarm clock off permanently. You still have 1 min and 18 s until the alarm clock will wake you up again. You have pressed the ON / OFF key and ended the slumber phase. The filter must be changed (see page 54). To reset the message, hold the Enter key down and, while you are doing this, insert the power supply plug into the device's mains socket. After the mains voltage is restored, the turbine re-starts automatically. Device Functions 51 ALARM FUNCTIONS OF DEVICE MASK ALARM If the mask slips off your face, the tube is pulled out or any other leak occurs that cannot be compensated for, the device does not switch off automatically but emits an acoustic and visual alarm. 0'(.)MMMMMM<;0 $!'0'H The mask alarm is only active in the Auto OFF and Auto Start automatic modes. Testing the mask alarm Start the device in Auto OFF mode. The mask should not be on the face. It has to be laid motionless on a surface. Ensure that the "inside" is exposed. After a short time an acoustic signal sounds. PRESSURE ALARM Should an excessively high pressure occur during the treatment due to a hardware error or other circumstance, the device emits an alarm sound and switches the turbine off. The alarm is turned off by pressing the ON / OFF key. 52 Alarm Functions of Device .!00/++$%#$ =@ 5 ;D <<L ?@ WAKE UP ALARM The device has an integrated alarm clock. You can set or unset it at any time with the programing keys. The alarm clock sets off an alarm at the programed wake up time. Pressing the ON / OFF key once mutes the alarm for the next 5 minutes and pressing it twice stops it completely. Alarm Functions of Device 53 CHANGING THE FILTER, CLEANING Make sure that you follow the cleaning instructions. If you do not do this, it could damage your health because of germs. CHANGING AND CLEANING THE FILTER If the filter is dirty or if a FILTER message appears on the display, the filter must be replaced or washed out. @ ;$ ==L <@ Changing the filter Pull out the filter from the back of the device and replace it with a new one or a cleaned one. Removing the filter 54 Changing the Filter, Cleaning Cleaning the filter 1. Pull out the filter from the back of the device. 2. Clean the filter with mild soapy water. Do not use any other agents! 3. Rinse the filter thoroughly with clear water. 4. Let the filter dry completely in the air. 5. Replace the filter. If the device is run with the optionally available filtersystempoint proceed according to the cleaning instructions in the filter system user's manual. Resetting the display message 1. Unplug the power supply plug from the device. 2. Hold down and at the same time insert the power supply plug into the mains socket of the device. 3. Filter Counter Reset appears on the display. Press . 4. Filter Counter deleted appears on the display. Changing the Filter, Cleaning 55 CLEANING THE MASK For hygienic reasons, clean the mask every day. To do so, proceed as follows: 1. Disconnect the mask from the therapy tube. 2. Clean the mask with mild soapy water. Do not use any other agents! 3. Rinse the mask thoroughly with clear water. 4. Let the mask dry completely in the air. CLEANING THE THERAPY TUBE For hygienic reasons, clean the therapy tube every day. To do this, proceed as follows: 1. Disconnect the therapy tube from the mask and the device. 2. Clean the therapy tube with mild soapy water. Do not use any other agents! 3. Rinse the therapy tube thoroughly with clear water. 4. Let the therapy tube dry completely in the air. 56 Changing the Filter, Cleaning CLEANING THE DEVICE For hygiene reasons, clean the device once a week. To do this, proceed as follows: 1. Unplug the mains plug. 2. Wipe the device with a cloth slightly dampened with soapy water. 3. Rub the device dry with a cloth. Chemical or thermal disinfecting of the device or the device parts by the user is not necessary. Changing the Filter, Cleaning 57 CLEANING THE HEADGEAR You only need to clean the headgear if it is necessary. To do this, proceed as follows: 1. Remove the headgear from the mask. 2. Clean the headgear according to the manufacturer's instructions. CLEANING THE HUMIDIFIER When using a humidifier, the cleaning instructions in the user's manual must be observed. 58 Changing the Filter, Cleaning TROUBLESHOOTING Problem Possible cause Remedy Pain in the nose, the paranasal sinuses or the ears Inflammation of the paranasal sinuses or the middle ear Stop the treatment and contact your physician Unpleasant feeling because of the high pressure Malaise with prescribed high pressure values If you suspect an error, please ask your physician for help Acclimatisation phase to the Try to relax. Use or vary the pressure not yet completed soft start function Dryness and irritation in the nose and throat Air is too dry Device probably does not have an air humidifier. Speak to your physician about retrofitting an aquapoint humidifier Original symptoms of sleep apnea come back Physical condition or life circumstances have changed Inform your physician Device error Have the device checked by customer services Air escapes between the mask and the skin of the face Check the positioning of the mask Room temperature too low Increase room temperature. Warm up the tube under the pillow Irritated or dry eyes Cold nose Replace the mask if the material has become chapped Troubleshooting 59 Problem Possible cause Remedy Runny nose, sneezing Reaction to the air flow Either increase the humidity in the room or the temperature of the humidifier Normal cold Contact your physician Incorrect mask size Inform your physician Headgear too tight Loosen the headgear Allergic reaction Inform your physician Filter dirty Change the filter Air inlet blocked Change the position of the device. Keep the air inlet clear Reddening of the skin in the mask area, skin swelling Feeling that the air is too hot Heater close to the device Move the device and the heater further apart No air flow Device is defective Inform customer services Very little air flow Soft start function has been selected Reduce soft start time Air channels are blocked Check air inlet Leak in the device Have the device checked by customer services Blower is running constantly at maximum speed 60 Troubleshooting MAINTENANCE Do not try to open the device. Maintenance and repairs may only be performed by personnel authorized by us. You yourself can help to increase the service life of the device and ensure that it continues to work safely. • Follow the cleaning instructions from page 54. • Check the system regularly: – Conduct a visual check for external damage and dirt – Check the mask alarm function once a week (see page 52) Maintenance 61 PREPARING THE DEVICE WHEN CHANGING PATIENT If the device is to be used for another patient, it must first of all be prepared hygienically. When being given to another patient, the device must be prepared hygienically by the specialist dealer or the manufacturer. If reuse of the mask and the therapy tube is planned, they must also be prepared by the specialist dealer or the manufacturer. The preparation procedure is described in detail in the corresponding hygiene plan. 62 Maintenance DISPOSAL DEVICE The device must not be disposed of with the household waste. Please contact the relevant customer services department to find out how to dispose of the device, etc. properly. Proper disposal saves natural resources and prevents harmful substances being released into the environment. PACKAGING The packaging is taken back by the distributor but it can alternatively be disposed of separately in the normal household waste. Disposal 63 ACCESSORIES Scope of delivery Article number Carrying case 0000 2111 Mains cable (approx. 2.30 m) 3110 0012 Filter 0000 2110 Spare filter (2 pack) 0000 7801 Power supply (cable approx. 1.93 m) 0000 2021 Therapy tube (1.80 m) 0000 7875 User's manual 5000 0280 Brief instruction 5000 0289 Optional Respiratory mask with exhalation valve Article number Different mask systems are available. aquapoint humidifier incl. electronics 0000 7945 aquapoint humidifier without electronics 0000 7949 powerpackpoint battery pack 0000 7846 filtersystempoint 0000 7847 Fine filter filtersystempoint 0000 2109 Coarse filter filtersystempoint 0000 2108 24 V DC vehicle cable 0000 2295 12 V to 24 V converter 0000 7133 64 Accessories TECHNICAL DATA Dimensions (W x D x H) Weight point point with aquapoint 170 x 220 x 95 mm 1.42 kg 180 x 350 x 110 mm approx. 1.7 kg (without water) Power supply Mains power 100 … 240 V AC, 50 ... 60 Hz DC power Battery power (per battery) 24 V DC / 2.1 A 11.1 V / 2150 mAh --- Up to 8 hours --- Operating time under battery power Running reserve of internal clock Up to 8 years Pressure range Max. limit pressure in the event of a fault Power consumption 4…20 hPa (mbar) 30 hPa DC power Mains power DC power Mains power Standby (battery charging) < 26 W < 35 W ----- Standby (without battery pack) <3W <5W ----- Operation at 20 hPa < 14 W < 17 W < 38 W < 42 W Operation at 12 hPa < 10 W < 12 W < 34 W < 38 W Operation at 6 hPa <6W <9W < 30 W < 35 W Technical Data 65 point point with aquapoint Short term pressure variation 4 hPa 8 hPa 12 hPa 16 hPa 20 hPa 4 hPa 8 hPa 12 hPa 16 hPa 20 hPa 10 bpm 0.22 hPa 0.42 hPa (at heating level 3) 15 bpm 0.34 hPa 0.76 hPa (at heating level 3) 20 bpm 0.52 hPa 0.92 hPa (at heating level 3) Long term pressure variation ± 0.2 hPa Pressure reading accuracy Average sound pressure level (operating at 1 m distance) 0.5 hPa 30 dB(A) at 10 hPa (equivalent to a sound power level of 38 dB[A]) Air flow rate at 4 hPa > 165 l/min at 8 hPa > 155 l/min at 12 hPa > 145 l/min at 16 hPa > 125 l/min at 20 hPa > 115 l/min Operating temperature + 5°C ... + 40°C Storage temperature Therapy air heating - 20°C ... + 70°C depending on the heating level and the ambient conditions 66 Technical Data <3 K point Relative humidity Operating conditions Filter Therapy tube connection Product class according to 93/42/EEC Classification according to EN 60601-1 point with aquapoint 10% ... 95% for operation and storage 1060 hPa ... 700 hPa (ca. - 400 m ... 3500 m) Polyurethane foam on polyester base, 80 ppi, 30 kg/m³ 22 mm, cone (as per ISO 5356-1) IIa Protection class II CE marking as per EC directive 93 / 42 / EEC. The manufacturer reserves the right to make technical changes without notice. Technical Data 67 MANUFACTURER'S DECLARATION ON ELECTROMAGNETIC COMPATIBILITY Guidance and manufacturer's declaration – electromagnetic emissions The point is intended for use in the electromagnetic environment specified below. The user of the point should assure that it is used in such an environment. Emissions test Compliance Electromagnetic environment – guidance RF emissions CISPR 11 Group 1 The point uses RF energy only for its internal function. Therefore, RF emissions are very low and are not likely to cause any interference in nearby electronic equipment. RF emissions CISPR 11 Class B Harmonic emissons IEC 61000-3-2 Class A Voltage fluctuations / flicker emissions IEC 61000-3-3 Complies The point is suitable in all establishments, including domestic establishments and those directly connected to the public lowvoltage power supply network that supplies buildings used for domestic purposes. 68 Manufacturer's Declaration on Electromagnetic Compatibility Guidance and manufacturer's declaration – electromagnetic immunity The point is intended for use in the electromagnetic environment specified below. The user of the point should assure that it is used in such an environment. Immunity test IEC 60601 Test level Compliance level Electromagnetic environment – guidance Electrostatic discharge (ESD) IEC 61000-4-2 ± 6 kV contact ± 6 kV contact ± 8 kV air ± 8 kV air Floors should be wood, concrete or ceramic tile. If floors are covered with synthetic material, the relative humidity should be at least 30%. Electrical fast transient (Burst) IEC 61000-4-4 ± 2 kV power supply lines ± 2 kV power supply lines ± 1 kV input / output ± 1 kV input / output ± 1 kV differential mode ± 1 kV differential mode ± 2 kV common mode not applicable > 95% dip in UT / 0.5 cycles > 95% dip in UT / 0.5 cycles 60% dip in UT / 5 cycles 60% dip in UT / 5 cycles 30% Dip in UT / 25 cycles 30% dip in UT / 25 cycles > 95% dip in UT / 5 s > 95% dip in UT / 5 s Surges IEC 61000-4-5 Voltage dips, short interruptions and voltage variations on power supply input lines IEC 61000-4-11 Mains power quality should be that of a typical commercial or hospital environment. Mains power quality should be that of a typical commercial or hospital environment. Mains power quality should be that of a typical commercial or hospital environment. If the user of the point requires continued operation during power mains interruption, it is recommended that the (Equipment or System) is powered from an UPS or a battery. Manufacturer's Declaration on Electromagnetic Compatibility 69 Guidance and manufacturer's declaration – electromagnetic immunity Magnetic field power frequency (50/60) Hz magnetic field IEC 61000-4-8 3 A/m 3 A/m Power frequency magnetic fields should be at levels characteristic of a typical location in a typical commercial or hospital environment. Conducted RF IEC 61000-4-6 V1 = 3 V 150 kHz – 80 MHz 3V Portable and mobile communications equipment should be used no closer to any part of the point, including cables, than the recommended separation distance calculated from the equation applicable to the frequency of the transmitter: D = 1.17 √P for V1 = 3 V 70 Manufacturer's Declaration on Electromagnetic Compatibility Guidance and manufacturer's declaration – electromagnetic immunity Radiated RF IEC 61000-4-3 E1 = 3 V/m 80 MHz – 2.5 GHz 3 V/m d = 1.17 P 80 MHz - 800 MHz d = 2.33 P 800 MHz - 2.5 GHz Field strengths from fixed RF transmitters, as determined by an electromagnetic site survey a, should be less than the compliance level in each frequency range. Interference may occur in the vicinity of equipment marked with the following symbol b: Note 1 At 80 MHz and 800 MHz the higher frequency range is essential. Note 2 These guidelines may not apply in all situations. Electromagnetic propagation is affected by absorption and reflection from structures, objects and people. a Field strengths from fixed transmitters, such as base stations for radio (cellular/cordless) telephones and land mobile radios, amateur radio, AM and FM radio broadcast and TV broadcast cannot be predicted theoretically with accuracy. To assess the electromagnetic environment due to fixed RF transmitters, an electromagnetic side survey should be considered. If the measured field strength outside the location in which the point is used exceeds the compliance level, the point should be observed to verify normal operation. If abnormal performance is observed, additional measures my be necessary, such as relocating or using another location of the point. b Over the frequency range from 150 kHz to 80 MHz the field strength should be lower than 3 V/m. Manufacturer's Declaration on Electromagnetic Compatibility 71 Recommended separation distances between portable and mobile RF communication equipment and the point The point is intended for use in an electromagnetic environment in which radiated RF disturbances are controlled. The user of the point can help prevent electromagnetic interference by maintaining a minimum distance between portable and mobile RF communications equipment (transmitters) and the point as recommended below, according to the maximum output power of the communications equipment. Rated maximum output power of transmitter (W) Separation distance according to frequency of transmitter (m) 150 kHz – 80 MHz d = 1.17 P 800 MHz – 80 MHz 800 MHz – 2.5 GHz d = 1.17 P d = 2.33 P 0.01 0.12 0.12 0.23 0.1 0.37 0.37 0.74 1 1.17 1.17 2.33 10 3.70 3.70 7.37 100 11.7 11.7 23.3 For transmitters rated at a maximum output power not listed above, the recommended separation distance d in metres (m) can be estimated using the equation applicable to the frequency of the transmitter, where P is the maximum output power rating of the transmitter in watts (W) according to the transmitter manufacturer. Note 1 At 80 MHz and 800 MHz the higher frequency range is essential. Note 2 These guidelines may not apply in all situations. Electromagnetic propagation is affected by absorption and reflection from structures, objects and people. 72 Manufacturer's Declaration on Electromagnetic Compatibility DISCLAIMER HOFFRICHTER GmbH is not liable for consequences in terms of safety, reliability and performance of the product where: • interventions, modifications, extensions, calibration, repairs and maintenance are carried out by persons not authorized by us, • other manufacturers' accessories and spare parts are used that have not been approved by us for use on the product, • the product is used other than as described in the user's manual or • the hygiene and cleaning instructions described in the user's manual have not been complied with. Statutory guarantee rights remain unaffected by this. Disclaimer 73 NOTES ............................................................................................................................ ............................................................................................................................ ............................................................................................................................ ............................................................................................................................ ............................................................................................................................ ............................................................................................................................ ............................................................................................................................ ............................................................................................................................ ............................................................................................................................ ............................................................................................................................ ............................................................................................................................ ............................................................................................................................ 74 Notes NOTES ............................................................................................................................ ............................................................................................................................ ............................................................................................................................ ............................................................................................................................ ............................................................................................................................ ............................................................................................................................ ............................................................................................................................ ............................................................................................................................ ............................................................................................................................ ............................................................................................................................ ............................................................................................................................ ............................................................................................................................ Notes 75 HOFFRICHTER GmbH Mettenheimer Strasse 12 / 14 19061 Schwerin Germany Phone: +49 385 39925 - 0 Fax: +49 385 39925 - 25 E-mail: [email protected] www.hoffrichter.de point re-eng-0910-06 Art. no.: 5000 0280