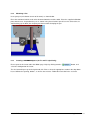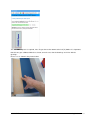
1
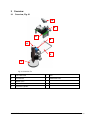
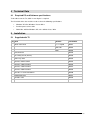
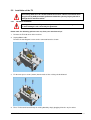
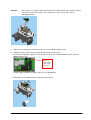
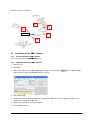
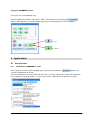
GUNNAR T2 scribe
User Manual
By Weissenberger AG
GUNNAR International
V1.2
Weissenberger AG
Staatsstrasse 119
CH-9445 Rebstein
Tel: +41 (071) 775 82 20
Fax: +41 (071) 775 82 29
Internet: www.gunnar-int.com
GUNNAR is a registered trademark of Weissenberger AG, Switzerland
1 Contents
1
Contents .............................................................................................................. 3
2
General ................................................................................................................ 4
2.1
2.2
2.3
2.4
2.5
3
Introduction ....................................................................................................................................4
Safety advice ..................................................................................................................................4
Intended purpose ............................................................................................................................4
Liability ..........................................................................................................................................4
Data protection ...............................................................................................................................4
Overview ............................................................................................................. 5
3.1 Overview, Fig .01 ...........................................................................................................................5
4
Technical Data .................................................................................................... 6
4.1 Required PC and Software specifications ......................................................................................6
5
Installation .......................................................................................................... 6
5.1 Supplied with T2 ............................................................................................................................6
5.2 Installation of the T2 ......................................................................................................................7
5.2.1
5.2.2
Hardware installation ...................................................................................................................... 7
Pneumatic connections ................................................................................................................... 9
5.3 Installation of the GMC software .................................................................................................10
5.3.1
5.3.2
6
First installation of GMC software ............................................................................................... 10
Updating an existing GMC software ............................................................................................ 10
Applications ...................................................................................................... 11
6.1 General notes ................................................................................................................................11
6.1.1
6.1.2
6.1.3
Calibration of GUNNAR T2 scribe............................................................................................ 11
Mounting a Pen ............................................................................................................................. 12
Creating a GUNNAR Spacer (for F1 and F1 hybrid only) ......................................................... 12
6.2 Things to know about GUNNAR T2 scribe ...............................................................................14
6.2.1
7
Configuration Center Settings ...................................................................................................... 14
Guarantee ......................................................................................................... 14
7.1 Guarantee provisions ....................................................................................................................14
GUNNAR T2 scribe
Contents • 3
2 General
2.1
Introduction
The information contained in this Document corresponds to the latest developments at the time of
publication. Printing errors and mistakes cannot be excluded.
We reserve the right to make design modifications or to deviate from the designs shown.
2.2
Safety advice
Please read the following safety advice before installing, operating, servicing or repairing the machine,
options or tools.
2.3
•
The installation, servicing and repair of the T2 has to be carried out solely by a GUNNAR trained
service engineer.
•
Care should be taken to observe the installation instruction for the T2 and in particular the
ambient conditions.
•
The T2 has to be operated by trained personnel only. Your GUNNAR distributor will provide
training.
•
Any unauthorized modification of the T2 will automatically render the product guarantee and the
safety guarantee invalid.
•
The mechanical assembly of the T2 must be removed when moving the machine longer
distances.
Intended purpose
The GUNNAR T2 scribe precision Pen Tool has been designed to be installed on GUNNAR machines
(F1, F1 hybrid, 601, 3001 & 4001) only. The T2 is only for writing and drawing on cardboards.
2.4
Liability
Weissenberger AG will not assume any product liability in the event of incorrect handling or use of the
Software, the T2 or its components. Weissenberger AG is not responsible for any loss of data. We
recommend that you save your data in a backup file on a regular basis.
2.5
Data protection
Weissenberger AG is owner and holder of all the rights. Neither the machine data nor any of the Software
may be made available to third parties.
GUNNAR T2 scribe
General • 4
3 Overview
3.1
Overview, Fig .01
4
3
2
5
6
1
7
Fig. 01 Overview T2
1
Draw Tool Head
6
Pen
2
Circuit board
7
Calibration Plate
3
Throttle Valve
4
Air Hose T Connector
5
Pneumatic Cylinder
GUNNAR T2 scribe
Overview • 5
4 Technical Data
4.1
Required PC and Software specifications
To be able to run the T2, GMC V1.2 or higher is required.
The PC which drives the machine needs at least the following specifications:
•
Windows XP SP3; Windows Vista or Win7
•
Pentium processor 2.5 GHz
•
RAM: Min. 2GB for Windows XP / min. 4GB for Vista / Win7
5 Installation
5.1
Supplied with T2
Qty Item
Machine
Part Number
1
F1, F1 hybrid
100581
3001, 601
100623
4001
100624
Draw Tool Head
1
Circuit Board
100528
2
Assembly Screw (25mm)
100526
1
Allen Key 2mm
100634
2
Air hose 40mm Ø4mm
100635
1
Air hose 100mm Ø4mm
100636
1
Air hose 160mm Ø4mm
100637
1
Air hose 280mm Ø4mm
100638
1
Air Hose T Connector Ø4mm
100640
1
Calibration Plate
100521
1
Throttle Valve
100639
GUNNAR T2 scribe
Technical Data • 6
5.2
Installation of the T2
All installing work must be conducted with the machine switched off and the main
plug (electricity AND pneumatic) pulled out. Otherwise you may injure yourself or
damage the T2 and the machine.
5.2.1
Hardware installation
Warning: An incorrect wiring can destroy the controller or cause damages at the
T2. Such damage is not covered by the guarantee.
Please note: the following pictures can vary from your machine set up!
1. Remove the Z-Head cover of the machine.
2. Unplug ribbon cable.
Remove the two diagonal screws on the connector board as shown.
3. Fix the two spacer screws (25mm) into the holes of the existing electrical board.
4. Place T2 electronic board on top of existing board by simply plugging it into the 16 pin socket.
GUNNAR T2 scribe
Installation • 7
Attention
Please make sure, that no cable underneath the electronic board gets jammed, and they
are all clear of the solder points. This could lead to a short circuit, and result in a
damaged controller.
5. Tighten the T2 electronic board onto the spacer screws with the original screws.
6. Setting the jumper on the electronic board according to your machine.
For F1 and F1 hybrid, the jumper on the top right corner of the electronic board must be set to the
right hand side “501”.
Jumper set
for F1 and F1
hybrid (right
hand side)
For 601, 3001 and 4001, the jumper must be set to the left side.
7. Mount the T2 from underneath the Z-Head of your machine.
GUNNAR T2 scribe
Installation • 8
8. Use the supplied Allen key (2mm) to tighten the T2 to the base of the Z-Head.
The shown distance varies for each machine. Please use the following measurements:
Machine Type
Dimension “A”
F1 and F1 hybrid (M & XL)
60mm
601XL & RS
43mm
3001M & XL (measured to the left edge of Z-head)
53mm
4001 (measured to the left edge of Z-head)
A
5.2.2
Pneumatic connections
Please connect the pneumatic air hoses (Ø 4mm) as shown below. Please refer to the numbers.
1
3
2
4
5
GUNNAR T2 scribe
Air-hose number
Length
1 (shorten existing)
100mm
2&3
40mm
4
280mm
5
160mm
Installation • 9
General pneumatic schematic
2
4
1
T-Piece
5
3
5.3
5.3.1
Installation of the GMC software
First installation of GMC software
Please contact your local GUNNAR-Partner.
5.3.2
Updating an existing GMC software
1. Start your PC
2. Start GMC
3. Make a BackUp of you current configuration settings, by clicking onto
page to make a copy of your GMCParameters.gcf file.
in the “Admin” ribbon
4. Close GMC again
5. Download the latest version of GMC (min. requirement GMC-V1.2), and execute the program (e.g.:
double click) to install it on
n your PC.
6. Follow the instructions in the setup program.
7. Restart GMC software
GUNNAR T2 scribe
Installation • 10
Testing the GUNNAR T2 scribe
To test you T2 use the following steps.
Open the ribbon page “Admin” and start the “GMC – Check Machine” by clicking onto
.
Now use the button for the T2 on the bottom right corner, to manually move the T2 up and down.
T2 “up”
T2 “down”
6 Applications
6.1
6.1.1
General notes
Calibration of GUNNAR T2 scribe
Please open the Assistant under the ribbon page “Help” by clicking onto the
select the Configuration Assistant.
button, and
The Assistant will open up on the right hand side. Please select the appropriate section in the drop down
list, to calibrate the opening, borders, as well as the overcuts. Follow the instruction in the assistant.
GUNNAR T2 scribe
Applications • 11
6.1.2
Mounting a Pen
Insert your pen (min Ø 8mm to max of Ø 16mm) as shown below.
Place the mat board, which needs to be decorated onto the machine table. Place the supplied calibration
plate onto the mat, and position the pen as shown in the picture below. Special care has to be taken, to
avoid moving (up or down) the clamping mechanism while clamping the pen.
6.1.3
Creating a GUNNAR Spacer (for F1 and F1 hybrid only)
Please open the Assistant under the ribbon page “Help” by clicking onto the
select the Configuration Assistant.
button, and
The Assistant will open up on the right hand side. Please select the appropriate section in the drop down
list, to calibrate the opening, borders, as well as the overcuts. Follow the instruction in the assistant.
GUNNAR T2 scribe
Applications • 12
This GUNNAR Spacer is required, if the T2 gets closer than 85mm to the left (X-) border. It is important,
that this one gets calibrated with the assistant, to make sure, that the drawings are in line with the
openings.
Please use as shown in the picture below.
GUNNAR T2 scribe
Applications • 13
Things to know about GUNNAR T2 scribe
6.2
Some special information about how to get the most use of the T2.
Please note: Each pen might differ in the way it draws onto a specific mat board, therefore this settings
may vary.
6.2.1
Configuration Center Settings
Open up the
Pen Tool.
and advance to the section “Tool Head List”, and open the appropriate
Please make sure the following settings are correct:
•
Uncheck “Use Mat Profile Setting”
•
Uncheck “Use Mat Profile Speed Setting”
•
Uncheck “Auto Tool Change”
These setting can be altered to get the most out of the used pen:
•
Cutting Speed: Setting the draw speed of the pen
•
Air Flow restrictor: Needs to be set, to avoid hitting the mat board to hard with the pen.
7 Guarantee
7.1
Guarantee provisions
The guarantee on the T2 scribe Pen Tool runs for one year as of the date of delivery. The guarantee
covers defects due to material faults or production errors.
Damage due to negligent and incorrect handling is not covered by the guarantee.
Normal wear is similarly excluded from the guarantee (assessment by us). Kindly observe our general
terms and conditions in this respect.
GUNNAR T2 scribe
Guarantee • 14