1
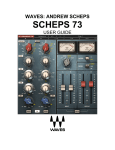
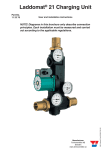
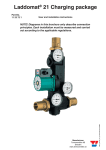
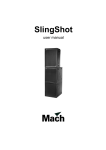
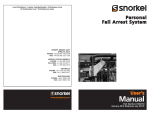
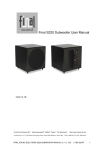
JA D SERIE S
OW N ER ’ S
MA NU AL
J A D900. 5
5 Channel F u l l R a n g e C l a s s D Am p lifie r
Authorized Dealer Name:
Purchase Date:
Model Number:
Serial Number:
JAD900.5
PERFORMANCE
MODEL:
RMS Power (4 Ohms, Stereo)
RMS Power (2 Ohms, Stereo)
RMS Power (4 Ohms, Bridged)
Length
Height
Width
Frequency Response ±1dB
Signal-to-Noise Ratio
Input Sensitivity
Electronic Crossover
JAD900.5
75 W x 4 + 220 W x 1
115 W x 4 + 440 W x 1
230 W x 2 + 440 W X 1
12.83” (326 mm)
1.84” (46.70 mm)
6.70” (170 mm)
20 Hz - 20 kHz
>105 dB
200 mV - 6 V
Variable Lowpass 80 Hz - 4 kHz
Variable Highpass 40 Hz - 4 kHz
Subsonic Filter
Variable Highpass 20 Hz - 38 Hz
Power Output
Signal to Noise Ratio
Additional Output
75 Watts RMS x 4 Channels
@ 4 Ohms and ≤ 1% THD+N
84 dBA Reference: 1 Watt into 4 Ohms
261 Watts RMS x 1 Channel
@ 4 Ohms and ≤ 1% THD+N
Tip: To obtain best performance out of your NVX amplifiers, it is suggested that you use quality,
true-to-spec NVX accessories and wiring. Using poor-quality, under-spec wiring kits will impede
NVX amplifier performance.
INSTALLATION
Mounting: Choosing a mounting location for the JAD900.5 involves more than just finding a
place where to install the amplifier. We suggest the following guidelines to properly mount your
amplifier to your vehicle.
- Choose a mounting location where the amplifier can be well ventilated.
- Mount your amplifier in a sturdy and ridged location.
- Ensure that there are no electrical wires or fuel lines behind where you will be drilling.
- Secure the amplifier by tightening all four screws.
- Have enough room around the amplifier where you can easily connect all power and
audio cables as well as make audio control adjustments.
- Avoid mounting the amplifier directly to a subwoofer enclosure as this will produce excessive
vibrations which can vibrate critical solder joints or components on the circuit board loose.
2
JAD900.5
To Source Unit
External Fuse
Power/Ground Wire
2 x 40 Amperes
4 Gauge
(Sold Separately)
Wiring: The JAD900.5 five channel amplifier requires a direct connection to the vehicle battery
to provide power for operation. Power connections should be circuit protected to protect
the vehicle from any electrical short, fire hazard, amplifier damage, or even injury. If several
amplifiers are connected to one main power wire connection, we recommend to electrically
distribute the power connection to each amplifier with its own form of circuit protection. Before
making any type of wire or cable connections to your amplifier, disconnect the vehicle’s battery
to avoid any electrical shorts. Below are recommendations for proper power cable installation
and connections.
- Make the ground wire as short as possible.
- Connect the ground wire to a paint and corrosion free, solid, metal area of the vehicle’s
chassis.
- For a solid ground connection, it is recommended an additional ground wire of the same
gauge as the main power wires (or larger) between the battery’s post and the vehicle chassis.
- Install an in-line fuse within 18” of the battery’s positive terminal.
- Place an additional in-line fuse within 18” of the amplifier.
Note: In the event you need to remove the amplifier from your vehicle, the ground wire should be
the last wire disconnected from the amplifier, just the opposite as it was when you installed it.
3
Line Level Connections
Low Level wired Bass Knob
Subwoofer Inputs from Source
Front Inputs from Source
Rear Inputs from Source
5-Channel Mode
Subwoofer
Left Rear
Right Rear
Bridge Mode Operation
Subwoofer
Left Front
Right Front
Left Channel
Right Channel
4
OPERATION
Status LEDs (Power and Protect): Power LED will illuminate when the amplifier is turned on
and operating normally. Protection LED will illuminate if the amplifier shuts down due to a short
circuit, DC offset, or overheating.
Remote Level Control: Input adaptor for connecting a remote bass control knob. (Included)
HPF Variable Control: This is a separate low frequency filter that can be adjusted anywhere
from 40Hz - 4kHz (front) and 40Hz - 400Hz (rear). This control function is useful for removing low
bass frequencies to prevent damage to the small full range speakers.
LPF Variable Control: The variable crossover control on the side panel of the amplifier allows
you to adjust the crossover frequency from 80Hz - 4kHz (front) and 20Hz - 220Hz (subwoofer).
We recommend starting at the midpoint setting (250Hz front and 100Hz subwoofer) and turn
clockwise for greater mid-bass frequencies or counterclockwise for reduced mid-bass output.
Subsonic Filter: Crossover that restricts damaging ultra-low frequency notes from reaching
speakers incapable of reproducing notes below (20Hz - 38Hz). Clockwise turn increases the
frequency filter and counterclockwise reduces the frequency filter.
Level Control: The input gain control is not a volume control. It is possible to have maximum
power output even with the level setting at minimum. To set this level properly turn the source
unit to 80% volume. Next, slowly turn the level control clockwise on the amplifier up until you can
hear audible distortion, then turn it down to preferred settings.
Line Level Inputs: The RCA inputs are capable of receiving low-level signals (200mV-6V) from
a source unit, preamplifier or equalizer.
Crossover Switch: This manual switch allows you to select either the lowpass or highpass
crossovers and includes the option of deactivating both crossovers.
Source Switch: Set the switch to the SUB position if you are connecting your head unit’s
subwoofer output to the SUB 1 or SUB 2 inputs. Set the switch to the INT position if you are
sending a full range signal to the full range inputs (FL, FR, RL, RR) and not connecting anything
to the SUB inputs. In the INT position, the amplifier will filter the bass frequencies from the full
range signal and send them to the subwoofer amplifier channel.
Channel Mode Switch (4CH/ST): Set the switch to 4CH if you are using four channel outputs
from your head unit to the FL, FR, RL, RR inputs on the amplifier. Set the switch to ST (stereo)
mode if you are using two channel outputs from your head unit. In the ST position, the amplifier
will take the signal input to the FL and RR inputs and send the same signals also to the RL and
RR amplifier channels.
The Band-Pass Filter (BPF) allows you to run your components in an active setup, where the
passive crossovers are eliminated and the electronic crossovers on the amplifier take over. To
take advantage of this feature, move the switch on the amplifier to the BPF position, and set the
LPF and HPF to your preference.
5
TROUBLESHOOTING
If your amplifier does not appear to be working, check the obvious things first such as blown
fuses, poor or incorrect wiring, setting of the crossovers, source unit, gain setting, etc. There
is a power LED indicator on the side of the amplifier denoting the power state of the amplifier
in addition to the protection LED. Green status is working and Red signifies the amplifier is in
protect mode.
Power LED not illuminated? With a multimeter check the following: 1) +12 volt power terminal
should read between +12V to 16V. 2) Remote turn-on terminal should read the same as +12
volt. 3) Check for reversed power and ground connections. 4) Ground terminal for proper
conductivity. 5) Check for blown fuses.
Power LED illuminated, no output? Check the following connections: 1) RCA connections.
2) Test speaker outputs with a known operating speaker. 3) Substitute stereo sound source
with a known operating source unit. 4) Check for a signal in the RCA cable, if needed run a
new cable on the outside of the vehicle.
Protection LED illuminated red? 1) If amplifier is very hot to the touch and thermal protection
is engaged. Test for proper impedance at the speaker terminals with a multimeter. Check for
adequate airflow around the amplifier. 2) If amplifier shuts down while the vehicle is running,
the voltage protection is engaged and voltage to the amplifier is not within the 10-16 volt
operating range. Have the vehicle’s charging and electrical system inspected. 3) If amplifier
will only play at low volume levels, the short circuit protection is engaged. Check for speaker
wires shorted to each other or the vehicle chassis. Check for damaged speaker(s) operating
below the minimum recommended impedance.
Alternator/Generator noise-whining sound with engines RPM? 1) Check for damaged RCA
cables. 2) Check the routing of the RCA cables (do not run signal and power cables parallel
to each other). 3) Check the source unit for proper grounding. 4) Check the gain settings and
turn them down if they are set too high.
Ground noise? NVX amplifiers are engineered to be fully compatible with all manufacturer’s
stereo head units. Some head units may require additional grounding to prevent noise from
entering the audio signal. If you are experiencing this problem with your head unit, in most
cases running a ground wire from the RCA outputs on the head unit to the chassis will remedy
this issue.
Reduced bass response? Reverse a speaker connection from positive to negative on the
subwoofer terminals, if the bass improves, the speaker was out of phase.
Warning!
NVX components are capable of producing sound levels that can permanently damage your
hearing! Turning up a system to a level that has audible distortion is more damaging to your
ears than listening to an undistorted system at the 6.5 volume level. The threshold of pain
is always an indicator that the sound level is too loud and may permanently damage your
hearing. Please use common sense when controlling volume!
When jump starting the vehicle, be sure that connections made with jumper cables are correct.
Improper connections can result in blown amplifier fuses as well as the failure of other critical
systems in the vehicle.
6
CONSUMER
LIMITED WARRANTY INFORMATION
NVX offers a limited warranty on this product with the following terms:
Mobile Electronics Limited Warranty
When purchased from an Authorized NVX Dealer, NVX warrants this product to be free from defects in material and
workmanship under normal use for a period of ONE (1) YEAR from date of original purchase. If this product is identified as
“Refurbished” or “B Goods”, the warranty is limited to a period of NINETY (90) DAYS from date of original purchase. In all cases
you must have the original receipt. Should service be necessary under this warranty for any reason due to manufacturing defect
or malfunction during the warranty period, NVX will repair or replace (at its discretion) the defective merchandise with equivalent
merchandise. Warranty replacements may have cosmetic scratches and blemishes. Discontinued products may be replaced
with more current equivalent products. This warranty is valid only for the original purchaser and is not extended to owners of
the product subsequent to the original purchaser. Any applicable implied warranties are limited in duration to a period of the
express warranty as provided herein beginning with the date of the original purchase at retail, and no warranties, whether
express or implied, shall apply to this product thereafter. Some states do not allow limitations on implied warranties; therefore,
these exclusions may not apply to you. This warranty gives you specific legal rights; however you may have other rights that
vary from state to state.
What To Do If You Need Warranty Or Service
Defective merchandise should be returned to the place of purchase. Your Authorized NVX Dealer is trained to handle and
expedite any warranty claim. Assistance in locating an Authorized Dealer can be found at www.nvx.com or by contacting
NVX directly.
Alternatively, if it becomes necessary for you to return defective merchandise directly to NVX, please contact us online at
www.nvx.com/support for a Return Authorization (RMA) number. Be sure to package all defective items in the original container
or in a package that will prevent shipping damage and follow the return instructions below.
NVX, 15303 Ventura Blvd., 9th Floor, Sherman Oaks, CA 91403
The RMA number must be clearly marked on the outside of the package. Please return only defective components. The return
of functioning items increases your return freight charges. Non-defective items received will be returned freight collect.
Include a copy of the original receipt with the purchase date clearly visible, and a “proof-of-purchase” statement listing the
Customer’s name, Dealer’s name and invoice number, and product purchased. Warranty expiration on items without proof-ofpurchase will be determined from type of sale and the manufacturing date code. Freight must be prepaid; items sent freight
collect, or COD, will be refused.
Failure to follow these steps may void your warranty. Any questions can be directed via email to [email protected] or via mail at the
address listed above.
What Is Not Covered?
This warranty is valid only if the product is purchased from an Authorized NVX Dealer and used for the purpose for which it was
designed. It does not cover:
•Damage due to improper installation and/or subsequent damage to other components.
•Damage caused by exposure to moisture, excessive heat, chemical cleaners, and/or UV radiation.
•Damage through negligence, misuse, accident or abuse.
•Repeated returns for the same damage may be considered abuse.
•Any cost or expense related to the removal or reinstallation of product.
•Speakers damaged due to amplifier clipping or distortion.
•Items previously repaired or modified by any unauthorized repair facility.
•Return shipping on non-defective items.
•Products with tampered or missing barcode labels.
•Products returned without a Return Merchandise Authorization (RMA) number.
•Freight Damage.
•The cost of shipping product to NVX.
•Service or installation performed by anyone other than NVX.
How Long Will It Take?
NVX strives to maintain a goal of 1 week service for all acoustics (subwoofers, midrange drivers, tweeters, crossovers, etc)
returns. Delays may be incurred if lack of replacement inventory or parts is encountered.
International Warranty
Contact your International NVX dealer or distributor concerning specific procedures for your country’s warranty policies.
7
www.nvx.com