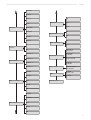
1
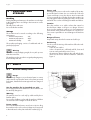
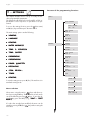
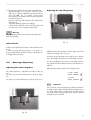
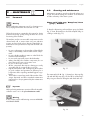
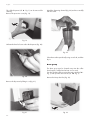
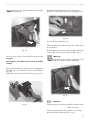
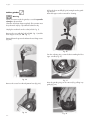
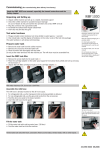
model
ROYAL OFFICE
Type SUP 015V
OPERATION AND MAINTENANCE
Vending Machine
English
TABLE OF CONTENTS
MAIN PARTS. .................................................................. 3
1
INTRODUCTION TO THE MANUAL. ..................... 4
1.1
Foreword ......................................................... 4
1.2
Symbols used ................................................... 4
2
GENERAL INFORMATION. .................................... 4
2.1
Foreword ......................................................... 4
2.2
Intended use of the machine .............................. 4
2.3
Residual risks ................................................... 4
2.4
Machine identification ...................................... 5
2.5
Technical specifications ..................................... 5
3
HANDLING AND STORAGE. ................................. 6
Handling ......................................................... 6
Storage ........................................................... 6
4
SAFETY. .................................................................... 6
4.1
General safety norms ....................................... 6
4.2
Operators requirements .................................... 7
Maintenance technician .................................... 7
Supply operator ............................................... 7
User ................................................................ 7
4.3
Safety devices .................................................. 7
4.4
Safety microswitch efficiency test ....................... 7
5
CONTROLS DESCRIPTION. .................................... 8
5.1
Main controls ................................................... 8
Main switch ..................................................... 8
Control panel ................................................... 8
Dispensing mode .............................................. 8
Setting mode .................................................... 8
6
INSTALLATION. ....................................................... 9
6.1
List of supplied accessories ................................ 9
6.2
Positioning ....................................................... 9
6.3
Electric connection ............................................ 9
6.4
Applying the ‘Instructions in brief’
adhesive plate .................................................. 9
8
USE OF THE VENDING MACHINE. ..................... 16
8.1
Machine status ............................................... 16
Off and electrically insulated ........................... 16
On ................................................................ 16
Energy saving ................................................ 16
8.2
Recommendations .......................................... 16
Prolonged inactivity ........................................ 16
Temperature control ........................................ 16
Coffee tank empty .......................................... 16
Water tank empty ........................................... 16
Grounds drawer full ....................................... 16
8.3
First Switching on ........................................... 17
Filling the coffee bean hopper ......................... 17
Fixing the cover lock plate ............................... 17
Filling the water tank ...................................... 17
Water circuit filling ......................................... 18
Grinding adjustment ....................................... 18
Coffee blends ................................................. 19
8.4
Beverage dispensing ....................................... 19
Adjusting the coffee dispenser ......................... 19
Adjusting the cup filling level ........................... 19
Coffee dispensing ........................................... 20
Hot water dispensing ...................................... 20
8.5
Messages and special warnings ...................... 20
Coffee tank electronic control .......................... 20
Coffee beans protection against impurities ....... 20
Water level electronic control .......................... 20
9
MAINTENANCE . .................................................. 21
9.1
Foreword ....................................................... 21
9.2
Cleaning and maintenance ............................. 21
Brew group .................................................... 22
Coffee grinder ............................................... 24
Descaling ...................................................... 25
Automatic descaling ....................................... 26
Eliminating the descaling message ................... 26
10 CARE. ..................................................................... 27
11 MACHINE SCRAPPING. ....................................... 27
7
2
SETTINGS. .............................................................. 10
Menu selection ............................................... 10
Struttura delle funzioni di programmazione ...... 10
7.1
Menu description ........................................... 12
Vending functions ........................................... 12
Displaying the number of products dispensed ... 13
Language selection ......................................... 14
Rinse function ................................................. 14
Water hardness adjustment ............................. 14
Set Temperature ............................................. 14
Prebrewing function ........................................ 14
Pregrinding function ....................................... 14
Set dose ........................................................ 14
Descaling ...................................................... 15
Descaling warning ......................................... 15
Timer ............................................................. 15
Washing cycle ............................................... 15
12 TROUBLESHOOTING. .......................................... 27
13 ACCESSORIES. ...................................................27
14 GENERAL MAINTENANCE . ................................. 28
14.1 Troubleshooting .............................................. 28
English
MAIN PARTS
21
10
12
4
11
9
20
8
14
13
15
7
6
17
16
19
3
18
2
1
5
26
24
25
22
Fig. 1
1
2
3
4
5
6
7
8
9
23
Dump box
Drip Tray
Grill drip tray
Main switch
(rear side of the machine)
Power cord
Coffee dispenser
Hot water spout
Control panel
Water tank
10
11
12
13
14
15
16
17
Water level gauge
(inside water tank)
Coffee bean hopper
Coffee bean hopper cover
(under the cover with lock)
Grind adjustment lever
Coffee dosing lever
Service door with lock
Water hopper
Brew group handle
18
19
20
21
22
23
24
25
26
Brew group
Coffee residue drawer
Safety microswitch
Cover with lock
Cover lock plate
Cleaning panel
Locking keys (2x)
Brew group key
Silicon pipe
3
English
1 - INTRODUCTION TO THE
MANUAL
1.1
Warning
The symbol indicates danger for operators and the machine itself.
Foreword
Important
This manual is an integral part of the machine and must be
read carefully. It contains all the information about installation, maintenance and correct use of the ROYAL OFFICE
machine.
Important
The symbol indicates operations that contribute to keep the
machine in good working conditions.
2 - GENERAL INFORMATION
Always refer to this manual before performing any operation.
Manufacturer: Saeco International Group S.p.A.
Via Panigali, 39 - 40041 GAGGIO MONTANO (Bo) Italy
This manual must be preserved with care and must accompany the machine throughout its operational life including
changes of ownership.
If this manual is lost or damaged, request a copy from an
Approved Assistance Centre.
The manufacturer reserves all copyrights on this manual.
2.1
Foreword
This machine is an automatic coffee and hot water dispenser with programmable dosing of all beverages.
If necessary, contact the nearest Distributor or National
Importer or the Manufacturer when no importers are available.
APPROVED ASSISTANCE CENTERS are available for information and explanations about the machine, and to
provide technical assistance and spare parts supplies.
The Manufacturer reserves the right to modify the machine
without any obligation to provide advance notice.
Important
The keys to open the water and bean hoppers, the side
door and the optional coiner door are available only to
the supply operator and maintenance technician.
1.2
Supply operator
Those in charge of supplying and cleaning the machine.
Maintenance operations that require a specialized technician are not to be performed by supply operators.
Maintenance technician
The symbol indicates operations to be performed only by
specialized maintenance technicians and servicemen.
Intended use of the machine
The ROYAL OFFICE machine automatically dispenses:
- freshly brewed coffee and espresso coffee;
- hot water for beverage preparation.
Symbols used
A number of symbols are used in this manual to indicate
danger or situations that require various degrees of expertise.
Each symbol is explained by a message.
Where no symbol is used, the information is intended for
all users of the machine. The symbols used are the following:
4
2.2
Important
Improper use of the machine determines the immediate
warranty expiration and the Manufacturer declines responsibility for damages and personal injuries.
Improper use includes:
- using the machine for purposes other than that intended
and/or following procedures not described in this
manual;
- interventions on the machine that are against instructions included in this manual;
- using the machine after component parts have been
tampered with and/or safety devices have been altered;
- installing the machine outdoors
2.3
Residual risks
The dispensing outlet has no protections against accidental hand exposure to coffee and hot water.
English
2.4
Machine identification
The machine is identified by the model and serial numbers
outlined on the specific plate (Fig. 2).
The plate also contains the following specifications:
-
-
Fig. 2
2.5
name of Manufacturer
CE marking
machine model
serial number
manufacturing year
technical specifications
- Power supply voltage (V)
- Power supply frequency (Hz)
- Power consumption (W)
Important
When contacting APPROVED ASSISTANCE CENTERS always refer to the plate and the specific data it contains.
Technical specifications
Power supply ...................................................................................................................... see data plate
Power rating ....................................................................................................................... see data plate
Dimensions (l x w x h) ......................................................................................... ca. 380 x 460 x 440 mm
Machine case ..................................................................galvanized steel and thermoplastic material (ABS)
Weight .................................................................................................................................. ca. 14.5 kg
Cable length .............................................................................................................................. ca. 1.2 m
Operating system .................................................................................................... Heat exchanger boiler
................................................................................................................ Electromagnetic vibration pump
Temperature control ................................................................................................................... electronic
Coffeegrinder adjusting device ............................................................................................... fine-grinding
Coffee grounds ejection .............................................................................................................. automatic
Coffee powder dosing ........................................................................................................ precision doser
Quantity setting .................................................................................................................. ca. 0 - 250 ml
Water tank ............................................................................................................ removable, transparent
Capacity
-Water tank......................................................................................... ca. 6.5 l
-Coffee bean hopper ....................................................................... ca. 950 gr.
-Drip tray ................................................................ .............................. ca. 1 l
Heating time ........................................................................................................................ ca. 2 minutes
Preparation time
-espresso....................................................................... ca. 20 seconds per cup
-coffee .......................................................................... ca. 30 seconds per cup
-hot water ..................................................................... ca. 60 seconds per cup
Thermal cut-out .............................................................................................................................. built-in
Insulation ........................................................................................................................ class protection I
Approval ............................................................................................................................ see data plate
Conformity with existing product class regulations .......................... (see Declaration of Conformity page 29)
Warranty .................................................................................................see enclosed warranty certificate
5
English
3 - HANDLING AND
STORAGE
Handling
During handling and transport, the machine must be kept
in the upright position according to the instructions on the
packaging.
Lift and position with care.
Do not shake the machine.
Storage
The machine must be stored according to the following
temperatures:
-- minimum temperature:
4°C.
- maximum temperature:
40°C
- maximum humidity:
95%
The machine packaging consists of cardboard and expanded polystyrene.
Warning
Given the overall packaging weight, do not pile up more
than three machines.
The machine must be stored in its original packaging away
from humidity and dust.
Power cord
If damaged, the power cord must be replaced by an Approved Assistance Centre. Do not connect the cord near
corners and sharp or very hot objects. Avoid contact with
oil. Do not stretch the cord when moving the machine. Do
not unplug the machine by pulling the cord or touch it with
wet hands. The cord must not hang from tables and shelves.
Location
Place the machine on a stable surface that cannot be
knocked down. Water could pour out: danger of burns!
Do not use the appliance outdoors or in low temperature
environments. Do not place the machine on a very hot surface or near open flames to avoid damage to the machine
casing.
Danger of burns
Keep hands away from the hot water and coffee jet.
Positioning
For the correct functioning of the machine follow the indications below:
- select an even surface
- select a location that is sufficiently well-lit, clean and
near an easily reachable power source.
- the minimum distance between the wall and the machine must be in line with the indications outlined in
figure 3.
4 - SAFETY
4.1
General safety norms
Danger
100 mm.
It is extremely dangerous to put electrical parts in contact
with water! Do not direct the steam or hot water jet toward
body parts; handle the hot water pipe with care: danger of
burns!
Use the machine for its intended use only.
Do not apply technical modifications to the machine: it can
be extremely dangerous!
Warning
The machine must be used only by adults and by those
familiar with it.
Do not allow children to play with the machine. Children
are not aware of the danger of electrical devices.
Power supply
Do not touch electrical parts to avoid serious injuries. Plug
the machine in the correct socket. Voltage must correspond
to that indicated on the plate inside the machine (Fig. 2).
6
Fig. 3
English
Cleaning
Before cleaning the machine, turn the main switch off and
disconnect the power supply. Wait until the machine is cold.
Do not soak the machine in water! Do not disassemble the
machine or perform any operation on the internal components of the machine.
4.4
Repairing and maintenance
In case of failure or faults possibly after a fall, immediately
unplug the machine. Do not turn the faulty machine on.
The machine can be repaired only by Approved Assistance Centres. The Manufacturer declines responsibility for
damage and injuries caused by incorrect repairing of the
machine.
In case of failure and/or malfunctioning contact exclusively
qualified ASSISTANCE SERVICE repairmen.
If the display and LEDs are off the machine is turned off
and the microswitch is working correctly.
Safety microswitch efficiency
test
When the machine is on, open the side door and check
that the display (ref. 8 - Fig. 1) and LEDs on the control
panel keypad (rif.8 - Fig. 1) turn off.
1
In case of fire use Carbon Dioxide extinguishers (CO2).
Do not use water or dry-powder extinguishers.
4.2
Operators requirements
To guarantee the safety and good functioning of the machine two operators with different skills are required:
Maintenance technician
A specialized technician in charge of machine installation,
set-up, maintenance and technical assistance.
Fig. 4
Supply operator
An operator in charge of turning the machine on/off, supplying products, removing coins and of the internal and
external cleaning of the machine.
If the machine is malfunctioning, the supply operator must
request the intervention of the maintenance technician.
User
The person who uses the machine. Users must NOT perform any of the tasks of the supply operator or the maintenance technician.
If the machine is malfunctioning, users should request the
intervention of the supply operator or the maintenance technician.
4.3
Safety devices
All the components that can be potentially dangerous are
located inside the machine.
A microswitch (ref. 1 - Fig. 4) automatically cuts the power
out if the side door is open.
7
English
5 - CONTROLS DESCRIPTION
Important
Keys
The dispensing keys of the machine are programmed with
pre-set values.
5.1
Dispensing mode
In this normal running mode, the following operations can
be performed by pressing the keys as indicated in figure 6:
,
Dispensing programmed beverages
Main controls
Main switch (Fig. 5)
Located in the rear side of the machine, centre-left.
When in the ”I” position, the machine is on (electrical
functions on).
When in the ”O” position, the machine is off (electrical
functions off).
,
=
espresso coffe
=
light coffee
=
hot water
Setting mode
In this service mode, the following operations can be performed by pressing the keys as indicated in figure 6:
E
ENT key - “Espresso coffee”
Confirm modified parameters.
Return to lower settings level
C
ESC key
Return to higher settings level without saving new parameters.
UP key - “Coffee”
Scroll Menu and increase the displayed value for resetting.
DOWN key - “Hot water”
Scroll Menu and decrease the displayed value for resetting.
Fig. 5
Control panel (Fig. 6)
It consists of 4 keys with different functions according to
the machine mode (standard running or setting mode).
SELECT PRODUCT
READY FOR USE
Fig. 6
8
Dispensing LEDs
Dispensing LEDs are green LEDs located inside the three
selection keys. During beverage dispensing, only the
LED corresponding to the selected beverage remains
on. After beverage dispensing, all three LEDs turn back
on.
Display
It consists of 2 15-character lines and it displays messages about operations under way or programmed and
about the machine status.
English
6 - INSTALLATION
Warning
The presence of nearby magnetic fields or electric devices
generating interference may cause malfunctioning in the
electronic control of the machine.
-
near an easily reachable power source;
the distance from the walls must be as shown in Fig.3;
the maximum angle of inclination of the supporting
surface must not exceed 2°
6.3
Warning
Important
Do not install the machine outdoors and in environments
where water or steam jets are used.
Important
This operation must be performed by the maintenance technician.
The machine requires single-phase voltage according to
the value contained in the identification plate (2.4 Machine
identification).
When the temperature is approaching 0°C internal components containing water are subject to freezing.
Do not use the machine in such conditions.
To guarantee the correct functioning and durability of the
appliance, follow the indications below:
- room temperature:
10°C ÷ 40°C
- maximum humidity :
90%.
- make sure that the machine has not been tampered
with during transport by verifying the package sealing;
- verify the machine conditions and model inside the
packaging;
- verify the content of the accessories envelope enclosed
to the machine (see “6.1 List of supplied accessories”);
- remove the machine from the original packaging that
should be preserved for future use (e.g. change of location);
- remove all the remaining packaging.
Electric connection
Warning
The socket should be easily accessible to the supply operator, so that the machine can be easily unplugged when
necessary.
Before connecting the machine check the following points:
- the line voltage of the socket must correspond to that
indicated on the machine plate;
- the electrical system must be in line with existing laws
and regulations and must have the load capacity indicated on the plate.
When in doubt, request professional assistance to determine the characteristics of the electrical system.
Warning
The use of extensions and adapters is forbidden.
Important
Disposal of packaging should be carried out according to
existing laws and regulations and in line with environmental considerations.
6.1
•
•
•
•
•
List of supplied accessories
N. 1 brew group key (ref. 25 - Fig. 1).
N. 1 Instruction and Maintenance Manual
N. 1 cleaning brush for coffee grinder (ref. 23 - Fig. 1).
N. 1 water hardness test strip
N. 1 silicon pipe (ref. 26 - Fig. 1).
6.2
6.4
Applying the ‘Instructions
in brief’ adhesive plate
To apply the adhesive plate it is necessary to:
- remove the top cover by inserting the key in the appropriate lock;
- remove the bean hopper cover;
- unfasten the 2 screws of the bean hopper;
- remove the bean hopper;
- apply the adhesive plate in the front inside the bean hopper;
- place the bean hopper back;
- fasten the 2 screws of the bean hopper;
- reinsert the bean hopper cover;
- reinsert the top cover and lock it.
Positioning
For correct functioning of the appliance follow the indications below:
- select an even surface
- select a location that is sufficiently well-lit, clean and
Important
This plate must be applied only when the machine is
equipped with a coiner (i.e. not free-of-charge)
9
English
7 - SETTINGS
This chapter illustrates how to set up or modify the machine programmable parameters.
The chapter should therefore be read carefully, to fully understand the correct sequence of operations to be performed.
Structure of the programming functions.
CODE??
RESET COUNTER
RESET COUNTER
JES
NO
To access the settings function, press the
(Hot water)
and C (Esc) keys and then press the main switch.
SMALL COFFEE
TOTAL 0
The main settings options are the following:
COFFEE
TOTAL 0
•
VENDING
•
LANGUAGE
•
RINSING
•
WATER HARDNESS
•
TEMP. S. ESPRESSO
COUNTER
LOCKING:
•
TEMP. COFFEE
TOTAL COFFEE
TOTAL 0
•
PREBREWING
BEVERAGES
TOTAL 0
•
PREGRINDING
•
PROGR. QUANTITY
•
DESCALING
PRICE
1 COFFEE
0
•
SIGN. DESCAL.
PRICE
HOT WATER
0
•
TIMER
CODE
* * * * *
•
RINSING
To exit the settings menu press C (Esc). The machine is in
standard running mode.
Menu selection
keys and select opSelect menus using the various
tions by pressing the E key. The parameters of each menu
keys. To save the decan be modified by pressing
sired setting press the E key (e.g., “ O N ” for “ S E T
DOSE”
”).
If a value has wrongly been modified, the menu can be
exited by pressing the C (Esc)
key without saving the
new value.
10
HOT WATER
TOTAL 0
VENDING
COUNTER
CYCLES 0
0
PRICE
1 SMALL COFF 0
CHANGE CODE
OLD CODE?
. . . . . .
NEW CODE?
. . . . . .
NEW CODE.....
SAVE >JES> NO
English
ITALIANO
FRANÇAIS
ON
Deutsch
JAPAN
LANGUAGE
PREBREWING
OFF
LONG
NEDERLANDS
ON
PORTUGUES
PREGRINDING
OFF
ESPAGNOL
ON
ENGLISH
PROGR. QUANTITY
ON
OFF
OFF
MACHINE IS
DESCALING
HARDNESS 4
DESCALING
FINISHED
RINSING
DESCALING
HARDNESS 3
RINSE MACHINE
HARDNESS 2
RINSING
FINISHED
WATER HARDN.
HARDNESS 1
SIGN. DESCAL.
MINIMUM
TIMER
MAXIMUM
TEMP. S. COFFEE
HIGH
QUANTITY WATER
NOT REACHED
STANDBY
AFTER 0:00
STANDBY
RINSING CYCLE
MEDIUM
LOW
MINIMUM
MAXIMUM
TEMP. COFFEE
HIGH
MEDIUM
LOW
11
English
7.1
Menu description
HOT WATER
TOTAL
CODE
A pre-set code must be entered to proceed with paramCODE
eters setting in the setting menu. To set the code, see ”CODE
CODE”
in the Vending menu.
Note down the new code when modified.
Vending functions
The Royal Office is equipped with a counter that, by keeping track of dispensing operations, allows for the statistical
analysis of the coffee machine. An additional counter is
also fit to shut off dispensing after a number of operations.
To access these functions a code must be entered.
keys to position the asterisk on “V
Press the
VENDG” and select it by pressing E (Ent).
ING
A submenu appears; select one of its options using the
standard
keys.
The display shows:
RESET COUNTER
With this function all partial counters can be reset. Press E
(Ent) and the display shows:
“RESET COUNTER
“
“
“
YES
Press the keys to select one of the Y E S / N O options, confirm by pressing the E (Ent) key.
SMALL COFFEE
TOTAL
0
The counter indicates the quantity of espresso coffee dispensed since the last reset.
From the VENDING menu, press the
keys to position the
asterisk on the SMALL COFFEE menu and confirm with the E
(Ent) key.
Press the
keys to modify the value displayed (e.g., to
reset the counter) and save the new value by pressing E
(Ent). Press the C (Esc) key to interrupt the setting of the new
value and maintain the previous counter setting.
COFFEE
TOTAL
0
The counter indicates the quantity of coffee dispensed since
the last reset.
From the VENDING menu, press the
keys to position
the asterisk to the COFFEE menu and confirm with the E
(Ent) key.
Press the
keys to modify the value displayed (e.g., to
reset the counter) and save the new value by pressing E
(Ent). Press the C (Esc) key to interrupt the setting of the new
value and maintain the previous counter setting.
12
0
The counter indicates the quantity of hot water dispensed
since the last reset.
From the VENDING menu, press the
keys to position
the asterisk on the HOT WATER menu and confirm with
the E (Ent) key.
keys to modify the value displayed (e.g., to
Press the
reset the counter) and save the new value by pressing E
(Ent). Press the C (Esc) key to interrupt the setting of the new
value and maintain the previous counter setting.
COUNTER
CYCLES
and
COUNTER
LOCKING
0
0
With this function coffee dispensing can be shut off after a
number of cycles while the machine can still dispense hot
water. This setting can be used, for example, to plan maintenance interventions.
If the value ‘0’ is entered, this function is off.
From the VENDING menu, press the
keys to position
the asterisk on the COUNTER menu and confirm with the E
(Ent) key.
Press the
keys to modify the value displayed (e.g., to
re-plan the limit for shut-off) and save the new value by
pressing E (Ent). Press the C (Esc) key to interrupt the setting
of the new value and maintain the previous counter setting.
When the set limit is reached, coffee dispensing shuts off
and the following messages flash alternatively on the display:
“COFFEE
“BLOCKED
TOTAL COFFEE
TOTAL
“
“
0
The counter displays the total number of coffee cups dispensed and cannot be reset.
BEVERAGES
TOTAL
0
The counter displays the total number of beverages dispensed and cannot be reset.
BEVERAGE PRICE
With this function each beverage can be associated with a
previously set price.
“PRICE
“1 SMALL COFF
“
0 “
“PRICE
“1 COFFEE
“
0 “
English
“PRICE
“HOT WATER
“
“
0
Important
The pre-set prices of the machine correspond to 0 , meaning that beverages are free.
To set up prices 1 and 2 the machine must be equipped
with the optional coiner (see Coiner Manual).
For example, if the new code is 312241, the key sequence must be as follows:
1: Key 3
Hot water
3
2: Key 1 E (Ent) Small Coffee
1
3: Key 2
Coffee
2
4: Key 2
Coffee
2
5: Key 4 C (Esc)
4
6: Key 1 E (Ent) Small Coffee
1
Warning
CODE
A code can be used to avoid unauthorized access to settings (default “111111”). By confirming, the following menu
option appears:
“CHANGE CODE
“
“OLD CODE?
“......
“
“
Write down the new password because, if lost or forgotten, it will not be possible to access the settings function.
Displaying the number of products
dispensed
When the machine is in the following mode
“NEW CODE ?
“......
0
“NEW CODE ......
“SAVE
YES
“
“
“
“
To access the settings function it is now necessary to enter
the code.
Warning
After 5 unsuccessful attempts to enter the code, the machine requires that the PUC (Personal User Code) be entered to access the settings function.
To receive the PUC contact the ASSISTANCE CENTER.
If the PUC is entered correctly, a new code must then be
entered.
When setting the code and the PUC the keys have the following functions:
Key 1
Key 2
Key 3
Key 4
E (Ent) Small Coffee ............... 1
Coffee ........................ 2
Hot water ................... 3
C (Esc) ................................. 4
“SELECT FUNCTION”
“READY”
the number of products dispensed since the last reset (see
n) will be displayed afCOUNTER RESET function
ter pressing simultaneously the following key combinations:
C + Small Coffee
“SMALL COFFEE “
“TOTAL
4”
SMALL COFFEE
indicating the number of “S
E” dispensed.
C + Coffee
“COFFEE
“TOTAL
“
2”
COFFEE
indicating the number of “C
E” dispensed.
C + Small Coffee + Coffee
“
“TOTAL
indicating the total number of “S
SMALL
COFFEE
“C
E” dispensed.
“
6”
COFFEE
E” +
C + Hot water
“HOT WATER
“TOTAL
”
7”
HOT WATER
indicating the number of “H
R” dispensed.
By pressing the C key only, the following message appears
on the display:
“TOTAL COFFEE “
“
50”
COFFEE
indicating the total number of “C
E” dispensed, this
value is not reset when counters are.
13
English
Language selection
LANPress the
keys to position the asterisk on the “L
E” option and select it by pressing E (Ent).
GUAGE
The display reads:
“LANGUAGE
“ITALIANO
“
“
Press the keys to modify the language:
ITALIANO
FRANÇAIS
”I
O”, ”F
S”,
Deutsch
NEDERLANDS
,
”D
h”,”N
S”,
PORTUGUES
ESPAGNOL
ENGLISH
”P
S”, ”E
L”, ”E
H”
“
“
keys to modify the set values O N
N, O F F
F.
Water hardness adjustment
To assess water hardness a test can be performed using
the supplied test strip. Soak the strip in water briefly (about
1 second), shake excessive water off and wait for the result
(about one minute).
WATER
Press the
keys to position the asterisk on the “W
HARDN.
.” option and select it by pressing E (Ent).
The display reads:
“ WATER HARDN.
“ HARDNESS 3
Use the standard keys to select the following values:
MINIMUM
MAXIMUM
HIGH
MEDIUM
“M
M”, “M
M”, “H
H”,”M
M” o
LOW
“L
W”.
When this function is on, the pump stops briefly when brewing coffee, using the coffee powder more effectively.
If the rinse function is on, when the machine is started following a period of inactivity an automatic rinsing cycle of
the coffee brewing components begins using hot water.
RINSPress the
keys, position the asterisk on the “R
ING
G” option and select it by pressing E (Ent).
The display reads:
Press the
“
“
Prebrewing function
Rinsing
“RINSING
“ON
“TEMP. COFFEE
“MEDIUM
Press the
keys to position the asterisk on the
PREBREWING
“P
G” option and select it by pressing E (Ent).
The display reads:
“PREBREWING
“ON
By pressing the standard
keys the function can be
ON
OFF
LONG
modified: “O
N”, “O
F” or “L
G” (in the latter case the
pump stops for a longer time).
Pregrinding function
With this function coffee is ground when the doser is empty,
so that a dose of ground coffee is always ready, saving
time when the machine is used frequently. This function is
not recommended in cases when the coffee must be freshly
brewed.
Press the keys to position the asterisk on the
PREGRINDING
“PREGRINDING
PREGRINDING” option and select it by pressing E (Ent).
The display reads:
“PREGRINDING
“ON
“
“
According to the test results, the following values can be
selected by pressing the
keys:
“
“
Press the standard
OFF
and “O
F”.
“
“
ON
keys to modify this function: “O
N”
HARDNESS 4 (hard)
HARDNESS 3 (medium)
Hardness
4
Sehr
weiches Wasser
Hardness
3
Weiches
Wasser
Hardness
2
Mittleres
Wasser
Set dose
HARDNESS 2 (soft)
With this function the quantity of coffee dispensed can be
dosed with precision by pressing the standard selection
keys (Espresso Coffee, Coffee and Hot water).
HARDNESS 1 (very soft)
Hardness
Hartes
Wasser1
Set Temperature
The Royal Office allows the setting of a specific coffee temperature.
TEMP.
Press the
keys to position the asterisk on the “T
ESPRESSO
TEMP. COFFEE
O” or “T
E” options and select
by pressing E (Ent).
According to the selection made, the display reads:
“TEMP. S. COFFEE
“MEDIUM
14
“
“
Press the keys to position the asterisk to the “SET DOSE”
option and press E (Ent) to select it.
The display reads:
“PROG. QUANTITY “
“ON
“
Press the standard keys to modify this function: “ON”, “OFF”
and press E (Ent) to select.
To program the cup filling level, press the corresponding
selection key until the desired quantity of coffee has been
reached (maximum ca. 250 ml). During this operation the
English
following message appears on the display:
“ SAVING
“ESPRESSO
“SET DOSE
or:
“COFFEE
“SET DOSE
or:
“HOT WATER
“SET DOSE
“
“
”
and the machine turns off. If necessary, the machine can be
turned back on by pressing C (Esc).
“
“
Rinsing cycle
“
“
Descaling
Press the
keys to position the asterisk on the
D E S C A L I N G menu option. To enter this option press E
(Ent).
The display reads:
“DESCALING
“
The machine is equipped with a washing program to be
used in addition to the standard, daily and weekly washing cycle. If used regularly, this program eliminates oily
coffee residue in components that are not accessible and
prevents alterations in the taste of coffee.
According to the use of the machine, washing cycles should
be performed monthly or after a maximum 250 cups of
coffee have been dispensed. The washing program lasts
for about 5 minutes and is divided in 4 cycles, including
rinsing. Short 40 seconds pauses occur between one cycle
and the next.
About descaling see page 25.
Warning
Descaling warning
This function indicates whether the level of water used requires descaling, according to the set value of water hardness.
Press the
keys to position the asterisk on the DESCAL.
WARNING menu option and press E (Ent) to select it.
The display reads:
“QUANTITY WATER
“NOT REACHED
“
“
This message appears when the “D
DESCAL. WARNG” menu option is set before the D E S C A L E warning
ING
appears.
Return to the settings menu by pressing C (Esc).
Before starting the washing program, fill the water tank
fully and position a large container (min. 1 l capacity) under the coffee machine (the dispenser is height-adjustable
and can be removed for cleaning). Washing requires about
1 litre of water (including rinsing). If necessary, empty the
container periodically.
Press the
keys to position the asterisk on the W A S H I N G C Y C L E option and select it by pressing E (Ent).
The display reads:
“RINSING CYCLE
”
With this function a washing cycle begins using water to
clean all the components of the brew group. The washing
cycle is over when the display reads:
Timer
With this function the machine can be programmed to automatically turn off after a period of time (varying from 15
minutes to ca. 13 hours). Time counting begins with the
last product dispensed. If coffee is dispensed again after a
few seconds, the timer starts anew. If the value is set at
0:00, this function is off.
Press the
keys to position the asterisk on the T I M E R
menu option. Press E (Ent) to select it.
The display reads:
“STANDBY
“AFTER
The washing program must not be interrupted.
“SELECT PRODUCT
“READY FOR USE
”
”
”
0:00 ”
Press the
keys to set the desired time. Press E (Ent) to
save.
If the set time has already passed, the display reads:
“ STANDBY
”
15
English
8 - USE OF THE VENDING
MACHINE
When the necessary temperature has been reached, the
display reads:
“SELECT PRODUCT
“READY FOR USE
Important
“
“
Read this manual in full before using the machine so as to
become sufficiently familiar with its functioning.
Bean hopper empty
Before using the machine after a period of inactivity it is
advisable to read again paragraph 8.3 “First switching
on”.
When the bean hopper is empty, the coffee grinder stops
and the display reads:
8.1
Machine status
“COF. BEANS EMPTY
“READY FOR USE
Depending on the power supply, the status of the machine
can be as follows:
Off and electrically insulated
•
•
Main switch (Fig. 5) in “0“ position.
Only the settings memory is on.
On
•
•
Main switch in “I“ position.
All functions are on and the display (ref. 8 - Fig. 1) is
lit.
“
“
The dispensing LED inside the coffee selection key turns
off.
READY
The message “R
Y” refers only to the availability of
hot water.
Fill the bean hopper and delete the B E A N H O P P E R
E M P T Y message by pressing one of the two coffee keys
for about 5 seconds.
Energy saving
Water tank empty
It indicates the energy saving of the machine when the
TIMER function is on (see SETTINGS) and automatically
turns the machine on and off.
When the water tank is empty, the program stops automatically and the display reads:
•
•
•
•
Main switch in “I“position;
ENERGY SAVThe display shows the message: “E
ING
G”.
Settings memory is on.
The machine is not dispensing beverages.
“FILL WATERTANK “
Fill the tank and restart the cycle.
Dump box full
8.2
Recommendations
Prolonged inactivity
Following a long period of inactivity, the circuit should be
fully cleaned for hygienic reasons.
Place a cup under the hot water spout (ref. 7 - Fig. 1) and
fill it with water by pressing the hot water key.
Temperature control
Every time the machine is started, the display reads:
“WARMING UP......“
16
When the Dump box contains 30 used coffee grounds, the
display reads:
“DREGDRAWER FULL
“READY FOR USE
“
“
The machine can dispense water only; remove and empty
the drawer.
READY
The message “R
Y” refers to hot water dispensing only.
English
8.3
First Switching on
Filling the water tank
Remove the water tank and place it under a water faucet.
Filling the bean hopper
Pour coffee beans in the hopper (Fig. 7).
Fill the tank (Fig. 9) with tap water.
Put the water tank back in place.
Fig. 7
Fig. 9
Close the hopper by placing the cover on the top (Fig. 8).
Coffee beans should be fresh, non-oily and of medium
grinding.
Fixing the cover lock plate
Put the plate on the cover lock and position it carefully as
shown in figure 10.
Fig. 8
Fig. 10
17
English
After fixing the plate the cover must be placed on the water
and bean hoppers before using the machine (Fig. 11).
Important
Prime the circuit before starting the machine for the first
time, following a long period of inactivity, if the water tank
has been fully emptied or if the pump has malfunctioned.
Grinding adjustment
The grind setting should be adjusted when the coffee is not
dispensed properly: If the coffee drips out slowly then your
grind is too fine. If the coffee is dispensed too quickly then your
grind is too coarse. The suggested initial position is at point 5.
Fig. 11
Secure the cover by turning the key in the lock (Fig. 12).
If grinding is too coarse and the coffee is dispensed too
rapidly, adjust the grinder to a finer setting (e.g., from 5 to
3). If the coffee drops out, select a coarser setting (e.g.,
from 5 to 7) (Fig. 13).
Fig. 12
Water circuit filling
Place a cup or other similar container under the hot water
spout. Start the machine and follow the procedure below
to fill the water circuit:
- Wait for the display to read:
“VENTILATE
“
Now press the HOT WATER key, the pump starts automatically and after a few seconds the display reads:
“SELECT PRODUCT
“READY FOR USE
“
“
indicating that the circuit is ready and the machine can
start dispensing beverages.
18
Fig. 13
Important
Grinding adjustments must be performed only when the
grinder is on. If possible avoid selecting position 1. Use
instead a different coffee blend, since not all blends produce the same results.
English
To adjust grinding, follow the procedure outlined below:
- when the machine is off, open the service door (ref.
15 - Fig. 1) using the supplied key, position the silicon
pipe (ref. 26 - Fig. 1) (cutting out the safety
microswitch), turn the main switch on and verify that
the machine turns on;
- press the coffee key and verify the coffee outflow from
the dispenser;
- adjust the grinding selection accordingly;
- turn the main switch off, remove the silicon pipe and
close the service door using the supplied key.
Adjusting the cup filling level
Warning
The new grinding selection can be appreciated only after the
third coffee grinding.
Fig. 15
Coffee blends
Coffee must be fresh and an espresso coffee blend must be
used.
To obtain a strong and tasty espresso, use a specific espresso machine blend. Keep the coffee in a fresh place in
a airtight sealed container.
With this machine the quantity of coffee dispensed can be
adjusted according to the cup used.
Select the desired quantity by pressing the two selection
keys. The display will show the corresponding messages.
8.4
Beverage dispensing
Adjusting the coffee dispenser
The coffee dispenser is adjustable according to the cup
size.
For short cups, position the dispenser as shown in figure
14.
For tall cups, position the dispenser as shown in figure 15.
To set the cup filling level press the corresponding selection
key until the desired quantity has been reached (max. ca.
250 ml).
When performing this operation, the display reads:
"1 SMALL COFFEE
"
"PROGR. QUANTITY
"
"1 COFFEE
"
"PROGR. QUANTITY
"
Important
This operation can be interrupted only after the minimum
quantity has been dispensed. If the pre-brewing function is
on, when adjusting the cup filling level keep the selected
key pressed also during pump pauses until the desired
quantity has been reached.
Fig. 14
19
English
When setting the desired quantity, the following message
appears on the display:
Coffee dispensing
“HOT WATER
“PROGR. QUANTITY
Place the cup on the Grill drip tray (ref. 3 - Fig. 1) under
the dispenser (ref. 6 - Fig. 1).
Press the corresponding selection key and the machine
automatically dispenses the selected coffee.
“
“
Place the glass or cup under the hot water spout (ref. 7 Fig. 1) and press the hot water selection key. Water is dispensed automatically.
Warning
Coffee can be programmed only if the corresponding setting is on (see page 14).
8.5
Messages and special
warnings
Hot water is dispensed thanks to a circuit that guarantees
that the water is tastefree and at the right temperature to
prepare tea and soups.
The machine shuts off automatically - partially or totally when the bean hopper is empty or the machine is malfunctioning. The cause of the shut-off appears on the display
located on the control panel.
If the display shows a warning message, contact the SUPPLY OPERATOR.
Press the HOT WATER key (Fig. 16), the display reads:
Bean hopper electronic control
Hot water dispensing
“HOT WATER
“
When the bean hopper is empty, the machines stops grinding after about 20 seconds. Fill the bean hopper following
instructions outlined on page 16.
Coffee beans protection against
impurities
HOT WATER
Even the best coffee beans may contain impurities (stones,
metallic parts, etc.)
To avoid damaging, the coffee grinder is equipped with a
protection device against impurities.
If a foreign body falls into the grinder, a special noise is
produced: turn the machine off immediately!
Grinding stops automatically in about 20 seconds thanks
to the electronic control.
Important
To avoid damaging the coffee grinder motor do not restart the machine until the foreign body has been removed.
Fig. 16
Follow the procedure outlined on page 24.
If the corresponding setting is on, only the set quantity of
hot water is dispensed. Otherwise, it is necessary to stop
water dispensing by pressing the key again when reaching the desired level of hot water.
To set the quantity of hot water, press the hot water selection key until the desired quantity has been reached.
Warning
The quantity of hot water dispensed can be programmed
only if the corresponding setting is on (see page 14).
20
Water level electronic control
The machine stops automatically when the water level in
the tank is below the minimum value detected by the floating indicator (ref. 10 - Fig. 1).
Fill the tank following instructions outlined on page 17.
English
9.2
9 - MAINTENANCE
9.1
Foreword
Warning
Cleaning and maintenance
Maintenance operations must be performed at least once
a year and include testing the condition of the machine
and the conformity of the electric system.
Water tank/ Drip tray/ Dump box/ Brew
group / Machine
Before performing maintenance and /or cleaning procedures, unplug the machine and wait until it is cold.
Follow the instructions contained in this manual to obtain
maximum beverage quality and guarantee the correct
functioning of the machine.
To keep the dispensing outlet and brew group (ref. 18 Fig. 1) clean, the Dump box should be emptied daily, according to needs (Fig. 17).
The machine and its non-removable components must be
cleaned with cold or warm water using non abrasive
sponges and wet cloths unless otherwise stated (this operation must not be performed on exposed electrical components).
•
•
•
•
•
•
•
•
Do not use detergents or solvents that could modify the
shape or functionality of the machine and its components.
Do not soak the machine in water or other fluids: the
machine will be damaged.
Do not wash component parts in the dishwasher.
Always hand-dry the machine components, do not
place them in the oven or microwave oven.
Do not use direct jets of water.
All the components that require cleaning are easily
accessible and do not require the use of tools.
Regular maintenance and cleaning keep the machine
in good condition and guarantee its efficiency for a
longer time while respecting standard hygienic regulations.
The machine counters keep track of the number of beverages dispensed and allow standard maintenance
interventions to be programmed by the maintenance
technician.
Fig. 17
The water tank (ref. 9 - Fig. 1), Dump box, drip tray (Fig.
18) and Grill drip tray (Fig. 18) should be washed regularly using non abrasive detergents and dried with care.
Important
When performing maintenance operations follow the timetable
outlined in section. 14.1 in the general maintenance table.
Warning
In case of failure and/or malfunctioning contact an APPROVED
ASSISTANCE CENTER.
fig. 18
21
English
The coffee dispenser (ref. 6 - Fig. 1) can be removed for
cleaning.
Remove the protection cover (Fig. 19).
Wash the dispensing channel (Fig. 22) and rinse carefully
with hot water.
Fig. 19
Unfasten the knurled screw under the dispenser (Fig. 20).
Fig. 22
Clean the machine periodically using a wet cloth, and then
dry it.
Brew group
The brew group must be cleaned every time the coffee
bean hopper is refilled and at least once a week.
Turn the machine off by pressing the main switch (ref. 4 Fig. 1) and open the service door (ref. 15 - Fig. 1).
Fig. 20
Remove the Dump box first (Fig. 23).
Remove the dispenser by lifting it out (Fig. 21).
Fig. 21
22
Fig. 23
English
Remove the brew group using the handle and pressing the
“PRESS” sign (Fig. 24).
the filter back in and fasten the screw using the key.
Remove the coffee residue drawer for cleaning (Fig. 26).
Fig. 26
Use non-abrasive detergents only.
Clean the dispensing outlet and place the coffee residue
drawer back in.
Fig. 24
The brew group must be cleaned with hot water and no
detergents.
The stainless steel filter must be free of coffee
residue.
Place the brew group back in using the handle until it locks
in place, then close the service door (ref. 15 - Fig. 1).
Warning
When placing the brew group back in, do not press the
“PRESS” sign (the machine would be damaged)!
Remove the upper filter for cleaning. Use the supplied key
(ref. 25 - Fig. 1) to unfasten the screw counterclockwise
(Fig. 25).
Wash and dry all components of the brew group, place
Fig. 27
Important
Fig. 25
If the brew group is not inserted correctly, the display reads:
“BREW UNIT MISS
“
Coffee cannot be brewed. The machine is not working.
Place the Dump box back in (ref. 1 - Fig. 1).
23
English
Pull up the lever carefully (Fig. 30) noting down the grinding selection.
Now the hopper can be removed for cleaning.
Coffee grinder
Warning
Never put water inside the grinder, to avoid irreparable
damage to the machine!
Clean the coffee bean hopper regularly. This operation must
be performed only by a specialized technician only.
Unplug the machine from the socket (ref. 5 - Fig. 1).
Remove the cover with the lock (ref. 21 - Fig. 1) and the
bean hopper cover (ref. 12 - Fig. 1).
Empty the bean hopper and unfasten the two fixing screws
(fig. 28).
Fig. 30
Turn the adjusting ring counterclockwise making the blue
signs coincide (Fig. 31).
Fig. 28
Remove the screws from the adjustment lever (Fig. 29).
Fig. 29
24
Fig. 31
Now the grinding ring can be removed, by pulling it up
gently (fig. 32).
Fig. 32
English
Clean the ring using the supplied brush (Fig. 33) and
vacuum the grinding area and ring.
Proceed carefully so as not to modify the positioning of the
reference signs.
Important
Given the complex structure of the machine hydraulic circuit, descaling cycles outlined below (automatic and standard) do not include all the channels. Easily accessible components are excluded, namely the brew group (ref. 18 Fig. 1) and the plastic pin/valve connected to it.
The descaling procedure must be performed regularly every
3 – 4 months. If the water used is particularly hard, it can
be performed more frequently.
To avoid hazardous delays, the machine is equipped with
a specific counter that, according to water hardness, signals the urgent need to perform this operation.
In this case the display will show the following message:
“DESCALING
“READY FOR USE
Fig. 33
Reassemble the coffee grinder following this procedure in
reverse order.
If the adjusting ring has turned during cleaning, reposition
it to make the blue reference sign coincide with one of the
three grooves.
Place back the grinding ring making sure that the blue reference signs coincide.
Turn the adjusting ring clockwise until the red reference
signs coincide.
Insert the adjustment lever on the ring so that it coincides
with the grind selection previously noted.
Place the hopper back in and fasten the screws.
Descaling
Warning
Descaling operations must be performed when the machine is cold.
“
“
When this message appears the machine does not stop but
it is advisable to perform the descaling procedure as soon
as possible. To delete the message, follow instructions outlined on page 14.
Initially the machine is set on a 25°fH hardness value, so
that the message appears after about 150 litres.
If the water is particularly hard, and to improve the quality
of coffee, a water filter should be used to protect the machine and to reduce the frequency of descaling.
Important
Use decalcified water specific for coffee machines.
This warning can however be adjusted according to water
hardness, following the instructions outlined on page 13.
The following adjustments are possible:
- Hardness 4: hard water, above 29°fH (14°dH),
corresponding to ca. 80 l of water
used;
- Hardness 3: medium-hard water, ca. 20-29°fH (714°dH), corresponding to ca. 150 l of
water used;
- Hardness 2: soft water, ca. 12-20°fH (4-7°dH), corresponding to ca. 300 l of water used;
- Hardness 1: very soft water, below 10°fH (3°dH),
corresponding to more than 500 l of
water used.
The descaling procedure is used to eliminate limescale buildup from the surfaces and holes of the hydraulic circuit,
guaranteeing the good functioning of the valves, of the
heating controls and other important components.
25
English
Eliminating the descaling message
Warning
Press the keys to position the asterisk on the Descal. Warning option from the settings menu and select it by pressing
E (Ent).
The display reads:
Never use vinegar to avoid damaging the machine!
Two descaling procedures are available:
-
“RESET DESCALING
“NO
AUTOMATIC DESCALING;
STANDARD DESCALING.
Automatic descaling
Select this option from the settings menu (see page 14).
Press the
keys to position the asterisk on the Descaling
option and select it by pressing E (Ent).
The display reads:
“DESCALING
“
Pour the descaling agent in the water tank (ref. 9 - Fig. 1)
following instructions on the product packaging. Place a
container of sufficient capacity under the hot water dispensing pipe (ref. 7 - Fig. 1) and press the HOT WATER
key. Automatic descaling begins, the pump injects small
quantities of decalcifier into the system and stops to give it
time to work.
During this phase, the display reads:
“MACHINE IS
“DESCALING
“
“
After about 45 minutes, when descaling is over, the display reads:
“DESCALING
“FINISHED
“
“
Press E (Ent). The pump stops. A message appears to signal that the machine must now be cleaned to eliminate
decalcifier residue.
“RINSE MACHINE
“FILL WATERTANK
“
“
Remove the water tank (ref. 9 - Fig. 1), rinse it with care
and fill with fresh water. Press E (Ent) to empty the tank
completely. The display reads:
“RINSING
“FINISHED
“
“
Go back to the settings function by pressing E (Ent).
Note:
26
Descaling can be exited by pressing C (Esc).
“
“
To modify this value YES or NO press the standard keys.
When this resetting is performed, all internal water counters
are reset and the DESCALING message disappears.
If now the following function is selected
“SIGNAL DESCAL.
“
the DESCALING message does not appear on the display,
replaced by the following message:
“QUANTITY WATER
“NOT REACHED
“
“
English
13 - ACCESSORIES
10 - CARE
When the machine is not used, it must be turned off and
unplugged from the socket.
The Royal Office machine can be equipped with the following optional components:
Keep the machine in a dry place away from children.
-
Coiner box
A coiner box can be attached to the machine.
If the machine is not used for a long period of time, it must
be protected from dust and dirt.
-
Cabinet
To support the machine and to store cups, stirrers, sugar
and stocks.
11 - MACHINE SCRAPPING
For further information see the corresponding manuals.
Waste disposal following machine scrapping must be carried out according to environmental considerations, so as
to prevent ground, water and air pollution.
Local environmental regulations must be complied with.
Cut the power cord so that the machine cannot be used.
Take the machine to the appropriate waste collection centre.
12 - TROUBLESHOOTING
In case of faults or damage possibly after a fall, immediately unplug the machine.
If the problem cannot be solved by following the instructions presented in the table below, contact the nearest ASSISTANCE CENTER.
Important
Problems may arise when using the machine that can cause
malfunctioning.
The possible causes are listed in par.14.2 of this manual in
the Troubleshooting table below along with the corresponding solutions.
If the problem cannot be solved, the machine must not be
used until the nearest ASSISTANCE CENTER has been contacted.
27
English
14 - GENERAL MAINTENANCE
To keep the machine in good working conditions cleaning and maintenance procedures should be performed according to
the instructions in the table below.
Operations to be performed
At each supply
After 2 supplies
After 5-10 supplies
Emptying and cleaning the Dump box
Emptying and cleaning the drip tray
Emptying and cleaning the water tank
Cleaning the coffee brew group
Oiling the coffee brew group
Cleaning the coffee bean hopper
14.1 Troubleshooting
In case of failures or faults, immediately unplug the machine. Contact the maintenance technician or an Approved Assistance Centre for interventions and repairing. Incorrect repairing can present serious hazards for users. The manufacturer
declines responsibility for incorrect repairing: the warranty also expires.
Problem
CAUSE
REMEDY
No display message.
No power supply.
Turn the main switch on, check the
socket and fuse.
The service door is open.
Close the service door.
The brew group is missing.
Insert the brew group.
The brew group is jammed.
Clean the brew group.
No water.
Fill the water tank.
No coffee.
Fill the coffee hopper.
In both cases, restart the brewing cycle.
No drawer.
Insert the Dump box correctly.
Coffee grinder jammed.
Clean the coffee grinder.
Coffee comes out too fast.
Grinding too coarse.
Adjust to a finer grinding (e.g., from 5
to 3).
Coffee comes out too slowly.
Grinding too fine.
Adjust to a coarser grinding (e.g., from
3 to 5).
Coffee has no sufficient crema.
Unsuitable coffee blend or coffee is not
freshly toasted.
Change coffee blend
It takes long for the machine to warm
up, or the load capacity is insufficient
There is limescale in the machine.
Descale the machine following instructions.
The brew group cannot be removed.
The brew group is not in the correct position.
Start the machine, close the service
door, insert the Dump box. The brew
group is automatically placed in the
correct position.
Automatic coffee brewing does not
start.
28
INTERNATIONAL GROUP
EC DECLARATION OF CONFORMITY
EC 73/23, EC 89/336,
EC 92/31, EC 93/68, EC 98/37
We :
SAECO INTERNATIONAL GROUP S.p.A
Via Panigali, 39
40041 GAGGIO MONTANO (BO)
declare under our responsibility that the product :
AUTOMATIC VENDING MACHINE
TYPE : SUP015V
to which this declaration relates is in conformity with the following standards or other normative
documents :
Safety of household and electrical appliances - General requirements
EN 60335-1 - 1994 + A11 / A12 / A13 / A14
Safety of household and electrical appliances - Part 2^
Particular requirements for appliances for heating liquids
EN 60335-2-15 - Edit.1996 + A1
Safety of household and electrical appliances - Part 2^
Particular requirements for coffee mills and coffee grinders
EN 60335-2-14 - Edit.1996 + A11 / A1 / A2
Safety of household and electrical appliances
Particular requirements for automatic vending machine
Document IEC 60335-2-75 - Edit.1995
Limits and methods of measurements of radio disturbance characteristics of electrical motor-operated and thermal
appliances for households and similar purposes, electric tools and similar electric apparatus
EN 55014 - 1 - Edit. 1993 + A1 / A2
Electromagnetic compatibility (EMC)
Part. 3^ Limits - Section 2 : Limits for harmonic current emissions (equipment input current ≤ 16A per phase)
EN 61000-3-2 - Edit. 1995 + A12 / A1 / A2
Electromagnetic compatibility (EMC)
Part 3^ : Limits - Section 3 : Limitation of voltage fluttuations and flicker in low-voltage supply systems for equipment with
rated current ≤ 16 A.
EN 61000-3-3 Edit. 1995
Immunity requirements for household appliances, tools and similar apparatus.
Product family standard EN 5014 - Edit. 1997
Electromagnetic compatibility (EMC)
Part 4^ : Testing and measurement technique.- Section 2 : Elelctrostatic discharge immunity test.
Basic EMC publication - EN 61000-4-2 Edit.1995 + A1 Edit. 1998
Electromagnetic compatibility (EMC)
Part 4^ : Testing and measurement technique.- Section 4 : Elelctrical fast transient/burst immunity test
Basic EMC publication - EN 61000-4-4 Edit.1995
Electromagnetic compatibility (EMC)
Part 4^ : Testing and measurement technique.- Section 5 : Surge immunity test.
EN 61000-4-5 Edit.1995
Electromagnetic compatibility (EMC)
Part 4^ : Testing and measurement technique.- Section 6 : Immunity to conduced disturbance,
inducted by radio-frequency fields. EN 61000-4-6 Edit.1996
Electromagnetic compatibility (EMC)
Part 4^ : Testing and measurement technique.- Section 11 : Voltage dips, short interruptions and voltage variations
immunity tests. EN 61000-4-11 Edit.1994
following the provisions of the Directives :
EC 73/23, EC 89/336, EC 92/31, EC 93/68.
Gaggio Montano
17/10/00
President
Sergio Zappella
Cod. 0333.964 - Ed. 00 05/01