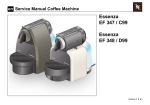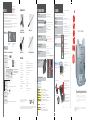
1
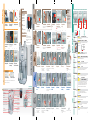
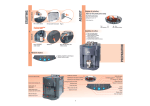
Every 3-4 months or when
the message appears:
DESCALE
Supplied accessories
DESCALING
READY FOR USE
TROUBLESHOOTING
- It is not permitted to draw off coffee, while descaler is in the water tank.
- For descaling, the machine has to be connected to the mains and the main switch
has to be switched on.
- For the descaling use a non-toxic and/or harmless descaler, available in common trading.
- NEVER use vinegar, it could damage the machine!
- Follow closely the manufacturer's instructions!
- Should the descaling be interrupted by switching off the mains, it is absolutely necessary
to execute a complete cleaning cycle after restarting.
- During the complete descaling process the machine interrupts, automatically and at
regular intervals, the output of the descaling agent.
CLEANING
No display
With selection «Preground coffee»
only water comes instead of coffee
- Fill with a measuring dipper of ground coffee
- Activate the cup heater and put
on the cups
- Eventually clean the brewing unit,
descale
Coffee is not hot enough
Key for brewing unit
dismantling/assembly
1 Preparation
Cleaning brush
No hot water / steam
Fill the water tank with
the descaling solution as
instructed by the
manufacturer.
2 Descaling
Heating time is too long
Not enough water
Casing
Wipe with a soft damp cloth
Dregs drawer
Drip tray
Rinse under fresh water
- Rinse under fresh water
- Extract the filter on the inside of the tank
and clean carefully; insert the filter by
light pressure and rotative movement
Water tank
- Clean nozzle with a needle
(Attention: only proceed when machine is
switched off and tap is closed)
Hot water / steam nozzle is blocked
Place a big container
under the hot water /
steam nozzle.
- During cleaning the device must not be connected to the mains.
- Do not dry any components in traditional or microwave ovens.
- Switch on main power switch
- Check plug and connection
No power to the machine
use only a non-abrasive cleaning agent
Coffee outlet
1. Extract external body by rotation and
downwards movement
Clean weekly
2. Rinse under fresh water
Pannarello
1. Extract external body by
rotation and downwards
movement
- Descale machine
2. Remove the internal mechanism
Duration: approx. 60 min.
Observe the display... ...and continue like follows:
DESCALING
READY FOR USE
Push
DESCALING
OPEN KNOB
Open the knob
Coffee measure
1.
2.
3.
4.
Brewing unit cannot be
removed
Test strip for water hardness
for 3 sec.
Technical data
... the knob
Interrupt the descaling
1.Close the knob
MACHINE IS DESCALING
OPEN KNOB
2.Push
DESCAL. INTERRUPTED
EMPTY WATERTANK
3.Rinse and fill up
the water tank
open ...
If the descaling process is being
interrupted, we suggest, to start
a complete descaling cycle at
a later date.
4.Rinse machine
DESCALING FINISHED
CLOSE KNOB
Close the knob
RINSE MACHINE
FILL WATERTANK
Rinse the water tank and fill with 1 liter of fresh water
RINSE MACHINE
PRESS KEY
Push
RINSE MACHINE
OPEN KNOB
Open the knob
-
Type
Nominal voltage
Nominal output
Supply
Casing material
Dimensions (L x W x H)
Weight (net)
Length supply cable
Supply casing
Operating panel
Water tank
Water tank capacity
Coffee bean container capacity
Heating
Pump pressure
Safety devices
SUP 021YDR
See name plate under the coffee machine
See name plate under the coffee machine
See name plate under the coffee machine
Metal - plastic
approx. 27,5 x 35 x 42 cm / 11 x 14 x 17”
approx. 11 kg / 22 lbs
1.2 m / 1.30 yards
yes
frontal
removable
1.8 l / 60 oz
180 g / 60 oz beans
Aluminium
15 bar
Security valve pump pressure
Security thermostat
MACHINE IS RINSING
1. Remove drip grid
1.1 Open service door
1.2 Remove dregs drawer and
drip tray
Brewing unit
Clean weekly
Never clean in the dishwasher
«Reset» brewing unit
1
2.
1.1
1.
1.2
This TSM SUCCESS MANUAL® has been examined by SEV for conformity with the safety-relevant standards, and has been
analysed by an application-oriented risk analysis for the completeness and correctness of the indications for a safe use of
the appliance. Thereby we assume a use with which can be reckoned based on common-sense.
6
3. Rinse all components of the nozzle
under fresh water in order to remove
milk residues
2
TSM SUCCESS MANUAL® - safe to use - easy to
understand due to TSM® - Total Security Management
and ergonomic communication®
Close the knob and the descaling process is finished.
Close service door
Switch on machine
Brewing unit is unlocked
Continue with
1.
Brewing unit cannot be
inserted
cod. 1.6.589.19.02 Rev. 00 del 20/09/02
close ...
MACHINE IS DESCALING
RINSING FINISHED
CLOSE KNOB
T Y P E S U P 0 2 1 YDR
7
The output does not start
2.1 Loosen sieve with key …
Observe the display:
ENERGY SAVING
DESCALING
FILL WATERTANK
VENTILATE
COFFEE BEANS EMPTY
DREGDRAWER FULL
BREWUNIT MISSING
DREGDRAWER MISSING
Push the «MENU/OK» button
Descaling see respective section ; page 6
Fill the tank with fresh water
Ventilate (prime) the circuit (Starting)
Fill coffee bean container with coffee beans
Empty the dregs drawer (with the machine switched on)
Correctly insert the brewing unit
Correctly insert the dregs drawer and the drip tray
CLOSE DOOR
Close the service door
GRINDER BLOCKED
BREWUNIT BLOCKED
Grinding motor is blocked
The motor of the brewing unit is blocked
Please call an authorized service center
2. Press PUSH position and remove unit.
If necessary remove the upper filter
of the brewing unit
Clean all the components under
running warm water and dry carefully.
Clean service area
2.2 … and remove
Operating Instructions
3. Reassemble brewing unit and
push in.
DO NOT press PUSH position with
the brewing unit inserted.
4. Insert drip tray and dregs drawer
and close the service door
Please read these TSM® operating instructions before operating the device. In order to
obtain drinks of good quality and to avoid damage or injury, follow the instructions
precisely. Ensure that these instructions are given to any other users of the device and
that they are kept in a safe place so that they can be referred to at any time. The device
has been conscientiously checked for safety and correct operation. It left the factory in
fault-free working order.
The enclosed «Safety Instructions» form an integral part of this user manual.
Read «Safety Instructions» prior to initial operation of the device and keep it together
with the user manual.
8
9
1
>
2
>
Insert plug into power socket
3
Ventilate
2.
Fill the water tank with
fresh drinking water
HOT WATER
WARMING UP ...
1
2
Place a receptacle under
the steam nozzle
>
3
Switch on the machine
(The switch is placed on the
rear of the machine)
5
>
6
4
... slowly:
Adjust to coarser grinding.
Filling quantity in the cup
fine
coarse
1. Place cup
2. Press and hold desired button
(small coffee, normal or large)
3. Release button when correct quantity
is reached
4. The quantity remains stored
>
6
Press again key to reset
the machine to normal condition
Observe the display
WARMING UP...
The machine is heating up
4.
5
If the water flows regularly
close turning knob
SELECT PRODUCT
READY FOR USE
The machine is ready for use
In case of a long period of non-use it is recommended to ventilate
(prime the unit) before starting.
Grid / Drip tray
Indicator: drip tray full
Adjusting lever for coffee quantity
Fresh water tank
Mains switch
Turning knob steam/hot water
Operating panel
Descaling
>
4
>
1
Improve froth
(Crema)
ADJUST
3
or
or
strong
coffee
’Press button and push coffee
outlet to the back
1
>
Place a container or
a big cup under outlet
1
1
or
3
Evtl. select quantity of
coffee
Press once for 1 cup
Press twice for 2 cups
2
Remove container or
cup (s)
>
3
>
4
or
1
2
2
>
Place a container or
a big cup under nozzle
3
3
Select preground coffee
1
>
4
>
5
Add frothed milk on
coffee
or
Press once
Select desired coffee
- Remove cup
- Max. 1 measuring dipper
(= 1 cup)
- NEVER use instant coffee
>
6
>
7
>
Language
3
Function…
Adjustment…
select
confirm
select
confirm +
store
LANGUAGE
>
LANGUAGE
ENGLISH
2
Start programming
ITALIANO - FRANCAIS - Deutsch - …
Select the desired language.
Water hardness
1 sec.
Preheat cups
Temperature
WATER HARDNESS
HARDNESS 1 - H... 2 - H.. 3 - HARDNESS 4
Measure the hardness of Select the hardness shown on the test strip
the water during 1 sec.
Hardness 1
Read after 1 min.
Hardness 2
Hardness 3
Hardness 4
CUP HEATER
ON - OFF
TEMPERATURE
MINIMUM - LOW - MEDIUM - HIGH - MAXIMUM
Select temperature according to your taste.
Prebrewing
1
2
>
3
4
5
Froth up milk
Start preparation
Place cup under nozzle
- Empty the nozzle of
remaining water
- Close turning knob
2
- Immerse nozzle ~3-4 cm/1-1.5” While shifting cup …
deep in liquid
- Open turning knob
3
>
4
>
6
End preparation
5
>
>
6
Rinse and clean nozzle with
damp cloth
to avoid the froth to dry up
on nozzle
7
>
>
PREBREWING
ON - OFF - LONG
By switching on this function the coffee obtains an outstanding
taste and full flavor.
7
Remove cup
Pregrinding
PREGRINDING
ON - OFF
During preparation, the next portion of coffee is already ground
(fast preparation for private parties, with friends, etc. ...)
Number of brewings
TOTAL COFFEES
Counter that allows to see how many drinks have been prepared.
HOT WATER
READY FOR USE
1
1
SELECT PRODUCT
READY FOR USE
2
3
Select hot water
4
Place cup under nozzle
- Immerse nozzle ~3-4 cm/1-1,5”
deep in liquid
>
2
>
3
>
6
5
Start preparation of
hot water
4
Draw off hot water
>
5
6
CLOCK
CLOCK - CLOCK TIME ON/OFF TIME - SHOW CLOCK TIME
This function, to be activated and deactivated by the user, opens
up the possibility to program the ON / OFF- Time of the machine.
To make sure that the programming works correctly, the local time
must be adjusted. When the machine is on stand-by or when a
function is selected, the machine shows the adjusted time.
7
End preparation and
remove cup
>
Clock
Press button to reset machine
in normal condition
Rinsing cycle
RINSING CYCLE
Enables the removal of the fat residues of the coffee.
The program is divided in 4 cycles which includes rinsing with
fresh water.
>
Factory settings
FACTORY SETTINGS
This functions allows to reset the machine on the original
settings made by the manufacturer.
Energy saving
ENERGY SAVING
Rinsing function
RINSING
Menu + OK
1
2
LANGUAGE
WATER HARDNESS
3
Switch on cup heater plate and place cups on top.
If necessary adjust
nozzle
Hot water/steam nozzle
>
Cancel with ESC
4
Fill in preground coffee
2
ENERGY SAVING *
RINSING
>
1 SMALL COFFEE
PREGROUND COFFEE
SELECT PRODUCT
PREGROUND COFFEE
’Press button and push coffee
outlet to the back
- Use fresh roasted coffee beans
- Change the grade of grinding
4
>
Select the desired coffee
>
Press coffee outlet unit
>
- Use another coffee
mixture (appropriate coffee
sort for fully automatic
espresso machine)
weak
coffee
2
Press coffee outlet unit
1
1
Optional grips
1
>
STEAM
Container for coffee grounds
(accessible through service door)
Adjusting lever for grinding coarseness
Small coffee (Espresso)
Coffee
v
Large coffee
esc
Preground coffee
Hot water
2
1
Fill 1/3 cup with cold milk
v
Funnel tube for
preground coffee
Service door/
brewing unit
Coffee outlet unit (adjustable)
Coffee bean container
>
1 SMALL COFFEE
Place the cup and
adjust coffee outlet
Programming buttons
Cup heater plate (danger of burns)
1
Place the cup(s) and
adjust coffee outlet
SELECT PRODUCT
READY FOR USE
Start drawing off water
>
1
... rapidly:
Adjust to finer grinding.
Choose hot water
Ventilate
4
3.
>
When the coffee flows
too …
1
PROGRAMMING
Fill the container
with coffee beans
3
Adjust only when grinding unit
is running
The machine is adjusted
to an average value.
The recommended
values are 8 (+4/-2)
or
2
only when required
1
BEAN COFFEE
See name plate
on the machine
Coarseness
PREGROUND COFFEE
>
CAPPUCCINO
3
HOT WATER
>
PREPARATION
2
ADJUSTMENT
>
Preparation
STARTING
1
1.
2
Start preparation of steam
Place cup under nozzle
- Empty the nozzle of
remaining water
- Close turning knob
- Immerse nozzle ~3-4 cm/1-1.5”
deep in liquid
- Open turning knob
3
Heat up the beverage while
shifting cup
4
5
End preparation
3
Remove cup
6
Rinse and clean nozzle with
damp cloth
to avoid the froth to dry up
on nozzle
TSM SUCCESS MANUAL® - ©170902 - by SEV / ASE
4
When pressing the button «MENU / OK» the machine automatically
is set in energy saving mode.
ON - OFF
If the function is activated, an automatic rinsing of the coffee outlet
zones is done.
5