1
User's Manual
Before operation, please carefully read the instructiOn,fianUal
Androad4.t.l
IN CAR DIULTIIUIEDIA&EPs sYsTElvI
T=gE@@@E@tld
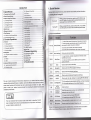
CATALOTUE
1. Qulck
Rrvlrw
tllell
urlng lhlr devior, Pllere
Tstnlnt On rnd Turnlng olt
Wernlngl
l.l
l,l
tha mrnurl
rtrd
l.f.ty
end law lnformatlon'
I Wncn you plug ln tho car keys, swltch on ACC START or the
wlll be€utomaticarrvturned on'
I ::1ql9Stly:tll:-q:'.]:o
dleplaying the boot anlmatlon LOGO.
Turnrns
on
Turnlng
you take off the key, switch to ACC OFF, or turn off the
off I When
.lr:rf h'Cc power, the device will automatically beshut down.
Prnol Function Button
ln the offstate, press this button short, the system is turned on'
O. ln the boot state, press this button short, the system becomes
O.
I'WR/VOL PoweriVolume
-mute; press this button, the system is shutdown
@ Turn
this button clockwise, the volume is increased
counterclockwise, the volume is decreased'
@ Turn this button
HOME
Main lnterface
Click to enter into main interface.
O. ln each function, extended manipulation of information, press
The use of certain features of these devices depends on your network service provider's
providers'
network settings and performance. ln addition, due to the different network servic€
some certain functions of this device may not be able to apply or restrlct to apply' And
please contact your network service provider for consultlng the n€twork functlona and
availability of this device
This mark indicates that the product used a label whlch la classlfled CLASSI
is
laser, indicating that the device uses theweakest level of laser beam, and there
no risk of radiation outside the unit'
the MENU key to pop uP;
@. ln the main interface, press the MENU key for the system to
quickly set function
MENU
Main Menu
BACK
Back
NAVI
Navigation
Click to enter into GPS navigation interface.
DVO
DVD Play
Click to enter into disk play interface.
PHONE
PHONE
Click to enter into Bluetooth telephone interface.
RADIO
RADIO
Click to enter into radio interface for receiving FM1/FM2/AM radio
TUNE
Compound
A
ln/Out
Disc Button
Click to back to the last interface.
O. in the audio and video playback interface, up / down one playe
@. ln the radio interface up / move down frequency
disk in and out
lnsert the appropriate memory card ,multlmedla flle
slotsyetem can read the oard
SD
SD Media
Card slot
uet
USB Socket
iTITT
Raa.t Button
Cllok ra.al butlon tO rtaat lyatam lnd ro'ltart.
Mlorophonr
Rao.lv. volo. freth blurtooth tlhphone call
Ml0
d.vlctt by UBB rockct.
rn.xt.rn.l WlFl/3O dongle
0),Conncct oth.r
(2),Connrotlno
Rcmark;All long pfat! mtanl pntr tlma at lallt lratlng g .loond!; Button and socket is
dlfferont accordlne to dlfllllnt olr lyPat' Pl.aaf taka rlrl typ. lt rtandard'
1.5
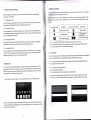
1.3 Tips for Using Touch Screen
when using the touch screen, you can use several ways to perform corresponding
operations on the device.
the lefi lSp ol llre :nf€€11 er€ nolifioeltons for mossagos and evonts; lcons on the right
top of lha aoFr€n 6rB tlovltre ctctug indieator,
gently from the
li thafo lt naw meeecgc, lt wlll bo dlcplayed on tho status bar, slide your finger
and view the
the
message
would b6 dleplayed, Then you could click
dll
lcont
On
alrlu: ber,
1.3.1 Clicking Function
you could select an application icon or optlon on the ecreen to realize clicking function.
For example, click Bluetooth to enter lnto bluetooth application'
'l
statu. brr lndlortor
llrompts
aonl€rtl
lrr dlcatore
.3.2 Pressing Function
m
function'
You could press the current user interfaCe, lCOn' lnputting column by
pop-up
menu'
a
comes
then
lnterface,
For example, press on the blank area of the maln
pressing
F
you could perform some function
ET
1.3. 3 Dragging Function
Drag the touch screen or press the scroll bar for up and down operation' For example,
browse the contact list of the bluetooth phones by dragglng function'
content. Or you could press the screen with two fingers by control the sliding distance
between the fingers to zoom in or out the pag€ content'
Description
Network signal strength
New Message
Description
lndicators on the right
w
Network signal
E
USB connection
WlFlsignal indicator
i
nstructions
Current Time indication
Ilp: You can tap and hold the status indication bar to view the current day.
Noto: The device software is under upgrading, the status indicator may be different with
your device; please refer to-the actual device software'
1.3.4 Zooming Function
when browsing the web, click the screen twice, then you could zoom in or out the page
the left
,l,0 Toxt Entering
Whon edit text, you could use existing method of entering and Android keyboard to edit English,
n{tmbers, and symbols etc., such as editing message, searching key words etc.
tgr the display format would be different according to different status and keyboard of the
orrlorlng, please refer the actual one
I
1.4 Main Screen
This
You can use the touch screen operation to use the various functions of the device.
with
each
switched
be
can
right
sliding
left
or
screen,
main
of
five
a
total
has
equipment
other. Any interface press the HOME physical buttons on the panel to return to the main
screen interface, and display the application
icon in the main screen interface, click any application icon to open the program.
icon
Note: You can add the freedom of the space of the main screen or Remove Programs
of
the
you
view
all
can
icon;
application
the
to see equipment Basic settings section. click
equiPment.
programs of the
1 .6.1 Switch on the Entering Method
opon the text editing interface
Ollck in the editing area, then the editing menu would appear'
At:cording to the input method, input method you want to use the midpoint of the input
rrrothod menu, you can choose the Android keyboard or install third-party input method.
1.6.2 Android Keyboard lnPut
Switch the input method into Android keyboard (see switch input method)
Remark:
1. you can click the number sign key
2.Click
lf
E
to switch to numbers and symbols input mode.
to switch letter case.
2. Function Operations
t
I
2.1 General
2, 1,3
2.1 .1 Steering Wheel
Users could set the steering wheel according to hint.
I
Note: Steering wheel interface is special for cars with buttons, but some cars' steering
button are not able for study but by "can", such as Ford MONDEO
J
> Steering wheel Settings
Solect approprlate map application, then it can beassociated with the navigation button on
tho physical andnavigation icon on the main screen.
Applications> Settings
- General Settings
Application >Setting
> General Settings
Navlgatlon appllcatlon
- Navigation options
. I or example: GO
Steering Wheel lnterface
') . 1
a. First to click "Start"
b. Click the buttons as You want.
c. click the corresponding button on the wheel, if the study displays successful,
there will be a change on the corresponding color on the main screen.
d. Repeat step 1 and 2 till you complete all the buttons'setting on the steering wheel.
e.click,,END"toensurethatthesteeringwheel
When the system is unable to work or there is problems after user used the system, it can
l)o rostored to the factory settings. Once it's restored to factory settings, all the third-party
noftware would be deleted, and the current system settings would be lost. For navigation
software, justneed to install corresponding APK. Please operate carefully'
Applications> Settings
> General Settings
settingiscompleted. lf youwantthe
>
steering wheel button to re-learn, press the [CLEAR] Repeat a, b, c' three steps
2.1 .2 Screen
Calibration (For resistive screen only)
factorY settings
2.2 Navlgation
2,2. 1 Navigation Software lnstallation
Applications> Settings
> General Settings
> Touch screen
.4 lactory settings
calibration
1 . Copy the application program with suffix name
lnatallation methods:
r
Enter the calibration screen to calibrate the screen interface, please click as close as
possible to the cross until a successful calibration, then exit the calibration screen
to SD card or U disk. There are two
lr,Cllck lnto the document management interface to find SD card or U disk directory and
and click installdirectly.
!€loct "APK"
application
After Buccellful lnttell6tlon rgqulr€d lo choogc you n6€d to uee the navigatlon
of
the main
interface
and
NAVI
koya
phyEloal
p6n€l
navlgeilon
on
program, raroclrllon
nlvigtllon appllotllon leon (scc 2,2,4navlgailon optlonB )'
2.
Applications> File Management lnterface
> Expansion card or U disk
a
*E
t,l irdlo
a
File Management lnterface
t
23
I RAD|O
P16at the RADIO button on panelor cllck the icon on
the meln monu to entor the radlo lnterface, the specific
functlone and op€ratlons are as follows:
Rsdlo lnterface
@. Extr a I nterface->Appl ication Program-> I nsta
Application Program
Select the application program with suffix named "APK"
and install.
I I
The functions of lcons in the radio interface are described
bolow:
ldffi
@
Application Program I nterface
Application > Settings
> Applications
> Application Program lnstallation
Note: please copy the navigation map software to the system storage memory first, and then
installthe navigation
APK" Steps are as follows:
@. lnsert navigation data packets to the SD card or a U disc
@.Start the ES file browser ( or other document management software )
@. Enter the" /sdcard/Favorites/mnt/usb/mmcblklpl"( SD) o/'Favorites / mnt/usb/mmcblk1p1"
( U-disk) directory, find the navigation packet directory ( forexample:APK (3rd party application)),
long press the directory and select "Copy" in pop-up menu
@. Go back to the "/sdcard/" directory, choose the paste command
@.Waiting for the copy is complete (30 minutes approximately /3'5G )
0l
d
., -.-
&
rr
@
ET
r
K
EI
r
E
E
Band Switching
Click BAND to switch between mode FM1/FM2lAM'
Search Channel
Backwards
Click to search channel backwards then stopwhen find
clear channel
Click to se"rch channel forwards then stop whenfind
strong and clear channel.
Scan automatically and save channels(Coupled with a
scanning radio signals broadcast for 1 0 seconds, no
signal ofthe radio scan play 3 seconds)
Search Channel
Forwards
Scan all Channels
Locate and DX
Change between locate and DX models.
Audio settings
Click enter the EQ setuP
list of radio stations
List of radio stations, according to the storage for
the playing frequencY Point
Forward tuning
Forward tuning radio
Back tuning
Backward tuning radio
Main Menu
Click to back to main menu'
Back
Click to go back to last interface.
Automatically search
Search and save band automatically'
2.3.2 RDS
Radio interface with RDS lcon details as below:
Click TA symbol to light up, it can source automotive the
station which can broadcast traffic information, the system
will source once every minute, it will stop to display traffic
Traffic Announc ement
matter when we get the news; and it will directly go back to the
situation after traffic information displays.
Alternative
Frequencies
Click AF symbol to light up , RDS can swift to the station which
has stronger signal when the frequency is weak, but the content
of RDS station will not change,.iust move to the other f requency.
Meanwhile it only can source RDS station.
Program Type
Click PTY symbol to light up, RDS radio display type When the
received RDS station, the corresponding PTY information is
automatically displayed.
Regional Link
Click REG symbol, it willonly search the RDS stations with the
same national area code (Pl 8-bit representation of the high
country area code) of the current RDS station. lf REG is not
highlighted, you can search RDS station while ignoring the
area code (excluded the high 8-bit Pl code )
er"., I
lrr Bluctootlr l)Hlrlntl interlar:e, ll will {lcl lnto tho stalus of the Bluetooth search
again will
lhls nrar:hlrra ls rearr;hirrg for [Jlrroloollr tlovicos around, nress p
modc a-nd
automatir:elly lernrltrete tlro aoatr:lt atrrto
Cltooaa lha Blu€lootll rlcvica rrarrro on llro soarch results to match connection. lt will
eulomallr:Elly dfl.!r tll6 {r(lnnoctlon la arrr:r;ossfuljump to the matching list, and there will be a
Hlttaloolh lr:rrn hanldee tho ruccctttful connocted Bluetooth devices
Nole. I lre ftrllowlrrg opardtlons aro performed in the Bluetooth pairing success and connect
rrrrlor llrq r;otttlltlons of oporation.
2 4 ll Bluotooth Phone Book
to enter the Bluetooth Address book interface.
cf icf ff
download the phone book
In tho Bluotooth intorface,
Arr<l
follow
thep
2.4 Bluetooth Wireless Connection
You could create a wireless connection between a mobile phone and this device for data exchange,
Note: O.There may be prohibition or restriction for Bluetooth devices, please abide by local laws.
€).ln order to ensure bluetooth security by the greatest degree, you should in safe and non-public
place when connecting a bluetooth device.
2.4. 1 startup bluetooth application
Under the default status, the bluetooth would be turned
on when the power is connected. Panel"PHON E" key
toquickly enter the Bluetooth interface;
2.4.2 Bluetooth pairing
The whole information of the Bluetooth interface, the mobile search auto-complete matching
(the default passkey: 0000) Matching refers to the mutual recognition process of two Bluetooth
devices for the first communication. After the first connection, the subsequent communication
connection will automatically pair and not have to pair every time. ( depending on mobile
phones).
A list of
dial-up operation when long names and numbers are used to scroll the display
E
r-
rr
Bluetooth Phone Book lnterface
Download the phone book Again after the download is complete, click the
phone is the search function
Download Mobile phone SIM card phone book Again after the download is
complete, click the phone is the search function
All download mobile phone book
Delete all phone book imported
2.4.4 Phone
2.4.41fo achieve the dialing function via Bluetooth
ln the Bluetooth interface, ctict
f,
to enter into the Bluetooth Dial interface
:
H
2.4.6 Bluetooth Music
O. Ctick numbers on the interface, if the input is wrong,
ctict
p
Music lnterface.
to delete
f
cri"r.!
p
grlaying music player for bluetooth music when using
switch to the phone
ff,
into Bluetooth
Note: Some kind of mobile phones need to start
to end up the call.
@.Are on a call, press ftre
I
When connected with bluetooth mobile phone, it can
operate play/pause/down music function.
after entering phone number;
@.ctick
call, press
in the Bluetooth interface, click
lrluetooth music function.
Bluetooth MuBlc lnterface
Bluetooth phone Dial Records lnterface
rtrrt" for MlC.
keys return to
@.Function keys on the panel are unavailable when in the call; the function
normal after hang uP.
I
2.4.4.2To achieve the called function via Bluetooth
when the mobile when phone is connected with Bluetooth device and there is an
incoming call, the interface is divided into two situations:
? 4.7
lrr
f
he whole Bluetooth hardware settings
Bluetooth interface, enter the Bluetooth settings screen'
@
@
@
@
@.ln the Bluetooth Application lnterface
@. ln other function interfaces
The head unit name when searching on phones
Pair settings
Automatic connection
Automatic anSwer
rr
E
2.5 3G
Click to back to main menu.
Click to go back to last interface.
Back to matching the main interface
Application
Applications> Settings
> Wireless and Network
uot", cti"t
!fl
the call is pickup the phone, and
"ti"tI
> Mobile network
means to hang up' the
>
small window will a utomatica lly d isappear.
2.5.1 Allow data roaming
2.4.5 Call Record
ln the Bluetooth interface, click
I
Applications> Settings
> Wireless and Network
to enter into bluetooth call history interface'
> Mobile network
Click for doing dial oPeration.
,l).Click data roaming, select OK.
:l) .lf the recognition is successful, the access
Remark: When the names and numbers are long,
they would be displayed rollingly.
I
rr
r
Access Points
1
j
Missed calls
would automatically identify the type of 3G device
to populate the appropriate access automatically,
as shown below:
Note: please confirm data roaming open, otherwise you cannot use the 3G function
Received calls
Dialed calls
2.5.2 Set the access point information
Delete all call information
Call recording interface
insert
Use 3G, please 3G module connected to the USB interface, and available to confirm
a 3G card.
11
Wre
WW
b. Select the "Settings" to enter the
main interface.
a.Enter the system main interface
" :""i;::
##f
::
;:""11;J
::;x"":
""
"
"
=
content' and return to tho main
interface of Apn settings
main interface, the3G network has opened, the search to the
3G signal, can use3c network.
f. Results shown in Figure 7. Chooso
is selected, if you have no choice,
point the" Data roaming "pop-up
prompt menu, select" Ok
Set the Access Poi nt N ames ", enter
the name of the network access
point settings to the main interface.
h. Press the "l\,4enu" button on the
machine panel, pop-up menu option
l. Select "NewAPN" new "APN" into
the "APN" to set the main interface
2"6
Multimedia
2 6.1 Equalizer
Alrplications > Equalizer
,,ti.f
!{
equalizer application icon into the equalizer interface. Or clickto enter into EQ
:;r)tup operation in all audio or video playing interface. Equalizer settings interface is divided
rrrto two
functions: namely, equalizer and sound field settings function.
Balance Setup lnterface
Equalizer settings interface
K. Select "APN", enter "the Apn access
name in the Chinese mainland of China
Unicom's 3G the APN settings for:" 39net
"in Hong Kong, Macao and Taiwan and
foreign, should be consulted local 3G
network
supplier,
enter
n. Whe n lhe lollowlng interface pops up,
rnako suro tllat Stap 1 is complete, press
Home to roturn to th€ main interface, then
,) ln theApnthe main interface,selectNewAPN network behind thecircle,
so that it is selected can.
l) Backto the
=
g.
m. Select "Save" to savo tho sottings
repeat 1-'15steps:
rumm
e.First make sure the " Data roaming
d. Select lVobile networks ", enter
the mobile network settings of
themain interface,
Irrss the "l\4enu" button on the machine
I ilrl)l, pop-up menu option.
r ln the equalizer settings interface provides B kinds of audio playback mode choose:
Note: ln the Normal mode, users can customize effects model through the effect adjuster.
'lnafieldsettinginterfacetheusercanfreelyadjustthebassandloudnessofthecontrast,
the
tlro user can also on the front left, front right, left, right after the four angularly audio settings,
.r:; shown below: Balance Setup
Note: the subwoofer adjustment is only effective when it is linked to external 5.1 amp.
correspondingAPN value.
12
13
.' t;.3 CD Player
2.6.2DVD PlaY
Irr;ert a CD disc, the system will automatically enter the
(:D interface, when a disc is detected, it will automatically
rcad the disc information and start normal play.
lnsert the DVD disk the system will automatically enter
interface and read the disk information
automatically when a disk is detected and then start to
the DVD
play normally.
Function details as below:
tr
E
Play/Pause
When playing, click it to Pause.
When pause, click it to continue playing.
Next Track
Click to play the next track or next chapter
Last Track
Click to play the last track or next chapter
E
Play/Pause
Click to play or pause.
At one time to play the next song, press down
roll list for tracks
Cycle Play Mode
Click to set up playback mode
Fast forward
Click to fast forward increasingly as by 2X I 4X I 8x I 20X
/ 9X119X19?X
1
DVS:Click to fast forward increasingly rt by
Fast Backward
Click to fast rewind increasingly as by 2X I 4X I 8Xl20X
DVS:Click to fast rewind increasingl y asb't2414x-!8X!16XJ34
Click to play the last track or next chapter.
Used to eject the expansion function
Click to enter into EQ setup interface
Extended function
Title
rr
@
Function details as below:
Click to show title (need disk support)
Cycle Play Mode
Click to set up playback mode, DVD: Chapter cycle /heading
cvcle / full caialogcirculation / cycle cancellation; VCD : single
Random play mode
play
Options for ON and OFF, ON, switch on the next song, random
Channel Switch
Subtitle
EQ Setup
Main lnterface
Back
Random playb mode
4 {
Click to set the random playback mode
Click to go back to main menu.
Click to go back to the last interface.
cycle / all cycle / cycle cancellation.
Click to switch in different languages and audiotracks
(need disk support).
Click to switch subtitle display(need disk support)
Click to enter into EQ setup interface
2 6.4 iPod Play
Application> iPod
(;lick the iPod application icon to enter into the iPod play interface, just as shown below
Click to back to main interface
Click to back to the last interface.
iPod Play lnterface
14
15
E
rr
rr
E
E
@
@
:.,
Play/Pause
Click to play or pause.
Next Track
Click to play the next track.
Last Track
Click one time to replay the current track; Click
twice to play the last track.
Fast Forward
Press to fast forward.
Fast Rewind
Press to fast rewind.
Cycle Play Mode
Click to start random play mode or cancel random play
Artist
Click to play the iPod's song in the form of an artist
Album
Click to display the iPod's song in the form of album.
Play List
Supporting form of the video player: mp4/avl/wmvl3gp/flv/saf/mov/mkv/mpg
Application >Video
press Video application icon to enter into vldeo playln lntortace, take a photo for example.
Click to set up play modes: sequential play,single
cycle, the whole catalog circulation.
Random play mode
Song
6.6 Video Playing
The detail of the button function of video playing interface
Click to display allthe songs in the iPod.
Click to display the listed songs in the iPod.
Press Pause when play / Press Play when pause
Forwards Fast
2.6.5 Audio Play
Backwards Fast
Audio player supports the following formats:
Click to forwards fast
Click to backwards fast
mp3 I aac I flac I w av I amr I m4a I ogg
Application> Music
Click music application icon to enter into the music
player interface, as shown below:
2.6.7 Digital TV
Application > Digital TV
Click analog TV application icon into the digital TV interface
Play/Pause
Click to play or pause.
The details of digitalTV function interface are as below.
Play the next track
Note
Last Track
:
Play the last track.
Click to set up play mode: sequential play,single
cycle, the whole catalog circulation.
Click to back into menu
Click to start or cancel random play.
Click to back into last content
Click to play all the song as if to be performed by an artist
Click to enter into EQ interface
Click to display all the songs in the form of album.
For more details of description of the digital TV, please refer to the digital TV instruction
Click to display all the songs.
Click to display the most recently added songs,
17
Upgrading
2.6.8 Analog TV
3 Firmware
Application
3.1 preparing for upgrade
>
Analog TV
ClickAnalog TV lcon to enter intoAnalog TV playing
interface, details as below.
1
.
Firstly, format your SD card for what you use to firmware upgrade
3.2. Update MGU
3.2. L co
py " 3'J.8a2e7
O-
44bf-
1 1e 1 - b
1cf-000c2
9
ba27c0'
to the root directory of SD card and Inserted into the
machine SD card slot.
Click to back into menu
Auto search
Automatic search and save
Last channel
Switch to last channel
Search on the next channels
3.2.2 Start to update MCU(Settings->General->MCU update)
click OK
Switch to last channel
:l.2,3Wait for the upgrade is completed. The system will
Cllck on the search on prevlous channels
rrutomatically restart afterthe upgrade is completed, please
rlon't lgnition or shut down during the upgrade process.
,
Click on the search on the next channels
Search list
Click to back into last content
3.3 Update sysiem
l).3.1.copy "u-boot-skip.bin. ulmage. uramdisk.img.
system. img" to the root directory of SD card , and lnserted
into the machine SD card slot.
2.7 AUX lN Function
3.3.2. Shutdown
To ensure after video source under the normal state when it works.
3.3.3. Press and hold any panel buttons , and boot , the
system will enter the upgrade interface automatically.
Application
>
AUX lN
Press screen to come out a hide menu, click
adjust EQ
effects,clickpto
E
,o enter into EQ setting interface, it can
back into last content,
ctictIto
back into system menu.
2.8 Rear View
Auto start reverse gear, such as with a mirror, the system switches to the rear-view mirror
screen output automatically,audio output sound still; if not equipped with rear-view mirror,
the system remains the same player
3.3.4 The system will automatically restart after update.(The system willenter the touch screen
calibration interface after the restart, please complete it.)3.3.5, lf one or more errors occur ,
please lgnore andrepeatstep 2 to step 4.
3.4. Update DVD
3.4.1 Burn "dvdrom.bin" to CD-ROM, and inserted into the machine dish mouth
3.4.2 Waitforthe update is complete.
3.4.3 Ej ect th e d sc
i
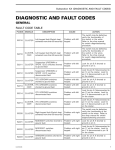
4. Trouble
handle
When your equipment met troubles, please check the problems as below.
Media can't be
recognized from
SD card.
I
3G, WlFl can' tbe
10
Unable connecl
to the network
MUSIC, RADIO
and third-party
Whon the
Bluetooth pair€d
success,
sometimes will be
mentioned
connect failed
How to install
applications
How to uninstall
users APK
application
Radio can't
research
Long press panel Back to exit the system MUSIC RADIO
mode, again into third-party applications can
application
11
Check the 3G card install right or not.
Can't install
applications.
prohibit hot-swappable 3G/Wl Fl
recognized
O.See 3G Card is installed coriectly
@.to make sure the correct and proper 3G terminal
operator's SIM card
@.weather launched 3G card data
t4;.Mobile data roaming setting is connected or not.
(D.nPU weather selected
@.Whether 3G card arrears
prohibit hot-swappable SD card
mixes, can not
turn off the
MUSIC, RADIO
5.Specification
O. Verify that the install application suffix is named "APK"
@. Enter into Setting to 8el6ct unknown sources
uperating voltage: DC 1 2V
O,Some cellphones wlth Androld system may occur this
problem at th6 first connection. Please just find the pairedn
device in matching list and then connect them once more.
@. The unsuccessful connection is compatibility issues
between cell phone and Bluetooth. lf this occurs, please
check the options in pair list of your cell phone. And you will
find that the setting of Bluetooth Media and Mobile Media
has been turned off. Turn on them and the
connection will be successful.
lnstallation size: 167.178-1 00mm
Dlsplay !croen
Operating voltage range: 1 0.8V
l\,4aximum
I
-
1
6V
operating current: 10A
Screen type: TFT
nstatlation angle: The front and rear inclination is less than 30"
FM radio
prrt
I A.2"
Screendimension:7"
part
Response time: Respons6 =30ms, fall =50m9
Pixel: 384,000 Pixels
Angular field: Top view =65 ,bottom vl€w =40
Left view =65", Right view=65'
Frequency range: 87.5-'l 08MHz (Europe)
87.5 1 07.9MHz (America) 36 stations preset
Ambient temperature
Sensitivity (-30d8):1 2dBu
Operating temperature:-20-+70'C
SNR (-50dB):1 5dBuV
Frequency response range: 30Hz-
1
5KHz
(
t
3dB)
AM radio part
Storage temperature: -30- +80'C
operating humidity: 45%- 80% (Relativo humldlty)
Storage humidity: 30vo-90% (Relative humldlty)
Frequency range: 522-1 620KHz (Eutope)
530- 1 71 0KHz (America) '1 8 stations preset
Package Contents
WMA,SVCD, VCD, MPEG, JPEG
CarPC
GPS antenna
Remote control (optional)
Metal fasteners and screws
iPod and USB cable
Usermanual
WlFldongle
Powercable
Audio SNR:85dBA
MagneticOigitalTVantenna(optlonal)
1
nterface Setti n g->Applications-> I nstallation
Applications->Uninstalltion Applications. To click the
unistallation APK Applications
Dynamic range: 95dB
UserManual
1
to check the radio antenna whether connected and have
DVD
2-
signal before use it.
CD-DA
10s
MP3
1
First, please copy the application files with suffix ".APK" to your
SD or U disk. And the following are installation methods:
1. Click into the document management interface to find the SD
card or U disk directory, and then select the ".APK" suffixed
application file and click to install.
2. Find the Setting interface->Applications->install
3. select the ".APK" suffixed application file and click to install.
I
channels
System is muted or not
Sensitivity (SN=20d8): 20dBuV
l\,4irror-image suppression
:
60dB
Frequency response: 50Hz -2KHz
(
t
3dB)
DVD/CD play part
Compatible discs and format:
DVD-R, DVD-RW, DVD+R, DVD+RW, CD-R, CD-RW, CD-DA' MP3'
Frequency response:50H2 -2KHz ( l3dB)
Digital audio sampling: 24bit
Electronic shock protection (ESP):
3
s€conds
00s
200s
Mechanical shock protsctlon | '10-200H z,xlY lZ:1 ,0Q
Power output:4*45W, impsd6nce 4 Ohm
SRN:70dB
20
,
1
1
I
1
'l
1
1
1