1
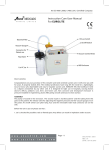
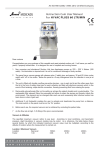
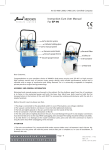
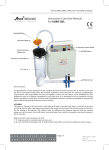
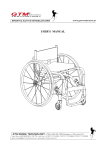
An ISO 9001:2008, 13485: 2012 Certified Company
Instruction Cum User Manual
For EUROVAC
2195
Vacuum Gauge
Vacuum control knob
Connector for
Patient use
Push-in Nozzle
MainLead
Connector
Float for Nylon Lid
2 Ltr PC Jar
On/Off Switch
ABS Enclosure
Bacterial Filter
Safety Jar
Jar
Back Side
Dear Customer,
Congratulations on your purchase of this versatile and need oriented suction unit. It will serve you
well for years, if properly looked after. The medical professions have long felt the need for a
lightweight, easy-to-move, safe, dependable and easy-to-regulate suction unit. EUROVAC fills this
healthcare need to a degree unmatched by any other unit. It is designed for use in hospitals, nursing
homes doctor's offices, pediatric care, ICU's and home care. Non corrosive and shockproof enclosure is
pressure moulded in engineering plastic ABS giving smooth and easy-to-clean surface.
ASSEMBLY
The pump is housed in the enclosure. To fasten it well with the base two black head screws (used as
holdfast for transportation at the bottom of the unit) MUST be removed by rotating with the aid of a
simple hand tool.
The bacterial filter is slipped into the safety jar (at the back) and the other end is connected to the
nozzle marked “Vacuum” on the jar lid. The second nozzle is marked “patient” and the tubing from this
goes to the patient. The release valve for adjusting the negative pressure and the vacuum gauge are
on the panel. An on/off switch cum pilot lamp, fuse and the removable main lead connector are on
the side.
. an na an nd di n
i nd d. c. co omm
w ww ww w. a
i on n- i n d i a . c o m
w ww ww w. s. su uc ct ti o
Page - 1
DOC ID NO : 6101
REV : 01
DATE : 09-10-2010
Instruction Cum User Manual
For EUROVAC
The EUROVAC is a versatile suction unit with minimal installation
on efforts. This section contains
contain
information on installing the unit.
A
1. Connect the short silicone tube, marked as (A) to the two litre
plastic jar lid marked as (B) in the figure above.
B
2. Safety jar with filter on the top are fitted at the back (Fig. on
page 1). Connect the other end of the tube A to the filter at the
back of the unit.
3. Connect the long silicone tube to the nozzle marked Patient on
the two litre plastic jar lid.
4. Attach the power cord to the socket on the side and connect
the plug to the electrical mains supply.
5. Switch the unit on and it is ready for use.
Before you turn on the unit, please ensure that:
1. ‘O’ ring on push-in connector and safety jar are not worn out.
2. Jars are checked for possible crack or flawed spots. Any defect can result in implosion under vacuum.
3. Check the bacterial filter, and change the filter element if necessary. The housing must be flip
tightened.
4. The lids and tube are tightly placed on the jars. To avoid leakage the push-in and angular connectors
must be inserted as far as the stop. While unplugging, twist and pull.
5. The main power supply is well earthed. In case of fluctuation, use voltage stabilizer/corrector.
6. The vacuum control knob is not loose. It must be fully tightened clockwise.
TECHNICAL
Housing: Engineering plastic moulded, shock-resistant ABS with 2 size hooks to hold tube.
Capacity: -575mm Hg ± 10 at 25 ltrs/min.
Pump type: Single Oil-free diaphragm pump mechanism provides reduced maintenance cost.
Jar: Wide mouthed autoclavable 2 ltr, collection jar (Polycarbonate)
Tubing: 8 mm ID x 2 mtr (Silicon)
Vacuum Gauge: 6.25 cms (2.5 inch). 0-760mm Hg calibration.
Power: 220V AC, 50 Hz, 125 watts. (110V on request)
Dimension & Weight: 20 x 42 x 36 cms. 7.5 kg.
. an na an nd di n
i nd d. c. co omm
w ww ww w. a
i on n- i n d i a . c o m
w ww ww w. s. su uc ct ti o
Page - 2
DOC ID NO : 6101
REV : 01
DATE : 09-10-2010
Instruction Cum User Manual
For EUROVAC
VACUUM AT ALTITUDES
The specified maximum vacuum refers to sea level. According to local conditions and barometric
pressure, slight deviations in vacuum reading may be noted. The table below shows several factors, by
which the indicated maximum vacuum value must be multiplied, according to the altitude of location
where the measurement is carried out.
Location/Maximum Vacuum
Location
Sea level
Factor
1.00
1000m
0.88
2000m
0.78
4000m
0.60
GUIDELINES FOR USE
Safety Jar: Safety jar with electronic overflow monitoring sensor and bacterial filter is at the back.
Negative Pressure: Before the unit is put to use, required vacuum must be set by occluding the safety
jar nozzle and controlling the release valve. Fully tightened (clockwise) vacuum control knob means
full vacuum.
Jars/Tubings: The material of the jars polycarbonate (PC) is superior to
glass. It is less fragile when subjected to impact and less sensitive to
temperature shock. PC is resistant up to 120°c provided it is not subjected
to any physical loading.
As the flow rate is high 3/4th filling of the jar is recommended. The lid has a
built-in antifrothing device. The jar is easier to clean if a little water or
disinfectant is put into it prior to suction operation. The safety jar must,
however, remain dry. Tubing after use can be brittle and must be changed.
Cleaning and Disinfecting: After each use, jars, lids, overflow cut off valve,
catheters, etc. should be cleaned thoroughly. When cleaning is necessary
after infective fluid has been evacuated, the jars, lids, cut off valve and
tubing can be sterilized by autoclaving upto 120° C for 20 minutes. Alkaline
cleaning agents and disinfectants based on phenyel may not be used.
Adherence to hospital directives on hygiene is of prime importance. The
instructions provided by the suppliers of cleaning agents as well as by the
manufacturers of sterilization and/or disinfection units must also be
followed, where application, temperature, process duration and airing, etc.
are concerned.
. an na an nd di n
i nd d. c. co omm
w ww ww w. a
i on n- i n d i a . c o m
w ww ww w. s. su uc ct ti o
Page - 3
2 Ltr PC Jar
Bacterial Filter
DOC ID NO : 6101
REV : 01
DATE : 09-10-2010
Instruction Cum User Manual
For EUROVAC
PUMP
The unit fitted with Diaphragm type oil-free pump, provides reduced maintenance cost.
A Open the back plate of the unit with the aid of an allen key provided, and disconnect the tube from
the inlet and outlet points on the pump housing (Fig. A).
B Unscrew the 2 hexa bolts from the bottom of the unit and take out the motorized pump fitted on
(and together with) the platform.
C The fly valves are fitted (Fig. C) in the top which can be opened. The valve and sieve are alternately
fitted one upon the other in the two nozals making one for vacuum and the other for outlet. The
diaphragm is fitted below the top plate (Fig. B) and over the eccentrically rotated came. Just wipe
clean these parts and set the unit again.
D Please run the unit and see its satisfactory functioning before the back plate is screwed up.
Unlike the rotary design, NO LUBRICATION IS REQUIRED IN THIS PUMP.
The unit has not to be tampered with by any mechanic other than our factory engineer, or the person
authorized.
Fig. A
Fig. B
Fig. C
Filter
N
E
Patient
L
Gauge
F
Safety
Jar
Sensor
S
Release
Valve
Outlet
220 V AC
PC CARD
Inlet
MOTOR
MOTORIZED
PUMP
MOTOR
. an na an nd di n
i nd d. c. co omm
w ww ww w. a
i on n- i n d i a . c o m
w ww ww w. s. su uc ct ti o
Page - 4
DOC ID NO : 6101
REV : 01
DATE : 09-10-2010
Instruction Cum User Manual
For EUROVAC
TROUBLE SHOOTING:
Not Run
Motor does
Problem
Possible source of trouble
Check/Action to be taken
Power Supply
Voltage, power socket
Main switch
Set at "ON"
Electrical cord
Plug type, plug connections, damaged cord
Check if the safety jar is activated. Open the safety jar, clean & dry the jar and replace the cap for
re-use
The blood has entered the pump. The remedy is given above under pump cleaning
Isolate the source of trouble by carrying out
the checks outlined.
External cause:
Pump does not suck, however
Vacuum gauge indicates a vacuum
Inadequate Suction Performance
Leak within the pump or in the external
suction circuit
Push-in connector O-rings/Lid gasket
Condition
Push-in angular connectors
No Leaks at tube ends. Push in as far as stop.
Release Valve
The Knob should be tightly placed
Tubing
Cracks, brittle areas
Lids
Airtight fit jars and Safety jar
Jars
Condition, Possible cracked edges,hairline cracks
Bacteria filter housing (on Safety jar top)
Condition and absence of leaks
Filter paper
Condition, position of housing
Blockage or kink in tubing within the
Isolate source of trouble as follows:
pump or in the external suction circuit
Remove the safety jar, leave the suction
connection open. If the vacuum gauge now
indicates zero vacuum, the cause is external
External cause:
Bacteria filter, safety jar, overflow valve in the
Investigate the whole external suction circuit
lid, (float valve) push-in connectors, tubing etc.
for blockage (s), float valve sticking, kinked
. an na an nd di n
i nd d. c. co omm
w ww ww w. a
i on n- i n d i a . c o m
w ww ww w. s. su uc ct ti o
tubing and rectify.
If the vacuum gauge still indicates a vacuum,
the cause is internal
Page - 5
DOC ID NO : 6101
REV : 01
DATE : 09-10-2010
Instruction Cum User Manual
For EUROVAC
TERMS OF WARRANTY
Anand Medicaids Private Limited warranty the high quality and workmanship of each Anand's HI-VAC
for a period of one year subsequent to the date of delivery by the company. During this period, faulty
material will be replaced free of charge. This warranty does not extend to components that are subject
to wear and tear in the course of normal operation or due to improper treatment/maintenance as per
instructions.
Further conditions in accordance with international standard IEC 601.1 item 6.8.2b.
The manufacturer is only responsible for effects on the safety, the reliability and the performance of
the appliance if
s Installation, additions, adjustments, modifications or repairs are carried out by personnel authorized
by the manufacturer
s The electrical installations within the room concerned satisfy the requirements laid down by IEC.
s The appliance is used in full accordance with the instruction manual which is solely a guide and no
substitute for professional training. The safe and effective use of this product largely depends on the
skill of the operator. We are not liable for any damages due to mishandling or improper and
unauthorised use.
s The company reserve the right to change technical specifications, designations and catalogue
numbers without prior notice.
Note
Ensure that your electrical wirings are well earthed with 1 line and 1 neutral phase and your voltage is
between 220V 240V. 50 Hz.
Ensure that the suction unit should not be lifted above human body level.
Dispose of used product/packaging in safe manner so as not to harm stray cattle, children and
environment.
____________________________________________________________________________
WARRANTEECARD
WARRANTY
CARD
Stamp :
Model No.
SN
Date of Purchase:
Dealer Name:
ANAND MEDICAIDS PRIVATE LIMITED
(Regd. Office) 33/16, Punjabi Bagh (Extn.)
New Delhi - 110026 [ India ]
Tel : +(91)-(11)-25225225/25229206/42464264
Fax : +(91)-(11)-25225062, E mail: [email protected]
(Works) 1460 M.I.E., Bahadurgarh, Haryana -124507 [ India ]
EC REP
KALEIDOS SH. VIA PONTIOA, 4 2012, MILANO, ITALY.
. an na an nd di n
i nd d. c. co omm
w ww ww w. a
i on n- i n d i a . c o m
w ww ww w. s. su uc ct ti o
Page - 6
DOC ID NO : 6101
REV : 01
DATE : 09-10-2010