1
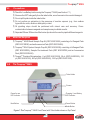
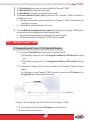
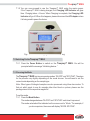
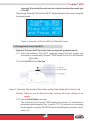
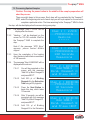
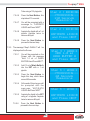
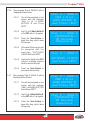
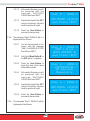
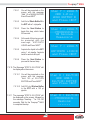
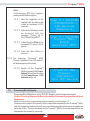
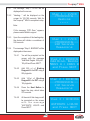
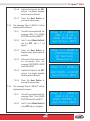
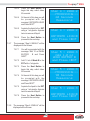
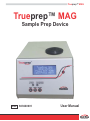
Trueprep™ MAG Trueprep™ MAG Sample Prep Device REF 603040001 User Manual DIAGNOSTICS Trueprep™ MAG TABLE OF CONTENTS 1.0 Introduction 1 2.0 Installation 2 2.1 Installation Precautions 2 2.2 Environmental Requirements 2 3.0 Specifications 2 4.0 Precautions 3 5.0 Materials Required 3 6.0 The TrueprepTM MAG 3-4 7.0 Using the Trueprep MAG TM 4 7.1 Charging/Using the TrueprepTM MAG with the AC Adapter TM 7.2 Switching on the Trueprep MAG 5 7.3 Choosing the Mode 5 7.4 Placing the Extraction Tube 6 7.5 Processing Sputum Samples 7.6 Processing Blood Samples 8.0 4 7 - 12 12 - 17 Errors and Maintenance 18 8.1 Error Messages 18 8.2 Maintenance 18 DIAGNOSTICS Trueprep™ MAG 1.0 Introduction 1.1 The TrueprepTM MAG Sample Prep Device Testing for infectious diseases by detecting the pathogens nucleic acids using nucleic acid amplification methods is a highly specific and sensitive diagnostic tool. Molbio's TruelabTM micro PCR System is a nucleic acid amplification platform that works on real time Polymerase Chain Reaction (PCR) technology that enables near patient diagnosis through disposable, disease specific TruenatTM micro PCR chips and a portable, automated TruelabTM real time micro PCR Analyzer. The PCR process necessitates the extraction and purification of nucleic acids from clinical specimens to free it from potential PCR inhibitors. The TrueprepTM MAG Sample Prep Device together with Trueprep™ MAG Sample Prep Kit provides an easy method of nucleic acid extraction and purification. TrueprepTM MAG Sample Prep Device is light weight and portable and operates on mains and/or re-chargeable battery. It is capable of performing 12 sample extractions with one recharge and has a simple, user friendly step-by-step instruction driven process control. The extraction process is quick, reliable and efficient and does not require highly skilled personnel to carry out the extraction process. The entire process of extraction and purification of nucleic acids is completed in 20 - 25 minutes. 1.2 Principle The TrueprepTM MAG is an electromechanical system pre-programmed to sequentially heat, mix (by vibration) and apply magnetic fields to the contents of the Extraction Tube (EXT) placed in the tube holder and has a four line LCD screen that displays the status and also prompts the user for the next step. The EXT containing the specimen and lysis reagent is placed in the tube holder for processing through a menu driven, user friendly step by step process. Nucleic acids released by chemical and thermal lysis of cells bind to surface functionalized, paramagnetic nanoparticles from the binding reagent. In subsequent steps, by selectively using a magnetic field, the captured nucleic acids are washed with buffers to remove the PCR inhibitors and finally eluted from the nanoparticles using the elution buffer. The elute, containing purified nucleic acids is then collected in an Elute Collection Tube (ECT) and is ready for analysis. 1 DIAGNOSTICS Trueprep™ MAG 2.0 Installation 2.1 Installation Precautions ♦ Do not install the TrueprepTM MAG next to instruments that may cause vibrations or electromagnetic interference. ♦ Do not store the Trueprep™ MAG in the path of direct sunlight or use it close to any radiating or heating apparatus, such as a conventional oven, hot plate or infrared lamp. ♦ Do not store the Trueprep™ MAG in an atmosphere of potentially explosive liquids, vapours and gas. ♦ Always place the Trueprep™ MAG on a flat surface in an upright position. 2.2 Environmental Requirements The Trueprep™ MAG has been designed to operate safely within the following environment specifications: ♦ Ambient room temperatures (between 15°C to 35°C). ♦ Relative Humidity (RH) between 10%- 80% (non-condensing). ♦ The unit should be stored on a flat, dry surface. 3.0 Specifications Trueprep™ MAG Sample Prep Device Principle Magnetic Nanoparticle-based Operation Semi-automatic Display Screen 4 line alphanumeric LCD display Power Rechargeable Lithium Ion Battery Pack 7.4 V, 4400 mAh. Input to AC/DC adaptor: Single Phase100-240V; 50/60Hz; 1500 mA. Output from AC/DC adaptor: 10 V; 4500mA; 45VA. Weight 1.6 kgs Size 210 mm x 155 mm x 109 mm Software Proprietary firmware Operating Environment Temperature 15 - 35o C, RH : 10-80% 2 DIAGNOSTICS Trueprep™ MAG 4.0 Precautions Check for Low Battery before using the Trueprep™ MAG (see Section 7.1) Remove the EXT tube gently from the tube holder, use of excessive force could damage it. Do not spill liquids inside the tube holder. Do not perform an extraction in the presence of reactive vapours (e.g., from sodium hypochlorite, acids, alkalis or aldehydes) or dust. All pipetting steps should be performed with utmost care and accuracy. Crosscontamination between reagents and samples may invalidate results. Separate DNase / RNase free filter barrier tips should be used to pipette different reagents. 5.0 Materials Required TrueprepTM MAG Blood Sample Prep Kit (REF 602010050) consisting of a Reagent Pack (REF 60201BR50) and an Accessories Pack (REF 60201BA50). TrueprepTM MAG Sputum Sample Prep Kit (REF 602020050) consisting of a Reagent Pack (REF 60202SR50), Sample Pre-treatment Pack (REF 60202SP50) and an Accessories Pack (REF60202SA50) . TruepetTM Precision Micropipettes - 6 μL (REF 604010006), 50 μL (REF 604020050), 100 μL (REF 604030100), 500 μL (REF 604040500), 1000 μL (REF 604051000). 6.0 The Trueprep™ MAG Tube Holder Screen Power/In-use LED Indicator Charging / Low Battery LED Indicator Next Button Power Button Mode Button Figure 1: The Trueprep™ MAG Front Panel, with Tube Holder shown on Top Panel 3 DIAGNOSTICS Trueprep™ MAG The Power Button switches on and switches off the Trueprep™ MAG. The Mode Button changes the sample type. The Next Button is used to move ahead in the process. The Power Indicator/In Use Light will glow when the Trueprep™ MAG is switched on and when it is in use. i) It will glow red and blink continuously when the Trueprep™ MAG is switched on and waiting for user input. ii) It will glow red continuously when it is in use. The Low Battery/Charging Indicator Light will glow when the Trueprep™ MAG battery is low and when it is being charged using the power cable. i) It will glow red when the battery is low and needs to be charged. ii) It will glow blue when the Trueprep™ MAG is being charged. 7.0. Using the Trueprep™ MAG 7.1 Charging/Using the Trueprep™ MAG with the AC Adapter 7.1.1. Press the Power Button to switch on the Trueprep™ MAG If the battery charge is low, the Charging/Low Battery LED Indicator will glow red. If the battery charge is full, the Charging/Low Battery LED Indicator will stay off. 7.1.2 If the battery charge is full, you may proceed to use Trueprep™ MAG on battery charge. For charging or to use Trueprep™ MAG on mains, connect the AC Adapter to the Charging Port on the left panel of the device. Figure 2 : The Charging Port on the Left Panel of the Trueprep™ MAG 7.1.3 Connect the other end of the AC Adapter to a mains Socket. 7.1.4 Switch On the mains power. 4 DIAGNOSTICS Trueprep™ MAG 7.1.5 You can now proceed to use the Trueprep™ MAG using the mains power. If the Trueprep™ MAG is being charged, the Charging LED Indicator will glow blue. Charging takes ~6 hours. When Charging is complete, the Charging LED Indicator will go off. When this happens, please disconnect the AC Adapter unless it is being used to power the device. Figure 3 : The Blue Charging LED Indicator Glowing 7.2 Switching On the Trueprep™ MAG 7.2.1 Press the Power Button to switch on the Trueprep™ MAG. You will be prompted with the message “Initializing device..” 7.3 Choosing the Mode The Trueprep™ MAG has two processing modes: “BLOOD” and “SPUTUM”. The steps for the process vary slightly depending on the mode chosen. You will need to set the correct mode depending on the sample type. Note: Other types of biological samples are also processed using these two modes. To find out which mode to use for samples other than blood or sputum, please see the package insert of the respective reagent kit. To set the mode, 7.3.1 Press the Mode Button. The mode changes between “BLOOD” and “SPUTUM” each time it is pressed. The mode selected will be indicated on the screen next to “Mode:” For example, if you chose sputum, the screen will display “MODE: SPUTUM”. 5 DIAGNOSTICS Trueprep™ MAG Important: Ensure that the mode you have selected matches the sample type in the EXT. The message “Place the EXT and Press NEXT” will be displayed on the screen, along with the selected mode. TruePrep MAG MODE: SPUTUM Place EXT TUBE and Press NEXT Figure 4: Instruction to Place the EXT and Start the Process 7.4 Placing the Extraction Tube (EXT) Important: Only use the EXT provided in the corresponding sample prep kits. 7.4.1 Place the Extraction Tube (EXT) containing sample and lysis reagent (see procedure in corresponding TrueprepTM MAG Sample Prep Kit) in the Extraction Tube Holder. 7.4.2 Seal the EXT with the Tube Cap. Figure 5 : Extraction Tube placed in Tube Holder, and the Tube Sealed with the Cap (in red) Caution: Failing to seal the Extraction tube securely will cause spillage of the sample. 7.4.3 Press the Next Button to proceed. This is the start of the TrueprepTM MAG sample prep process. For instructions on processing sputum samples, refer to section 7.5. For instructions on processing blood samples or using the “BLOOD” Mode for other biological specimens, refer to section 7.6. 6 DIAGNOSTICS Trueprep™ MAG 7.5 Processing Sputum Samples Caution: Pressing the power button in the middle of the sample preparation will abort the process. There are eight steps in this process. Each step will be completed by the Trueprep™ MAG, and at the beginning and end of each step you will be prompted on the screen to complete a particular action. The time remaining for the Trueprep™ MAG to finish the step will also be displayed on the screen during every step. 7.5.1 The message “Step 1: LYSIS” will be displayed on the screen. 7.5.2 “Heating…” will be displayed on the screen for 120-180 seconds. Wait for the Trueprep™ MAG to complete the step. Step 1 : LYSIS ---PROCESSING--Heating ...... Note: If the message “RTD Error” appears, please contact Molbio support. 7.5.3 Upon the completion of the heating step, the device will initiate a countdown of 240 seconds. 7.5.4 The message “Step 2: BINDING” will be displayed on the screen. 7.5.4.1 You will be prompted on the screen with the message “Add 500 μl Bind. Reagent A and press NEXT”. 7.5.4.2 Add 500 μl of Binding Reagent A to the Extraction Tube using a 500 μl pipette. 7.5.4.3 Press the Next Button to begin this step, which takes 10 seconds. 7.5.4.4 After 10 seconds, you will be prompted with the message “Add 100 μl Bind. Reagent B and press NEXT”. 7.5.4.5 Step 1 : LYSIS ---PROCESSING--240 Seconds Remaining Step 2 : BINDING Add 500µl Bind. Reagent A and Press NEXT Step 2 : BINDING ---PROCESSING--10 Seconds Remaining Step 2 : BINDING Add 100µl Bind. Reagent B and Press NEXT Add 100 μl of Binding Reagent B to the Extraction 7 DIAGNOSTICS Trueprep™ MAG Tube using a 100 μl pipette. 7.5.4.6 Press the Next Button, this step takes 210 seconds. 7.5.4.7 You will be prompted with a message to “ASPIRATE LIQUID and Press NEXT”. 7.5.4.8 Aspirate the liquid with a 1 ml pipette. Aspirate twice to remove all liquid. 7.5.4.9 Step 2 : BINDING ---PROCESSING--210 Seconds Remaining Step 2 : BINDING ASPIRATE LIQUID and Press NEXT Press the Next Button to proceed to the next step. 7.5.5 The message “Step 3: WASH-1” will be displayed on the Screen. 7.5.5.1 You will be prompted on the Screen with the message “Add 1.0 ml of WASH BUFFER A and Press NEXT”. 7.5.5.2 Add 1.0 ml of Wash Buffer A into the EXT with a 1 ml pipette. Step 3 : WASH-1 ADD 1.0 ml WASH BUFFER A and Press NEXT 7.5.5.3 Press the Next Button to begin this step, which takes around 60 seconds. Step 3 : WASH-1 ---PROCESSING--60 Seconds Remaining 7.5.5.4 At the end of this step you will be prompted with the m e s s a g e “ A S P I R AT E LIQUID and Press NEXT”. Step 3 : WASH-1 7.5.5.5 Aspirate the liquid in the EXT using a 1 ml pipette. Aspirate twice to remove all liquid. ASPIRATE LIQUID and Press NEXT 7.5.5.6 Press the Next Button to proceed to the next step. 8 DIAGNOSTICS Trueprep™ MAG 7.5.6 The message “Step 4: WASH-2” will be displayed on the screen. 7.5.6.1 You will be prompted on the screen with the message “Add 1.0 ml of WASH BUFFER B and Press NEXT”. 7.5.6.2 Add 1.0 ml of Wash Buffer B to the EXT with a 1 ml pipette. 7.5.6.3 Press the Next Button to begin this step, which takes 90 seconds. 7.5.6.4 At the end of this step you will be prompted with the m e s s a g e “ A S P I R AT E LIQUID and Press NEXT”. 7.5.6.5 Aspirate the liquid in the EXT using a 1 ml pipette. Aspirate twice to remove all liquid. 7.5.6.6 Press the Next Button to proceed to the next step. Step 4 : WASH-2 Add 1.0 ml WASH BUFFER B and Press NEXT Step 4 : WASH-2 ---PROCESSING--90 Seconds Remaining Step 4 : WASH-2 ASPIRATE LIQUID and Press NEXT 7.5.7 The message “Step 5: WASH-3” will be displayed on the Screen. 7.5.7.1 You will be prompted on the screen with the message “Add 1.0 ml WASH BUFFER B and Press NEXT”. 7.5.7.2 Add 1.0 ml of Wash Buffer B to the EXT with a 1 ml pipette. 7.5.7.3 Press the Next Button to begin this step, which takes 90 seconds. Step 5 : WASH-3 ADD 1.0 ml WASH BUFFER B and Press NEXT Step 5 : WASH-3 ---PROCESSING--90 Seconds Remaining 9 DIAGNOSTICS Trueprep™ MAG 7.5.7.4 At the end of this step you will be prompted with the m e s s a g e “ A S P I R AT E LIQUID and Press NEXT”. 7.5.7.5 Aspirate the liquid in the E X T using a 1 ml pipette. Aspirate twice to remove all liquid. 7.5.7.6 Press the Next Button to proceed to the next step. Step 5 : WASH-3 ASPIRATE LIQUID and Press NEXT 7.5.8 The message “Step 6: WASH-4” will b e displayed on the Screen. 7.5.8.1 You will be prompted on the screen with the message “Add 1.0 ml WASH BUFFER B and Press NEXT”. 7.5.8.2 Add 1ml of Wash Buffer B t o the EXT with a 1 ml pipette. 7.5.8.3 Press the Next Button to begin this step, which takes around 90 seconds. 7.5.8.4 At the end of this step you will be prompted with the m e s s a g e “ A S P I R AT E LIQUID and Press NEXT”. 7.5.8.5 Aspirate the liquid in the E X T using a 1 ml pipette. Aspirate twice to remove all liquid. 7.5.8.6 Step 6 : WASH-4 ADD 1.0 ml WASH BUFFER B and Press NEXT Step 6 : WASH-4 ---PROCESSING--90 Seconds Remaining Step 6 : WASH-4 ASPIRATE LIQUID and Press NEXT Press the Next Button to proceed to the next step. 7.5.9 The message “Step 7: WASH-5” will be displayed on the Screen. 10 DIAGNOSTICS Trueprep™ MAG 7.5.9.1 You will be prompted on the screen with the message “Add 1.0 ml WASH BUFFER B and Press NEXT”. 7.5.9.2 Add 1ml of Wash Buffer B to the EXT with a 1 ml pipette. 7.5.9.3 Press the Next Button to begin this step, which takes 90 seconds. 7.5.9.4 At the end of this step you will be prompted with the m e s s a g e “ A S P I R AT E LIQUID and Press NEXT”. 7.5.9.5 Aspirate the liquid in the EXT using 1 ml pipette. Aspirate twice to remove all liquid. 7.5.9.6 Press the Next Button to proceed to the next step. Step 7 : WASH-5 ADD 1.0 ml WASH BUFFER B and Press NEXT Step 7 : WASH-5 ---PROCESSING--90 Seconds Remaining Step 7 : WASH-5 ASPIRATE LIQUID and Press NEXT 7.5.10 The Message “STEP 8: ELUTION” will be displayed on the screen. 7.5.10.1 You will be prompted on the screen with the message “Add 100 µl ELUTION BUFFER and Press NEXT”. Step 8 : ELUTION ADD 100µl ELUTION BUFFER and Press NEXT 7.5.10.2 Add 100 µl of Elution Buffer to the EXT with a 100 µl pipette. Step 8 : ELUTION ---PROCESSING--Heating ....... 7.5.11 The message “STEP 8: ELUTION” will be displayed on the screen, followed by the message “Heating….” for 120-180 seconds. Wait for the TrueprepTM MAG to complete the step. 11 DIAGNOSTICS Trueprep™ MAG Note: If the message “RTD Error” appears, please contact Molbio support. 7.5.11.1 After the completion of the heating step, the device will initiate a countdown of 210 seconds. Step 8 : ELUTION ---PROCESSING--210 Seconds Remaining 7.5.11.2 At the end of this step you will be prompted with the message “Collect 50 µl ELUTE and Press NEXT”. Step 8 : ELUTION Collect 50µl ELUTE and Press NEXT 7.5.11.3 Collect the 50 µl Elute in the provided ECT using a 50 µl pipette. 7.5.11.4 Press the Next Button to proceed. 7.5.12 The message “Trueprep T M MAG Process Completed. Turn OFF device.” will be displayed on the screen. 7.5.12.1 Switch off the TrueprepTM MAG by pressing the Power Button. When it is switched off, the Power/In-use LED Indicator will go off. 7.6 TruePrep MAG Process Completed Turn OFF Device Processing Blood Samples Processing Blood Samples or using “BLOOD” Mode for other biological specimens. Caution: Pressing the power button in the middle of the sample preparation will abort the process. Note: For instructions on processing sputum samples, read to section 7.5. There are seven steps in this process. Each step will be completed by the TrueprepTM MAG, and at the beginning and end of each step you will be prompted on the screen to complete a particular action. The time remaining for the TrueprepTM MAG to finish the step will also be displayed on the screen for every step. 12 DIAGNOSTICS Trueprep™ MAG 7.6.1 The message “Step 1: LYSIS” will be displayed on the screen. 7.6.2 Step 1 : LYSIS ---PROCESSING—-Heating ..... “Heating…” will be displayed on the screen for 120-180 seconds. Wait for the TrueprepTM MAG to complete to step. Note: If the message “RTD Error” appears, please contact Molbio support. 7.6.3 Upon the completion of the heating step, the device will initiate a countdown of 240 seconds. Step 1 : LYSIS ---PROCESSING--240 Seconds Remaining 7.6.4 The message “Step 2 : BINDING” will be displayed on the screen. 7.6.4.1 You will be prompted on the screen with the message “Add Bind. Regnts. 500 μl A + 100 μl B and Press NEXT”. 7.6.4.2 Add 500 μl of Binding Reagent A to the EXT using a 500 μl pipette. 7.6.4.3 Add 100μl of Binding Reagent B to the EXT using a 100 μl pipette. 7.6.4.4 Press the Next Button to begin the step, which takes 210 seconds. 7.6.4.5 At the end of this step you will be prompted on the screen with the message “ASPIRATE LIQUID and Press NEXT”. Step 2 : BINDING Add Bind. Regnts 500µl A + 100µl B and Press NEXT Step 2 : BINDING ---PROCESSING--210 Seconds Remaining Step 2 : BINDING ASPIRATE LIQUID and Press NEXT 13 DIAGNOSTICS Trueprep™ MAG 7.6.4.6 Aspirate the liquid in the EXT using a 1 ml pipette. Aspirate twice to remove all liquid. 7.6.4.7 Press the Next Button to proceed to the next step. 7.6.5 The message “Step 3: WASH-1” will be displayed on the Screen. 7.6.5.1 You will be prompted with the message “Add 1.0 ml WASH BUFFER A and Press NEXT”. 7.6.5.2 Add 1.0 ml of Wash Buffer A into the EXT with a 1 ml pipette. 7.6.5.3 Press the Next Button to begin this step, which takes 60 seconds. 7.6.5.4 At the end of this step you will be prompted with the message “ASPIRATE LIQUID and Press NEXT”. 7.6.5.5 Aspirate the liquid in the EXT using a 1 ml pipette. Aspirate twice to remove all liquid. 7.6.5.6 Press the Next Button to proceed to the next step. Step 3 : WASH-1 ADD 1.0 ml WASH BUFFER A and Press NEXT Step 3 : WASH-1 ---PROCESSING--60 Seconds Remaining Step 3 : WASH-1 ASPIRATE LIQUID and Press NEXT 7.6.6 The message “Step 4: WASH-2” will be displayed on the screen. 7.6.6.1 You will be prompted with the message “Add 1.0 ml WASH BUFFER A and Press NEXT”. 7.6.6.2 Add 1.0 ml of Wash Buffer A to the EXT with a 1 ml pipette. Step 4 : WASH-2 Add 1.0 ml WASH BUFFER A and Press NEXT 14 DIAGNOSTICS Trueprep™ MAG 7.6.6.3 At the end of this step you will be prompted with the message “ASPIRATE LIQUID and Press NEXT”. 7.6.6.5 Aspirate the liquid in the EXT using a 1 ml pipette. Aspirate twice to remove all liquid. Step 4 : WASH-2 Press the Next Button to proceed to the next step. ASPIRATE LIQUID and Press NEXT The message “Step 5: WASH-3” will be displayed on the Screen. 7.6.7.1 7.6.8 Step 4 : WASH-2 ---PROCESSING--60 Seconds Remaining 7.6.6.4 7.6.6.6 7.6.7 Press the Next Button to begin this step, which takes 60 seconds. You will be prompted with the message “Add 1.0 ml WASH BUFFER B and Press NEXT”. 7.6.7.2 Add 1.0 ml of Wash-B to the EXT with a 1 ml pipette. 7.6.7.3 Press the Next Button to begin this step, which takes 90 seconds. 7.6.7.4 At the end of this step you will be prompted with the message “ASPIRATE LIQUID and Press NEXT”. 7.6.7.5 Aspirate the liquid in the EXT using a 1 ml pipette. Aspirate twice to remove all liquid. 7.6.7.6 Press the Next Button to proceed to the next step. Step 5 : WASH-3 Add 1.0 ml WASH BUFFER B and Press NEXT Step 5 : WASH-3 ---PROCESSING--90 Seconds Remaining Step 5 : WASH-3 ASPIRATE LIQUID and Press NEXT The message “Step 6: WASH-4” will be displayed on the Screen. 15 DIAGNOSTICS Trueprep™ MAG 7.6.8.1 You will be prompted with the message “Add 1.0 ml WASH BUFFER B and Press NEXT”. 7.6.8.2 Add 1ml of Wash Buffer B to the EXT with a 1 ml pipette. 7.6.8.3 Press the Next Button to begin this step, which takes 90 seconds. 7.6.8.4 At the end of this step you will be prompted with the message “ASPIRATE LIQUID and Press NEXT”. 7.6.8.5 Aspirate the liquid in the EXT using a 1 ml pipette. Aspirate twice to remove all liquid. 7.6.8.6 Step 6 : WASH-4 ADD 1.0 ml WASH BUFFER B and Press NEXT Step 6 : WASH-4 ---PROCESSING--90 Seconds Remaining Step 6 : WASH-4 Press the Next Button to proceed to the next step. ASPIRATE LIQUID and Press NEXT 7.6.9 The Message “STEP 7: ELUTION” will be displayed on the screen. 7.6.9.1 7.6.9.2 You will be prompted on the screen with the message “Add 100 µl ELUTION BUFFER and Press NEXT”. Step 7 : ELUTION ADD 100 µl ELUTION BUFFER and Press NEXT Add 100 µl of Elution Buffer to the EXT with a 100 µl pipette. 7.6.10 The message “STEP 7: ELUTION” will be displayed on the screen, followed by the message “Heating….” for 120-180 seconds. Wait for the TrueprepTM MAG to complete to step. Step 7 : ELUTION ---PROCESSING--Heating 16 DIAGNOSTICS Trueprep™ MAG Note: If the message “RTD Error” appears, please contact Molbio support. Step 7 : ELUTION ---PROCESSING--210 Seconds Remaining 7.6.10.1 After the completion of the heating step, the device will initiate a countdown of 210 seconds. 7.6.10.2 At the end of this step you will be prompted with the message “Collect 50 µl ELUTE and Press NEXT”. Step 7 : ELUTION Collect 50 µl ELUTE and Press NEXT 7.6.10.3 Collect the 50 µl Elute in the provided ECT using a 50 µl pipette. 7.6.10.4 Press the Next Button to proceed to the next step. TruePrep MAG Process Completed Turn OFF Device 7.6.11 The message “TrueprepTM MAG Process Completed. Turn OFF device.” will be displayed on the screen. 7.6.11.1 Switch off the TrueprepTM MAG by pressing the Power Button. When it is switched off, the Power/In-use LED Indicator will go off. 17 DIAGNOSTICS Trueprep™ MAG 8.0 Errors and Maintenance 8.1Error Messages Error Message RTD ERROR Description The Screen displays the error message “RTD ERROR” Reason for Error and Solution Reason: An internal component of the TrueprepTM MAG is malfunctioning. Solution: Please contact Molbio Support. 8.2 Maintenance The surface of the device should be cleaned using 0.5% Sodium Hypochlorite solution and a clean cloth or tissue. 18 DIAGNOSTICS Molbio Diagnostics Pvt. Ltd. Tulip House, Dr. Antonio Do Rego Bagh, Alto Santacruz, Bambolim Complex P.O., Bambolim Complex P.O., Goa - 403 202, India. www.molbiodiagnostics.com MB/TM/09-13/VER-2 Manufactured by: