1
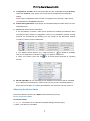
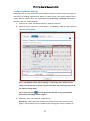
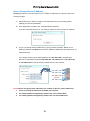
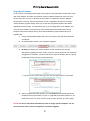
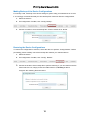
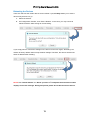
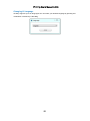
IP Utility
User’s Manual
Version 4.2.04
2013/01/08
IP Utility User’s Manual 4.2.04
Table of Contents
1 Overview
3
What is IP Utility ............................................................................. 3
Featured Functions ......................................................................... 4
2 Getting Started
5
System Requirement ....................................................................... 5
Operation System .......................................................................... 5
Web Browser.................................................................................. 5
Running the Application ................................................................ 5
Searching Devices ........................................................................... 6
Device Connection Status
7
Configuration Status
8
Configuring Device Settings ........................................................... 9
Configuring Date/Time ................................................................. 10
Configuring Motion Settings ......................................................... 11
Configuring the Video / Audio Settings ......................................... 13
The Simplest Way to Command Multiple Devices ........................ 15
How to Change Device IP Address .............................................. 16
Upgrading Firmware..................................................................... 17
Making Backup of the Device Configurations ............................... 18
Restoring the Device Configurations ............................................ 18
Rebooting the Devices ................................................................. 19
Changing UI Language ................................................................ 20
2
IP Utility User’s Manual 4.2.04
Overview
What is IP Utility
IP Utility is a free, Windows-based application tool with friendly user interface. It helps you
locate available devices in the network by showing its IP address so as the capability of editing
essential camera settings such as automatically assign IP address, resolution change and
motion detection region setups and more. Detailed information of each of those features will be
covered in the later chapters.
Computer running IP Utility
IP Products
As We continue to deliver new products and technologies, IP Utility has also been streamlined
to enhance essential functions to help you manage your devices.
3
IP Utility User’s Manual 4.2.04
Featured Functions
IP Utility is featured by the following functions:
1. Global Configuring Method
To achieve mass installation and configuration, “Global setting” delivers a new concept of
multi-device setup in a speedy fashion. With this concept, you may select multiple devices for
configuration at an instant and simultaneously apply your desirable settings to all.
Regardless of unique settings in different models, “Global setting” will automatically select
the best and/or next immediate value individually for your selected devices to achieve the
best and fastest way for your time-saving installation.
Camera 1
Success!
Camera 2
Success!
Camera 3
Success!
Camera 4
Success!
Camera 5
Success!
…
…
2. Smart Firmware Upgrade
Upgrading an individual device to its latest firmware version could be time-consuming and
confusing. IP Utility supports one-step firmware upgrade for multiple devices. In addition, it
would also pick the latest firmware that is available in selected folder and its subfolders.
3. URL Command Support
This version supports URL Command for specific controls and configurations.
4. Multi-language Support
IP Utility supports ten languages and will auto-select the UI language based on your operation
system.
4
IP Utility User’s Manual 4.2.04
Getting Started
System Requirement
The operation of IP Utility will only consume limited system resources, but it should meet the
following criteria:
Operation System
Windows, XP, Vista and Windows 7 (both 32 bit and 64-bit versions)
Web Browser
Internet Explorer 7 or newer
Running the Application
1. Unzip the compressed file.
2. Execute the application “IP_Utility.exe”.
5
IP Utility User’s Manual 4.2.04
Searching Devices
IP Utility will search for devices based on the selected network interface card (NIC) and
network segments it binds to. IP Utility will show a dropdown menu if there are multiple NICs
available.
The default search mode - Basic Search will perform a quick search for available devices in no
time.
Using Advanced Search for Detailed Device Properties
For the purposes of installation, system inspection or trouble-shooting, you may need a glance
of device serial numbers, names and basic audio/video properties, which are available through
Advanced Search. However, it would take longer to finish searching. The search result will
show as picture below which contains four sections-A, B, C and D:
A Configuration Tool Bar
B
Global Setting Parameter
C
D Manual Input Bar
6
Device List
IP Utility User’s Manual 4.2.04
A
Configuration Tool Bar: All the functions listed here are configurable through IP Utility.
Other than “Refresh”, each option can be executed on multiple devices with global
setting.
NOTE: All the configuration tools here are only applied to the cameras / video servers
you selected from the Device List below.
B
Global Setting Parameter: Input proper account/password/port number here to access
selected devices.
C
Device List: Shows device information.
● The checkboxes of camera / video server products are enabled for selections when
executing functions listed on Configuration Tool bar. For standalone network recorder
products, the checkboxes are disabled; you may connect to the discovered network
recorders y clicking on the IP addresses.
● For multiple-channel devices (e.g., video encoder), a
Click on it to expand the channel list, click
● Move your mouse cursor over the
icon would be available.
icon again to collapse list.
icon to reveal device properties in a floating
window.
D
Manual Input Bar: You can manually input IP address here for device that is reachable
by IP Utility but not showing up in search result. As long as you successfully added a
device and connected to it, it will be remembered in the device list until you remove it.
Observing the Device Status
Each device status is shown in the Status column behind every entry.
Device Connection Status
Connection status:
● Gray-out → this device is not reachable via global setting parameter (port).
● Black → this device is reachable.
7
IP Utility User’s Manual 4.2.04
Status Message:
● The device IP address is conflict with another devices → Ip address conflict.
● This device is added manually → this device was added manually.
● Fail in authentication for querying device information → Wrong account/password.
Configuration Status
Each time you apply settings to devices with global settings, the status column would display
the result. For example, if you reboot a camera, its status would appear as “Rebooting” during
the process, and turns to “Success in save&reboot device” when finished. On the other hand, if
the configuration fails, the status would show “Fail to save & reboot device”.
8
IP Utility User’s Manual 4.2.04
Configuring Device Settings
For configurations including Date / Time, Motion, Video / Audio and URL, they are available
when the checkbox is checked.
9
IP Utility User’s Manual 4.2.04
Configuring Date/Time
On Date/Time tab, choose the SNTP/NTP Server if you want the device to sync with the time
server of your choice; or choose “Set Manually” to give specific time setting to the device.
For certain time-sensitive surveillance systems, you may modify the Daylight Saving Time
according to the DST rule of that country or region.
10
IP Utility User’s Manual 4.2.04
Configuring Motion Settings
Motion detection is a key element in most surveillance systems; it can be used as a trigger for
events such as sending notifications or alarms to system monitor. Our camera supports three
motion detection regions, which are configurable through IP Utility. In IP Utility, selected the
device(s), and click “Device Settings”.
1. In Motion tab, check “Set Motion Detection Settings to devices”.
2. Select the region, input the X coordinate(X), Y coordinate(Y), width (W) and height (H)
value into the four boxes.
X
Y
W
H
NOTE: The default motion region setting is “Full image size”. Please select
“Keep current settings” if motion regions have been set previously and you do
not wish to change them.
NOTE: You can click
on top right of this window to bring up detailed
instructions on setting motion regions.
3. Sensitivity, Timer and Threshold configurations:
Sensitivity – Determines how sensitive the camera reacts to the movement. The
higher is the sensitivity level, the smaller motion will trigger the alarm, default is 70.
11
IP Utility User’s Manual 4.2.04
Timer - The time period from the beginning of the triggered event during which the all
motion activities are ignored by the camera, default is 1 second.
Threshold – Determines at what point the motion detection feature is triggered. The
higher threshold means more variance of pixels in view is needed to trigger the alarm,
default is 10%.
Configuring the PIR Settings
Not all devices support PIR motion detection. For devices that are built-in with this function,
you can configure the Sensitivity and Timer of the PIR detector here.
12
IP Utility User’s Manual 4.2.04
Configuring the Video / Audio Settings
The video configurations such as resolution, frame rate or encoder type are the keys in user’s
application. However, they vary by different platforms and camera capabilities. For example,
ACM cameras support MJPG and MPEG4 encoders, while TCM cameras support MJPG,
MPEG4 and H.264 encoders. To let user manage various devices regardless of those
configuration differences, IP Utility provides complete lists of options for both video and audio
configurations; if the option you choose is not supported by the model, IP Utility will apply the
next mediate value.
Configuration
Video Streaming
Value
Single, Dual
Mode
Description
For devices with dual stream functionality, they
can use a smaller video stream for live view with
lesser frame rate to save CPU power.
Meanwhile the recording stream can be larger
and have more FPS to retrieve evidence when
needed.
Video Encoder
MPEG-4 / MJPEG /
Select the encoder’s compression type.
H.264
13
IP Utility User’s Manual 4.2.04
Video Resolution
Video Frame Rate
Max, 1080p, 720p,
Select the video resolution of the device. “Max”
D1, VGA, CIF, QVGA,
will automatically pick the max resolution of
QCIF, QQVGA
each device’s capability.
Max. Half, Quarter, 2,
Select the available frame rate. “Max” will
1
automatically pick the max frame rate of each
device’s capability. “Half “will use the half of the
device’s max supported value ,as “Quarter” will
use the quarter of the device’s max supported
value.
Video Bitrate Mode
Constant, Variable
Constant Bit Rate: The bit rate remains constant
at all conditions, Video quality will be better
when image is still. Large amount of motion or
complex scene will degrade quality slightly.
Variable Bit Rate: The video bit rate will vary
based upon scene complexity and amount of
movement. The quality will remain the same.
Video Max Bitrate
Unlimited, 3M, 2.5M,
This puts a hard cap on the maximum bit rate
(Constant Bitrate
2M, 1.5M, 1.2M, 1M,
allowed in any given second of video streaming.
only)
750K, 500K, 384K,
Assigning a limited bit rate may result in a few
256K, 128K, 56K,
dropped frames rate when the stream data
28K
overflows the allowed bit rate. Doing so will also
disable Bit Rate setting below.
Video Bitrate
3M, 2.5M, 2M, 1.5M,
This is the target bitrate that the camera will
(Constant Bitrate
1.2M, 1M, 750K,
attempt to provide when using Constant Bitrate
only)
500K, 384K, 256K,
mode, only enable when you selected
128K, 56K, 28K
“Unlimited” for Video Max Bitrate. The actual
value will fluctuate slightly based on scene
changes.
Video Quality
1~100
This configuration is only available if the video
encoder is H.264 or MPEG4 and the video
bitrate mode is Variable Bitrate Mode. For
devices that use Low/Medium/High settings for
video quality, the settings 1~100 in this
configuration will be converted to those three
levels like this:
1~33→ Low; 34~66→Medium; 67~100→High
GOP Length
(Variable Bit Rate
0~60
When encoder type is MPEG4 or H.264 and
video bitrate mode is “Variable Bit Rate”. Select
14
IP Utility User’s Manual 4.2.04
Only)
the Interval between two I-frames. This is also
called GOP Length. (Group of Picture).
Audio In State
Enabled , Disabled
Enable or disable Audio In via the check box.
Audio In Sensitivity
High, Low
Choose the sensitivity level of line-in audio
Audio Out Volume
1~100
Control the output volume of Audio Out here
NOTE: If the device does not support audio function, IP Utility should skip audio setup
to the device.
The Simplest Way to Command Multiple Devices
Our devices support URL API. Through IP Utility, you can setup multiple devices
simultaneously by inputting corresponding URL command and send to selected devices. For
example, adding two different user accounts to multiple devices would take you several steps a
firmware page. By using URL command, you only have to do setup once and apply to all.
1. On Configuration tool bar, click “Device Settings”.
2. In URL tab, check “Send URLs to device”.
3. Select the CGI and input the command, then click “Apply”.
NOTE: You can click
on top right of this window for more descriptions and
examples of URL settings.
15
IP Utility User’s Manual 4.2.04
How to Change Device IP Address
IP Utility provides a convenient way for you to modify IP addresses of a group of devices in
merely few steps.
1. Select devices you wish to configure, and make sure they use the same global
settings (account and password).
2. On Configuration Tool Bar, click “Change Network Address”.
If you are using DHCP sever for your network, please choose “Dynamic IP Address
3. Or you can assign static IP addresses by giving a starting address. Bases on the
starting IP address, IP Utility will search for availible IP addresses and assign them to
selected devices.
For example, with the given starting address as “192.168.0.100”, selected three
devices are individually assigned 192.168.0.100, 192.168.0.101 and 192.168.0.103,
as 192.168.0.102 has beend used by another device in the network.
192.168.0.100
192.168.0.101
192.168.0.102
(in use)
192.168.0.103
NOTE: Before assigning static addresses to a number of devices, please make sure:
1. There are enough IP addresses available in the subnet.
2. The starting address and gateway address are in the same subnet.
3. The starting address and gateway address are unicast IP addresses.
16
IP Utility User’s Manual 4.2.04
Upgrading Firmware
As we continue innovating and developing new products, later generation models often come
with newer designs. Therefore, the firmware system of different platforms would vary. Your
devices may carry one, two or three kinds of firmware to respectively enhance different
performances. However, these firmware files are not compatible to all devices. IP Utility’s
“Smart firmware upgrade” design helps you choose the appropriate firmware file. Before
upgrading device firmware, it is important that you (1) are totally aware of the platform and
versions of the firmware of the device (2) have read though and understood the device
firmware manual and release note (3) have downloaded the proper firmware files to be
upgrade with.
1. Put the downloaded firmware files in the same folder, and keep their filenames
unchanged.
2. On Configuration tool bar, click “Firmware Upgrade”.
3. IP Utility can detect your device firmware version and bring you through
appropriate upgrading process. Firstly, you get to choose what kind of firmware file
to upgrade. For example, you device carries two types of firmware files, the popup
window will provide you two file type selections:
If your device only carries one type, then only one type selection is provided.
4. Select “Upgrade the latest firmware” to have IP Utility automatically decide the
firmware file from the location you give; or “Upgrade the specific firmware” if you
know which file to use. Then choose the file or folder location, and click “Apply”.
NOTE: The device will reboot automatically after an image upload completes. Do not
disconnect the device until the completion of firmware upgrade.
17
IP Utility User’s Manual 4.2.04
Making Backup of the Device Configurations
For security need, a backup of the device settings is good to help you troubleshoot or recover
it. It is strongly recommended that you save backup files of devices after the configurations.
1. Select the devices.
2. On Configuration Tool Bar, click “Config. Backup”.
3. Choose a location to save the backup files. It will be saved as an .ini file.
Restoring the Device Configurations
To restore the configuration to a device, select the device to perform “Config Restore”. Before
proceeding, please carefully check if the backup file matches your selected device.
1. Select the device.
2. On Configuration Tool Bar, click “Config”. Restore”.
3. Choose the location of the backup file to perform restoring. If you can’t tell from the file
names which to use, simply choose the folder where it is, IP Utility is able to
recognize the matching file and locate it.
18
IP Utility User’s Manual 4.2.04
Rebooting the Devices
There are chances that certain devices need a refresh cycle; IP Utility allows you to save &
reboot many devices in a go.
1. Select the devices.
2. On Configuration Tool Bar, click “Save & Reboot”. In this case, you may choose to
reboot the device while saving all current setting.
If you simply want to clear all the settings on the device to start over again, “Resetting” can
restore its factory default values except network settings. Therefore, this device still uses the
same IP address after resetting.
NOTE: The “Save & Reboot” or “Reset” process isn’t completed until the device status
displays a success message. During this period, please do not disconnect the device.
19
IP Utility User’s Manual 4.2.04
Changing UI Language
IP Utility supports up to ten languages. You can select your desired language by pressing this
combination of three keys: ctrl+alt+j.
20