1
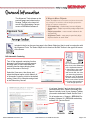
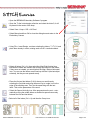
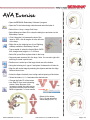
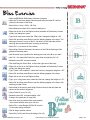
Alignment Tools Created by Susan Beck Learn to use the Alignment Tools of Version 6 by creating three compositions using letters from the BERNINA Exclusive design collection, To the Letter. Supplies and Tools Machine & Accessories Alignment Tools Exclusive Embroidery Collection To The Letter #21004 BERNINA Embroidery Software 6 ©2012 BERNINA of America, Inc. Visit bernina.com for additional lessons! Page 1 of 5 General Information The Alignment Tools (shown on the previous page) are located on the Arrange Toolbar in the lower left corner of the Embroidery Canvas screen of BERNINA Software 6. 4 Ways to Move Objects Note: An object can be the parts and pieces that make up a design or it could be several designs grouped to‐ gether to create a composition. Click and drag – easiest way to move objects Arrow keys – helps to precisely nudge object into place Object properties – uses numeric values to be very precise Alignment Tools – easy way to precisely align objects relative to each other Included in the list on the previous page is the Select Object tool that is used in conjunction with the Alignment Tools. The Select Object tool is found on the Edit Toolbar in the upper left corner of the screen. NO Automatic Centering Turn off the automatic centering function because it is difficult move things around and align them to each other when the centering function keeps bringing them back to the center of the hoop. Tip: To increase speed and ease of use, take advantage of the keyboard shortcuts. It often helps to see a word or picture that the icons and menus offer, but once you start using keyboard shortcuts, you’ll be amazed at how it becomes second nature to move from function to function without taking a lot of thought process. Select the View menu, then Hoop, and select the Manual option, which takes it off of Automatic Centering, which is the default setting. Select OK to complete and go back to the Embroidery Canvas. If you have Version 6 and you do not see the two distribution tools, Space Horizontally and Space Vertically icons in your Arrange Toolbar, you need to download & install Service Pack 1. Go to bernina.com > Support > BERNINA Embroidery Software V6 > BERNINA embroidery software V6 - Service Pack1 ©2012 BERNINA of America, Inc. Visit bernina.com for additional lessons! Page 2 of 5 STITCH Exercise Open the BERNINA Embroidery Software 6 program. Open the To the Letter design collection and select the letter S; it will be placed in the center of the hoop. Select View > Hoop > 255 x 145 Oval Select Manual and then OK to close the dialog box and return to the Embroidery Canvas Using File > Insert Design, continue selecting the letters, T-I-T-C-H, and place them loosely in order, rotating each one 90° counterclockwise. Select all letters (Ctrl + A), then select the Align Right Vertical icon. Because the letters are rotated, this will align the bottom of the letters. If they were not rotated, you would select the Align Bottom Horizontal icon. You can see the letters are all lined up with the H (the last object selected), but they are not spaced evenly. Place the first and last letters (S & H) where you want them by selecting the first letter and using the arrow key to nudge it out to the edge of the stitching area. Then, do the same thing with the last letter. This set the parameters of the word. Select the Space Vertically icon & the program does the rest – automatically moving the middle letters as needed to space them evenly between the first and last letters. Select all of the letters (Ctrl + A) and then the Group Icon. ©2012 BERNINA of America, Inc. Visit bernina.com for additional lessons! Page 3 of 5 AVA Exercise Open the BERNINA Embroidery Software 6 program. Open the To the Letter design collection and select the letter A. Select View > Hoop > Large Oval Hoop Select Manual and then OK to close the dialog box and return to the Embroidery Canvas Click & drag the A to increase the size of the letter to 150%; click & drag the A to the left side of the hoop. Right click on the Lettering icon (A on Digitizing toolbar) available in Embroidery Canvas. Type a capital A; select the Varsity Block-CAPS font; change letter height to 1.4” or 35mm. Select OK; press Enter to place letter in the hoop. Copy and paste a second A in the hoop. Note: You can also right click and drag to create a quick clone. Position one A at the top of the large A and one at the bottom. Using the Lettering tool, type a V and place it between the 2 letter As. Align the left vertical edge by selecting the objects and then the Align Centers Vertical icon. Select the Space Vertically icon to align vertical spacing of the letters. Select the letters, A, V, A and select the desired color. Change the Satin Fill of the letters to a Step Fill for a more interesting texture. Note: Because of the satin increase in height, the satin are too long and would not stitch favorably. Refer to Appendix C of user manual. ©2012 BERNINA of America, Inc. step Select all four letters (Ctrl + A) and group the entire design (Ctrl + G). Visit bernina.com for additional lessons! Page 4 of 5 Bliss Exercise Open the BERNINA Embroidery Software 6 program. Open the To the Letter design collection and select the letter B; it will be placed in the center of the hoop. Select View > Hoop > 255 x 145 Oval. Select Manual and then OK to close the dialog box. Right click on the A on the Digitize toolbar (available in Embroidery Canvas mode); text dialog box opens. Type liss in lower case; select the Tiffany font; change the height to 1.03”. Select OK and then press Enter to see the lettering appear in the hoop. The lettering will come in on top of the B. Just slide it to the right side without worrying about exact placement or staying in the hoop. Select Ctrl + A to select all of the letters. Select Align Centers Horizontal; the centers of the B & the lettering will be placed on the same plane. Use the arrow keys to position the lettering as close to the B as you want. Use Ctrl + A to select the B and liss; group them by selecting Ctrl +G. Rotate the word 90° counterclockwise. Click and Drag the Word, Bliss, to the lower right area of the hoop. Right click on the A on the Digitize toolbar (available in Embroidery Canvas mode); text dialog box opens. Type “Follow” with a capital F; select the Lisa font; change the height to 1.03”. Select OK and then press Enter to see the lettering appear in the hoop. Right click on the A on the Digitize toolbar Type “your” using lower case; select the Lisa font; change the height to 1.03”. Select OK and then press Enter to see the lettering appear in the hoop; click and drag it under Follow. Select both of the words; select Align Centers Vertical; that will place the centers of the words in alignment. Group Follow & your (Ctrl +G). Rotate the word 90° counterclockwise; click & drag to the upper part of hoop (left). Use arrow keys to position them approximately in the center with the word your over liss. Select File > Insert Design #21004-39 from the To the Letter design collection. Click & drag to position shown. Select All (Ctrl+A) and Group the design (Ctrl +G). . ©2012 BERNINA of America, Inc. Visit bernina.com for additional lessons! Page 5 of 5