1
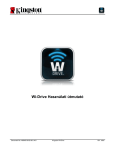
CM1-Mini Wi Drive
Setup Guide • Ver 0.1
Please read the following safety information prior to using CM1.
•
Only qualified personnel should service
CM1. Faulty installation or service may
invalidate any warranty applicable to
CM1.
•
CM1 can cause interference to pacemakers, hearing aids, and medical
equipment. Keep safe distances from
medical devices when operating in such
environments.
•
Do not store or carry flammable liquids,
gases, or explosive materials in the
same compartment as CM1.
•
Switch your CM1 off when in any area
with a potentially explosive atmosphere,
and obey all signs and instructions.
Sparks can cause an explosion or fire
resulting in bodily injury or even death.
•
Do not drop or knock CM1. Rough handling can damage the electronics board
and hard drive in CM1.
•
Do not expose CM1 to extreme temperature. Do not put CM1 on heating devices such as microwave oven, stove,
or radiator.
•
Clean CM1 surface with soft damp cloth.
Do not use any cleaning agent.
•
Keep CM1 dry. Any precipitation, humidity, and liquids can corrode, or short
electronic circuits in CM1.
Sabio is not liable for loss of data. Sabio strongly recommends that users not rely on any single
device to protect their data. Sabio recommends
that users save critical files on multiple devices
in multiple locations to be assured of recoverability.
Thank you for purchasing Sabio’s CM1 Mini WiDrive.
Included items:
• USB Cable : This is a “Y” cable to allow you to connect the CM1 directly to your computer, without the need of any additional devices.
• System CD: Install on a PC to discover the IP address of the CM1 on the network. This disc
also includes a copy of this manual and the full users manual.
• Ethernet Cable: This cable allows you to connect the CM1 to a Router.
• Power Supply: To provide power to the CM1 when used as a NAS or a Personal Cloud device.
Introduction to the CM1
1. Use the provided power adapter and Ethernet cable and connect to the unit and a router
(figure - 01).
figure-01
2.Make certain the switch located on the back of the CM1 is set to “AP”.
figure-02
3.Touch the power button to turn the unit on.
4.The front panel indicators will light up, with the top two red and the bottom two green.
As the unit comes online you will notice the top two indicators flashing, and occasionally the bottom indicator as well. The CM1 is ready to use when all the indicators are green, with the LAN indicator flickering occasionally.
Locate the CD that came with your CM1 and
insert the disc into the optical drive of your
Windows computer. Since the device is set up
and controlled via a web-browser interface, the
following instructions will also apply to the use
of a CMQ on an Apple MAC computer. A discussion of how to locate the CM1 using a MAC is
included in the user’s manual.
5.Follow instructions on each screen and click through: the License agreement, customer information, setup, ready to install and finish screens. Click on the “finish” button
6.Run the “CM1 Utility” by clicking on “Start” and then click the “CM1 Utility” icon in the start menu. The screen below appears.
Click on the “Search CM1” button in order to locate your CM1 on your network. (figure-03)
NOTE: In order for the CM1 to be discover
able on your network, both the CM1 and the computer you are running the CM1 Utility on must be on the same network.
The CM1 Utility will search the network for all
CM1’s connected to the local area network
(LAN) and display them in the small box on the
right. It should look something like this (figure-04).
figure-03
figure-04
Make sure the CM1 is highlighted, and then
click on the “Login” button. You will be prompted for the ID and Password (figure-05).
Leave the default ID of “admin” in place, and type the factory set password of “admin” (without the quotes) and then click on the “Login” button.
The buttons on the bottom half of the CM1 Utility page will then become active. Click on the
“Web Page” button.
figure-05
Click on the “System Setting” icon (figure-06).
The screen showing the system status is displayed first.
Click on the “Maintenance” option on the left
hand side (figure-07). The “Maintenance” screen
will appear. Click on the “Format” button at the
bottom of the page. This will format the hard
disk drive built into the CM1
figure-06
figure-07
A warning message will appear telling you that any unsaved data will be lost, but since the disk is
blank, this message is just cautionary. Click on “OK”. The disk format page will be displayed with
messages concerning the progress of the format process.
When the formatting process is completed, you will be returned to the “Maintenance” page. Click
on the “Status” option on the left side, and you will see the “Status” page and the “Application Status” should list all applications as “ON” (figure-08).
Your CM1 is now ready to accept files and be used as a wired network attached storage device (NAS). Now that the CM1’s disk is prepared, you can move on to configuration of the device as a networked attached storage unit.
figure-08
CM1 can be configured as a wireless networked drive:
Use this mode if you want the main network connection to be the wireless interface. You will still need to leave the CM1 plugged into your network using an Ethernet cable for the setup phase of the configuration.
1.Turn the CM1 off, change the “network se
lection switch” located on the back of the CM1 to “Client Scan” (figure-09).
figure-09
2.Extend the antenna at this time, and power the unit back on at this time (figure-10).
You will need to run the CM1 Discovery utility
again to find the CM1 on the network, and log
into the CM1 as previously explained. Click on
the “System Setting” icon (figure-11). The screen
showing the system status is displayed first.
figure-10
figure-11
You may want to reposition the CM1, the antenna on the CM1, your router, or both, to see if you can get a better signal. If you b.Click on the “Client Scan Mode” photo below cannot get the numbers to be close to 100, the wording. The screen in figure-12 will ap
you may want to use the CM1 in a wired pear.
configuration to ensure optimal performance.
c. You will see a list of wireless access points listed under the “Step 1” section of the screen. If your wireless router or access point is not listed, just click the “Refresh” link on the page to have the CM1 rescan the wireless signals at your location (figure-13).
a.Click on the “Setting” option on the left side (figure-11).
d.NOTE: Initially the signal strength will be high as the CM1 will be sitting next to the router. If after configuration of the CM1 you decide to move it to a different location, the wireless signal of the router or AP will change, and if it is below 50 the performance of the CM1 may be poor or unacceptable. figure-12
figure-13
e.Click on the SSID of the wireless connection you wish to use, and then click on “Apply” in the “Step 2” section of the page. The SSID will appear in the top most slot. Select/
Enter the appropriate security settings to allow the CM1 to join the wireless network (figure-14).
figure-14
f. Click “Apply” down at the bottom and you will see a warning dialog appear (figure-15).
Once the setting is applied, the CM1 will re
boot. Once the WiFi light stops flashing red and green, and turns all green, you can then figure-15
power down the CM1, remove the Ethernet cable, and power it back up. You can now relocate your CM1 to your desired location and it will operate wirelessly as long as there is a strong signal.
Three Folders have been created on the CM1. These folders can be accessed us
ing the web interface. Select “Web Fold
er” (figure-16).
figure-16
The following screen should appear (figure-17). These three folders can be mapped to your
computer.
figure-17
On a Windows PC, launch the CM1 utility. After you log in to the CM1, click on the Web
Folder button, and the following screen will appear (figure-18).
figure-18
Right clicking on any of the folders will allow you to map the drive as a local drive, (figure19). After the drive is mapped, you can use these folders as you would a local drive directly connected to the your computer.
figure-19
On a Mac computer, in Finder use the “Command K” key combination to connect to the
CM1, and enter the IP address of the CM1 or the product name “CM1” (figure-20).
figure-20
This will ask you for a Name and password as a registered user. Enter “admin” and “admin” as your name and password (figure-21).
figure-21
Now the CM1 will appear in Finder as a network connected drive.
Use the Home folder for: Use of the Home folder is optional, but can be used to store personal
documents you do not wish others to see.
Use the Public folder for: Use of the Public folder is optional, but can be used to store files you
want everyone to have unrestricted access to.
Use the Share folder for: Use the Share folder for files you wish to share with others. This
folder contains the Music, Download, Photo and Video folders. These folders can also be accessed from the menu bar on the left side.
Setting the iTunes server
Make sure the iTunes server is on in the status screen (figure-22).
figure-22
Click on the iTunes button from the home screen, and make sure the default setting of “my
Music” is selected (figure-23).
figure-23
This will allow computers on your network to
see the CM1 as a music server, and music files
on the CM1 will be available through iTunes.
(figure-24)
NOTE: The music files must reside on the CM1 under the Share/Musicfolder in
order for the iTunes service to pick them up.
figure-24
Personal Cloud
Setting up the CM1 to allow for functionality
as a Personal Cloud storage device. There
are two elements to gaining access to your
CM1 from outside your local network (home or
office). One is configuration of the Router and
the other is DDNS. Below each is described in
brief summaries.
Personal Cloud/ Remote access/access
from road.
You will need to register with just one of many
Dynamic DNS service providers that are out
there. Sabio Storage does not provide this service, and while there are some that charge you
a monthly fee, many of them are free. Below
are some free services that we have found:
•
•
•
•
DynDNS.com
no-ip.com
dnsexit.com
TZO.com
We will show you one as an example to show
you how it works. Others are similar and offer
similar services. Go to http://www.dyndns.com,
using a web browser on a computer connected
to the same local network as the CM1.
Click on the “Sign In” button in the upper right
hand portion of the web page. A drop down
box will appear and ask for your login information (user name and password). Enter them
in, if you have already registered, but if you
haven’t, you will need to click on the option
below and “Create an account” (figure-25).
figure-25
You will then see the screen that will allow you to register for their DDNS services.
You can use anything as a user name, but it should be something you will remember, as you will
be using this once in a while. The other items are self-explanatory. Click on the “Create Account”
button (figure-26).
figure-26
The next screen is an advisory screen telling you that they will be sending a confirmation Email to
the address that you gave them during the registration. Make sure you follow the instructions in
the Email carefully, as this will verify your account.
Once you have completed the confirmation Email go back to their site and sign in. Then click on
“Add Host Services” (figure-27).
figure-27
You will then see a screen (figure-28) and will be asked for some information about the new hostname you are going to create. This is the name that you will use to access your CM1 and its
contents while you are out on the Internet, such as when you are traveling. The first item is the
Hostname. This can be any name you wish, and will be the name that you type into your browser
when you access your CM1 from outside your local network. For this example we are using the
name “sabio”.
figure-28
The next step is to select the last two segments of the name you will be using. The free service
that DynDNS.com offers allows you to select from a dozen or more possibilities. For the example
we are using, we have selected “dyndns.info” (figure-29).
You then will need to select the service type. Please make sure that “Host with IP address” is
selected (figure-27).
figure-29
Once that is done, you will need to type in the IP address where your CM1 can be located. This
is NOT the IP address of the CM1 itself, as this is most often a private IP address. This is the
address of your cable modem or DSL modem. For your benefit, the folks at DynDNS.com have
conveniently provided the public IP address of your network just below the entry blank (figure-30).
If you are filling this information out while you are on the same network that the CM1 is
attached to, then this address will be correct, and you can just click on this link and the
number will be filled in for you.
If you are filling this form out while you are on a different network, then this number will NOT be
correct and you will need to open a browser on a computer attached to the same network as the
CM1 and go to the site www.whatismyip.com. This will tell you the IP address that you will need
for this part of the form.
figure-30
The next item on the page has to do with Mail Routing, and you will want to leave this unchecked.
The next part of the setup for your new hostname is basically telling the folks at DynDNS.com
what you intend to use the new hostname for. You do not have to volunteer this information, but
it may help them improve their services. You can use the suggested options, or leave this area
without any selections (figure-31).
Then you will click on the “Add to Cart” button at the bottom. The next screen is a confirmation
screen to the checkout procedure in creating your new hostname. You will notice there is no
charge for the services you have selected. Click on the “Proceed to Checkout” button (figure-32).
figure-31
figure-32
The next screen shows you the new hostname you are about to activate. Please click on the
“Activate Services” button to continue (figure-33).
figure-33
You will then see the next screen showing your new hostname that you can utilize to access your
CM1, from your PC, tablet, or web enabled phone, wherever you are on the Internet (figure-34).
Now, even if the address of your home network changes, which can be the case with many Internet Service Providers, the name you have created, along with the services, will compensate for
the changes, if and when they occur.
figure-34
Router (Port Forwarding) configuration.
This phase of the setup for your personal cloud requires a Wireless Router with UPnP enabled.
If your router is UPnP enabled, then the configuration of the router for port forwarding will take
place automatically. This will allow your router to provide access to the CM1 from the Internet.
If you do not know whether you have Universal Plug and Play features on your router, please
check the manufacturer’s web site. For instructions on how to enable this feature, if it is not
enabled by default, please refer to the instructions that came with your router. As an example,
the port forwarding screen on a LInksys router should look like figure-35 (every router has similar
screen and functionality).
figure-35
You are almost done, one last setting. Log back into the CM1. Please click on the “Account Setting” button on the left side of the page.
When you arrive at the “Account Settings” page, click on the “DDNS” tab in the upper right section of the page (figure-36).
figure-36
You will then see the “DDNS Settings” page. Please fill in the information from the DynDNS.com
site that you created, including the hostname, login information, and the port number you wish to
use. In most cases, the default port of 80 is used (figure-37).
figure-37
Then click on “Save”. Please reboot the CM1
using the reboot option on the “Maintenance”
page. This completes the setup for your personal cloud – enjoy. Please refer to our web
site for some examples on how to use your
CM1.
Please bookmark the host/domain name that
you created in your browser. In our example it
is: http://sabiosupport.dyndns.org/
Clicking on this address from anywhere on the
internet should take you to the log in screen for
your CM1 at home or office (figure-38).
When you log in, you should have complete
access to the CM1, including downloading and
uploading files, creating new folders,….etc.
figure-38