1
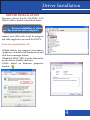
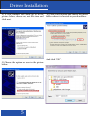
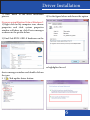
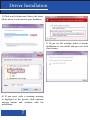
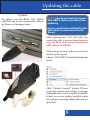
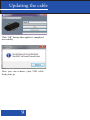
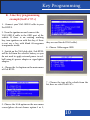
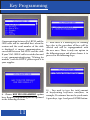
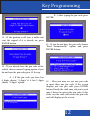
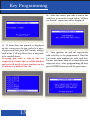
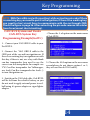
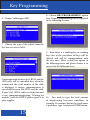
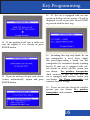
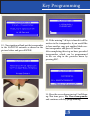
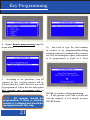
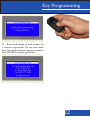
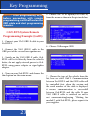
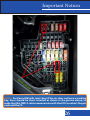
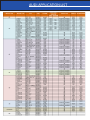
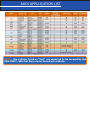
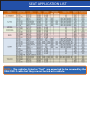
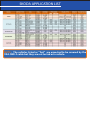
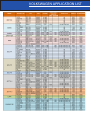
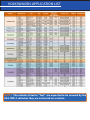
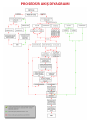
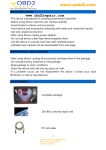
Content
CONTENT..................................................................................................................................................1
VAG SYSTEMS SUMMARY.....................................................................................................................2
GENERAL INFO ABOUT THE CABLE...............................................................................................3
IMPORTANT NOTICES..........................................................................................................................3
DRIVER INSTALLATION.......................................................................................................................4
UPDATING THE CABLE........................................................................................................................8
KEY PROGRAMMING FOR K-LINE SYSTEMS...............................................................................10
KEY PROGRAMMING FOR CAN-BUS SYSTEM & DEALER CAN-BUS SYSTEM ..................12
K-LINE REMOTE PROGRAMMING..................................................................................................20
CAN-BUS SYSTEM REMOTE PROGRAMMING.............................................................................23
IMPORTANT NOTES.......................................................................................................................26/27
AUDI APPLICATION LIST..............................................................................................................28/29
SEAT APPLICATION LIST....................................................................................................................30
SKODA APPLICATION LIST................................................................................................................31
VOLKSWAGEN APPLICATION LIST...........................................................................................32/33
USER NOTES..........................................................................................................................................35
PROCEDURE FLOW DIAGRAM.......................................................................................................36
1
General Info
VAG SYSTEMS SUMMARY
K-Line SYSTEMS:
WHAT IS AN ECU ?
SYSTEM 1 : Vehicles equipped with this
system use 33 transponders.
SYSTEM 2 : Vehicles equipped with this
system use 42 transponders
SYSTEM 3 : Vehicles equipped with this
system use 44 transponders
SYSTEM 4 : Vehicles equipped with this
system use 48 megamos or philips 46
transponders
ECU stands for Electronic control unit
and controls all electronic activities on
the vehicle. Mostly, data related with
immobiliser is present in this unit, due
to this fact communication with this unit
through OBD is necessary. If there is no
communication through OBD, related
IC(eeprom or processor) should be read to
get the immobiliser data. Here is the list of
ECUs present in VAG cars:
-EDC15
-EDC16
-EDC17
-ME7.1.1
-ME7.5
-ME7.8
-MED9.5.10
-MED9.1
-MED17
-Simos Ppd1.x
-Simos 7.1
CAN-BUS SYSTEM : Vehicles equipped
with this system use 48 megamos Can-Bus
transponder. Each vehicle group has its
own transponder like; VW Can-Bus, Audi
Can-Bus, Skoda Can-Bus, Seat Can-Bus. A
blank VW Can-Bus transponder can be used
for any VW vehicle equipped with can bus
system(excluding dealer can bus system),
same applies for Audi, Skoda and for Seat.
DEALER CAN-BUS SYSTEM : With this
system regular 48 megamos transponder
can never be used or 48 megamos CanBus transponders can not be used as blank.
Transponder precoding information must
be taken from the vehicle, each individual
vehicle has its own precoding information,
due to this fact a blank can-bus transponder
can not be used for any vehicle equipped with
delaer can-bus system. Specific precoding
information should be written to can-bus
transponder.
WHAT IS A CS ?
CS is known as component security.
Component security is the data taken from
the car to prepare transponder for Dealer
Can-bus system cars, this data is taken from
the vehicle sometimes as 7 bytes(14 digits)
sometimes as 6 bytes(12 digits), CS is always
displayed 14 digits, if last 2 digits are “00”
this means CS is 6 bytes(12 digits). CS is
mostly present in ECU, and sometimes in
the dashboard.
2
General Info
GENERAL INFO ABOUT THE
CABLE
-It can extract pin code through the OBD.
-It can generate transponder from 6 byte CS
with the help of external antenna.
-It can programme keys and remotes for
K-Line systems, Can-bus systems and dealer
can bus systems, with another saying, it can
programme Vag cars with 48 megamos, 48
can-bus and 48 dealer can-bus transponders.
-It works only with Zed-BULL key
programming tool, can not be used with pc
or as a stand alone machine.
-It is upgradable and new developments can
be loaded to the cable with an update file.
IMPORTANT NOTICES
- There is no “Add key” function with all VAG
cars, according to the procedure all keys are
deleted and new ones are added respectively.
In example, if the car has 1 working key
and a spare key will be programmed, the
number of keys to be programmed should
be choosen as “2”. If the car has a working
key always start programming with the
working key. If you do not have a working
key, channel maybe blocked for five minutes
before programming.
-Each time at least 1 key and at most 8 keys
3
can be programmed to a VAG vehicle.
-If a wrong pincode is sent to a VAG vehicle
3 times in a row, the car will block itself
and all keys will stop working temporarily.
If this is the case, leaving the ignition on
for 35 minutes will unblock the ECU and
everything will turn to normal. If attemps on
a blocked ECU continues, unblocking it may
take up to 1-2 days.
-If wrong type of transponder is used on a
Can-bus car programming may continue
without any problem but at the end of
process, due to wrong transponder usage,
key will not be actually programmed.
-If the cable is connected to the OBD port of
the vehicle and the engine is started K-line
pin of the cable may be damaged, in order
not to face with this kind of problem, it is
highly recommended not to start the engine
while the cable is connected to OBD.
-In example If number of keys to be
programmed is choosen as 3 and total 2 keys
are programmed, the procedure will not end
successfully and none of the keys will work,
so all keys must be programmed as it is
choosen at the beginning.
Driver Installation
DRIVER INSTALLATION
Necessary drivers for the Zed-BULL VAG
OBD-F cable is loaded as described below:
NOTE : Driver installation is done
just for once for each computer.
connect your OBD cable to the Pc using the
usb cable supplied to you with Zed-BULL.
If you are using Windows XP:
1) Right click on “my computer” icon, choose
“properties” and then click hardware tab and
click device manager button.
2)Find Zed-BULL OBD-F under other tools,
or usb devices. Double click on it.
3)Click reload on hardware properties
window.
4
Driver Installation
4) A new window will show up as in the
picture below; choose no, not this time and
click next.
5) Choose the option as seen in the picture
below.
5
6) Click search button and choose the driver
folder where it is located in your harddrive.
And click “OK” .
Driver Installation
7) Click “finish” to end driver installation
process.
4) See the figure below and choose the option
If you are using Windows Vista or Windows7:
1) Right click on My computer icon, choose
properties and click. system properties
window will show up, click Device manager
as shown in the picture below.
2) Find Zed-BULL OBD-F hardware on the
as highlighted in red.
device manager window and double click on
the icon
3 ) Click update driver button.
6
Driver Installation
5) Click search button and choose the driver
folder where it is located in your harddrive.
7) If you see the window below it means
installation is successfull and you can click
close button.
6) If you meet with a warning message
as displayed in the picture click continue
anyway button and continue with the
installation.
7
Updating the cable
Update
To update your Zed-BULL VAG OBD-F
cable first you need to conenct the cable to
pc. Please see the figure below.
NOTE : You do not need to connect
VAG OBD-F cable to pc other than
updating.
Drivers need to be installed for the
VAG cable to communicate with
the pc.
while updating your VAG obd cable, just
conenct the cable to your pc.(do not connect
your Zed-BULL to Pc, do not connect your
OBD cable to Zed-BULL)
Click settings tab on pc software and choose
module update option.
Choose VAG OBD-F from the dropdown
menu
Click “Update Control” button. If there
is a newer version you will get a message
telling that there is a new update available,
if there is no new update available again
you will get a message telling that you are
upto date.
7
8
Updating the cable
Click “OK” button after update is completed
successfully.
Now you can remove your USB cable
from your pc.
9
Key Programming
K - Line Key programming
example(Golf 4 ‘97+)
1 - Connect your VAG OBD-F cable to your
Zed-BULL.
2 -Turn the ignition on and connect the
VAG OBD-F cable to the OBD port of the
vehicle. If there is an existing working
key, turn ignition on with this key, if there
is not, use a key with blank 48 megamos
transponder inside.
they are used for old VAG cable).
6 - Choose Volkswagen OBD.
3 - Switch on the VAG obd cable. Zed-BULL
will be fed from the vehicle’s battery, so you
do not need to apply external power to zedbull using it’s power adapter or cigar lighter
adapter.
4 - Choose the 3 rd option on the main menu
of Zed-BULL.
7 - Choose the type of the vehicle from the
list, here we select Golf 4 97+.
5- Choose the 10 th option on the new menu
screen(please do not choose option 1 or 2,
10
Key Programming
Communication between Zed-BULL and the
OBD cable will be controlled first. when the
version and the serial number of the cable
is displayed, it means communication is
successfull between Zed-BULL and the cable
If your VAG OBD-F cable is switched on and
is not communicating(saying “Waiting for
module”) with Zed-BULL, please report it to
your supplier.
8 - Choose KEY PROGRAMMING option
here. Remote programming will be explained
in the following sections.
11
9 - Even there is a working key or working
keys due to the procedure all keys will be
deleted and will be reprogrammed with
the new ones. There is only one option in
the following menu and please choose it to
proceed to the following steps.
10 - You need to type the total amount
of keys(existing keys+new ones)here, in
example; If customer has one key and wants
2 spare keys, type 3 and press ENTER button.
Key Programming
B -) After typing the pin code press
ENTER.
11 - If the ignition is off turn it on(do not
start the engine) if it is already on, press
ENTER button.
13 - If you do not have the pin code choose
“Find Automatically” option and press
ENTER button.
12 - If you already have the pin code of the
vehicle choose manual typing option if you
do not have the pin code go to 13 th step.
A -) If the pin code you have has
4 digits choose “4 digits” if it has 5 digits
choose “5 digits” option.
14 - Here you may see just one pin code
or more than one pin code, if the screen
displays just one pin code press ENTER
button. Rarely the cable may ask you to wait
upto 2 hours to extract the pin code, if this
is the case the cable will extract the pin code
and will display on the screen.
12
Key Programming
16 - After the correct pin code is sent to the
vehicle as seen on the screen below, “all keys
are deleted” expression will be displayed.
15 - If more than one pincode is displayed
on the screen note the pin codes to a piece
of paper and then press ESC button and go
back to the 12 th step. Here there is one point
to be carefull about:
If wrong pin code is sent to the car
respectively 3 times, the car will be blocked
and you will need to leave ignition on for
35 minutes to unblock the car.
13
17- Turn ignition on and off respectively
with each key to be programmed. Wait for
5 seconds with ignition on with each key.
Do not wait more than 20 seconds between
respective keys. After programming all keys
press ENTER button to end the procedure.
Key Programming
NOTE : With Passat B6 cars(with smart key) while extracting pin code if there
is a working key you need to put it to the ignition, if there is no working key,
you need to short circuit fuses to communicate with the car through OBD.
Check the figure in page 26. After extracting the pin code remove the cables
from fuses(cancel short circuiting).
CAN-BUS System and Dealer
CAN-BUS System Key
Programming Example(Golf 5 )
4
- Choose the 3 rd option on the main menu
of Zed-BULL.
1 - Connect your VAG OBD-F cable to your
Zed-BULL.
2 -Connect the VAG OBD-F cable to the
OBD port of the car and turn ignition on. If
there is an existing key turn ignition on with
this key, if there is not, use a key with blank
can-bus transponder (you need to use the
correct can-bus transponder. In example: use
VW Can-Bus transponder for Volkswagen,
use Audi Can-Bus transponder for Audi....)
to turn the ignition on.
5- Choose the 10 th option on the new menu
screen(please do not choose option 1 or 2,
they are used for old VAG cable).
3 - Switch on the VAG obd cable. Zed-BULL
will be fed from the vehicle’s battery, so you
do not need to apply external power to zedbull using it’s power adapter or cigar lighter
adapter.
14
Key Programming
6 - Choose Volkswagen OBD.
8 - Choose KEY PROGRAMMING option
here. Remote programming will be explained
in the following sections.
7 - Choose the type of the vehicle from the
list, here we select Golf 5.
9 - Even there is a working key or working
keys due to the procedure all keys will be
deleted and will be reprogrammed with
the new ones. There is only one option in
the following menu and please choose it to
proceed to the following steps.
Communication between Zed-BULL and the
OBD cable will be controlled first. when the
version and the serial number of the cable
is displayed, it means communication is
successfull between Zed-BULL and the cable
If your VAG OBD-F cable is switched on and
is not communicating(saying “Waiting for
module”) with Zed-BULL, please report it to
your supplier.
15
10 - You need to type the total amount
of keys(existing keys+new ones)here, in
example; If customer has one key and wants
2 spare keys, type 3 and press ENTER button.
Key Programming
13 - If the car is equipped with can bus
system or dealer can bus system, CS will be
displayed as well as pin code. Press ENTER
to proceed with the next step.
11 - If the ignition is off turn it on(do not
start the engine) if it is already on press
ENTER button.
12 - If you do not have the pin code choose
“extract automatically” option and press
ENTER button.
14 - Including this step only blank 48 can
bus transponder is used. Never Apply
this process(precoding a blank can bus
transponder) to customer’s already working
key(s)). If your car is equipped with canbus system or dealer can-bus system you
can choose Yes, produce transponder
dand continue if you are sure that the
car is equipped with can-bus system you
can choose No, I have transponder and
continue from 21 st step.
15 - If you are not sure about the vehicle’s
system you can choose Yes, produce
transponder and contunie.
16
Key Programming
18 - As shown in the screen below press
ENTER and put the new key with blank
transponder to the ignition and turn ignition
on in 10 seconds. You will see a status bar on
the Zed-BULL screen showing 10 seconds
time. You need to turn ignition on before the
status bar is fully filled. If the necessary data
is sniffed by the antenna, Zed-BULL screen
will jump to next screen.
16 - If CS is 7 bytes continue from step 21.
17 - If CS is 6 bytes Zed-BULL will tell you
to brute force the 7 th byte and will switch to
the next screen.
External antenna is put to the ignition coil as
shown in the picture below.After putting the
antenna near the ignition coil press ENTER.
NOTE : If Zed-BULL does not switch to
the next screen, turn ignition off and
on again.
For Passat B6 cars, you need to put
1 transponder to Zed-BULL antenna
and put original key or a blank remote
key to the ignition and turn it on(cable
will take the car to programming
mode). After Zed-BULL writes data to
transponder, you need to now put this
transponder(inside the remote) and
turn ignition on within 10 seconds.
17
Key Programming
19 - Turn ignition off and put the transponder
to the Zed-BULL antenna as shown in the
picture below and press ENTER.
20 -If the missing 7 th byte is found it will be
written to the transponder, if you would like
to have another copy put another blank canbus transponder and press W button.
After completing this step we have precoded
transponders which can be programmed
to the car. skip to the previous menu by
pressing ESC.
21 - Here the screen shown in step 15 will show
up. This time press No, I have transponder
and continue with key programming.
18
Key Programming
22- Turn the ignition on with each key
respectively. Leave ignition on for 5 seconds.
Do not wait more than 20 second between
respective keys.(If there is already working
key start with it.)
23- After turning ignition on with all keys
press ENTER to end the procedure.
NOTE : If there is existing key
always start programming with it.
19
Key Programming
NOTE : After programming keys
before proceeding with remote
programming, switch off and on the
OBD cable and start programming
remotes.
5- Choose the 10 th option(VAG-OBD-F)
from the manu as shown in the picture below.
K-Line remote programming
example(Golf 4’ 97+)
1 - Connect your VAG OBD-F cable to your
Zed-BULL.
6 -Choose Volkswagen OBD
2 -Connect the VAG OBD-F cable to the
OBD port of the car and turn ignition on.
3 - Switch on the VAG OBD-F cable. ZedBULL will be fed directly from the vehicle’s
batter, do not apply external power to ZedBULL using power adapter or cigar lighter
adapter.
4 - Turn on your Zed-BULL and choose the
third option on the main menu.
7 - Choose the type of the vehicle from the list,
here we select Golf 4 97+. Communication
between Zed-BULL and the OBD cable will
be controlled first. when the version and
the serial number of the cable is displayed,
it means communication is successfull
between Zed-BULL and the cable If your
VAG OBD-F cable is switched on and is
not communicating(saying “Waiting for
module”) with Zed-BULL, please report it to
your supplier.
20
Key Programming
8 - Choose Remote programming from the
menu below.
9 - According to the procedure even all
remotes are lost, existing remotes will be
deleted from the vehicle and new ones will
be programmed. Due to this fact only option
Del. remotes and programme news is
selected.
NOTE : All remotes should be
programmed, if there is existing
remote, it is deleted and should be
reprogrammed at this step.
21
10 - You need to type the total number
of remotes to be programmed(including
working remotes). In example if the customer
has 1 key and asking for a spare, total remotes
to be programmed is typed as 2. Press
ENTER to continue with programming.
11 - If the ignition is off, turn it on(do not
start the engine!), if it is already on press
ENTER button.
Key Programming
12 - Press Lock button of each remote for
2 seconds respectively. Do not wait more
than 20 seconds between respective remotes.
Press ENTER to end the procedure.
22
Key Programming
NOTE : After programming keys
before proceeding with remote
programming, switch off and on the
OBD cable and start programming
remotes.
5- Choose the 10 th option(VAG-OBD-F)
from the menu as shown in the picture below.
CAN-BUS System Remote
Programming Example (Golf5)
1 - Connect your VAG OBD-F cable to your
Zed-BULL.
2 -Connect the VAG OBD-F cable to the
OBD port of the car and turn ignition on.
6 - Choose Volkswagen OBD.
3 - Switch on the VAG OBD-F cable. ZedBULL will be fed directly from the vehicle’s
batter, do not apply external power to ZedBULL using power adapter or cigar lighter
adapter.
4 - Turn on your Zed-BULL and choose the
third option on the main menu.
23
7 - Choose the type of the vehicle from the
list, here we select Golf 5. Communication
between Zed-BULL and the OBD cable will
be controlled first. when the version and
the serial number of the cable is displayed,
it means communication is successfull
between Zed-BULL and the cable If your
VAG OBD-F cable is switched on and is
not communicating(saying “Waiting for
module”) with Zed-BULL, please report it to
your supplier.
Key Programming
8 - Choose Remote programming from the
menu below.
NOTE : If all remotes are deleted at
step 9 customer’s remotes should
be reprogrammed, otherwise they
will not work anymore.
9 - If you would like to delete existing
remotes choose Delete all remotes option
and press ENTER. After deleting all keys,
Zed-BULL will display a message telling that
all remotes are deleted. Now you can choose
Add new remote option and programme
new remotes one by one.
24
Key Programming
11 - Press the lock button of the remote to
be programmed for 2 seconds and then press
ENTER to end the procedure.
25
Important Notices
NOTE : For Passat B6(with smart key) if the car does not have a working
key, fuses should be short circuited as shown in the picture above, to
make the VAG OBD-F cable communicate with the ECU to extract the pin
code and the CS.
26
Important Notes
For any reason(ECU might be blocked, electrical problems, flat battery, blown fuse)
if pin code and CS can not be extracted via OBD, you can get the pin code and the
CS from the eeprom dump by removing the ECU(supported types are listed below)
- EDC 16
- Simos 7
- Simos PPD1
- Med 9.5.10
- ME 7.1
- ME 7.5
If there is aproblem between VAG OBD-F cable and the vehicle:
1 - Make sure that the car is listed in the application list.
2 - Check the battery voltage and check the fuses.
3 - Ask the owner if someone else made something similar like you do, if yes ask
the details.
4 - Ask if the car had an accident and the ECU or immobiliser unit was damaged
or not.
27
AUDI APPLICATION LIST
AUDI APPLLICATION LIST
NOTE : The vehicles listed as “Test” are expected to be covered by the
VAG OBD-F cable but they are not tested on a vehicle.
SEAT APPLICATION LIST
NOTE : The vehicles listed as “Test” are expected to be covered by the
VAG OBD-F cable but they are not tested on a vehicle.
SKODA APPLICATION LIST
NOTE : The vehicles listed as “Test” are expected to be covered by the
VAG OBD-F cable but they are not tested on a vehicle.
VOLKSWAGEN APPLICATION LIST
VOLKSWAGEN APPLICATION LIST
NOTE : The vehicles listed as “Test” are expected to be covered by the
VAG OBD-F cable but they are not tested on a vehicle.
User Notes
NOTE:
PROSEDÜR AKIŞ DİYAGRAMI