Download Line 6 POD 2.0 User Manual

Transcript
Pilot’s Handbook for version 2.0 software
An in-depth exploration of the revolutionary technologies and pulsing
tonal pleasures of POD, plus the insider info on the optional Line 6 foot
controllers: the Floor Board and FB4. An electrophonic version is
available on the included CD-Rom and at www.line6.com. Revision F.
This equipment has been tested and found to comply with the limits for a Class B digital device pursuant to Part 15 of FCC Rules. Operation is subject to the
following two conditions: (1) This device may not cause harmful interference, and (2) this device must accept any interference received, including
interference that may cause undesired operation.
POD, Line 6, Amp Farm, Flextone II, and Line 6 logos are all trademarks of Line 6. Pro Tools and TDM are trademarks of Digidesign. Emagic and SoundDiver are
trademarks of Emagic Software. Mackie and 1202VLZ are trademarks of Mackie. Arbiter, Fender, Marshall, Matchless, Mesa Boogie, Soldano, Vox and other
amplifier and effect models are all trademarks of their respective owners, which are in no way affiliated or associated with Line 6. These trademarks of other
manufacturers are used solely for the purpose of describing certain amplifier tones modeled after some of the most popular sounds of these classic amps and effects.
10
3
OUTPUT
LEVEL
0
24
23
11
0
27
10
A B
C D
PEDAL
0
10
TREBLE
U 6
10
0
16
REVERB
0
15
MI
INDI
10
25
28
17
2
ROTARY
DELAY/COMPRESSOR EFFECT
2x12
FLANGER 2
DELAY/TREMOLO
TWEAK
FLANGER 1
DELAY/CHORUS 1
CHORUS 2
DELAY/CHORUS 2
CHORUS 1
DELAY/FLANGER 1
TREMOLO 1x8
DELAY/FLANGER 2
O FF
COMPRESSOR
DELAY/SWELL
BYPASS
DELAY
EFFECTS
(CAB SELECT)
19 20
18
TAP
(HOLD)
SAVE
21
NOISE
GATE
MIDI
MANUAL
10
8
CHAN VOL
0
14
MI I
OUD
T
TUNER
22
9
THE ULTIMATE GUITAR DIRECT BOX
Version 2.0
POD
MIDDLE
MODERN CLASS A
BLACK PANEL
BRIT CLASS A
TWEED BLUES
BRIT BLUES
SMALL TWEED
BRIT CLASSIC
LINE 6 LAYER
BRIT HI GAIN
LINE 6 DRIVE
RECTIFIED
LINE 6 CRUNCH
MODERN HIGAIN
LINE 6 CLEAN
FUZZ BOX
TUBE PREAMP
AMP MODELS
(AMP MODELS 17–32)
EDITED
6
10
13
BASS
0
MP
T/A E
EC OD
DIR.I.R. M
A
T
RIGHUT
OUTP
7
1x12
ES
ON
PH
1
Chorus Speed Range of
choruses
Delay Time
Delay Time
Delay
Delay Swell
Notes
Turns off the effects
Higher settings
"squeeze" your volume
more.
The tremolo was
designed with the
characteristic Fender
shape.
Square wave LFO,
"rack" type chorus
setup; subtler than
Chorus 2
Sine wave LFO, approx.
10% feedback; emulates
an old Roland CE-1 for
classic stomp box sound.
Light Flange
26
Heavier flange with
more feedback.
This emulates a classic
spinning speaker, a la
the Leslie
Delay Level Very quick delays will
have no repeats for
better slapback
Swell Time Volume swell
Flanger Speed Range of
flangers
Flanger 2
Flanger Speed Range of
flangers
Rotary Speaker Rotary Speed Depth
Flanger 1
Chorus 2
Chorus Speed Range of
choruses
Tremolo Speed Depth
Tremolo
Chorus 1
Tap
n/a
n/a
Tweak
n/a
Ratio
EFFECT SETUPS
Effect
Bypass
Compressor
* Fender, Marshall, Vox, Budda, Dumble, Matchless, Mesa Boogie, Soldano, Roland, Arbiter, and other amplifier and effect models are all trademarks of their respective owners, which are in no way associated or affiliated with Line 6. These trademarks of other manufacturers are used solely for the purpose of describing certain
amplifier and effect tones produced using Line 6's modeling technology. Line 6's modeling technology provides POD with a wide variety of sounds and effects modeled after some of the most popular sounds of these classic amps. Line 6, POD, Floor Board, the Line 6 logo and the POD logo are trademarks of Line 6, Inc.
FLEXTONE: TAP LIT BUTTON FOR TAP TEMPO / HOLD LIT BUTTON FOR MANUAL
Spring
Room
Room
Room
Room
Room
Spring
Room
Room
Spring
Spring
Room
Room
Room
Room
Room
4
10
FT T
LETPU
OU
DRIVE
0
12
5
6
5
4x1
2
Reverb
Room
Spring
Room
Room
Room
Spring
Spring
Spring
Room
Room
Room
Room
Room
Room
Room
Room
0
4x1
29
Amp Model
Based on:
Volume Pedal
Line 6 Clean
Line 6 21st Century Clean
Pre
Line 6 Crunch
Line 6 Thick Grindage
Pre
Line 6 Drive
Line 6 Industrial Strength Overdrive
Post
Line 6 Layer
Line 6 Clean meets Psychotic Drive
Post
Small Tweed
1952 Fender Tweed Deluxe
Pre
Tweed Blues
1959 Fender Bassman
Pre
Black Panel
1964 Blackface Fender Deluxe
Pre
Modern Class A
1996 Matchless Chieftain
Pre
Brit Class A
1960 Vox AC 15
Pre
Brit Blues
1964/65 Marshall JTM-45
Pre
Brit Classic
1968 Marshall “Plexi”
Pre
Brit Hi Gain
1986 Marshall JCM 800
Post
Rectified
1994 Mesa Boogie Dual Rectifier
Post
Modern Hi Gain
1989 Soldano SLO Super Lead Overdrive Post
Fuzz
1960s Arbiter Fuzz Face
Post
Tube Preamp
Tube-based instrument preamp
Post
(Hold Tap and turn to this position) for Amp Models 17-32:
(Line 6 Clean) Line 6 Twang
Fender Deluxe and Bassman
Pre
(Line 6 Crunch) Line 6 Crunch #2
’68 Marshall Plexi 50 watt
Pre
(Line 6 Drive) Line 6 Blues
Marshall JTM-45 meets Budda Twinmaster Pre
(Line 6 Layer) Line 6 Insane
Way too many hours of shredding
Post
(Small Tweed) Small Tweed #2
’60 Tweed Fender Champ
Pre
(Tweed Blues) Boutique #3
Budda Twinmaster head
Pre
(Black Panel) Black Panel #2
’65 Blackface Fender Twin
Pre
(Modern Class A) Brit Class A #3
’60 Vox AC 15
Pre
(Brit Class A) Brit Class A #2
’60 Vox AC 30 non-Top Boost
Pre
(Brit Blues) California Crunch #1
’85 Mesa Boogie Mark IIc+ Clean Channel Pre
(Brit Classic) California Crunch #2
’85 Mesa Boogie Mark IIc+ Drive Channel Post
(Brit Hi Gain) Boutique #1
Dumble Overdrive Special Clean Channel Pre
(Rectified) Rectified #2
’95 Mesa Boogie Dual Rectifier Head
Post
(Modern HiGain) Modern HiGain #2 ’89 Soldano SLO Super Lead Overdrive
Post
(Fuzz Box) Boutique #2
Dumble Overdrive Special Drive Channel Post
(Tube Preamp) Jazz Clean
1987 Roland JC-120 Jazz Chorus
Post
IN
PU
T
AMP MODELS*
REDUCED SIZE BACK COVER FOLDOUT FOR ELECTROPHONIC PILOT'S GUIDE
R
WE
PO
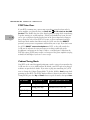
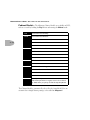
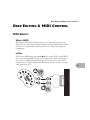
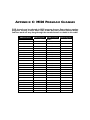
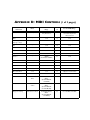
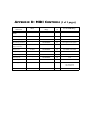
BANK 1
A
B
C
D
More great sounds for your POD are at www.line6.com
Big Rectifier with Delay & Room Reverb
Black Panel with Compression & Spring Reverb
Vox AC-30 Top Boost
Marshall JTM-45 with Room Reverb
BANK 2
A
B
C
D
Line 6 Clean with Compression
Line 6 Crunch with Room Reverb
Line 6 Drive with Delay
Line 6 Layer with Light Chorus & Delay
BANK 3
A
B
C
D
Small Tweed with Room Reverb – modeled after 1952 Fender Deluxe
Tweed Blues – modeled after 1959 Fender Bassman
Black Panel with Tremolo & Spring Reverb – modeled after 1965 Fender Deluxe
Modern Class A – modeled after 1996 Matchless Chieftain
BANK 4
A
B
C
D
Brit Class A with Echo – modeled after 1963 Vox AC 30 Top Boost
Brit Blues – modeled after 1965 Marshall JTM-45
Brit Classic – modeled after 1968 Marshall “Plexi”
Brit Hi Gain – modeled after 1990 Marshall JCM 800
BANK 5
A
B
C
D
Rectified – modeled after 1994 Mesa Boogie Dual Rectifier Tremoverb
Modern Hi Gain with Echo & Verb – modeled after 1989 Soldano X88 Preamp
Fuzz Box – modeled after Arbitor Fuzzface
Tube Preamp – for direct recording of non-guitar instruments
BANK 6
A
B
C
D
Line 6 Twang with Slapback Echo – modeled after Fender Deluxe meets Bassman
Line 6 Crunch #2 with Room Reverb – modeled after Plexi + more tone range
Line 6 Blues – modeled after Marshall JTM-45 meets Budda Twinmaster
Line 6 Insane with Echo & Verb – guaranteed to make you shred!
BANK 7
A
B
C
A
Small Tweed #2 – modeled after 1960 Fender Champ
Boutique #3 – modeled after Budda Twinmaster
Black Panel #2 – modeled after 1965 Blackface Fender Twin
Brit Class A #3 with Echo – modeled after 1960 Vox AC15
BANK 8
A
B
C
D
Brit Class A #2 – modeled after 1960 Vox AC 30
California Crunch #1 modeled after Mesa Boogie Mark IIC+ Clean Channel
California Crunch #2 modeled after Mesa Boogie Mark IIC+ Drive Channel
Boutique #1 with light slapback – modeled after Dumble Overdrive Special Clean
BANK 9
Fender, Marshall, Vox, Dumble, Matchless, Mesa Boogie, Roland, Soldano, Arbiter, and other
amplifier and effect models are all trademarks of their respective owners, which are in no way
associated or affiliated with Line 6. These trademarks of other manufacturers are used solely
for the purpose of describing certain amplifier tones produced using Line 6's modeling technology.
Line 6's modeling technology provides Line 6 products with a wide variety of sounds and effects
modeled after some of the most popular sounds of these classic amps and effects.
POD
2.
0
P
ets
res
A
B
C
D
Rectified #2 modeled after 1995 Mesa Boogie Dual Rectifier Head
Modern Hi Gain #2 modeled after 1989 Soldano SLO Super Lead Overdrive
Boutique #2 – modeled after Dumble Overdrive Special Drive
Jazz Clean with Chorus – modeled after Roland JC 120 Jazz Chorus
Rev D
CHAPTER 1: QUICK START GUIDE
MANUAL? I DON’T NEED NO STINKING MANUAL! . . . . . . . . . . . . . . . . . . . . . . . . . . . . . . . . . . . . 1•1
Register and Get Great Free Stuff . . . . . . . . . . . . . . . . . . . . . . . . . . . . . . . . . . . . . . . . . . . . . . . . . . . . . . . 1•1
Get On-line: Line 6 Internet Resources . . . . . . . . . . . . . . . . . . . . . . . . . . . . . . . . . . . . . . . . . . . . . . . . . . 1•2
INTRODUCTION: WELCOME THE POD...
Modeling . . . . . . . . . . . . . . . . . . . . . . . . . . . . . . . . . . . . . . . . . . . . . . . . . . . . . . . . . . . . . . . . . . . . . . . . . . . 1•3
Amp & Cab Models . . . . . . . . . . . . . . . . . . . . . . . . . . . . . . . . . . . . . . . . . . . . . . . . . . . . . . . . . . . . . . . . . . 1•4
There’s Magic in the A.I.R. . . . . . . . . . . . . . . . . . . . . . . . . . . . . . . . . . . . . . . . . . . . . . . . . . . . . . . . . . . . . . 1•5
Customizing your Amp Models and Effects. . . . . . . . . . . . . . . . . . . . . . . . . . . . . . . . . . . . . . . . . . . . . . . . .1•7
ToneTransfer . . . . . . . . . . . . . . . . . . . . . . . . . . . . . . . . . . . . . . . . . . . . . . . . . . . . . . . . . . . . . . . . . . . . . . . . 1•7
CHAPTER 2: CONTROLS & CONNECTIONS REFERENCE . . . . . . . . . . . . . . . . . . . . . . . . . . . . . . . . . . . 2•1
CHAPTER 3: GETTING SET UP
All Purpose Basics . . . . . . . . . . . . . . . . . . . . . . . . . . . . . . . . . . . . . . . . . . . . . . . . . . . . . . . . . . . . . . . . . . . . 3•1
SCENARIO ONE – IN THE STUDIO
Mount Up: Mounting Accessories Available for POD . . . . . . . . . . . . . . . . . . . . . . . . . . . . . . . . . . . . . . . .3•1
Gimme Some A.I.R.: The All Important Air Switch and How to Set It . . . . . . . . . . . . . . . . . . . . . . . . . .3•2
Picking The Right Inputs: Line Level Inputs Are The Ticket!. . . . . . . . . . . . . . . . . . . . . . . . . . . . . . . . . .3•2
Ready to Play Anywhere: The Versatile POD Works with Systems Large & Small . . . . . . . . . . . . . . . . . .3•2
Boom Boxes & Small Portable Studios . . . . . . . . . . . . . . . . . . . . . . . . . . . . . . . . . . . . . . . . . . . . . . . . . . . .3•3
Big Time Connections: POD Setup in High-End Studios. . . . . . . . . . . . . . . . . . . . . . . . . . . . . . . . . . . . . .3•4
First Time’s a Charm: Simple POD Operation . . . . . . . . . . . . . . . . . . . . . . . . . . . . . . . . . . . . . . . . . . .3•4
Changing History: Setting Up POD for More Versatile Processing & Later Tweaking . . . . . . . . . . . .3•4
Direct Injection: Direct Guitar Signal Requirements . . . . . . . . . . . . . . . . . . . . . . . . . . . . . . . . . . . . . .3•5
Return to Sender: Setting Up POD in a Send-Return Configuration . . . . . . . . . . . . . . . . . . . . . . . . .3•5
Level Headed: Setting Levels . . . . . . . . . . . . . . . . . . . . . . . . . . . . . . . . . . . . . . . . . . . . . . . . . . . . . . . . 3•7
Radiation Alert: Computer Monitors as a Source of Hum . . . . . . . . . . . . . . . . . . . . . . . . . . . . . . . . . .3•7
Pedal Power: Foot Control Options for POD . . . . . . . . . . . . . . . . . . . . . . . . . . . . . . . . . . . . . . . . . . . .3•8
Not So Big Time Connections: POD Setup in Small Studios. . . . . . . . . . . . . . . . . . . . . . . . . . . . . . . . . . .3•9
Stomp Boxes: Using Them with POD. . . . . . . . . . . . . . . . . . . . . . . . . . . . . . . . . . . . . . . . . . . . . . . . . . . . . 3•9
MIDI Mania: Controlling POD with MIDI . . . . . . . . . . . . . . . . . . . . . . . . . . . . . . . . . . . . . . . . . . . . . . . .3•10
SCENARIO TWO – POD PLAYS LIVE
Mount Up: Mounting Accessories Available for POD . . . . . . . . . . . . . . . . . . . . . . . . . . . . . . . . . . . . . . . .3•11
Gimme Some A.I.R.: The All Important Air Switch and How to Set It . . . . . . . . . . . . . . . . . . . . . . . . . .3•11
POD Takes Over: Using POD as a Tone-Shaping Front End for a Guitar Amp. . . . . . . . . . . . . . . . . . . . .3•12
Cabinet Tuning Modes: Correctly Tuning POD for your Setup . . . . . . . . . . . . . . . . . . . . . . . . . . . . . . . . .3•12
POD Output Level: A Word of Caution . . . . . . . . . . . . . . . . . . . . . . . . . . . . . . . . . . . . . . . . . . . . . . . . . . .3•13
Tuning Your Amplifier: Setting Up your Guitar Amplifier to Host POD . . . . . . . . . . . . . . . . . . . . . . . . . .3•13
POD Live Hook-Up Illustrations: Pictures to Help you Get Connected . . . . . . . . . . . . . . . . . . . . . . . . . .3•14
Stomp Boxes, Live Setups, & You . . . . . . . . . . . . . . . . . . . . . . . . . . . . . . . . . . . . . . . . . . . . . . . . . . . . . . . . 3•15
Pedal Power: Foot Control Options for POD . . . . . . . . . . . . . . . . . . . . . . . . . . . . . . . . . . . . . . . . . . . . . . .3•16
CHAPTER 4: MODELED AMPS & CABS . . . . . . . . . . . . . . . . . . . . . . . . . . . . . . . . . . . . . . . . . . . . . . . . . . . 4•1
CHAPTER 5: POD EFFECTS
Deep Editing: Where to Look for More Info . . . . . . . . . . . . . . . . . . . . . . . . . . . . . . . . . . . . . . . . . . . . . . . . 5•1
POD Onboard Effects . . . . . . . . . . . . . . . . . . . . . . . . . . . . . . . . . . . . . . . . . . . . . . . . . . . . . . . . . . . . . . . . . 5•1
Reverbs . . . . . . . . . . . . . . . . . . . . . . . . . . . . . . . . . . . . . . . . . . . . . . . . . . . . . . . . . . . . . . . . . . . . . . . . . 5•2
Compressor . . . . . . . . . . . . . . . . . . . . . . . . . . . . . . . . . . . . . . . . . . . . . . . . . . . . . . . . . . . . . . . . . . . . . . 5•2
Tremolo . . . . . . . . . . . . . . . . . . . . . . . . . . . . . . . . . . . . . . . . . . . . . . . . . . . . . . . . . . . . . . . . . . . . . . . . . 5•3
Chorus . . . . . . . . . . . . . . . . . . . . . . . . . . . . . . . . . . . . . . . . . . . . . . . . . . . . . . . . . . . . . . . . . . . . . . . . . . 5•3
Flanger. . . . . . . . . . . . . . . . . . . . . . . . . . . . . . . . . . . . . . . . . . . . . . . . . . . . . . . . . . . . . . . . . . . . . . . . . . 5•3
Rotary . . . . . . . . . . . . . . . . . . . . . . . . . . . . . . . . . . . . . . . . . . . . . . . . . . . . . . . . . . . . . . . . . . . . . . . . . . 5•4
Delay . . . . . . . . . . . . . . . . . . . . . . . . . . . . . . . . . . . . . . . . . . . . . . . . . . . . . . . . . . . . . . . . . . . . . . . . . . . 5•4
Noise Gate . . . . . . . . . . . . . . . . . . . . . . . . . . . . . . . . . . . . . . . . . . . . . . . . . . . . . . . . . . . . . . . . . . . . . . 5•5
Combined Effects . . . . . . . . . . . . . . . . . . . . . . . . . . . . . . . . . . . . . . . . . . . . . . . . . . . . . . . . . . . . . . . . . 5•6
CHAPTER 6: CREATING & STORING PROGRAMS
Using the Manual Mode Features . . . . . . . . . . . . . . . . . . . . . . . . . . . . . . . . . . . . . . . . . . . . . . . . . . . . . . . . 6•1
Using the Channel Program Memories . . . . . . . . . . . . . . . . . . . . . . . . . . . . . . . . . . . . . . . . . . . . . . . . . . . . 6•1
ToneTransfer . . . . . . . . . . . . . . . . . . . . . . . . . . . . . . . . . . . . . . . . . . . . . . . . . . . . . . . . . . . . . . . . . . . . . . . . 6•1
POD Sounds on the Web . . . . . . . . . . . . . . . . . . . . . . . . . . . . . . . . . . . . . . . . . . . . . . . . . . . . . . . . . . 6•2
Your POD Sounds Transfer to POD Pro and Flextone II Series Amplifiers . . . . . . . . . . . . . . . . . . . .6•2
Swapping POD Channels with Friends. . . . . . . . . . . . . . . . . . . . . . . . . . . . . . . . . . . . . . . . . . . . . . . . 6•2
Edit Mode . . . . . . . . . . . . . . . . . . . . . . . . . . . . . . . . . . . . . . . . . . . . . . . . . . . . . . . . . . . . . . . . . . . . . . . . . . 6•3
Customizing Amp Models and Effects. . . . . . . . . . . . . . . . . . . . . . . . . . . . . . . . . . . . . . . . . . . . . . . . . . . . . 6•4
About Customization Mode . . . . . . . . . . . . . . . . . . . . . . . . . . . . . . . . . . . . . . . . . . . . . . . . . . . . . . . . 6•4
Activating Customization Mode. . . . . . . . . . . . . . . . . . . . . . . . . . . . . . . . . . . . . . . . . . . . . . . . . . . . . 6•6
Memory Reset: Returning your POD to its Factory-Programmed State of Mind . . . . . . . . . . . . . . . . . . . .6•7
CHAPTER 7: THAT’S USING YOUR FEET
Floor Board: The Full-Featured POD Foot Controller . . . . . . . . . . . . . . . . . . . . . . . . . . . . . . . . . . . . . . . . 7•1
Getting Connected . . . . . . . . . . . . . . . . . . . . . . . . . . . . . . . . . . . . . . . . . . . . . . . . . . . . . . . . . . . . . . . 7•1
Two Modes: 1. Channel Select Mode . . . . . . . . . . . . . . . . . . . . . . . . . . . . . . . . . . . . . . . . . . . . . . . . . 7•2
Banks . . . . . . . . . . . . . . . . . . . . . . . . . . . . . . . . . . . . . . . . . . . . . . . . . . . . . . . . . . . . . . . . . . 7•2
Channel Select . . . . . . . . . . . . . . . . . . . . . . . . . . . . . . . . . . . . . . . . . . . . . . . . . . . . . . . . . . 7•3
Manual Mode . . . . . . . . . . . . . . . . . . . . . . . . . . . . . . . . . . . . . . . . . . . . . . . . . . . . . . . . . . . 7•3
Editing and Saving POD Channels with the Floor Board . . . . . . . . . . . . . . . . . . . . . . . . .7•3
Tap Tempo. . . . . . . . . . . . . . . . . . . . . . . . . . . . . . . . . . . . . . . . . . . . . . . . . . . . . . . . . . . . . . 7•4
Tuner . . . . . . . . . . . . . . . . . . . . . . . . . . . . . . . . . . . . . . . . . . . . . . . . . . . . . . . . . . . . . . . . . . 7•4
Wah Pedal . . . . . . . . . . . . . . . . . . . . . . . . . . . . . . . . . . . . . . . . . . . . . . . . . . . . . . . . . . . . . . 7•5
Volume Pedal . . . . . . . . . . . . . . . . . . . . . . . . . . . . . . . . . . . . . . . . . . . . . . . . . . . . . . . . . . . 7•5
Two Modes: 2. Effect On/Off Mode . . . . . . . . . . . . . . . . . . . . . . . . . . . . . . . . . . . . . . . . . . . . . . . . . . 7•6
Distortion . . . . . . . . . . . . . . . . . . . . . . . . . . . . . . . . . . . . . . . . . . . . . . . . . . . . . . . . . . . . . . 7•6
Drive/Boost . . . . . . . . . . . . . . . . . . . . . . . . . . . . . . . . . . . . . . . . . . . . . . . . . . . . . . . . . . . . . 7•6
EQ . . . . . . . . . . . . . . . . . . . . . . . . . . . . . . . . . . . . . . . . . . . . . . . . . . . . . . . . . . . . . . . . . . . . 7•7
Tremolo/Chorus . . . . . . . . . . . . . . . . . . . . . . . . . . . . . . . . . . . . . . . . . . . . . . . . . . . . . . . . . 7•7
Delay . . . . . . . . . . . . . . . . . . . . . . . . . . . . . . . . . . . . . . . . . . . . . . . . . . . . . . . . . . . . . . . . . . 7•7
Reverb. . . . . . . . . . . . . . . . . . . . . . . . . . . . . . . . . . . . . . . . . . . . . . . . . . . . . . . . . . . . . . . . . 7•7
Effect On/Off Setting Stored with Programmed Channels . . . . . . . . . . . . . . . . . . . . . . . .7•8
FB4: Simple Foot Control for POD . . . . . . . . . . . . . . . . . . . . . . . . . . . . . . . . . . . . . . . . . . . . . . . . . . . . . . . 7•9
CHAPTER 8: DEEP EDITING & MIDI CONTROL
MIDI Basics . . . . . . . . . . . . . . . . . . . . . . . . . . . . . . . . . . . . . . . . . . . . . . . . . . . . . . . . . . . . . . . . . . . . . . . .
What’s MIDI?. . . . . . . . . . . . . . . . . . . . . . . . . . . . . . . . . . . . . . . . . . . . . . . . . . . . . . . . . . . . . . . . . . .
MIDI In/Out . . . . . . . . . . . . . . . . . . . . . . . . . . . . . . . . . . . . . . . . . . . . . . . . . . . . . . . . . . . . . . . . . . .
MIDI Channel . . . . . . . . . . . . . . . . . . . . . . . . . . . . . . . . . . . . . . . . . . . . . . . . . . . . . . . . . . . . . . . . . .
MIDI Messages. . . . . . . . . . . . . . . . . . . . . . . . . . . . . . . . . . . . . . . . . . . . . . . . . . . . . . . . . . . . . . . . . .
MIDI Program Changes. . . . . . . . . . . . . . . . . . . . . . . . . . . . . . . . . . . . . . . . . . . . . . . . . . . . . . .
MIDI Controllers. . . . . . . . . . . . . . . . . . . . . . . . . . . . . . . . . . . . . . . . . . . . . . . . . . . . . . . . . . . .
MIDI Sysex Commands. . . . . . . . . . . . . . . . . . . . . . . . . . . . . . . . . . . . . . . . . . . . . . . . . . . . . . .
Emagic SoundDiver Software . . . . . . . . . . . . . . . . . . . . . . . . . . . . . . . . . . . . . . . . . . . . . . . . . . . . . . . . . .
POD / POD Pro / Flextone II ToneTransfer via MIDI. . . . . . . . . . . . . . . . . . . . . . . . . . . . . . . . . . . . . . . .
Transferring All Sounds . . . . . . . . . . . . . . . . . . . . . . . . . . . . . . . . . . . . . . . . . . . . . . . . . . . . . . . . . . .
Transferring Some Sounds . . . . . . . . . . . . . . . . . . . . . . . . . . . . . . . . . . . . . . . . . . . . . . . . . . . . . . . . .
Backing Up POD Programs to Other Devices . . . . . . . . . . . . . . . . . . . . . . . . . . . . . . . . . . . . . . . . . . . . . .
Transferring All Sounds . . . . . . . . . . . . . . . . . . . . . . . . . . . . . . . . . . . . . . . . . . . . . . . . . . . . . . . . . . .
Transferring Some Sounds . . . . . . . . . . . . . . . . . . . . . . . . . . . . . . . . . . . . . . . . . . . . . . . . . . . . . . . . .
Other Things You Can Do with MIDI. . . . . . . . . . . . . . . . . . . . . . . . . . . . . . . . . . . . . . . . . . . . . . . . . . . .
Changing POD Channels with MIDI Program Changes . . . . . . . . . . . . . . . . . . . . . . . . . . . . . . . . .
Tweaking POD Tones with MIDI Controllers. . . . . . . . . . . . . . . . . . . . . . . . . . . . . . . . . . . . . . . . . .
Full MIDI Automation of POD . . . . . . . . . . . . . . . . . . . . . . . . . . . . . . . . . . . . . . . . . . . . . . . . . . . . .
Step-By-Step With SoundDiver . . . . . . . . . . . . . . . . . . . . . . . . . . . . . . . . . . . . . . . . . . . . . . . . . . . . . . . .
SoundDiver Setup Troubleshooting . . . . . . . . . . . . . . . . . . . . . . . . . . . . . . . . . . . . . . . . . . . . . . . . .
APPENDIX
A:
B:
C:
D:
E:
F:
Amp Models & Associated Parameters
Effect Parameters: Tapping, Tweaking & More
MIDI Program Changes
MIDI Controls
Line 6 Contact: Customer Service & Other Line 6 Products
Warranty Info & Instructions for Obtaining Factory Service
8•1
8•1
8•1
8•2
8•2
8•2
8•2
8•3
8•4
8•5
8•5
8•5
8•7
8•7
8•7
8•8
8•8
8•8
8•8
8•10
8•15
QUICK START GUIDE:
“MANUAL? I DON’T NEED NO STINKING MANUAL!”
QUICK START GUIDE
or:
“MANUAL? I DON’T NEED NO STINKING MANUAL!”
1.
2.
2.
3.
4.
5.
6.
7.
8.
9.
10.
Turn the POD OUTPUT LEVEL control all the way down to zero.
Plug the POD LEFT and RIGHT OUTPUTS into your recorder or
mixer’s input, or plug the left output into your guitar amplifier’s
input. Or connect headphones to the PHONES jack on your POD.
If you’re plugged into a guitar amp, set A.I.R. switch to ‘AMP.’
Otherwise, set it to ‘DIRECT.’
Plug the power adapter into the POD POWER CONNECTOR, then
plug the other end into an AC wall socket.
Connect your guitar to the POD INPUT JACK.
Flip the POWER switch near the POD power connector to fire up.
Select an AMP MODEL.
Set the CHAN VOL to max and the BASS, MID, and TREBLE to your
heart’s desire. OUTPUT LEVEL sets the output level (duh).
Pick an EFFECTS setting and adjust the REVERB LEVEL and EFFECTS
TWEAK so you’re happy with the sound.Tap the TAP TEMPO
BUTTON to set the speed of the selected effect.
Browse pre-programmed settings using the UP/DOWN arrows.
You can press the MANUAL button for a “Manual Override” that
gives you where-the-knobs-are-is-how-it-sounds operation.
What number 10? You’re already up and running!
But wait, before you go any further, flip to the inside back cover of this manual and
notice that it folds out. The idea is to have this handy pictorial reference always
opened out while you’re thumbing through the manual. If you photocopy the back
of it, you’ll have a handy template for making a note of your favorite POD
settings. Now then, before you run off....
REGISTER AND GET GREAT FREE STUFF!
Included in this manual is a handy, postage-paid card for you to send back to us to
register your purchase, and let us know a little about yourself. It is very important
1•1
QUICK START GUIDE:
1•2
GET ON-LINE
that you fill that registration card out right now, and send it to us in the mail or
jump on the internet and register at the Line 6 Support Center – www.line6.com.
How come? Well, for one thing, it gets you all set up for warranty service should
you ever have a problem with your POD. (Warranty info is at the end of this
manual.) It also ensures that we will be able to contact you if new software
versions or other enhancements are offered – cutting edge technology and all that.
GET ON-LINE
Here at Line 6, our mission is to bring powerful new technologies to musicians. As
part of that mission, we focus great effort on making the Internet a valuable
resource for every one of our customers. You may already have surfed the Line 6
site at http://www.line6.com when you were considering your purchase, and
found all the information already there on Line 6 products and technologies.
The Line 6 web site is one of the most effective ways for us to bring you what you
need. Through the Internet, we can give you instant access to all kinds of great,
free stuff to make you and your POD ever more powerful. Like easy email access to
our product support experts, handy tips & tricks, electronic versions of this and
other documentation, the latest news of what’s happening with Line 6 and the
products we make for you, and....
Line 6 ToneTransfer and Discussion Forums: Visit the web site, and you’ll
find a powerful way to connect to other POD and Flextone II users. Swap sounds,
get and give advice, and generally hang out and get POD-a-licious, all from the
privacy of your own comfy computer chair!
Already on the Internet? Great! Visit us often and check out the late-breaking
news and the other resources there. Not on the Internet yet? This may be the time
to make the big jump, and thereby ensure that you will get all the great resources
we can offer for you and your POD.
INTRODUCTION:
WELCOME THE POD...
INTRODUCTION
WELCOME THE POD...
Thank you for inviting POD home with you. Whether you use your POD as a
direct recording miracle, a stomp box on steroids, for practice, or as a creative
digital signal processing tool – and heck, why should it be just one? – we think
you’ll agree that POD is about the most amazing thing to happen to electric guitar
since – well, since the guitar amplifier itself. POD mines the tonal heritage of the
past forty years of guitar amplifier design and matches it up with the kind of digital
signal processing magic that will still be ahead of its time in the next century.
How does POD help you create a guitar tone that is out of this world, and then get
that tone wherever you need it? Easy! It’s…
MODELING
Modeling: just what is it, and why is it so important? (By the way, you sent in that
registration card or did it on the web, right? OK, just checking.)
Tubes, we can all agree, are the heart and soul of every legendary guitar amp and
are responsible for the warm, harmonic-rich tone quality of those amps. Solid state
devices (transistors) are simply unable to duplicate tube warmth and performance.
And “hybrids” – a tube in a circuit along with a bunch of transistors – are really a
vain attempt at warming up a transistor-based tone. They fall short in any
comparison to a 100% tube circuit. So that’s it – tubes or nothin’, right? Well, not
any more....
You see, the engineers at Line 6, being an adventurous lot, and totally pumped
about this whole guitar tone thing as well, decided to stock up on the coffee, bust
out the engineering equipment, and get down to learning everything there is to
know about tubes. Riding high on the caffeine wave, they began a three-year
project to analyze and map out exactly how different types of tubes respond under
various conditions typical of guitar amplifier design. How tubes process an input
1•3
INTRODUCTION:
1•4
WELCOME THE POD...
signal, how the signal is colored and shaped, at what point it begins to distort, the
quality and characteristic of the distortion – complicated stuff, but all analyzable
as electronic data. A guitar pickup output, after all, is an electronic signal, and
tubes are really just a complex form of signal processing.
The Line 6 engineers also directed their caffeine-enhanced attention to a study of
guitar speaker cabinets, and the important part they play in communicating great
guitar tone.
Having sussed it all out, the Line 6 engineers were then able to apply their digital
expertise to develop software which simulates the signal processing of tubes and
other electronics, as well as the speaker cabinets, entirely within the digital
domain. Cool, huh?
This revolutionary DSP (digital signal processing) software-based modeling
technology gives Line 6 the power to create super silicon-based life forms like
POD: a tonally mind-blowing, multi-FX packed, shiny red wonder box with
ultimate flexibility for creating awesome guitar tone....
AMP & CAB MODELS
This modeling know-how allowed Line 6 to create software Amp and Cab Models
modeled after a collection of amplifiers and speaker cabinets recognized by
guitarists the world over as true “tone classics.” We got these amps and cabs
together, cranked ’em up, and had a look at the electronic data generated by the
tubes, transformers, capacitors, plate and grid voltages, tone control curves – and
the whole mess of components and elements unique to each amplifier design. This
research led to the creation of Line 6’s software Amp and Cab Models. These
models were tweaked up through careful, scientific A/B comparisons to the gear
that inspired them, with an ear open for the effects of different volume levels and
settings of the originals’ tone and gain controls. The gain and equalization
characteristics of the modeled amps were carefully measured so that changes to
amp knobs on the models would mirror the effects of these changes on the
originals as closely as possible. We’re talkin’ major attention to detail here. Tone
control center frequencies, slopes, and cut/boost range were painstakingly
analyzed, and we also carefully attended to the effect of presence switches, “bright”
channels, and other model-specific factors. Not only that, but since these old amps
have highly interactive circuits, we paid careful attention to the way that the
INTRODUCTION:
WELCOME THE POD...
setting of one knob changes the way that another knob on the amp behaves. All
in an effort to make our Amp and Cab Models as much like the amps and cabs we
modeled as possible.
The resulting Amp and Cab Models are the foundation of POD. Now, then – here
are a couple of things we want to be completely crystal clear on:
1. The Line 6 modeling process is a patented, 100% digital software-based
technology exclusive to Line 6.
2. Line 6 Modeling is not sampling, nor is it solid state; no special guitar,
pickup, or cabling is needed.
THERE’S MAGIC IN THE A.I.R.
POD delivers its modeling tones through another innovation: Line 6's A.I.R.
direct recording output. The A.I.R. (acoustically integrated recording) technology
is the result of intensive research and careful study of the tonal characteristics
produced by the interaction of amplifiers, cabinets, speakers, microphones and the
recording room during the recording process.
The direct output of many preamps, amplifiers and direct box-style amp
replacements available today offer some limited form of cabinet simulation or
speaker emulation. Those that happen to be more than simple high end roll offs
have little or no control options. These cabinet simulations cannot reproduce the
markedly different tones of different cabinets which arise from the choice of
speakers, wood, and other design elements. They also fail to reproduce the
significant tonal contribution of microphone selection and placement, and do
nothing to reproduce the subtle ambience of the recording space.
The result is the familiar dissatisfaction with direct recording products – even
those that deliver a reasonably usable basic tone fail to reproduce the “life” of the
guitar sound, and destroy the proper feel in the process. It is as if your guitar strings
became heavier and less responsive, like they just went up a couple of gauges when
you plugged into your direct box. And your sound lost its life.
POD's combination of Amp Models and A.I.R. technology provides superior
direct tones by recreating all the elements contributing to a great recorded guitar
sound, and giving you that tone with the same feel as playing through a real amp
1•5
INTRODUCTION:
1•6
WELCOME THE POD...
and speaker cabinet:
• The effect of the guitar amplifier electronics is emulated by the Amp Model you
choose. Each model was developed from extensive study of a classic amplifier
treasured as a tone classic.
• In a guitar amp, once the guitar signal passes through the electronics, it is output
to one or more speakers in a speaker cabinet. The specific design of the speakers,
how many there are, and how they are arranged contributes significantly to your
guitar tone, as does the construction and resulting tone of the wood box itself. A
Marshall head driving a single 12-inch speaker in an open-back cabinet, for
instance, will sound dramatically different from the same head driving a 4x12
closed-back cabinet. Line 6 has carefully constructed virtual software speaker
cabinets that emulate the contribution made by real speaker cabinets to great
guitar sound.
• Once the sound makes it out of the speaker cabinet, the next important link in
the recording system is the microphone that receives that sound. Guitar
recordists select different microphones, and arrange them in different
placements, to get particular sounds. A microphone pointing directly into the
cone of a speaker will hear something different than one positioned off-axis.
Line 6 carefully analyzed the coloring that standard microphones add to the
guitar sound, as well as the effects of different mic placement techniques, and
developed a set of cabinet simulations that give you the tone of great speaker
cabinet and microphone combinations.
• The guitar amp, cabinet, and microphone don't just sit in empty space. The
room that they are in contributes importantly to the guitar sound you will
record. Reverb can be used to capture the basic character of the space,
simulating the effect of the sound reflecting off the room's walls, floors and
ceiling. But there are other subtle details that have more to do with the “spread”
of the sound as it passes through the air between the speaker and microphone.
This final component is the key to the sense that the listener is in one position
in the room, and the guitar sound is in another position, and that the two are
separated by a mass of air that sound spreads through to reach the listener.
All of these important sound-shaping components are accounted for in Line 6's
POD. Turn the Amp Model knob to call up the amplifier emulation you want.
POD automatically matches that amplifier with an appropriate cabinet and
microphone setup, and gives you the sound of that setup coming through the air of
a recording space. You can add reverb to taste, and start recording incredible mic'd
INTRODUCTION:
WELCOME THE POD...
up sound. The included SoundDiver MIDI-control software lets you use a
Macintosh or Windows computer to do “deep editing” of these and other POD
parameters. With it, you can design your own custom rig, making new
combinations of Amp Model and cabinet/microphone emulation, and adjusting
the contribution of the “spread” of the sound as well.
The A.I.R. direct recording output is exclusive to Line 6. In combination with
Line 6's Amp Models, it is the key to POD's phenomenally satisfying direct
recording sound.
CUSTOMIZING YOUR AMP MODELS AND EFFECTS
New with version 2.0 software, you can customize the settings for each of POD’s
Amp Models and Effects. This way, when you pull up an Amp Model or Effect via
their knobs, you’ll get your very own favorite setting for that amp or effect,
without having to do a lot of knob twiddling. Chapter 6 has all the details.
TONETRANSFER
With your POD, you get a constantly-expanding universe of sounds, and the
ability to use those sounds with POD, POD Pro, or the Flextone II series
amplifiers. Visit our ToneTransfer Web Library at www.line6.com, or one of the
many other sources popping up for sound exchange. The sounds you collect
transfer seamlessly between POD, POD Pro and Flextone II series amps, so
wherever you go, all your sounds can make the trip.
AND AWAY WE GO....
So, now that you know what’s in store, it’s time to experience POD for yourself.
Grab your favorite axe, plug in to POD, and flip back to the handy Quick Start
Guide on the first page of this chapter if you haven’t already been through that.
Then, press ahead to the POD Grand Tour....
1•7
CONTROLS & CONNECTIONS
2•1
If you haven’t already done so, turn to the inside back cover of this manual and
notice that it folds out. Ooh, pretty pictures! The idea is to have this essential
pictorial reference always opened out while you’re thumbing through the manual.
And if you photocopy the back of it, you’ll have a handy template for making a
note of your favorite settings. The boxed numbers that pop up throughout the
manual correspond to the numbers on the foldout’s illustrations.
1
Power Switch - Right edge of POD. Flip this to bring your POD to life.
2 Input - Bottom right side of POD illustration. Plug your guitar in here. (You
techies will want to know this is a mono, unbalanced connection).
3 Phones - Bottom left side of POD illustration. Plug in your headphones here
for silent practicing. Volume’s set by the Output Level knob. The headphone
amplifier is designed to provide hot signals for a variety of headphones. As a result,
you can get very loud output from this connector. Be sure to set levels carefully so
you don’t blow your head off when listening to your POD through your phones.
4 Output Level - Far left knob on the POD illustration. Controls the
overall output level of POD. Also sets the headphone level. This setting is not
saved when you store settings into one of the POD’s memory locations. Changing
the Output Level does not change your tone. So you can get the tone you want at
any volume level.
POD will give the best signal-to-noise ratio performance when you have the
Output Level control at max. With the Output Level control turned down low, you
may get extra hiss that obviously ain’t what you want. In order to allow you to set
the Output Level as high as possible with recording, mixing, and other studio gear,
CONTROLS & CONNECTIONS
2•2
be sure you are plugging POD’s outputs into line level, not microphone or
guitar level inputs. Line level inputs should allow you to turn POD’s Output Level
up all the way (or close to it) and thereby get the best sound possible. If your gear
has inputs that function as mic/line level inputs, try to set the trim for those inputs
to the minimum level, and POD’s Output Level to maximum, when setting levels.
5 Left & Right Output - Top left of POD illustration. These are
balanced 1/4" TRS connectors, and ready to rock with pro +4 dBu balanced
equipment. They will also work happily with unbalanced -10 dBV equipment and
standard guitar cables. If you are running POD mono, use the Left output. (POD is
smart; if it sees that only the left output and no headphones are connected, it will
switch to mono, summing the effects processing properly so you hear things like the
Rotary Speaker emulation correctly in mono. If you have headphones connected,
POD will always run stereo.)
6 A.I.R. Mode - Between Left and Right Outputs. We discussed the
benefits of POD’s A.I.R. output in the first chapter of this handbook. When you’re
setting up with POD, here’s the thing to know: if you’re plugging your POD into
a guitar amplifier to use POD as a “front end” to change the amp’s tone, flip the
A.I.R. Mode switch to AMP, and set your amp for a clean tone. This defeats the
speaker-microphone-room tone simulation of the A.I.R. processing. If you’re using
POD in almost any other setup (plugging direct into a mixer, recorder, PA, power
amplifier, etc.) you want the DIRECT position of this A.I.R. switch. When running
into an amp, be sure NOT to plug in headphones, as they will override the A.I.R.
switch position and turn A.I.R. on so that things sound right in the headphones,
but wrong on your amp. See Chapter 3 to learn how to tune POD for your setup.
7 Foot Pedal Connector - Top of POD illustration. Looks like a
telephone connector on steroids. This is where you connect the optional Line 6
Floor Board or FB4 foot controllers.
CONTROLS & CONNECTIONS
8 MIDI In & Out - Top right of POD illustration. Connect POD to your
MIDI equipment to select channel memories (via Program Change messages) or
automate POD settings (via controllers and/or Sysex). Emagic SoundDiver
software is included on the POD Tools CD for sound editing/storage on a
computer. The POD MIDI OUT connects to another device’s MIDI IN; its MIDI
IN goes to another device’s MIDI OUT. Please also see Chapter 9, Deep Editing
and MIDI Control, to setup your MIDI gear with POD and find out what MIDI
can do for POD and you.
9 Manual Button - In the middle of the POD. Press this button to light it
and activate Manual Mode. In this mode, wherever the knobs are set is what you’re
hearing. Move knobs around to change sounds. Or....
10 Channel Up/Down Buttons - To the left of the Manual button.
The POD has 36 channel locations (POD is like a 36-channel amp) that store a
huge variety of complete amp-and-effect selections pre-programmed by the tone
mavens at Line 6 to rock your world. They are arranged in nine banks of four
channels each. (The four are called A, B, C, and D.) You can think of each bank as
a sort of virtual four-channel guitar amp – and you’ll find that the same layout is
used on the optional Line 6 foot controllers for POD (the Floor Board and FB4)
which are discussed later in their own chapter. You access POD channels by
pressing the Up and Down buttons. Tap either button to move to the next
channel in the bank; press and hold down either Up or Down button to jump from
bank to bank. The Manual button’s light goes off to let you know you’re not in
Manual – the “where-the-knobs-are-is-how-POD-sounds” – Mode anymore. When
recalling a channel, its settings will not be reflected by the present knob positions –
like you may have left the Bass knob at minimum whereas the just-recalled channel
has this control set to max. To change anything, just grab the knob you want and
tweak. More on all that later.
2•3
CONTROLS & CONNECTIONS
11
2•4
Amp Models - Bottom left knob on the POD with words all round it. When
you spin this knob, it’s essentially like changing what electronic “circuitry” is
running inside POD to make your amp sound. (Also see Modeled Amps and
Cabs in Chapter 4.) We’ve arranged the Amp Models around the knob so you get
Line 6’s four custom sounds first. From there, the models go clockwise from
“cleanest” (Small Tweed) to “dirtiest” (Fuzz Box). And then we finish up with the
Tube Preamp for processing non-guitar sources.
New with Version 2.0 software, you have a selection of 32 Amp Models from this
knob (earlier versions could access only 16). To access models 17-32, hold down
the TAP button and turn the Amp Models knob.
When you choose an Amp Model, a Cabinet Model is also loaded automatically.
For instance, when you choose the Brit Hi Gain model (based on the classic
Marshall JCM 800 head), a Cabinet Model based on a Marshall 4x12 will be loaded
with it. You can choose a different cabinet via the Effects/Cab knob (below).
In fact, with Version 2.0 software, all amp-related settings are automatically loaded
when you turn the Amp Models knob. Drive, Bass, Mid, Treble, Cab, Reverb
type, etc. will all be determined by the Amp Model you choose – giving you a
ready-to-rock sound with the turn of just this one knob. Once you get familiar with
POD, you can change these Amp-associated settings to customize the settings of
each of the Amp Models to fit your tastes. Note that when you’re in Manual Mode
then Drive, Bass, Mid, Treble, and Channel Volume are set by the knob positions instead
of being automatically set with the amp selection. Complete details are in Chapter 6.
12
Drive - Knob to the left of the button panel. This knob controls how hard
you’re driving the input of the chosen Amp Model. Like the input volume control
on a non-master volume guitar amp, higher settings give you more “dirt.”
13 Tone Controls - Following the arc of knobs up and to the right. Bass,
Middle, Treble. Just like a regular guitar amp, only when you change Amp Models,
CONTROLS & CONNECTIONS
the response and interactivity of the controls changes, too – to act like the tone
controls of the original amp that inspired the Amp Model you’ve selected. POD
also has a Presence bump that can be switched on and off when you hold the Tap
button and turn the Treble knob. The detail is in the Tap (HOLD) Functions
section that begins in another couple pages or so.
14 Chan Vol - This knob controls the relative volume level of the “channel”
you are playing through. Use this to balance levels between the sounds you store in
two different POD channels (say between your backing and lead tones). In general,
you want to set the Chan Vol as high as possible to insure you’re getting the best
signal-to-noise ratio performance.
15 Reverb - How much reverb do you want today? Spin this knob to set the
Reverb level. Two flavors of reverb live inside POD; a model of a spring reverb,
and a room reverb tone. Which you get depends on which Amp Model you select.
Generally speaking, if the amp that inspired a given Amp Model had a spring
reverb, that’s what you’ll get. If the amp didn’t have a reverb (like the 1968
Marshall “Plexi” which inspired the Brit Classic model), you’ll get the room. The
back cover foldout, Chapter 4, and Appendix A run down the details.
16 Effect Tweak - This knob varies the effect you’ve chosen. Turn it up and
the effect will go deeper, louder, faster, longer or just plain more. The speed of the
effects (delay, tremolo, chorus, flanger, rotary speaker simulation) is set by the Tap
switch (coming up in a page or two). For all the inside poop, look at the back cover
foldout, Appendix B for Effect Parameters, and the POD Effects chapter. If you
set the Effects knob to Bypass, Effect Tweak will, of course, not change anything.
2•5
CONTROLS & CONNECTIONS
2•6
17 Effects/Cabs - This knob selects which effect or combination of effects
you get (once again, all the details on effects are in the POD Effects chapter).
New with Version 2.0 software, this knob also allows you to choose Cabinet
Models, and mix ’n’ match them with the Amp Models. To choose a Cabinet
Model, hold the TAP button and turn this knob; the available cabinets are labeled
in gray around the knob. Choosing an Amp Model will automatically select an
appropriate cabinet; you can customize this Amp/Cab pairing, as described in
Chapter 6.
18 Tuner - Button in the middle of the POD. Press that puppy and – shazam!
Instant digital chromatic tuner. All POD’s Amp Model and effects processing are
bypassed so you can hear those questionably-tuned strings clearly, should you
choose to do so. Play a note on your guitar and POD will show you what it is on
that handy single-character display; all notes are displayed as naturals or flats, so
you’ll see A instead of G . Play that string you’re trying to tune again, spin its
tuning key so it goes sharp and flat, and two little red arrows below the Tuner
button will give you a light show. The idea is that the left pointing arrow will light
if you’re sharp. The right pointing arrow will light if you’re flat. And both arrows
will light at the same time when you’ve got it just right. Give any one of POD’s
buttons a push and the tuner disappears just as swiftly as it came and you’re right
back to normal POD operation.
Tuner Volume - You can adjust the tuning volume of your POD by turning the
Chan Vol knob while the tuner is active (this doesn’t affect the volume of your
not-in-tuner-mode POD sound). Alternatively, if you have a Floor Board
connected, the volume pedal will control the tuner volume, too.
Tuner Reference - Want a different reference than A=440Hz? When you’re in
the tuner mode, turn the Middle knob on POD while watching the display. Hey,
it changes! You can set the reference frequency anywhere from 436-445 Hz. This
setting is stored so you don’t have to reset it every time you turn on POD if you
decide you want to be different (or if that piano in your rehearsal room has
decided to be different). Since there’s only one digit in the POD display, all we
display is the last number, so if you set the tuner to reference 441 Hz, you’ll see “1”.
CONTROLS & CONNECTIONS
19 Noise Gate - Turns on and off the POD’s built in Noise Gate. More
Noise Gate details in the POD Effects chapter.
2•7
20 Tap - This control sets and displays the current tempo or speed of delay or
tremolo/chorus/flange/rotary speaker. To use the Tap control, just tap the button at
the tempo you want. For Chorus and Flange effects, the speed is actually displayed
by the blinking of the button and set at twice the speed of the effect so you don’t have
to count to 23 between taps if you want to set up a really slow chorus. And for
Tremolo the tapped tempo is displayed and set at half the speed of the Tremolo
effect, so you can get fast tremolo settings even if you can’t tap as fast as Bruce Lee.
You can also simply hold the Tap button and turn the Effect Tweak knob to
change the speed or tempo of your effects. This is especially useful if you are trying
to nudge your Tap setting to just the right value. See the Effects chapter, the back
cover foldout, and Appendix B for Effect Parameters to learn exactly what Tap
controls for each of the Effect settings.
20 Tap (HOLD) Functions - The Tap button also lets you access a
second layer of POD features: Amp Models 17-32, Cab Model selection, Delay
Feedback, Delay Level, Reverb Decay Time, a Presence Boost, a Volume Boost, and
a Drive Boost. Here’s the detail:
Amp Models 17-32: Hold down, and keep holding down, the Tap button as
you turn the Amp Models knob to select Amp Models 17-32. Appendix A lists
these Amp Models and details about them. Chapter 4 describes them.
Cab Model Select (Effects Knob): Hold down, and keep holding down, the
Tap button as you turn the Effects knob to select Cab Models. The cab models
are labeled in gray. You’ll find a list of the Cab Models at the end of Chapter 4.
Drive Boost On/Off (Drive Knob): Hold down, and keep holding down, the
Tap button as you turn the Drive knob up past twelve o’clock, and you get the
kind of extra ‘dirt’ that you’d expect from a Distortion pedal with the distortion
CONTROLS & CONNECTIONS
2•8
control set low and the output control set high. It boosts your guitar signal before
it reaches the Amp Model, so that you hit the model harder and get a dirtier
sound. This is just the same as kicking on the Distortion at the Floor Board
(details in Chapter 7). As you do this, the Channel A light comes on if you turn
the Distortion on.
Delay Repeats (Bass Knob): Hold down, and keep holding down, the Tap
button as you turn the Bass knob to set Delay Repeats any time you’re using a
Delay effect. More Delay details are in the Effects Chapter.
Delay Level (Middle Knob): Hold down, and keep holding down, the Tap
button as you turn the Middle knob to set Delay Level any time you’re using a
Delay effect. More Delay details are in the Effects Chapter.
Presence Bump On/Off (Treble Knob): Hold down, and keep holding
down, the Tap button as you turn the Treble knob up past twelve o’clock, and you
get a Presence boost, brightening your tone. Same as the EQ boost on the Floor
Board (details in Chapter 7). As you do this, the Channel C light comes on if
you turn the Presence “circuit” on.
Volume Boost On/Off (Chan Vol Knob): Hold down, and keep holding
down, the Tap button as you turn the Chan Vol knob up past twelve o’clock, and
a Volume Boost kicks in. This boosts volume without extra ‘dirt’ – like for a lead
boost. This is the same as kicking on Drive/Boost at the Floor Board (details in
Chapter 7). As you do this, the Channel B light comes on if you turn the Drive
Boost on.
Reverb Decay Time (Reverb Knob): Hold down, and keep holding down,
the Tap button as you turn the Reverb knob to set Reverb Decay Time (the
apparent “size” of the Reverb). More Reverb details are in the Effects Chapter.
Effect Speed (Effect Tweak Knob): Hold down, and keep holding down, the
Tap button as you turn the Effect Tweak knob to fine tune the current Effect’s
speed. More Effect details are in the Effects Chapter.
CONTROLS & CONNECTIONS
2•9
Hold the TAP button to access these features
21 Save - When you want to store your own tweaked up sounds in your POD,
this button is the key. Exactly how it works is detailed in Chapter 6: Creating &
Storing Sounds. But you’re probably impatient, so here are the basics:
When you are using one of the pre-programmed POD sounds, the POD’s singledigit number display will be lit, telling which bank you are in – 1 thru 9 – and one
of the channel letters – A thru D – will be lit also. If you turn one of POD’s knobs,
you’ll notice the word “EDITED” will be lit to the left of the POD single-digit
display. This is a reminder to you that you have tweaked the memorized channel,
CONTROLS & CONNECTIONS
2 • 10
and that you should save it if you want the memory to remember the tweak. To save
your changes, press the Save button 21 . The button will start to flash. Press the
Up and Down 10 buttons and you will see that you are switching through
memory locations A, B, C, and D in each of POD’s nine numbered banks. Pick
one to store your sound in, and press that Save button a second time. The button’s
light will stop flashing, and the sound is stored at the location you chose, replacing
the sound that was stored there before. Doesn’t get much simpler than that. After
the sound is stored, you can bring it back any old time by simply pressing the Up
and Down buttons to call up the location where you stored it. (See Chapter 7 to
learn how to do all this with your feet on the Floor Board).
If you aren’t using one of the pre-programmed POD sounds – you’re in Manual
mode, and you’re just getting the sound of where the knobs are set – you can store
that state into a memory location the same way. Press Save, use the Up and Down
buttons to choose a place to save to, and press Save again.
You may want to audition the memorized POD “preset” sounds before you start
saving anything. Note the ones you can live without as locations you can save over.
If you decide you don’t want to store the sound after you’ve started saving, press
the Tap, Manual, Tuner, Noise Gate, or MIDI button to cancel the save. (The
save will also be canceled if you don’t press any buttons for 5 seconds after having
pressed Save.)
The Save button also lets you customize any of the Amp Models and Effects to
your own taste, so your customized version of the amp or effect comes up instantly
when you turn Amp Models or Effects. See Chapter 6 for the details on that.
22 MIDI - This button is used to set POD’s MIDI channel and dump sounds
via MIDI. Details are in the Deep Editing & MIDI Control chapter.
GETTING SET UP:
SCENARIO ONE – IN THE STUDIO
GETTING SET UP
The numbers in black boxes below refer to the back cover foldout’s POD illustration.
3•1
ALL PURPOSE BASICS
Plug POD’s power supply into the wall, and connect it to the power input on the
right edge 1 of your POD. Plug the output of your guitar to the POD Input 2 .
If you want to listen to POD with headphones, plug them into the Phones 3
jack. If you’re gonna be PODding in a recording studio, you’ll want to check out
Scenario One below.
If you’re using POD for practice or live gigs, flip forward a few pages and read up on
Scenario Two.
SCENARIO ONE – IN THE STUDIO
If you’re going to be using your POD in a recording situation, here’s what you need to
know to get set up:
Mount Up
When you’re looking for the perfect spot to put your POD, you’ll want to know
about the optional POD mic stand / amp top adaptor you can get from Line 6 – it’s
described on the POD Tools CD-Rom and the Line 6 web site (where it can also
be purchased). We know this is a shameless plug to get you to buy more gear, but
what the heck – you just may want some! And a POD carry case....
GETTING SET UP:
SCENARIO ONE – IN THE STUDIO
Gimme Some A.I.R.
3•2
If you’re plugging POD’s output into anything other than a guitar amplifier’s input,
flip the 6 A.I.R. switch to its DIRECT position. In this mode, the A.I.R.
DSP is active, and you are getting a virtual version of the speaker-cabinet-airmicrophone experience that’s so good you may never use a regular guitar amplifier
and microphone set up again. The POD 1/4" TRS outputs are versatile, merrily
sending their magic tones into +4dBu balanced, or -10dBu unbalanced inputs.
Quality cables are obviously recommended for best performance.
Pick the Right Inputs
If you’re hooking your POD up to a recorder, mixer, or other equipment, be sure
you are plugging its outputs into line level inputs on your other gear, as opposed to
microphone level or guitar level inputs. This will insure that you get the best
signal-to-noise ratio (lots of juicy guitar tone, not too much hiss) with POD. Some
equipment uses the same physical inputs for mic & line level sources, allowing you
to trim low level signals (like mics) up to a high level at the inputs. If you are
plugging your POD into one of these inputs, try setting the trim to minimum, and
twisting POD’s Output Level and Chan Vol knobs up to maximum. If your
equipment has a couple of open line-level only inputs, you’ll probably get better
performance by plugging into these, rather than the wide-ranging mic-to-line level
trimmed inputs.
Ready To Play Anywhere
POD makes friends easily. It’s right at home next to a multiple hundred thousand
dollar, bajillion input SSL console, and will just as happily do its thing with your
portable cassette recorder. Here’s how to hook up, starting from the simple stuff
and working our way up the recording system food chain:
GETTING SET UP:
SCENARIO ONE – IN THE STUDIO
BOOM BOXES & SMALL PORTABLE STUDIOS
Connect the output of the POD 5 to the input of your system. Ideally, you want
to connect both right and left outputs to your gear and run stereo. Make sure the
A.I.R. switch 6 is set to DIRECT, plug your guitar into 2 the guitar input, and
away you go. Set your POD Output Level 4 so that you’re getting plenty of
signal feeding into your gear, but not so loud that it’s overdriving your system and
distorting. Try turning the Amp Model knob 11 to POD Clean, set POD’s
Drive 12 to the 9 or 10 o’clock position, and Chan Vol 14 to Max. Now play
with the POD Output Level knob and any input volume control on your system
so you can get the maximum sound level out of your POD without going so far
that you overdrive the input and cause unwanted distortion. If you’ve got some
headphones handy, you can plug them into the POD headphone output to make
sure that it sounds the same as what you hear through your system. Before you
strap the phones on your ears, be careful that the headphones aren’t too loud,
since their level is set by the Output Level, too.
3•3
GETTING SET UP:
SCENARIO ONE – IN THE STUDIO
BIG TIME CONNECTIONS
3•4
With bigger setups including a mixer and a multi-track recorder, or with new
fangled setups like computer-based and stand-alone Digital Audio Workstations,
you’ve got a couple choices. If you’re a MIDI computer user, you’ll also want to
check out the Deep Editing & MIDI Control chapter to learn about the
complete MIDI control available with the POD, including the SoundDiver editor/
librarian program that’s included on the POD Tools CD.
First Time’s a Charm
Make sure the POD A.I.R. switch 6 is set to DIRECT. The “normal” thing to do
is plug your guitar into POD, and then connect your POD’s +4 dBu stereo TRS 1/4"
left and right outputs to the inputs of your system (the POD outputs are also
perfectly happy connecting to -10 dBV and unbalanced equipment). POD will
process your guitar as you play, and you can print that processing to tape (or disk) as
you make your tracks. For most situations, you may find this is perfect.
Changing History
But there is another option that can give you the exciting ability to go back in time
and change your amp and effect settings weeks after you’ve recorded your guitar
tracks, bringing you flexibility and creative control during mixdown that you could
never get with a traditional guitar amplification system. It’s like this: the simple
setup just described in the preceding paragraph is basically like taking a reverb,
running your vocal mic’s preamp into it, and printing the reverb-processed sound to
your recorder’s track. Now you’ve got that vocal performance, with that reverb
setting, on tape (or disk). The more often used studio setup is to record the vocal to
your recorder’s track dry, using an effect send on your mixer’s tape return channel to
send the vocal to the reverb to audition the effect processing as you record your
track. Then, when it’s time to mix, you can make final decisions about the verb to
insure that it’s fitting in with the rest of your tracks. You can use a completely
different verb if you want to, or no verb at all – all your possibilities are open. You
can use POD like this – in an effect send/return set up – and get great advantages of
flexibility for your guitar tracks. Here’s how this configuration works, plus other
hook-up details:
GETTING SET UP:
SCENARIO ONE – IN THE STUDIO
Direct Injection
First thing to do to play the send/return game is get your guitar to deliver a direct
input to your recorder or mixer, or the input of your computer-based audio system.
How about just plugging the guitar’s output into a mixer channel? Guitar pickups
like to feed into a high impedance load – at least 300 KOhms impedance;
1 MOhm is ideal for the best results. Most mixer inputs are relatively low
impedance, and therefore don’t deliver ideal guitar tone; you will tend to get a
darker, “squashed” sound if you plug the guitar in directly. To avoid this, we
recommend buffering your guitar’s signal before the mixer with a quality DI box or
tonally “transparent” instrument preamp. Look for a unit that delivers clean,
uncolored sound. Steer clear of amp simulators. You can use a guitar preamp, as
long as it is clean, with a flat frequency response – no tone shaping.
With that said, you can sometimes get acceptable results plugging direct into a
line level mixer channel if you have a guitar with hot, active pickups (since the
active electronics’ output can have relatively low impedance). For instance, we’ve
sometimes plugged a guitar right into a channel on a Mackie 1202 VLZ, cranked
up the trim, and gotten acceptable results. Don’t try to plug into a microphone
level mixer input if you’ve got active pickups, because the extremely low
impedance of mic inputs will load the active circuitry down too much.
Return to Sender
Next, we’re gonna look at how you’d connect your POD to a send and a return
from your system. Which you don’t have to do, but it gives the flexibility we talked
about in the ‘Changing History’ section a page or two back.
Configure things the way you would with a reverb: you want to be able to track
your guitar unprocessed, and audition the POD processing as you are playing or
tracking. So, for instance, if you have a mixer with direct outputs from some or all
of its channels, along with a separate tape or disk recorder, you’ll do something
like this:
3•5
GETTING SET UP:
SCENARIO ONE – IN THE STUDIO
3•6
Return To Sender Illustration
Hooking up POD to a mixer send/return
Plug the guitar into your DI. Plug the DI into a mixer channel with a direct out.
Set the trim on your channel so your input levels look good. Plug the direct output
from the mixer channel into one of your recorder’s track inputs, and set the
recorder to monitor the input to that track. Connect the recorder’s track output to
another mixer channel input that has a direct output. Plug that direct output into
your POD’s input, and plug the POD outputs into one of your mixer’s stereo
GETTING SET UP:
SCENARIO ONE – IN THE STUDIO
channel inputs. Make sure the POD A.I.R. switch 6 is set to DIRECT.
You should be all ready to play your guitar and hear it POD-processed, and lay
down a track on your recorder. Then you can play back the track and switch amps,
effects, whatever – welcome to the digital software revolution! And for an even
more revolutionary experience, be sure to check out the MIDI Mania section
below, plus the Deep Editing & MIDI Control chapter to learn how to
automate it all. By the way: don’t monitor the pre-POD and post-POD guitar
signals at the same time, as you’ll get comb filtering that will mess up your sound.
(Scary, huh?)
Level Headed
When setting levels in any of the above scenarios, watch carefully for the CLIP
indicator to light on your POD (it’s just under the 10 Up and Down buttons).
This lets you know you’re clipping the POD input and so you need to turn down
the signal you’re feeding it. You should also be sure you don’t send too little level to
POD. As with any audio device, this will result in poor performance.
Radiation Alert
You’re also likely to find, especially if you are using a guitar with single coil
pickups, that it is quite easy to pick up some serious noise from any computer
monitor you might have in your studio. CRT displays are, after all, just special
purpose ray guns that shoot photons at you all day long. Your guitar pickups
receive and amplify the electro-magnetic fields that your display radiates, and you
hear this in your audio signal as buzz and hum. Moving farther from the CRT, and
turning your guitar so it does not directly face the computer’s display, will
minimize this problem. But if you find yourself in a tight studio setup, needing to
lay down some quick tracks, and being pestered by CRT-induced buzz, you may
find it helpful to do as we have sometimes done: set up your track to record and
start your pre-roll; reach up and flick your computer monitor’s power switch off;
record your guitar part; stop your recording, flick the monitor back on, and check
out the buzz-free playback.
3•7
GETTING SET UP:
SCENARIO ONE – IN THE STUDIO
Pedal Power
3•8
POD has a couple of foot control options: the Line 6 Floor Board and FB4. While
we’ll go into all the details in a later chapter, for now, it’s good to know that the
FB4 is a four-button foot switch that allows you to select between four POD
channels and Tap your effect speeds/tempos. Its big brother, the Floor Board,
allows hands-free selection of any of the sounds programmed in your POD’s
channels, plus a wah pedal, a volume pedal, stomp box-style individual on/off
control of POD effects, Tap control of effect speeds/tempos, and tuner control.
Whichever Line 6 foot controller you choose, it will plug into the POD 7 Pedal
jack. You can also control your POD with a standard MIDI control pedal.
GETTING SET UP:
SCENARIO ONE – IN THE STUDIO
NOT SO BIG TIME CONNECTIONS
You can run your POD in a send/return type configuration even with a reasonably
sophisticated four (or more)-track recorder or a “native” computer audio system.
(You’ll ideally want more than two channels out and in on your computer system
if you want to mix guitar with other instruments.)
Computer users: Plug your guitar into the computer’s input (preferably using a
DI to get the signal level right). Make sure the POD A.I.R. switch 6 is set to
DIRECT. Plug the output of the computer into POD and send your guitar signal
from the computer through that output, and listen to the POD output cranking
out great amp tone as you play. Remember to check for the CLIP light 10 to
make sure you’re not overdriving POD’s input.
Multi-trackers: Plug your guitar into the multi-track’s input (preferably using a
DI to get the signal level right). Make sure the POD A.I.R. switch 6 is set to
DIRECT. Take the output from the track on your multi-track and feed it into your
POD, adjusting the level output to POD so you don’t light that CLIP 10
indicator. In order to monitor POD through the multi-track, the recorded guitar
signal has to be able to go from tape (or disk) to POD without you having to hear
it; otherwise you’ll hear both the direct and POD-processed guitar at the same
time, which ain’t no good. So you want a multi-track with direct output from one
or more channels, or pre-fader effect sends (which means you can turn the
monitor level for the track all the way down, while still feeding signal from it to
the POD via its effect send).
STOMP BOXES
Got some old stomp boxes you want to run your guitar through in addition to
POD? No problem. You can place the stomp box(es) between the guitar and the
DI box (if you’re using one) or between the guitar and your mixer input (if you’re
feeling wild and running without a DI). Make sure the stomp box isn’t overdriving
your mixer channel or DI, and make sure that the stomped and then DI’d signal
doesn’t overdrive your mixer’s input. You can also experiment with putting your
3•9
GETTING SET UP:
SCENARIO ONE – IN THE STUDIO
stomp boxes just before or after POD – most anything might work depending on
the specific gear you’re working with and the sound you’re trying to achieve.
When setting your levels, be sure to try your loudest strumming, hottest pick-up
combination, and your maximum volume boost from the stomp box(es) at the
same time to make sure the resulting clamor gets through the signal chain cleanly.
3 • 10
MIDI MANIA
And for yet more control (and who can ever get enough) those of you with MIDIcapable studios will find that your POD lets you control everything via MIDI. This
is especially powerful with the send & return setup described above. Using MIDI,
you can automate any POD parameter. So, for instance, you could start recording
a track (with your guitar going direct to tape, and POD’s MIDI output recording to
your MIDI sequencer), and, as you track, switch from one POD memory to
another from the front panel or your foot controller, tweak your reverb up a bit,
twiddle the tone knobs, switch from one amp to another – whatever. Stop
recording, and replay the track with the POD getting MIDI back from your
sequencer, and POD will make all the same moves as when you were recording.
You can even replay the track, this time with only the MIDI track record-enabled
and the guitar track in playback, and do all the automation tweaking you want
right from the POD’s knobs and buttons or your foot controller. Or, you can go in
and edit those MIDI messages and make POD do something else. Pretty neat, huh?
Be sure to read the Deep Editing & MIDI Control chapter if you plan to
venture into this realm.
GETTING SET UP:
SCENARIO TWO – POD PLAYS LIVE
If you’re going to be using your POD in a live situation, as either the “front end” for a
guitar amplifier, or for its direct output to a sound system, here’s what you need to know
to get set up:
3 • 11
Mount Up
If you perform live, you’ll probably want to have the POD in a handy spot on
stage. One of the easiest ways to get it there is with the optional POD mic stand /
amp top adaptor you can get from Line 6 – it’s described on the POD Tools CDRom and the Line 6 web site (where it can also be purchased). We know this is
another shameless plug to get you to buy more gear, but what the heck – this really
is a handy little item to get the POD’s righteous red aluminum chassis wherever
you need it for mid-show tweaking. And that custom POD carry case is just the
bomb.... Now back to educational stuff:
Gimme Some A.I.R.
When you’re playing live with POD, you’ve got a choice of setups. You can plug
straight out of the POD’s outputs into the house system for awesome tone without
the hassle of mics and cabinets and all that other stage setup. You can also choose
to run POD into a power amp and speaker cabinets, using it as a preamp. Or you
can plug your POD in between your guitar and a guitar amplifier so the POD acts
as a tone shaping front end for the amp.
For plugging into a PA or other sound system, flip the 6 A.I.R. switch to its
DIRECT position. In this mode, the A.I.R. DSP is active, and you are getting a
virtual version of the speaker-cabinet-air-microphone experience that’s so good you
may never use a regular guitar amplifier and microphone set up on stage again. The
POD 1/4" TRS outputs are versatile, merrily sending their magic tones into +4dBu
balanced, or -10dBV unbalanced inputs. Quality cables are obviously
recommended for best performance.
GETTING SET UP:
SCENARIO TWO – POD PLAYS LIVE
POD Takes Over
3 • 12
If your POD is running into a power amp or speakers, or into the front end of a
guitar amplifier, you generally want to switch the 6 A.I.R. switch to the AMP
position. This disables the part of the digital signal processing which is simulating
a speaker, moving air, and microphone – which you probably don’t want, because
you’ve got a real physical speaker right there in the guitar amp which is doing its
part to shape the tone of your POD. (Of course, we have sometimes found that
small open-back combos sound better with the A.I.R. switch in the DIRECT
position; you may want to experiment with both for your set up). If you don’t want
the A.I.R., DON’T connect headphones to POD, as they will override the
A.I.R. switch and turn the extra processing on so things sound right in the
headphones (and wrong on the amp). Connect a standard guitar cable from the
POD left output (POD’s mono output) to the input of the guitar amplifier (or plug
in both Left and Right if you have a stereo setup).
Cabinet Tuning Mode
Your POD can be tuned for optimal performance with a variety of systems when the
A.I.R. switch is set to its AMP position. By default, your POD expects be plugged
in before an open-backed cabinet. If you want to plug into something else, you’ll
want to change the Cabinet Tuning Mode. To do this, hold the Save button while
powering up your POD. The POD’s display will show a letter for one of the Cabinet
Tuning Modes; press the Up and Down arrows to pick the mode, then press Save.
Use Mode...
when POD is...
& your speaker cabs are...
A
feeding power amp
closed back (ideal for 4x12 cab)
B
feeding power amp
open back (ideal for 1x12 cab)
C (default)
in front of combo/head
open back (ideal for 1x12 or 2x12 cab)
D
in front of combo/head
closed back (ideal for 4x12 cab)
GETTING SET UP:
SCENARIO TWO – POD PLAYS LIVE
POD Output Level: A Word of Caution
POD’s Output Level control is setup with enough gain available to drive into
almost any piece of equipment. Consequently, it also has plenty of power available
to overdrive the input of your guitar amp, which you don’t want since it will add
extra distortion that will color the sound so you don’t hear the “true” POD tones.
So, set it pretty low at first, then you can experiment with higher settings.
Tuning Your Amplifier
When you’re having your POD “take over” another guitar amplifier, it’s a good
idea to start off with that amp in neutral. What is “neutral,” you ask? Well, if you
only have one volume control on your amp, set it low enough to get a “clean”
tone; that ensures POD’s sounds come through as purely as possible. If you have a
master volume in addition to a volume control on the input, set them both so that
the first volume doesn’t overdrive the master volume (so you’re getting a clean
tone). This will vary from amp to amp, but usually the input volume is going to be
less than the master volume to get a clean, non-distorted sound. If you have
passive tone controls, try setting your mid control at max, and your treble and bass
controls at zero (this is actually “flat” equalization-wise on most amps). Active
tone controls may vary, but just be sure you’re not overdriving the amp so the
POD tone comes through without extra coloration. Once you get going, you can
tweak the amplifier settings to suit your tastes. Try to set the POD Output Level
so you’re not overdriving the input of the amp, be sure the A.I.R. switch is in the
AMP position, and you should be in business!
If you have a guitar amp with an effect return or a jack that lets you connect
directly to the input to the power amp, you can plug POD’s output right into that
connection to bypass the tone controls of the amp and avoid their coloring POD’s
tones.
3 • 13
GETTING SET UP:
SCENARIO TWO – POD PLAYS LIVE
POD Live Hook-up Illustrations
Pictures are handy. Here are a few you may appreciate. In all cases, plug the left
output of your POD into your amp’s input for mono operation. Experiment to get
the best from your setup; try the A.I.R. switch in the DIRECT position (this can
work great with smaller amps) and also try other knob settings on your amp:
3 • 14
POD As Front End for a Combo Amp or Head
POD In Insert/Return of a Combo Amp or Head
GETTING SET UP:
SCENARIO TWO – POD PLAYS LIVE
POD Into a Power Amplifier Driving Speaker Cabinets
3 • 15
Stomp Boxes, Live Setups, & You
If you’ve been playing guitar for a while, you probably have some favorite pedals
that you dig. And even though POD has now graced your life with some pretty hip
digital effects, you probably still want to have the option of keeping those old
pedals in your arsenal. No problem! Just remember that if you’re going to use POD
with those other effects boxes in front of your amp, you’ll need to think about
where to place everybody in the line-up. If you have a distortion pedal or wah, try
positioning it in between your guitar and your POD. Reverb and delay should
generally go after the POD, before the input that you are using to feed POD sound
to your amp. And things like compressor, chorus, flanger, phaser, tremolo and
vibrato might work either before or after your POD, depending on what sound
you’re looking for. Putting a volume pedal after POD lets you control the volume
without changing the tone. Or put it before POD to control how hard you’re
driving POD’s input, which lets you pedal yourself to cleaner or dirtier tones. If
your amp has a line level effects loop, you probably won’t want to try to hook your
effect send into the POD input, since POD’s input was designed for guitar level
inputs (you can use just the return, as mentioned above, with your guitar plugged
right into POD).
GETTING SET UP:
SCENARIO TWO – POD PLAYS LIVE
Pedal Power
3 • 16
POD has a couple of foot control options: the Line 6 Floor Board and FB4. While
we’ll go into all the details in a later chapter, for now it’s good to know that the
FB4 is a four-button foot switch that allows you to select between four POD
memories and Tap your effect speeds and tempos. Its big brother, the Floor Board,
allows hands-free selection of any of the sounds programmed in your POD’s
channels, plus a wah pedal, a volume pedal, stomp box-style individual on/off
control of POD effects, Tap control for effect speeds/tempos, and tuner control.
Whichever you Line 6 foot controller you choose, it will plug into the POD 7
Pedal jack. You can also control your POD with a standard MIDI control pedal.
MODELED AMPS & CABS:
WHICH AMPS AND CABS ARE MODELED?
MODELED AMPS & CABS
WHICH AMPS AND CABS ARE MODELED?
Note: For the following description of the Line 6 Amp Models, and other references
that you will find throughout this manual, please be aware that Fender, Marshall, Vox,
Boogie, Soldano, Peavey, Roland, Matchless, Arbiter, ADA, Leslie, and other amplifier
model designations, and the names of musical artists and groups, and effects, are all
trademarks of their respective owners, which are in no way associated or affiliated with
Line 6. These marks and names are used solely for the purpose of describing certain
amplifier tones produced using Line 6’s modeling technology. The Line 6 modeling
technology provides POD with a wide variety of sounds and effects modeled after some of
the most popular sounds of the classic amps, effects, and artists mentioned here.
There are 32 Amp Models living within your POD, plus 16 Cab Model selections.
When you turn the Amp Models knob, you select an Amp/Cab combination.
You can then mix ’n’ match different cabs with the amp by holding the Tap button
and turning the Effects knob. Chapter 6 tells you how you can customize these
amp/cab combinations. We list all the Amp Models and the Cabinet Models
below, and describe the original equipment that inspired them:
Line 6 Clean - To create this Amp Model, we essentially grafted the top end
of a JC-120 (Roland’s popular “Jazz Chorus” solid state combo) onto the bottom
end of a classic Marshall JTM-45 tube head, to give you the crisp and clear top end
of a solid state amp, but with a rich, satisfying tube amp-style bottom.
4•1
MODELED AMPS & CABS:
WHICH AMPS AND CABS ARE MODELED?
Line 6 Crunch - Our “boutique” sound. Not too clean, but not too raging.
We spent some time with a rare Dumble combo, and picked up a few tricks from it
to put together this tone. Great for modern blues or jazz, this sound should be like
a fine cognac, smooth and warm going down, but with a nice kick. The Mid
control is located before the Amp Model’s Drive, but the Bass and Treble
controls are placed after the Drive for maximum range.
4•2
Line 6 Drive - Our version of the modern, super-saturated, high gain, lead
amp; smooth, yet biting. All the tone controls here are post-Amp Model for
maximum control with minimum muddiness. Again, this unique overdrive tone
was created by merging different tone-shaping elements from different high-gain
amps. It’s like playing through a collection of amps simultaneously – a studio
technique that has made possible some of the greatest guitar tones of modern
recordings (Line 6 Layer builds on this idea with even more versatility). With
POD, you can get this same kind of rich, multi-amp tone out of one combo, a feat
that wouldn’t be possible with traditional guitar amps.
Line 6 Layer - Line 6 Clean meets Line 6 Drive. As we’ve already
mentioned, many guitarists and producers have experimented with running
multiple amps simultaneously, with each amp making a contribution to the overall
tone. Stevie Ray Vaughn, for example, would split his guitar signal to drive a
Marshall, Fender Vibroverb, and Dumble Steel String Singer simultaneously to get
some of the great sounds on his records. This Amp Model was produced by
superimposing a “traditional” clean guitar tone and a particularly tweaked-up
variant of the Line 6 Drive. The Drive knob acts as a blender control – fully left
you’ve got big bottom 21st Century Clean, and fully right you’ve got paint-peeling
Ultra-drive. Set it anywhere in between, and you get to have your cake and smear
it all over your audience, too.
Small Tweed - Modeled after a 1952 “wide panel” Fender Tweed Deluxe, this
Amp Model will snarl with the best of them. The original amp had only a single
tone control, essentially a Treble roll off. We set up the Treble knob to give you
this Treble roll off when using this Amp Model. Which left us with the Bass and
MODELED AMPS & CABS:
WHICH AMPS AND CABS ARE MODELED?
Middle knobs just sitting there. That just didn’t seem right, so we figured out a
way to put those knobs to work without mucking about with the authenticity of
this Amp Model’s treble tone control. We set up the Bass and Middle as postAmp Model controls, which essentially lets you EQ up your tone as you would do
on a mixing console after recording your amp. Set the Bass and Middle knobs at
halfway to put them in “neutral,” and try the Treble knob somewhere above
halfway for a classic Tweed sound.
Tweed Blues - The classic ’59 Fender Bassman 4x10 combo was the amp
that started it all – instant rock and roll tone. Originally a bass guitar amp, the
Bassman became a Blues staple for 6-string guitarists. It has the fat bottom end
you’d expect from a bass amp but also has the Fender twang on the top. The
Bassman was the “blueprint” for POD’s Tweed Blues. Incidentally, when Jim
Marshall built his first amps with Ken Bran they were heavily influenced by the
early Bassman. One of the interesting things about the Bassman is just how
interactive the Mid and Treble controls are. The Mid control isn’t a bandpass, as
in most tone control setups. Instead, it’s almost like a second treble control. The
two are additive, so if you’re running the Middle knob higher than halfway up,
you’ll find that the Treble control might give you more bright than you really
want. On the other hand, when you turn the Middle knob down, you’ll probably
want to boost the Treble.
The Bassman, like many of the amps modeled for POD, didn’t have a master
volume. So to get the kind of tone that the Bassman can deliver at higher gain
settings, you had to crank it up loud enough to do some serious damage to anyone
who might be standing close by. With POD, you can get that kind of tone at a
bedroom or studio level – or through your headphones even! Try a Drive setting
of about 4 or 5 – it’s guaranteed to dredge up the best R&B licks you know.
Black Panel - The Holy Grail for many blues, country, and “roots” players
has been a blackface Fender Deluxe Reverb. (Of course, now that POD’s here, that
may all change.) After listening to quite a few candidates for modeling, we
stumbled upon an extremely cool ’64 Deluxe. Most players love a Deluxe when it’s
turned up to about 7 for a nice gritty sound that cleans up when you back off your
guitar’s volume knob just a little. Notice how the tone control response changes as
4•3
MODELED AMPS & CABS:
WHICH AMPS AND CABS ARE MODELED?
this Amp Model’s Drive is changed; clean settings are crisp and present, while
more driven settings will mellow the high end. This is typical of what you get from
a Deluxe, and is nicely captured here.
4•4
The Deluxe itself has only Bass and Treble controls. Leaving us, once again, with
the prospect of a knob with nothing to say for itself. But fear not; in this case,
we’ve set up POD’s Middle knob so you can add some post-Amp Model Midrange
contouring for a little more flexibility. Once again, set the Middle knob to its
“neutral” 12 o’clock position for the classic Deluxe sound. Tweaked up right, this
tone will cut through and sing.
Modern Class A - The ’96 Matchless Chieftain, which was studied for the
Modern Class A selection, is a very expensive handmade amp. The Matchless has
an EL34-powered “modern class A” design – hence this model’s name – and a
unique tone (largely due to the complicated EQ scheme). The sound is sort of
“future retro.” Its soft clipping is typical of Class A amplifiers; almost a “hi-fi”
sound in a great rock n’ roll amplifier.
Brit Class A - Music was changing in the early 60’s and guitarists were asking
for more brilliance & twang. So the Jennings Company, makers of Vox amps,
decided to add Treble and Bass controls (and an extra 12AX7 gain stage,
incidentally); this additional circuit became known as Top Boost. The AC 30 with
Top Boost was the amp made famous by many British invasion bands. Much of the
unique character of the Vox sound can be attributed to the fact that Class A amps
overdrive in a very different way than Class AB. Brian May of Queen, Mike
Campbell of Tom Petty’s Heartbreakers, and The Edge of U2 have also used classic
AC 30s to make their music. On this Amp Model, POD’s Middle control acts like
the Cut knob on the AC 30. Although usually played fairly clean, a cranked
AC 30 has a great saturated lead tone, a la Brian May on the early Queen albums.
A non-Top Boost AC 30 is modeled for POD’s Brit Class A #2 Amp Model, which
comes up in a few more pages.
MODELED AMPS & CABS:
WHICH AMPS AND CABS ARE MODELED?
Brit Blues - This Amp Model is based on a circa 1964-65 JTM-45 head with
block logo (predates the “scrolled” Marshall logo), complete with a gold Plexiglas
(Plexi) front panel, although the sound normally associated with Plexi amps
comes from the late 60’s, 50-watt version that was the inspiration for the next in
POD’s line up of Amp Models. The JTM-45 marked the beginning of Marshall’s
transition from a mellower Fender-like tone to the distinctive bright “crunchy”
sound of the later Marshalls.
4•5
Brit Classic - Modeled after the infamous Marshall Plexi – coveted by tone
connoisseurs the world over. By this time (ca. 1968) Marshall had completely
changed the circuitry away from the Fender 6L6 power tube heritage and moved
to an EL34 tube; another major tone difference was due to the necessary output &
power supply transformer changes. (See, we told you we spent some time looking
into all this stuff.) All this mucking about added up to create a tone forever linked
with Rock Guitar. Amps of this era didn’t have any sort of master volume control,
so to get this sound you’d have to crank your “Mark III Super Amp” to max – just
the thing to help you really make friends with the neighbors. Hendrix used
Marshalls of this era; 20 years later Van Halen’s first two records owed their
“brown sound” to a 100-watt Plexi. In order to get a crunch sound out of a Plexi
you would likely crank up the input volume and the tone controls (to 10!). You’ll
find that the Brit Classic, in keeping with our basic “make-it-sound-a-whole-lotlike-the-original” concept, is set up to do pretty darned near the same thing. Max
out the Middle and Treble knobs and turn Bass to about 9 or 10 o’clock on your
POD when using this Plexi-inspired Amp Model and you can treat those nice
neighbors to a tasty slice of fat rock tone.
Brit Hi Gain - Turn to this Amp Model to conjure up tones of the coveted
JCM 800, one of Marshall’s most universally-acclaimed modern amps. This
updated version of the Plexi continued Marshall’s heritage with added gain and
edge for a new generation of rock guitarists. One of the biggest differences here is
that the tone controls are located after the preamp tubes. We worked with a 1990
JCM 800 with Master Volume to develop this model. Incidentally, some versions
of JCM800’s get their distortion from clipping a diode. The amp we modeled uses a
tube for distortion. This is the metal sound Marshall made famous. Although not
MODELED AMPS & CABS:
WHICH AMPS AND CABS ARE MODELED?
many people play Marshalls clean, it’s a great tone, so you should also be sure to
check out this model with a low Drive setting, too. Of course, you can always
pump up the drive and rage....
4•6
Rectified - This model is modeled after a 1994 Mesa Boogie Dual Rectifier
Tremoverb. You can use this Amp Model to get that tight, high gain sound used by
bands like Dream Theater or Metallica. Boogie made their mark in the late 70’s
and early 80’s by adding master volumes and more gain stages to amps with
Fender-style circuitry. You can hear the Fender heritage but with more “punch” in
the mids. The Boogie Dual Rectifier’s tone controls are post-distortion and, as
with the tone sections of most of the amps we based our models on, the individual
controls interact with each other and with the Drive. With high drive settings,
you can scoop the mids and crank the bottom end for some great Seattle grunge
sounds.
Modern Hi Gain - The Soldano sound is intensely overdriven, and also has
EQ after the preamp distortion. This oversaturated tone is well-suited to thrash
metal and grunge bands, but has also been used more subtly by artists like Eric
Clapton. This is a good Amp Model to use if you want to get a current Van Halen
or Joe Satriani sound. The POD Modern Hi Gain Amp Model is based on one of
Mike Soldano’s rackmount preamps. Talk about high gain preamp tube distortion!
The X88R we studied to create this Amp Model would have been the rage for Los
Angeles studio use in the late ‘80s.
Fuzz Box - Although not technically an amp, we felt that the unique tonal
qualities of the classic 1960’s Arbiter Fuzz Face earned it a place among the amps
modeled to create POD’s Amp Models. This fuzz box used broad frequency
transistor-based clipping. The result is a buzzing kind of distortion that has become
popular again with the alternative and grunge set. Jimi Hendrix was among the
first guitarists to popularize the Fuzz Face in the States, but our model is
considerably dirtier than the tones found on “Are You Experienced.” Try playing
“Satisfaction” by the Stones, or the lead from “American Woman” by The Guess
MODELED AMPS & CABS:
WHICH AMPS AND CABS ARE MODELED?
Who. Liberal use of the Bass, Middle, and Treble controls will let you go beyond
the tones that the Fuzz Face could deliver, enabling you to discover your own
unique recipe for those elusive fuzz tones in your head. Just a note: when recording
Purple Haze, Jimi didn’t even use an amp – he just went straight from a Fuzz Face
to an Orange power amp to a 4x12 cabinet. Which is the same sort of tone you
find here....
Tube Preamp - Not even close to being a guitar amp, but once we got
started, we just couldn’t stop ourselves. The thinking went like this: ‘Once people
get this POD, it’s gonna be so great that they’re gonna wish they could use it for
everything – warming up keyboards, crunching up drums, fuzzing up vocals. We’ve
gotta give ’em something to do that!’ So we did. The Tube Preamp Amp Model
lets you warm up any sound source the way producers and engineers often do in
the studio with vintage tube gear. For more “edge” on vocals, try running your
vocal tracks through POD. Or punch up (or munch up) a synth bass track by
sending it through POD and cranking up the drive and EQ controls to suit your
taste. Although this is not actually a guitar amp model, you can even get some
great guitar tones out of it. Also try using it as a direct box for bass. When you do
this stuff, you want to use the Drive control like a mix knob on a reverb to control
how much processing you want to hear. You generally don’t want to mix the prePOD sound with the post-POD sound because of the comb filtering that results.
Instead, jack the sound source right into POD and then only monitor it post-POD
processing. With the tone controls at 12 o’clock, the EQ is “flat.”
Line 6 Twang (Hold Tap + Line 6 Clean) - This model draws on our analysis of
the '60s Fender blackface Deluxe amps and the '50s Fender Bassman. (It includes
the classic Fender glassy high end, plus the snap and bite of these vintage amps.)
Things don’t really get too crunchy until you get to the top range of the Drive
knob. The tone controls provide more range than the blackface Deluxe or
Bassman.
Line 6 Crunch #2 (Hold Tap + Line 6 Crunch) - This sound was crafted
during our studies of the '68 50 Watt Marshall Plexi. But unlike the Plexi, this
4•7
MODELED AMPS & CABS:
WHICH AMPS AND CABS ARE MODELED?
Amp Model provides more wide-ranging tone controls. With the Plexi, once
you’re overdriven, the tone controls really don’t do much, but POD will allow you
to scoop out the mids even at the highest Drive settings.
Line 6 Blues (Hold Tap + Line 6 Drive) - This tone is based on the '65
4•8
Marshall JTM-45 Bluesbreaker but incorporates wider range tone controls. Once
you get into higher Drive settings, this Amp Model begins to transition into a
variant of the Budda Twinmaster (a high end boutique amp) for sweeter overdrive
tonality.
Line 6 Insane (Hold Tap + Line 6 Layer) - Our goal here was to provide you
with as much input gain distortion as possible short of complete meltdown. You
get ridiculous, rich tube drive to shame the distortion of pretty much any amp on
the planet (sort of like a Dual Rectifier on 10 being used as a preamp for a
Soldano), while still retaining tonal definition and character. As a result, you get
way lots of bottom end and cabinet character with tons of wide-ranging tone
shaping. Crank up the Drive control and take no prisoners!
Small Tweed #2 (Hold Tap + Small Tweed) - Modeled after a 1960 Tweed
Champ, this is a great sound when the Drive is cranked (not bad clean, either).
These amps were originally designed to be sold to beginners, but rock and rollers
quickly discovered that you could get a great distorted sound at fairly low volume
levels. Many of the classic guitar solos of the 50’s were recorded through a Champ.
The Champ had no tone control, only volume. With your POD, it’s easy to get a
classic Champ tone. Just leave all the Bass, Middle, and Treble controls parked
at 12 o’clock, which means they are “flat,” making no contribution to the tone.
Still, we’d hate to waste those things, so we figured out a way to put the Bass,
Middle, and Treble controls to work without mucking about with the
authenticity of this Amp Model. When using this Amp Model, all these tone
controls are applied after the Amp Model processing, which essentially lets you
EQ up your tone as you would do on a mixing console after recording your amp.
Remember, for the authentic emulated sound of the Champ, set all the tone
controls at 12 o’clock.
MODELED AMPS & CABS:
WHICH AMPS AND CABS ARE MODELED?
Boutique #3 (Hold Tap + Tweed Blues) - This model is based on a Budda
Twinmaster head. The Budda has a great, warm, Class A, sound. This was Budda’s
first offering. The Budda philosophy is all about power tube distortion. Simplicity
is the key. With relatively low front end gain, highly interactive tone controls, and
tube rectifier “sag” it’s great at getting a classic cranked sound for small gigs and
recording. Once again, since the Twinmaster has no mid control, we’ve added a
little bonus in the form of some post-Amp Model mid contouring available via
POD’s Middle control. As usual, set this control to 12 o’clock to get groovy with
the unadorned Budda-style vibe.
4•9
Black Panel #2 (Hold Tap + Black Panel) - The classic blackface Fender Twin
(in this case, a 1965 Twin) was a real workhorse. Everybody used it, from jazz and
country players to serious rockers. I remember seeing Johnny Winter at a concert
where both he and Rick Derringer – am I dating myself or what? – were using six
Twins stacked in a pyramid each. We were in the second balcony and it was
REALLY loud even all the way back there. The Twin has a lot of tonal flexibility
and is at home in a great many different situations. It never gets extremely
overdriven and dirty, mostly just louder; a lot louder. This is the amp for the classic
surf sound. Dial up the spring reverb, switch on the tremolo, crank up the volume,
and look out for bikinis.
Brit Class A #3 (Hold Tap + Modern Class A) - Here’s another Vox-inspired
Amp Model. This model is based on Channel 1 of a wonderful 1960 AC 15. The
sound is similar to that of the Vox AC 30s that were studied for POD’s Brit Class
A and Brit Class A #2 Amp Models, but this is a smaller amp (one, instead of two,
12" speakers) with a warmer, more “woody” sound. Once again, the original amp
had only a single tone control – a treble cut. We faithfully modeled that and then
slipped in some post-Amp Model Bass and Middle contouring. Set the Bass and
Middle in neutral (12 o’clock, or halfway up) and play with the Treble control to
get yourself some of those classic British invasion sounds.
Brit Class A #2 (Hold Tap + Brit Class A) - This Amp Model is based on the
Normal Channel of a Non Top Boost Vox AC-30. As we mentioned in reference
MODELED AMPS & CABS:
4 • 10
WHICH AMPS AND CABS ARE MODELED?
to the Vox AC 30 Top Boost, the early Vox amps were the first designed especially
for electric guitar (Hey, some early amps from other manufacturers have
Accordion inputs! Polka, anyone?), and used Class A power amp designs, rather
than the much more common Class AB type. We were lucky enough to find what
we are told was one of Bryan Adams’ favorite AC 30s for recording. Lenny Kravitz
happened to be using it the week before we began testing. It was one of the gems
in a great collection of vintage amplifiers offered for rental in Los Angeles, where
Line 6 is located. We later bought this amp, and continued to hone our emulation
of it to bring you the Amp Model it inspired in the POD. This is definitely a good
place to start to get yourself some of those classic British invasion sounds. Like the
AC 15 (above), the AC 30 NTB has only a single treble control, so POD’s Bass
and Middle controls here are set up for boost after the Amp Model processing to
add a little extra flexibility without compromising the accuracy of the model. The
12 o’clock setting on these controls is flat response.
California Crunch #1 (Hold Tap + Brit Blues) -The first of the “boutique”
amp makers was probably Mesa Boogie. Boogie made their mark in the late 70’s
and early 80’s by adding master volumes and more gain stages to amps with
Fender-style circuitry. You can hear the Fender heritage but with more “punch” in
the mids. This model is based on the Clean Channel of the classic Boogie Mark
IIc, with the enhancements of the + version of the Mark IIc circuitry design.
California Crunch #2 (Hold Tap + Brit Classic) - And this Amp Model
emulates the Drive Channel of the IIc+. Try your Santana licks here.
Boutique #1 (Hold Tap + Brit Hi Gain) - Based on the Clean Channel of the
Dumble Overdrive Special. The Dumble Overdrive Special is one of those
incredibly expensive, custom amps that most people never get a chance to actually
get close to in this lifetime. Each incarnation of the Dumble magic is a little bit
different, because each of these amps is hand built for a specific customer, and
voiced to match their playing and desires. With that in mind, we based this Amp
Model on the analysis of several different Dumble Overdrive Specials. Despite this
tuning to the individual owner, these amplifiers tend to have a number of features
in common; the clean channel is very sensitive to attack, and dynamically
MODELED AMPS & CABS:
WHICH AMPS AND CABS ARE MODELED?
responsive, and the drive channel has a thick, liquid, singing sustain that doesn’t
lose string definition when driven hard. POD’s tone controls on this Amp Model
are quite subtle, like those of the Dumble itself.
Rectified #2 (Hold Tap + Rectified) - This Amp Model is modeled after a
1995 Mesa Boogie Dual Rectifier head. As with the Tremoverb combo that was
modeled for the POD Rectified Amp Model, the Dual Rectifier was part of
Boogie’s more modern, high gain approach for that “big hair” sound. In contrast to
the earlier Boogies, the Dual Rectifier’s tone controls have more influence at high
gain settings, so you can scoop the mids and increase the bottom end.
Modern Hi Gain #2 (Hold Tap + Modern HiGain) - This sound is modeled
after a Soldano SLO – Super Lead Overdrive – head. With snake skin tolex and
everything! Unlike the X88R preamp used for the POD Modern Hi Gain Amp
Model, the SLO includes a presence control, plus other little details that give it a
bit of a different sound. With the Drive control cranked way up, you’ll get sustain
for days.... Go out’n’ave a bite – when you come back it’ll still be sustaining!
Boutique #2 (Hold Tap + Fuzz Box) - Based on the Dumble Overdrive
Special Drive Channel (just described). If you like the Dumble sound, you might
also want to check out the Line 6 Crunch model – it was created to deliver a
similar kind of tone.
Jazz Clean (Hold Tap + Tube Preamp) - This Amp Model is modeled after the
classic Roland JC-120. This transistor amp was known for a strident clean sound
and built-in stereo chorus. When using the Jazz Clean Amp Model, try cranking
up the Treble for a shimmering clean sound that’ll cut through just about any
mix. It’s also perfect for that 80’s “new wave” sound. Alternatively, try backing off
on the Treble and turn up the Bass and Middle for a darker jazz tone. It’ll give
you an essentially flat response, providing a balanced tone across the fret board for
jazz chord melodies or single-line phrasing.
4 • 11
MODELED AMPS & CABS:
WHICH AMPS AND CABS ARE MODELED?
Cabinet Models - The following Cabinet Models are available on POD,
and are accessed by holding the Tap button and turning the Effects knob:
1x8
1960 Fender Tweed Champ
1x12s
1952 Fender Tweed Deluxe
1960 Vox AC-15
1964 Fender Blackface Deluxe
4 • 12
Line 6 1x12
2x12s
1965 Fender Blackface Twin
1967 Vox AC-30
1995 Matchless Chieftain
Line 6 2x12
4x10s
1959 Fender Bassman
Line 6 4x10
4x12s
1996 Marshall with Vintage 30s
1978 Marshall with stock 70s
1968 Marshall Basketweave with Greenbacks
Line 6 4x12
No Cab
You will probably want to use this Cabinet model with the
Tube Preamp model for non-guitar sources. It is selected
by default when you pull up the Tube Preamp Amp Model.
The Cabinet Model is automatically selected by the Amp Model. You can
customize these Amp/Cabinet pairings, as described in Chapter 6.
POD EFFECTS:
DEEP EDITING
POD EFFECTS
DEEP EDITING
For tweak heads and MIDI-philes, we’ve included a handy MIDI editor/librarian
program which is made by emagic, and called SoundDiver. The program runs on
Macintosh and Windows computers, and can turn your computer into a POD
command station. It lets you take “remote control,” and do everything that can be
done from your POD’s front panel, plus a bunch of other cool stuff like saving and
swapping sounds on the computer, as well as accessing additional effect parameters
that lurk deep within the heart of POD. All the details are in the Deep Editing
& MIDI Control chapter. Once you’ve looked over the basic information below
on the POD effects, you may want to check out that chapter to find out about the
extras that a POD-computer-MIDI connection can bring you.
POD ONBOARD EFFECTS
In addition to all the great Amp Models built into POD, there are some great
sounding effects. To pick which effect you want to hear, turn the Effects 17
Knob. When you first select the Effect you want, your helpful POD will preset the
effect’s parameters so you’re instantly ready to go with a great sound (you can also
customize this effect “preset” as described in Chapter 6). You can adjust the
character of the effect you’ve chosen by tapping the Tap 20 control, and turning
the Effect Tweak 16 knob like so...
5•1
POD EFFECTS:
POD ONBOARD EFFECTS
Reverbs - Reverb 15 is the effect that makes it sound like something is in a
room. It’s basically a whole bunch of echoes smeared together to give you a sense
of sound in an ambient space. With POD, reverb is always available. You control
how much with the Reverb knob. You can also set the Reverb Decay Time by
holding the TAP button and turning the Reverb knob; this allows you to adjust
the apparent size of the reverberant space.
5•2
There are two basic reverbs in your POD; a model of a spring reverb, and a
standard digital room reverb. The reverb type is chosen when you select an Amp
Model. (You can customize this Amp Model/Reverb Type pairing as described in
Chapter 6.) Generally speaking, if the amp that inspired a given Amp Model had
a spring reverb, we give you the spring reverb. If the amp didn’t have a reverb (like
the 1968 Marshall “Plexi” which inspired the Brit Classic model), we’ve given you
the room reverb. The back cover foldout and Amp Models Appendix run down
the details on the standard pairings or the Amp Models/Reverb Types.
Compressor - A compressor “squeezes” your sound so that the softer sounds
are louder and the louder sounds won’t be too loud and jump out at you. It helps to
even out your playing, and can also be used to give increased sustain. Compression
is often expressed in ratios, like 2:1 or 5:1. The higher the ratio, the less difference
there is between your softest and loudest playing. The Effect Tweak knob will
control the compression ratio. There are 5 settings: 1.4:1, 2:1, 3:1, 6:1, and :1.
(The figure eight on its side means “infinity.” With Effect Tweak set to max, you
get infinite compression, which is the same as having a limiter.)
The compression is pre-Amp Model processing, so its like having a compressor
pedal.
POD EFFECTS:
POD ONBOARD EFFECTS
Tremolo - Modeled after the classic Fender tremolo. The Effect Tweak knob
controls the depth; Tap controls the speed. The tremolo speed will be twice as fast
as you tap (and twice as fast as the Tap light flashes), allowing you to set fast
tremolos without having to tap like a madman.
Chorus - You’ll find two different chorus sounds in POD. Chorus 1 is
modulated by a square wave, so it sounds more like a “rackmount effect” type
chorus. Chorus 2 is modulated by a sine wave with more feedback, so it has a
richer harmonic content with more movement. Chorus 2 was massaged to closely
approximate the classic tone of an old Roland CE-1 box. The Effect Tweak knob
spins you through a range of chorus settings from subtle to extreme; Tap controls
the speed of the effect. By the way, if you want to get a really slow chorus, you
have to tap really slow – try about 6 or 7 seconds between taps. And if you don’t
like that, remember that you can always set your tempo by holding down the Tap
button and then twisting the Effect Tweak knob to wherever you want to go.
Flanger - Flanging is that familiar “jet-plane” whoosh you remember from
recordings of the 70’s. Originally the effect was used rarely, mostly because engineers
had to use finger pressure on one of the tape reels so they could slow down and speed
up the tape in tiny increments to get this effect. Since the part of the tape reel they
pressed on is called the flange, you can see how the effect got its name. As soon as
someone figured out how to get this effect electronically, it was no longer rare and was
probably used a little too much for the next several years. We’ve got two flavors of
flanging available on POD, both of which closely model the tone of an old ADA
flanger stomp box. Flanger 1 is a light flange with no pre-delay, and is subtler than
Flanger 2, which is inverted, and has a deeper range (depth). The Effect Tweak knob
gives you a range of Flanger effects from just a bit to Holy Cow! Tap dials in the speed.
5•3
POD EFFECTS:
POD ONBOARD EFFECTS
Rotary - This effect simulates the effect of a mic’d, rotating high frequency
speaker horn, like on a Leslie. Listening to this effect in stereo through
headphones could cause motion sickness. Rotary speakers have two speeds: slow
and fast. We’ve set up POD’s Rotary Speaker emulation to select a fixed slow speed
if you tap slowly, and a fixed fast speed if you tap quickly. When you switch from
one speed to the other, you’ll notice that the speed doesn’t change immediately,
but gradually changes from one speed to the other, just as a real rotating speaker’s
speed would ramp from one setting to the other. The Effect Tweak knob controls
the amount of Doppler effect (pitch modulation); Tap controls the speed.
5•4
Delay - Sometimes referred to as echo or slap back. The Effect Tweak knob
controls the level; Tap controls the delay time – in other words, how far apart the
echoes are spaced from each other. When you are using quicker delay times, we
cut down the number of repeats so you can get those rockabilly and surf slap back
sounds. You can fine tune the number of delay repeats by holding the Tap button
and turning the Bass knob, set the delay level by holding the Tap button and
turning the Middle knob, and fine tune your delay time by holding the Tap
button and turning the Effect Tweak knob. By the way, we let you set the
maximum delay level high enough that your delay’s echoes can be louder than
your direct signal. You may find this handy for getting delay effect setups like U2’s
The Edge is known for.
If you’re using POD with a Floor Board or MIDI control, the delay is always
available, even when some other effect is selected. Just switch it on from the Floor
Board Delay On/Off switch, or from the Emagic Sound Diver software, or with a
MIDI Controller message (Appendix D lists MIDI Controllers).
POD EFFECTS:
POD ONBOARD EFFECTS
Noise Gate - POD includes a built-in noise gate, intended to reduce the hiss
and noise guitar systems tend to put out when you’re not playing, especially at
high gain settings (since high gain means that noise is turned up along with your
guitar sound). The Noise Gate is on when its button 19 is lit. Any time you
want to disable the noise gate, press the button so that the light turns off. Turn it
on again, and notice how the hiss magically disappears....
5•5
POD EFFECTS:
COMBINED EFFECTS
COMBINED EFFECTS
The rest of the effects are combinations of Delay and one other effect. They
should be fairly self-explanatory. Tap sets the delay speed for all these effects.
Remember that the Delay Repeats (Tap + Bass knob) and Delay Level (Tap +
Middle knob) controls are also available with all these effects. (Details are in the
Tap (HOLD) description in Chapter 2).
Delay/Compressor - Tweak controls Compression Ratio.
5•6
Delay/Tremolo - Tweak automatically controls both speed and depth to
give you a variety of Tremolos. If you want more fine control of the Tremolo, use
the Tremolo (without Delay) effect setting.
Delay/Chorus 1 - Tweak spins you through a variety of chorus settings.
Delay/Chorus 2 - Tweak spins you through a variety of chorus settings.
Delay/Flanger 1 - Tweak spins you through a variety of flanger settings.
Delay/Flanger 2 - Tweak spins you through a variety of flanger settings.
Delay/Swell - Well, here’s one we haven’t explained before. Swell is like an
automatic volume pedal that will give you a very even volume swell with each
note or chord you play. Effect Tweak controls the attack speed of the volume
swell. You can, of course, achieve a similar effect by using a Line 6 Floor Board
with POD, and riding its volume pedal, by using a MIDI pedal or other controller,
or turning the volume knob on your guitar with your the heel of your picking
hand. Or spin the Effects knob here and have POD do the job for you!
CREATING & STORING SOUNDS:
USING THE CHANNEL PROGRAM MEMORIES
CREATING & STORING SOUNDS
USING THE MANUAL MODE FEATURES
When you are using your POD in Manual Mode, all of the controls are active and
the sound of POD always reflects the knob settings. Sounds just like any ordinary
guitar amp or pedal, doesn’t it? Who says technology is threatening? You know
you’re in Manual Mode, by the way, whenever the Manual button 9 is lit (but
you probably already figured out that part). Play with the knobs until you get a
sound that you really like. At this point, you can either follow tradition and put
tiny little pieces of tape on POD or mess it all up with grease pencil to mark your
favorite settings, or you can take a bold step into new technology and save your
sound to one of POD’s memory locations. Which we’re about to tell you how to do
in the next section of the manual, appropriately titled…
USING THE CHANNEL PROGRAM MEMORIES
So, there you are with a sound that you really like – wouldn’t it be nice to be able
to call it up any time you want it? That’s simple once you have it stored into one of
the 36 POD channel memory locations. How do you do it? Just press the Save
button 21 . It will start to flash. Press the Up and Down 10 buttons and you will
see that you are switching through memory locations A, B, C, and D in each of
POD’s nine numbered banks. Pick one to store your sound in, and press that Save
button a second time. The light will stop flashing, and the sound is stored at the
location you chose, replacing the sound that was stored there before. Doesn’t get
much simpler than that. After the sound is stored, you can bring it back any old
time by simply pressing the Up and Down buttons to call up the location where
you stored it. (See Chapter 7 to learn how to do all this with your feet on the
Floor Board). If you decide that you don’t want to store the sound after you’ve got
all the lights blinking, pressing Tap or Manual or Tuner or Noise Gate or MIDI
6•1
CREATING & STORING SOUNDS:
TONETRANSFER
buttons will abandon the save. (Save mode will also be canceled if you don’t press
any buttons for 5 seconds after having pressed Save.)
TONETRANSFER
POD Sounds on the Web
6•2
Your POD gives you access to a constantly-expanding world of sounds. Visit the
ToneTransfer Web Library at www.line6.com and you’ll find a growing
collection of sounds for your POD, created by Line 6 users around the world. The
SoundDiver software included on the CD with this manual will help you store,
organize, and transfer your sounds.
Your POD Sounds Transfer to POD Pro and Flextone II
The sounds of your POD are compatible with POD, POD Pro, and the Flextone II
series amplifiers, so you can use your sounds with any of these products. Use your
POD in the studio or for practice, and then transfer your sounds to a Flextone II
amp for your gigs. For more information on POD Pro or the Flextone II series
amps, visit www.line6.com.
Swapping POD Channels With Friends
OK, so you go over to a friend’s house who also had the good taste and intelligence
to buy a POD. They’ve created this awesome sound that’s stored in the Bank 1,
Channel A location. You’ve got to have this sound so you can write the song that’s
going to make you rich, but your friend forgot to make a copy of the Sound
Programmer’s Sheet on the back of the POD manual and write down his settings.
(Perhaps we can learn a valuable lesson from this: always back up your work!) Do
you have to give up your dreams of rock and roll success and spend the rest of your
life cleaning bird cages to pay the bills? Luckily, we thought this one through in
CREATING & STORING SOUNDS:
advance. We provided you with a way to get those settings. Just press and keep
holding the Save button on your friend’s POD and turn any one of the POD’s
knobs (except the Output Level knob – that one’s not saved into programs).
Don’t worry, holding down the Save button won’t cause your settings to be altered
or cause Save Mode to be entered. Instead, you’ll notice one of the little arrows
below the Tuner button will light up. The arrow tells you which way to turn the
knob so that it will match the stored memory’s setting for that control. When the
knob position exactly matches the stored setting, the arrows will both light up.
(The Amp Model and Effects knobs don’t give you the left or right arrows on
their own; they will only light the two arrows together when you have the knob in
the right place.) After you’ve done this for every knob and noted the Tap speed,
you can write down the settings on the Programmer’s sheet, take it home, enter it
in your own POD, and write the anthem for a future (or past) generation. And be
sure to thank us in the album’s liner notes. To check that you’ve got everything
just right, once the knobs are set, you can also switch to Manual Mode and see if
the sound changes. (It shouldn’t, unless the Tap speed is different.)
If that sounds too complicated, and you have a MIDI cable handy, flip ahead to
Chapter 8: “Deep Editing & MIDI Control” to find out how to swap sounds
between two PODs with MIDI. It’s also possible to swap POD sounds on computer,
using the emagic SoundDiver software – for both Macintosh and Windows
computers – that’s included on the CD with this manual.
EDIT MODE
Alright, so let’s say you’ve got that sound you saved in one of POD’s handy
channels, and you want to add some more Bass. No problem. If you haven’t
already selected the memory you want, then go ahead and get on those Up and
Down buttons to recall the sound. Now, grab the Bass knob and crank it up. The
word “EDITED” lights up to the left of POD’s single-digit display, letting you know
that you’ve made a change to your stored channel memory, and (if you like it
EDIT MODE
6•3
CREATING & STORING SOUNDS:
CUSTOMIZING AMP MODELS & EFFECTS
better that way) you should use the Save button to save it. This is what’s called
Edit Mode since you’ve done just that: edited a stored channel. To commit your
edit to POD’s memory, press Save and it will start to flash. Press it a second time,
and the sound will be stored into the currently selected memory. If you want to
choose a different memory location for the save, then use the Up and Down
buttons once you’ve got Save flashing and pick the memory you want.
If you don’t want to save your edit, that’s OK, too – just ignore the Save button. If
you decide not to save after pressing Save, you can touch the Tap, Manual,
Tuner, Noise Gate, or MIDI button to abandon saving. Keep in mind that if
you switch to another channel without saving your edit, all your sound changes
made during that edit will be forgotten.
6•4
CUSTOMIZING AMP MODELS & EFFECTS
New with Version 2.0 software, you can customize the settings that are called up
by the Amp Models and Effects knobs. Using this powerful new feature, you can
pack your POD with all the special sound genius that only you possess, and have
this brilliance available instantly at the turn of a single knob. Here’s how it works:
About Customization Mode
Hold (and keep holding) the Save button, then press the Manual button. The
Save, Manual, A, and B lights will all start a-flashing (and you can let go of those
buttons now). You have entered the Customization Mode where you get to put your
very own stamp on the settings called up by the Amp Models and Effects knobs.
To understand how this Customization works, we’ll start with an explanation of
what happens when you turn the Amp Models and Effects knobs:
Turning the Amp Models knob picks an Amp Model, and turning the Effects
knob picks an effect, right? Actually, each of these knobs is setting a number of
parameters behind the scenes. When you pick an Amp Model, POD sets the
following controls to values determined by the Amp Models knob:
CREATING & STORING SOUNDS:
CUSTOMIZING AMP MODELS & EFFECTS
Controls affected by the Amp Models Knob
Amp Model
Cabinet Model
Drive
Drive 2 (if Amp Model is Line 6 Layer) *
Bass
Middle
Treble
Bright Switch (if available on Amp Model) *
Channel Volume
Distortion On/Off (Hold Tap, turn Drive to set)
Volume Boost On/Off (Hold Tap, Turn Channel Volume to set)
Presence Bump On/Off (Hold Tap, Turn Treble to set)
Noise Gate On/Off (Hold Tap, Turn Reverb to set)
Noise Gate Decay Time *
Reverb Type *
Reverb Decay *
Reverb Tone *
Reverb Diffusion *
Reverb Density *
Volume Pedal Location (before or after the Amp Model) *
Volume Pedal Minimum *
Wah Minimum *
Wah Maximum *
*You only get access to these extra controls via the SoundDiver software or MIDI.
In the same way, turning the Effects knob sets all the parameters related to the
effect you choose.
Customization allows you to store your own personal favorite adjustments for all
these parameters so they live on the 16 positions of the Amp Models and Effects
6•5
CREATING & STORING SOUNDS:
CUSTOMIZING AMP MODELS & EFFECTS
knobs. This way, when you turn the Amp Models knob to the Rectifier position,
you’ll get your personal Rectifier, with all the controls in the list above set for your
very own version of the Rectifier. Same thing for the Effects – your Chorus,
Tremolo, etc. is always just one knob click away.
6•6
So where is stuff going to be saved, exactly? If you’re customizing the Amp Model,
then you’ll be saving to the knob position of the selected Amp Model. For
instance, if your sound uses the Rectifier, and you do the Customized Save of the
Amp settings, you will now get those settings whenever you turn the knob to the
Rectifier position. Alternatively, if your sound uses the Small Tweed, then doing
the Customized Save will save your settings there. Your POD will choose the
correct place to store the information regardless of the present physical position of the
Amp Models encoder – so don’t worry, you can’t accidentally copy your Modern
HiGain settings to the Small Tweed position. Same deal goes for the effects; your
POD knows whether you’re using Tremolo or Rotary Speaker or whatever, and will
save to that knob position.
So what if you’re not sure which Amp Model or effect you are using right now, and
want to find out before you make your Customization? That’s easy, too:
Just press (and keep holding) the Save button and turn the Amp Models or
Effects knob. Once you have them in the right position, both the arrows for the
tuning indicator will light up. The Tap light will also light solid if your Amp
Model is part of the second “layer” of models (17-32).
So, now that you know exactly what you’re getting yourself into, lets get to it:
CREATING & STORING SOUNDS:
MEMORY RESET
Activating Customization Mode
The first thing to do is get an Amp or Effect setting that you really like and want
to store to the Amp Models or Effects knob. This amp or effect setting can come
from a factory preset, one of your own edits, a sound you downloaded off the web,
or a sound you’ve tweaked up in SoundDiver. Whatever its source, all you have to
do is get that sound into your POD so it’s active and you’re playing though it.
With that done, you’ll hold (and keep holding) the Save button, then press the
Manual button. The Save, Manual, A and B lights will all start a-flashing (and
you can let go of those buttons now). You have entered the Customization Mode. If
you use the Up/Down buttons to select A now, you will instruct your POD that
you want to save your present Amp settings to live on the Amp Models knob. If
you select B, your POD will understand that you want to save your current effects
setting to the Effects knob. And then you’ll press the Save button to finalize your
choice. Got it? Here are the steps in handy list form:
1. Get an amp or effect you love happening on your POD.
2. Hold Save, and press Manual. Save, Manual, A, and B lights flash.
3. Use Up/Down arrows to select A (Amps) or B (Effects).
4. Press Save to complete the deed.
MEMORY RESET
If, for any reason, or just for the sheer mad joy of it, you decide you need to reset
your POD’s memory to its factory-programmed state, hold down the Up and
Down buttons as you turn on the power. That’ll blow your POD’s memory and
reset it just like it was when it left the Line 6 factory.
Warning: This will erase ALL the channels, as well as the custom amp and effect
settings you might have created. So be sure and ask yourself “Do I really want to do
this?” If the answer is yes, go on ahead with your bad self.
6•7
THAT’S USING YOUR FEET:
FLOOR BOARD: THE FULL-FEATURED FOOT
THAT’S USING YOUR FEET
You really get the most out of your POD with a foot controller. Two different foot
controllers can be used: Line 6’s Floor Board and FB4.
FLOOR BOARD: THE FULL-FEATURED FOOT
CONTROLLER FOR POD
Using the Floor Board with POD lets you access many features that are not
available otherwise. This all-steel chassis, oh-so-stylish foot control wonder gives
you plenty of stuff: A volume pedal. A wah pedal with a Crybaby-style toe-down
on/off switch so you can kick the wah effect in and out. Stomp box-style on/off
control of your POD’s effects. Channel switching. Plus Tap Tempo and Tuner
control.
If you haven’t already discovered the back panel foldout, get set for a surprise. If
you have, go ahead and jump to the next paragraph. Still here? Alright – flip to
the inside back cover of this manual. Hmm, looks like the cover is all folded up.
Unfold it, and hey, presto! It’s your very own POD road map. The idea is to have
this handy pictorial reference always opened out while you’re breezing through
this manual and becoming an expert on all things POD. The boxed numbers
throughout the following text refer to the fold out illustration.
Getting Connected
So, how’s that Floor Board work, exactly? Well, the very first thing is to plug it
into your POD with the handy cable that came with your Floor Board. We
recommend you turn your POD off first, but you do whatever you feel like – it’s
your amp! Then, plug in your guitar, turn on your POD (scared you, didn’t we?)
and just press that Volume Pedal on the far right side of the Floor Board 26 all
the way forward so you can hear something.
7•1
THAT’S USING YOUR FEET:
FLOOR BOARD: THE FULL-FEATURED FOOT
TWO MODES
The first thing to know is that the Floor Board has two modes of operation:
Channel Select Mode, and Effect On/Off Mode. The Mode Select switch 23
chooses which mode you’re in.
Mine Looks Funny: Your Floor Board may look a little different than the one illustrated
on the POD manual’s fold out back cover. Older Floor Boards have the label Select
Sound instead of Channel Select. We decided to change the name to Channel Select for
this mode, since that’s, in fact, what you do with it. We changed Sound A, B, C, D to
Channel A, B, C, and D, too. However the Floor Board’s decorated, it works the same.
1. CHANNEL SELECT MODE
7•2
Let’s start with Channel Select Mode. Note the line that traces from the Mode
Select switch 23 and points to the two light-up arrows below. The top arrow
lights if you’ve selected Effect On/Off, and the bottom arrow lights if you’ve
chosen Channel Select mode. Give that Mode Select switch a kick if
necessary, and get that lower arrow (Channel Select) lit.
Banks
The two left-most stomp switches on the bottom row ( 24 on your handy back
cover foldout Floor Board diagram) are labeled Bank Down and Bank Up. A
Bank is a section of POD memory that holds four channel settings. The POD has
nine memory banks total. These memory locations come pre-loaded with some
tasty little tones created at Line 6, but you can change them into whatever you
want, and store those changes back into one of the memory locations. You know
which Bank you’ve got because the Floor Board’s display 25 will show you the
same thing as your POD.
The Floor Board notes that you can press the Bank Up & Down buttons at the same
time to switch between Preset and User Banks. This only applies to some of our guitar
amplifier products, not to POD.
THAT’S USING YOUR FEET:
FLOOR BOARD: THE FULL-FEATURED FOOT
Channel Select
So, now that we’ve got this whole Bank thing down, let’s move onto the other four
switches on the bottom row. These let you pick which of the four channels – A, B,
C, or D – you want to use in the bank you’ve selected. Pick your Bank 24 , hit
one of the Channel Select switches 28 , and you’re ready to roll.
Manual Mode
Hey, what about Manual Mode? Don’t worry – you can get there any time. Let’s
say you have a particular Channel selected. The channel’s corresponding light is
lit above its Floor Board Channel Select switch, right? OK, step on this switch a
second time and hold it for at least a second. Boom! You'll find yourself
transported directly to Manual Mode. The Floor Board display will show a zero. To
get back out of Manual Mode, press either Bank Up or Bank Down foot switch
and you’ll be switched right back to wherever you were when you entered.
7•3
Editing and Saving POD Channels with the Floor Board
The basic story on editing the programmable POD channels is in the POD
Effects Chapter. With a Floor Board you’ll find that the display 25 will show an
E (for “Edited”) whenever you’ve edited a channel. It will display an S (Save) if
you press the Save button on your POD in preparation for saving a channel. When
you decide you want to save an edited channel, you can select any of the locations
via the Floor Board as your destination. Here’s how:
1.
EDIT A CHANNEL’S SETTINGS TO YOUR LIKING.
2.
PRESS THE SAVE BUTTON ON YOUR POD.
3.
PICK THE MEMORY BANK YOU WANT TO STORE TO WITH THE BANK UP AND BANK
DOWN SWITCHES ON THE FLOOR BOARD.
4A.
ON YOUR POD, PICK THE CHANNEL MEMORY LOCATION
TO SAVE TO WITHIN THE SELECTED BANK, AND
5.
PRESS THE SAVE BUTTON TO COMMIT YOUR MASTERPIECE TO YOUR POD’S MEMORY.
(A, B, C, OR D) YOU WANT
OR,
4B.
SKIP 4A AND 5, AND JUST KICK YOUR CHOSEN FLOOR BOARD
SWITCH TWICE TO SAVE INTO THAT CHANNEL.
CHANNEL SELECT
THAT’S USING YOUR FEET:
FLOOR BOARD: THE FULL-FEATURED FOOT
Tap Tempo
Now, then, how about that handy Tap Tempo thing on your POD? Sure would be
nice to be able to change the speed of your effects without taking your hands off
your guitar, wouldn’t it? That’s what the Tap Tempo 27 foot switch is for. The
light to the left of it (you’ve already probably been entranced by it as it pulses
away), flashes just like the Tap Tempo button on your POD to let you know the
speed of your effect. To change this speed, all you’ve got to do is tap on this Tap
Tempo switch.
Tuner
7•4
Well, Tap Tempo/Tuner switch, really 27 . Hold that puppy down for a second
or more and – shazam! Instant digital chromatic tuner. All POD’s Amp Model and
effects processing are bypassed so you can hear those questionably-tuned strings
clearly, should you choose to do so. If you’d rather appear more professional, don’t
worry; the volume pedal still works. Play a note on your guitar and the Floor Board
will show you what it is in that handy display 25 . Play that string again, spin its
tuning key so it goes sharp and flat, and the six LEDs above the bottom row of
Floor Board switches give you a light show. The idea is that the LEDs to the left
light if you’re flat. The LEDs to the right light if you’re sharp. And the two LEDs
in the center will light at the same time when you’ve got it just right. Give any one
of the Floor Board’s switches a stomp and the tuner disappears just as swiftly as it
came and you’re right back to Channel Select Mode. What if you want to tune to
a different reference than A=440Hz? When you’re in the tuner mode, turn the
Middle knob on your POD while watching the display on the Floor Board. Hey, it
changes! You can set the reference frequency anywhere from 436-445Hz. This
setting is stored so you don’t have to reset it every time you turn on the amp if you
decide you want to be different (or if that piano in your rehearsal room has
decided to be different).
THAT’S USING YOUR FEET:
FLOOR BOARD: THE FULL-FEATURED FOOT
Wah Pedal
So how about that wah pedal? It’s the one on the left 26 . Get yourself planted
with your foot on there nice and comfortable. Now, press down with your toes, let
go, and do it again. You should see a little light turning on and off to the left of the
wah pedal. When the light’s on, the wah’s on. When the light’s off, the wah’s off.
Neat. Incidentally, the POD wah is modeled after a late 60’s Vox wah, with plenty
of “growl” in the heel back position. Now then, turn the wah light on, switch to
the Black Panel Amp Model, set your Drive to about 5, and do a little fast rhythm
playing while you rock back and forth to the beat on that pedal. Hang a disco ball,
unbutton your shirt to your navel (assuming you don’t have it that way all the
time), hang some gold chains around your neck, and get ready to party! You can
do subtle things with the wah pedal too, like turning it on just a tiny bit and
leaving it there, just barely caressing your sound. But then, that’s not as much fun
as playing the theme to “Shaft,” is it?
Volume Pedal
Not nearly as fun as the wah pedal, but arguably more useful (and it doesn’t
require you to have Very Large Hair to use it convincingly). Put your foot up on
that thing 26 . It’s the one on the far right. Press the volume pedal forward with
your toes for loud, and back with your heel for quiet. The volume pedal is tapered
for a very musical swell. It starts out slow and then gets faster as you move your toe
down, very much like an Ernie Ball volume pedal.
Many guitarists used to switch potentiometers in their volume pedal if they
wanted to gradually swell an extremely overdriven tone. POD is hip enough to
know about this. When you select a low gain Amp model (to the left-hand side of
the 16-position switch), POD automatically chooses the normal volume pedal
taper and sets up the volume pedal to control the guitar’s volume before the
preamp. Then, when you select a high-gain amp type, your POD changes the taper
and re-patches the volume pedal location to be post-preamp, as this is the more
valuable position for a volume pedal with this kind of amplifier tone. With the
SoundDiver software, you can change the Volume Pedal position & tapers as you
like with any Amp Model.
7•5
THAT’S USING YOUR FEET:
FLOOR BOARD: THE FULL-FEATURED FOOT
2. EFFECT ON/OFF MODE
Alright. So that wah pedal was pretty fun, but now you want to get down to some
business with the rest of your POD effects. This is where we get to light up that top
arrow of the pair that the Mode Select switch points to. Press the Mode Select
switch 23 to get that arrow lit.
Now, notice that the six stomp switches that we were using for the Channel Select
Mode also have an alternative set of labels. This top row reads Distortion, Drive,
EQ, Trem/Chorus, Delay, and Reverb (but you’re already seeing that on the
handy fold out illustration and on the Floor Board itself, right? OK, just
checking.... And you sent in your registration card, right? It always makes us really
happy to get those things).
The light above a stomp switch will be on if the effect that it controls is on. The
light will be off if the effect it controls is off. There goes that easy to use
technology again.
7•6
Distortion
The Distortion on/off switch works kinda like a distortion pedal with the
distortion control set low and the output level cranked. With a distortion pedal,
you kick the Distortion on, and your sound is more distorted. You kick it off, and
your sound is less distorted. Same thing here. What this does in actuality is
increase the drive of your POD, so you’re hitting the Amp Model a little harder on
the input. Distortion always can add more Drive to your sound, even if the Drive
12 knob is already crammed up to max. Thus, finally, you can get everything
turned up louder than everything else.
Drive/Boost
Depending on when you buy your Floor Board, you may find that the Drive/
Boost switch is just labeled Drive instead. What gives? While the switch does
control Drive on our older AxSys 212 Digital Guitar Amplification Systems, for
our later products (like POD) it’s actually set up to give you a volume boost. Our
users asked us to put in this capability – an easy to use volume boost/cut control –
so here it is. The idea is that you can use this for a “lead boost” when you want to
get a bit of extra volume and jump out over the band, or a “rhythm cut” when you
THAT’S USING YOUR FEET:
FLOOR BOARD: THE FULL-FEATURED FOOT
want to drop your volume back a bit – like when you switch from lead to rhythm
parts. With Drive/Boost on (the light is lit at the Floor Board), you’re getting the
full, boosted volume. With Drive/Boost off, your volume is backed off a bit. In
light of all this good stuff, newer Floor Boards label this control Drive/Boost. Of
course, we fully expect that those “vintage” Floor Boards will be highly prized in
the future because of this.
EQ
The EQ on/off switch will kick in a presence boost of 6-9 dB, depending on which
amp model is chosen. The abbreviation “dB” stands for decibels, a measure of
sound volume. A “presence boost of 6-9 dB” is just a fancy way of saying your
sound gets a bit brighter. In keeping with our attention to amp tone detail, the
frequency range covered by the presence boost varies according to how the
original amp that we modeled had its presence circuitry set up.
7•7
Tremolo/Chorus
The Trem/Chorus on/off switch lets you kick your tremolo and pitch mangling
effects (it says chorus, but it’s really chorus, flanger, tremolo or rotary speaker) on
and off. Light on, effect on. Light off, effect off.
Delay
The Delay on/off switch turns your Delay effects on – light on. Or off – light off.
Reverb
Bet you can guess this one already. Light on – reverb-o-rama. Light off – bone dry.
THAT’S USING YOUR FEET:
FLOOR BOARD: THE FULL-FEATURED FOOT
Effect On/Off Settings Stored With Programmed
Channels
7•8
OK, this part’s mostly for the people who fret about all the little details that make
other people think, “Wow, you’re way too concerned about all the little details!”
What happens if you turn some of these handy effects off and on and then you
save your sound into one of your POD memories? The effect on/off status gets
stored, too. Cool. Now, what happens when you decide to head over to your
friends’ house to show them how cool your POD is, and you jump on your bike,
and decide taking the Floor Board along is too much hassle, so you leave it behind,
pump the pedals with your POD bouncing along in its attractive Line 6 carry bag,
strut into your friends’ place trying not to look like you’re out of breath, plug in
your POD, recall your FAVORITE sound from the handy channel select buttons,
go to play that incredibly classic-sounding Ultimate Tremolo tone that you know
is going to have your friends turning pale and quivery with envy, even if they do
think you're too concerned about all the little details, and then it hits you – you
turned the tremolo off from the Floor Board and stored the channel like that. Feel
foolish, don’t you? Let that be a lesson – never leave your Floor Board behind.
Especially when there are friends to impress. But we hate to see you suffer. So
here’s how to save your bacon: just grab the Effect Tweak 16 knob and give it a
spin. Magically, your tremolo is back to make you a hero once again. That’s
because a particular effect’s on/off status is overridden if you tweak that effect’s
setting. So Tremolo/Chorus on/off comes on when you move the Effect Tweak
knob to change your Tremolo, Chorus, Flanger, or Rotary Speaker setting. Ditto if
it’s Drive or Delay or Reverb. But only if the Floor Board’s not connected. See? A
bunch of little details. Getting a headache, aren’t you? The important thing is, if
you save channels with effects on or off and then you don’t have your Floor Board,
no worries – we’ve made sure it doesn’t cause you problems. That’s it for the Floor
Board section. Fun, wasn’t it?
By the way, if you don’t have your Floor Board handy, and want to set the EQ
(Presence), Distortion, or Drive/Boost on/off functions, you can do it by holding
Tap and turning the Treble, Chan Vol, and Drive knobs, respectively. The
details are in Chapter 2’s discussion of the Tap control.
THAT’S USING YOUR FEET:
FB4: SIMPLE FOOT CONTROL FOR POD
The FB4 gives you basic control over channel switching with POD. We tried to
make it as simple as possible. Turn off your POD. Connect the FB4 to your POD
with the thoughtfully-included connection cable. Turn on your POD. Select
Channel A, B, C, or D by pressing the appropriate button on the FB4. The
channel’s light will be lit to indicate that the channel is selected. If you press and
hold down the button below the light for about a second, your POD will switch to
Manual Mode. If you tap the button below the light two (or more) times, it will
set the Tap Tempo speed. And finally, if you unplug the FB4 from your POD and
tap on one of its switches, nothing will happen.
Note: The FB4 is always selecting sounds from the currently chosen POD Bank. Use
the Up/Down arrows on your POD to select a different bank.
7•9
Deep Editing & MIDI Control:
MIDI BASICS
DEEP EDITING & MIDI CONTROL
MIDI BASICS
What’s MIDI?
MIDI (Musical Instrument Digital Interface) is a communications protocol
designed to let various music-making machines exchange information. It allows
one device to control another, and several devices to all be used together in
coordination.
In/Out
POD has two MIDI connections: In & Out. You connect POD to other MIDI
devices by connecting MIDI cables to these connections. Each connection is a
one-way street: information flows from the OUT of one device to the IN of
another device. To allow information to flow back, you must connect a second
cable, from IN to OUT.
8•1
Deep Editing & MIDI Control:
MIDI BASICS
MIDI Channel
MIDI allows 16 different channels of information to be transmitted and received
through one MIDI cable. The MIDI channel is independent of, and has nothing
to do with, POD’s channels for storing individual sound programs.
You tune POD in to listen to a particular MIDI channel (like choosing a channel
on a TV or a station on a radio), and make sure the device that you want POD to
listen to is transmitting on that same MIDI Channel. To set POD’s MIDI channel,
press the MIDI button (which will light up). The single-digit display will show
you the channel POD is currently tuned in to. Use the Up and Down arrows to
select a different MIDI channel. POD will display channels 10–16 by lighting up
the decimal point to the right of the single digit. So “2.” means channel 12.
You can also set POD to listen to all channels (Omni mode) by selecting A (A for
all) for the MIDI channel. When in Omni mode, POD will transmit on MIDI
channel 1.
8•2
MIDI Messages
MIDI allows several different kinds of messages, each with a different purpose:
MIDI Program Changes - Program change messages tell a device to switch from
one sound or setup to another. With POD, program changes change from one
channel to another. So, for instance, when POD receives program change number
1, it will select Bank 1, Channel A. When it gets program change number 2, it will
select Bank 1, Channel B. And so on, as the chart in Appendix C shows.
MIDI Controllers - MIDI controller messages allow you to control a device’s
parameters in real time. So, for instance, you can use a MIDI controller to vary the
setting the of the POD Drive control, or the Reverb level. Each of POD’s
parameters are mapped to a MIDI controller, so you can take full control of your
POD. The chart in Appendix D lists each POD parameter, the controller
assigned to it, and how that controller affects POD. Note that the wah and
Deep Editing & MIDI Control:
MIDI BASICS
volume pedals of the Floor Board also transmit MIDI controller messages via MIDI
when used with your POD. To minimize “zipper” noise when controlling
parameter changes via MIDI, try making gradual, rather than sudden
changes to POD settings.
MIDI Sysex Commands - Sysex stands for “System Exclusive.” Sysex
commands are special commands that only a particular device understands – they
are ‘exclusive’ to that device – as opposed to the more generic kind of program,
controller, and other messages that almost all MIDI devices understand. POD uses
Sysex to transmit the sounds that are programmed in its memory to another
device, or to receive new sounds from another device. This exchange of data is
typically called a “dump.” The emagic SoundDiver software included on your
POD Tools CD uses Sysex commands to dump POD programs to your computer
for backup and editing, and to send programs from your computer to POD. You
can also have your POD exchange sounds with a POD, POD Pro, or Flextone II
series amplifier via Sysex directly, by hooking one to the other with a MIDI cable.
The following sections tell you how all this works.
8•3
Deep Editing & MIDI Control:
POD / POD PRO / FLEXTONE II TONETRANSFER VIA MIDI
POD / POD PRO / FLEXTONE II
TONETRANSFER VIA MIDI
If you just want to transfer sounds directly from POD to POD, or between a POD
and a Flextone II or POD Pro, follow the directions below. You’ll need a standard
MIDI cable to do the deed. Connect the MIDI OUT of the transmitting device
(POD, POD Pro, or Flextone II) to the MIDI IN of the receiving device.
Transferring All Sounds - To overwrite all sounds in the receiving device with
the sounds in the transmitting device:
POD or POD Pro is transmitting: make sure that the MIDI button is lit
up, and press the Save button. The POD’s single digit display will say “A”
which means send All sounds via MIDI, and the Save button will flash as if to
say, “press me again to start sending.” If you do press Save a second time, the
entire memory of the transmitting POD will be dumped into the brain of the
receiving POD, making one a virtual clone of the other. Pressing any other
button on the transmitting POD will abort the transfer, saving the receiving
POD/Flextone II/POD Pro from the big brainwash.
8•4
Flextone II is transmitting: (These instructions are also printed on the back of
the Flextone II near the MIDI jacks.) Hold the Save button and then press the
Manual button. The Channel A, B, C, D lights will flash on the Flextone II.
Press and release D button, then press Save. The entire memory of the
transmitting Flextone II will be dumped into the brain of the receiving POD,
so the POD now has all the same sounds as the Flextone II. Pressing any other
button on the transmitting Flextone II will abort the transfer, saving the
receiving POD from the big brainwash.
Transferring Only Some Sounds - To transfer only one or more individual
sounds from one POD to another, here’s the procedure:
POD or POD Pro is transmitting: Start by having POD in normal
operating mode (no MIDI button lit), and selecting the sound you want to
transfer. You can make edits to it if you like; the POD is about to transfer
whatever settings you make active. So, once you’ve got the sound you want,
press MIDI. Now press Save. Use the Up button to change from “A” to “1”
Deep Editing & MIDI Control:
POD / POD PRO / FLEXTONE II TONETRANSFER VIA MIDI
which means you only want to transfer ONE sound to the receiving POD.
Press Save again to make the transfer, or press anything else to abort. One last
important step: the receiving POD/POD Pro will now have its Edited light
lit, or if its a Flextone, its Save light will be flashing. In either case, the sound
you transferred is waiting to be stored into a memory location. You must press
Save on the receiving POD/POD Pro/Flextone II, choose a destination, and
then press Save again to confirm that you really want that transferred sound
to get stored at that location in the receiving POD/POD Pro/Flextone II.
Flextone II is transmitting: (These instructions are also printed on the back of
the Flextone II near the MIDI jacks.) Hold the Save button and then press the
Manual button. The Channel A, B, C, D lights will flash on the Flextone II.
Press and release C button, then press Save again to make the transfer, or
press anything else to abort. One last important step: the receiving POD will
now have its Edited light lit and has the sound you transferred waiting to be
stored into a memory location. You must press Save on the receiving POD,
choose a destination, and then press Save again to confirm that you really
want that transferred sound to get stored at that location in the receiving
POD’s memory.
8•5
Deep Editing & MIDI Control:
BACKING UP POD PROGRAMS TO OTHER DEVICES
It’s recommended that you backup the sounds programmed into your POD so that
you can restore them in case of some future disaster. If you want to transfer sounds
from POD to some other MIDI device for backup (like say a MIDI file player or a
hardware sequencer or keyboard workstation), things work pretty much the same
way as they do for POD-to-POD transfers. But we’ll spell it out anyway. You’ll
need a standard MIDI cable to get everybody talking.
Connect the MIDI OUT of your POD to the MIDI IN of the receiving MIDI
devices. Press the MIDI button on POD and check to see what MIDI channel it is
set to. Use the Up and Down buttons to set it to the same channel that your
MIDI device is expecting to receive on. Or alternatively, change your other MIDI
device to match the POD MIDI channel – whichever ya wanna do is just fine, so
long as they both end up talking on the same MIDI Channel.
8•6
Transferring All Sounds - To dump all the programmed sounds from POD to
your MIDI recorder, make sure that the POD MIDI button is lit up, and press the
POD SAVE button. The POD’s single digit display will say “A” which means send
All sounds via MIDI, and the Save button will flash as if to say, “press me again to
start sending.” Start your MIDI recorder. Now, if you do press Save a second time,
the entire memory of your POD will be dumped to the receiving MIDI device.
Pressing any other button on POD will abort the transfer. You also probably have
to press STOP on your MIDI recorder once the transfer is complete.
Transferring Only Some Sounds - To transfer only one or more individual
sounds from POD to your MIDI recorder, here’s the procedure. Start by having
POD in normal operating mode (no MIDI button lit), and selecting the sound you
want to transfer. You can make edits to it if you like; the POD is about to transfer
whatever settings you make active. So, once you’ve got the sound you want, press
MIDI. Now press Save. Use the Up button to change from “A” to “1” which
means you only want to transfer ONE sound to the receiving MIDI recorder. Start
the MIDI recorder going, and then press Save again to make the transfer, or press
anything else to abort. Then you probably have to press STOP on your MIDI
recorder. If you want to send another single sound, select it on your POD, and
press MIDI, then Save, then Up. Set your recorder to receive again. Press Save
on POD to execute the dump. And press STOP on your MIDI recorder.
Deep Editing & MIDI Control:
EMAGIC SOUNDDIVER SOFTWARE
The Emagic SoundDiver software included on your POD Tools CD is an editor/
librarian program that turns your computer into a POD control station. Check
http://www.line6.com for the latest update for this software. SoundDiver lets
you store POD sounds on your computer and edit POD sounds on-screen, with
access to extra parameters not available when using POD on its own. Included on
the CD are installation instructions and an electronic user guide. Please refer to
them for instruction, and for information on Emagic’s technical support services.
You will need to have a MIDI interface for your computer in order to use the
SoundDiver software. Emagic makes interfaces, as well as a line of software and
hardware for music recording that you should check out for use with your POD.
See the Step-By-Step with SoundDiver section later in this chapter for an
introduction to using the SoundDiver software, as well as the SoundDiver
Troubleshooting section.
8•7
Emagic can be reached in the U.S. by phone at (530) 477-1051, or at their
German headquarters: +49 4101 495-0. They’re also on the internet at
http://www.emagic.de, and can be emailed at [email protected] – U.S. customers
note that the web and email addresses are “.de” not “.com” because Emagic is
headquartered in Germany. A list of Emagic distributors is under the Apple Menu
in the SoundDiver Macintosh software Mac. If you’re using Windows, this list is
available from the Welcome Window when you start up SoundDiver, or from the
Help Menu > Emagic Distributors....
MIDI interfaces are also made by Mark of the Unicorn (www.motu.com), MIDI
Man (www.midiman.com) and others.
Deep Editing & MIDI Control:
OTHER THINGS YOU CAN DO WITH MIDI
In addition to using the Emagic SoundDiver software on the POD Tools CD to
edit and store POD sounds, or using a MIDI connection for ToneTransfer between
a POD, POD Pro, and Flextone II, MIDI also gives you what you need for:
Changing POD Channels with MIDI Program Changes
The most basic thing to do with POD via MIDI is change channels. You may have
a foot controller or other device that sends MIDI program change messages. Hook
its MIDI OUT to POD’s MIDI IN, set the MIDI Channels of both devices to be
the same, and refer to the chart in Appendix C to see what program number on
the foot controller will select which POD Channel. Note that both Manual Mode
and the Tuner can be selected with MIDI Program Change messages. You can also
send MIDI Program change messages to POD from a MIDI sequencer to allow you
to change POD sounds automatically in sync with your sequences. To minimize
“zipper” noise when controlling parameter changes via MIDI, try
making gradual, rather than sudden changes to POD settings.
8•8
Tweaking POD Tones with MIDI Controllers
If you have a hardware MIDI “fader box,” assignable MIDI controllers on a
keyboard, or a stand-alone or computer software-based MIDI sequencer, you can
take control of any POD parameter via MIDI. The chart in Appendix D lists
which POD parameter is controlled by which MIDI Controller. Remember to
make sure that the MIDI Channels have been set properly when first setting up
your POD with the gear that will control it.
Full MIDI Automation of POD
When you use POD with a MIDI sequencer, you can automate any POD
parameter using MIDI Controller messages. This allows POD to give you the same
kind of capabilities as Line 6’s acclaimed Amp Farm software plug-in software for
Pro Tools TDM systems, without the Pro Tools system!
Deep Editing & MIDI Control:
OTHER THINGS YOU CAN DO WITH MIDI
The POD front panel knobs all send out appropriate MIDI controllers (as do the
wah and volume pedals of the optional Floor Board foot controller) that you can
record into a MIDI track as you play through your POD along with a MIDI
sequence. Follow the Return to Sender hook up instructions in Chapter 3 to set
up your audio.
Hook your POD’s MIDI OUT to a MIDI IN on your sequencing setup. Hook a
sequencer MIDI OUT to POD’s MIDI IN, and make sure POD and your sequencer
are set to the same MIDI Channel.
To allow MIDI-controlled automation, you need to set up a MIDI track in your
sequencer to record the data flowing from POD’s MIDI OUT. Set up a MIDI track
to receive POD’s MIDI output, record-enable it, and start the sequencer recording.
Slowly turn POD’s Drive knob all the way up and then all the way down as your
sequencer records, and then stop your sequencer. Now, look at the data that’s been
recorded into the POD MIDI track on your sequencer. You’ll see that you’ve
recorded MIDI controller #13 messages. This is the controller that’s assigned to
POD’s Drive parameter. Play back the recorded MIDI track as you play through
POD (or play back recorded direct guitar audio through POD), and you’ll hear the
Drive changes that you recorded into your MIDI track.
To automate POD parameters that aren’t accessible from front panel controls (like
the Reverb Tone), you need to use a hardware MIDI controller, or setup an onscreen fader or other controller on your software MIDI sequencer to transmit the
correct MIDI Controller number on POD’s MIDI Channel.
To minimize “zipper” noise when controlling parameter changes via
MIDI, try making gradual, rather than sudden changes to POD settings.
8•9
Deep Editing & MIDI Control:
STEP-BY-STEP WITH SOUNDDIVER
Step 1 - Hook your POD up to your computer’s MIDI interface. Use both the MIDI
IN and MIDI OUT connections for bi-directional communication (so POD can talk
to your computer, and the computer can talk to POD). Remember that POD’s OUT
connects to the computer’s IN, and the computer’s OUT connects to POD’s IN. Make
sure POD is powered on.
Step 2 - Install the SoundDiver software on your computer. We’ve included
SoundDiver installers on the accompanying CD. We also strongly recommend that
you surf the Support pages at www.line6.com to check for an updated version of the
SoundDiver installer. Run the SoundDiver installer to get SoundDiver installed on
your machine. Now, with your POD hooked up to the computer via MIDI and
powered on, launch the newly-installed SoundDiver software.
8•10
Step 3 - First you’ll see the “splash screen” with Emagic’s contact info, including
information on upgrading to the full version of the SoundDiver software. You’ll then
get a dialogue box to select English or German (SoundDiver is made by Emagic, a
German company).
Step 4 (Macintosh) - Then you’ll configure your ports; make sure you are plugged
into the right port on your mac (Modem, Printer, or USB) and that you’ve checked
the box for this port before hitting the OK button in the Preferences dialogue box.
Step 4 (Windows) - SoundDiver will now probably give you a series of dialogue
boxes to OK regarding MIDI ports. These will say something like “Port XXXX no
longer exists,” and will include an OK button. Typically, you’ll get two dialogues
referring to SoundBlaster ports, and eight referring to Unitor ports (the Unitor is a
particular MIDI interface). Go ahead and OK all these dialogue boxes, and then
SoundDiver should give you the dialogue box we’re about to describe in step 5....
Deep Editing & MIDI Control:
STEP-BY-STEP WITH SOUNDDIVER
Step 5 - SoundDiver should now establish communication with your POD (like we
said above, make sure you have both MIDI In and MIDI Out connected to allow this),
and will give you a dialogue box asking if you’d like to “Request Device’s Memories?”
OK this dialogue, and SoundDiver sucks all the sounds out of your POD, and opens
them in a window titled “POD” or something similarly inventive.
Step 6 - You’ll have a window that looks about
like the one on the left.
Use your mouse to move your on-screen arrow
pointer to the User Programs header bar as
shown, and click once. The list of all 32 user
memories will then be highlighted to show that
they are all selected (clicking on the header bar
is a handy “select all user memories” command).
8•11
Step 7 (Macintosh) - Now, notice that there are two menus in this window: Entry
and Options. From the Entry menu, choose Save as... > Selected Entries, as
shown below:
Deep Editing & MIDI Control:
STEP-BY-STEP WITH SOUNDDIVER
SoundDiver will give you a standard Save File dialogue box. A pop-up menu at the top
of the dialogue box will say “Libraries,” letting you know you are about to save your
library to the SoundDiver Libraries folder.
You can click on this “Libraries” pop-up menu to navigate to another place if you want
to save this library file some place else. You can also change the name of your library
by typing one here (we recommend something like “POD Factory Sounds”), and then
you complete the Save by clicking Save.
8•12
Step 7 (Windows) - On Windows, the Entry menu is at the top of the screen with
File and the rest of ’em. From it, choose Save as... > Selected Entries. SoundDiver
will give you a standard Save File dialogue box. The SoundDiver software’s Libraries
folder has been automatically selected for you as the destination for your library file.
You can change the name of your library by typing one here (we recommend
something like “POD Factory Sounds”), and then complete the Save by clicking the
Save button.
Deep Editing & MIDI Control:
STEP-BY-STEP WITH SOUNDDIVER
Step 8 - As a final check to make sure
everything went as it should, choose Open
from the File menu, and open the library
you just saved. You should see a window
similar to the one at the left, listing all 36
of your POD’s memories.
Congratulations! You’ve now backed up
the memory of your POD, and gotten
started with SoundDiver’s library features
in the process!
8•13
Deep Editing & MIDI Control:
STEP-BY-STEP WITH SOUNDDIVER
A Few Other SoundDiver Tips
We’re done with the tutorial on how to save your sounds to the computer, but we
figured we should give you one or two other tips:
Editing a Channel Memory/Program The SoundDiver window shown on the left
shows you the contents of your POD’s memory (a
Bass POD, actually, but let’s not be picky).
To edit any one of your POD’s channel memories
(SoundDiver calls these “User Programs”), just
double-click its name in the list, and you’ll get an
editing window.
8•14
Transmit/Request The “Transmit” and “Receive” commands are
available in SoundDiver’s MIDI menu. These
commands instruct SoundDiver to Transmit
or Receive information to your POD, based
on what youhave selected in SoundDiver. So,
for instance., if you click on one of the
channels/programs in the name list of the
window above, and then choose the
Transmit command, SoundDiver will
understand you want to Transmit this sound to your POD (in other words, the
parameters that define the sound are sent from the computer to POD, so now they
both have the same information – what was in the computer has been copied to
the POD as well). If you clicked on one of the names in the list, and then chose
Request, that would instruct SoundDiver to Request this sound from your POD (in
other words, the parameters that define the sound are sent from POD to the
computer, so now they both have the same information – what was in POD has
been copied to the computer as well).
Keep these commands in mind any time your POD and computer don’t seem to be
dealing with the same information; you can use Transmit and Request to get your
POD and computer back in sync.
Deep Editing & MIDI Control:
SOUNDDIVER SETUP TROUBLE-SHOOTING
There are a couple of considerations with SoundDiver and Windows sound card systems.
Here are some troubleshooting hints, courtesy of Line 6’s own product support hero,
George Van Wagner:
1. SoundBlaster type cards have more than one MIDI driver. The system will
usually default to the driver for the built-in synth on the card, rather than the
external MIDI port. This means that you must select the correct driver, before
SoundDiver can see the POD.
2. MIDI cables must run from out to in and vice versa (don’t connect POD’s MIDI
In to your computer’s MIDI In; connect POD’s MIDI In to your computer’s MIDI
Out). Think of it in terms of the direction that information is flowing; out of the
POD in to the computer. Out of the computer in to the POD.
3. MIDI channels must be set to the same value. The quickest way to ensure
communication is to simply set the POD MIDI Channel to A for all (In MIDI-ese,
this is known as Omni mode).
Here are some basic steps to ensure communication with the POD:
1. When you get the dialog box stating that no new device is found, click on the
button that says Manually. You will be dropped in the Memory Manager window
of SoundDiver.
2. On the left hand side of the Memory Manager window, you will see a list of
parameters. Make sure that the Out Port is set to the driver for the External
MIDI. As different companies have different driver names, there's no one set
name, but the selection should be fairly obvious.
8•15
Deep Editing & MIDI Control:
SOUNDDIVER SETUP TROUBLE-SHOOTING
3. Make sure that the Device ID is set to 1.
4. On the right hand side of the Memory Manager, click on the title bar that says
User Programs. This will highlight all 36 of the user preset locations that are
currently blank.
5. Now click on the left-most icon in the upper left of the Memory Manager. It
should look like a little keyboard with an arrow coming out of it and a small
question mark. This requests the current programs from the POD. At this point,
you should see all the patch names fill in, and you’re good to go.
8•16
APPENDIX A: AMP MODELS
Please note that Fender, Marshall, Vox, Boogie, Soldano, Roland, Matchless, Budda, Arbiter, and other amplifier model
designations, and effects, are all trademarks of their respective owners, which are in no way associated or affiliated with
Line 6. These marks and names are used solely for the purpose of describing certain amplifier tones produced using Line 6’s
modeling technology. The Line 6 modeling technology provides POD with a wide variety of sounds and effects modeled
after some of the most popular sounds of the classic amps and effects mentioned here.
Amp Model Name
Based On
Volume
Pedal
Position
Reverb
Type
Bright
Switch
Tube Preamp
Line 6 Clean
Line 6 Crunch
Line 6 Drive
Line 6 Layer
Small Tweed
Tweed Blues
Black Panel
Modern Class A
Brit Class A
Brit Blues
Brit Classic
Brit Hi Gain
Rectified
Modern Hi Gain
Fuzz Box
Line 6 Twang
Line 6 Crunch #2
Line 6 Blues
Line 6 Insane
Small Tweed #2
Boutique #3
Black Panel #2
Brit Class A #3
Brit Class A #2
California Crunch #1
California Crunch #2
Boutique #1
Rectified #2
Modern Hi Gain #2
Boutique #2
Jazz Clean
Tube Instrument Preamp
Line 6 21st Century Clean
Line 6 Thick Grindage
Line 6 Industrial Strength OD
Line 6 Clean meets Psychotic Drive
’52 Fender Deluxe
’59 Fender Bassman
’65 Fender Deluxe
’96 Matchless Chieftain
’63 Vox AC 30 with Top Boost
’65 Marshall JTM-45
’68 Marshall Plexi 50 watt
’90 Marshall JCM-800
’94 Mesa Boogie Dual Rectifier Tremoverb Combo
’89 Soldano X88R Preamp
’60’s Dallas Arbiter Fuzz Face
Fender Deluxe and Bassman, with more tone control range
’68 Marshall Plexi 50 watt with more tone control range
Marshall JTM-45 meets Budda Twinmaster meets Line 6
Way too many hours of shredding
’60 Tweed Fender Champ
Budda Twinmaster head
’65 Blackface Fender Twin
’60 Vox AC 15
’60 Vox AC 30 non-Top Boost
’85 Mesa Boogie Mark IIc+ Clean Channel
’85 Mesa Boogie Mark IIc+ Drive Channel
Dumble Overdrive Special Clean Channel
’95 Mesa Boogie Dual Rectifier Head
’89 Soldano SLO Super Lead Overdrive
Dumble Overdrive Special Drive Channel
’87 Roland JC-120
Post
Pre
Pre
Post
Post
Pre
Pre
Pre
Pre
Pre
Pre
Pre
Post
Post
Post
Post
Pre
Pre
Pre
Post
Pre
Pre
Pre
Pre
Pre
Pre
Post
Pre
Post
Post
Post
Pre
Room
Room
Spring
Room
Room
Room
Spring
Spring
Spring
Room
Room
Room
Room
Room
Room
Room
Spring
Room
Room
Room
Room
Room
Spring
Room
Room
Spring
Spring
Room
Room
Room
Room
Spring
No
Yes
Yes
Yes
Yes
No
No
No
No
No
Yes
No
No
No
No
No
No
No
No
No
No
No
Yes
No
No
Yes
No
No
No
No
No
Yes
APPENDIX B: EFFECT PARAMETERS
Effect
Tap
Tweak
Notes
Bypass
n/a
n/a
Turns off the effects.
Compressor
n/a
Ratio
There are 5 Compressor ratios: 1.4:1, 2:1, 3:1, 6:1, and
Higher settings “squeeze” your volume more.
Tremolo
Tremolo Speed
Depth
The tremolo was designed with the characteristic Fender
tremolo shape.
Chorus 1
Chorus Speed
Range of
Choruses
Square wave LFO, “rack” type chorus setup; subtler than
Chorus 2.
Chorus 2
Chorus Speed
Range of
Choruses
Sine wave LFO, approximately 10% feedback; emulates an old
Roland CE-1 for classic stomp box-type sound.
Flanger 1
Flanger Speed
Range of
Flangers
Light flange.
Flanger 2
Flanger Speed
Range of
Flangers
Heavier flange; inverted, and with deeper range.
Rotary Speaker
Rotary Speed
Depth
This emulates a classic spinning speaker, a la the Leslie.
Delay
Delay Speed
Delay Level
Very quick delays will have no repeats for better slapback.
Delay/
Compressor
Delay Speed
Compression
Ratio
There are 5 Compressor ratios: 1.4:1, 2:1, 3:1, 6:1, and
Higher settings “squeeze” your volume more.
Delay/Tremolo
Delay Speed
Range of
Tremolos
The delay speed is set for a short slapback (100 ms).
Delay/
Chorus 1
Delay Speed
Range of
Choruses
Chorus 1 uses a Square wave LFO, no feedback. This is the
“rack” type chorus setup.
Delay/
Chorus 2
Delay Speed
Range of
Choruses
Chorus 2 uses a Sine wave LFO, approximately 10%
feedback. This emulates an old Roland CE-1 for classic stomp
box chorus sound.
Delay/Flanger 1
Delay Speed
Range of
Flangers
Light flange.
Delay/Flanger 2
Delay Speed
Range of
Flangers
Heavier flange; inverted, and with deeper range.
Delay/Swell
Delay Speed
Swell Attack
Speed
Automatic volume pedal swells... Swell is a slow ramp-up, or
swell of volume when you play each note.
:1.
:1.
APPENDIX C: MIDI PROGRAM CHANGES
POD channels can be selected via MIDI program changes. Some devices number
programs starting at zero. Some start at one. We start at zero (Manual Mode)
and then work our way along through the stored channels as shown in this table:
POD Channel
Bank 1
Channel A
Channel B
Channel C
Channel D
Bank 2
Channel A
Channel B
Channel C
Channel D
Bank 3
Channel A
Channel B
Channel C
Channel D
Bank 4
Channel A
Channel B
Channel C
Channel D
Bank 5
Channel A
Channel B
Channel C
Channel D
MIDI Program
01
02
03
04
05
06
07
08
09
10
11
12
13
14
15
16
17
18
19
20
POD Channel
Bank 6
Channel A
Channel B
Channel C
Channel D
Bank 7
Channel A
Channel B
Channel C
Channel D
Bank 8
Channel A
Channel B
Channel C
Channel D
Bank 9
Channel A
Channel B
Channel C
Channel D
Manual Mode
Tuner
MIDI Program
21
22
23
24
25
26
27
28
29
30
31
32
33
34
35
36
00
37
APPENDIX D: MIDI CONTROLS
Sound Diver
Parameters
(1 of 3 pages)
Transmitted MIDI
Range
Control
#
Selects Amp Model
0-15 transmitted from
Amp Model knob
12
0 = Tube Preamp,
1-32 = Other Amp Models
>32 treated as 32
Drive
-
0-127
13
0-127
Drive 2 (only if
Amp Type = Layer)
-
NO TRANSMIT
20
0-127
Bass
-
0-127
14
0-127
Mid
-
0-127
15
0-127
Treble
-
0-127
16
0-127
On/Off
Trans: Off=0/On=127
73
Rcv: 0-63=OFF, 64-127=ON
Presence
-
On/Off
(Hold TAP, turn TREBLE)
21
0-127
Channel Volume
-
0-127
17
0-127
On/Off
Trans: Off=0/On=127
22
Rcv: 0-63=OFF, 64-127=ON
Gate Threshold
-
NO TRANSMIT
23
0-127
Gate Decay
-
NO TRANSMIT
24
0-127
0-15
0-15
19
0=Bypass, 1-15 other effects
0-127
1
0-127
Amp Model
Bright Switch
Noise Gate On/Off
Effect Select Knob
Notes
Effect Tweak
Received MIDI Range
Distortion On/Off
Adds Preset Amount of
Drive
FB SWITCH ON=127
OFF=0
(Or hold POD TAP,
turn DRIVE)
25
Rcv: 0-63=OFF, 64-127=ON
Drive/Boost
4dB Boost of Channel
Volume
FB SWITCH ON=127
OFF=0
(Or hold POD TAP,
turn CH. VOLUME)
26
Rcv: 0-63=OFF, 64-127=ON
EQ (presence Bump)
Adds a Presence Boost
FB SWITCH ON=127
OFF=0
(Or hold POD TAP,
turn TREBLE)
27
Rcv: 0-63=OFF, 64-127=ON
APPENDIX D: MIDI CONTROLS
Sound Diver
Parameters
Delay (always available)
(2 of 3 pages)
Notes
Transmitted MIDI
Range
Control
#
Received MIDI Range
On/Off
FB SWITCH ON=127
28
Rcv: 0-63=OFF, 64-127=ON
Delay Time
0-3150 mS, 128 equal
steps
NO TRANSMIT
30
0-127
Double-precision
control for Delay Time
with Delay Time,
gives 14 bit precision
NO TRANSMIT
62
0-127
-
0-127
32
0-127
Delay Repeats
Delay Level
Reverb (always available)
Reverb Type
-
0-127
34
0-127
On/Off
FB SWITCH ON=127
36
Rcv: 0-63=OFF, 64-127=ON
Spring/Hall
NO TRANSMIT
37
Rcv: 0-63=SPRING, 64127=HALL
Reverb Decay
-
0-127
38
0-127
Reverb Tone
-
NO TRANSMIT
39
0-127
Reverb Diffusion
-
NO TRANSMIT
40
0-127
Reverb Density
-
NO TRANSMIT
41
0-127
Reverb Level
Compression Ratio
Wah Wah Pedal On/Off
-
0-127
18
0-127
off, 1.4:1, 2:1,
3:1, 6:1, infinity:1
NO TRANSMIT
42
0-21=off, 22-44=1.4:1,
45-67=2:1, 68-90=3:1,
91-113=6:1, 114-127= infinity:1
On/Off
FB SWITCH ON=127/
OFF=0
43
Rcv: 0-63=OFF, 64-127=ON
Wah Pedal
-
0-127
4
0-127
Wah Bottom Frequency
-
NO TRANSMIT
44
0-127
Wah Top Frequency
-
NO TRANSMIT
45
0-127
Volume Pedal
-
0-127
7
0-127
Volume Pedal Minimum
-
NO TRANSMIT
46
0-127
Volume Pedal Location
Pre Tube Drive /
Post Tube Drive
NO TRANSMIT
47
Rcv: 0-63=BEFORE TUBE,
64-127=AFTER TUBE
On/Off
NO TRANSMIT
48
Rcv: 0-63=OFF, 64-127=ON
Volume Swell On/Off
Volume Swell Ramp Time
-
NO TRANSMIT
49
0-127
Tap Tempo
-
TAP BUTTON OR FB
SWITCH TRANSMITS 127
64
64-127= a Tap
APPENDIX D: MIDI CONTROLS
Sound Diver
Parameters
(3 of 3 pages)
Notes
Transmitted MIDI
Range
Control
#
Received MIDI Range
On/Off
FB SWITCH ON=127
50
Rcv: 0-63=OFF, 64-127=ON
Chorus/Flange Speed
-
NO TRANSMIT
51
0-127
Chorus/Flange Depth
-
NO TRANSMIT
52
0-127
Chorus/Flange Feedback
-
NO TRANSMIT
53
0-63 negative, 64-127 positive
Chorus PreDelay
(if type = Chorus)
-
NO TRANSMIT
54
0-127
Slow/Fast
NO TRANSMIT
55
0-63=SLOW, 64-127=FAST
Rotary Max Speed
-
NO TRANSMIT
56
0-127
Rotary Min Speed
-
NO TRANSMIT
57
0-127
Tremolo Speed
-
NO TRANSMIT
58
0-127
Tremolo Depth
-
NO TRANSMIT
59
0-127
Selects Cab Simulation
0-15
71
0 = No Cab,
1-15 = Cab Models
>15 treated as 15
0-127
NO TRANSMIT
72
0-127
Chorus/Rotary/Tremolo
On/Off
Rotary Speed
Cabinet Type
A.I.R. Ambience Level
APPENDIX E: LINE 6 CONTACT
CUSTOMER SERVICE
Hope you enjoy your POD. If you have any questions or comments, our diligent support
staff can be contacted at (805) 379-8900 (weekdays, 8am-6pm Pacific Time), via our
website (www.line6.com,) or via email ([email protected]). To ensure that your support
experience is a pleasant one, we recommend taking some notes for yourself before you call.
That way, you’ll remember to ask everything you want to ask the first time, and be able to
get back to POD-ing ASAP.
OTHER LINE 6 PRODUCTS
Our full line of affordable amplifiers feature the same great tones as POD, along with builtin effects, programmable channels, foot control options, MIDI, and more. We also have
POD Pro, Bass POD, and the Stomp Box Modelers series effect pedals. Learn about the full
line up at the Line 6 web site (www.line6.com) or by contacting our sales or support staff
via email ([email protected] or [email protected]) or phone: (805) 379-8900.
POD Series – POD Pro and Bass POD are also available. POD Pro is ToneTransfer
compatible with POD, and includes effect loop, digital out and more. Bass POD is the POD
for bass guitar.
Flextone II Series – A selection of combos, plus a high-powered head, bring you
ToneTransfer compatibility to run all your POD sounds.
AX2 212 – The most tweakable Line 6 amplifier, AX2 matches Line 6 modeling
technology with extensive multi-effects in an all-in-one 100 Watt 2x12" combo.
Spider Series – 6 Amp Models and built-in FX in our lowest price amps.
Stomp Box Modelers – A mass of modeled vintage effects in three stomp boxes: Delay
Modeler includes Tape and Analog Delays, 14 Second Loop Sampler and more. Modulation
Modeler includes classic Choruses, Flangers, Phasers, Rotary Speakers, Tremolos and more.
Distortion Modeler brings you a collection of Distotion, Fuzz, and Overdrive models.
Amp Farm – Plug-in software for Pro Tools TDM systems puts Line 6 modeling right into
your high-end computer music system. Requires Pro Tools TDM hardware. Amp Farm is
distributed by Digidesign; contact them directly for pre-sales information.
Digidesign: 3401 A Hillview Ave., Palo Alto, CA 94304. Email [email protected]
or telephone (800) 333-2137 (from USA) or (650) 842-7900. Surf www.digidesign.com.
APPENDIX F: WARRANTY INFO
Line 6 Limited Warranty Information
Sending in your registration card allows us to register key information so that we may handle
problems faster and inform you of advance information, upgrades, and other news. Thanks in
advance for filling out your registration card and sending it to us. And good luck in your music!
Line 6, Inc., warrants this product when purchased at an Authorized Line 6 Dealer in the United States of America or Canada, to be free of defects in
materials and workmanship for a period of one year from the date of original purchase only upon completion and return of the Line 6 Warranty
Registration form within 30 days from date of purchase. Please contact your distributor for information on warranty and service outside USA and Canada.
During the warranty period Line 6 shall, at its option, either repair or replace any product that proves to be defective upon inspection by Line 6. Line 6
reserves the right to update any unit returned for repair, and reserves the right to change or improve the design of the product at any time without notice.
This warranty is extended to the original retail purchaser. This warranty can be transferred to anyone who may subsequently purchase this product within
the applicable warranty period by providing Line 6 with all Warranty Registration information for the new owner and proof of transfer within 30 days of
the purchase. Final determination of warranty coverage lies solely with Line 6.
This is your sole warranty. Line 6 does not authorize any third party, including any dealer or sales representative, to assume any liability on behalf of Line 6
or to make any warranty for Line 6.
Line 6 may, at its option, require proof of the original date of purchase in the form of a dated copy of the original authorized dealer’s invoice or sales receipt.
Service and repairs of Line 6 products are to be performed only at the factory (see below) unless otherwise authorized in advance by the Line 6 Service
Department. Unauthorized service, repair or modification will void this warranty.
To obtain factory service:
Contact Line 6 at (805) 379-8900, 8AM to 5:30 PM Monday through Friday (Pacific Time) and
request the Product Support department (or email [email protected]). If necessary, you will be
given a return authorization (RA) number. Products returned without an RA number will be
returned to you at your sole expense. Pack the product in its original shipping carton and
attach a description of the problem along with your name and a phone number where Line 6 can
contact you if necessary. Ship the product insured and freight prepaid to:
Line 6 Product Support
6033 De Soto Avenue
Woodland Hills, CA 91367
DISCLAIMER AND LIMITATION OF WARRANTY
THE FORGOING WARRANTY IS THE ONLY WARRANTY GIVEN BY LINE 6 AND IS IN LIEU OF ALL OTHER WARRANTIES. ALL
IMPLIED WARRANTIES, INCLUDING WARRANTIES OF MERCHANTABILITY AND FITNESS FOR ANY PARTICULAR PURPOSE, ARE
HEREBY EXCLUDED. UPON EXPIRATION OF THE APPLICABLE EXPRESSED WARRANTY PERIOD, LINE 6 SHALL HAVE NO FURTHER
WARRANTY OBLIGATION OF ANY KIND, EXPRESSED OR IMPLIED. LINE 6 SHALL IN NO EVENT BE OBLIGATED FOR ANY
INCIDENTAL OR CONSEQUENTIAL DAMAGES THAT MAY RESULT FROM ANY DEFECT OR WARRANTY CLAIM, EXPRESSED OR
IMPLIED. Some states do not allow the exclusion or limitation of incidental or consequential damages or limitation on how long implied warranties last,
so some of the above limitation or exclusion may not apply to you. This warranty gives you specific legal rights, and you may also have other rights which
vary from state to state. This warranty only applies to products sold and used in the United States of America and Canada. Line 6 shall not be liable for
damages or loss resulting from negligent or intentional acts of shipper or his contract affiliates. You should contact the shipper for proper claims procedures
in the event of damage or loss resulting from shipment.