1
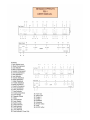
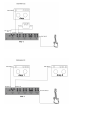
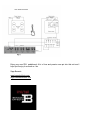
BENADO EFFECTS
Thank you for purchasing the BENADO EFFECTS pedalboard. Owning this unit will give you
the ability to free yourself from clutter, weight and many other frustrations we guitar players have
suffered for years without losing the quality of sound and build.
On this pedalboard there are five basic effects that most guitar players use, and the effects are
all analog. How cool is that? Oh, not to mention it's already buffered on the input level, so
you can look at it as six pedals in your board. Every pedal was carefully designed to be the best
and achieve a complete purity of the sound without diminishing your tone one little bit.
A brief description of the effects is as follows: Compressor (can act as a clean boost if needed),
Distortion gives you that vintage warm great raw tube amp sound, Overdrive with wide range of
options, Analog Delay and Spring Style Reverb.
Below I'm including my favorite settings, which I'm using almost exclusively:
•
•
•
•
•
Compressor: all knobs set to 12:00 o'clock. (level knob changes from time to time to set
volume right). This setting I'm using as my boost.
Distortion: treble all the way up, mids 3/4 way up, bass 10-12 o'clock, volume 10
o'clock, gain 1:00 o'clock.
OD: tone 1:00 o'clock, bass 11:00 o'clock, switch set to cream, volume 10:00-11:00
o'clock, gain 8:00-9:00 o'clock.
Delay: delay all the way up, tone all the way down, repeats 9:00-10:00 o'clock, level set
to bring the overall sound to match my reverb so I get an echo type of sound.
Reverb: tone 12:00 o'clock, level 10:00-11:00 o'clock, depth 12:00 o'clock.
Do not use an adaptor with a higher output voltage than the specified 9V
DC center pin negative. An adapter with an AC voltage output should
never be used with the unit as it will permanently damage the unit.
I recommend using the Visual Sound 1 Spot 9V DC Power Supply.
Warranty
Warranty is in effect for 2 years from day of purchase. Repairs during this time
will be free of charge due to manufacturing defect and not caused by the end
user. Upon receiving the unit, warranty repairs will be granted pending inspection
of the unit. (There is a 7 day, no questions asked return policy, beginning on the
date you receive your pedalboard. The cost of shipping will be at your expense,
and any damages caused by end user will be deducted from the refund. Units
purchased from a dealer do not qualify for this 7-day no questions asked policy.
If you purchased your pedalboard from a dealer contact them for store warranty
policies). Any unauthorized modifications to the pedalboard will void your
warranty. Any damage caused by using the incorrect adapters mentioned above
will void your warranty.
You must register your board to validate the warranty on the website.
PB-1 is your answer to simplicity and high quality in one box. I am going to go over each
function of the individual effect and give examples for different sounds and options in
this manual. The Loop option has many possibilities and I will try to explore all of them.
If you find other options that are not listed here and unique to your use, please feel free
to contact me and I'll share it with others and I'll credit you (if you want).
Let's start!
The Compressor on The PB-1 is what I like to call light
Compressor. With different settings you can use it as a
clean boost. In this photo you can find the setting that
makes it act more like a boost rather than full compression if
desired. Note that the Level knob should be adjusted
accordingly. The Mesh knob ( see controls 4.) lets you mix
the dry signal with the compressed signal. For full dry signal
turn Mesh knob all the way down, for full compressed signal
turn Mesh all the way up.
The Distortion on my PB-1 was influenced by my love for the
sound of the SLO100 and Soldano Supercharger. This
Distortion will give you that flavor along with an old Marshall
roaring sound. I also designed the Distortion to give you the
ability to have a nice crunchy sound if desired by dialing the
Gain knob (see controls 7.) all the way down and adjusting the
Volume knob (see controls 9.) accordingly. My favorite setting
is Volume to 10-11 o'clock, Gain to 1-2 o'clock, Treble (see
controls 12.), all the way down, Mids (see controls 11.) 3-4
o'clock, and Bass (see controls 10.) 11-1 o'clock.
The Overdrive on the PB-1 is very sweet. I always
wanted to have a pedal that that would give me that nice,
warm sound that a good tube amp will give you. It also
had to be very responsive to my playing, just like the old
Dumble amps are known for. If you play light it sound
clean; hit the strings hard it sound like the tubes are
working. My Overdrive does that nicely. Set the Gain (see
controls 16.) 7-9 o'clock, Volume (see controls 18.) 10-12
o'clock, Tone (see controls 15.) 12-1 o'clock, Bass (see
controls 13.) 11-12 o'clock, and set the switch (see
controls 14.) to Cream sound. That is the sound I was
referring to. (If using a humbucker equipped guitar you
may want to back the gain off a little to keep a cap on the
dirt).
The Delay is always a tough one a specially when you want it
to sound analog. We are all familiar with TC 2290 which is
widely regarded as the holy grail of delays. If you're lucky, you
have one. At this point TC is not making them anymore. How
cool would it be to have a floor pedal that sounds very close
to the holy grail in an analog flavor. The PB-1 delay does this.
My favorite way to use the delay is to dial in a setting to be
used in tandem with my Reverb on the PB-1 to create an
echo sound. Try this: Set the Delay (see controls 21.) all the
way up for a long delay, set Tone (see controls 19.) all the
way down for a warm sound, Repeats (see controls 20.) 8-9
o'clock. Now adjust the Level (see controls 23.) slowly until
you get more of an echo sound rather than a delay. Read on
and I'll give you my Reverb settings to be used together with
these Delay settings for my favorite echo sound.
How cool would it be to have a Spring Reverb in your
arsenal to take with you for ready access to the sound
that you like? That is the reason why I wanted to include
a spring reverb effect in the PB-1 pedalboard. My Spring
Reverb has a warm sound with analog characteristics
that can be tweaked thanks to the Tone knob (see
controls 27.) You can obtain that vintage sound by
adjusting Tone to around 12:00 o'clock. I like to use the
Reverb in tandem with the Delay (see settings above) for
a nice echo sound. Try these Spring Reverb settings:
Level (see controls 28.) 9-11 o'clock, Depth (see controls
25.) 10-11 o'clock and Tone (see controls 27.) in the
middle. These settings should give you a nice, warm
concert hall or Twin Reverb-like sound.
The Loop is an idea I had for a long time whilst trying to simplify
the set up I had at home with my rig. At home my equipment is set
up to play live in a studio-similar configuration that lets you run
your guitar dry and add effects in parallel. When I was designing
that pedalboard I wanted to have that option but in a simpler way
without carrying extra heavy equipment with me. That's what the
Loop is all about. There are many loop options you can get thanks
to the way that the PB-1 is wired. Some of them are traditional
and some are not, but they all work for different situations and
that's what's great about it. The loop switch (see controls 24.) is
for activating the Loop or canceling the loop. You will find
the Loop jacks in the back of the PB-1 (see controls 34,
35.)
Here are some of the options. Scenario 1: Let's say you have an amp that has an
effects loop (normally found on the back of the amp - Send/Receive). You wish to run
the PB-1's Delay and Spring Reverb only to the loop of the amp. Here's how you'll do it.
Plug your guitar into the input of the PB-1 (see controls 1.) The PB-1's Output 1 or 2
(see controls 32, 33.) goes to the amp's input. Plug your amp's effects loop 'Send' to the
In/Receive of PB-1 (see controls 35.). The PB-1's Out/Send (see controls 34.) goes to
your amp's effects loop 'Receive'. Flip the PB-1's Loop Switch (see controls 24.) to ON.
This configuration routes the Compressor, Distortion and Overdrive to the front of the
amp. The Delay and Spring Reverb will be routed, in series, through the amp's effects
loop. Cool, eh?
Scenario 2: Now, let's say you have a stomp box or two that you love and you want to
run them with the PB-1. But you want to run them before the delay and reverb but after
the Compressor, Distortion and Overdrive. This is how you do it: Your guitar goes to the
PB-1's input (see controls 1.). Send the PB-1's Output 1 or 2 (see controls 32, 33.) into
the input of your desired stomp box or extra effect. If it's only one effect, send the
stomp's output to the In/Receive of the PB-1 (see controls 35.) Plug the PB-1's Out/
Send (see controls 34.) into your amp. (If you have more than one effect then the last
one in the chain should have its output sent to the PB-1's In/Receive - the rest is the
same). Flip Loop Switch to ON. Your extra stomps are now routed before the Delay and
Spring Reverb but after the Compressor, Distortion and Overdrive.
Scenario 3: Let's say you want to run 2 amps in a kind of stereo style. The PB-1 lets you
do this is in a couple of ways. One way would be to utilize the PB-1's Outputs 1 and 2
and send them to two separate amps. Easy. Another way you can try is to use an AB
box with 2 outputs: Plug your guitar into the input of the A/B Box. Plug the A/B box's
output A to the input of PB-1. The PB-1's Output 1 or 2 goes to the front of one amp.
Send the A/B box's Output B to the In/Receive of PB-1 and the Out/Send of the PB-1 to
the input of amp 2. Flip the Loop Switch to ON and make sure that your AB box is on on
both channels. Amp 1 will get the PB-1's Compressor, Distortion and Overdrive and amp
2 will get the PB-1's Delay and Spring Reverb. This is a very cool sound, especially if
you keep the amp that's receiving the Delay and Spring Reverb at a lower volume than
the other one.
I am sure that there are further unexplored and cool ways to use the PB-1's Loop that
have evaded me while writing this manual. The examples I've mentioned here are pretty
much the most useful. As more options become apparent I will post them on the site.
Here are some illustrations featuring the above scenarios.
Enjoy your new PB-1 pedalboard. A lot of love and passion was put into this unit and I
hope you'll enjoy it as much as I do.
Sage Benado.
www.benadoeffects.com
[email protected]