1
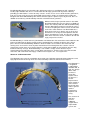
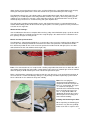
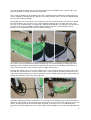
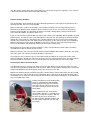
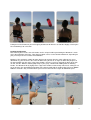
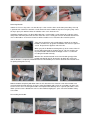
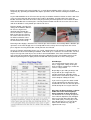
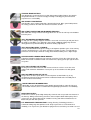
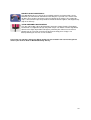
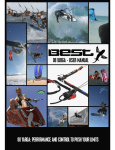
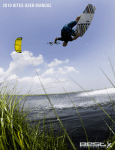
1
BEST KITEBOARDING
USERS MANUAL
Thank you for purchasing a Best kite. Please read this manual carefully and in its entirety before using
your new Best kite.
WARNING
Kiteboarding/kitesurfing is an extreme sport, has numerous inherent risks and dangers, and poses
substantial risk of cuts, scrapes, bruises, broken bones, loss of limbs, loss of vision, paralysis, and other
serious, permanent and disabling injuries and death to the rider and others. Some of the sources of these
risks include but are not limited to:
•
•
•
•
•
•
•
•
Being lifted by the kite and then dropped or slammed into the ground, trees, rocks, buildings,
piers, jetties and/or other structures or surfaces.
Being dropped or slammed into other people and/or property.
Contact with kite lines under tension, and/or watercraft.
Drowning.
Underwater conditions and/or objects such as sharp shells, broken glass, sand bars, shoals,
reefs, oyster beds, and/or concrete.
Contact with sea life such as sting rays, sharks, sea turtles, jelly fish, etc.
Weather conditions and/or changes in weather conditions such as increasing or decreasing wind,
waves, updrafts, lightning and/or water spouts.
Equipment performance. Kiteboarding is a new sport. Kiteboarding equipment and safety gear
are NOT 100% reliable. Safety designs and features are often new and unproven. Kites may
behave unfavorably and unpredictably. Lines can twist, tangle, or break, resulting in serious injury
and/or loss of control of the kite.
When using this product, you are responsible for your own safety and the safety of others around you.
Never use this product as a flying device. Never touch flying lines when the kite is in use.
RELEASE OF LIABILITY AND ASSUMPTION OF RISK
DO NOT USE THIS PRODUCT UNLESS YOU AGREE WITH THE
FOLLOWING TERMS AND CONDITIONS
Before using this product, the purchaser/user has carefully reviewed, understood and agrees to comply
with the terms of this Users Manual. Use of this product and any of its components involves certain
inherent risks, dangers and hazards, which can result in serious personal injury or death. The
purchaser/user of this product understands that the seller is not responsible for any damage to property
or injury caused by negligent operation of this product by the purchaser/user, and the purchaser/user
releases the seller from all such liability. In the event of your death or incapacity, this Agreement shall be
effective and binding upon your heirs, next of kin, executors, administrators, assigns and representatives.
The purchaser/user of this product expressly assumes the risk of any and all bodily injury, death and/or
liability which may result from the purchaser or user’s participation in kiteboarding. The purchaser/user
agrees to hold Ride Best, LLC harmless from any and all liability, and waive and release any and all
claims or potential claims against Ride Best, LLC and any of its respective agents, affiliates, subsidiaries,
employees, instructors, officers, directors, shareholders, suppliers and manufacturers in the event of any
such bodily injury or death which may result from the purchase and/or use of Ride Best LLC (d/b/a Best
Kiteboarding LLC) products.
© 2006 RIDE BEST, LLC, d/b/a BEST KITEBOARDING LLC
2
BestKiteboarding thanks you for making the decision to purchase a new Waroo 07 SLE ‘supported
leading edge’ inflatable kite, we are sure that this kite will repay your decision to purchase Best by
providing you with faultless service for many seasons. In fact, we are so sure of this that we guarantee it,
if for any reason at all, you are not satisfied with your purchase simply send it back to the retailer you
bought it from or BestKiteboarding.com and we will refund you the purchase price of your kite, this is in
addition to our industry standard 90 day materials and manufacture guarantee.
With one of the largest pro-rider teams in the world,
Best Kiteboarding also has one of the best R&D test
beds in the industry. With our dedicated R&D facility
based in Brazil being staffed year round you can be
sure that everything we make has been tested to the
ends of the earth and back. Our Brazil R&D site is
open whenever there is wind, if you are in the area
and want to see and try the latest products that we
have in development, call in, we value the feedback.
After all we make kites for our customers to ride and
enjoy, not just for ourselves.
BestKiteboarding is staffed and run by kiteboarders for kiteboarders. We entered the market with the sole
purpose of delivering the highest quality and best performing kites available anywhere at the fairest
prices. Because Best Kiteboarding distributes direct to retailers and customers our overheads and
running costs are much less than any other manufacturer. Even though our kites cost the same to
manufacture and in some cases like the Pro-kites, much more to build, we still sell them at prices way
below the industry average. Bestkiteboarding’s sales model is simply a more effective way of
manufacturing and selling kites than used by other manufacturers, and the end result is that we build
more kites and sell them to more happy customers than anyone else, so everyone wins.
Waroo 07: SLE Inflatable Kite
The Waroo 07 represents the culmination of over two years R&D into advanced kiting performance and
high projected area kite design and is the most technically advanced SLE kite on the market.
The Waroo 07 is
a ‘Supported
Leading Edge’
inflatable kite, or
SLE, this design
differs from
previous Cshape kite
layouts in that
the kite has a
greater
projected area
which enables a
more efficient
kite design that
delivers greater
upwind
performance,
depower and
safety.
The structure of
SLE kites
receives
additional
support from a
simple bridle
system, this
3
allows for the increased projected surface area, and also facilitates the extended depower and safety by
moving the front pivot points for the entire kite outside of the space bounded by the kite canopy.
The Waroo 07 uniquely has self adjusting pulleys attached to both the front and the back of the kite. The
front pulleys assist with depower and safety activation, whilst the rear pulleys increasing turning speed,
stability and assist with faster relaunch. Unlike most other SLE kites the Waroo 07 does not rely on bar
mounted pulleys to achieve its excellent turning and quick depower rates.
The SLE design, including a 4-point bridle system, and virtual front and rear “V” point attachments for
variable AOA stability, deliver all the benefits of huge de-power, fast turning, improved safety and instant
re-launch in one single kite.
Waroo 07 Kite Package:
Your new Waroo 07 kite comes complete with travel bag, alloy shafted inflatable pump, repair kit and this
user manual. All that is required to make the kite ready for flying is the attachment of a suitable bar and
lines package and you are ready to ride.
Details and Set-up Instructions:
The Waroo 07 is shipped with all bridle lines secured to the center strut valve retaining Velcro. When you
receive your kite, unroll your Waroo 07 and remove the foam valve protectors. Next detach the bridle
lines from their position on the center strut and separate the bridles into left and right. (these are color
coded, Red for the left side and Blue for the right side).
Front : The front attachments are comprised of a leading edge bridle that terminates on both sides with a
closed loop (larks head) and replaceable section that the pulley travels on. Should signs of wear show on
either the pulley or bridle contact your nearest dealer for replacement parts.
Riders should perform a thorough inspection of their kite each time they set-up and prior to launching; to
ensure that it has sustained no damage during use. Any damage should be repaired by a professional
kite or sail loft to ensure continued safety and usability.
Rear: The rear flying line
attachment on the Waroo 07 is
comprised of two lines that join to
form a ‘Y’ shape bridle. The upper
‘V’ section has two pulleys
attached to it to smooth out turning
forces and reduce bar pressure.
This ‘Y’ shape bridle allows for
distribution of turning force across
different parts of the canopy and
more relaxed handling.’
Inflating and Anchoring the Kite:
When unpacking and inflating your
kite for the very first time, partially
inflate each strut in sequence and
4
massage the bladder through the strut material towards the top and bottom of the strut, this will ensure
that each bladder is perfectly seated in the strut pocket.
Once ready to complete the first inflation of your kite, stand with your back towards the wind and lay the
kite out, lengthways, downwind of you, with the struts facing upwards. Place sand on the upwind wingtip
to secure the kite during inflation.
Starting with the centre strut inflate each section of the kite to the required air pressure. All struts should
be inflated until they are free from creases and unyielding to light grip pressure from your hand. If you
have the use of a calibrated pressure gauge this should read around 8psi, any more pressure than this in
the struts in unnecessary and will not further improve flight performance. For maximum relaunch
performance it is important that the struts be inflated correctly.
Once all the struts are inflated move onto the leading edge. The reduced diameter leading edge of the
Waroo 07 requires inflation to around 9PSI. Inflated to the correct pressure the Dacron cloth delivers a
much stiffer LE and more results in more responsive flight characteristics.
To inflate the leading edge ensure that the deflate valve is fully seated and that the top of the valve cap is
flush with the stem of the valve. Once the deflate valve is securely closed, attach the pump leash to the
centre bridle point by looping the end of the pump leash over the bridle and passing the stopper ball back
through the small loop at the end of the pump leash.
Inflate the leading edge until all small wrinkles are removed, the LE should give ‘ping’ when flicked with a
finger once fully inflated. A correctly inflated kite should give heavy resistance to the pump on the last few
strokes, do not try to inflate the LE to the limit of the pump. If you have the use of a calibrated inline
gauge the correct LE inflation pressure is around 9PSI. Correct inflation pressure will vary slightly with kite
5
size, the smaller models will require slightly more pressure and the larger kites slightly less; this variance
is likely to be no more than half a PSI in either direction.
Trouble shooting bladders:
The strut bladders on the Waroo 07 are thin to aid flight performance and require to be pumped up to a
relatively high PSI, 8.5 PSI is recommended.
When reseating the smallest strut bladders, if the bladder and pocket are not completely dry there is
potential for the bladder not to completely fill the end of the strut. Please ensure that the strut pocket
material and the bladder are completely dry before reinsertion, adding copious amounts of talc to the
valve-end of the bladder sill suffice in most cases.
If you are concerned that your bladder may not be fully seated, try the following. With the bladder inserted
into the pocket, and with the valve seated through the valve hole, but still exposing the tail of the bladder
through the small end of the strut pocket, take a length of plastic tube and a funnel and carefully pour
around 1 pint of water into the strut. After closing the valve pick up the strut by the thin end, and holding
both the strut pocket and the tail of the bladder in your hand, shake the strut so that the weight of the
water pulls the bladder end completely towards the back of the leading edge.
Do not inflate the strut until the tail of the bladder is safely seated inside the pocket and the end of the
strut folded over with the Velcro closed securely.
With the end of the strut securely fastened and the tail of the bladder folded inside, inflate the strut gently
and shake again. This will ensure that the bladder is fully seated.
Then angle the strut so that the valve is at the lowest point and deflate the strut to release the water.
Inflate and drain the bladder one more time to ensure you have removed all the water. The water will not
harm the bladder in any way but excess retained water may affect the balance of the kite in flight.
Launching the Waroo 07 on the Beach:
The Waroo 07 launches much like any other LEI kite; the only difference being that the rider must take
care where they position the bridle lines prior to launch. Make sure the bridles and flying lines can not get
tangled. The Waroo 07 has line deflectors on the strut ends to assist in this.
With the kite inflated correctly and all the flying lines attached to the correct bridle points the rider should
st
place the kite at the edge of the wind. They should then place sand on the inside of the kite behind the 1
nd
strut towards the 2 strut, this helps to keep the kite flat to the wind until the wingtip has been folded over
and secured with more sand.
Fold the wingtip over on the leading edge, ,
and then sand down the folded wingtip.
Before going back to your bar to launch,
wait at the kite for a while to ensure you
have placed enough sand on the kite to
hold it down.
Retire upwind to the bar, hook into the
Chickenloop, and take a second to check
your lines visually one last time. With the
bar firmly in your grasp and the bar
positioned at 50% depower position, pull
the top of the bar towards you and step
backwards.
6
Pulling the bar back towards you and stepping backwards will flick the sand off the wingtip, releasing the
kite and allowing it to self launch.
Landing the Waroo 07
Due to having dual rear line ‘oh-shit’ handles and it’s unique bridle layout landing the Waroo 07 is much
easier than with other SLE kites. Two simple methods can be used to land the Waroo 07, depending on
your personal preference and the wind conditions.
Method 1: This method is suitable for most wind speeds on open beaches, with sufficient free space
downwind. Fly your kite to the side of the window leaving the kite at an angle of about thirty degrees to
the ground. With your kite at the edge of the window; sheet-out, reach up and grab the lower of the two
’oh-shit’ handles. With the webbing loop firmly in your grasp, unhook while holding onto the webbing
handle. The Waroo 07 will fly slightly to the edge of the window, and then loop under itself, coming to rest
on the beach in the dead downwind position facing into the wind with the leading edge facing up. please
note: this method is only recommended if you have more than two line lengths of downwind space.
7
Self-landing the Waroo 07:
Method 2: To land the Waroo 07 in higher winds fly it down to the ground at the edge of the wind window,
so that the lower wingtip touches the sand. Clip your leash to the webbing on the ‘oh-shit’ handle that is
now facing upwards on your bar. ie. if you landed the kite on its right wingtip, then clip into the left hand
side ’oh-shit’ handle. Pull gently on the handle to loosen the retaining Velcro. Reach up and pull the trim
strap all the way in to fully depower the kite and then unhook from the bar holding the bar equally in both
hands. Quickly check that you hooked correctly into the safety handle and then simply drop the bar. The
kite will flag out into the wind with the canopy facing upwards. Practice this a few times in lighter wind to
get the hang of the routine. If you ever feel unsure of your ability to land in this way due to hugely
increased wind speeds then ask for an assisted landing.
Water relaunching the Waroo 07
The Waroo 07 has ‘built-in’ relaunch capability. With the kite’s leading edge down in the water simply pull
on either of the back rear lines and the kite will taxi across the wind window, take an upright position and
await relaunch by a swift upward pull on the bar.
In lighter winds it may be beneficial to use your board to create extra resistance to the pull of the kite, to
enable faster relaunch, and to speed the kite taking an upright position at the edge of the wind window.
Once in this position simply adjust the bar and steer the kite launching it upward.
Advanced downwind re-launch techniques can also be used. Some terms are ‘hot-launching’ and reverse
launching.
Hot launching.
With the kite resting on its trailing edge in the water with its weight partly supported by the struts, it is
possible that the kite may accidentally ‘hot launch’. As soon as the kite powers up you must sheet out the
kite, front line load only. The rear lines must not have any tension until the kite is safely in the neutral
zone, in this case that would be overhead in the zenith.
Reverse launching.
When the LE is downwind and away from you, using the rear lines a reverse draft can be created using
the trailing edge, which causes the kite to hover up backwards. If both rear lines are pulled with even
tension the kite will hover up evenly balanced. If one rear line is released a few inches the kite will spin
round and start to redirect. In this case be prepared to flip the bar and sheet-out the kite to reduce
powering up the kite in a downwind position.
8
Assisted Landing the Kite
When landing your kite with an assistant simply fly the kite to the edge of the window and down to ground
level slowly. Have your assistant the take hold of the kite firmly in the middle of the leading edge, and
then walk towards your assistant to remove all flying line tension. You can either have you assistant lay
the kite down and sand the upper canopy, or have them hold the kite until you are unhooked from the bar
and safely able to have them hand the kite over.
FAQ
What pre-flight checks should I perform before I first fly my Waroo 07?
Your Waroo 07 kite is checked before it leaves the factory, the only item you need to check is that the
leading edge zip is completely closed. With the kite un-inflated force the body of the zip downwards
towards the pack of the zip closure, the body of the zipper should be hidden within the small reinforced
pocket and not visible behind the zipper flap.
What type of performance can I expect from my 07 Waroo 07 ?
Expect the ‘best-performance’, the most user-friendly and safest Dacron and rip-stop kite available at this
time on the market! The Waroo 07 is not only used by schools, but many advanced riders prefer the
flatter profile because of the huge amount of de-power available in a short amount of throw.
Surfing waves has never been more do-able. With the ability to shut the kite down you can now ride the
board more than ever, letting the wave provide the acceleration when wave riding and using the kite as a
primary or supplemental power source. Throwing tricks (hooked and un-hooked) can be a safe way to
accelerate the learning curve, due to the auto de-powering effect initiated by dropping the bar.
How do I adjust the turning speed and feel of my kite?
The Waroo 07 uses a dual rear line pulley set up based around a simple V shaped bridle, this system
automatically adjusts the distribution of turning force between the two rear attachment points. Unlike the
system used previously on the Waroo 06 the new set-up automatically compensates for bar position,
adjusting bar pressure and turning speed.
How should I care for my Waroo 07?
Inflate and deflate your kite with care. Follow proper inflation techniques and pack down your kite when it
is completely deflated and dry.
Do not leave the kite inflated sitting on a windy beach unused for long periods of time, flapping in the
wind. Inspect the kite periodically for small holes or tears and patch when detected to eliminate costly
repairs.
How should I pack my Waroo 07?
The easiest way to pack your Waroo 07 is to lay the kite flat, fold over the LE into the kite, then folding the
kite is half lengthways, and then roll the kite loosely from tip to centre. With the kite rolled up, take the
trailing edge and fold it over twice towards the LE to expel any remaining air from the bladders. Further
details on how to roll the kite to protect the battens appear in the following pages.
How do I Remove and Install a Bladder?
Typically the bladder should last the life of the kite, however unforeseen things happen. If you should
need to replace a strut or LE bladder make sure it is sized for your kite. Order specific Waroo 07
replacement bladders. Whilst protected inside the LE and struts bladders are incredibly robust, when
taking them out ensure that they are placed on a clean, dry and grit free surface.
You will require 2 lengths of line, preferably an old flying line with a closed loop still attached. Each length
of line needs to be about 6 feet longer than half the wingspan of the kite
9
Removing Bladder
Undo the LE access zip; make sure that the zip is clean and free from sand before proceeding. If the zip
is jammed with sand flush it out with a small amount of water or blow the zip clean using the pump. Once
the zip is open push both the inflate and deflate valve stems inside the LE.
Unfold the wingtip pockets, the black ABC-cloth flap is retained with a small Velcro tab, undo the Velcro
and pull the end of the pocket out from the end of the sleeve. Gently pull 10-15cm of bladder out from the
sleeve. All bladders are oversized so there will be suitable excess material at the end of the pocket.
Take your length of line and carefully loop it around the end of the
bladder, cinch the line up against the bladder end so that is tight and
secure. Repeat for the opposite end of the kite.
When you pull the bladder out through the zip at the centre of the LE
the line will pull through the length of the LE. This line enables you
to pull the bladder back towards to wingtips and it is essential for
reseating the bladder correctly.
With the lines attached to both ends of the bladder gently pull the
bladder out through the LE. Repeat this for both sides of the kite
until the bladder is completely withdrawn from the LE and both pieces of line attached to the bladder ends
are poking through the LE zip.
With the bladder completely withdrawn from the LE, detach the lines from the ends of the bladder and
carefully fold the bladder from tips to centre so that the bladder folds up like an ‘accordion’ on either side
of valve stems. For re-inserting the bladder it is important that both tips are in separate piles/folds, as this
allows you to insert the bladder one side at a time without tangling the ‘spare’ side of the bladder during
re-insertion.
Re-installing the bladder
10
Before you attempt to reinsert the bladder it is essential that the bladder and the LE sleeve are both
completely dry. Sprinkling the bladder with copious quantities of ‘talc’ will make refitting the bladder much
easier.
Lay the folded bladder on the LE next to the open zip, the bladder should be laid out so that the two valve
stems are facing upwards with no twists being visible in the bladder. Carefully taking one end of the
bladder attach the end to one of the lines that you previously drew through the LE. Then attach the other
end of the bladder to the remaining line. Carefully feed the bladder into the LE sleeve one side at a time
until all the bladder is neatly folded up inside the LE sleeve.
From the wingtip, carefully and
slowly pull the bladder down the
LE sleeve using the lines
attached to the bladder tips.
Once the bladder is exposed at
both ends of the kite return to
the centre of the kite and seat
the inflate and deflate valves
through their reinforced holes in
the LE and close the LE zip.
Returning to the wingtips, detach the lines from the tips of the bladders and carefully fold the bladders tips
up into the ends of the wingtip sleeve. Carefully fold over the end cap and securely fasten the Velcro
pieces together ensuring the bladder cannot poke out once inflated.
Once the LE zipper and wingtip closures are sealed, slowly inflate the LE and observe bladder inflation. If
the bladder has been twisted during installation, it will show up as a void in the area of the twist. The area
may be massaged at a low air pressure to relieve the twisted bladder. If this does not work the bladder
may need to be uninstalled and reinstalled correctly to eliminate the twist. If the bladder appears to be
difficult to pull through the LE lightly coat the bladder with talcum powder once more and try again.
Wind Ranges
The suggested wind range chart is just
that; a ‘suggestion’, always know your
limits and when in doubt rig a smaller kite
and use a larger board.
Depending on your riding technique and
the position of your stopper ball it is
possible, though not advisable, to ride
outside of the stated wind speeds and still
retain complete stability of the kite.
If you can’t keep your kite stable at wind
speeds approaching or above the upper
stated limits for each size kite then please
do not attempt to exceed your skill level.
Why does the Waroo 07 have a simpler
bridle and no bar mounted pulleys
when compared to other SLE kites?
The Waroo 07 was carefully designed to
have reduced depower travel and lighter
bar pressure than other SLE kites with
fewer bridle pulleys. Extra pulleys at the
bar add more bar pressure. For 07 we
believe other brands may copy this
approach and set up.
11
What is the bridle used for?
The bridle supports the flatter shape and reduced leading edge of the Waroo 07. With specific attachment
points it allows greater power from a higher projected area, making it a more efficient kite. In combination
with the front pivot placement it also allows the Waroo 07 to have a huge amount of de-power.
Can I use a bar from other kites on the Waroo 07?
Yes, however certain precautions need to be taken in consideration when using other bars. It is best to
seek technical assistance before rigging a ‘non-Waroo bar’ to the kite.
The Best 07 bar is designed to work best with the Waroo kites, its extended travel allows for complete
depower of the kite, this is key to the improved safety of the Waroo 07 over a ‘C’ shaped kite. An upgrade
kit is available that includes everything but the bar and lines for swapping any 05 Best bar over to be
suitable for the Waroo 07.
For details of the new 07 bar please visit the Best Website
How hard should I pump my Waroo 07 kite?
To the specified PSI ratings, we recommend 8.5-9psi for the Waroo 07; smaller kites require slightly more
inflation than larger kites. An under inflated kite will be problematic through the flight cycle and relaunching. Some riders have noted that in some wind conditions inflating the kite up to a maximum of
10PSI has delivered further benefits in improved stability
Does the Waroo 07 invert like other SLE kites?
Some SLE kites have shown tendencies to invert when fully de-powered or at the high end of their wind
range turning inside out during flight.
Precautions for inversion have been taken in consideration with the design of the Waroo 07, such as
profile shapers, tow point limiters at the front bridle and a variable rear bridle. These variable points help
stabilize the AOA of the kite when fully de-powered or at the high end of the kites wind range.
As with any kite, if flown incorrectly or outside of it’s stated wind range, it can be made to misbehave.
What safety systems are built into the Waroo 07?
A Waroo 07 flown with a 07 Best Bar has multiple redundant safety systems. First and foremost releasing
the bar and allowing it to slide up to the trim strap will depower the kite to be handled in a safe manner.
Both back flying lines on the Waroo bar are equipped with ‘oh-shit’ handles; these can be used in
conjunction with depowering the kite to completely flag the kite out to a powerless position. A leash can
also be clipped to the webbing handles for use on the water.
How do I rig my Waroo 07, what attachment knots should I use?
All Waroo 07s come with 6 knots already tied on the
bottom of the rear flying line attachment bridle, the
Waroo 07 is designed to work best for riders of
average weight when the flying lines are attached to
nd
rd
the 2 or 3 from bottom knot on the rear bridle.
When attaching for the first time please use the
bottom knot on the bridle, if the kites handling
and turning is sluggish then re-attach top the
next knot up. Repeat this procedure until you
have found the perfect knot position for your
arm reach and your preferred riding style.
When the kite is trimmed correctly you should be comfortable enough to steer the kite and still have
enough reach left to depower the kite by pushing the bar away from you. As an additional passive
depower adjustment the trim strap allows further depowering on the fly.
12
If you intend on riding unhooked for performing tricks it is important that you trim your kite so it does not
back stall when unhooked. To check this once you think you have found your preferred rear knot setting,
unhook the chicken loop from your spreader bar and fly the kite overhead. If the kit sits directly above you
with no backing down, then you have the perfect trim.
If you find the kites wants to back down towards the beach then you have too much rear line tension and
the kite is oversheeted. To fix this simply pull down on the depower strap in small increments until the
kite flies happily overhead with the bar unhooked.
Please note that flying unhooked is not recommended unless you are already comfortable with the
increased level of kite control required. Never try to asses the correct trim for unhooking in high winds and
never unhook without using a rated safety leash designed for this purpose.
How do I perform a self-rescue with my Waroo 07?
If possible, release the OSR handle to flag the kite and wind the lines onto the end posts. Hold the bottom
of the kite near the first or second strut (it doesn’t matter too much which). Then grab the part of the LE
bridle that attaches closest to the wingtip, approximately 1-2ft from the LE attachment point. Once the kite
is trimmed well--powered, but not dragging downwind you can sail downwind easily.
How do I pack my Waroo 07:
As your Waroo 07 uses battens in the leading edge and trailing edge, you need to consider this as you
pack your kite away. To ensure you do not damage your lightweight battens during packing always roll
your Waroo 07 from the wingtips to the centre ensuring that the leading edge forms a straight line in the
finished roll. Once the kite is rolled up, find the ends of the trailing edge battens and fold the kite in thirds
from this point towards the leading edge. With the kite fully rolled all the trailing edge battens should be in
one third of the roll and all the leading edge battens should be in the first third of the roll.
How do I replace worn bridles on the Waroo 07?
The Waroo 07 front bridle has user replaceable heavy duty inserts fitted into the centre of the line. Should
these become worn then simply undo the retaining loops at either end and fix in place a replacement set.
It is recommended that you replace both sides at the same time even it only one side is showing wear.
Introduction to performance features:
The 2007 Waroo 07 is the most technically advanced, best performing kite ever made. With a reduced
diameter leading edge, exclusive new "Canopy Framing Technology", profile shapers, surf-proof
construction and countless other features, the Waroo 07 is simply the best Dacron kite available.
The Waroo 07 has handling to match its technical excellence, it delivers more explosive pop and greater
hangtime than any other Dacron and rip-stop BOW, SLE or C kite, while still delivering maximum
depower, unmatched stability and multiple integrated safety systems.
The Waroo 07 is suited to riders of all ages and all abilities. Its combination of huge wind range, great
depower and safety makes it the ideal choice for beginners. The hangtime, ease of handling and friendly
kite looping potential of the Waroo makes it the number one choice for intermediate and advanced riders
looking to safely push the limits of their riding.
REDUCED DIAMETER LEADING EDGE: (Waroo 07 only).
Smaller than any other SLE kite, the Waroo’s thin leading edge structure helps deliver
improved upwind riding and offers improved low end ability to riders of all levels. The
ability to take high inflation pressures aids in stability and kite responsiveness, making
the Waroo an unbeatable package.
13
EXCLUSIVE CANOPY FRAMING TECHNOLOGY:
Kite-wide continuous reinforcement and load distribution zone. Helping to transfer
turning loads across the entire canopy for the fastest response to flying inputs. High
impact distribution zone separates the canopy from airframe loading during heavy
crashes.
SURF TOUGH CONSTRUCTION.
a three layer triple stitched seam with a full length webbing wrap, designed to better
absorb the shock of big wipe-outs. The toughest LE seam is market is also rotated out of
the way behind the LE to improve under canopy airflow.
HARMONIZED ARC:
Size specific leading edge curvature, ensuring the perfect ratio of lifting to control
surface. Every size of kite has a precision designed and tested blend of performance
and handling to deliver maximum levels of user friendliness.
MAXIMUM PERFORMANCE STRUT PLACEMENT:
Proven performance from reduced weight and improved under canopy airflow. The
Waroo-Pro weighs less than any other SLE kite on the market, and delivers greater ease
of use, durability and unmatched performance.
PERFECT PROFILE SHAPERS:
High modulus glass fiber reinforced battens, flexible enough to bend tip to tip without
breaking, stiff enough to provide the canopy with maximum support enabling faster flight
and exceptional upwind ability.
FLUID POCKET BATTEN MOUNTS:
EVA padded and webbing reinforced batten pockets, separate the canopy from direct
contact with the battens and eliminates potential wear points previously associated with
battened kites. We finish each item of canopy protection off with a layer of Mark cloth to
ensure your lines don’t get snagged on your canopy at any time.
LEADING EDGE BRIDLE SCUFF PADS:
Strategically placed LE scuff pads eliminate bridle contact with the LE. Whether riding on
snow water or land, the Waroo 07 is built to withstand any punishment you throw its way.
FLUID POCKET CANOPY PROTECTION:
EVA protection pads with flat locked edges on all canopy protection and batten pockets
to ensure zero line ‘hang ups’ when self launching, and maximum kite protection from
impacts, on or off the water.
PERFORMANCE MATCHED SIZING:
Every size of Waroo 07 is designed to have the exact same feel and responsiveness as
every other size, so jumping from a 15m to a 9m takes no rider adjustment. Every kite
from the smallest to the largest delivers massive hangtime and unreal upwind
performance.
SERVICABLE FRONT BRIDLE INSERTS:
Woven spectra pulley lines for maximum durability and smoother handling. Plus in the
event that a bridle wears through, replacement is a snap.
PERFORMANCE PROFILING:
Custom shaped from tip to tip, to deliver the best riding experience, with unmatched
responsiveness, depower and upwind ability the Waroo 07 is ahead of the curve.
14
TRAILING EDGE BATTENS:
Your Waroo 07 is guaranteed never to flap during normal riding. Battens also work in
conjunction with Best’s exclusive Canopy Framing Technology to yield unmatched
responsiveness and stability
.
ABC CANOPY PROTECTION:
Ultra durable, upper canopy protection. Strategically placed ‘ABC’ guard cloth protects
the canopy and leach line from the worst the beach has to offer.
ABC STRUT PROTECTION AND BLADDER END CAPS:
ABC cloth with enlarged Velcro fastening protects the strut ends and keeps the bladders
locked in place.
SELF TENSIONING LINE DEFELCTORS:
To stop your lines getting wrapped around the strut ends even when you roll your kite in
the toughest conditions. Line deflectors also provide additional trailing edge tension
during powered up unhooked loops to eliminate trailing edge flutter.
SELF-ADJUSTING REAR ‘V’ BRIDLE:
Perfect load distribution through the canopy at all depower positions gives faster turning
response and tighter turns, even when unhooked. Variable rear line ‘V’ bridle delivers
perfect bar feel and helps eliminate canopy flutter without adding excess flight weight.
COLOUR CODED LEADING EDGE BRIDLES:
A practical solution to rigging the kite correctly every time. Each side of the kite has the
bridle constructed in a different color zero stretch line, helping you to rig it right first time
every time.
EASY PULL VELCRO VALVE TABS:
Redesigned extended Velcro tabs with increased closure surface secure the valve
stopper with maximum ‘hold down’. Faster pack up and set down even with gloved
hands.
HIGH VOLUME LE DEFLATE VALVE:
Larger valves for faster pack down, tested and proven to work flawlessly in any
environment, from the heat of mid-summer in Northern Brazil to the incredibly harsh
weather of winter time Norway.
DOUBLE BAGGED BLADDER ENDS:
All bladder ends in the Waroo-Pro come double wrapped with an extra thick layer of
TPU bladder material, the best combination of lightweight performance and durability.
RONSTAN PULLEYS:
For 07 we’ve chosen uprated high load pulleys from the most respected manufacturer in
the industry. With greater bearing clearance and an improved low friction pulley wheel
surface they are designed to provide smoother running and minimal maintenance no
matter how you look after your kite.
CFT REINFORCED TRAILING EDGE: Canopy Framing Technology includes a
reinforced trailing edge that provides razor sharp responsiveness and unmatched
durability, even if you leave your Waroo 07 lying on the beach for days or months on end
15
HIGHEST QUALITY MATERIALS:
The 2007 Waroo 07 uses only the best available materials and construction. On the
Waroo 07 you’ll find Dacron from Dimensional Polyant, respected as the maker of the
absolute finest, toughest and most expensive Dacron on the market. The canopy Ripstop is sourced from Teijin, who provide the Waroo 07 with the lightest and toughest RipStop in the industry.
SOLID AIRFRAME CONSTRCUTION:
The ultra stiff leading edge of the Waroo 07, innovative Canopy Framing Technology,
harmonized arc, Rigid Strut design and profile shaper cam battens all come together to
form the most rigid, dependable and highest performing kite airframe on the market.
Wrapped up in a precision shaped and constructed canopy there simply is no
better performing or easier to use kite available.
If you have any questions about your Waroo 07 that are not covered in the user manual, please
contact your nearest dealer or BestKiteboarding directly.
16