1
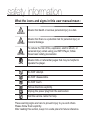
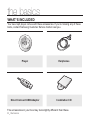
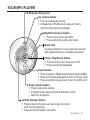
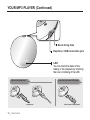
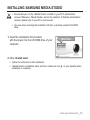
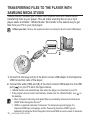
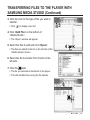
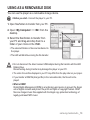
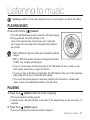
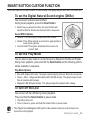
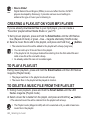
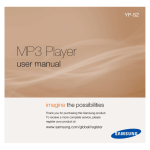
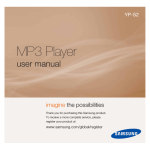
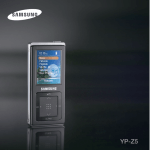
YP-S2 MP3 Player user manual imagine the possibilities Thank you for purchasing this Samsung product. To receive a more complete service, please register your product at www.samsung.com/global/register features of your new MP3 Player Good looking. Smart. Reliable. And lots of fun. Your new MP3 player is all this and more. Its compact silhouette takes up the tiniest space in your pocket. You’ll love your new MP3 player, whether you’re exercising or downloading your favorite tunes. Use it once, and you’ll wonder how you ever lived without it. SIMPLE DESIGN IN A PEBBLE SHAPE Compact, simple and portable design. LONGER PLAY TIME AND SHORTER DOWNLOADING! With your new player, you’re not limited to MP3 files. Your player supports MP3, WMA and Ogg formats. A fully charged battery can play up to 13 hours of music. Download times are shorter. Because of its USB 2.0 capability, the player is much faster than models with USB 1.1. NECKLACE EARPHONE ACOUSTIC WONDER With the necklace-shaped earphones you can enjoy music without the inconvenience of tangled wires. Your new MP3 player has built-in DNSe™ (Digital Natural Sound engine), Samsung’s unique sound technology created to deliver richer, deeper sound for an unbelievable listening experience. EXPANSION AND COMPATIBILITY FREEDOM OF MY FAVORITE SELECTION WITH THIS MP3 PLAYER! You can create a playlist of your favorite music. safety information What the icons and signs in this user manual mean : Means that death or serious personal injury is a risk. WARNING CAUTION Means that there is a potential risk for personal injury or material damage. CAUTION To reduce the risk of fire, explosion, electric shock, or personal injury when using your MP3 Player, follow these basic safety precautions: NOTE Means hints or referential pages that may be helpful to operate the player. Do NOT attempt. Do NOT disassemble. Do NOT touch. Follow directions explicitly. Unplug the power plug from the wall socket. Call the service center for help. These warning signs are here to prevent injury to you and others. Please follow them explicitly. After reading this section, keep it in a safe place for future reference. safety information This manual describes how to properly use your new mp3 player. Read it carefully to avoid damaging the player and injuring yourself. Pay particular attention to the following serious warnings: PROTECT YOURSELF Do not disassemble, repair, or modify this product on your own. CAUTION Do not get the product wet or drop it in water. If the product gets wet, do not switch it on because you could get an electric shock. Instead, contact Samsung's Customer Service Center near you. Do not use the product during a thunderstorm, as it may cause malfunction or a risk of electric shock. CAUTION Do not use the earphones while you are driving a bicycle, automobile or motorcycle. It can cause a serious accident, and furthermore, is prohibited by law in some areas. Using the earphones while walking or jogging on a road, in particular, on a crosswalk can lead to a serious accident. For your safety, make sure the earphone cable does not get in the way of your arm or other surrounding objects while you are taking exercise or a walk. Do not place the product in damp, dusty, or sooty areas because these WARNING environments could lead to fire or electric shock. PROTECT YOURSELF WARNING Using earphones or headphones for an extended time may cause serious damage to your hearing. If you are exposed to sound louder than 85db for an extended time, you may adversely affect your hearing. The louder the sound is, the more seriously damaged your hearing may be (an ordinary conversation is between 50 to 60db and road noise is approximately 80db). You are strongly advised to set the volume level to medium (the medium level is usually less than 2/3 of the maximum). If you feel a ringing in the ear(s), lower the volume or stop using the earphones or headphones. PROTECT YOUR MP3 PLAYER Do not leave the player in temperatures above 95°F (35°C), such as a sauna or a parked car. Do not cause excessive impact on the player by dropping it. Do not place heavy objects on top of the player. Prevent any foreign particles or dust from entering into the product. Do not place the product near magnetic objects. Be sure to backup important data. Samsung is not responsible for data loss. Use only accessories provided by or approved by Samsung. CAUTION Do not spray water on the product. Never clean the product with chemical substances such as benzene or thinner, as it may cause fire, electric shock or deteriorate the surface. Failure to follow these instructions may lead to physical injuries or damage to CAUTION the player. When printing this user manual, we recommend that you print in color and NOTE check “Fit to Page” in the print option for better viewing. contents THE BASICS 8 SAMSUNG MEDIA STUDIO 14 LISTENING TO MUSIC 21 8 9 11 12 12 13 13 13 What’s included Your MP3 Player Charging the battery Caring for the battery Turning the power on & off Playing music Controlling the volume Resetting the system 14 15 PC requirements Installing Samsung Media Studio Transferring files to the player with Samsung Media Studio Using as a removable disk Disconnecting from your PC 16 19 20 21 21 22 22 22 22 Playing music Pausing Searching within a track Playing from the beginning of the current track Playing the previous track Playing the next track contents 23 23 23 23 24 24 24 TROUBLESHOOTING Smart button custom function To set the Digital Natural Sound Engine (DNSe) To set the Play Mode To turn off the LED Creating a playlist on your mp3 player To play a playlist To delete a music file from the playlist 25 Troubleshooting 28 Product specifications 25 APPENDIX 28 the basics WHAT’S INCLUDED Your new mp3 player comes with these accessories. If you’re missing any of these items, contact Samsung Customer Service Center near you. L R Player Earphones Direct Connect USB Adaptor Installation CD The accessories in your box may look slightly different than these. 8 _ the basics YOUR MP3 PLAYER Earphone fixing hole Up volume button Press to increase the volume. In Repeat All or Shuffle mode, press and hold to add the current track to the playlist. Right file browser button Press to move to the next track. Press and hold to quickly scan tracks. Reset hole If a player malfunction occurs, press the reset hole with a pointed object to re-initialize the system. Power, Play/Pause button Press and hold to turn the power on/off. Press to select the play/pause. Smart button Press to switch to Digital Natural Sound engine (DNSe). Press and hold during playback to switch to the play mode. Press and hold in pause mode to turn the LED on/off. Down volume button Press to reduce the volume. In Playlist mode, press and hold to delete the current track from the playlist. Left file browser button Press to move to the previous track or play the current track from the beginning. Press and hold to quickly scan tracks. the basics _ 9 YOUR MP3 PLAYER (Continued) Neck string hole Earphone / USB connection jack LED You can check the status of the battery or the playback by checking the color or blinking of the LED. Connect the direct connect USB adaptor Connect the earphones earphones 10 _ the basics direct connect USB adaptor CHARGING THE BATTERY Charge the player before using it for the first time and when you haven’t used it for a long time. The battery for your mp3 player will fully charge in about 2 hours, although total charging time varies depending on your PC environment. Before you start - Remove the earphones before connecting the direct connect USB adaptor. 1 (B) 2 (A) 1. Connect the mini plug end (A) of the direct connect USB adaptor to the Earphone/USB Connection Jack of the player. 2. Connect the wide (USB) end (B) of the direct connect USB adaptor to the USB port ( ) on your PC as in the figure above. The LED will blink red while the battery is being charged. When done, it turns green. NOTE When you need to recharge the battery. - When the battery is too low, the LED blinks red and the color of the selected play mode alternately. If the LED is turned off, this will not work. - When the battery runs out, the LED blinks red. If you are charging the player while it is connected to a laptop computer, make sure the laptop’s battery is also fully charged or that the laptop is plugged into its power source. the basics _ 11 CARING FOR THE BATTERY Your battery will last longer if you follow these simple guidelines for caring and storing it. • Recharge and store the battery within the temperature range of 40°F~95°F (5°C~35°C ). • Do not overcharge (longer than 12 hours). Excessive charging or discharging may shorten the battery’s life. • Battery life naturally shortens slowly over time. TURNING THE POWER ON & OFF Turning the Power on ] button. Press and hold the [ The LED will flash blue and Power is turned on. Turning the Power off ] button. Press and hold the [ The player turns off with a beep. NOTE The player will be automatically turned off when none of the buttons have been pressed for 1 minute in the pause mode. 12 _ the basics PLAYING MUSIC Press and hold the [ ] button. The LED will flash blue and the music file will begin playing. CONTROLLING THE VOLUME Press the [ , ] button. The volume range is set between 0 to 30. ] button to increase the volume or the [ Press the [ button to decrease it. NOTE ] If you selected over 15, the volume will be set back to 15 when you turn the player off to avoid hearing damage when you turn the player back on. RESETTING THE SYSTEM If your mp3 player won’t turn on, won’t play music, or isn’t recognized by your computer when you connect it, you may have to reset the system. Press the Reset hole at the rear of the player with a pointed object such as a safety clip. The system will be initialized. Your settings and files will not be affected. the basics _ 13 Samsung Media Studio Samsung Media Studio is an easy-to-use software application that helps you organize your files on your PC. With your files already sorted and organized in Media Studio, you can quickly transfer them to your mp3 without searching your entire hard drive for the right file. PC REQUIREMENTS Your PC system must meet the following minimum specifications in order to install and run Media Studio: • Pentium 500MHz or higher • USB Port 2.0 • Windows 2000/XP/Vista • DirectX 9.0 or higher • 100MB of free hard disc space • CD Rom Drive (2X or higher) • Windows Media Player 9.0 or higher • Resolution 1024 X 768 or higher • Internet Explorer 6.0 or higher • 512 MB RAM or higher 14 _ samsung media studio INSTALLING SAMSUNG MEDIA STUDIO CAUTION Ensure that you run the <Media Studio> installer in your PC’s administrator account Otherwise, <Media Studio> will not be installed. To find the administrator account, please refer to your PC’s user manual. Use care when inserting the Installation CD into a vertically oriented CD-ROM drive. 1. Insert the Installation CD provided with the player into the CD-ROM drive of your computer. 2. Click <Install now>. Follow the instruction to start installation. <Media Studio> installation starts and then creates an icon installation is complete. on your desktop when samsung media studio _ 15 TRANSFERRING FILES TO THE PLAYER WITH SAMSUNG MEDIA STUDIO <Media Studio> enables you to select and organize files and folders before transferring them to your player. This will make scanning files on your mp3 player easier and faster. <Media Studio> file transfer is the easiest way to get files from your PC to your mp3 player. Before you start - Remove the earphones before connecting the direct connect USB adaptor. 1 (B) 2 (A) 1. Connect the mini plug end (A) of the direct connect USB adaptor to the Earphone/ USB Connection Jack of the player. 2. Connect the wide (USB) end (B) of the direct connect USB adaptor to the USB port ( ) on your PC as in the figure above. <Media Studio> will automatically start when the player is connected to your PC. on If the program does not start automatically, double click the <Media Studio> icon the desktop. Music recognition technology and related data are provided by Gracenote and Gracenote CDDB® Music Recognition ServiceSM. NOTE CDDB is a registered trademark of Gracenote. The Gracenote logo and logotype, the Gracenote CDDB logo and logotype, and the “Powered by Gracenote CDDB” logo are trademarks of Gracenote. Music Recognition Service and MRS are service marks of Gracenote. 16 _ samsung media studio TRANSFERRING FILES TO THE PLAYER WITH SAMSUNG MEDIA STUDIO (Continued) 3. Click the icon for the type of file you want to transfer. Click to display music list. 3 4. Click <Add File> on the bottom of <Media Studio>. The <Open> window will appear. 4 5. Select the files to add and click <Open>. The files are added to the list on the left side of the <Media Studio> Screen. 6. Select the file to transfer from the list on the left side. 7. Click the icon. 5 The file you selected is transferred to the player. The LED will blink blue during the file transfer. 6 7 samsung media studio _ 17 TRANSFERRING FILES TO THE PLAYER WITH SAMSUNG MEDIA STUDIO (Continued) CAUTION Do not disconnect the direct connect USB adaptor during file transfer with the LED blinking blue. Disconnecting during transfer may damage the player or your PC. When connecting via a USB port on the front of your PC or a USB hub, it may not connect properly. If there is an unstable connection, connect it via the USB port on the rear of your PC. All functions are disabled during connection. NOTE If you connect the direct connect USB adaptor to the PC and the player's Battery charge is low, the player will be charged for several minutes before connecting to the PC. Use FAT 32 for the file system when formatting the player on your PC. In Windows Vista, click Restore device defaults and format it. Samsung Media Studio has a thorough Help function. If you can’t find the answer to your question about Media Studio, click <MENU> <Help> <Help> on the top of the <Media Studio> program. 18 _ samsung media studio USING AS A REMOVABLE DISK You can use the player as a removable storage device. Before you start - Connect the player to your PC. 1. Open files/folders to transfer from your PC. 2. Open <My Computer> <S2> from the desktop. 3. Select the files/folders to transfer from your PC and drag-and-drop them to a folder of your choice in the <S2>. The selected folders or files are transferred to the player. The LED will blink blue during the file transfer. CAUTION Do not disconnect the direct connect USB adaptor during file transfer with the LED blinking blue. Disconnecting during transfer may damage the player or your PC. The order of music files displayed in your PC may differ from the play order on your player. If you transfer a DRM file(charged file) to the removable disk, the file will not be played. What is DRM? Digital Rights Management (DRM) is a technology and service to prevent the illegal use of digital contents and protect the profit and rights of copyright holders. DRM files are charged music files applied with the illegal copy protection technology of legally purchased MP3 music. samsung media studio _ 19 DISCONNECTING FROM YOUR PC Follow the steps below to prevent damage to the player and data when disconnecting from your PC. 1. Place the mouse cursor on top of the icon on the taskbar at the bottom right corner of the desktop and click the left mouse button. 1 2. Click the <Safely Remove USB Mass Storage Device Drive> message. 3. Disconnect the player from your PC. 2 CAUTION Do not disconnect the player from the PC during file transfer with the LED blinking blue. This may cause damage to data and the player. You cannot remove the player while files within the player are being played on your PC. Please retry after file playback is finished. 20 _ samsung media studio Listening to music Before you start - Connect the earphones, then turn on the player, and check the battery. PLAYING MUSIC Press and hold the [ ] button. The LED will flash blue and the music file will begin playing. During playback, the LED will blink in the color of the selected play mode once every 3 seconds. Go to page 23 to see what color indicates which different play mode. NOTE MP3, WMA and Ogg music files are compatible with the player. MP1 or MP2 files which only have a changed extension to MP3 may not play on the player. If you try to play when no files are present, the LED does not turn on and you will hear a beep each time you press the button. If you try to play a file that is not playable, the LED blinks in the color of the selected play mode once every 1.5 seconds with a beep. The music files will be played in sequence following the characters, numbers and upper / lower case alphabetical letters in the file name. PAUSING 1. Press the [ ] button while the music is playing. The music playback will be paused. In pause mode, the LED will blink in the color of the selected play mode once every 1.5 seconds. 2. Press the [ ] button again. The music will play from the point where it stopped. listening to music _ 21 SEARCHING WITHIN A TRACK 1. Press and hold the [ , ] button while the selected track is playing. It searches to the beginning or the end of the track. 2. Release the button at the point you wish to start. It starts playing from the point you release the button. PLAYING FROM THE BEGINNING OF THE CURRENT TRACK Press the [ of the track. ] button after 4 seconds of play has elapsed from the beginning The current track starts playing from the beginning. PLAYING THE PREVIOUS TRACK Press the [ ] button before 4 seconds of play has elapsed from the beginning of the track. Press the [ ] button twice after 4 seconds of play has elapsed from the beginning of the track. The previous track will start playing. PLAYING THE NEXT TRACK Press the [ ] button. The next track will start playing. CAUTION When playing VBR (Variable Bit Rate) files, the previous track may not play even if ] button within 4 seconds. you press the [ 22 _ listening to music SMART BUTTON CUSTOM FUNCTION You can use the Smart button to set DNSe, the play mode, and turn off the LED. To set the Digital Natural Sound engine (DNSe) You can select a desired sound effect. During music playback, press the Smart button. Each time you press the button, the sound effect will switch to Normal, Studio and Concert Hall in sequence. Sound Effect Options Normal: You can enjoy a sharp and clear sound. Studio: This offers natural sound and is appropriate to most music genres. Concert Hall: This option simulates the sound of a concert hall. To set the Play Mode You can select a play mode of a music file such as Repeat All, Shuffle and Playlist. During music playback, press and hold the Smart button and the following options will be available in sequence. Play Mode Options Blue LED (Repeat All mode): The player repeats playing all music files with a long beep. Green – Blue – Magenta alternately LED (Shuffle mode): The player plays music files at random with a beep. Magenta LED (Playlist mode): The player plays the playlist with a beep. To turn off the LED You can turn off the LED during music playback. Press and hold the Smart button in pause mode. The LED will turn off. To turn it back on, press and hold the Smart button in pause mode. NOTE The Playlist mode(Magenta LED) will not be selected until you add at least one music file to the playlist. listening to music _ 23 NOTE What is DNSe? Digital Natural Sound Engine (DNSe) is a sound effect function for MP3 players developed by Samsung. It provides various sound settings to enhance the type of music you’re listening to. CREATING A PLAYLIST ON YOUR MP3 PLAYER If you’ve already downloaded files to your mp3 player, you can create a “Favorites” playlist without Media Studio or your PC. 1. During music playback, press and hold the Smart button until the LED flashes blue (Repeat All mode) or green – blue – magenta alternately (Shuffle mode). 2. Select a music file to add to the playlist, and press and hold the [ ] button. The selected music file will be added to the playlist with a beep.(long tone) NOTE You can add up to 30 music files to the playlist. If the playlist is full, the player deletes files starting from the first added file and adds a new file at the end with a beep. An already added file can not be added again. TO PLAY A PLAYLIST During music playback, press and hold the Smart button until the LED flashes magenta (Playlist mode). The player switches to the playlist mode with a beep. The music files in the playlist will be played at random. TO DELETE A MUSIC FILE FROM THE PLAYLIST 1. During music playback, press and hold the Smart button until the LED flashes magenta (Playlist mode). 2. Select a music file to delete from the playlist, and press and hold the [ ] button. The selected music file will be deleted from the playlist with a beep. NOTE The Playlist mode (Magenta LED) will not be selected until you add at least one music file to the playlist. 24 _ listening to music troubleshooting If you have a problem with your new mp3 player, check for a solution in this list. If the problem persists, contact a Samsung Customer Service Center near you. PROBLEM SOLUTION Power will not turn on. • Power will not turn on if the battery is completely drained. Recharge the battery and turn the power on again. • Press the Reset hole. Buttons do not work. • Check if you pressed the right button, then press again. • Press the Reset hole. Power is turning off. • The power is automatically turned off when the battery is completely drained. Recharge the battery. • Your mp3 player will be automatically turned off when none of the buttons have been pressed for 1 minute in the pause mode. Turn on the Player. Battery life differs from what is stated in the manual. • The battery life can vary depending on the sound mode. • Battery life may be shortened when the player is left for extended periods in low or high temperatures. troubleshooting _ 25 PROBLEM SOLUTION Media Studio Program malfunction. • Check if your PC meets the basic system requirements. Connection to your PC is disabled. • Check if the direct connect USB adaptor is correctly connected and try again. • Press <Start> on the toolbar of your PC to run Windows Update. Select Key Updates and Service Packs, then update all. Reboot your PC and reconnect. • When connecting via a USB port on the front of your PC or a USB hub, it may not connect properly. If there is an unstable connection, connect it via the USB port on the rear of your PC. The file transfer rate is too slow. • If you have formatted the player on Windows 2000, the file transfer may be delayed. Format the player on Windows XP or Vista and try again. • If you are running multiple programs including <Media Studio> on your PC, the file transfer rate will be slow. Exit unnecessary programs and try transferring again. Player isn’t playing. • Check if the available file has been saved in the memory of the player. • Check if the music file is damaged. • Check if there is enough battery power. • This player does not support secure WMA files from online stores. File upload doesn’t work. • Check if the direct connect USB adaptor is securely connected. Reconnect if necessary. • Check if the memory is full. • Press the Reset hole. 26 _ troubleshooting PROBLEM SOLUTION • Check if the direct connect USB adaptor has been disconnected during file or data transmission. If this is the case, it may cause serious damage not only Files or data are missing. to files/data but also to the product. You have to be extra cautious as Samsung is not responsible for data loss. The product is hot. • Heat may be generated during recharging. This has no effect on the product life or functions. troubleshooting _ 27 appendix PRODUCT SPECIFICATIONS Model Name Rating Built-in Battery Power File Compatibility Supported Number of folders and files Earphone Output Output Frequency Range Signal to Noise Ratio Play Time Temperature Range for Operation Case Weight Dimensions (WxHxD) YP-S2 DC 5.0V / 500mA 200 mAh / DC 3.7V AUDIO : MPEG1/2/2.5 Layer3(8kbps~320kbps, 8kHz~48kHz), WMA(48kbps~192kbps,8kHz ~48kHz), Ogg(Q0~Q10) Folder: Max. 2000 / File: Max. 2000 16mW/Ch. (France 5mW/Ch.) (based on 16Ω) 40Hz~20KHz 88 dB with 20 KHz LPF(based on 1kHz 0 dB) Maximum of 13 hours for music playback (based on : MP3 128kbps, Volume 15, Normal sound mode). -5~35°C (23~95°F) Plastic 17.2 g 41.2 X 42.4 X 16.7 mm The contents of this Manual are subject to change without prior notice for further improvement. • This Class B digital apparatus complies with Canadian ICES-003. 28 _ appendix LICENSE The product player accompanying this user manual is licensed under certain intellectual property rights of certain third parties. This license is limited to private non-commercial use by end-user consumers for licensed contents. No rights are granted for commercial use. The license does not cover any product player other than this product player and the license does not extend to any unlicensed product player or process conforming to ISO/IEC 11172-3 or ISO/IEC 13818-3 used or sold in combination with this product player. The license only covers the use of this product player to encode and/or decode audio files conforming to the ISO/IEC 11172-3 or ISO/ IEC 13818-3. No rights are granted under this license for product features or functions that do not conform to the ISO/IEC 11172-3 or ISO/IEC 13818-3. appendix _ 29 Samsung Limited Warranty Samsung Electronics Canada Inc. (SECA), garantit ce produit contre tout défaut de fabrication. warrants that this product is free from defective material and workmanship SECA further warrants that if this product fails to operate properly within the specifi ed warranty period and the failure is due to improper workmanship or defective material SECA will repair or replace the product at its option. All warranty repairs must be performed by a SECA authorized service centre. (The name and address of the location nearest you can be obtained by calling toll free 1-800-726-7864 or visiting our web site at www.samsung.ca) Labour Parts one (1) year (carry-in) one (1) year On carry-in models, transportation to and from the service centre is the customer’s responsibility. The original dated sales receipt must be retained by the customer and is the only acceptable proof of purchase. It must be presented to the authorized service centre at the time service is requested. Exclusions This warranty does not cover damage due to accident, fi re fl ood and/or other acts of God; misuse, incorrect line voltage, improper installation, improper or unauthorized repairs, commercial use, or damage that occurs in shipping. Exterior and interior fi nish, lamps and glass are not covered under this warranty. Customer adjustments which are explained in the instruction manual are not covered under the terms of this warranty. This warranty will automatically be voided for any unit found with a missing or altered serial number. This warranty is valid only on products purchased and used in Canada. If you have any questions or comments relating to Samsung products, please contact the SAMSUNG customer care centre. Samsung Electronics Canada Inc., Customer Service 1-800-SAMSUNG (7267864) www.samsung.com/ca REV. 0.0