1
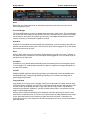
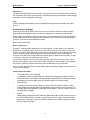
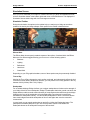
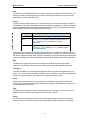
User Manual © Copyright 2003 Auran Games Pty Ltd. All rights reserved. Bridge It Manual Table of Contents Table of Contents USER MANUAL................................................................................................................................. 1 TABLE OF CONTENTS.................................................................................................................. I THE AIM OF THE GAME............................................................................................................... 1 GETTING STARTED...................................................................................................................... 2 RECOMMENDED SYSTEM REQUIREMENTS ............................................................................................... 2 MINIMUM SYSTEM REQUIREMENTS ....................................................................................................... 2 PLAYING BRIDGE IT........................................................................................................................... 2 MAIN MENU................................................................................................................................... 3 START............................................................................................................................................ 3 LOAD BRIDGE.................................................................................................................................. 3 LOAD LEVEL.................................................................................................................................... 4 PROFILES........................................................................................................................................ 5 OPTIONS......................................................................................................................................... 6 CREDITS......................................................................................................................................... 7 EXIT.............................................................................................................................................. 7 IN GAME........................................................................................................................................ 8 BUILDING A BRIDGE........................................................................................................................... 8 SIMULATION SCREEN....................................................................................................................... 14 KEYBOARD SHORTCUTS.................................................................................................................... 16 -i- The Aim of the Game The aim of Bridge It is to build different bridges across a variety of valleys, chasms and rivers using a combination of iron, steel, heavy steel, cable, suspension cable and hydraulics. The challenges vary from small, straight-forward bridges to constructions requiring a great deal of fore-thought. Good luck battling the vast gaps, gravity and the earthquakes… -1- Getting Started Recommended System Requirements Operating System: Windows® 98/ME/2000/XP/VISTA/7 Processor: AMD Athlon 2200+ Intel Pentium 4 2.0GHz Memory: 512 MB RAM Hard Disk Space: 500 MB free Video: Graphics card with Pixel and Vertex shader 2.0 support (Intel 915, Nvidia Geforce 4 ti, Ati Radeon 9500, or any newer card) Sound: DirectX 9 compatible sound card DirectX: DirectX 9 or higher Minimum System Requirements Operating System: Windows® 98/ME/2000/XP/VISTA/7 Processor: AMD Athlon 1.0GHz Intel Pentium 3 1.0GHz Memory: 384 MB RAM Hard Disk Space: 500 MB free Video: Graphics card with Pixel and Vertex shader 2.0 support (Intel 915, Nvidia Geforce 4 ti, Ati Radeon 9500, or any newer card) Sound: DirectX 9 compatible sound card DirectX: DirectX 9 or higher Playing Bridge It Once the Installation Wizard is complete, you can start playing Bridge It. To begin, click the Bridge It icon from the Bridge It group in the Start Menu. -2- Main Menu The Main Menu gives you access to all aspects of the game, and is the central hub for all your activities. When you first enter the game, you are presented with the following options: Start Load Bridge Load Level Profiles Options Credits Exit These options are explained in detail below. Start Left-clicking the Start button takes you into the Map Pack selection screen. Map Packs In the Map Pack screen, you can choose from tutorials and four different difficulty levels: Easy Medium Hard Complex If it is your first time playing Bridge It, it is suggested you start on the Tutorials then move to the Easy map pack, at least until you get a feel for things. If you are feeling adventurous, you can start on the first level in each map pack at any time. Once you have selected a map pack, a list of available levels in that difficulty level is displayed. When you decide which one you wish to play, simply left-click on it to load the level. When you first start playing the game, not all levels are available to play. You must unlock the levels by progressing through the map pack. If you have played before, any levels you have completed are selectable along with the next available level in the map pack. Tutorials If this is your first time playing Bridge It, the Tutorials are the place to start. Click the Tutorials button from the Map Pack screen to see the list of available tutorials. The tutorials explain the various tools used to progress through the game as well as how to build different styles of bridges. You can return to these tutorials at any time for a refresher on how to play. Load Bridge Over the course of playing Bridge It, there is much trial and error. If you complete a level but think you can do a better job, you can save your bridge and start again. If you decide you were happy -3- Bridge It Manual Main Menu: Credits with the bridge you made or want to see how you did something, you can always load it again at a later date. Click the Load Bridge button to access a menu of saved bridges. When you find the one you want, left-click the Load button to load the bridge. You can also access previously created bridges by left-clicking ‘Start’, choosing a map pack and then selecting a level you have already completed. Load Level Occasionally you may want to start a level again or jump ahead to a level in a map pack that you have not yet unlocked. To do this click the Load Level button from the Main Menu. This displays a menu listing all the levels in the game (from all the map packs and the tutorial). All levels (both lock and unlocked) appear in the menu, selecting one and clicking the Load button opens the level without a bridge, ready for you to start building. -4- Bridge It Manual Main Menu: Credits Profiles Often there is more than one user per computer who wishes to play Bridge It. To prevent players confusing their progression, each player can create their own profile. Your saved games and bridges are stored within your profile. To create a Profile of your own, click the Profiles button. In the bottom right-hand corner of the Profiles Screen is the New Profile textbox where you can type a name for your profile. Once you have entered a name, click Create and then Back to return to the Main Menu. Any saved games or levels are now stored under this particular profile until a new one is selected from the menu. To swap profiles, click on the Profiles button, select the Profile you want from the list on the lefthand side of the screen and then click the Back button. -5- Bridge It Manual Main Menu: Credits Options Clicking Options displays the Graphics Options screen. This screen you can change several graphics settings: Resolution - Change the game resolution as well as switch between windowed and full screen modes. Vertical Sync – Disabling Vertical Sync results in a higher frame rate but tearing artifacts may be visible. Low Res Textures – Only use this if the performance on your computer is slow. It will decrease the graphics of Bridge It but increase frame rate. Anti Aliasing - Each factor will smooth the edges found along objects like the power lines and result in a much nicer picture, however each increasing factor quadruples the number of pixels calculated and as Bridge It is very dependent on pixel effects, performance will be reduced by increasing the anti-aliasing factor. After changing any settings on this screen you must restart Bridge It for them to be applied. -6- Bridge It Manual Main Menu: Credits Credits Clicking Credits displays a list of all the fine people who worked hard to bring this game to you. We hope you enjoy playing Bridge It as much as we enjoyed making it! Exit When you decide you have had enough destruction, click the Exit button to leave the game. -7- In Game When you first enter the game, your view centers on the expanse over which you construct your bridge. Above it is the grid you use to plan your bridge. To move the view and see different parts of your bridge, use the following mouse and keyboard commands: Use the A, D, W and S keys to pan left, right, up and down. Use SHIFT+(A, D, W and S) to rotate left, right, up and down. Use the Q and Z keys to zoom in and zoom out. Hold the CTRL key, click-and-hold the Left Mouse Button and move the mouse to pan left, right, up and down. Hold the CTRL key, click-and-hold the Right Mouse Button and move the mouse to rotate left, right, up and down. Hold the CTRL key, click-and-hold both the Left Mouse Button and Right Mouse Button and move the mouse to zoom in and zoom out. Scroll the mouse-wheel (if your mouse has one) to zoom in and zoom out. You can also pan the view by moving the mouse to any edge of the screen. This is called Bump Scrolling. Along the bottom of the screen is the Menu Bar. This contains the tools and options you need to create bridges and proceed through the entirety of the game. There are a variety of choices to be made explained below, starting with the Materials Menu. To see a list of keyboard short-cuts, click on the Help button in the bottom right-hand corner of the Edit Screen. Building a Bridge The Edit Screen is the part of the game in which you construct your bridge. Each area is explained in this section. -8- Bridge It Manual In Game: Keyboard Shortcuts Materials Menu The Materials Menu is located on the left-hand side of the screen and lists the different building materials available for each level. Not all materials are available on each level, although during the game you have the chance to use all of the following to construct your bridges: Iron Steel Heavy Steel Cable Suspension Cable Hydraulics Break Joint Iron Iron is a relatively weak metal that is cheap and can be used to build small bridges. As the size of the bridges increase, Iron can be used for supports, platforms and even small sections of the bridge. Steel Steel is much stronger than Iron and is used to great effect on medium to large sized bridges. It is however quite expensive, so it must be used effectively to ensure there is enough money to finish the whole bridge. Heavy Steel Heavy Steel is an even stronger and subsequently more expensive version of Steel. Heavy Steel is used on the largest bridges that span wide crossings. It can handle tremendous stress so can also be used to build towers from which you can hang Suspension Cable. -9- Bridge It Manual In Game: Keyboard Shortcuts Cable Cable is incredibly versatile and strong when used correctly. From the tiniest foot paths to the largest crossing, Cable is best used in any place on your bridge where high tension is required. When trying for high scores, experiment using Cable in place of other materials to lower the cost of your bridge. Suspension Cable Suspension Cable is used on suspension bridges. Heavier and stronger than regular Cable, when placed correctly it can be used to hold up massive structures in conjunction with regular Cable and other materials. A length of Suspension Cable is comprised of a series of strong cable pieces and joints onto which other materials can connect. Hydraulics Sometimes bridges need to cater for traffic going both over and under them. In such cases Hydraulics are used so a bridge can be raised, allowing tall ships to pass underneath. Placing and using hydraulics follows the same process as other materials but be sure to include a Break Joint in an appropriate place. Break Joint A Break Joint is a point in the bridge at which it separates when it is raised. This is usually in the centre of the bridge, though different circumstances may require one or more Break Joints to be placed elsewhere. Material Properties Each material has a different cost, weight and strength associated with it. These need to be taken into account when deciding which materials to use in your bridge. Below is a table with information to help you make that decision. Material Iron Iron Cross Brace Iron Road Decking Steel Steel Cross Brace Steel Road Decking Heavy Steel Heavy Steel Cross Brace Cable Suspension Cable Hydraulics Cost (per meter) Maximum Length (meter) 22.5 25.0 22.5 22.5 25.0 22.5 Relative Compression Strength 21.5 16.1 21.5 41.7 31.25 41.7 Relative Tension Strength 21.5 16.1 21.5 41.7 31.25 41.7 $5.00 $3.75 $10.00 $10.00 $7.50 $20.00 $20.00 $15.00 45.0 50.0 50.0 37.5 50.0 37.5 $4.00 $15.00 $20.00 1600 1600 22.5 N/A N/A 66.7 300.0 400.0 66.7 Construction Toolbar To the right of the Materials Menu is the Construction Toolbar. This contains all the tools you need to construct and alter your bridges. Each tool’s functionality is explained below. - 10 - Bridge It Manual In Game: Keyboard Shortcuts Back Back takes you to the Load screen or Start Menu depending on the last screen you were in before entering the game. Cost and Budget The Cost and Budget for the level are located along the bottom of the screen. The Cost indicates the current cost of the bridge you are building. The cost is calculated as you construct the bridge and is based on the quantity of materials you are using. The Budget represents the maximum amount of money you are allowed to spend for the level. Autodeck Autodeck is on by default and automatically lays road decking if you are creating horizontal links between the two lowest anchor points. The Auto Deck option can be toggled on or off, but cannot be on at the same time as ‘Deck’. Deck With the Deck option turned on you can lay road decking piece by piece in an arch, vertically or any particular way you would like. The Deck option can be toggled on or off, but cannot be on at the same time as ‘Auto Deck’. Crossbars Crossbars is on by default and automatically places cross-bracing struts in the lengths of girder. You can toggle it off, meaning that the girders you place for support are cheaper and lighter but are also much weaker. GridHD Enabling GridHD displays a high-density grid above your bridge that is twice as detailed as the standard editing grid. Using the high-density grid allows you to construct your bridge with a greater degree of precision. Copy and Paste Copy allows you to copy a section of bridge, which you can then place in another location using the Paste function. Hold down the SHIFT key on the keyboard then left-click and drag the mouse over the section of the bridge you wish to copy, then click the ‘Copy’ button. This places the selection on the Bridge It clipboard. If you have a middle mouse button, you can also click and drag it to select bridge sections. Having copied a section of the bridge to the clipboard, click Paste and bring the mouse cursor back into the construction area, you will see your copied section of bridge attached to the mouse cursor. Move the section into the position you want and left-click to place it. Note that if the section does not fit or is too expensive to fit within the budget for the level, you will not be able to place the section. - 11 - Bridge It Manual In Game: Keyboard Shortcuts Delete To delete a section of bridge, drag select the section (as explained in Copy and Paste above) and click the Delete button. Flip X The Flip X command reverses the section of bridge being pasted on its ‘X’ axis (left to right). In this manner you can construct one side of a bridge, select the section and click Copy, then click Paste and finally click Flip X to reverse it and place it into position. This gives you a reversed section of the bridge you’ve just built, rather than having to build it all again. This is useful if you are building a symmetrical bridge. Undo and Redo Undo allows you to step back though the construction process if you make a mistake. Redo does the opposite; allowing you to step forward to where you started clicking Undo. Save As Clicking the Save As button allows you to save your bridge in its current state. From the Save window, select a folder and a name for your bridge and then click the Save button. If you want to load the bridge in the future click Load Bridge on the Main Menu. Details Clicking the Details button displays various pieces of information for the current level. In the Details window, you are able to add an Architect Name for the current bridge. This name can be whatever you would like to call yourself. Below the architect name, the top 3 high scores from all the profiles on the computer for that level are displayed. Is your name listed there? - 12 - Bridge It Manual In Game: Keyboard Shortcuts High Scores The high scores listed in the Details screen are the three best scores that have been achieved for the level across all Profiles. The score itself is calculated by looking at the bridges overall strength and relative cost as compared to the budget. Help Clicking the Help button displays a list of keyboard shortcut keys that are available in the Edit Screen. Constructing Your Bridge Now that you have all the tools in hand, it is time to look at how to use them to make a bridge. Before starting construction though, you need to understand one more thing: Anchor Points. Anchor Points are locations in each level from where you can start building. These are generally found at either side of the crossing where the road ends. Anchor Points are also found along the river floor, so be sure to look underwater for them. Now, on with construction! Basic Construction In Bridge It, building girders and decking is a simple process. To start building, from within the Edit Screen, left-click the mouse cursor on an Anchor Point. Now move the mouse cursor in the direction you want to build. Note how the girder resizes and stretches to fit the appropriate length up to its maximum length. When the girder is in the correct position, left-click the mouse to construct it and add it to your bridge. Move the mouse again to construct the next girder. To stop construction, right-click in an empty area of the screen. If you make a mistake or want to remove excess girders, right-click the mouse cursor on them and they will disappear. If there are a large number of girders you want to delete, click-and-drag the mouse to select the relevant girders then press the Delete key on your keyboard. As you can see, building girders is simple. Getting them to stand up is slightly more difficult but is all part of the challenge! Some Construction Hints Three Sides Good, Four Sides Bad A good start to creating a stable bridge is to build with the appropriate shapes. The first thing to remember is to always build using triangles. Shapes with more sides tend to bend and collapse, so using triangles gives you the best platform for a stable bridge. Build in Circles In a similar vein to building with triangles, use arcs and arches where possible. A good quality bridge has its weight and stress distributed evenly across the entire structure. This is usually achieved by building in a generally circular fashion – not as in a wheel, but more so round and oval shapes. Lean In Building larger bridges so the two sides lean against each other is often crucial to success in the more difficult levels. Creating a central point on which a bridge is focused and then supporting it accordingly is often the difference between a successful bridge and one that buckles under the pressure. - 13 - Bridge It Manual In Game: Keyboard Shortcuts Simulation Screen Once you have exhausted your budget or created a structure you think can withstand the tests, click the Simulation button in the bottom right-hand corner of the Edit Screen. This displays the Simulation Screen which brings with it a few changes to the view. Simulation Toolbar During the simulation, the options on the toolbar help you analyze your bridge to see where problems lie should your bridge collapse. Each option on the toolbar is detailed below. Effects Menu The Effects Menu houses purely aesthetic aspects of the toolbar. Contained within the Effects Menu are five different toggles allowing you to turn on or off the following options: Shadows Lighting Reflections Heat Haze Grass Wind Depending on your PC graphics hardware, some of these options may be permanently disabled. Time of Day Altering the Time of Day changes the sun’s position overhead, and subsequently affects the look of the level overall. Moving at half hour intervals, you can place the sun in any position in the sky between 06:30 (6:30am) and 17:30 (5:30pm). Earthquakes For an added challenge, Bridge It allows you to trigger earthquakes to further test the strength of your bridge. Much like a real earthquake, Bridge It’s earthquake shake the ground onto which the bridge attaches and thus sends various stresses of compression and tension through the bridge. Changing the force of the earthquake using the Earthquake Force buttons increases and decreases the earthquake intensity. You will find that earthquakes of force 4 and below tend to leave most bridges intact while earthquakes of force 5 and higher test even the most solid constructions. In most levels you can toggle earthquakes on and off by clicking the Earthquake button. The earthquake immediately stops once you click the Play button. Some levels disable the Earthquake button as an earthquake forms part of the test itself. - 14 - Bridge It Manual In Game: Keyboard Shortcuts Edit Located below the Earthquake button, the Edit button takes you back into the Edit Screen if you decide you need to make changes to your bridge. Pressing the Escape key on your keyboard also takes you back to the Edit Screen. Stress Toggling the Stress option allows you to see which parts of your bridge are being put under the most pressure. This view is particularly useful if your bridge is collapsing as it helps you figure out where the problem areas are and which sections require reinforcing. The different colors on the girders indicate different forces being applied to the bridge. Color Meaning Green Minimal stress is being applied to this section Blue There is a high degree of tension in this section (the girder is being strongly pulled in 2 or more directions) Red There is a high degree of compression in this section (the girder is being strongly pushed from 2 or more directions) Sections that are red benefit from greater support and/or stronger materials. Sections that are blue benefit from materials that can withstand high tension (i.e. Cables). The parts of your bridge that do not change from being bright green are undergoing minimal stress and can sometimes be removed, allowing you to focus your budget on the parts of the bridge that are under high stress. Max The Max option toggles the Stress view to display the maximum stress that each girder underwent up to that point. The same color codes are used as for the standard Stress view. View Menu From the View Menu you can change the angle from which you watch the happenings on your bridge. You can select either manual or cinematic views or, during tests, you can ride aboard the various test vehicles and see your bridge from the ground or even the water. Reset Reset restarts the simulation to let you study how your bridge is coping with the stress of the world physics. Pressing the Reset button rebuilds your bridge if it has collapsed or allows you to run the tests again if you wish to. Play The Play button starts the first phase of the simulation test. To progress to the next level, your bridge must still be standing after all phases of the test are complete. Pause The Pause button freezes the simulation and the currently running test vehicles. Click Pause again to continue. Use Pause to examine your bridge during different stages of the simulation. - 15 - Bridge It Manual In Game: Keyboard Shortcuts Simulation Speed Using the Simulation Speed slider you can alter the speed at which the simulation and test run. By slowing the simulation speed, you can study the stress on the bridge closely while the test continues. Bottom Toolbar The bar along the very bottom of the screen displays various pieces of information as the simulation progresses. It displays whether or not you have passed the test, how many (if any) broken links there were and how much time has passed in the simulation. This can be useful for seeing how long it takes for certain parts of the bridge to break and then deciding where to place extra support. Once all test phases are complete and your bridge has passed the level, the score for your bridge is also displayed in the Bottom Toolbar. Next Level Once you have completed a level, the Next Level button becomes available in the bottom righthand corner of the screen. Pressing Next Level takes you back to the Map Pack screen and unlocks the next level. Keyboard Shortcuts Edit Screen Key Command Esc Returns to the Main Menu Del Deletes the currently selected girders 1 Selects the Iron material type (if available) 2 Selects the Steel material type (if available) 3 Selects the Cable material type (if available) 4 Selects the Suspension Cable material type (if available) 5 Selects the Heavy Steel material type (if available) 6 Selects the Hydraulic material type (if available) 7 or J Selects the Break Joint material type (if available) B Toggles the Crossbeam option C Copies the selected girders to the clipboard E Returns the view to its original position G Toggles between the low and high detail design grids O Redoes the previously undone command (if there is one) T Enters the Simulation Screen and starts the simulation U Undoes the previous action V Pastes the girders from the clipboard X Flips the girders attached to the cursor on the X axis Y Hold down to continue building from the same anchor point - 16 - Bridge It Manual In Game: Keyboard Shortcuts ` (Tilde) Toggles the Deck option F1 or H Displays the Help screen F9 Opens the Save As dialog SHIFT+LMB Drag and select bridge components Simulation Screen Key Command Esc Returns to the Edit Screen B Rebuilds the bridge, resets the simulation and stops the test (if running) E Returns the view to its original position M Displays the maximum stress P & Pause Pause the simulation R Displays the current stress on the bridge T Starts the bridge test F1 Returns the camera to the standard, manual movement mode F2 Switches the camera to cinematic mode F3 Places the camera on the first vehicle in the scene (if there is one) F4 Places the camera on the second vehicle in the scene (if there is one) F5 Places the camera on the third vehicle in the scene (if there is one) F6 Places the camera on the fourth vehicle in the scene (if there is one) - 17 -