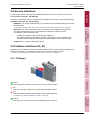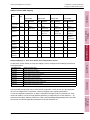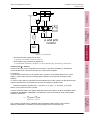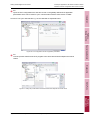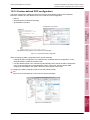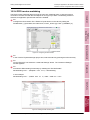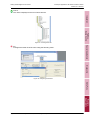
1
APPLICATION INSTRUCTION GETTING STARTED DIGITAL CONTROL VALVES SERIES D63X, D94X, D67X Version -, August 2015 COMMISSIONING INSTRUCTION FOR DIGITAL CONTROLLED MOOG SERVO VALVES WITH FIELDBUS INTERFACE WHAT MOVES YOUR WORLD Copyright © 2015 Moog GmbH Hanns-Klemm-Straße 28 71034 Boeblingen Germany Telephone: +49 7031 622-0 Fax: +49 7031 622-191 E-mail: [email protected] Internet: www.moog.com/Industrial DCV & ACV products: www.moogsoftwaredownload.com/ All rights reserved No part of this document may be reproduced in any form (print, photocopies, microfilm, or by any other means) or edited, duplicated, or distributed with electronic systems without our prior written consent. Offenders will be held liable for the payment of damages. Subject to change without notice The information contained in this Application Instruction is valid and correct at the moment of release of this version of the user information. The version number and release date of this user information are indicated in the footer. Changes may be made to this user information at any time and without notice. Completeness This document is complete only when used in conjunction with the product-related hardware and software documentation required for the relevant application, as for example operating instructions of the valve and other manuals. Selection and qualification of personnel As specified in the product-related hardware and software documentation required for the relevant application, only users properly qualified and authorized for these tasks may work with and on our products. Note This document has been prepared with great care in compliance with the relevant regulations, state-of-the-art technology and our many years of knowledge and experience, and the contents have been generated to the best of the authors' knowledge. However, the possibility of error remains and improvements are possible. Please feel free to submit any comments about possible errors and incomplete information to us. Application Instruction DCV (CDS45379-en; Version -, August 2015) A Getting Started Digital Control Valves Overview Overview Moog Axis Control Valve Moog Digital Control Valve Example: A position and pressure limiting application. Example: A position and pressure limiting application. The control loops are closed in the PLC. PLC The control loops are closed within the valve electronics. PLC V/A V/A SSI WHEATSTONE BRIDGE V/A Figure 1: Overview Application Instruction DCV (CDS45379-en; Version -, August 2015) 1 Getting Started Digital Control Valves Table of contents Table of contents Copyright ................................................................................................................................................... A List of tables............................................................................................................................................... iii List of figures .............................................................................................................................................iv 1 Introduction ...............................................................................................1 1.1 1.2 1.3 1.4 1.5 1.6 1.7 1.8 1.9 1.10 Scope of document ..................................................................................................................... 1 General information .................................................................................................................... 3 Typographical conventions ........................................................................................................ 4 Structure of the warning notes .................................................................................................. 5 Essential documentation, hard- and software for commissioning of DCVs.......................... 6 Further documentation ............................................................................................................... 8 DCV (Digital Control Valve) capabilities .................................................................................. 10 Q-Control.................................................................................................................................... 11 p-Control .................................................................................................................................... 11 pQ-Control.................................................................................................................................. 11 2 Electrical installation / cabling...............................................................12 2.1 Main connector X1..................................................................................................................... 13 2.2 Service interfaces...................................................................................................................... 14 2.3 Fieldbus interfaces X3, X4 ........................................................................................................ 14 2.3.1 CANopen...................................................................................................................... 14 2.3.2 Profibus ........................................................................................................................ 15 2.3.3 EtherCAT...................................................................................................................... 15 2.4 Analog setpoint value interfaces X1, X5, X6, X7..................................................................... 15 2.5 Pressure sensor - valve internal (optional)............................................................................. 16 2.6 Pressure sensor connected to the analog interface (optional)............................................. 17 2.6.1 Fieldbus pressure sensor interface (optional) .............................................................. 17 3 Introduction: Fieldbus (NMT) and Device State Machine (DSM).........18 3.1 Network Management State Machine (NMT) ........................................................................... 19 3.2 Device State Machine (DSM) .................................................................................................... 20 4 Fieldbus configuration ...........................................................................22 4.1 4.2 4.3 4.4 4.5 4.6 Configuration files..................................................................................................................... 23 CANopen baudrate and Node-ID configuration ...................................................................... 24 Parameterization (SDO) ............................................................................................................ 24 Cyclic communication (PDO) ................................................................................................... 25 Link the application program's parameters to the fieldbus .................................................. 27 Start the fieldbus network ........................................................................................................ 28 5 Device control .........................................................................................30 6 Storing and loading of settings .............................................................31 6.1 Data storage in non-volatile memory of the valve electronics.............................................. 31 6.2 Saving of the parameter settings on the PC ........................................................................... 31 6.3 Transmission of configuration data from a data file on the PC to the valve ....................... 31 Application Instruction DCV (CDS45379-en; Version -, August 2015) i Getting Started Digital Control Valves Table of contents 7 Adaptation to special applications ........................................................32 7.1 7.2 7.3 7.4 7.5 7.6 7.7 7.8 7.9 Changing the control modes (pressure control, pQ Control, delta p, flow control) ........... 32 Changing the source of the Q setpoint value ......................................................................... 33 Changing the source of the control word ............................................................................... 34 PDO monitoring / watchdog activation ................................................................................... 34 Changing the default PDO mapping ........................................................................................ 35 Event handler............................................................................................................................. 39 Data logger, function generator ............................................................................................... 39 Configuration of fault reactions ............................................................................................... 39 Pressure control ........................................................................................................................ 40 7.9.1 Pressure setpoint value................................................................................................ 41 7.9.2 Pressure actual value interface .................................................................................... 43 7.9.2.1 Example of configuring an analog pressure actual value transducer...... 45 7.9.2.2 Example of configuring a fieldbus pressure transducer .......................... 47 7.9.3 Control mode p and p/Q control ................................................................................... 48 7.9.4 Adjustment of the pressure controller to the application .............................................. 51 8 Diagnostics / troubleshooting ...............................................................54 8.1 8.2 8.3 8.4 CANopen emergency message used in CANopen incl. EtherCAT CoE networks .............. 54 SDO abort codes ....................................................................................................................... 55 Diagnostics / troubleshooting fieldbus EtherCAT ................................................................. 58 Diagnostics / troubleshooting valve application .................................................................... 62 9 Moog Valve and Pump Configuration Software (MoVaPuCo) .............66 9.1 Requirements............................................................................................................................. 66 9.2 USB to CAN driver version VCI3 .............................................................................................. 66 9.3 Installation of the MoVaPuCo software ................................................................................... 67 9.3.1 Help function of the MoVaPuCo ................................................................................... 68 10 Example applications with different network masters ........................69 10.1 CANopen network with Moog MSC II....................................................................................... 69 10.1.1 MSC CANopen stack documentation........................................................................... 70 10.2 EtherCAT network configuration with TwinCAT master........................................................ 71 10.2.1 Exchanging an existing valve in the network configuration .......................................... 78 10.2.2 SDO parameter exchange to PLC................................................................................ 79 10.2.3 Custom-defined PDO configuration.............................................................................. 80 10.2.4 PDO receive watchdog................................................................................................. 82 10.3 Profibus, S7 / Siemens.............................................................................................................. 84 11 Abbreviations / Units ..............................................................................87 Application Instruction DCV (CDS45379-en; Version -, August 2015) ii Getting Started Digital Control Valves List of tables List of tables Table 1: Further documentation .................................................................................................................... 8 Table 2: Q-Control ....................................................................................................................................... 11 Table 3: CANopen network states ............................................................................................................... 19 Table 4: EtherCAT network states............................................................................................................... 19 Table 5: DSM states .................................................................................................................................... 20 Table 6: Configuration files.......................................................................................................................... 23 Table 7: RxPDO_4 data frame .................................................................................................................... 25 Table 8: TxPDO_4 data frame..................................................................................................................... 25 Table 9: Setpoint value ranges.................................................................................................................... 27 Table 10: Control mode values...................................................................................................................... 32 Table 11: Device mode values ...................................................................................................................... 33 Table 12: Local mode values......................................................................................................................... 34 Table 13: Default Receive PDO mapping...................................................................................................... 36 Table 14: Default Transmit PDO mapping..................................................................................................... 37 Table 15: Mapping for drive speed and position control................................................................................ 37 Table 16: Profibus data telegram selection ................................................................................................... 38 Table 17: Pressure control - setpoint and actual value ranges ..................................................................... 40 Table 18: Δp control....................................................................................................................................... 50 Table 19: Emergency message ..................................................................................................................... 54 Table 20: Emergency message extensions for EtherCAT............................................................................. 54 Table 21: SDO abort codes ........................................................................................................................... 55 Table 22: Fieldbus checklist (CANopen only)................................................................................................ 56 Table 23: AL status codes ............................................................................................................................. 58 Table 24: EtherCAT checklist ........................................................................................................................ 60 Table 25: Status word.................................................................................................................................... 64 Table 26: Valve Application checklist ............................................................................................................ 65 Table 27: EtherCAT network states............................................................................................................... 77 Table 28: Methods accessing non-cyclic data ............................................................................................... 79 Table 29: Abbreviations................................................................................................................................. 87 Table 30: Physical units................................................................................................................................. 87 Application Instruction DCV (CDS45379-en; Version -, August 2015) iii Getting Started Digital Control Valves List of figures List of figures Figure 1: Overview.......................................................................................................................................... 1 Figure 1: Valve series: D636, D637, D638, D639, D67x. D94x ...................................................................... 1 Figure 2: Step-by-step instruction ................................................................................................................... 2 Figure 3: Q-Control ....................................................................................................................................... 11 Figure 4: Connectors .................................................................................................................................... 12 Figure 5: Analog input interface.................................................................................................................... 17 Figure 6: Network State Machine (NMT) ...................................................................................................... 19 Figure 7: Device State Machine (DSM) ........................................................................................................ 20 Figure 8: Master-slave communication ......................................................................................................... 25 Figure 9: Changing the Q setpoint value ...................................................................................................... 33 Figure 10: Local mode .................................................................................................................................... 34 Figure 11: PDO mapping ................................................................................................................................ 35 Figure 12: Master-slave communication ......................................................................................................... 35 Figure 13: Default mapping ............................................................................................................................ 36 Figure 14: Analog input interface.................................................................................................................... 41 Figure 15: Pressure setpoint value path ......................................................................................................... 42 Figure 16: Pressure actual value interface ..................................................................................................... 43 Figure 17: p and p/Q control ........................................................................................................................... 49 Figure 18: Δp control principle ........................................................................................................................ 50 Figure 19: Pressure controller ........................................................................................................................ 51 Figure 20: TwinCAT System Manager............................................................................................................ 59 Figure 21: Error states shown in MoVaPuCo ................................................................................................. 62 Figure 22: MoVaPuCo fault configuration ....................................................................................................... 63 Figure 23: Device State Machine fault states ................................................................................................. 64 Figure 24: USB to CAN adapter ..................................................................................................................... 66 Figure 25: CAN cable ..................................................................................................................................... 66 Figure 26: Startup-surface of the MoVaPuCo software with the help function ............................................... 67 Figure 27: User interface of the MoVaPuCo with help function ...................................................................... 68 Figure 28: CANopen network with Moog MSC II configuration ...................................................................... 70 Figure 29: Appending a network card............................................................................................................. 71 Figure 30: Selecting a network card ............................................................................................................... 72 Figure 31: Inserting a network card ................................................................................................................ 72 Figure 32: Scanning the network .................................................................................................................... 73 Figure 33: Process Data Objects (PDO) mapping .......................................................................................... 73 Figure 34: Linking an application to the PLC program.................................................................................... 74 Figure 35: Appending a PLC project............................................................................................................... 74 Figure 36: PLC configuration with PLC application parameters ..................................................................... 75 Application Instruction DCV (CDS45379-en; Version -, August 2015) iv Getting Started Digital Control Valves List of figures Figure 37: Linking the process data to the slave device/valves setpoint and actual values ........................... 75 Figure 38: Setting the network startup options ............................................................................................... 76 Figure 39: Activating the network configuration .............................................................................................. 77 Figure 40: Starting the PLC application .......................................................................................................... 78 Figure 41: Custom-defined PDO configuration ............................................................................................... 80 Figure 42: "Process Data" tab......................................................................................................................... 80 Figure 43: Editing the PDO mapping .............................................................................................................. 81 Figure 44: Editing the PDO list ....................................................................................................................... 81 Figure 45: Configuring the fault reaction......................................................................................................... 82 Figure 46: Setting the SM watchdog time ....................................................................................................... 82 Figure 47: Editing the ESI file ......................................................................................................................... 83 Figure 48: Network start sequence ................................................................................................................. 83 Figure 49: Copying slave interface description file (GSD) .............................................................................. 84 Figure 50: Installing slave interface description file (GSD) ............................................................................. 84 Figure 51: Checking slaves list ....................................................................................................................... 85 Figure 52: Configuring the Node-ID ................................................................................................................ 85 Figure 53: Configuring the Node-ID using MoVaPuCo ................................................................................... 86 Figure 54: Selecting the telegram ................................................................................................................... 86 Application Instruction DCV (CDS45379-en; Version -, August 2015) v Getting Started Digital Control Valves 1 Introduction Scope of document 1 Introduction Installation 1.1 Scope of document This application instruction is intended to be used by application and service engineers for initial set-up and operation of all Moog valves with digital electronics (DCV and ACV), Q and p/Q functionality and integrated fieldbus interface. Products covered • Direct driven and ServoJet operated valves Fieldbus, Device Control • Single stage and electrical dual stage • Sizes NG6 to NG32 • Fieldbusses CANopen, Profibus DPV1, EtherCAT • Valve series: D636 to D639 (Direct Driven NG 6 and NG10) Special Applications Diagnostics Figure 1: Valve series: D636, D637, D638, D639, D67x. D94x This instruction has as its primary focus the initial parameterization and commissioning of the fieldbus master (PLC). The parameterization on the valve, if even necessary, can also be done using the Moog Valve and Pump Configuration Software (MoVaPuCo). MoVaPuCo The factory default parameterization covers most applications. For special applications the parameterization can be adapted to the customers' needs. This DIV document can be used for Axis Control Valves as the first steps are exactly the same. The following chapters give a step-by-step instruction for commissioning the different valve interfaces. Example Applications Application Instruction DCV (CDS45379-en; Version -, August 2015) 1 Getting Started Digital Control Valves 1 Introduction Scope of document Mechanical installation 1) Installation Electrical installation / cabling Fieldbus, Device Control Fieldbus configuration Special Applications Device control Device State Machine Network State Machine Storing and loading of settings Diagnostics Adaptation to special applications Diagnostics / troubleshooting MoVaPuCo MoVaPuCo Example applications Example Applications 1) For the correct mechanical installation, see the corresponding valve-specific installation manual Figure 2: Step-by-step instruction Some steps are only described briefly. If there is an existing Moog document already describing the procedure, this document is referred to. Application Instruction DCV (CDS45379-en; Version -, August 2015) 2 Getting Started Digital Control Valves 1 Introduction General information 1.2 General information Installation The described valves may be operated exclusively within the framework of the data and applications specified in the corresponding user manual. Any other or more extensive use is not permitted. The application instruction DCV is only valid in conjunction with the corresponding user manuals of our digital valves. Fieldbus, Device Control The corresponding user manuals of our digital valves can be downloaded from the following link: www.moog.com/literature-search Special Applications Diagnostics MoVaPuCo Example Applications Application Instruction DCV (CDS45379-en; Version -, August 2015) 3 Getting Started Digital Control Valves 1 Introduction Typographical conventions 1.3 Typographical conventions Installation DANGER Warns about an imminent danger to health and life. Failure to observe this warning can result in severe injuries or even death. Make absolutely sure to heed the measures described to prevent this danger WARNING Fieldbus, Device Control Warns about a possible situation dangerous to health. Failure to observe this warning can result in severe injuries or even death. Make absolutely sure to heed the measures described to prevent this danger CAUTION Special Applications Warns about a possible situation dangerous to health. Failure to observe this warning can cause slight injuries. Make absolutely sure to heed the measures described to prevent this danger NOTICE Failure to observe this safety notice can result in property damage! Identifies important notes that contain usage tips and special useful information, but no warnings. Identifies listings Identifies an action that must be taken Identifies references to another chapter, another table or figure "…" Denotes headings to the chapters or titles of the documents to which reference is being made Identifies hyperlinks 1., 2., … Identifies steps in a procedure that must be performed in consecutive order MoVaPuCo Blue text '…' Diagnostics • or - Identifies parameters for valve software e.g.: 'Node-ID' or the valve status, e.g.: 'ACTIVE' Do. Identifies next action, next step, to do Example Applications Check. Identifies check e.g. requirements and conditions on hardware, software Application Instruction DCV (CDS45379-en; Version -, August 2015) 4 Getting Started Digital Control Valves 1 Introduction Structure of the warning notes 1.4 Structure of the warning notes DANGER 1 3 Entrapment hazard! 4 Do not enter danger zone! 5 2 Fieldbus, Device Control Moving machine parts! Installation In the present application instruction, danger symbols draw attention to existing dangers in the handling of valves that are inherent in the design of hydraulic equipment. The actions for avoiding danger described must be adhered to. The warning notes used are structured as follows: Special Applications Legend 1 Warning symbol: draws attention to the danger 2 Signal word: indicates the severity of the danger 3 Type and source of hazard 4 Possible consequences if a potential hazard. Describes the consequences in case of nonobservance. 5 Hazard prevention measures Diagnostics MoVaPuCo Example Applications Application Instruction DCV (CDS45379-en; Version -, August 2015) 5 Getting Started Digital Control Valves 1 Introduction Essential documentation, hard- and software for commissioning of DCVs 1.5 Essential documentation, hard- and software for commissioning of DCVs Installation Check essential valve documentation for installation and commissioning of the valve Chap. "1.6 Further documentation", page 8 Fieldbus, Device Control Special Applications Diagnostics MoVaPuCo Application Instruction DCV (CDS45379-en; Version -, August 2015) Example Applications Check essential hardware for installation of the valve 6 Getting Started Digital Control Valves 1 Introduction Essential documentation, hard- and software for commissioning of DCVs Installation Fieldbus, Device Control Special Applications Diagnostics Chap. "7 Adaptation to special applications", page 32 MoVaPuCo Check software for installation of the valve Start commissioning Example Applications Application Instruction DCV (CDS45379-en; Version -, August 2015) 7 Getting Started Digital Control Valves 1 Introduction Further documentation 1.6 Further documentation Moog Document Number Language Operating Instructions D636/D638 Series B95872-001 Montage- und InbetriebnahmeHinweise Baureihen D671/2/3/4/5 Proportional- und Servoventile B97072-670 German D671 bis D675 Proportionalventile Montage-InbetriebnahmeHinweise Manual Mounting and Installation Notes D671/2/3/4/5 Series - Proportional Valves and Servo Valves B97072-670 English D67X Series ServoProportional Valves and Servovalves Manual Operating Instructions D941 Series C43357-001 English D941 Series pQ-ServoProportional Valves Manual Proportionalventile Baureihe D941 C43357-002 German Serie D941 p/QProportionalventile Manual Mounting and Installation Notes D941/2/3/4/5 Series - Proportional Valves and Servo Valves B97072-941 English D941 Series pQ-ServoProportional Valves Manual Montage- und InbetriebnahmeHinweise Baureihen D941/2/3/4/5 Proportional- und Servoventile B97072-941 German D941 bis D944 Proportionalventile Montage-InbetriebnahmeHinweise Manual User Manual D637-R/D639-R Series CA61892-001 English Direct Drive Servo Valves D637 and D639 Series Manual Mounting and Installation Notes D6636/7/8/9/5 Series - Proportional Valves and Servo Valves B97072-636 German Servoventile Baureihen D636, D637, D638 und D639 Montage- und Inbetriebnahme-Hinweise Manual Montage- und InbetriebnahmeHinweise Baureihen D636/7/8/9/5 Series - Proportional- und Servoventile B97072-636 English D636, D637, D638 and D639 Series Servovalves Manual Direct-Operated Servo Valves with Integrated Digital Electronics Type Series D636K and D638K ATEX/IECEx CDS29587-en English ATEX Direct Drive Digital and Axis Control Valves Series D636K and D638K Size 03 Manual Direktbetätigte Servoventile mit integrierter digitaler Elektronik Baureihe D636K und D638K ATEX/IECEx CDS29587-de German ATEX Direct Drive Digital and Axis Control Valves Series D636K and D638K Size 03 Manual Direktbetätigte Servo- und Proportionalventile mit Integrierter Digitaler Elektronik Baureihe D637K und D639K ATEX/IECEx CDS29577-de German ATEX Direktbetätigte Servoventile - Baureihen D637K und D639K Größe 05 Manual Direct-Operated Servo Valves with Integrated Digital Electronics Type Series D637K and D639K ATEX/IECEx CDS29577-en English ATEX Direct Drive Digital and Axis Control Valves Series D637K and D639K Size 05 Manual Mounting and Installation Notes Proportional Valves and Servo Valves D670/1/2/3/4/5 Series B97072-670 German/Engl ish Proportionalventile Baureihen D671, D672, D673, D674 und D675 Manual Example Applications Manual MoVaPuCo D636/D638 Series ServoProportional Valves Diagnostics English Special Applications Type of Document Fieldbus, Device Control Description of the Document Document title Installation This application instruction is part of the complete set of documentation for the servo valve, which includes the following documents: Table 1: Further documentation (part 1 of 3) Application Instruction DCV (CDS45379-en; Version -, August 2015) 8 Getting Started Digital Control Valves 1 Introduction Further documentation Language Vorgesteuerte Proportionalventile mit Integrierter Digitaler Elektronik Baureihe D67xK ATEX/IECEx CDS29588-de Manual Pilot-Operated Proportional Valves with Integrated Digital Electronics D67xK Series ATEX/IECEx CDS29588-en English ATEX Pilot-operated Digital and Axis Control Valves Series D67xK - Sizes 05 to 10 Manual Mounting and Installation Notes pQProportional Valves D941/2/3/4 Series B97072-941 German pQ-Proportionalventile Baureihen D941, D942, D943 und D944 Manual Pilot-Operated Proportional Valves with Integrated Digital Electronics D94xK Series ATEX/IECEx CDS29589-en English ATEX Pilot-operated Digital and Axis Control Valves Series D94xK - Sizes 05 to 10 Manual Vorgesteuerte Proportionalventile mit Integrierter Digitaler Elektronik Baureihe D94xK ATEX/IECEx CDS29589-de German ATEX Pilot-operated Digital and Axis Control Valves Series D94xK - Sizes 05 to 10 Manual Digital Control Valves with CANopen Interface Firmware B99224-DV016-B-211 CDS33853-en English Digital Interface Valves with CANopen Interface Firmware Manual Manual Digital Control Valves with EtherCAT Interface Firmware B99226-DV016-B-211 CDS33722-en English Digital Interface Valves with EtherCAT Interface Firmware Manual Manual Axis Control valves with CANopen Interface Firmware B99224-DV016-D-211 CDS45934-en English Axis Control valves with CANopen Interface Firmware Manual Manual Digital Control Valves with Profibus Interface Firmware B99225-DV016-B-211 CDS33854-en English Digital Interface Valves with Profibus Interface Firmware Manual Manual Benutzerinformation Elektrische Anschlüsse CA63420-002 German Elektrische Anschlüsse Manual User Manual Electrical Interfaces CA63420-001 English Electrical Interfaces Manual Zulässige Längen für elektrische Anschlussleitungen von Hydraulikventilen mit integrierter Elektronik CA48851-002 German TN 494 - Zulässige Längen für elektrische Anschlussleitungen von Ventilen mit intgreierter Elektronik Technical Note Maximum permissible lengths of electric cables of hydraulic valves with integrated electronics CA48851-001 English TN 494 - Maximum Permissible Length of Electric Cables for Valves with Integrated Electronics Technical Note Technical Note TN353 Protective Grounding and Electrical Shielding of Hydraulic Valves with Integrated Electronics CA58437-001 English TN 353 Protective Grounding and Electrical Shielding of Valves Technical Note MoVaPuCo ATEX Vorgesteuerte Proportionalventile mit integrierter digitaler Elektronik und optionaler Feldbus-Schnittstelle Baureihen D67xK - Größen 05 bis 10 Diagnostics German Special Applications Type of Document Fieldbus, Device Control Description of the Document Installation Moog Document Number Document title Table 1: Further documentation (part 2 of 3) Example Applications Application Instruction DCV (CDS45379-en; Version -, August 2015) 9 Getting Started Digital Control Valves 1 Introduction DCV (Digital Control Valve) capabilities Language Technische Notiz TN353 Schutzerdung und Schirmung von Hydraulikventilen mit integrierter Elektronik CA58437 German TN 353 Potenzialausgleich und Schutzerdung bei Hydraulikventilen mit integrierter Elektronik Technical Note Benutzerinformation Baureihe D67x vorgesteuerte Proportionalventile mit integrierter digitaler Elektronik CA75181-002 German User Manual D67x Manual Servo-Proportional Valves Pilotoperated with integrated digital electronics and Fieldbus Interface Series D671 to D675 CDL28319-en English Catalog - D671-D672D673-D674-D675 Series Drive Servo-Proportional Valves with Integrated Digital Electronics and CAN bus interface Catalog User Manual Firmware Radial Piston Pump (RKP-D) with CAN Bus Interface B99224-DV007CE400 English Firmware Manual Radial Piston Pump (RKP-D) with CAN Bus Interface Manual Direktgesteuerte Servoventile mit integrierter digitaler Elektronik D636 / D637 CA45707-002 German Direktgesteuerte Servoventile mit integrierter digitaler Elektronik D636 D637 Catalog Special Applications Type of Document Fieldbus, Device Control Description of the Document Installation Moog Document Number Document title Table 1: Further documentation (part 3 of 3) To download the documents for valve documentation use the following link: www.moog.com/literature-search To download Moog Software use the following link: www.moogsoftwaredownload.com 1.7 DCV (Digital Control Valve) capabilities Diagnostics The integrated digital control electronics of Moog valves is capable of closing different control loops such as spool (valve) position, pressure control in port A and p/Q-control. Control loop type is set by a parameter in control mode. The factory setting of the control mode is hence always defined by Moog according to the type designation (16th place in the valves type designation), as part of the valve's ordering code. The fieldbus or analog inputs can be used independently or together for both setpoint and command signal sources. MoVaPuCo Example Applications Application Instruction DCV (CDS45379-en; Version -, August 2015) 10 Getting Started Digital Control Valves 1 Introduction Q-Control 1.8 Q-Control Capability 16th place in the valves type designation Q (spool position closed loop) A1 Installation The Q controller controls the spool position of a servo or proportional valve. Hence, the user only needs to give a spool position command and an enable signal to the valve. The valve integrated electronics of the valve measures the spool position and moves the spool accordingly to the desired position. Table 2: Q-Control Special Applications Fieldbus Communication Analogue signals Pos LOAD Fieldbus, Device Control Valve electronics Q-Control Diagnostics PLC Figure 3: Q-Control MoVaPuCo 1.9 p-Control The valve is able to also control the output pressure p and Δp = pA – pB. Details about this control mode: Chap. "7.9.3 Control mode p and p/Q control", page 48 1.10 pQ-Control Example Applications The valve is able to control spool position while limiting the pressure p in port A. It is also possible to use the p/Q controller together with Δp-control. Details about this control mode: Chap. "7.9.3 Control mode p and p/Q control", page 48 Application Instruction DCV (CDS45379-en; Version -, August 2015) 11 Getting Started Digital Control Valves 2 Electrical installation / cabling 2 Electrical installation / cabling Installation WARNING X1 - Main Connector Description: power supply, enable signal X2 - Incremental Encoder Description: position of rotary drive Special Applications X10 - Service Connector Description: commissioning interface Fieldbus, Device Control Danger of personal injury and damage to property due to unexpected or accidental operation! Plug in the valve connectors in the state of configuration or maintenance of the valves might lead to an uncontrolled and/or unpredictable operational sequence of actuators or of the overall machine. Before plug in valve connectors, make sure the machine and hydraulic pump is off, the hydraulic system is depressurized, the accumulators are unloaded (i.e., contain no oil) and the actuator cannot move due to external loads. If automatic control technology is to be used, the user should, in addition to all the potentially available standards or guidelines on safety-engineering installations, consult the manufacturer of the components used in great depth. X3/X4 - Fieldbus Interface Description: fieldbus interface to superior system X5/X6/X7 - Analog inputs Description: pressure transducer Diagnostics X12 - Strain Gauge Input Description: force measurement Figure 4: Connectors MoVaPuCo Because of the large number of different connectors and pin assignments for the Moog valve range the electrical commissioning is described in a separate document containing general information about the individual connections: User Manual "Electrical Interfaces", CA63420-001, Chapter 4 "Electrical Interfaces" Detailed information about special topics like cable length, shielding, building up voltage supply systems and fieldbus networks is described in the following technical notes: • CA58437-001 Technical Note TN353 Protective Grounding and Electrical Shielding of Valves • CA48851-001 Technical Note TN494 Maximum Permissible Length of Electric Cables for Valves with Integrated Electronics Example Applications Application Instruction DCV (CDS45379-en; Version -, August 2015) 12 Getting Started Digital Control Valves 2 Electrical installation / cabling Main connector X1 2.1 Main connector X1 Installation Do: Prepare the main connector and cable. The connector and cable must match the valve X1 connector. For initial operation: the X1 connector has to have the following signals/power connected: • Power 0 V, 24 V • Release Signal / Enable Signal at X1, Pin C (24 VDC) unless position 13 in type designation is "O". Fieldbus, Device Control • Optional: analog setpoint value for the spool position and/or pressure. For assignment see: User Manual "Electrical Interfaces", CA63420-001, Chapter 4 "Electrical Interfaces" The electrical installation includes the following steps: Each connector and cable: Check: The pin-layout against what is defined in the user manual. Special Applications Check: The connector for proper connection of individual cables and pins. Check: The signal or power has the correct polarity. Check: The valve is grounded with low-resistance. Check: The protective shield of the cable is properly connected. Diagnostics Do: Connect the above signals: 24 V power and release signal. Do: Switch off the hydraulic pressure. Check: The hydraulic pressure is zero. Do: Switch on the 24 V power supply. MoVaPuCo Check: Power consumption must be below 4 A. Check: «MS» LED is blinking yellow or green or constant green. Do: Switch off the 24 V power. Example Applications Application Instruction DCV (CDS45379-en; Version -, August 2015) 13 Getting Started Digital Control Valves 2 Electrical installation / cabling Service interfaces 2.2 Service interfaces Installation To access the valve's configuration parameters (SDO) the following interfaces can be used: Local service connector, X10, M8 plug The valve's parameters can be accessed via the CANopen SDO Protocol using the MoVaPuCo. Fieldbus connectors, X3, X4, M12 plugs • CANopen: The valve's parameters can be accessed via the CANopen SDO protocol using the MoVaPuCo Chapter "9 Moog Valve and Pump Configuration Software (MoVaPuCo)", page 66 Fieldbus, Device Control • EtherCAT: The valve's parameters can be accessed via the CANopen SDO protocol. Therefore the SDO protocol is encapsulated in the EtherCAT mailbox protocol. This mailbox can be accessed using - an EtherCAT mailbox frame with EtherType 0x88A4 or - the mailbox gateway of the fieldbus master. This gateway can be accessed using a standard Internet UDP/TCP frame sent to the port 0x88A4 of the fieldbus master. • Profibus: DP-V1 protocol parameter channel. Special Applications 2.3 Fieldbus interfaces X3, X4 Depending on the fieldbus selected, the fieldbus cable has to be connected as described in the following subchapters. If no fieldbus is used, continue with the following chapter: Chapter "2.4 Analog setpoint value interfaces X1, X5, X6, X7", page 15 2.3.1 CANopen Diagnostics MoVaPuCo Check: One termination resistor is connected to each end of the CAN bus. Do: Switch on the power supply for the valve and the fieldbus master. Do: Start the fieldbus master's network state machine (NMT protocol). Chapter "4.6 Start the fieldbus network", page 28 Application Instruction DCV (CDS45379-en; Version -, August 2015) Example Applications Check: The «NS» LED of the valve must be on/blinking (yellow or green). 14 Getting Started Digital Control Valves 2 Electrical installation / cabling Analog setpoint value interfaces X1, X5, X6, X7 2.3.2 Profibus Installation Check: One termination resistor is connected to each end of the Profibus. Do: Switch on the power supply for the valve and the fieldbus master. Do: Start the fieldbus master's network state machine (NMT protocol). Chapter "4.6 Start the fieldbus network", page 28 Fieldbus, Device Control Check: The «NS» LED of the valve must be on/blinking (yellow or green). 2.3.3 EtherCAT Special Applications Do: Connect the EtherCAT cable to a second EtherCAT device e.g. another valve or a network slave or master. Do: Switch on the power supply for the valve and the other device. Check: The «NS» LED of the valve must be on/blinking (yellow or green). 2.4 Analog setpoint value interfaces X1, X5, X6, X7 Diagnostics Per default the analog input 0 and input 1 on connector X1 are used as setpoint inputs. The connectors X5, X6, X7 can also be used as analog setpoint inputs. The signal ranges of the analog input can be configured to different types and ranges (e.g. 4…20 mA, ±10 mA, ±0 V), the ground can be "potential free" (dedicated current return path) or "single ended" (referenced to circuit ground, current return path is ground). MoVaPuCo Example Applications Application Instruction DCV (CDS45379-en; Version -, August 2015) 15 Getting Started Digital Control Valves 2 Electrical installation / cabling Pressure sensor - valve internal (optional) 2.5 Pressure sensor - valve internal (optional) Installation This sensor is a valve internal transducer used to measure the pressure on hydraulic port A. Do: Switch on the power supply for the valve. Do: Connect the MoVaPuCo to the valve or check later with the fieldbus master. Check: The actual pressure value is shown in the parameter <PressureTransducerValue> index#sub-index 0x3404#0. Fieldbus, Device Control Do: Charge the port A with pressure. Check: The actual pressure value is shown in the parameter <PressureTransducerValue> index#sub-index 0x3404#0. Special Applications Check: The actual pressure value is conditioned and scaled and passed to the pressure controller's input <PrsActualValue> index 0x6381. If not, check the 'Pressure transducer selection' and the 'Actual value filter'. For more details see: Chapter "7.9 Pressure control", page 40 Diagnostics MoVaPuCo Example Applications Application Instruction DCV (CDS45379-en; Version -, August 2015) 16 Getting Started Digital Control Valves 2 Electrical installation / cabling Pressure sensor connected to the analog interface (optional) Installation 2.6 Pressure sensor connected to the analog interface (optional) The user can connect external pressure transducers to the valve. The connectors X5, X6, X7 can be used as analog actual value transducer interfaces. The signal ranges of the analog input can be configured to different types and ranges (4…20 mA, ±10 mA, ±10 V), the ground can be "Potential Free" or "Grounded". Fieldbus, Device Control Special Applications Connector no: X5, X6, X7 M8. 4-pin Description: Analog input interface <InputType> (index#sub-index 0x3210#0) Value range Grounded 1 9 0…10 V (0…100 %) 2 10 ±10 mA (±100 %) 3 6 0…10 mA (0…100 %) 4 7 4…20 mA (0…100 %) 5 8 4…20 mA (±100 %) 11 12 Diagnostics Potential-free ±10 V (±100 %) Parameter, name, communication address: X5 analog input: an2val, index#sub-index 0x3214#0; an2typ, index#sub-index 0x3210#0 X6 analog input: an3val, index#sub-index 0x321C#0; an3typ, index#sub-index 0x3218#0 X7 analog input: an4val, index#sub-index 0x3224#0; an4typ, index#sub-index 0x3220#0 All inputs 0…100 % correspond to 0…16384 or ±100 % correspond to ±16384 Figure 5: Analog input interface MoVaPuCo The logic to select the interface is called the "transducer interface". This interface is the link between the input source and the actual value conditioning. Within the pressure controller the conditioned value source must be selected. Configuration of the input path: Chapter "7.9.1 Pressure setpoint value", page 41 2.6.1 Fieldbus pressure sensor interface (optional) Example Applications The valve can use the fieldbus interface to read in a pressure transducer value. In this case the Transducer Port index#sub-index 0x4032#0 has to be set to a parameter mapped to a receive PDO. Note that you need to have an ACV Firmware (ACV valve) to do this. Application Instruction DCV (CDS45379-en; Version -, August 2015) 17 Getting Started Digital Control Valves 3 Introduction: Fieldbus (NMT) and Device State Machine (DSM) Installation 3 Introduction: Fieldbus (NMT) and Device State Machine (DSM) After the electrical connection (power supply and setpoint signal) to the valve has been completed, the next step is the configuration of the network communication, as described in the following chapter 4. For better understanding of the next steps, this chapter explains the valve's state machines in general terms. The valve has two state machines for the main control of the valve's behavior: Fieldbus, Device Control • A Network Management State Machine (NMT) to synchronize the network communication between the valve and the fieldbus master (only for valves with fieldbus interface). • A Device State Machine (DSM) to control the behavior of the valve application. (for valves with fieldbus interface and valves with analog setpoint I/O). Special Applications Both state machines are more or less independent. Normally the network state machine is started first. This will enable setpoint, actual value and command exchange between the fieldbus master and the valve. With this the valves application can be activated by controlling the valve application state machine. Valves without a fieldbus connection start the valve device state machine automatically. Diagnostics MoVaPuCo Example Applications Application Instruction DCV (CDS45379-en; Version -, August 2015) 18 Getting Started Digital Control Valves 3 Introduction: Fieldbus (NMT) and Device State Machine (DSM) Network Management State Machine (NMT) 3.1 Network Management State Machine (NMT) Installation Fieldbus, Device Control Figure 6: Network State Machine (NMT) CANopen network states • Default state after power on • No communication (PDO/SDO) 'PRE-OPERATIONAL' • Network communication initialized • SDO communication is enabled • No PDO 'OPERATIONAL' • SDO communication is enabled • PDO communication is enabled 'STOPPED' No communication with this device is possible. Such a device can only react on commanded state transitions, which are received via NMT objects. Special Applications 'INITIALIZATION' Table 3: CANopen network states EtherCAT network states Default state after power on No SDO (a-cyclic) communication No PDO (cyclic) communication Master can write info register 'PRE-OPERATIONAL' • Network communication initialized • No PDO (cyclic) communication • SDO (a-cyclic) communication enabled 'SAFE-OPERATIONAL' • SDO (a-cyclic) communication enabled • PDO (cyclic) communication just inputs, outputs are in 'SAFE' state 'OPERATIONAL' • SDO (a-cyclic) communication enabled • PDO (cyclic) communication inputs and outputs MoVaPuCo • • • • Diagnostics 'INIT' Table 4: EtherCAT network states Example Applications Application Instruction DCV (CDS45379-en; Version -, August 2015) 19 Getting Started Digital Control Valves 3 Introduction: Fieldbus (NMT) and Device State Machine (DSM) Device State Machine (DSM) 3.2 Device State Machine (DSM) Installation The valve has a state machine controlling and reflecting the actual operational state of the valve. This state machine is controlled by the <ControlWord> to activate and deactivate the valve. The actual state of the device is notified in the <StatusWord>. Valve Application State Machine 0 (control word from bus) <StatusWord> (0x6041) #ControlWord# <LocalControlWord> (0x4040) Fieldbus, Device Control <ControlWord> (0x6040) 1 (control word local) <Local> (0x604F) <StatusWord> (0x6041) #ControlWord# Special Applications R: Bit Ready (Bit 3) M: Bit Active (Bit 2) H: Bit Hold (Bit 1) D: Bit Disabled (Bit 0) R: Bit Reset faults (Bit 3) M: Bit Active (Bit 2) H: Bit Hold (Bit 1) D: Bit Disabled (Bit 0) Figure 7: Device State Machine (DSM) DSM states Status word bits Description 0 D 'NOT_READY' x x x 0 • The electronic circuit has power. • Device initialization running (e.g. communication interface, hardware, software). • Device function disabled. • Hydraulic failsafe spool position (as specified in model code). 'INIT' 1 0 0 1 Device parameters can be set. • Device function disabled. • Hydraulic failsafe spool position (as specified in model code). 'DISABLED' 1 0 1 1 Device parameters can be set. • Device function disabled. • Actual values are available. • Hydraulic failsafe spool position (as specified in model code) 'HOLD' 1 1 1 1 Device parameters can be set. • Actual values are available. • The selected <ControlMode> (0x6043) is active. • The setpoint according to the chosen <DeviceMode> (0x6042) are not effective. • The pre-defined, electrically controlled hold spool position setpoint value <SplHoldSetPoint> (0x6314) is active. 'ACTIVE' 1 1 1 1 Device parameters can be set. • Actual values are available. • The setpoint values from the bus or from the analog input according to the chosen <DeviceMode> (0x6042) are active. 'FAULT_INIT', 'FAULT_DISABLED', 'FAUL_HOLD', 'FAULT_REACTION' 0 0 0 0 0 0 1 x 0 1 1 x 1 1 1 x • A fault reaction has occurred. • Hydraulic failsafe or 'HOLD' spool position (as specified in model code) Example Applications 1 H MoVaPuCo 2 M Diagnostics 3 R Table 5: DSM states Application Instruction DCV (CDS45379-en; Version -, August 2015) 20 Getting Started Digital Control Valves 3 Introduction: Fieldbus (NMT) and Device State Machine (DSM) Device State Machine (DSM) State transitions can be caused by • Changing the <ControlWord> Installation • Hardware enable signal on connector X1 • Valve internal events For more information regarding the Device State Machine, see: User Manual "Firmware", Chapter 5.2.2 "Device State Machine (DSM)" Fieldbus, Device Control Special Applications Diagnostics MoVaPuCo Example Applications Application Instruction DCV (CDS45379-en; Version -, August 2015) 21 Getting Started Digital Control Valves 4 Fieldbus configuration 4 Fieldbus configuration Installation This chapter shows how to configure the fieldbus communication between the valve and the fieldbus master / PLC. To use a valve for controlling a machine, at least one application program is needed. The input and output parameters of this application must be linked to the I/O devices like sensors or valves. This is done using cyclic communication protocol PDO. The parameterization of this PDO protocol is done using the SDO protocol. Fieldbus, Device Control For the following configurations, the Valve Configuration Software provides assistance with a graphical user interface. Even though all configuration can be done by just using the SDO protocol. Details on how to connect the MoVaPuCo to the valve: Chapter "9 Moog Valve and Pump Configuration Software (MoVaPuCo)", page 66 Special Applications Diagnostics MoVaPuCo Example Applications Application Instruction DCV (CDS45379-en; Version -, August 2015) 22 Getting Started Digital Control Valves 4 Fieldbus configuration Configuration files 4.1 Configuration files Type of configuration file Example file CANopen EDS file D636-214-0001.eds ProfibusDP GSD file Moog07F4.GSD EtherCAT EDS file and GDS file D638-225-0001.eds D638-225-0001.xml Fieldbus, Device Control Fieldbus Installation Do: Make sure the correct configuration files are available for configuring the fieldbus master. Therefore please visit Moog webpage www.moogsoftwaredownload.com/ section 'Configuration Files for BUS master'. Depending on the fieldbus type (CANopen, ProfibusDP or EtherCAT) there are different files available. Table 6: Configuration files Check: The files are up to date, www.moogsoftwaredownload.com Special Applications Do: The configuration file of the valve being configured has to be copied to the directory as it is required by the fieldbus master: Examples for specific fieldbus masters: • CANopen master MSC II C:\Program Files (x86)\MACS 3.3\MACS\Targets\ MACS_V33\MSC_II_V33_IOs\EtherCAT\ TwinCAT Beckhoff • Profibus master S7 Siemens MSC II Diagnostics • EtherCAT master MSC II C:\Program Files (x86)\MACS 3.3\MACS\Targets\ (special files are needed) MACS_V33\MSC_II_V33_IOs\EtherCAT\ C:\TwinCAT\io\CANopen\*.eds C:\TwinCAT\io\EtherCAT\*.xml C:\Program Files\Siemens\Step7\S7data\GSD\ C:\Program Files (x86)\MACS 3.3\MACS\Targets\ MACS_V33\MSC_II_V33_IOs\*.gsd MoVaPuCo Do: Start the fieldbus master. Check: The objects with their attributes (SDO index, name, access rights, …) of the valve model are read in by the fieldbus master and are listed. Example Applications Application Instruction DCV (CDS45379-en; Version -, August 2015) 23 Getting Started Digital Control Valves 4 Fieldbus configuration CANopen baudrate and Node-ID configuration 4.2 CANopen baudrate and Node-ID configuration Installation Within a CANopen network each node must communicate at the same baudrate and each node must have a unique Node-ID. Moog valves with CANopen fieldbus will be delivered with the following default factory settings: • Baudrate 500 kBit/sec • Node-ID 127 To change the baudrate or Node-ID, the CANopen Layer Setting Services (LSS) according [CiA305] can be used. This can be done e.g. by using the MoVaPuCo. Fieldbus, Device Control If desired by the customer, another default setting can be delivered. Check: All nodes within the network have configured a unique Node-ID. The Node-ID is sent to the bus with the bootup message when powering on the valve. 4.3 Parameterization (SDO) Special Applications After power on, parameterization can be done by CANopen SDO services. To keep the new parameter settings persistent, they have to be stored to the non-volatile memory. This can be done using the Object 0x1010 "Save Parameter". Chapter "6 Storing and loading of settings", page 31 Diagnostics MoVaPuCo Example Applications Application Instruction DCV (CDS45379-en; Version -, August 2015) 24 Getting Started Digital Control Valves 4 Fieldbus configuration Cyclic communication (PDO) 4.4 Cyclic communication (PDO) To operate the valve three input parameters are needed: Installation • The Control Word <ControlWord> index#sub-index 0x6040#0 to control the device state machine (DSM). • The spool position setpoint value <SplSetpoint> index#sub-index 0x6300#1. • Optional the pressure setpoint value <PrsSetpoint> index#sub-index 0x6380#1. The functionality of these parameters is defined by [CANopen CiA408]. For valves with Profibus fieldbus they are defined in [PROFIBUS - DP Profile, Fluid Power Technology]. Fieldbus, Device Control Usually the control and setpoint data will be transmitted using the cyclic communication via process data objects (PDO). In a CANopen network a Transmit PDO (TxPDO) will be received by one or more Receive PDOs (RxPDO): Special Applications Figure 8: Master-slave communication Diagnostics The assignment of the application data to a defined place within the PDO data package is defined by the PDO mapping using the CANopen objects 0x1600…0x1603 and 0x1A00…0x1A03 according to [CiA 301]. We use the default mapping 4 configured as default for RxPDO 4. This default RxPDO mapping is adequate for initial operation of the valve. Default parameter mapping of p/Q valves for cyclic communication with RxPDO 4: RxPDO_4 data frame COB-ID = 0x57f Byte Data 1 2 3 4 5 6 ApplObj 2 0x0007 ('ACTIVE') 16384 (100 %) 8192 (50 %) Control word Spool position setpoint Pressure setpoint 7 8 Empty Empty 7 8 Empty Empty ApplObj 3 MoVaPuCo ApplObj 1 Table 7: RxPDO_4 data frame TxPDO_4 data frame COB-ID = 0x4ff Byte 1 2 ApplObj 1 Data 3 4 5 6 ApplObj 2 ApplObj 3 0x001F ('ACTIVE') 16 (0,1 %) 0 (0 %) Status word Spool position act. Pressure actual value Example Applications Table 8: TxPDO_4 data frame Valves with fieldbus EtherCAT have configured this mapping in RxPDO 1 instead of RxPDO 4. The next steps lead through the configuration of a bidirectional PDO communication. Application Instruction DCV (CDS45379-en; Version -, August 2015) 25 Getting Started Digital Control Valves 4 Fieldbus configuration Cyclic communication (PDO) Configuration of PDO to be sent from the master to the valve used for valve setpoints: Installation Do: On the fieldbus Master configure the Control Word <ControlWord> index#sub-index 0x6040#00 to a TxPDO application parameter according the table above. Use the COB-ID 0x57F to address the valves RxPDO. If the Node-ID of the valve has been changed, then use 0x500+$NODEID as COB-ID. Do: On the fieldbus Master configure the spool position setpoint value <SplSetpoint> index#sub-index 0x6300#01 to the second TxPDO application parameter according the table above. Fieldbus, Device Control Do: On the fieldbus Master configure the pressure setpoint value <PrsSetpoint> index#subindex 0x6380#01 even if you do not need it for your application. The length in bytes of the TxPDO in the master must fit to the length of the corresponding RxPDO in the valve. If you do not have a setpoint use a 16 bit dummy parameter sending the value 0. Do: Configure the number of parameters to be transmitted to 3 by setting the number of entries for the TxPDO (e.g. index#sub-index 0x1603#00) in the master to 3. Special Applications Per default the valve is ready to receive the RxPDO. Only the NMT state 'OPERATIONAL' has to be entered, see further down. Check: The corresponding RxPDO mapping in the valve. This is already configured by default as shown above. How to change and adapt this parameter mapping to a special application see: Chapter "7.5 Changing the default PDO mapping", page 35 Diagnostics Configuration of PDO to be sent from the valve to the master used for valve actual values: For initial operation of a CAN network it is not necessary to configure a Transmit PDO in the valve but it is helpful to get feedback from the valve. EtherCAT needs to have the transmit and the receive PDOs configured consistently on both transmit and receive ends. Check: In the valve/slave the TxPDO is already configured to the default mapping as shown above. MoVaPuCo Do: On the fieldbus master configure an RxPDO with a COB-ID 0x4FF to receive the valves TxPDO. If the Node-ID of the valve has been changed, then use 0x480+$NODEID as COB-ID. Do: On the fieldbus master map the valves spool position actual value <SplActualValue> index#sub-index 0x6301#1 as second Application Parameter of this RxPDO. Example Applications Do: Map the valve's pressure actual value <PrsActualValue> index#sub-index 0x6381#1 as third application parameter of this RxPDO. Even if you do not need a pressure value for your application, the length in bytes of the RxPDO in the master must fit to the length of the corresponding TxPDO in the valve. In this case use a 16 bit dummy parameter for receiving. Do: Activate the TxPDO on the valve by setting the corresponding TxPDO event timer index#subindex 0x1800#5 and transmission type index#sub-index 0x1800#2. Application Instruction DCV (CDS45379-en; Version -, August 2015) 26 Getting Started Digital Control Valves 4 Fieldbus configuration Link the application program's parameters to the fieldbus Check: To check whether the PDO configuration is correct, the network must be started. This is described in the next subchapters. Installation 4.5 Link the application program's parameters to the fieldbus Depending on the fieldbus master there are different ways to send values to the slave devices: Fieldbus, Device Control Some masters allow sending values before starting an application program. If so, the network can be started and setpoints can be configured by hand in the network configuration (e.g. the "free run" mode of TwinCAT). Chapter "10.2 EtherCAT network configuration with TwinCAT master", page 71 In this case the values can be set in the parameters online tab. In the final application the data in the PDO must be linked to a parameter in the application program. How to do this is described in the following steps: Special Applications Do: Link the application output data (<spool position setpoint value>) to the network. How to do this depends on the specific master and its programming language. Commonly used methods are: • Global defined variables within the application program will be linked to the cyclic communication message using a network configuration tool within the master. • For PLC programs according to IEC 61131 this configuration is done in the so called IO configuration. • Special functions for sending and receiving cyclic process data (called process data objects or parameter channels) are provided with a library. Diagnostics For the MSC Master see: Chapter "10.1 CANopen network with Moog MSC II", page 69 For EtherCAT see: Chapter "10.2 EtherCAT network configuration with TwinCAT master", page 71 Do: Configure the master to transmit a control word value 'ACTIVE' (7) to the valve. Therefore set the following three bits of the Control Word to 1: 'Disable (D)', 'Hold enable (H)' and 'Device mode active (M)'. MoVaPuCo Do: Configure the master to transmit a spool position setpoint value between –16384…+16384 (±100 %) to the valve. Check: After starting the network and the application program (see step further down), the valve switches to state 'ACTIVE'. Profibus slot#index 0x6300#1 21#21 –214…+214 –10 V…+10 V, 4…20 mA, –10…+10 mA –16384 dec…16384dec 4…20 mA 0x6301#1 21#144 Digital value Analog value Spool position setpoint value –100 %…+100 % –16384 dec…16384dec Spool position actual value –100 %…+100 % Example Applications CANopen index#sub-index Function –214…+214 Table 9: Setpoint value ranges Application Instruction DCV (CDS45379-en; Version -, August 2015) 27 Getting Started Digital Control Valves 4 Fieldbus configuration Start the fieldbus network 4.6 Start the fieldbus network Installation This chapter describes how to start the CANopen or EtherCAT network. How to start the valve application is described in the following chapter. WARNING Fieldbus, Device Control Danger of personal injury and damage to property due to unexpected or accidental operation! This might lead to an uncontrolled and/or unpredictable operational sequence of actuators or of the overall machine. Before setting the state machine to 'ACTIVE', make sure the machine and hydraulic pump is off, the hydraulic system is depressurized, the accumulators are unloaded (i.e., contain no oil) and the actuator cannot move due to external loads. If automatic control technology is to be used, the user should, in addition to all the potentially available standards or guidelines on safety-engineering installations, consult the manufacturer of the components used in great depth. Do: Make sure the hydraulic pressure is switched off. Special Applications Do: Switch on the supply power (24 V) for the valve. Do: Switch on the supply power (24 V) for the fieldbus master / machine controller. Do: Make sure the HW-Enable signal is switched on. Check: The «MS» LED is green (blinking or constant on). Diagnostics Check: The «NS» LED is yellow or green blinking or on. Do: On the network fieldbus master switch the network state machine to 'PRE-OPERATIONAL'. Check: The valve's network state has switched to 'PRE-OPERATIONAL' («NS» LED green blinking). MoVaPuCo This indicates that the hardware of the network connection has started successfully. The bitrate settings are OK and node addressing has been configured successfully. The non-cyclic communication is available. Check: The log messages on the fieldbus master. This can give a hint for configuration mismatches. Do: On the fieldbus master switch the network state machine to the state 'OPERATIONAL'. Application Instruction DCV (CDS45379-en; Version -, August 2015) Example Applications Check: The network state 'OPERATIONAL' has been entered (the «NS» LED is constant green). This indicates that the cyclic PDO communication is available and started successfully. The valve receives the control word and a spool position setpoint value. 28 Getting Started Digital Control Valves 4 Fieldbus configuration Start the fieldbus network Installation Check: If the NMT state machine still stays in 'PRE-OPERATIONAL', there may be a problem with the PDO mapping. Chapter "8 Diagnostics / troubleshooting", page 54 Do: Start the cyclic network communication. Set some distinctive commands like 0x1122 for the setpoint value or 0x0104 for the control word. With these values it is possible to distinguish every single byte within the data package. Fieldbus, Device Control Check: Verify the functionality checking the Status Word and the spool actual value transmitted with the TxPDO from the valve to the master. Now the network configuration has been finished and the valve can be controlled via fieldbus. The next chapters describe special aspects of configuration. With this the valve's behavior can be adapted to specific applications. Special Applications Diagnostics MoVaPuCo Example Applications Application Instruction DCV (CDS45379-en; Version -, August 2015) 29 Getting Started Digital Control Valves 5 Device control 5 Device control Installation To activate spool control, the following conditions must be met: • The enable signal, which enables the power stage of the valve, must be on. • The valve's Application State Machine must be set to 'HOLD' or 'ACTIVE' by setting the control word to 'ACTIVE'. Do: To release the power stage of the valve put a 24 V signal on the 'Enable Signal', pin 3 of connector X1. Fieldbus, Device Control Do: Set the <ControlWord> (0x6040) to activate 'HOLD' or activate 'ACTIVE'. Chapter "3.2 Device State Machine (DSM)", page 20 Check: The valve gets active. The <StatusWord> (0x6041) changed to 'ACTIVE'. The «MS» LED is blinking or constant green. The spool will be controlled by the valve's servo drive (random acoustic noise). Special Applications Check: The valve's application is not in 'FAULT' state 'FAULD_HOLD', 'FAULT_DISABLED' or 'FAULT_INIT '. Chapter "3.2 Device State Machine (DSM)", page 20 How to read in a spool position or pressure setpoint locally from a specific source, see: Chapter "7.2 Changing the source of the Q setpoint value", page 33 Diagnostics MoVaPuCo Example Applications Application Instruction DCV (CDS45379-en; Version -, August 2015) 30 Getting Started Digital Control Valves 6 Storing and loading of settings Data storage in non-volatile memory of the valve electronics 6 Storing and loading of settings Installation 6.1 Data storage in non-volatile memory of the valve electronics In order to permanently save any changes made in the valve's configuration, the user should save the parameters. This can be done using the MoVaPuCo or the parameter <StoreParameters> (index 0x1010). Fieldbus, Device Control If the changes are not saved in the valve as described above, it will be lost after next power off of the valve electronics. 6.2 Saving of the parameter settings on the PC Valve parameters can be saved in a data file on the PC e.g. to reload them on other valves. This is done using the "Export Device Parameter" function of the MoVaPuCo. Special Applications 6.3 Transmission of configuration data from a data file on the PC to the valve Parameters can be set using the MoVaPuCo's graphical user interface. They also can be read by the MoVaPuCo from a data file and transferred into the valve's memory. Note that the changes have to be stored as described above. Detailed information: User Manual "Firmware", Chapter 9 "Storing / restoring parameters" Diagnostics MoVaPuCo Example Applications Application Instruction DCV (CDS45379-en; Version -, August 2015) 31 Getting Started Digital Control Valves 7 Adaptation to special applications Changing the control modes (pressure control, pQ Control, delta p, flow control) 7 Adaptation to special applications Installation 7.1 Changing the control modes (pressure control, pQ Control, delta p, flow control) The control mode can be set using the parameter <ControlMode> index#sub-index 0x6043#0. <ControlMode> Meaning 2 Spool position control closed loop Spool position control 3 Pressure control open loop Used for tests. Behaves like a closed loop Q control. 4 Pressure control closed loop Pressure / force control 5 p/Q control In many applications the p/Q controller is used as Q controller with pressure/force limitation Special Applications Spool position control open loop Used for test Fieldbus, Device Control 1 Table 10: Control mode values Diagnostics MoVaPuCo Example Applications Application Instruction DCV (CDS45379-en; Version -, August 2015) 32 Getting Started Digital Control Valves 7 Adaptation to special applications Changing the source of the Q setpoint value 7.2 Changing the source of the Q setpoint value Installation As source of the spool position setpoint value either the analog input or the fieldbus interface can be used. The factory configuration is given by the 16th place in the valves type designation and can be chosen by the customer. Spool position setpoint value from analog signal Analog input 0 <ActualValue0> (0x3204) 0x32040010 0x... <...> (0x...) 0x... <SplSetpointParameter> (0x3320) Spool position setpoint value from field bus Object 0x1600: RxPDO mapping <SplSetpoint> (0x6300) Fieldbus, Device Control <...> (0x...) 2 (Setpoint input locally) 1 (Setpoint input via the bus) <DeviceMode> (0x6042) <SplHoldSetPoint> (0x6314) ’ACTIVE’ ’HOLD’ or ’FAULT HOLD’ #SpoolPositionSetpoint# ’INIT’ or ’DISABLED’ or ’FAULT DISABLED’ Special Applications <StatusWord> (0x6041) Figure 9: Changing the Q setpoint value <DeviceMode> index#sub-index 0x6042#0 Device mode Value (dec) Function 1 The following setpoint sources are effective: • For spool position: <SpoolPositionSetpoint> index#sub-index 0x6300#1) and • For pressure: <PressureSetpoint> index#sub-index 0x6380#1 Setpoint input Locally 2 The following setpoint sources are effective: • For spool position: The parameter <SplSetpointPar> index#sub-index 0x3320#0 points to. Per default this is the analog input0 on the connector X1. • For pressure: The parameter <PrsSetpointPar> index#sub-index 0x3310#0 points to. Per default this is the analog input1 on the connector X1. Diagnostics Setpoint input via Bus Table 11: Device mode values The analog inputs can be configured as voltage or current input. The default configuration depends on the valve's type designation. MoVaPuCo For special applications both sources could be mixed and used in parallel. In this case the device mode 'Setpoint input Locally' has to be chosen and <SplSetpointPar> must point to either 'Spool position setpoint value' or 'analog0value' ('pressure setpoint' or 'analog1value'). Example Applications Application Instruction DCV (CDS45379-en; Version -, August 2015) 33 Getting Started Digital Control Valves 7 Adaptation to special applications Changing the source of the control word 7.3 Changing the source of the control word <ControlWord> (0x6040) 0 (control word from bus) #ControlWord# <LocalControlWord> (0x4040) Installation As source of the Control Word either the fieldbus interface or a locally configured control word can be used. Device State Machine (DSM) <StatusWord> (0x6041) 1 (control word local) <Local> (0x604F) Fieldbus, Device Control Figure 10: Local mode <LocalMode> index#sub-index 0x604F#0 (Profibus 0#41) Local mode Value (dec) Function 0 In this case the <ControlWord> index#sub-index 0x6040#0 is effective as control word source. Control Word Locally 1 In this case the <LocalControlWord> index#sub-index 0x60xx#0 is effective as control word source. Special Applications Control Word via Bus Table 12: Local mode values • Analog driven valve The source of the Control Word is always set to valve internally <LocalMode> index#subindex 0x604F#0 = Control Word Locally. The effective Control Word is given by the parameter <LocalControlWord> index#sub-index 0x4040#0. Per default it is set to 'ACTIVE' state. For normal operation the user must not care about it. Diagnostics • Fieldbus driven valve The source of the Control Word is always set to fieldbus <LocalMode> index#sub-index 0x604F#0 = 'Control Word via Bus'. The effective Control Word is given by the parameter <ControlWord> index#sub-index 0x6040#0. For special purposes, the initial value of the Local Control Word during power on, can be configured using the parameter <LocalControlWordDefault> index#sub-index 0x403F#0. 7.4 PDO monitoring / watchdog activation MoVaPuCo The PDO transmission can be monitored and a fault reaction can be configured to switch the valve into a save state in case the communication to the fieldbus master is interrupted or disturbed. • EtherCAT: User Manual "Digital Control Valves with EtherCAT Interface, Firmware B99226-DV016-B-211, Chapter 2.10.2 PDO Watchdog (SM watchdog)" • CANopen: User Manual "Digital Control Valves with CANopen Interface, Firmware B99224-DV016-B-211", Chapter "2.8.3.1.1 Object 0x1400: 1st RxPDO protocol configuration", parameter "RPdo1_EventTimer" Example Applications Application Instruction DCV (CDS45379-en; Version -, August 2015) 34 Getting Started Digital Control Valves 7 Adaptation to special applications Changing the default PDO mapping 7.5 Changing the default PDO mapping Installation For default valve operation with setpoints for spool position and pressure, the default mapping must not be changed. If special values are to be transmitted like additional axis position values, monitoring values or valve states, the PDO mapping can be adapted and extended. Fieldbus, Device Control Figure 11: PDO mapping Special Applications One PDO can be sent to more than one receiving node. A direct transmission of a PDO from slave to slave is also possible. Diagnostics Figure 12: Master-slave communication MoVaPuCo The assignment of the application data to a defined place within the PDO data package is defined by the PDO mapping using the CANopen objects 0x1600…0x1603 and 0x1A00…0x1A03 according to CiA 301. Example Applications Application Instruction DCV (CDS45379-en; Version -, August 2015) 35 Getting Started Digital Control Valves 7 Adaptation to special applications Changing the default PDO mapping Installation Fieldbus, Device Control Special Applications Figure 13: Default mapping Eight default mappings are defined in the Device Profile [CiA408] for hydraulic valves. Each of the 4 PDOs in the valve is configured to one of the following default mappings. Valves with EtherCAT fieldbus have configured the default mapping 4 in the objects 0x1600 and 0x1A00. Default Receive PDO mapping Data Type RxPDO_1 RxPDO_2 RxPDO_3 RxPDO_4 Index 1600 Index 0x1601 Index 0x1602 Index 0x1603 #Sub Mapped parameter #Sub Mapped parameter #Sub Mapped parameter #Sub Mapped parameter #00 1 #00 2 #00 2 #00 3 Mapping of ApplObj 1 uint32 #01 0x6040 control word #01 0x6040 control word #01 0x6040 control word #01 0x6040 control word Mapping of ApplObj 2 uint32 #02 #02 0x6300 spool position setpoint #02 0x6380 pressure setpoint #02 0x6300 spool position setpoint Mapping of ApplObj 3 uint32 #03 #03 #03 #03 0x6380 pressure setpoint Mapping of ApplObj 4 uint32 #04 #04 #04 #04 Mapping of ApplObj 5 uint32 #05 #05 #05 #05 Mapping of ApplObj 6 uint32 #06 #06 #06 #06 Mapping of ApplObj 7 uint32 #07 #07 #07 #07 Mapping of ApplObj 8 uint32 #08 #08 #08 #08 Example Applications uint8 MoVaPuCo Number of mapped Obj Diagnostics Name Table 13: Default Receive PDO mapping Application Instruction DCV (CDS45379-en; Version -, August 2015) 36 Getting Started Digital Control Valves 7 Adaptation to special applications Changing the default PDO mapping Default Transmit PDO mapping Data Type TxPDO_1 TxPDO_2 TxPDO_3 TxPDO_4 Index 0x1A00 Index 0x1A01 Index 0x1A02 Index 0x1A03 #Sub Mapped parameter #Sub Mapped parameter #Sub Mapped parameter #Sub Mapped parameter #00 1 #00 2 #00 2 #00 3 Mapping of ApplObj 1 uint32 #01 0x6041 status word #01 0x6041 status word #01 0x6041 status word #01 0x6041 status word Mapping of ApplObj 2 uint32 #02 #02 0x6301 spool position actual val #02 0x6301 pressure actual value #02 0x6301 spool position actual val Mapping of ApplObj 3 uint32 #03 #03 #03 #03 0x6301 pressure actual value Mapping of ApplObj 4 uint32 #04 #04 #04 #04 Mapping of ApplObj 5 uint32 #05 #05 #05 #05 Mapping of ApplObj 6 uint32 #06 #06 #06 #06 Mapping of ApplObj 7 uint32 #07 #07 #07 #07 Mapping of ApplObj 8 uint32 #08 #08 #08 #08 Special Applications uint8 Fieldbus, Device Control Number of mapped Obj Installation Name Table 14: Default Transmit PDO mapping Default mappings 6…8 for drive speed, force and position control Index#Sub-Index Setpoint / actual value 0x6480#01 (Drive open loop) setpoint 0x6500#01 (Drive speed control) setpoint 0x6580#01 (Drive force/pressure control) setpoint 0x6600#01 (Drive position control) setpoint 0x6481#01 (Drive open loop) actual value 0x6501#01 (Drive speed control) actual value (Drive force/pressure control) actual value 0x6601#01 (Drive position control) actual value MoVaPuCo 0x6581#01 Diagnostics In case drive control modes are used, the mapping can be changed to the following setpoint and actual parameters: Table 15: Mapping for drive speed and position control These predefined mappings can be used without modification. If they do not fit to the application they can be adapted to the customers' needs by configuring the mapping parameters. Application Instruction DCV (CDS45379-en; Version -, August 2015) Example Applications To map the application parameter, its index, sub-index and length must be combined to a 32 bit value and written to one of the eight possible positions (corresponding to the sub-indexes 1…8) within the PDO object. With the parameter <TPdo_NumberOfMappedApplicParaInPdo> (0x1A00) the number of real-time application parameters to be transmitted is set. 37 Getting Started Digital Control Valves 7 Adaptation to special applications Changing the default PDO mapping Example of changing the mapping of TxPDO1: Installation The actual spool position control deviation (index#sub-index 0x6350#0) should be mapped into TxPDO1. Therefore: Do: Set the number of mapped parameters to 0 (0x1A00#00 = 0). Map the <Spool control deviation> with SDO index 0x6350, sub-index 0x01 and length in number of bits 0x10. Therefore write the index, sub-index and length to the first mapped parameter 0x1600#01 using the following notation. Write 0x63500110 into the TxPDO mapping <Mapping of ApplObj1> index#sub-index (0x1A00#01). Fieldbus, Device Control Do: If needed map additional parameters into the <Mapping of ApplObj2> index#sub-index (0x1A00#02) and so on. Do: Set the number of mapped parameters (in our case 1 for the spool control deviation or more if additional parameters are mapped) to the number of mapped parameters <Number of mappedObj> index#sub-index 0x1A00#00 = 1. Special Applications Do: Enable the TxPDO1 by setting the <TPdo1_TransmissionType> index#sub-index 0x1800#02 and switching the NMT state machine to 'OPERATIONAL'. For more details see: User Manual "CANopen", Chapter "2.8.3 Process data object (PDO) protocol " or User Manual "EtherCAT", Chapter "2.9 Process data object (PDO) communication" Valves with Profibus fieldbus use data telegrams defined by "PROFIBUS - DP Profile, Fluid Power Technology". This set of predefined mappings is fixed but can be adapted by Moog. The standard telegram is depending on the control mode, e.g. for a p/Q valve the standard telegram is 5. Module name I/O telegram content 3 Std. Tel. 3 | Q + Par.Chn. • Parameter channel • Control word • Spool position 4 Std. Tel. 4 | Q • Control word • Spool position 5 Std. Tel. 5 | p/Q + Par.Chn. • • • • 6 Std. Tel. 6 | p/Q • Control word • Pressure • Spool position 100 MOOG Tel. 100 | p + Par.Chn. • Parameter channel • Control word • Pressure 101 MOOG Tel. 101 | p • Control word • Pressure Diagnostics Profibus <TelegramSelection> MoVaPuCo Parameter channel Control word Pressure Spool position Application Instruction DCV (CDS45379-en; Version -, August 2015) Example Applications Table 16: Profibus data telegram selection 38 Getting Started Digital Control Valves 7 Adaptation to special applications Event handler 7.6 Event handler Installation The event handler allows calculating values for special tasks depending on internal and external parameter values. This allows implementing elementary free programmed application dependent functionality. Events can also be used to initiate application and communication functions in order to automate control tasks. For more details see: User Manual "Firmware", Chapter "7.9 Event handler" Fieldbus, Device Control 7.7 Data logger, function generator The data logger is a four channel oscilloscope to trace the parameters inside of the valve. The parameters which are monitored can be chosen. The trigger condition, pre trigger, trigger level, slopes and scaling can be set. The valve's internal function generator can be used to generate a periodic signal with specific shapes, thereby enabling an engineer or technician to test and examine a valve. Special Applications The data logger and the function generator can be accessed using the MoVaPuCo. For more details see: User Manual "Firmware", Chapter "7.10 Data Logger" and Chapter "7.11 Function Generator" 7.8 Configuration of fault reactions To adapt the behavior to the application, for each cause of fault a separate fault reaction can be configured forcing a specified behavior of the valve. For more details see: User Manual "Firmware", Chapter "8 Diagnostics" Diagnostics MoVaPuCo Example Applications Application Instruction DCV (CDS45379-en; Version -, August 2015) 39 Getting Started Digital Control Valves 7 Adaptation to special applications Pressure control 7.9 Pressure control Installation With the pressure controller, the pressure on port A or B of the valve can be controlled (control mode 4 "Pressure Control Closed Loop"). Alternatively a combined spool position control with pressure limitation can be activated (control mode 5, "p/Q Control"). For more details see: User Manual "Firmware", Chapter 7.1 "Control modes" For initial operation the following steps are recommended: Fieldbus, Device Control 1. Configuration of the setpoint inputs. Chapter "7.9.1 Pressure setpoint value", page 41 2. Configuration of the actual value sensor interfaces. Chapter "7.9.2 Pressure actual value interface", page 43 3. Configuration of the pressure control mode. Chapter "7.1 Changing the control modes (pressure control, pQ Control, delta p, flow control)", page 32, 4. Configuration of the pressure controller itself. Chapter "7.9 Pressure control", page 40 Setpoint and actual value range Analog value Digital value CANopen index#sub-index Profibus slot#index 0x6380#01 22#21 0x6390#01 22#24 0x6381#01 22#144 0x6380#01 22#21 0x6381#01 22#144 Special Applications We recommend to initially start with a pressure setpoint value of 100 % which effectively disables the pressure limiting control and permits control of the valve with the spool position setpoint. Once this flow control operation is satisfactorily confirmed, the pressure control can be checked by setting the pressure setpoint to that required by the application. Controlling pressure in both directions port A and B ( User Manual "Firmware", Chapter 7.7.1 "Object 0x586C[N]: pQ switching mode") Pressure setpoint value –100 %…+100 % –10 V…+10 V or 4…20 mA –16384 dec…16384dec –214…+214 Pressure demand value Diagnostics Pressure actual value –100 %…+100 % Controlling pressure in one direction only or limiting max. pressure Pressure setpoint value 0 %…+100 % Pressure actual value 0 %…+100 % 0 V…+10 V or 4…20 mA 0dec…16384dec 0…+214 Table 17: Pressure control - setpoint and actual value ranges MoVaPuCo Example Applications Application Instruction DCV (CDS45379-en; Version -, August 2015) 40 Getting Started Digital Control Valves 7 Adaptation to special applications Pressure control 7.9.1 Pressure setpoint value Make sure, the spool position and pressure setpoints are received via fieldbus or analog. Installation Fieldbus valves: Do: Select the PDO mapping/telegram selection with pressure setpoint. Do: Select the device mode (index#sub-index 0x6042#00) 1 for 'input via bus'. Fieldbus, Device Control Check: Read out the received pressure setpoint (index#sub-index 0x6380#01) e.g. by using the MoVaPuCo. Analog driven valves: Do: Select the analog input type for analog input 1 to read in the pressure setpoint 'analog input type' index#sub-index 0x3208#0. The following types are available: Special Applications Diagnostics Connector no: X5, X6, X7 M8. 4-pin Description: Analog input interface <InputType> (index#sub-index 0x3210#0) Value range Grounded 1 9 0…10 V (0…100 %) 2 10 ±10 mA (±100 %) 3 6 0…10 mA (0…100 %) 4 7 4…20 mA (0…100 %) 5 8 4…20 mA (±100 %) 11 12 MoVaPuCo Potential-free ±10 V (±100 %) Parameter, name, communication address: X5 analog input: an2val, index#sub-index 0x3214#0; an2typ, index#sub-index 0x3210#0 X6 analog input: an3val, index#sub-index 0x321C#0; an3typ, index#sub-index 0x3218#0 X7 analog input: an4val, index#sub-index 0x3224#0; an4typ, index#sub-index 0x3220#0 All inputs 0…100 % correspond to 0…16384 or ±100 % correspond to ±16384 Figure 14: Analog input interface Example Applications Application Instruction DCV (CDS45379-en; Version -, August 2015) 41 Getting Started Digital Control Valves Pressure setpoint value analog signal 7 Adaptation to special applications Pressure control Analog input 1 <ActualValue1> (74#3) <...> (0x...) 0x... 0x... <PrsSetpointParameter> (0#203) Pressure setpoint value from field bus Object 0#46 : Telegram selection <PrsSetpoint> (22#21) Installation <...> (0x...) 0x320C0010 2 (Setpoint input locally) 1 (Setpoint input via the bus) <DeviceMode> (0#39) <PrsHoldSetPoint> (22#30) ’ACTIVE’ ’HOLD’ or ’FAULT HOLD’ #PressureSetpoint# Fieldbus, Device Control ’INIT’ or ’DISABLED’ or ’FAULT DISABLED’ <StatusWord> (0#38) Figure 15: Pressure setpoint value path Check: Read out the analog pressure setpoint value (analog input 1 value index#sub-index 0x320C#00) and check that it corresponds to the analog input value. Special Applications Do: Select the device mode (index#sub-index 0x6042#00) 2 for 'setpoint input locally'. Do: Check that the pressure source setpoint parameter prspar (index#sub-index 0x3310#0) is set to 'Analog Input1 value' (0x320C0010). Check: Read the pressure demand value (index#sub-index 0x6390#01) and check that it corresponds to the analog input value. Diagnostics MoVaPuCo Example Applications Application Instruction DCV (CDS45379-en; Version -, August 2015) 42 Getting Started Digital Control Valves 7 Adaptation to special applications Pressure control 7.9.2 Pressure actual value interface Installation The actual pressure can be measured with the valve's internal pressure transducer (factory default) or with an external analog or fieldbus pressure transducer. 4. Transducer interface 3. Transducer interface 2. Transducer interface 1. Transducer interface pA p p All parameters in this box are only effective for the choosen transducer interface number <InterfaceNumber> (0x6101)! 0x34040010 Analog input 0 0x32040010 Analog input 1 0x320C0010 <Sign> (0x6103) Analog input 2 <ActueValue4> (0x6113) <ActueValue3> (0x6112) <ActueValue2> (0x6111) 0 (No transducer function) 0x32140010 <ActueValue1> (0x6110) -2 (Analog direct) p p Analog input 3 0x321C0010 <Type> (0x6102) Analog input 4 0x32240010 Pressure actual value scaling <MinimumPressure> (0x6120) <MaximumPressure> (0x6121) <PressureOffset> (0x6123) <MaximumTransducerSignal> (0x6124) <MinimumTransducerSignal> (0x6125) Field bus or 0x... Local CAN p 2 (Pressure transducer) Special Applications p Fieldbus, Device Control p Internal pressure transd. in pipe A Any signed 16-bit param. from the object dictionary 0x... 4 3 <TransducerPort> (0x3264) 2 1 <InterfaceNumber> (0x6101) <CylinderPistonDiameter> (0x585F) <CylinderPistonDiameter> (0x585F) ) ) 2 2 -( -( <CylinderRodDiameterB> (0x585E) <CylinderRodDiameterA> (0x585D) ) ) 2 2 Diagnostics ( ( 0 1 2 3 4 <ActiveTransducerInterfaceAreaB> (0x230F[N]) Interface 2 Interface 3 Interface 4 <ActualValue1> (0x6110) <ActualValue2> (0x6111) <ActualValue3> (0x6112) <ActualValue4> (0x6113) 1 2 + Interface 1 - Pressure actual value path 3 4 PID controller KP Vqu, Dv, wv 1/CH Actual value KI Set value MoVaPuCo <ActiveTransducerInterfaceAreaA> (0x230D[N]) Linear plant model Example Applications KD, T1 Figure 16: Pressure actual value interface Application Instruction DCV (CDS45379-en; Version -, August 2015) 43 Getting Started Digital Control Valves 7 Adaptation to special applications Pressure control Installation Transducer A, B: If more than one pressure transducer is used, the valve can be configured to read both A and B side of the cylinder. For this case the controlled pressure is actually the Δp = (pA – α* pB) with the cylinder area ratio taken into account. The control value now represents a value which is proportional to the hydraulic force of a cylinder. Chapter "7.9.3 Control mode p and p/Q control", page 48 Fieldbus, Device Control Pressure Weighting: When activating the A, B pressure transducers, the user shall also define the piston diameter, piston rod A diameter and piston rod B diameter, all values given in same units (e.g. in mm only). Here the A-side is the cylinder chamber on the A side of the valve. For more detailed Δp-controller setting, see Chapter "7.9.3 Control mode p and p/Q control", page 48 If external pressure transducers are used, it might be necessary to calibrate the pressure actual value. This procedure is explained in the user manual for firmware: User Manual "Digital Control Valves with EtherCAT Interface, Firmware B99226-DV016-B-211" Special Applications Diagnostics MoVaPuCo Example Applications Application Instruction DCV (CDS45379-en; Version -, August 2015) 44 Getting Started Digital Control Valves 7 Adaptation to special applications Pressure control 7.9.2.1 Example of configuring an analog pressure actual value transducer Installation The following example describes how to configure the transducer interface to connect an analog pressure sensor 4…20 mA potential free, 400 bar. Therefore we connect the external pressure transducer to the valve's analog input X5 and use the transducer interface 1. For supported transducer types, signal and wiring see: User Manual "Electrical Interfaces", CA63420-001, Chapter 4 "Electrical Interfaces", X1, X5, X6, X7, X10 User Manual "Firmware" CANopen or EtherCAT, Chapter 6.3 "Actual value transducer interface" Fieldbus, Device Control Do: Analog interface: set the analog input type of X5 (DIV_AnalogueInput2_InputType) index#sub-index 0x3210#00 to 4…20 mA potential free, value 5. Do: Switch on the supply power (24 V) of the valve. Special Applications Check: You should be able to read the actual pressure value on the output of the analog input conditioning: <ActualValue2> index#sub-index 0x3214#00. User Manual "Firmware", Chapter 6.4.3 "Analog input 2" Do: Select internal transducer "Interface 1" to be configured. Set the <InterfaceNo> index#sub-index 0x6101#00 to 1. User Manual "Firmware", Chapter 6.3 "Actual value transducer interface" Do: Set the Interface Type <Type> index#sub-index 0x6102#00 to 2 (pressure transducer). User Manual "Firmware", Chapter 6.3.5.3 "Object 0x6102: Type" Do: Set the interface sign <Sign> index#sub-index 0x6103#00 to 1 (positive polarity). Diagnostics Do: Set the signal source to X5 (analog input 2) 0x3264#00 to 0x32140010. The value 0x32140010 represents the SDO index, sub-index and length (0x10) of "an2val" (scaled analog input value of X5). Check: The following scaling parameters can remain on factory setting: The maximum pressure: 250 bar----------------------⋅ 16384 = 10240 400 bar 20 mA = 16834 The minimum pressure: 0 bar =0 The minimum signal: 4 mA =0 MoVaPuCo The maximum signal: Do: Set reference pressure value <PrsReferenceValue> index#sub-index 0x231C#01 to correspond to the max. nominal pressure of the transducer e.g. 400 for 400 bar corresponding to 100 %. Application Instruction DCV (CDS45379-en; Version -, August 2015) Example Applications Do: The pressure sensor scaling is factory preset to 0…100 % and the zero point to 0. For any adjustments beyond these values, see index#sub-index 0x6121#01, 0x6125#01, 0x6120#01, 0x6120#02, 0x6124#01 and 0x6123#01. User Manual "Firmware", Chapter 6.3.6 "Pressure actual value scaling" 45 Getting Started Digital Control Valves 7 Adaptation to special applications Pressure control Installation Check: You should be able to read the actual pressure value on the transducer interface output: <ActualValue> index#sub-index 0x6110#01. Test carefully by applying pressure to the transducer to verify the configuration, scaling and offset is correct. Do: In the pressure controller select the pressure signal source by setting the <ActiveTransducerInterfaceAreaA> index#sub-index 0x230D#01 to interface 1. User Manual "Firmware", Chapter 7.5.10 "Pressure transducer selection" Fieldbus, Device Control Do: Optional when using Δp control: in the pressure controller select the pressure signal source for pressure on port B by setting the <ActiveTransducerInterfaceAreaA> index#sub-index 0x230D#02 to interface 2. User Manual "Firmware", Chapter 7.5.10 "Pressure transducer selection" Check: It should be possible to read the actual pressure value on the pressure controller input <PrsActualValue> index 0x6381. Special Applications Diagnostics MoVaPuCo Example Applications Application Instruction DCV (CDS45379-en; Version -, August 2015) 46 Getting Started Digital Control Valves 7 Adaptation to special applications Pressure control 7.9.2.2 Example of configuring a fieldbus pressure transducer In the following example the Installation • first line is for firmware variant VALVE, B99xxx-DV0xx-B-211, • the second line is for firmware variant DRIVE/ACV, B99xxx-DV0xx-D-211 Do: Configure an unused PDO to receive the actual pressure value from a CANopen sensor. Therefore map a parameter e.g. vars16[0] into a RxPDO. Chapter "7.5 Changing the default PDO mapping", page 35 Fieldbus, Device Control Do: Start the CAN network with NMT service 'Start Network'. Check: The actual pressure value should be received in the parameter vars16[0]. Do: Select the VALVE transducer interface number index#sub-index 0x6101#00 to the value 1. Select the DRIVE transducer interface number index#sub-index 0x6201#00 to the value 1. Special Applications Do: Select the VALVE transducer interface type index#sub-index 0x6102#00 to 2 'Pressure Transducer'. Select the DRIVE transducer interface type index#sub-index 0x6202#00 to 2 'Pressure Transducer'. Do: Select the VALVE transducer interface sign index#sub-index 0x6103#00 to 1 'Positive'. Select the DRIVE transducer interface sign index#sub-index 0x6203#00 to 1 'Positive'. Diagnostics Do: Select the VALVE transducer interface port drvtrdpar index#sub-index 0x4032#00 to 0x290C#01 'vars16[0]'. Select the DRIVE transducer interface port vlvtrdpar index#sub-index 0x3264#00 to 0x290C#01 'vars16[0]'. Check: The VALVE transducer interface output index#sub-index 0x6104#01 corresponds to the setpoint sent by PDO. The DRIVE transducer interface output index#sub-index 0x6204#01 corresponds to the setpoint sent by PDO. MoVaPuCo Do: In the pressure controller select the pressure signal source by setting the <DIV_ValvePressureControl_PressureControllerActiveTransducerInterface> cmpprsitf (index#sub-index 0x230D#01) to interface 1. User Manual "Firmware", Chapter "Pressure Controller, subchapter "Pressure transducer selection" Check: It should be possible to read the actual pressure value on the pressure controller input <PrsActualValue> index#sub-index 0x6381#01. Example Applications Application Instruction DCV (CDS45379-en; Version -, August 2015) 47 Getting Started Digital Control Valves 7 Adaptation to special applications Pressure control 7.9.3 Control mode p and p/Q control Installation p control mode The pressure controller (p-control mode) controls the pressure in a hydraulic system which is connected to the valve. (2 way pressure control = pressure relief functionality, 3 way pressure control = pressure reduce valve.) The pressure sensor could be located internally or externally. Externally via analog interface, or fieldbus interface. Which interface (sensor) is used has to be selected by configuration. Fieldbus, Device Control Hint: positive signal of the pressure controller output has to lead to pressure increase in the hydraulic system. pQ control mode The device has two setpoint commands, one for the pressure (p) and one for the flow (Q). The pressure sensor could be located internally or externally. Externally via analog interface or fieldbus interface. Which interface (sensor) is used has to be selected by configuration. Special Applications Positive Q command opens the valve. The Q command is directly linked with the spool command of the valve until then pressure in the hydraulic system reaches the value which is commanded by the pressure command. When this happens the pressure controller takes control of the spool position command. For instance, when a cylinder reaches the end stop of a mechanical system, the pressure controller will reduce the spool command roughly to 0 (depending on leakage), to limit the pressure according the pressure command. Hint: positive Q command has to lead to pressure increase in the hydraulic system. Capability 16th place in the valves type designation B1 p/Q (Q and p-limiting) C1 Diagnostics p (pressure control) MoVaPuCo Example Applications Application Instruction DCV (CDS45379-en; Version -, August 2015) 48 7 Adaptation to special applications Pressure control LOAD Getting Started Digital Control Valves Installation I p Fieldbus communication analog signals electronics Fieldbus, Device Control Pos Valve p and p/Q control Special Applications PLC Figure 17: p and p/Q control • Pressure controller (configured by user) Chapter "7.9 Pressure control", page 40 • Spool position (Q) / pressure (P) switchover User Manual "Firmware", Chapter "7.7 Spool position (Q) / pressure (P) switchover" Diagnostics Control mode Δp - Control Control mode Δp is not an independent control mode. It is just the possibility to calculate the control variable for the pressure controller out of two pressure signals. For instance: To get a better performance of an hydraulic axes, cylinders are operated between two control edges: A control edge and B control edge. Both chambers of the cylinder are always under pressure. MoVaPuCo To control a value which is proportional to the hydraulic force of the cylinder, the pressures of both cylinder chambers have to be taken into account according the cylinder areas. PressureActualValue_EFFECTIVE = Pressure_on_A_side – ( α ⋅ Pressure_on_B_side ) Where α is the area ratio of the cylinder. In order to use this feature the cylinder dimensions/area ratio needs to be given (index#sub-index 0x585F#00, 0x585D#00, 0x585E#00). This allows the valve to calculate an area compensated pressure coefficient α. 2 2 Example Applications D Actuator – D rodB α = ---------------------------------------------------2 2 D Actuator – D rodA The <Pressure Actual Value> index#sub-index 0x6381#01 always refers to the pressure difference stated above. Similarly the pressure setpoint refers to the desired Δp. Application Instruction DCV (CDS45379-en; Version -, August 2015) 49 Getting Started Digital Control Valves 7 Adaptation to special applications Pressure control Capability 16th place in the valves type designation Δp (pressure pA – pB) K1 Installation It is possible to use the integrated pressure transducer of the p/Q valve and connect an external transducer to the valve electronics. For actual pressure on port B, a second input and transducer interface has to be configured and the corresponding interface <TransducerInterfaceAreaB> index#sub-index 0x230F#01 has to be selected. Table 18: Δp control LOAD Fieldbus, Device Control I p p A I B Special Applications electronics Fieldbus communication analog signals Pos Valve Delta p/Q control Diagnostics PLC Figure 18: Δp control principle MoVaPuCo Example Applications Application Instruction DCV (CDS45379-en; Version -, August 2015) 50 Getting Started Digital Control Valves 7 Adaptation to special applications Pressure control 7.9.4 Adjustment of the pressure controller to the application Installation Below a schematic of a simplified pressure controller integrated in the valve is shown. The next task in a system commissioning would be tuning the pressure controller parameters. Proportional first order lag element <ProportionalPart> (0x2311) <PrsControlDeviation> (0x63D0) Integral preload value Demand pressure ramp function Fieldbus, Device Control #preload# <PrsDemamdValue> (0x6390) Feed forward <ControllerOutput> (0x2418) <IntegralPart> (0x2310) Integral element Alpha correction Signal limitation 1 Signal limitation 2 - - <ActualValue1...4> (0x6110...0x6113) Pressure transducer selection Derivative element 1 Actual value filter <DifferentialPart> (0x2312) <DifferentialPart_2> (0x5862) Special Applications <PrsActualValue> (0x6381) Derivative element 2 Figure 19: Pressure controller Editable set: The pressure controller can store up to 16 different controller parameter sets. The parameter <ActiveParameterSetNumber> prssetnum index#sub-index 0x2350#00 defines the active set. Note that the active set and the editable set are the same. Diagnostics Pressure Controller Type The pressure controller is either "PIDT1" or "Advanced". The first is a basic PID + T1 filter, and the latter uses the "System Pressure" and "Reference Pressure" in order to linearize the pressure control output around the given reference point. Both pressures given in proportion to the pressure transducer (e.g. with a pressure range on 210 bar the 110 bar reference point would be either "50" in % or "8192" in dec). Do: Ramp time: demand value ramp. MoVaPuCo Automatic parameterization The valve has a pre-configured P-I-D controller with a <HydraulicCapacity> index#sub-index 0x230C#01, which is the hydraulic capacitance of the system called 'CH'. For example, if the load is a large volume it will have high compliance (or low stiffness). When you configure a system which has a large CH value, the controller gain is increased to maintain an optimum response. CH is a convenient gain term that can be used to obtain a reasonable first cut tuning without having to play with P, I and D. Application Instruction DCV (CDS45379-en; Version -, August 2015) Example Applications Do: It is recommended to first adjust the <HydraulicCapacity> index#sub-index 0x230C#01 "CH". Start with a "CH" value of "1" and then increase it step by step to a value where the system response becomes slightly nervous. Reduce the controller CH to 30 % below this value. 51 Getting Started Digital Control Valves 7 Adaptation to special applications Pressure control Sample calculation Volume to control = 0.3 litre Installation Bulk Modulus (for oil in steel) ~ 10,000 bar: Vol 0.3 l –6 l CH = ------------ = -------------------------------- = 30 ⋅ 10 -----------B 10,000 bar bar Bulk Modulus (for oil in hose) ~ 3,000 bar: Vol 0.3 l –6 l CH = ------------ = ---------------------------- = 100 ⋅ 10 -----------B 3,000 bar bar Fieldbus, Device Control This higher compliance means lower stiffness so more controller gain is needed (and can be used) to achieve the same pressure response as with oil in steel. It means the valve will open more and so the same response applies only for pressure changes where the valve size is not the limiting factor. It may mean that a larger valve is needed. Do: After the initial tuning of the "CH" value, it is probably needed to fine tune the controller. Special Applications Do: Actual value filter adjustment: the actual value of the pressure transducer can be filtered with this low-pass filter. Corner frequency in Hertz [1/s], filter order is set to 1 as default. Note the value must be greater than 10 Hz, but attention too low frequencies here result in phase lag of the control value. Do: Integrator Gain [1/s]: classic integrator gain. Diagnostics Do: I control range / I active window: the window where the integrator (gain) is working. For example a value of 0.1 would cause the integrator to work fully when command and actual pressure value differs less than 10 %. Outside this window the integrator gain is multiplied with the "Factor". Do: I gain Factor: depending on the "Integrator Control Range" and the "Factor" the user can set the integrator to work with different gain. Here the logic is: if the command value – actual value differs less than I range then integrator gain = integrator gain, otherwise the integrator gain = Factor * integrator gain. MoVaPuCo Do: Integral part upper and lower limit: Controller upper limit, range 0…100 % Controller lower limit, range: –100…0 % The integrator can be limited in positive and negative direction. Hint: in applications with slow moving loads and pressure limiting function it is typically required to limit the integral part in order to avoid overshooting of the pressure (integrator windup). Differentiator gain and time constant: classic differentiator part of PID controller with a possibility to set the time constant in ms. Application Instruction DCV (CDS45379-en; Version -, August 2015) Example Applications Do: Controller output limit: both upper and lower limit of the whole pressure controller can be limited. Pressure Controller upper limit, range 0…100 % Pressure Controller lower limit, range: –100…0 % 52 Getting Started Digital Control Valves 7 Adaptation to special applications Pressure control Installation Check: Monitor the controller output: the P, I and D output can be individually and overall monitored: cmpprspro 0x2311#00, cmpprsint 0x2310#00, cmpprsdt1 0x2312#00, overall ControllerOutput 0x2418#00. Check: Monitor the <PrsControlDeviation> index#sub-index (0x63D0#01) which directly gives the deviation between pressure demand and actual value. Keep in mind that between the pressure setpoint and pressure demand is the setpoint conditioning with ramp, scaling and filters. Practical hints for pressure controller tuning Fieldbus, Device Control Start the tuning by using the "Automatic CH" value until you have a stable enough response. If the pressure response after the initial tuning is not satisfactory, the controller parameters can be tuned individually (PIDT1). In most pressure controller systems the integral part has to be limited and the gain reduced. This will make the controller output more P-gain dominant and typically reduce overshooting of the system: Special Applications Do: Set the integrator upper limit to 20 %, lower limit to –20 %. Do: Set the integrator range to 5 %. Do: Set the integrator factor to 0.1 (dec). Do: Reduce the I-gain as necessary. Diagnostics In most pressure control systems, the D part does not increase the stability of the system. You might find it useful for preventing I gain originated overshoots. In case of load disturbances in the system, use the "Actual Value Filter" to cut the worst disturbances from the actual value. MoVaPuCo Example Applications Application Instruction DCV (CDS45379-en; Version -, August 2015) 53 Getting Started Digital Control Valves 8 Diagnostics / troubleshooting CANopen emergency message used in CANopen incl. EtherCAT CoE networks 8 Diagnostics / troubleshooting Installation The following steps lead you through diagnosis of electrical supply and fieldbus problems. First some general hints about diagnosis messages are given followed by checklists which will help to locate or exclude certain errors or problems and determine the reason. 8.1 CANopen emergency message used in CANopen incl. EtherCAT CoE networks Byte 7 Description Moog-specific error code 6 5 4 Power on time in minutes 3 1 Emergency error code User Manual "Firmware", Chapter "8.1.4 Error codes depending on fault codes" 0 Special Applications Fault code User Manual "Firmware" Chapter "8.1.2 Possible fault codes" 2 Error register Fieldbus, Device Control The emergency message is a CANopen event triggered protocol used to indicate faults indicated by the slave device. Each occurrence of an error initiates an emergency message. It is only sent once when it occurs. When the error recovered an emergency message with code 0 is sent. Table 19: Emergency message For more details about the emergency message see: User Manual "Firmware", Chapter 8.1.9 "Emergency message" For EtherCAT Devices additional emergency error codes are defined for indicating SyncManager configuration problems. In these cases the error register and Moog-specific error code have different meaning. The error register contains the network state in whilst the error occurred. Byte 7 6 5 0 3 Diagnose code 2 Error register 1 Emergency error code SM 0, mailbox read State of the Network State Machine 0x00 Odd address not allowed 0x01 Initializing 0x01 Invalid address 0x02 'PRE-OPERATIONAL' 0xA000 Transition from 'PREOPERATIONAL' to 'SAFE-OPERATIONAL' failed 0x02 Invalid size 0x03 'SAFEOPERATIONAL' 0x03 Invalid settings 0x04 'OPERATIONAL' SM 1, mailbox write Odd address not allowed 0x05 Invalid address 0x06 Invalid size 0x07 Invalid settings 0xA001 Transition from 'SAFEOPERATIONAL' to 'OPERATIONAL' failed MoVaPuCo 0x04 Diagnostics Diagnose data 4 SM 2, PDO out / receive 0x08 Odd address not allowed 0x09 Invalid address 0x0A Invalid size 0x0B Invalid settings Example Applications SM 3, PDO in / send 0x0C Odd address not allowed 0x0D Invalid address 0x0E Invalid size 0x0F Invalid settings Table 20: Emergency message extensions for EtherCAT Application Instruction DCV (CDS45379-en; Version -, August 2015) 54 Getting Started Digital Control Valves 8 Diagnostics / troubleshooting SDO abort codes 8.2 SDO abort codes SDO abort code Meaning 0503 0000 Toggle bit not alternated. SDO protocol timed out. 0504 0001 Client/server command specifier not valid or unknown. 0504 0002 Invalid block size (block upload/download only). 0504 0003 Invalid sequence number (block upload/download only). 0504 0004 CRC error (block upload/download only). 0601 0000 Unsupported access to an object. Probably access right violation. 0601 0001 Attempt to read a write only object. 0601 0002 Attempt to write a read only object. 0602 0000 Object does not exist in the object dictionary. Object cannot be mapped to the PDO. 0604 0042 The number and length of the objects to be mapped would exceed PDO length. 0604 0043 General parameter incompatibility reason. 0604 0047 General internal incompatibility in the device. 0606 0000 Access failed due to a hardware error. 0607 0010 Data type does not match, length of service parameter does not match. 0607 0012 Data type does not match, length of service parameter too high. 0607 0013 Data type does not match, length of service parameter too low. Sub-index does not exist. 0609 0030 Invalid value for parameter (download only). 0609 0031 Value of parameter written too high (download only). 0609 0032 Value of parameter written too low (download only). 0609 0036 Maximum value is less than minimum value. 060A 0023 Resource not available: SDO connection. 0800 0000 General error. 0800 0020 Data cannot be transferred or stored to the application. 0800 0021 Data cannot be transferred or stored to the application because of local control. 0800 0022 Data cannot be transferred or stored to the application because of the present device state. 0800 0024 No data available. Diagnostics 0609 0011 Special Applications 0604 0041 Fieldbus, Device Control 0504 0000 Installation Every CANopen SDO upload or download request to the valve is responded to by the valve. If the valve is not able to provide meaningful data or the request itself was already erroneous, the request is responded to with a so called 'SDO abort'. It transfers a 4 byte long SDO abort code, which specifies the cause of the abort. These abort codes are defined by CiA 301. MoVaPuCo Table 21: SDO abort codes Example Applications Application Instruction DCV (CDS45379-en; Version -, August 2015) 55 Getting Started Digital Control Valves 8 Diagnostics / troubleshooting SDO abort codes Checklist fieldbus CANopen only Check Valve has no power, all LEDs are dark Power supply (24 V) and connector X1. User Manual "Electrical Interfaces", CA63420-001, Chapter 4.1 "Connector X1" Installation Problem Check polarity of 24 V. Having power, at least «MS» status LED should be on or blinking. With power connected, at least the «MS» status LED should be on or blinking. CANopen status LEDs User Manual "Electrical Interfaces", CA63420-001, Chapter 5.2 "Network status LED «NS»" CANopen network does not transmit any telegram • Check the bus termination: 120 Ω resistor between signal line CAN_HIGH and CAN_LOW on each end of the CAN bus cable. If the resistance between CAN_HIGH and CAN_LOW is more than 65 Ω, one of the resistors is not connected correctly or has too high resistance. • Correctly applied connector wiring? • Correctly terminated connector? • Look for a short circuit between CAN ground and CAN_HIGH or CAN_LOW. • Check the bitrate on each device within the network is configured the same. • Check the maximum permissible length of the CAN wire depending on the configured bitrate. • On powering on the valve, it sends automatically a boot-up message with its configured Node-ID. Check this message with a CAN monitor program. • Check the bus load using a network monitor program e.g. the Minimon delivered with the IXXAT CAN to USB interface. Detection of reasons for CAN error frames on the bus • Checking CAN controller status (error counters). • Disconnecting one device and testing whether rest of the network works correctly. • Sample point within specified range of nominal bit time? • Exceeding of max. stub line length? CANopen: telegrams are transmitted on the CAN bus but not received by the valve Check the configured Node-ID. No SDO transmission is possible • Correctly applied COB-IDs? • Evaluate error SDO abort codes. Network state does not become 'PREOPERATIONAL' • Evaluate error history 0x1003 • Evaluate emergency message codes. Network state becomes 'OPERATIONAL', but the setpoint value in the valve stays zero • PDO-Configuration (process data configuration) in the slave and master. • Device mode must have configured "Setpoint input via Bus". If the Local Control Mode is set to "Control Word via Bus" then the "control word" has to be set via Bus. • Error messages in Logger-Output of the master. • Error parameter of the valve: SDO index 0x1003, 0x2832 Fieldbus, Device Control CANopen network does not transmit any telegram Special Applications Diagnostics MoVaPuCo Example Applications Table 22: Fieldbus checklist (CANopen only) (part 1 of 2) Application Instruction DCV (CDS45379-en; Version -, August 2015) 56 Getting Started Digital Control Valves 8 Diagnostics / troubleshooting SDO abort codes Checklist fieldbus CANopen only Check Check the byte ordering in the PDO. Network state will not become 'OPERATIONAL' • PDO configuration (data length) on master and slave side. • The type of valve in the node list of the master. If applicable deactivate "Check Product Type". • The valves type and revision does match the configured one. CANopen SDOs are transmitted but no PDO • • • • • CANopen: slave node has switched back from Operational to PreOperational by itself Check for RPDO timeout in the parameter preerrfld 0x1003. The setpoint value in the valve has steps, whereas the source values on the PLC are strictly continuous The bus cycle time is configured properly. It will be configured in the fieldbus master. Installation Problem CANopen: A PDO will be received but the signal shape of the <spool position setpoint value> (0x6300#00) does not look like the setpoint signal in the PLC controller Fieldbus, Device Control Check the PDO mapping. Monitor process Images / PDOs and PDO mapping Check the NMT state. Check for occurrence of the PDO watchdog timeout. Check for missing Sync signal if the RPOD or TPDO <RPdo2_TransmissionType> (0x140x#02) was configured for synchronous driven transmission. • Too many TxPDOs have been configured. • A TxPDO is present at the node, but no process data has been mapped. • Check that the configured RPDO length matches the received TPDO. Special Applications Table 22: Fieldbus checklist (CANopen only) (part 2 of 2) Diagnostics MoVaPuCo Example Applications Application Instruction DCV (CDS45379-en; Version -, August 2015) 57 Getting Started Digital Control Valves 8 Diagnostics / troubleshooting Diagnostics / troubleshooting fieldbus EtherCAT 8.3 Diagnostics / troubleshooting fieldbus EtherCAT Installation If the slave node does not enter the 'OPERATIONAL' state, the following AL status code gives an indication of the error source. (This status register is supported in DCV valves since Sept. 2013.) This status registers are displayed in the network master in logging window or in the slaves memory in the "Advanced Settings" window. AL status code, register 0x123…0x135 Current state (or state change) Resulting state 0x0000 No error Any Current state 0x0001 Unspecified error Any Any + E 0x0011 Invalid requested state change I -> S, I -> O, P -> O, O -> B, S > B, P -> B Current state + E 0x0012 Unknown requested state Any Current state + E 0x0013 Bootstrap not supported I -> B I+E 0x0014 No valid firmware I -> P I+E 0x0015 Invalid mailbox configuration I -> B I+E 0x0016 Invalid mailbox configuration I -> P I+E 0x0017 Invalid sync manager configuration P -> S, S -> O Current state + E No valid inputs available S, P -> S P+E 0x0019 No valid outputs O, S -> O S+E 0x001A Synchronization error O, S -> O S+E 0x001B Sync manager watchdog O, S S+E 0x001C Invalid Sync Manager Types O, S, P -> S S+E 0x001D Invalid Output Configuration O, S, P -> S P+E 0x001E Invalid Input Configuration O, S, P -> S S+E 0x001F Invalid Watchdog Configuration O, S, P -> S P+E 0x0020 Slave needs cold start Any Any + E 0x0021 Slave needs INIT B, P, S, O Any + E 0x0022 Slave needs PREOP S, O S + E, O + E 0x0023 Slave needs SAFEOP O O+E 0x0043 Mailbox CoE B, P, S, O Current state + E Diagnostics 0x0018 Special Applications Description Fieldbus, Device Control Status code Table 23: AL status codes Network analyzing tool MoVaPuCo To analyze the Ethernet data frames including the EtherCAT frames, the network analyzing tool Wireshark can be used. This tool is under Free Software / GNU General Public License and can be downloaded from www.wireshark.org. For the interpretation of the EtherCAT frames the ethercat.dll should be installed (available: www.ethercat.org/download, for EtherCAT members only). Example Applications Application Instruction DCV (CDS45379-en; Version -, August 2015) 58 Getting Started Digital Control Valves 8 Diagnostics / troubleshooting Diagnostics / troubleshooting fieldbus EtherCAT To receive the Ethernet frames in the analyzer tool, on several network masters a special operation mode has to be enabled. For example in the TwinCAT Master the "Promiscuous Mode" has to be enabled for the appropriate network card. Installation Fieldbus, Device Control Figure 20: TwinCAT System Manager Special Applications Diagnostics MoVaPuCo Example Applications Application Instruction DCV (CDS45379-en; Version -, August 2015) 59 Getting Started Digital Control Valves 8 Diagnostics / troubleshooting Diagnostics / troubleshooting fieldbus EtherCAT Checklist EtherCAT • Fieldbus cable and plugs. Typical errors: corroded or broken wires, bad contacts. • The connected nodes (e.g. master node) have no supply power. User Manual "Electrical Interfaces", CA63420-001, Chapter 5 "Status display" and Chapter 4.3 "Field bus connectors X3, X4" • Master network card has not been enabled. LEDs «L/A in» or «LA out» is off, flickering, on, blinking fast Probably no physical connection, for details see: User Manual "Electrical Interfaces", CA63420-001, Chapter 5.2.3 "Valves with EtherCAT interface" Any problem The log messages on the network master. This can give a hint for configuration mismatches. For TwinCAT: The Log window can be activated with the menu "View | Show Logger Output". For MSC II: Start the MSC web interface by typing the IO address into the path field of a browser. On the main page of the MSC, click on "MACS Logging" in the sector "Diagnostics". Network state does not become 'PREOPERATIONAL' If you use TwinCAT: • The TwinCAT System Manager has no connection to the TwinCAT runtime system: Start the TwinCAT Runtime System. Check the error messages in the TwinCAT System Managers Logger output for emergency messages. • The fieldbus topology has been changed without adapting and restarting the configuration in the network master. Network state (AL status) does not become 'OPERATIONAL' Mailbox configuration with SM2 and SM3. Network state does not become 'PREOPERATIONAL' The valves type and revision does not match the configured one. Network state does not become 'SAFE-OPERATIONAL' • PDO configuration (data length) on master and slave side. • The type of valve in the node list of the master. If applicable deactivate "Check Product Type". Network state stays in 'SAFEOPERATIONAL' but does not become 'OPERATIONAL' • The PDO configuration is correct. • Check the application program (PLC) is still running or • Check the checkbox "Stay at 'PRE-OP' until Sync Task started" is not set in the EtherCAT's "Advanced Settings" window of the network card. Fieldbus, Device Control Check No hardware «Link» / «NS» LED is dark Installation Problem Special Applications Diagnostics MoVaPuCo Table 24: EtherCAT checklist (part 1 of 2) Example Applications Application Instruction DCV (CDS45379-en; Version -, August 2015) 60 Getting Started Digital Control Valves 8 Diagnostics / troubleshooting Diagnostics / troubleshooting fieldbus EtherCAT Checklist EtherCAT Check Network state becomes 'OPERATIONAL', but the setpoint value in the valve stays zero • PDO mapping (process data configuration) in the slave and master. • Check the byte order within the PDO data frame. Installation Problem Check that the setpoint value is received in the corresponding parameter, e.g. index#sub-index 0x6300#1. This check can be done by: • Reading the parameters using the MoVaPuCo. • Sending back the values received with RxPDO to the network master and comparing them with the sent values. • Checking that the spool is moving. Indicated by a changing digital output on the "fail safe position" signal (Only for direct driven valves). Fieldbus, Device Control • Check that the Control Word is received in the parameter index#sub-index 0x6040#0. • Change the control word from 'INIT/DISABLED' to 'HOLD'. This switches the 10 kHz motor PWM on. This increases the current consumption of the valve significantly. • Device Mode must be configured 'Setpoint input via Bus'. • In case the Local Control Mode is set to 'Control Word via Bus' then the 'Control Word' has to be set via Bus. • Check the valve state machine («MS» LED) follows the Control Word sent via bus. Special Applications Error messages in Logger output of the master. Error parameter of the valve: SDO index 0x1003, 0x2832 SDO transmission does not work but PDO does Mailbox configuration configured in the valve (slave configuration file <Modelnumber>.xml) In the "CoE Online" window no SDOs are displayed *.eds file in the masters installation directory could not be found or the name/path of the *.eds file does not match with the corresponding element <CoE> in the slave configuration file. Network state stays at 'PREOPERATIONAL' and will not get 'SAFE-OPERATIONAL' Probably the master is configured to "Stay at 'PRE-OPERATIONAL' until Sync. Manager is running". In this case the PLC program must be started to enable PDO transmission and to enable the master to enter the 'OPERATIONAL' state. The network state is 'OPERATIONAL' but all PDO parameters are zero Depending on the master configuration the process parameters are updated only if they are mapped and the PLC program is running. The link LEDs are yellow but the AL state will not get 'PREOPERATIONAL' • Check if the working counter (WcState) of the valve is greater than zero. Probably one of the nodes between the valve and the master node is defect and destroys the data packages. • Disable all slave nodes and re-enable one by one. CANopen: A PDO will be received but the signal shape of the <spool position setpoint value> (0x6300#00) does not look like the setpoint signal in the PLC controller Check the byte ordering in the PDO. CANopen: slave node has switched back from 'OPERATIONAL' to 'PREOPERATIONAL' by itself Check for RPDO timeout in the parameter preerrfld 0x1003. Network state will not become 'OPERATIONAL' • PDO configuration (data length) on master and slave side. • The type of valve in the node list of the master. If applicable deactivate "Check Product Type". MoVaPuCo The bus cycle time is configured properly. It will be configured in the network master. Diagnostics The setpoint value in the valve has steps, whereas the source values on the PLC are strictly continuous Table 24: EtherCAT checklist (part 2 of 2) Example Applications Application Instruction DCV (CDS45379-en; Version -, August 2015) 61 Getting Started Digital Control Valves 8 Diagnostics / troubleshooting Diagnostics / troubleshooting valve application 8.4 Diagnostics / troubleshooting valve application Installation The valve error handling and fault configuration together with the Device State Machine are providing exact information on both, valve internal problems such as problems on the interfaces (feedback, command, actual value, valve internal or external cable break, power supply voltage failure and fieldbus communication related issues etc.). The fault maybe also be caused by lack of supply pressure at port P of the separate pilot port. Fault indication Fault states are indicated on different ways: Fieldbus, Device Control • Status Word (Ready bit of index#sub-index 0x6041#0) representing the state of the valves DSM. • Module status LED «MS» and network status LED «NS», see: User Manual "Electrical Interfaces", CA63420-001, Chapter 5 "Status display" • Error output signal on pin 11 of X1 (in case of an 11+PE connector) 0 V = error active, Device State Machine is in one of the 'FAULT' states or 'NOT_READY'. 24 V = no error, Device State Machine is in 'INIT', 'DISABLED', 'HOLD' or 'ACTIVE'. • CANopen emergency message • A summary of the errors can be accessed reading the parameter <errreg> 0x1001. Special Applications • A list of recent errors can be accessed reading the parameter <StandardErrorField> index#sub-index 0x1003#1…8. • <FaultReactionDescription> index#sub-index 0x2832. • <FaultStatus> index#sub-index 0x2831, <FaultRetainStatus> index#sub-index 0x2834. • The <FaultHistoryNumber> index#sub-index 0x2832. Detailed description of the fault parameters and a list of the fault codes: User Manual "Firmware", Chapter 8.1.4 "Error Codes" In the MoVaPuCo, the error states are shown in the right window named "Errors". Diagnostics MoVaPuCo Figure 21: Error states shown in MoVaPuCo Status Word The valve application <StatusWord> index#sub-index (0x6041#0) shows the current communication-independent device state. Bus-specific fault states are not shown in the status. Example Applications Application Instruction DCV (CDS45379-en; Version -, August 2015) 62 Getting Started Digital Control Valves 8 Diagnostics / troubleshooting Diagnostics / troubleshooting valve application Fault Reaction Installation In all these cases fault is indicated in the parameter <FaultStatus> index#sub-index 0x2831#01…4. Corresponding fault reactions can force the Device State Machine (DSM) to go into a defined fault state. Depending on the fault configuration (parameter <fault reaction type> index#sub-index 0x2830#1…127), different reactions can be configured individually for each possible fault source: • Sending an emergency message only • Forcing a fault reaction resulting in one of the DSMs fault state 'FAULT_HOLD', 'FAULT_DISABLED' • No reaction Fieldbus, Device Control A fault with configured reaction 'FAULT_STOP' (value 127) leads to a shutdown of the valve. In this case spring centered position is entered and the «MS» LED is constant red. Only by switching on the power again, the valve can be re-activated. Faults which are preconfigured with 'FAULT_STOP' (127) cannot be modified. Application related fault reactions are not set to any predefined action (all marked to NONE). They have to be set by the user depending on the applications needs. Special Applications The easy way to make customer-specific fault reaction configuration is using the Moog Valve Configuration Software. See picture below. Diagnostics Figure 22: MoVaPuCo fault configuration MoVaPuCo Fault Acknowledgement To switch the valve back to an active state, the fault has to be acknowledged. Faults can be acknowledged by: • Forcing a 0 to 1 (rising edge) on the reset bit (bit 3) within the <ControlWord> index#subindex 0x6040#00. • Toggling the hardware enable signal (pin 3 of X1) from 0 to 1, User Manual "Firmware", Chapter 5.2.2.2 "DSM state transitions caused by the enable signal" • Switching on the power again. Example Applications After acknowledgement the valve enters the state requested by the <ControlWord> and enable signal. A fault state can only be left if the error cause has been corrected. Otherwise, the acknowledgement of a fault will immediately lead to a fault reaction again. Application Instruction DCV (CDS45379-en; Version -, August 2015) 63 Getting Started Digital Control Valves 8 Diagnostics / troubleshooting Diagnostics / troubleshooting valve application Valve Application / Device State Machine (DSM) When the valve is in a fault state, the DSM enters a corresponding fault state. Installation Valve Application State Machine <ControlWord> (0x6040) 0 (control word from bus) Fieldbus, Device Control <StatusWord> (0x6041) #ControlWord# <LocalControlWord> (0x4040) 1 (control word local) <Local> (0x604F) <StatusWord> (0x6041) #ControlWord# R: Bit Ready (Bit 3) M: Bit Active (Bit 2) H: Bit Hold (Bit 1) D: Bit Disabled (Bit 0) R: Bit Reset faults (Bit 3) M: Bit Active (Bit 2) H: Bit Hold (Bit 1) D: Bit Disabled (Bit 0) Special Applications Figure 23: Device State Machine fault states State 0x00 'NOT READY' 0x08 'INIT' 0x09 'DISABLED' 0x0B 'HOLD' 0x0F 'ACTIVE' 0x01 'FAULT' Diagnostics Status word (lowest four bits) Table 25: Status word MoVaPuCo Example Applications Application Instruction DCV (CDS45379-en; Version -, August 2015) 64 Getting Started Digital Control Valves 8 Diagnostics / troubleshooting Diagnostics / troubleshooting valve application Checklist Valve Application Requested state 'ACTIVE' with the ControlWord (0x6040) but actual state of the valve application state machine stays in 'INIT' • Check the ready bit (3) in the status word (0x6041). • Check parameter <StandardErrorField> index#sub-index 0x1003#1…8. Requested state 'ACTIVE' with the ControlWord (0x6040) but actual state of the valve application state machine stays in 'DISABLED' or 'HOLD' • Check the hardware enable signal pin 3 of X1. • Check if DSM is in state 'FAULT_DISABLED' or 'FAULT_HOLD'. If so, check parameter <StandardErrorField> index#sub-index 0x1003#1…8. The setpoint value is received in the valve but the spool does not move • Check Device State Machine (DSM) state. • Check the hardware enable signal pin 3 of X1. • Check the signals within the valve in the following order: - <Spool position setpoint value> index#sub-index 0x6300#01 - Demand value generators/setpoint conditioning settings. User Manual "Firmware", Chapter 7.2 - <Spool position demand value> index#sub-index 0x6301#01 - <Controller output> index#sub-index 0x2158#00 The valve is 'ACTIVE' but the spool does not move. The spool position control deviation is out of the limit • Check if the oil system pressure is available. • With a pilot operated dual stage valve: check that the supply pressure for the pilot system is sufficient. • To avoid faults due to oil contamination, it is essential to check the oil quality and improve it if necessary by appropriate means such as flushing or additional installation of filters. The NMT state is 'OPERATIONAL' but the spool does not follow the setpoint Check the configuration of the demand signal path configured with the Service Data Objects (SDO) devmod (0x6042), ctlwrd (0x6040), ctlmod (0x4043). For more details see: User manual "Firmware", Chapter 6.2.3 "Spool position setpoint value path" Special Applications • The power supply (24 V) and connectors [3]. Check polarity of 24 V. • «MS» status LED should be on or blinking. Fieldbus, Device Control Check Valve has no power Installation Problem Table 26: Valve Application checklist Diagnostics MoVaPuCo Example Applications Application Instruction DCV (CDS45379-en; Version -, August 2015) 65 Getting Started Digital Control Valves 9 Moog Valve and Pump Configuration Software (MoVaPuCo) Requirements Installation 9 Moog Valve and Pump Configuration Software (MoVaPuCo) The Moog Valve and Pump Configuration Software (MoVaPuCo) is a PC based program which allows convenient access via the Moog Service Interface, connector X10 to configuration and setup of digital controlled valves (DCV) and pumps with digital control (RKP-D). The factory settings of the digital interface valves match for most applications. However, the settings can be adjusted to fit your individual needs if necessary. Therefore the MoVaPuCo allows easy access to a variety of parameters. Last but not least it is a diagnosis tool for valves. Fieldbus, Device Control The following information and images are related to the MoVaPuCo, B99464-DV021-A-010, Version 2.1. With this version the firmware B9922x-DV001 to B9922x-DV017 can be configured. Depending on the existing firmware the valve configuration window may differ. 9.1 Requirements Operating system: Special Applications • Required operating system is Windows Vista, Windows 8.1 Software: • Moog Valve and Pump Configuration Software B99464-DV021-A-010 Hardware: • USB to CAN adapter card (Moog order code: C43094-001) • CAN adapter cable 9-pin D-Sub socket to M12, a-coded connector with termination resistor for a one to-one connection between the notebook and the valve (Moog order code: TD 3999-137). MoVaPuCo Figure 24: USB to CAN adapter (Moog order code: C43094-001) Diagnostics • CAN adapter cable M8 to M12, A-coded. Needed when connecting to the X10 service plug (Moog order code: CA40934-001) Figure 25: CAN cable (Moog order code: TD 3999-137) 9.2 USB to CAN driver version VCI3 Example Applications Before installing the driver version VCI3 it is recommended to uninstall earlier driver versions, e.g. VCI2.x. The latest versions of drivers and utilities to uninstall older IXXAT drivers can be found on the manufacturer's website or at the following address: www.moogsoftwaredownload.com Application Instruction DCV (CDS45379-en; Version -, August 2015) 66 Getting Started Digital Control Valves 9 Moog Valve and Pump Configuration Software (MoVaPuCo) Installation of the MoVaPuCo software 9.3 Installation of the MoVaPuCo software Steps to install the software: Installation • Start the setup program of the MoVaPuCo. • During the installation, setup will automatically check if the required version of Microsoft .NET Framework 4 client profile is installed on the computer. If this software was not previously installed and the computer is connected to the Internet the installation of Microsoft .NET Framework 4 client profile will start automatically. • Installation of IXXAT Version 3.x if not already installed. After successful installation and launch of the MoVaPuCo the following user interface appears. Fieldbus, Device Control The communication between the MoVaPuCo and the valve uses the CANopen protocol defined by CANopen [CiA 301, CiA 305 and CiA408]. Special Applications Diagnostics Figure 26: Startup-surface of the MoVaPuCo software with the help function MoVaPuCo Example Applications Application Instruction DCV (CDS45379-en; Version -, August 2015) 67 Getting Started Digital Control Valves 9 Moog Valve and Pump Configuration Software (MoVaPuCo) Installation of the MoVaPuCo software 9.3.1 Help function of the MoVaPuCo The operation of MoVaPuCo is intuitive but if needed, it contains a help function. Installation A short introduction is available under the help function as a video. These videos can be found on www.moogsoftwaredownload.com Fieldbus, Device Control Special Applications Figure 27: User interface of the MoVaPuCo with help function Diagnostics MoVaPuCo Example Applications Application Instruction DCV (CDS45379-en; Version -, August 2015) 68 Getting Started Digital Control Valves 10 Example applications with different network masters CANopen network with Moog MSC II Installation 10 Example applications with different network masters 10.1 CANopen network with Moog MSC II Do: The CANopen eds configuration file for the valve with certain model number (e.g. D672-E5704-0001.eds must be copied to the following directory. This has to be done before starting the MSC II application: Fieldbus, Device Control C:\Program Files (x86)\MACS 3.3\MACS\Targets\MACS_V33\MCTRL_V33_IOs\CanOpen Do: Start the MACS development environment. Do: Open a new project: Special Applications • Select "Projekt neu". • Enter: "Steuerungskonfiguration | Motion Controller | WideCAN | Element ersetzen CAN Master". • Right mouse click: "Unterelement anhängen". Diagnostics MoVaPuCo Example Applications Application Instruction DCV (CDS45379-en; Version -, August 2015) 69 Getting Started Digital Control Valves 10 Example applications with different network masters CANopen network with Moog MSC II Installation Fieldbus, Device Control Special Applications Diagnostics MoVaPuCo Figure 28: CANopen network with Moog MSC II configuration Do: Select: 'Fenster | Bibliotheksverwaltung | weitere Bibliotheken | CAN*.lib' or select all libraries. 10.1.1 MSC CANopen stack documentation Application Instruction DCV (CDS45379-en; Version -, August 2015) Example Applications The CAN interface of the MSC is documented in: C:\Program Files (x86)\MACS 3.3\MACS\Documents\CoDeSysDoku\German\ CANopen_fuer_3S_Laufzeitsysteme_V2_3_5_0.pdf 70 Getting Started Digital Control Valves 10 Example applications with different network masters EtherCAT network configuration with TwinCAT master 10.2 EtherCAT network configuration with TwinCAT master Installation Do: The model specific ESI configuration file for the valve with certain model number (e.g. D672-E5704-0001.xml), and the corresponding CANopen eds file must be copied to the following directories. This has to be done before starting the TwinCAT System Manager: • ESI file: e.g. D672-E5704-0001.xml C:\TwinCAT\Io\EtherCAT\ • EDS file: e.g. D672-E5704-0001.eds C:\TwinCAT\Io\CANopen\ Fieldbus, Device Control Do not confuse the model-specific ESI configuration file, which has an XML format with the MoVaCo-B9922x-DV0xx-211.xml configuration file which also has an XML format. Do: The model specific ESI configuration file for the valve with certain model number (e.g. D672-E5704-0001.xml), and the corresponding CANopen eds file must be copied to the following directories. This has to be done before starting the TwinCAT System Manager: • ESI file: e.g. D672-E5704-0001.xml C:\TwinCAT\Io\EtherCAT\ Special Applications • EDS file: e.g. D672-E5704-0001.eds C:\TwinCAT\Io\CANopen\ Do: Connect the valve with the fieldbus master using the fieldbus cable. Do: Start the TwinCAT System Manager. Do: Open a new network configuration by selecting the menu 'File | New' or open an existing one. Diagnostics Do: Append a network card by opening the "Append Devices" window: MoVaPuCo Figure 29: Appending a network card Example Applications Application Instruction DCV (CDS45379-en; Version -, August 2015) 71 Getting Started Digital Control Valves 10 Example applications with different network masters EtherCAT network configuration with TwinCAT master Do: Select a network card used for EtherCAT: Installation Fieldbus, Device Control Figure 30: Selecting a network card Special Applications Do: Right-click on the network card and press "Append Box" to insert a Moog valve as EtherCAT slave device. An "Insert EtherCAT Device" window will open. Diagnostics MoVaPuCo Figure 31: Inserting a network card Check: The list has the Moog valve listed under the sub-tree "EtherCAT Devices". Do: Select one Moog valve and press "OK". Application Instruction DCV (CDS45379-en; Version -, August 2015) Example Applications Check: The valve will be listed in the left tree connected to the network card. 72 Getting Started Digital Control Valves 10 Example applications with different network masters EtherCAT network configuration with TwinCAT master It is also possible to scan the network for existing slaves. Therefore select "Scan Boxes": Installation Fieldbus, Device Control Figure 32: Scanning the network Disadvantage of scanning is: Special Applications If the network tree already has some slave devices configured, there may be problems with the order of the devices or parameter mapping s could get lost. Check: Check the pre-configured Process Data Objects (PDO) mapping within the "Process Data" tab. With this mapping the setpoint and actual values are transmitted to the valve. This mapping matches the default configuration within the valve. It can be changed according to the applications needs. Details see: Chap. "7.5 Changing the default PDO mapping", page 35 Diagnostics MoVaPuCo Figure 33: Process Data Objects (PDO) mapping Example Applications Application Instruction DCV (CDS45379-en; Version -, August 2015) 73 Getting Started Digital Control Valves 10 Example applications with different network masters EtherCAT network configuration with TwinCAT master Do: Link an application PLC program to the network: Installation Fieldbus, Device Control Special Applications Figure 34: Linking an application to the PLC program Do: Therefore select "Append PLC Project" and choose an existing project: Diagnostics MoVaPuCo Example Applications Figure 35: Appending a PLC project Application Instruction DCV (CDS45379-en; Version -, August 2015) 74 Getting Started Digital Control Valves 10 Example applications with different network masters EtherCAT network configuration with TwinCAT master Do: Open the PLC configuration tree and have a look on the globally defined PLC application parameters which can be used for cyclic communication with the slave device via PDO. Installation Access of non-cyclic data transfer e.g. service data will be explained below. Fieldbus, Device Control Special Applications Figure 36: PLC configuration with PLC application parameters Do: Link the process data from the PLC program to the slave device/valves setpoint and actual values. Diagnostics MoVaPuCo Figure 37: Linking the process data to the slave device/valves setpoint and actual values Example Applications Application Instruction DCV (CDS45379-en; Version -, August 2015) 75 Getting Started Digital Control Valves 10 Example applications with different network masters EtherCAT network configuration with TwinCAT master Do: Set the options for the startup of the network. Installation Fieldbus, Device Control Special Applications Diagnostics Figure 38: Setting the network startup options Do: Activate the configuration to start the network. Do: After each change of the network configuration, the network has to be re-started. This is done by pressing "Action | Activate Configuration" or by a click on the icon: MoVaPuCo Example Applications Application Instruction DCV (CDS45379-en; Version -, August 2015) 76 Getting Started Digital Control Valves 10 Example applications with different network masters EtherCAT network configuration with TwinCAT master Installation Fieldbus, Device Control Special Applications Figure 39: Activating the network configuration Check: The network should change into the network state 'OPERATIONIAL' (OP). EtherCAT network state Description 'INIT' • • • • 'PRE-OPERATIONAL' • Network communication initialized • No PDO (cyclic) communication • SDO (a-cyclic) communication enabled 'SAFE-OPERATIONAL' • SDO (a-cyclic) communication enabled • PDO (cyclic) communication; just inputs, outputs are in 'Safe-State' 'OPERATIONAL' • SDO (a-cyclic) communication enabled • PDO (cyclic) communication; inputs and outputs Default state after power on No SDO (a-cyclic) communication No PDO (cyclic) communication Master can write info register Diagnostics Table 27: EtherCAT network states MoVaPuCo If the network stays in 'PRE-OPERATIONAL' or 'SAFE-OPERATIONAL' one of the most common reason is a mismatch in PDO configuration. More details see: User Manual "Firmware", Chapter 12 "Diagnostics" Now the network is operational and transmits actual values. The last step is to start the application program. Example Applications Application Instruction DCV (CDS45379-en; Version -, August 2015) 77 Getting Started Digital Control Valves 10 Example applications with different network masters EtherCAT network configuration with TwinCAT master Do: Start the PLC application. Installation Fieldbus, Device Control Figure 40: Starting the PLC application Special Applications Now the network and application is running and the application can be used. 10.2.1 Exchanging an existing valve in the network configuration If the EDS file of a certain valve model has been modified, it must be re-read into the TwinCAT System Manager. To re-read the EDS file do the following steps: Diagnostics Do: 1. Remove all slave nodes of this valve model from the network tree in the TwinCAT System Manager. (With this the variable mapping of theses slaves get lost.) 2. Copy the new EDS file to C:\TwinCAT\Io\EtherCAT\. 3. Restart the TwinCAT System Manager (with this step the configuration file is re-read). 4. Insert or scan the slave nodes to insert them into the list. 5. Map the valves input and output variables (setpoint and actual value) to the application by using the right-mouse menu "Change Link…". 6. Activate the configuration by pressing "Action | Activate Configuration" or by a click on the icon: MoVaPuCo Example Applications Application Instruction DCV (CDS45379-en; Version -, August 2015) 78 Getting Started Digital Control Valves 10 Example applications with different network masters EtherCAT network configuration with TwinCAT master 10.2.2 SDO parameter exchange to PLC The following methods are supported to access non-cyclic data e.g. service data within the valves. Installation EtherCAT/CANopen protocol available for data exchange Data exchange with the PLC via... Globally defined variables Service Data Objects / CANopen SDO (configuration data) Function block / function call within the PLC library 'TcEtherCAT.Lib' FB_EcCoESdoRead FB_EcCoESdoWrite Emergency message (error messages from the slave to the master) Log window / No direct access from PLC program. Alternative: Read out the valves parameter 'predefined error field' 0x1003 in case the status word 0x6041 ready bit indicates an error. Fieldbus, Device Control Process Data Objects / PDO (cyclic process data) Table 28: Methods accessing non-cyclic data Special Applications Diagnostics MoVaPuCo Example Applications Application Instruction DCV (CDS45379-en; Version -, August 2015) 79 Getting Started Digital Control Valves 10 Example applications with different network masters EtherCAT network configuration with TwinCAT master 10.2.3 Custom-defined PDO configuration Installation The PDO configuration of EtherCAT slaves is stored on three different places where different EtherCAT masters do prefer different sources to read this PDO configuration: • ESI file • SDO parameter 0x1600 and following • SII-EPROM in the slave Configuration in the master Fieldbus, Device Control Special Applications XML file is read during startup of the TwinCAT System Manager Figure 41: Custom-defined PDO configuration When changing the PDO configuration there are two methods: • Change the PDO configuration in the ESI file and, consistent with this configuration, in the SDO parameters 0x1600 of the slave node. Diagnostics • Use the default ESI file in the TwinCAT System Manager and change the PDO configuration in the "Process Data" tab to the applications needs. In this case the user defined PDO mapping is transmitted to the slave node during every startup of the node. To configure the PDO according to method 2 do the following steps: Do: Open the "Process Data" tab in the TwinCAT System Manager. MoVaPuCo Example Applications Figure 42: "Process Data" tab Application Instruction DCV (CDS45379-en; Version -, August 2015) 80 Getting Started Digital Control Valves 10 Example applications with different network masters EtherCAT network configuration with TwinCAT master Do: Deactivate the "Fixed Content" checkbox. This enables changes to the PDO mapping. Installation This setting corresponds to the "SlaveInformation XML: <Mailbox> … <CoE … … PdoConfig=1" setting in the ESI file. Fieldbus, Device Control Figure 43: Editing the PDO mapping Do: Edit the PDO list by double clicking on PDO: Special Applications Diagnostics Figure 44: Editing the PDO list MoVaPuCo Do: Activate the configuration by pressing "Action | Activate Configuration" or by a click on the icon: The new configuration is transferred to the slave during the transition from 'PRE-OPERATIONAL' to 'SAFE-OPERATIONAL', using the SDO index 0x1600, 0x1A00. Example Applications Application Instruction DCV (CDS45379-en; Version -, August 2015) 81 Getting Started Digital Control Valves 10 Example applications with different network masters EtherCAT network configuration with TwinCAT master 10.2.4 PDO receive watchdog Installation The PDO receive watchdog allows to bring the valve into a defined state, in case the network connection is broken and with this the setpoint is no longer up to date. If a watchdog timeout is detected, an application specific fault reaction is initiated. Do: Configure the fault reaction #114 'EtherCAT rpdo timeout' in the valve by setting the FaultReaction_Type 0x2830, sub-index 0x73, 'FAULT_HOLD' [3], 'FAULT_DISABLE' (2). Fieldbus, Device Control Special Applications Figure 45: Configuring the fault reaction Do: In the TwinCAT System Manager project tree, select the slave by pressing the left mouse key. Do: On the "EtherCAT" tab select the "Advanced Settings" button. The "Advanced Settings" window appears. Diagnostics Do: Activate the SM watchdog functionality by enabling the "Set SM Enable". –4 SM Watchdog Time = ( Multiplier ⋅ 0.04 ⋅ 10 s ) ⋅ SM watchdog In this example: –4 SM Watchdog Time = ( 25000 ⋅ 0.04 ⋅ 10 s ) ⋅ 3000 = 3000 ms = 3 sec. MoVaPuCo Example Applications Figure 46: Setting the SM watchdog time Application Instruction DCV (CDS45379-en; Version -, August 2015) 82 Getting Started Digital Control Valves 10 Example applications with different network masters EtherCAT network configuration with TwinCAT master To change the watchdog setting for all valves it is possible to edit the ESI file. Installation Do: Set the bit 4 in the ControlByte of the Output SyncManager (SM) to enable the PDO watchdog. Therefore edit the ESI file: Fieldbus, Device Control Figure 47: Editing the ESI file Do: Update the ESI file in the TwinCAT System Manager. Chap. "10.2.1 Exchanging an existing valve in the network configuration", page 78 Special Applications Check: Stop the PLC application program and with this the PDO transmission. The watchdog with the corresponding error reaction is triggered, the corresponding bit in the <FaultReaction_Status> index#sub-index 0x2831#04 is set and the valve status word switches to the configured state 'FAULT_HOLD' or 'FAULT_DISABLED'. Diagnostics MoVaPuCo Figure 48: Network start sequence Example Applications Application Instruction DCV (CDS45379-en; Version -, August 2015) 83 Getting Started Digital Control Valves 10 Example applications with different network masters Profibus, S7 / Siemens 10.3 Profibus, S7 / Siemens Installation Do: The Profibus master needs a slave interface description file (GSD) to start up the network. Therefore the MOOG07F4.GSD file has to be copied to the following directory on the network master. This has to be done before starting the PLC application. C:\Programme\Siemens\Step7\S7DATA\GSD\ Fieldbus, Device Control Special Applications Figure 49: Copying slave interface description file (GSD) The fieldbus master needs information about the valves fieldbus interface configuration. Diagnostics Do: Start the Simatic S7 Master. Do: Select "Extras | Neue GSD installieren…". MoVaPuCo Figure 50: Installing slave interface description file (GSD) Example Applications Application Instruction DCV (CDS45379-en; Version -, August 2015) 84 Getting Started Digital Control Valves 10 Example applications with different network masters Profibus, S7 / Siemens Check: The valve is displayed in the list of slave devices: Installation Fieldbus, Device Control Figure 51: Checking slaves list Special Applications Do: Configure the Node-ID of the valve using the following menu: Diagnostics Figure 52: Configuring the Node-ID MoVaPuCo Example Applications Application Instruction DCV (CDS45379-en; Version -, August 2015) 85 Getting Started Digital Control Valves 10 Example applications with different network masters Profibus, S7 / Siemens Do: Configure the Node-ID in the valve using the MoVaPuCo: Installation Fieldbus, Device Control Figure 53: Configuring the Node-ID using MoVaPuCo Special Applications Do: Select the telegram used to transmit cyclic process data: Diagnostics Figure 54: Selecting the telegram MoVaPuCo Example Applications Application Instruction DCV (CDS45379-en; Version -, August 2015) 86 Getting Started Digital Control Valves 11 Abbreviations / Units 11 Abbreviations / Units Installation Abbreviation Description AL Application layer, Software interface of the EtherCAT interface to the slave devices application CAN Controller Area Network, specified by CAN in Automation (CiA) CAN in Automation, international user's and manufacturer's organization CANopen EN 50325-4, Osi Layer 7 protocol, specified by CAN in Automation (CiA) CAT 5 Category for twisted pair wires standardised in ANSI/TIA/EIA-568-B.1-2001 CoE CANopen over EtherCAT DC Distributed Clock DIV Digital Interface Valve DCV Digital Control Valve, former DIV EDS / Eds Electronic Datasheets, containing a description of the CANopen object dictionary ESC EtherCAT Slave Controller ESI EtherCAT Slave Information Interface (Configuration file) Ethernet Control Automation Technology IEC International Electrotechnical Commission IEEE Institute of Electrical and Electronics Engineers Inc. IN Input IP Internet Protocol ISO International Organization for Standardization LED Light Emitting Diode MS Module Status NS Network Status OUT Output PDI Physical Device Interface (device internal interface in a slave node between EtherCAT fieldbus and application) Process Data Object. Object for data exchange between several devices Phy PHY Physical layer entity sub layer (ISO/IEC 8802.3) PLC Programmable Logic Controller Pre-Op PRE-OPERATIONAL = EtherCAT network state (AL state) Safe-Op SAFE-OPERATIONAL = EtherCAT network state (AL state) SDO Service Data Object. Peer to peer communication with access to the Object Dictionary of a device SII Slave Information Interface (EPROM in the valve) SM1/2 Sync Manager ½, synchronizes the PDO and mailbox communication Transmission Control Protocol (one of the core protocols of the Internet) UDP User Datagram Protocol (one of the core protocols of the Internet) RFC 768 VDMA Verband Deutscher Maschinen- und Anlagenbau e.V., German Engineering Federation XML Extensible Markup Language. General-purpose language, combining text and extra information about the text 100Base-TX Twisted Pair Ethernet wiring with 100 MBit/sec (Fast Ethernet) MoVaPuCo TCP Diagnostics PDO Special Applications EtherCAT Fieldbus, Device Control CiA Table 29: Abbreviations Unit Description Micro seconds m Meter Mbit/s Million bits per second MBit Mega Bit s Second Example Applications µs Table 30: Physical units Application Instruction DCV (CDS45379-en; Version -, August 2015) 87 TAKE A CLOSER LOOK. Moog designs a range of products that complement the performance of those featured in this user manual. Visit our Web site for more information and the Moog facility nearest you. Australia +61 3 9561 6044 [email protected] Ireland +353 21 451 9000 [email protected] South Africa +27 12 653 6768 [email protected] Brazil +55 11 3572 0400 [email protected] Italy +39 0332 421 111 [email protected] Spain +34 902 133 240 [email protected] Canada +1 716 652 2000 [email protected] Japan +81 46 355 3767 [email protected] Turkey +90 216 663 6020 [email protected] China +86 21 2893 1600 [email protected] Korea +82 31 764 6711 [email protected] United Kingdom +44 (0) 168 4 858000 [email protected] Finland +358 10 422 1840 [email protected] Luxembourg +352 40 46 401 [email protected] USA +1 716 652 2000 [email protected] France +33 1 4560 7000 [email protected] The Netherlands +31 252 462 000 [email protected] Germany +49 7031 622 0 [email protected] Norway +47 6494 1948 [email protected] Hong Kong +852 2 635 3200 [email protected] Russia +7 8 31 713 1811 [email protected] India +91 80 4057 6666 [email protected] Singapore +65 677 36238 [email protected] www.moog.com/industrial Moog is registered trademark of Moog Inc. and its subsidiaries. All trademarks as indicated herein are the property of Moog Inc. and its subsidiaries. © 2012 Moog GmbH. All rights reserved. All changes reserved. GETTING STARTED DIGITAL CONTROL VALVES - Application Instruction Version -, August 2015, Id. CDS45379-en WHAT MOVES YOUR WORLD