1
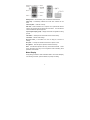
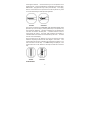
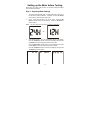
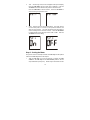
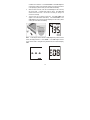
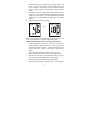
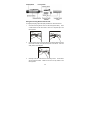
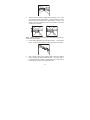
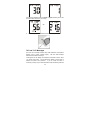
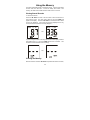
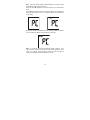
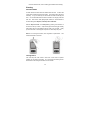
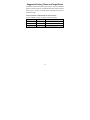
Mission® Ultra Cholesterol Monitoring System
High total cholesterol in blood has been established as one of the key factors
associated with a higher occurrence of coronary heart disease. Lipid and
lipoprotein metabolic disorders are closely linked to high total cholesterol in
blood. Lower blood cholesterol levels have a decreased risk of coronary
heart disease. The National Cholesterol Education Program (NCEP) has
established guidelines to identify risk groups in adults associated with various
cholesterol levels in blood. At ACON, our goal is provide you a simple, fast
and accurate way to keep track of one’s cholesterol level.
Welcome and thank you for choosing ACON’s Mission® Ultra
Cholesterol Monitoring System.
Intended Use
The Mission® Ultra Cholesterol Monitoring System is designed for the
quantitative measurement of cholesterol level in fresh fingertip capillary
whole blood. It is intended for in vitro diagnostic use and suitable for
hypercholesterolemia management. For self-testing and professional use.
To ensure accurate results
•
Read instructions in the User’s Manual and complete any necessary
training before use.
•
Use the code chip that accompanies each box of test strips.
•
Use only Mission® Ultra CHOL Total Cholesterol Test Strips with the
Mission® Ultra Cholesterol Meter.
•
Test with fresh fingertip capillary whole blood specimens. Do not use
venous blood, serum or plasma specimen. Neonatal blood specimens
are not validated.
•
Verify the test results using clinical laboratory methods before making
any adjustments to your medication, diet or activity routines.
•
Keep out of reach of children, handicapped persons or invalids.
Important Safety Instructions
•
Users should adhere to Standard Precautions when handling or
using this device.
•
All parts of the cholesterol monitoring system should be
considered potentially infectious and are capable of transmitting
blood-borne pathogens between patients and healthcare
i
professionals. For more information, refer to “Guideline for
Isolation Precautions: Preventing Transmission of Infectious
Agents in Healthcare Settings 2007”,
http://www.cdc.gov/hicpac/2007ip/2007isolationprecautions.html .
•
Misuse of electrical equipment can cause electrocution, burns,
fire and other hazards.
•
The unit is exclusively to be supplied from the adapter
GFP051DA-0510B.
•
If the meter is powered by AC adaptor, unplug the equipment
immediately after use.
•
If the meter is powered by AC adaptor, do not leave the equipment
unattended while it is plugged in.
•
Use the equipment only for the purpose described in the
instructions for use.
•
Do not use accessories which are not supplied or recommended
by the manufacturer.
•
Do not use the equipment if it is not working properly or if it has
suffered any damage.
•
Do not let the equipment or its flexible cord come into contact
with surfaces which are too hot to touch.
•
Do not use the equipment where aerosol sprays are being used or
where oxygen is being administered.
•
Do not use the equipment outdoors.
•
If the equipment is used in a manner not specified by the
manufacture, the protection provided by the equipment will be
impaired.
•
Do not drop or put anything into any opening in the equipment, or
into any hose or coupling.
•
Keep in mind the instructions mentioned.
Note: Throughout this user’s manual, meter parts or functions will appear
in bold. Items appearing on displays are identified in bold italics.
ii
Table of Contents
Getting Started ......................................................................................................... 1
Component Descriptions ............................................................................................. 2
Mission® Ultra Cholesterol Meter ................................................................................. 2
Meter Display ............................................................................................................... 3
Mission® Ultra CHOL Total Cholesterol Test Strips ...................................................... 5
Mission® Ultra Cholesterol Control Solution ................................................................ 9
Installing the Batteries ......................................................................................... 11
Setting up the Meter before Testing ................................................................. 13
Step 1 - Adjusting Meter Settings............................................................................... 13
Step 2 - Coding the Meter .......................................................................................... 14
Performing a Quality Control Test ....................................................................16
Performing a Cholesterol Test ...........................................................................19
Step 1 –Collecting Blood Specimen ........................................................................... 19
Step 2 - Testing for Total Cholesterol ......................................................................... 23
"HI" and "LO" Messages ............................................................................................ 26
Precautions and Limitations....................................................................................... 27
Using the Memory ................................................................................................. 28
Viewing Stored Records ............................................................................................ 28
Clearing the Memory ................................................................................................. 28
Transferring Records ................................................................................................. 29
Maintenance ............................................................................................................ 31
Replacing Batteries .................................................................................................... 31
Cleaning ..................................................................................................................... 32
Suggested Testing Times and Target Goals ..................................................33
Comparing Meter and Laboratory Results ..................................................... 34
Troubleshooting Guide ........................................................................................ 35
Specification ........................................................................................................... 37
Warranty ................................................................................................................... 38
Index of Symbols ................................................................................................... 39
References............................................................................................................... 40
iii
Getting Started
Inspect the kit box, meter, and accessories for any visible damage. Remove
the meter and other packaging contents from the kit box. The following
items are needed to perform a test:
0123
1
Component Descriptions
Cholesterol Meter: Reads the test strips and displays the total cholesterol
concentration in blood.
Carrying Case: Provides portability for cholesterol testing wherever you go.
User's Manual: Provides detailed instructions on how to use your
cholesterol monitoring system.
Quick Reference Guide: A short set of instructions to get you started
testing with your new cholesterol monitoring system.
Warranty Card: Should be completed and returned to the distributor to
qualify for the 2-year meter warranty.
CHOL Total Cholesterol Test Strips: Chemical reagent system strips used
with the meter to measure total cholesterol concentration in blood.
Code Chip:
meter.
Automatically calibrates the meter when inserted into the
Lancing Device: Use with sterile lancets to prick the fingertip for blood
specimen collection. The packaged lancing device has multiple depth
settings which allow users to adjust the depth of the puncture and to minimize
discomfort. It can also eject the used lancets.
Sterile Lancets: Use with the lancing device to draw a blood specimen.
New sterile lancets are inserted into the lancing device for each test and
discarded after use.
Optional Components:
Mission® Ultra Cholesterol Control Solution: Two levels of known
cholesterol concentrations: Level 1 Low and Level 2 High are control
solutions that can be purchased separately from the starter kit. They are
intended for use as a quality control check for the Mission® Ultra Cholesterol
Monitoring System. Only perform quality control checks when necessary.
Cholesterol controls are not included in the starter kit. Contact your local
distributor.
Mission® Ultra Cholesterol Meter
The Mission® Ultra Cholesterol Meter reads the test strips and displays the
total cholesterol concentration. Use the diagram below to become familiar
with all parts of your meter.
2
Battery Cover:
Code Chip:
meter.
Remove battery cover to install three AAA batteries.
Automatically calibrates the meter when inserted into the
Code Chip Slot:
Holds the code chip.
Data Port: Sends information to a computer via an optional data transfer
cable to view, analyze and print stored data in the meter. The data transfer
cable is available as optional equipment.
Liquid Crystal Display (LCD):
process.
Displays test results and guides the testing
<M> Button:
Recalls previous test results from the meter memory.
<S> Button:
Selects meter settings.
Strip Port Cover:A removable cover over the strip port, removed for
cleaning.
Strip Port:
Test strips are inserted into this area to perform a test.
Strip Ejector:
Slide the ejector upward to discard the test strip.
Note: Treat all blood specimens as if they are infectious materials. Follow
proper precautions and obey all local regulations when discarding blood
specimens and materials.
Meter Display
During testing, the Mission® Ultra Cholesterol Meter’s LCD screen will display
icons showing the status, options available, and prompts for testing:
3
Battery Symbol:
Appears when the batteries need to be replaced.
Blood Drop/Strip Symbol:
specimen.
Code:
Indicates when to insert test strip or to apply
Indicates the code number of the test strips.
Control Solution Symbol:
Indicates a control test is being performed.
Test Result Area: Displays the Code Number,Blood test result or Control
test result.
Pound Sign (#):
Indicates a control test result.
Measurement Units: Indicates the units for the test result.
measurement units are set at the factory and cannot be changed.
Memory:
The
Indicates a test result being recalled from memory.
Meter Use and Precautions
•
Do not get water or other liquids inside the meter.
•
Do not drop the meter or get it wet. If you drop the meter or get it
wet, check the meter by running a quality control test. Refer to
“Performing a Quality Control Test” for instructions.
•
Do not take the meter apart.
warranty.
•
Keep the Strip Port area clean.
•
Keep the meter dry and avoid exposure to extreme temperatures or
humidity, such as in a car.
4
Taking the meter apart will void the
•
Refer to” Maintenance” for details on how to clean the meter.
•
Keep the meter and all associated parts out of the reach of children.
•
The meter is pre-set to display blood Total Cholesterol concentration
in either millimoles per liter (mmol/L) or milligrams per deciliter
(mg/dL) depending on which unit of measure is standard in your
country. This unit of measure cannot be adjusted.
Note: Follow proper precautions and all local regulations when disposing
of the meter and used batteries.
EMC Warnings
1. This instrument is tested for immunity to electrostatic discharge as
specified in IEC 61000-4-2. However, use of this instrument in a dry
environment, especially if synthetic materials are present (synthetic
clothing, carpets, etc.) may cause damaging static discharges that may
cause erroneous results.
2. This instrument complies with the emission and immunity requirements
described in EN61326-1 and EN61326-2-6. Do not use this instrument
in close proximity to sources of strong electromagnetic radiation, as this
may interfere with proper operation of the meter.
3. For professional use, the electromagnetic environment should be
evaluated prior to operation of this device.
Mission® Ultra CHOL Total Cholesterol Test Strips
The Mission® Ultra CHOL Total Cholesterol Test Strips are thin strips with a
chemical reagent which works with the Mission® Ultra Cholesterol Meter to
measure the Total Cholesterol concentration in fingertip capillary whole blood.
Each test strip appears as shown below.
Specimen Application
For best results, fill the Check Window completely with specimen before
5
meter begins countdown. Incorrect results may occur if the specimen is not
applied correctly, or if the Check Window is not filled before countdown starts.
IMPORTANT: Apply specimen only to the tip of the test strip. Do not apply
blood or control solution to the top surface of the test strip as this may result
in an inaccurate reading or failed specimen application.
After the strip is inserted into the Strip Port, apply a blood drop directly to the
Specimen Tip of the test strip by touching blood drop to the Specimen Tip
area (see above illustration). Specimen is absorbed into the measurement
cell where the reaction will take place. A transient electrical current is
formed during the reaction. The blood Total Cholesterol concentration is
calculated based on the electrical current detected by the meter. The result
is shown on the meter display.
Apply the blood drop to the Specimen Tip of the test strip until the check
window is completely full and until the meter begins to count down. If the
check window does not fill up completely and meter starts countdown, do not
add more blood to the test strip. If an “E05" message is displayed, or the
check window does not fill, discard the used strip and retest with a fresh test
strip.
Code Number
6
Each package of test strips has a printed code number (CODE), lot number
) and control range (CTRL1 and CTRL
(LOT), unopened expiration date (
2).
Test Strips Storage and Handling
Please review the following storage and handling instructions:
•
Store test strips in a cool, dry place at 2-30°C (36-86°F) temperature
range. Store test strips away from heat or direct sunlight.
•
Do not freeze or refrigerate.
•
Do not store or use test strips in a high humidity location such as a
bathroom.
•
Do not store the meter, test strips or control solution near bleach or
cleaners that contain bleach.
•
Replace the cap on the test strip canister immediately after removal of a
test strip.
•
The test strip should be used immediately after removal from canister or
pouch.
•
Do not use your test strips past the unopened expiration date printed on
the label. Using test strips past the unopened expiration date may
produce incorrect test results.
•
After inserting the test strip, the meter will automatically turn off in 4
minutes of inactivity.
Note: The expiration date is printed in Year-Month format.
means January 2012.
Special Instructions for Test Strips in the Canister
7
2012-01
•
Do not store test strips outside their protective canister.
Test strips
must be stored in the original canister with the cap tightly closed to
ensure proper working condition.
•
•
Do not transfer test strips to a new canister or any other container.
Replace the cap on the test strip canister immediately after removal of a
test strip.
•
A new canister of test strips may be used for 3 months after initial
opening.
The opened expiration date is 3 months after the date the
canister was first opened. Write the opened expiration date on the
canister label after opening.
Discard the canister 3 months after your
initial opening, because usage after this period may result in inaccurate
readings.
Special Instructions for Test Strips in Foil Pouch
•
Tear the pouch carefully starting from the tear gap. Avoid damaging or
bending the test strip.
•
Use test strip immediately after removal from foil pouch.
Test Strips Precautions
•
For in vitro diagnostic use.
body for testing purposes.
•
For self-testing and professional use.
•
Do not use test strips that are torn, bent, or damaged in any way.
•
Do not reuse test strips.
•
Before running a Cholesterol test, make sure the code number on the
meter display matches the number shown on the test strip canister or
on the foil pouch.
•
Keep the test strip canister or the foil pouch away from children and
animals.
•
For self-testers, consult your physician or healthcare professional
before making any changes in your treatment plan based on your blood
Cholesterol test results.
Test strips are to be only used outside the
See the test strip insert for more details.
8
Mission® Ultra Cholesterol Control Solution
The Mission® Ultra Cholesterol Control Solution contains liquid with known
concentration of Total Cholesterol. This control solution is used to confirm
that your Mission® Ultra Cholesterol Monitoring System is working properly.
The control solution also checks that you are performing the test correctly. It
is important to run a quality control test regularly to make sure you are getting
correct results.
You should run a quality control test:
•
Before your first use of the meter to familiarize yourself with its
operation.
•
When you suspect that the meter or test strips is not working properly.
•
When you suspect that your test results are inaccurate, or if they are
inconsistent with how you feel.
•
When you suspect your meter is damaged. Refer to “Performing a
Quality Control Test” for instructions on how to run a quality control test.
Storage and Handling
Please review the following storage and handling instructions.
•
Store the control at room temperature 2-30°C (36-86°F).
refrigeration or freezing.
•
If the control is cold, do not use until it has warmed to room
temperature.
•
Use before the unopened expiration date shown on the vial or pouch.
Note: The expiration date is printed in Year-Month format.
means January 2012.
Avoid
2012-01
Precautions
•
For in vitro diagnostic use. The control solution is only for testing
outside the body. Do not swallow or inject.
•
Shake gently without making bubbles before use.
•
Control tests are specified to be accurate only when tested between
15-40°C (60-104°F).
•
The control ranges shown on the test strip canister or foil pouch are not
recommended ranges for your blood Total Cholesterol level. Your
personal blood Total Cholesterol target ranges should be determined by
9
your healthcare professional.
•
Do not touch the test strip with the tip of the control vial.
•
Use only the same brand of control that was provided with your kit.
See the control insert for more details.
10
Installing the Batteries
When you first receive the meter, batteries may not be preinstalled in the
meter. Three AAA batteries (1.5V) are required. The batteries can be found
in your carrying case. Install the batteries according to the following steps:
1.
Turn over the meter to locate the battery cover. Press in the direction
of the arrow on the battery cover and lift the cover to open it.
2.
Insert three alkaline AAA batteries into the battery case, and note the
direction of battery.
3.
Close the battery cover and make sure that it snaps shut.
Note: Batteries should be taken out when equipment is not used for an
extended period.
The unit is exclusively to be supplied from the adapter with
GFP051DA-0510B. When using it, connect the Mini USB port of the power
adaptor to the USB port located on the left of the meter with a USB cable, and
plug the adaptor into a 100-240V ac, 50-60 Hz primary power outlet. The
meter can also be powered from the USB port of a personal computer,
connected by a USB cable.
Turn on Meter
11
The meter will automatically turn on after the batteries are installed. The
meter will display the date and time setup screen. Refer to “Setting up the
Meter before Testing” for details. After the date and time have been set, the
meter will automatically turn off.
Insert strip to turn the meter on. The screen will briefly display all of the LCD
symbols. Observe the LCD at this time to ensure all segments and display
elements are turned on, and there are no missing icons or elements. After
startup, observe whether there are any permanently turned on segments or
icons. After the power-on diagnostic check, the Initial screen will be
displayed and the meter will automatically turn off after 2 minutes of inactivity.
12
Setting up the Meter before Testing
Before using your meter for the first time, you will need to adjust the settings
that are listed in detail below.
Step 1 - Adjusting Meter Settings
1.
The meter will automatically enter the setup mode when turned on for
the first time by battery installation. Otherwise, press the <S> Button
for 2 seconds to enter the meter setup mode.
2.
Clock: Set the clock to either 12 or 24 hour mode. Press the <M>
Button to switch between the two settings. Press the <S> Button to
save the setting.
Note:
The clock needs to be reset after every battery replacement.
OR
3.
Year, Month, and Day: The year will appear at the top of the display.
Press the <M> Button until the correct year is displayed and press the
<S> Button to save the setting and proceed to the month.
Press the <M> Button until the correct month is displayed, then press
the <S> Button to save the setting and proceed to the day.
Press the <M> Button until the correct day is displayed, then press the
<S> Button to save the setting.
13
4.
Time: Once the day is set, the hour will appear at the top of the display.
Press the <M> Button until the correct hour is displayed. Press the
<S> Button to save the selection and proceed to set the minutes.
Press the <M> Button to set the minutes.
save the setting and proceed to Audio.
5.
Press the <S> Button to
Audio: Audio is turned on as the initial default. The meter will give
one short beep when it is turned on, after specimen detection, and
when the result is ready. The meter will sound three short beeps to
sound a warning when an error has occurred. Press the <M> Button
to switch between turning the beep function “On” or “Off”. Press the
<S> Button to save the setting.
Step 2 - Coding the Meter
Every time a new box of test strips is started, the code chip must be replaced
with the new code chip from the test strip box.
1.
Take the code chip out of the test strip box to compare the code
number on the code chip with the code number printed on the test
strip canister label (or foil pouch). Results may be inaccurate if the two
14
numbers are not identical. If the code number on the code chip does
not match the number on the test strip canister (or foil pouch) with which
it was packaged, please contact your local dealer immediately.
2.
With the meter turned off, insert the new code chip into the code chip
slot of the meter. It should easily snap into place. The code chip
should remain in the meter. Do not take it out until you change to a
new box of test strips.
3.
Turn the meter on by inserting a test strip. The code number will
appear on the Initial screen after startup. If the code number on the
code chip does not match the number displayed on the screen, please
contact your local dealer immediately.
Note:
If a test strip is inserted without a code chip already inserted into the
meter, the display will flash “---” and “CODE”.
If the code chip is incorrect
for the current meter or changed during measurement, the meter will display
“E08”.
15
Performing a Quality Control Test
1.
Perform as if a normal Cholesterol test is being run. Refer to “Step 2 Testing for Total Cholesterol” in “Performing a Cholesterol Test” and
follow the operation steps 1 to 5: Insert a test strip, check the display,
observe the meter self check, wait for meter temperature to stable and
display correct code number.
2.
Press the <M> Button to mark the measurement as a control test.
Both the blood drop symbol and the control solution symbol will display.
3.
Gently shake the control vial, and squeeze to discard the first drop. If
the tip clogs, tap the tip gently on a clean, hard surface, shake again,
and then proceed. Squeeze out a second small drop on a clean
nonabsorbent surface. Touch the specimen tip of the test strip to the
control solution drop. If the audio option is turned on, the meter will
beep to indicate a test has been started.
Note: If the control specimen is applied, but count down does not start,
insert a new test strip and retest.
4.
Refer to “Step 2 - Testing for Total Cholesterol” and follow the 7th step to
wait for the meter to count down to 1. When the count down reaches 1,
the meter will display the control result. The control result should be
16
compared to the control range printed on the test strip canister or foil
pouch. If the control result is within the control range printed on the
test strip canister or pouch label, the blood cholesterol monitoring
system is working properly and the procedure is being performed
correctly.
5.
The display should show a pound sign (#) indicating this test was a
control test. The pound sign (#) will also be displayed when reviewing
results stored in the memory. If the result falls outside the indicated
control range,the Total Cholesterol monitoring system is not working
properly.
6.
Slide the strip ejector to eject the test strip.
OR
Note: The control range is the expected range for the control results.
not a recommended range for your blood Total Cholesterol level.
It is
Checklist of Possible Reasons for an Out-of-Range Control Result
•
Confirm the expected correct range. Two levels of control results
should be matched to the respective CTRL 1 or CTRL 2 range printed
on the test strip canister or foil pouch. Check the expiration date of the
test strip and control. Discard any test strips or control that has
expired.
•
Confirm the testing temperature is between 15-40℃ (60-104℉).
•
Make sure that the strip canister and control vial are tightly capped.
•
Make sure the code number on the strip canister label (or foil pouch)
matches the code number that appears on the meter display.
•
Confirm the same brand of control is used as your kit brand.
•
Make sure the test procedure is followed correctly.
17
After checking all
of the conditions listed above, repeat the quality control test with a new
test strip. If results still fall outside the control range shown on the test
strip canister or foil pouch, the meter may be defective. Contact your
local dealer for assistance.
•
Two levels of control are available, Level 1 control solution is sufficient
for most self-testing needs. If you think your meter or strips may not be
working correctly, you may also want to do a level 2 test.
•
For results confirmation, both CTRL 1 and CTRL 2 should fall within the
respective range. If the control test results do not fall within the
respective ranges, DO NOT use the system to test blood specimen, as
the system may not be working properly. If you cannot resolve the
problem, contact your dealer for help.
•
Please contact your dealer for information on ordering the Mission® Ultra
Cholesterol Control Solutions, which contains CTRL 1 and CTRL 2.
18
Performing a Cholesterol Test
The following steps will instruct how to use the meter, test strips, lancing
device and sterile lancets together to measure blood Total Cholesterol
concentration.
Do not perform cholesterol testing in an area with wind as this could affect the
accuracy of the test results.
Step 1 –Collecting Blood Specimen
All the blood specimens should be handled as a potential pathogen
transmission risk. Users should wash hand thoroughly with soap and water
after handling the meter and strips.
Note: A new pair gloves should be worn for every patient’s testing.
Please follow standard precautions and practices guideline to draw and
handle blood.
Biosafety in Microbiological and Biomedical Laboratories (BMBL) found at
http://www.cdc.gov/biosafety/publications/bmbl5/
“Protection of Laboratory Workers From Occupationally Acquired Infections;
Approved Guideline-Third Edition” Clinical and Laboratory Standards Institute
(CLSI) M29-A3.
The Mission® Ultra Cholesterol Monitoring System requires a very small drop
of blood which may be obtained from the fingertip. Before testing, choose a
clean, dry work surface. Familiarize yourself with the procedure and make
sure you have all the items needed.
IMPORTANT: Prior to testing, wipe the test site with an alcohol swab or
soapy water. Use warm water to increase blood flow if necessary. Then
dry hands and test site thoroughly. Make sure there is no cream or lotion on
the test site.
Blood specimens are obtained by using the included lancing device. Refer
to the instructions below for details.
19
Using the Lancing Device and Lancets
For fingertip sampling, adjust the depth penetration to reduce discomfort.
1.
Unscrew the lancing device cover from the lancing device Body.
Insert
a sterile lancet into the lancet until it comes to a complete stop in the
lancing holder.
2.
Hold the lancet firmly in the lancing device and twist the safety tab of the
lancet until it loosens, then pull the safety tab off the lancet. Save the
safety tab for lancet disposal.
3.
Carefully screw the cover back onto the lancing device. Avoid contact
with the exposed needle. Make sure the cover is fully sealed on the
lancing device.
20
4.
Adjust the puncture depth by rotating the lancing device cover. There
are a total of 6 puncture depth settings. To reduce discomfort, use the
lowest setting that still produces an adequate drop of blood. Use
settings 1 and 2 for delicate skin, 3 and 4 for normal skin, and 5 and 6
for calloused or thick skin.
Note: Greater pressure of the lancing device against the finger will also
increase the puncture depth.
5.
Pull the cocking barrel back to set the lancing device. A click may be
heard. The device is now loaded and ready to obtain a drop of blood.
6.
Prior to testing, make sure the patient‘s hand is warm and relaxed
before collecting the capillary blood specimen. Use warm water to
increase blood flow if necessary. Massage the hand from the wrist up
to the fingertip a few times to encourage blood flow.
21
7.
Clean the testing site with an alcohol swab and then dry the testing site
thoroughly.
8.
Hold the lancing device against the side of the finger to be lanced with
the cover resting on the finger. Push the release button to prick the
fingertip. You should hear a click as the lancing device activates.
Gently massage from the base of the finger to the tip of the finger to
obtain the first drop of blood.
9.
Wipe away the first drop of blood. Apply light pressure to obtain a
second drop of blood. Touch the second drop of blood onto the
Specimen Tip of the inserted test strip. The blood is then automatically
absorbed into the reaction cell where the reaction takes place. Avoid
smearing the blood drop. For the greatest reduction in pain, lance on
the sides of the fingertips. Rotation of sites is recommended.
Repeated punctures in the same spot can make your fingers sore and
callused.
Discarding the Lancet
1.
Unscrew the lancing device cover. Place the safety tab of the lancet on a
hard surface and carefully insert the lancet needle into the safety tab.
2.
Press the release button to make sure that the lancet is in the extended
position.
Slide the ejection button forward to discard the used lancet.
Place the lancing device cover back on the lancing device.
22
Lancet Precautions
•
Do not use the lancet if the safety tab is missing or loose when you take
the lancet out of the bag.
•
Do not use the lancet if the needle is bent.
•
Use caution whenever the lancet needle is exposed.
•
In order to reduce the risk of infection from prior use of the instrument,
always use a new, sterile lancet. Do not reuse lancets.
•
Avoid getting the lancing device or lancets dirty with hand lotion, oils,
dirt or debris.
Specimen collection and preparation
A small drop of fresh capillary whole blood is needed to perform the blood
cholesterol test. Do not use venous blood, serum or plasma specimen. Do
not use for Neonatal blood specimens.
•
Always test the blood specimen as close as possible to the time the
specimen is collected.
•
When fresh finger whole blood in a test tube is used, care should be
taken to uniformly distribute red cells throughout the tube several times
by several tube inversions. (Please note: Do not mix the blood
specimen in the tube excessively.)
Step 2 - Testing for Total Cholesterol
Note:Insertion of a new test strip at any time, except during the data transfer
mode (Refer to “Using the Memory”) will cause the meter to automatically
enter the test mode.
1.
Insert a test strip into the strip port with contact bars end first and facing
up. Insert the strip in as far as it will go without extra force. This will
23
turn on the meter and display all the display segments. If the audio
option is on, the meter will beep to signal that the meter is turned on.
2.
Check the display to confirm that all the display segments turn on (see
display illustration above).
3.
Following the display check, the meter will continue to do self check
(see the picture below).
4.
Following this self check, the meter will wait for temperature to stabilize
(refer to the picture below).
5.
When the CODE flag and CODE number is shown on the LCD, the
temperature has stabilized and the blood drop symbol will start to blink.
24
The following picture shows the code number “200”. Make sure that
the code number that appears on the display matches the code number
(CODE) on the test strip canister or foil pouch. If not, make sure to
locate and insert the code chip that came with the box of strips. If the
codes still do not match, DO NOT perform a test, and contact your
distributor. You will need a new package of test strips to perform a test.
The blinking test strip and blood drop icon indicates that the test strip is
inserted correctly and a drop of blood specimen is ready to be added.
Note: If the test strip has been inserted incorrectly, the meter will not turn on.
6.
Touch the blood specimen to the specimen tip at the end of the test strip.
If audio is turned on, the meter will beep to indicate the measurement
has started. If specimen is applied but count down does not start,
change to a new strip and reapply a drop of blood.
DO NOT:
•
Apply specimen to the front or back surface of the test strip.
•
Press your finger against the test strip.
7.
Once a sufficient specimen has been applied, the meter display will
count down from a calculated number to 1 and then will display the
result.
25
Test results are displayed either in mmol/L or mg/dL depending on the units
of measure most common in your country.
OR
8.
Slide the strip ejector to discard the test strip.
"HI" and "LO" Messages
The meter can accurately measure blood total cholesterol concentrations
between 2.6-11.7 mmol/L (100-450 mg/dL). “HI” and “LO” messages
indicate results outside of this range.
If “HI” appears on the display, the measured concentration value is above
11.7 mmol/L (450 mg/dL). The test should be retaken to ensure that no
mistake was made in the procedure. If you are certain the meter is
functioning correctly, and your blood cholesterol is still consistently measured
26
as “HI”, it indicates severe hyperlipidemia (high blood cholesterol).
should contact your healthcare professional immediately.
You
If “LO” appears on the display, the measured concentration value is below 2.6
mmol/L (100 mg/dL). The test should be retaken to ensure that no mistakes
were made in the procedure. If you are certain that the meter is functioning
correctly and no mistakes were made in the procedure, and your blood
cholesterol is still consistently measured as “LO”, it may indicate severe low
blood cholesterol.
You should contact your healthcare professional
immediately.
Precautions and Limitations
Mission® Ultra Cholesterol Meters, test strips and other components of the
Mission® Ultra Cholesterol Monitoring Systems have been designed, tested
and proven to work together effectively to provide accurate blood total
cholesterol measurements. Do not use components from other brands.
Very high (above 60%) and very low (below 30%) hematocrit levels can
cause false results. Hematocrit levels less than 30% cause false high
readings, while hematocrit levels greater than 60% may cause false low
readings. If you do not know your hematocrit level, consult your healthcare
professional.
Patients undergoing oxygen therapy may yield false results.
The system is tested to accurately read the measurement of total cholesterol
in whole blood within the range of 2.6-11.7mmol/L (100-450 mg/dL). For
detailed limitations, please refer to Mission® Ultra CHOL Total Cholesterol
Test Strips insert.
27
Using the Memory
The meter automatically stores up to 200 test records. Each record includes
the test result, time and date. If there are already 200 records in the
memory, the oldest record will be erased to make room for a new one.
Viewing Stored Records
To view stored records:
Press the <M> Button one time to turn the meter on and a second time to
enter memory mode. The most recent value and the word “MEM” will
appear on the display. Press the <M> Button to recall the second to oldest
record to be displayed. If the current record being displayed is the only
record, then this is the latest record being displayed.
OR
If you are using the meter for the very first time, the meter display will show
three dashed lines (“---”), the word “MEM” and the unit of measure. This
shows that no data has been stored in memory.
OR
Clearing the Memory
When the meter is off and the <M> Button is pressed and held for 2 seconds,
28
the “MEM” symbol is displayed and “dEL” is displayed on the large display.
All the records in the log can be erased by pressing <M> and <S> buttons
together and holding for 2 seconds.
The meter will display the words “MEM” and “- - -” to indicate that the memory
has been cleared.
The meter will automatically turn off after 2 minutes with no operation, or after
the <S> Button has been pressed.
Transferring Records
Plug the USB cable into the USB port located on the left side of the meter
and connect the other end of the USB cable to a suitable PC.
29
Note: The PC must have suitable software installed to receive and process
the data being transmitted from the meter.
Press <S> and <M> together and the meter will enter PC communication
mode.
Press <M> again and the meter will show the PC symbol on the display and
start to transfer the data to the PC. During the transfer, “to” will also show
on the display.
After the data transfer is completed, the meter will display “End” on upper left
corner of display and “PC” on the large display for 2 minutes.
Note: Up to 200 test records are automatically stored in memory. After
200 test records are stored, the oldest test record will be replaced by a new
record. For example, if 200 records are stored in memory, the next test
result (201) will replace the first result stored in memory.
30
Maintenance
Proper maintenance is recommended for best results.
Replacing Batteries
When the battery icon (
) is blinking, it means the battery is running low
and it should be replaced as soon as possible. An “E00” error message will
appear if the battery is too low to perform any more blood cholesterol tests.
The meter will not function until the batteries are replaced.
Instructions:
1.
Make sure the meter is off before removing the battery.
2.
Turn over the meter to locate the battery cover. Press the battery
cover tab on the top and lift the cover to open the battery cover.
3.
Remove and properly discard the old battery. Insert three new AAA
batteries on top of the plastic tape. Make sure batteries are aligned in
the correct direction as shown under the batteries.
4.
Close the battery cover and make sure it snaps shut.
5.
Recheck and reset the date and time setting as necessary after battery
replacement to ensure that the date and time are correctly set. To set
31
the meter date and time, refer to “Setting up the Meter before Testing”.
Cleaning
Cholesterol Meter
For best results, the meter should be cleaned after each test. A cotton cloth
can be used to clean the surface of the meter. Use a damp cotton cloth only if
necessary. A dry, soft cloth may be used to clean the LCD and the strip port
area. It is recommended that the meter be stored in the carrying case after
each use. Take care to avoid getting liquids, residue, or control solutions in
the meter through the Strip Port, Code Chip Slot or USB Port.
Remove Strip Port Cover on the Strip Port by pressing in the direction of
the arrow on the top of meter. Wipe the strip port surface and gap carefully
with a damp cloth or a mild detergent and dry it with a dry, soft cloth. Firmly
put the cover back on the strip port and push it in until it snaps into place.
Note: Do not use organic solvents, such as gasoline or paint thinner.
will cause damage to the meter.
This
Lancing Device
Use mild soap and warm water to clean with a soft cloth as required.
Carefully dry the device thoroughly. Do not immerse the lancing device.
Please refer to the lancing device insert for more details.
32
Suggested Testing Times and Target Goals
The National Cholesterol Education Program (NCEP, 1993)1 has established
guideline to identify risk groups in adults associated with various cholesterol
levels in blood. However, you should discuss cholesterol results with your
healthcare provider.
Initial Classification of Adults Based On Total Cholesterol
(mg/dL) x 0.02586 = (mmol/L) or (mg/dL)= 38.66976 x (mmol/L)
mg/dL
mmol/L
<200
<5.17
200-239
5.17-6.18
≥240
>6.21
Total Cholesterol
Desirable blood cholesterol
Borderline high blood cholesterol
High blood cholesterol
1. ”Lipids and Dyslipoproteinemia” in Clinical Diagnosis and Management by Laboratory
Methods (Twentieth Edition), Chapter 12, Pg241.
33
Comparing Meter and Laboratory
Results
The Mission® Ultra Cholesterol Monitoring System results reports fingertip
blood cholesterol concentrations converted to plasma concentrations, while
laboratories can report both serum and plasma cholesterol concentrations.
However, the results may differ somewhat due to normal variation.
To
ensure a reasonable comparison, follow these guidelines.
Before lab testing:
•
Bring your meter, test strip and control solution with you to the lab.
•
Make sure your meter is clean.
•
Perform a quality control test to make sure the meter is working
properly.
At the lab:
•
•
Wash your hands before obtaining a blood specimen.
Obtain blood specimens for the laboratory test and for your meter within
10 minutes of each other.
This will ensure an accurate comparison of
results.
34
Troubleshooting Guide
Display
Causes
Meter
fails
to turn on
Battery
may
be
damaged or not be
charged
Solution
Replace battery.
Temperature
high(>40℃)
is
too
Move to a cooler environment and wait at
least 30 minutes before repeating the test.
Temperature
low(<15℃)
is
too
Move to a warmer environment and wait at
least 30 minutes before repeating the test.
Battery Voltage Low,it
could only do more 20
tests
Test results will still be accurate for 20 tests,
but batteries need to be replaced as soon as
possible.
No Code chip
Insert the code chip that accompanied the box
of test strips.
Battery is discharged
Replace the batteries and repeat the test.
Test strip was removed
during the testing
Repeat the test and ensure test strip remains
in place.
Specimen was applied
to the test strip too soon
Repeat test and apply specimen after blood
drop/test strip icon appears.
Do not hold the meter in hand during test or
test in an unstable temperature environment.
Repeat the test after moving to a more stable
temperature environment for at least 30
minutes.
Temperature not stable
Test
strip
is
contaminated or used
before
Insufficient specimen
volume or specimen
application error due to
late
specimen
re-dosing
Strip test error.
Measure result is too
high
(>450
mg/dL
or >11.7 mmol/L)
Measure result is too
low (<100 mg/dL or
<2.6 mmol/L)
Memory error
Repeat test with a new test strip.
Repeat the test and apply enough specimen
to fill the test strip check window.
Repeat test again and run control solution. If
problem persists, your blood specimen may
be out of meter’s detection range. Please
consult with your doctor.
Repeat test again and if problem persists,
please consult with your doctor.
Repeat test again and if problem persists,
please consult with your doctor.
Remove battery for 90 seconds, put the
battery back in and turn on the meter again. If
problem persists, contact your local dealer.
35
Display
Causes
Code Chip Error
System failure
Data transfer error
Solution
Make sure the Code Chip is Mission® Ultra
Cholesterol Code Chip and then repeat test
again.
If the code is damaged, use a new code chip
with the correct code number and run the test.
If the code chip is removed during a test,
confirm that the code chip matches the test
strip code and repeat the test.
If a cell phone,radio frequency source or a
high On/Off electrical source is nearby, place
more distance between the meter and any of
these sources then retest. If the problem
persists, contact your local distributor.
Obtain a new data transfer line and try again,
if problem persists, please contact your local
dealer.
36
Specification
Feature
Specification
Measurement Range
2.6~11.7 mmol/L (100-450 mg/dL)
Result Calibration
Plasma-equivalent
Minimum Specimen Size
4 μL
Test Time
15-70 seconds
On/Off Source
3 AAA Batteries
or AC Adapter (Mini USB, 5V dc, 50 mA, AC
input voltage 100-240V)
Battery Life
Minimum of 1,000 measurements
Cholesterol Units of Measure
The meter is pre-set to either millimoles per
liter (mmol/L) or milligrams per deciliter
(mg/dL) depending on the standard of your
country
Memory
200 results with date/time
Automatic shutoff
4 minutes after inserting the test strip
2 minutes after the last other actions
Meter Size
55 mm × 106 mm × 20 mm
Display Size
32.5 mm × 34.8 mm
Weight
104 g
Operating Temperature
15°C - 40°C
Operating Relative Humidity
20%~90%
Data Port
Mini USB data Port
37
Warranty
Please complete the warranty card included in the packaging.
distributor to register your purchase within one year of purchase.
Mail it to your local
For your records, write the purchase date of your starter kit here:
Note: This warranty applies only to the meter in the original purchase.
apply to the other materials included with the meter.
It does not
ACON Laboratories, Inc. warrants to the original purchaser that this meter will be free
from defects in materials and workmanship for a period of two years (24 months). The
two years starts from the later of the date of original purchase or installation (except as
noted below). During the stated two years period, ACON shall replace the meter under
warranty with a reconditioned meter or, at its option, repair at no charge a meter that is
found to be defective. ACON shall not be responsible for shipping charges incurred in
the repair of a meter.
This Warranty is subject to the following exceptions and limitations:
This warranty is limited to repair or replacement due to defects in parts or workmanship.
Parts required which were not defective shall be replaced at additional cost. ACON
shall not be required to make any repairs or replace any parts that are necessitated by
abuse, accidents, alteration, misuse, neglect, failure to operate the meter in accordance
with the user’s manual, or maintenance by anyone other than ACON. Furthermore,
ACON assumes no liability from malfunction or damage to meters caused by the use of
devices other than devices manufactured by ACON. ACON reserves the right to make
changes in the design of this meter without obligation to incorporate such changes into
previously manufactured meters.
Disclaimer of Warranties
This warranty is expressly made in lieu of any and all other warranties express or implied
(either in fact or by operation of law) including the warranties of merchantability and
fitness for use, which are expressly excluded, and is the only warranty given by ACON.
Limitations of Liability
In no event shall ACON be liable for indirect, special or consequential damages, even if
ACON has been advised of the possibility of such damages.
For warranty service, please contact your local distributor.
38
Index of Symbols
Consult instructions
For In vitro
diagnostic use only
for use
REF
SN
Catalog #
Authorized
Manufacturer
representative
Lot number
Use by
Contains sufficient for
<n> tests
Store between
2-30°C
Sterilized using
irradiation
Code number
Do not discard along
with household waste
USB Port
Fragile, handle with
This side up
care
Keep away from
Keep dry
sunlight and heat
Do not reuse
MODEL
Serial number
Control range
Model number
39
References
“FDA Public Health Notification: Use of Fingerstick Devices on More than
One Person Poses Risk for Transmitting Bloodborne Pathogens: Initial
Communication” (2010)
http://www.fda.gov/MedicalDevices/Safety/AlertsandNotices/ucm224025.htm
“CDC Clinical Reminder: Use of Fingerstick Devices on More than One
Person Poses Risk for Transmitting Bloodborne Pathogens” (2010)
http://www.cdc.gov/injectionsafety/Fingerstick-DevicesBGM.html
40