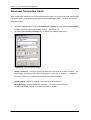
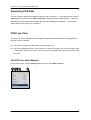
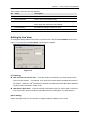
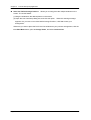
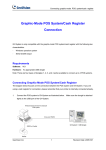
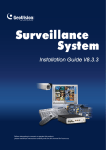
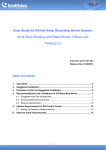
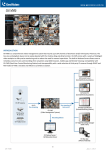
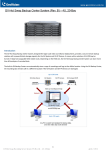
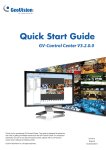
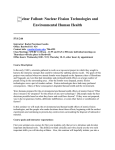
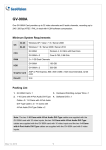
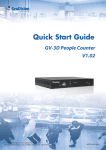
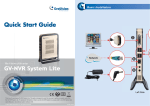
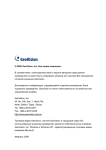
1
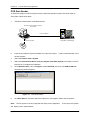
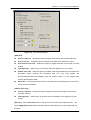
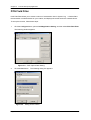
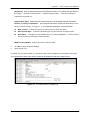
3
CHAPTER
Point-Of-Sale (POS) Application
A POS system may be integrated to a GV-System through the GV-Data Capture box. Through the
integration, you can investigate a transaction with transaction data overlaying on video footage, by
either live viewing or playing back.
POS System Connection
POS systems vary in different forms, with a receipt printer attached internally or externally (also called
cash register), and with the text or graphic mode.
For the information on attaching the text-mode POS system to GV-System, visit the related links below.
To access
Visit
DB9 Interface POS System
http://www.geovision.com.tw/english/faq/POSflowchart/text/DB9_POS.pdf
DB25 Interface POS System
http://www.geovision.com.tw/english/faq/POSflowchart/text/DB25_POS.pdf
DB9 Interface Cash Register
http://www.geovision.com.tw/english/faq/POSflowchart/text/DB9_cash.pdf
DB25 Interface Cash Register
http://www.geovision.com.tw/english/faq/POSflowchart/text/DB25_cash.pdf
To attach the graphic-mode POS system to GV-System, first check if your POS system has these two
characteristics:
Windows operation system
Serial port (COM port) for output
For the application of the graphic-mode POS system, you need:
Additional USB dongle
POS Data Sender program. (Included in the Surveillance System Software CD)
If you are not sure about the printing mode of your POS system, refer to The Printing Mode of POS
System/Cash Register at this link:
http://www.geovision.com.tw/english/faq/POSflowchart/The_printing_mode_of_POS_system_cash_register.pdf
Page 104
Chapter 3: Point-Of-Sale (POS) Application
POS Data Sender
To attach the graphic-mode POS system with the Windows operation system and serial output to
GV-System, follow these steps:
1.
Connect the POS system as illustrated below.
Windows-based and built-in serial-port
POS System
Cross-over RS232
RS232 or Parallel
GV-System + USB dongle
Printer
2.
Insert the Surveillance System Software CD to the POS system. It will run automatically, and a
window appears.
3.
Select the Install V 8.0.0.0 System.
4.
Select the Software POS Driver (Only for Graphic mode POS System), and follow on-screen
instructions to complete the installation.
5.
Go to Windows Start, point to Programs, select DVR-POS, and then click DVR POS Driver.
The following window appears.
Figure 3-1 POS Data Sender
6.
Click Start Service, and then select the COM port to send graphic data to the GV-System.
Note: The GV-System must be configured and ready for this application. To set up the GV-System,
see Setting a POS System below.
Page 105
Chapter 3: Point-Of-Sale (POS) Application
Setting a POS System
To connect a POS system to GV-System, follow these steps:
1. Click the Configure button, point to POS Application Setting, and then select POS Device
Setup. The POS Sever Setup window appears.
Figure 3-2 POS Server Setup
2.
Click the New button in the upper part of the window. The following dialog box appears.
Figure 3-3 POS system settings
Page 106
Chapter 3: Point-Of-Sale (POS) Application
Printer Type: Select Serial Port, Parallel Port or TCP/IP Port that the POS system
belongs to.
For TCP/IP Port applications, see GV-Data Capture V2E User’s Manual.
Device: Assign the POS system to a camera screen. POS 1 displays the images and
data on the Camera 1 screen; POS 2 on the Camera 2 screen, and so on. Click the […]
button next to the item to rename the device.
POS Module: Select the printer attached to the POS system. If it’s not Epson, select
General for other brands. If the printing is in the graphic mode, choose GraphMode.
For Graphic mode applications, see the POS System Connection section above.
COM Port: Select the COM port that the POS system is connected to.
The parameter button: Click the button to configure Baud Rate, Data Bits, Parity, and/or
Stop Bits to match those of the POS system, or keep them as defaults.
Cash Drawer Open Signal:
This option is only available when an input module is
configured in the Main System. Assign the input module connected to the cash drawer.
Every time when the cash drawer is opened, a signal will be sent to the Main System and
recorded in System Log for later retrieval.
Use Codepage Mapping: This feature is to support special characters and symbols
display.
For details, see Codepage Mapping.
Trace Mode: Check this item only after getting the recommendation from our technical
support staff.
3.
After above settings, click Add to add the POS system to the Main System.
Superimposing POS Data onto Camera Screen
Follow these steps to set camera screens with POS text data:
1.
Open the POS Device Setup window. Refer to Figure 3-2.
2.
Click the Text Setup tab to set text font and position of the data.
Page 107
Chapter 3: Point-Of-Sale (POS) Application
Figure 3-4 Text Overlay Settings
[POS Text]
Print on video file: Enable this option to display POS data on the recorded video file.
Print on screen: Enable this option to display POS data on the transaction scene.
Print on POS Live View: Enable this option to display POS data on the POS Live View
window.
Text Alignment: Select how you want POS data to be aligned on a view screen.
Enable clean time: When the option is enabled, after the specified time in seconds that if
GV-System hasn’t received the transaction data from your POS system, the
already-displayed data will disappear from the camera screen, i.e. the cashier stops
entering the transaction data.
Dwell time: Specify the amount of time in seconds that POS data stays on a view screen
before the next transaction.
[Camera/Time Text]
Print on video file: Enable this option to display camera ID and location name on the
recorded video file.
Text Alignment: Select how you want the camera information to be aligned on a view
screen.
[Set Font] Click the Set Font button to set up the font for POS and Camera/Time text. The
option Apply Stereo Font makes texts stand out from the background by giving white-edge to
the texts.
Page 108
Chapter 3: Point-Of-Sale (POS) Application
POS Field Filter
POS Field Filter allows you to create a column of a transaction item in System Log. It further filters
the transaction conditions based on your criteria, and displays the results under the created column.
To set up the function, follow these steps:
1.
Click the Configure button, point to POS Application Setting, and then select POS Field Filter.
The following window appears.
Figure 3-5 POS Capture Data Setting
2.
Click the New button. The following dialog box appears.
Figure 3-6 Setting search criteria
Page 109
Chapter 3: Point-Of-Sale (POS) Application
[Key Word] Enter a meaningful keyword that matches exactly one of transaction items/texts in
the receipt. The field is case sensitive. Suppose we enter Coke. Every text matching to
Coke will be screened out.
[Capture Data Type]
Select the type of data followed by the specified transaction item/text:
Numeric, Currency or Alphabetic. If the specified transaction item/text is followed by a price
amount, choose Numeric or Currency. If it is followed by alphabets, choose Alphabetic.
With Comma: If there are commas in a price amount, check the option.
With Decimal Sign: If there are decimal signs in a price amount, check the option.
With Space: The option is only available when you choose Alphabetic. If there is space
among a series of characters, check the option.
[MDB File Entry Name] Enter a file name to store the data.
3.
Click OK to apply the above settings.
4.
Open System Log.
In System Log, for this example, you can see the last column created for the transaction item Coke.
The transactions matching the search criteria will be displayed under the created column.
Figure 3-7 A created column in System Log
Page 110
Chapter 3: Point-Of-Sale (POS) Application
Abnormal Transaction Alerts
When an abnormal transaction of the specified transaction item occurs, this function can automatically
activate the output device and send out assigned E-Mail/SMS/Pager alerts. To set up this function,
follow these steps:
1.
Click the Configure button, point to POS Application Setting, and then select POS Field Filter
to display the POS Capture Data Setting window. See Figure 3-5.
2.
Click the Loss Prevention Setting button to display the following dialogue box.
Figure 3-8 Loss Prevention Setting
[Alarm Conditions] Check this option and define the price range for an alarm condition. For
this example, when the price amount in a transaction is great than or equal to (>=) 10000 and
less than or equal to (<=) 100000, the assigned alarm will be activated.
[Alarm Output] Assign an installed output module for the application.
[Alert Message] Enter a desired alert message. To set up a notification type
(E-Mail/Hotline/SMS), refer to Send Alerts Approach in Chapter 1.
Page 111
Chapter 3: Point-Of-Sale (POS) Application
Codepage Mapping
This feature is to support special characters and symbols display. When your transaction text
appears on the screen incorrectly, your POS system may use different character code from
GV-System’s. To change a character code, follow these steps:
1.
In Figure 3-3, enable Use Codepage Mapping, and then select a character code from the
drop-down list.
Note: The codepage is related to “Script” in the Set Font option (see Figure 3-4). When this
option is disabled, it means there are no codepages matching your script setting.
2.
To verify the character code you selected, click the […] button to preview its codepage.
Figure 3-9 Codepage Mapping Preview
3.
At the From side, locate and click one of the symbols or characters that couldn’t display correctly.
For this example, you can see its previous character code (From side: Ox9C) has been
transferred to the default equivalent (To side: OxA3).
Page 112
Chapter 3: Point-Of-Sale (POS) Application
Searching POS Data
You can locate any desired POS data and videos during a transaction. In the Main System, click the
ViewLog button and then select Search POS Data to display the Quick Search window. When the
Quick Search starts, the latest transaction video and data will always be displayed. For the Quick
Search feature, see Figure 4-16 in Chapter 4
POS Live View
The POS Live View can display transaction data in a separate window instead of overlaying data on
the main screen. It features:
Fast access to transaction data without opening System Log.
The View is designed for high screen resolution of 1280 x 1024. When your monitor supports 1280
x 1024 and the main screen is set to 1024 x 768, you can juxtapose the main screen and the POS
Live View.
The POS Live View Window
On the main screen, click the ViewLog button, and then select POS Live View.
1 2
3
4
Figure 3-10
Page 113
5
Chapter 3: Point-Of-Sale (POS) Application
The controls in the POS Live View Window:
No. Name
Description
1
Previous Transaction
Goes to the previous transaction data.
2
Next Transaction
Goes to the next transaction data.
3
Freeze
Suspends the current transaction data display. Clicking this
button again will restore to the live display.
4
Live View Menu
Accesses the settings of POS Live View.
5
Exit
Closes the POS Live View window.
Setting Up Live View
To change the display status on the POS Live View window, click the Live View Menu button (No.4,
Figure 3-10) and select Live View Setup. This dialog box appears.
Figure 3-11
[View Setting]
Max Transactions in Each View:
Enter the number of transactions you want to keep on the
POS Live View window. For example, if you enter 99, there are always 99 transactions kept on
the window. When the 100th transaction is entered, the oldest transaction data will be deleted to
remain the max. transaction number to 99.
Max Rows in Each View: Enter the number of transaction rows you want to keep on the POS
Live View window, which includes any materials printed by POS System, e.g. data and time.
[Mode Setting]
Select one single POS Live View window or multiple windows to display on the screen.
Page 114
Chapter 3: Point-Of-Sale (POS) Application
Save User Define Arrange Position:
Allows you to freely place the multiple windows on the
screen. To use this feature:
(1) Drag the windows to the desired places on the screen.
(2) Open the Live View Setup dialog box, and click this option. When this warning message
appears: Are you sure to save User Define Arrange Position?, click Yes to save your
arrangement.
Whenever you want to place the POS Live View windows as your previous arrangement, click the
Live View Menu button, point to Arrange Views, and select Custom View.
Page 115