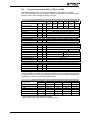
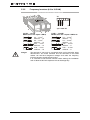
1
Brief Manual ACTIVE 230V single-three phase (2 sizes) 0.55 kW - 0.75 kW - 1.1 kW 1.5 kW - 2.2 kW - 3.0 kW 400V three phase (4 sizes) 0.55 kW - 0.75 kW - 1.1 kW 1.5 kW - 2.2 kW - 3.0 kW 4.0 kW - 5.5 kW - 7.5 kW 11.0 kW - 15.0 kW - 18.5 kW N3878 MANUFACTORY FACILITIES VECTRON Elektronik GmbH Europark Fichtenhain A 6 47807 Krefeld Tel. (0 21 51) 83 96-30 - Fax (0 21 51) 83 96-99 www.vectron.net - [email protected] General on the documentation The present documentation is applicable to frequency inverters in the output range 0.55 kW to 18.5 kW. The factory settings of the entire range of units are suitable for a wide range of applications. The modular structure of the software and hardware makes it possible to set up the frequency inverters to suit the customer’s particular requirements. Applications can be realized comfortable with a high level of functionality and dynamics The user documentation has been structured according to the customer-specific requirements for the frequency inverter to ensure better clarity. Brief instructions The brief instructions describe the basic steps for mechanical and electrical installation of the frequency inverter. The commissioning helps you when selecting the required parameters and carrying out the software configuration of the frequency inverter. Operating instructions The operating instructions document the full functionality of the frequency inverter. The parameters required for special applications to adapt to the application and the comprehensive additional functions are fully described here. User manual The user manual supplements the documentation for specific installation and commissioning of the frequency inverter. Information on various topics in connection with the use of frequency inverters is given for specific applications. The documentation and additional information can be obtained on request from the local representative of VECTRON Elektronik. The following pictograms and symbols have been used in this documentation: Danger indicates an immediate and direct hazard. There is a direct risk of death, severe injury and considerable damage to valuable assets if the precautionary measure is not taken. Warning indicates a possible hazard. There is a risk of death, severe injury and considerable damage to valuable assets if the precautionary information is not followed. Caution indicates an immediate and direct hazard. Injury or damage to assets could be the result. Attention indicates a possible form of operating behaviour or an undesirable state that can occur as described in the information text. Note indicates information to make handling of the unit easier for you and which supplements the corresponding part of the documentation. Warning: Follow carefully the information given in the documentation during installation and commissioning. As a suitably qualified person, you must carefully read the documentation before starting the work and comply with the safety instructions. For the purposes of these instructions, a “qualified person” is someone who is familiar with the setting up, installation, commissioning and operation of frequency inverters and has the corresponding qualifications to carry out such work. 1 TABLE OF CONTENTS 1 2 3 4 5 General Information on Safety and Use....................................................................................... 4 1.1 General Information................................................................................................................ 4 1.2 Appropriate Use ...................................................................................................................... 4 1.3 Transport and Storage ........................................................................................................... 5 1.4 Handling and Setting Up ........................................................................................................ 5 1.5 Electrical Connection ............................................................................................................. 5 1.6 Operational Notes ................................................................................................................... 5 1.7 Maintenance and Servicing.................................................................................................... 5 Scope of Supply ............................................................................................................................. 6 2.1 Frequency Inverters (0.55 to 3.0 kW) .................................................................................... 6 2.2 Frequency Inverters (4.0 to 18.5 kW) .................................................................................... 7 Technical Data ................................................................................................................................ 8 3.1 Frequency Inverters 230 V (0.55 to 3.0 kW).......................................................................... 8 3.2 Frequency Inverters 400 V (0.55 to 3.0 kW).......................................................................... 9 3.3 Frequency Inverters 400 V (4.0 to 18.5 kW)........................................................................ 10 3.4 Operational Diagrams........................................................................................................... 11 Mechanical Installation ................................................................................................................ 12 4.1 Frequency Inverters (0.55 to 3.0 kW) .................................................................................. 12 4.2 Frequency Inverters (4.0 to 18.5 kW) .................................................................................. 13 Electrical Installation ................................................................................................................... 14 5.1 EMC Information ................................................................................................................... 15 5.2 Block diagram ....................................................................................................................... 16 5.3 Mains Connection ................................................................................................................. 17 5.3.1 Frequency Inverters (0.55 to 3.0 kW) .............................................................................. 17 5.3.2 Frequency Inverters (4.0 to 18.5 kW) .............................................................................. 18 5.4 Motor Connection ................................................................................................................. 19 5.4.1 Frequency Inverters (0.55 to 3.0 kW) .............................................................................. 19 5.4.2 Frequency inverters (4.0 to 18.5 kW) .............................................................................. 20 5.5 6 2 Control Terminals ................................................................................................................. 21 Control Unit KP500....................................................................................................................... 23 6.1 Actual Values Menu .............................................................................................................. 24 6.2 Parameters Menu .................................................................................................................. 25 6.3 Controlling the Motor via the Control Unit ......................................................................... 26 TABLE OF CONTENTS 7 Commissioning the Frequency Inverter .................................................................................... 27 7.1 Turning On the Mains Voltage ............................................................................................. 27 7.2 Setup ...................................................................................................................................... 27 7.2.1 Configuration.................................................................................................................... 28 7.2.2 Data Set ........................................................................................................................... 28 7.2.3 Machine Data................................................................................................................... 28 7.2.4 Plausibility Check............................................................................................................. 29 7.2.5 Parameter Identification................................................................................................... 30 7.2.6 Application Data............................................................................................................... 30 7.3 8 9 Checking the Direction of Rotation..................................................................................... 31 Basic Parameters ......................................................................................................................... 32 8.1 Menu Branch PARA .............................................................................................................. 32 8.2 Menu Branch VAL ................................................................................................................. 34 Operation and Fault Diagnosis ................................................................................................... 35 9.1 Status Messages ................................................................................................................... 35 9.2 Warning Messages ............................................................................................................... 35 9.3 Fault Messages ..................................................................................................................... 36 3 1 General Information on Safety and Use The present documentation was produced with great care and meticulously checked several times. It is not possible to give full detailed information on all types of products in view of the need for clarity, and it is also not possible to take into consideration the setting up, operation or servicing in every possible case. If you require further information or if particular problems crop up that are not covered in enough detail in the documentation, you can request the information that you require from the local representative of VECTRON Elektronik. In addition, we would like to point out that the contents of this documentation are not part of an earlier or existing agreement, approval or legal relationship and are not intended to modify one. All the obligations of the manufacturer arise out of the relevant purchase contract, which alone includes the complete and solely valid stipulations concerning the warranty. These contractual stipulations concerning the warranty are neither increased nor restricted by the details given in this documentation. The manufacturer reserves the right to correct or modify the contents and product details and also put right omissions without prior notice and shall have no liability whatsoever for damage, injuries or costs incurred that are due to the abovementioned reasons. 1.1 General Information Depending on the type of protection applicable for a particular VECTRON frequency inverter, there are moving or live parts and hot surfaces that could be touched. There is a risk of severe personal injury or damage to valuable assets if the required covers are removed without permission, if the unit is used incorrectly, or as the result of incorrect installation or operation. Avoid any risks of severe personal injury or damage to valuable assets by ensuring that only suitably qualified technicians are involving in transporting, installing, commissioning and servicing the unit. Standards IEC 60364 and CENELEC HD 384 or DIN VDE 0100 and IEC Report 664 or EN 50178 and BGV A2 (VBG 4) and the relevant national regulations are to be complied with. “Qualified persons” within the meaning of this basic safety information covers persons who are familiar with the setting up, installation, commissioning and operation of frequency inverters and have the corresponding qualifications to carry out such work. 1.2 Appropriate Use Frequency inverters are electrical drive unit components that are intended for installation in industrial units or machines. Frequency inverters are only sold on a limited basis and as components that are solely intended for professional use within the meaning of standard EN 61000-3-2. Commissioning and the starting of appropriate operation are forbidden until it has been determined that the machine complies with the stipulations of EU Machine Guidelines 98/37/EWG and EN 60204. According to the CE marking regulations, frequency inverters must also comply with the requirements of Low Voltage Guideline 73/23/EWG and of standard EN 50178 / DIN VDE 0160. The owner has the responsibility for ensuring compliance with EMC Guideline 89/336/EWG. The frequency inverters meet the requirements of Low Voltage Guideline 73/23/EWG and comply with standard EN 50178 / DIN VDE 0160. The requirements of CSA Standard C22.2-No. 14-95 were also complied with through the granting of the UL test mark as per UL508c.The technical data and the details on the connection and environmental conditions can be found on the rating plate and in the documentation and are to be complied with at all times. 4 1.3 Transport and Storage Transport and storage are to be done in an appropriate manner and using the original packing materials. The units are to be stored in dry, dust-free rooms that are protected against wet and are subject to only minor temperature variations. Note the permissible climatic conditions as per EN 50178 and from the details given on the packing materials. The period of storage may not exceed a year without the unit being connected to the relevant permitted rated voltage! 1.4 Handling and Setting Up The frequency inverter concerned to be used in accordance with the documentation, regulations and standards. Ensure that it is handled with due care and avoid any mechanical overloading or stresses. Do not bend any structural parts in transport or handling, and nor should you change the insulation gaps. Do not touch any electronic components and contacts. The equipment has electrostatically-sensitive components that are easily damaged by incorrect handling. Damaged or destroyed components may not be used, since this could endanger your safety, and also compliance with the relevant standards cannot be guaranteed in such a case. 1.5 Electrical Connection Ensure when working on or with the frequency inverter that the currently applicable standards BGV A2 (VBG 4), VDE 0100and other national standards are complied with. Comply with the information given in the documentation concerning electrical installation and the relevant regulations. The responsibility for compliance with and testing of the limit values for EMC - product standard EN 61800-3 for variable speed electric drive units lies with the manufacturer of the industrial unit or machine. The documentation includes information concerning a proper installation in terms of EMC. The cables connected to the frequency inverter may not be subjected to insulation testing with a higher test voltage without having taken suitable switching precautions beforehand. 1.6 Operational Notes Before commissioning starting up operation in an appropriate manner, all the safety covers are to be in place and the terminals must be checked. Check the additional monitoring and protective devices in accordance with EN 60204 and the relevant applicable safety stipulations (e.g., regulations concerning technical equipment or safety at work, etc.). The frequency inverter is to be completely free of any voltages before starting work, but in any case any connections that carry electric power may not be touched at once, since the capacitors could still be charged. Follow the notes and markings on the frequency inverter. 1.7 Maintenance and Servicing Unauthorized opening and inappropriate actions can lead to either injury or damage. Repairs to the frequency inverters may only be carried out by the manufacturer or by persons authorized by him. 5 2 Scope of Supply These frequency inverters can easily be integrated into an automation concept due to the modular hardware components. The scope of supply described here can be supplemented by optional components and to suit specific customer requirements. The plug-in connections made possible functionally safe and economical installation. 2.1 Frequency Inverters (0.55 to 3.0 kW) Output range 0.55 kW to 3.0 kW A X1 B C D x10 E X210A X2 A B C D E F G Note: 6 F G Scope of supply Frequency inverter Terminal strip X1 (Phoenix ZEC 1.5/...ST7.5) Plug-in terminals for the mains connection and DC link Terminal strip X10 (Phoenix ZEC 1.5/3ST5.0) Plug-in terminals for the relay output Standard fasteners for three vertical installation variants Brief instructions, present document Terminal strip X2 (Phoenix ZEC 1.5/...ST7.5) Plug-in terminal for brake resistor and motor connection Terminals X210A / X210B (Wieland DST 85 / RM3.5) Plug-in terminal to connect the control signals Please make a thorough check of the items that you have received in terms of quality, quantity and type. Any obvious problems such as external damage to the packing or to the equipment must be reported to the shipper within seven days for insurance reasons. 2.2 Frequency Inverters (4.0 to 18.5 kW) Output range 4.0 kW to 18.5 kW A x10 B C D X210A E A B C D E Note: Scope of supply Frequency inverter Terminal strip X10 (Phoenix ZEC 1.5/3ST5.0) Plug-in terminals for the relay output Standard fasteners for vertical installation Brief instructions, present document Terminals X210A / X210B (Wieland DST 85 / RM3.5) Plug-in terminal to connect the control signals Please make a thorough check of the items that you have received in terms of quality, quantity and type. Any obvious problems such as external damage to the packing or to the equipment must be reported to the shipper within seven days for insurance reasons. 7 3 3.1 Technical Data Frequency Inverters 230 V (0.55 to 3.0 kW) The following details relate to the nominal rated point of the frequency inverter. The nominal rated point of the frequency inverter is defined for an approved mains voltage of 230 V and a switching frequency of 2 kHz. Output at the motor ACT200 Recommended motor shaft output Output current Output voltage Overload capacity Protection Rotary field frequency Switching frequency 003 004 005 007 009 012 P kW 0.55 0.75 1.1 1.5 2.2 3.0 I U f f A V Hz kHz 3.0 4.0 R - ȍ - 230 160 115 75 short-circuit proof I A 3 5.4 4 7.2 U f V Hz I A 7 5.5 2) 9.5 13.2 184 to 264 45 to 66 10 16 HxWxD mm kg 2 mm - 5.5 7.0 9.5 12.5 3 x 0 ... mains voltage 1.2 for 60s; 1.5 for 1s short-circuit proof / earth-fault proof 0 to 400 depending on the switching frequency 2 to 16 Output brake resistor Min. brake resistor Protection 55 37 Input at the mains Mains current 3) 3ph/PE 1ph/N/PE; 2ph/PE Mains voltage Mains frequency Fuses 3ph/PE 1ph/N/PE; 2ph/PE 6 10 10.5 1) 9.5 2) 16.5 2) 4) 16.5 16 20 16 32 Mechanical Dimensions: Weight (approx.) Type of protection Connection terminals Type of installation m A - 190x60x175 250x60x175 1.3 1.7 IP20 (EN60529) 0.2 to 1.5 vertical Environmental conditions Energy dissipation Coolant temperature Storage temperature Transport temperature Relative humidity P Tn TL TT - W °C °C °C % 43 53 73 84 115 0 to 40 (3K3 DIN IEC 721-3-3) -25 to 55 -25 to 70 15 to 85; non-condensing 170 It is permissible to increase the switching frequency while at the same time reducing the output current to suit customer-specific requirements. The relevant standards and regulations are to be noted for this operational point. Output current Frequency inverter nominal rating 0.55 kW 0.75 kW 1.1 kW 1.5 kW 2.2 kW 3.0 kW 1) 2 kHz 3.0 A 4.0 A 5.5 A 2) 7.0 A 9.5 A 2) 12.5 A 1) 2) Switching frequency 4 kHz 8 kHz 12 kHz 2.8 A 2.4 A 2.0 A 3.7 A 3.0 A 2.5 A 2) 5.0 A 4.0 A 3.4 A 6.5 A 5.5 A 4.6 A 8.7 A 2) 7.0 A 5.9 A 1) 2) 2) 11.5 A 9.5 A 8.0 A 2) Three phase connection requires line choke One and two phase connection requires line choke Mains current with a relative mains impedance of 1% 4) One and two phase connection requires the power limitation (derating) 2) 3) 8 16 kHz 1.6 A 2.0 A 2.7 A 3.7 A 4.8 A 6.5 A 3.2 Frequency Inverters 400 V (0.55 to 3.0 kW) The following details relate to the nominal rated point of the frequency inverter. The nominal rated point of the frequency inverter is defined for an approved mains voltage of 400 V and a switching frequency of 2 kHz. Output at the motor ACT400 Recommended motor shaft output Output current Output voltage Overload capacity Protection Rotary field frequency Switching frequency 001 002 003 004 005 007 P kW 0.55 0.75 1.1 1.5 2.2 3.0 I U f f A V Hz kHz 1.8 2.4 R - ȍ - 930 634 462 300 short-circuit proof I U f I A V Hz A 1.8 2.4 2.8 4.2 320 to 528 45 to 66 HxWxD mm kg 2 mm - 3.2 4.2 5.8 7.8 3 x 0 ... mains voltage 1.2 for 60s; 1.5 for 1s short-circuit proof / earth-fault proof 0 to 400 depending on the switching frequency 2 to 16 Output brake resistor min. brake resistor Protection 220 148 5.8 6.8 1) Input at the mains 2) Mains current 3ph/PE Mains voltage Mains frequency Fuses 3ph/PE 1) 6 10 Mechanical Dimensions: Weight (approx.) Type of protection Connection terminals Type of installation m A - 190x60x175 250x60x175 1.3 1.7 IP20 (EN60529) 0.2 to 1.5 vertical Environmental conditions Energy dissipation Coolant temperature Storage temperature Transport temperature Relative humidity P Tn TL TT - W °C °C °C % 40 46 58 68 87 0 to 40 (3K3 DIN IEC 721-3-3) -25 to 55 -25 to 70 15 to 85, non-condensing 115 It is permissible to increase the switching frequency while at the same time reducing the output current to suit customer-specific requirements. The relevant standards and regulations are to be noted for this operational point. Output current Frequency inverter nominal rating 0.55 kW 0.75 kW 1.1 kW 1.5 kW 2.2 kW 3.0 kW 1) 2) 2 kHz 1.8 A 2.4 A 3.2 A 1) 4.2 A 5.8 A 7.8 A 1) 4 kHz 1.6 A 2.2 A 2.9 A 1) 3.9 A 5.3 A 1) 7.1 A Switching frequency 8 kHz 12 kHz 1.3 A 1.1 A 1.8 A 1.5 A 2.4 A 2.0 A 3.2 A 2.7 A 4.2 A 3.5 A 5.8 A 4.9 A 16 kHz 0.9 A 1.2 A 1.6 A 2.2 A 2.9 A 3.9 A Three phase connection requires line choke Mains current with a relative mains impedance of 1% 9 3.3 Frequency Inverters 400 V (4.0 to 18.5 kW) The following details relate to the nominal rated point of the frequency inverter. The nominal rated point of the frequency inverter is defined for an approved mains voltage of 400 V and a switching frequency of 2 kHz. Output at the motor ACT400 Recommended motor shaft output Output current Output voltage Overload capacity Protection Rotary field frequency Switching frequency 010 014 018 025 034 040 7.5 11 15 18.5 P kW 4.0 5.5 I U f f A V Hz kHz 10 14 R ȍ 106 80 18 25 32 40 3 x 0 ... mains voltage 1.2 for 60s; 1.5 for 1s short-circuit proof / earth-fault proof 0 to 400 depending on the switching frequency 2 to 16 Output brake resistor Min. brake resistor 58 48 32 24 Input at the mains 2) Mains current 3ph/PE Mains voltage Mains frequency Fuses 3ph/PE I U f I A V Hz A HxWxD mm kg 2 mm - 10 14.2 16 1) 28.2 15.8 26 320 to 528 45 to 66 25 35 1) 35.6 1) 50 Mechanical Dimensions: Weight (approx.) Type of protection Connection terminals Type of installation m A - 250x100x200 250x125x200 2.7 3.8 IP20 (EN60529) 0.2 to 6 0,2 to 16 vertical Environmental conditions Energy dissipation Coolant temperature Storage temperature Transport temperature Relative humidity P Tn TL TT - W °C °C °C % 115 145 200 240 310 0 to 40 (3K3 DIN IEC 721-3-3) -25 to 55 -25 to 70 15 to 85, non-condensing 420 It is permissible to increase the switching frequency while at the same time reducing the output current to suit customer-specific requirements. The relevant standards and regulations are to be noted for this operational point. Output current Frequency inverter nominal rating 4.0 kW 5.5 kW 7.5 kW 11 kW 15 kW 18.5 kW 1) 2) 10 2 kHz 10 A 14 A 18 A 1) 25 A 32 A 1) 40 A 1) Switching frequency 4 kHz 8 kHz 12 kHz 9.3 A 7.8 A 6.6 A 12.7 A 10 A 8.4 A 1) 16.7 A 14 A 11.8 A 22.7 A 18 A 15.1 A 1) 29.7 A 25 A 21 A 1) 1) 1) 37.3 A 32 A 26.9 A Three phase connection requires line choke Mains current with a relative mains impedance of 1% 16 kHz 5.3 A 6.8 A 9.5 A 12.2 A 17 A 21.8 A 3.4 Operational Diagrams The technical data for the frequency inverter relates to the nominal rated point that was selected for a wide range of applications. It is possible to apply a functionally safe and economical dimensioning (derating) of the frequency inverter via the following diagrams for specific applications. Mounting altitude 3.3°C/1000m upper 1000 m above sea level Coolant temperature in °C max. coolant temperature; 5 %/1000m upper 1000 m above sea level; hmax = 4000m Output current in % Power reduction (Derating); 100 85 60 40 20 1000 2000 3000 55 45 3000 4000 2000 1000 Mounting altitude in m above sea level 4000 Coolant temperature Power reduction (Derating); Output current in % 2,5 %/K upper 40 °C; Tmax = 55 °C 100 80 63 40 20 0 20 50 10 30 40 Coolant temperature in °C 55 Mains voltage Output current in % Power reduction (Derating); 0,22 %/V upper 400 V; Umax = 480 V 100 83 63 40 20 0 480 400 420 440 460 Mains voltage in V 11 4 Mechanical Installation Frequency inverters built to protection type IP20 are normally intended for installation in an electrical cabinet. Follow the installation and safety guidelines, and carefully note the specifications of the unit. The frequency inverters only comply with protection class IP20 once the covers are properly in place and the terminals connected up. Operation is permitted then. Warning: 4.1 Frequency Inverters (0.55 to 3.0 kW) Installation is done with the standard fasteners in a vertical position onto the installation plate or with the feedthrough variant. The following illustration shows the various options for attachment. Standard installation x c b b1 b1 c1 a1 a2 a x x t100mm Installation is done by inserting the long side of the fastening sheet into the heat sink and fixing it to the installation plate with screws. The dimensions and installation dimensions given are for the standard unit without any optional components. Frequency inverter 0.55 kW 2.2 kW Caution: 12 to to 1.1 kW 3.0 kW Installation dimensions in mm a a1 a2 b 190 250 210 to 230 270 to 290 255 315 60 60 b1 c c1 30 30 175 175 130 130 Ensure that there is sufficient space all around the equipment so that cooling air can circulate freely. Ensure that air pollution from sources such as dust, greases, aggressive gases, etc., is avoided. 4.2 Frequency Inverters (4.0 to 18.5 kW) Installation is done with the standard fasteners in a vertical position onto the installation plate. The following illustration shows the standard form of attachment. Standard installation b x c b1 c1 a1 a2 a x x t100mm Installation is done by fixing the two angle brackets with the heat sink of the frequency inverter onto the installation plate with thread-forming tapping screws. The frequency inverter in the power range 11.0 kW to 18.5 kW are delivered with angle brackets which are fixed with four thread-forming tapping screws. The dimensions and installation dimensions given are for the standard unit without any optional components. Frequency inverter 4.0 kW 11.0 kW Caution: to to 7.5 kW 18.5 kW Installation dimensions in mm a a1 a2 b 250 250 270 to 290 270 to 290 315 315 100 125 b1 c c1 12 17,5 200 200 133 133 Ensure that there is sufficient space all around the equipment so that cooling air can circulate freely. Ensure that air pollution from sources such as dust, greases, aggressive gases, etc., is avoided. 13 5 Electrical Installation The electrical installation is to be carried out by qualified persons in accordance with the general and regional safety and installation regulations. Safe operation of the frequency inverter presupposes that the documentation and equipment specifications are followed during installation and commissioning. If special areas of application apply, then additional regulations and guidelines must be followed. Danger: The mains terminals, DC terminals and motor terminals can still have dangerous voltages even after the frequency inverter has been properly disconnected. It is essential to wait several minutes before starting work on the unit to allow the DC link capacitors time to discharge fully. The mains fuses and cable cross-sections are to be as given in EN 60204-1 and DIN VDE 0298 part 4 for the nominal operating point of the frequency inverter. According to UL/CSA, approved copper cables of class 1 with a temperature range of 60/75°C are to be used for the power cables, together with the corresponding mains fuses. Warning: The frequency inverters are to be connected to earth over a large area and with good conductivity. The leakage current of the frequency inverter can be >3.5 mA, a fixed connection must be provided as specified in standard EN 50178. The cross-section of the earth conductor for the installation area must be at least 10 mm², or else a second earth conductor must be laid electrically parallel to the first one. The cross-section must correspond to the recommended cross-section for such applications. Connection conditions x The connection for frequency inverters with a phase current 16 A to the public mains system (1st environment) is to be done with the recommended line choke as per the stipulations of standard EN 61000-3-2. Devices used professionally with a connection rating > 1 kW connected to the public mains system (1st environment) and frequency inverters in industrial applications (2nd environment) only require the recommended line choke if the ratio of active power (real power) to the mains short-circuit power is < 1 %. x Frequency inverters 7.5 kW with a built-in EMC filter comply with the emission limit values of the product standard EN 61800-3, for a motor cable length of up to 10 m. Optional filters can be used to meet any customer-specific requirements. x Operation on an unearthed network (IT network) is permissible after disconnecting the Y-capacitors inside the unit. x Operation with fault current protective devices is only permissible in connection with a pulsed current or universal current-sensitive fault current relay with leakage current separation. The value of the leakage current depends on the installation, the environment and the length of the motor cables. Operation is possible with a fault current circuit breaker and a cable length of less than 10 m (shielded). The relevant standards and regulations must be complied with. Note: 14 Functionally safe and economic dimensioning of the unit is possible for a particular application. If you require additional product information, it can be obtained on request from the local representative of VECTRON Elektronik. 5.1 EMC Information The frequency inverters are designed for an interference immunity factor corresponding to the requirements of standard EN61800-3 for use in industrial applications. Electromagnetic interference can be avoided by proper installation and following the specific information for a particular product. Measures x Ensure that there is good equipotential bonding within the system or unit. Unit parts such as electrical cabinets, control panels, machine frames, etc. are to be connected with PE cables with good conductivity over a wide area. x Ensure that the frequency inverter, the line choke, external filter and other components are connected to each other via short cables with one earthing point. x Avoid unnecessarily long cables and freely swinging loops of cable. x Contactors, relays and solenoid valves in the electrical cabinet must be provided with suitable means to suppress electromagnetic interference. A B A Mains connection The mains supply line can be of any length, but it must be laid spatially separated from control, data and motor cables. The shield must be connected to earth on both sides with good conductivity over a wide area. B DC link connection The frequency inverters are to be connected with the same mains potential or with a direct voltage source. C D C Control connection The control and signal cables must be laid spatially separated from the power cables. The shield of control cables must be connected to earth on both sides with good conductivity over a large area. Analog signal cables are to be connected at one side to the shield earth potential. D Motor connection The shielded motor cable is to be connected to the motor with a metallic PG screw fitting and to the frequency inverter with a suitable and highly conductive clip with earth potential. The signal cable to monitor the motor temperature is to be laid spatially separated from the motor cable. Attention: The frequency inverters comply with the requirements of Low Voltage Guideline. 73/23/EWG and the requirements of EMC Guideline 89/336/EWG. EMC product standard EN 61800-3 relates to the drive unit system. The documentation gives information on how to comply with the standards to be applied if the frequency inverter is one component of the drive unit system. The person setting up the drive unit system must provide the statement of conformity. 15 5.2 Block diagram A X10 1 S3OUT 2 3 X210A + - X1 L1 L2 L3 1 +24V / 180mA 2 GND 24V B C 3 4 5 6 7 S1IND S2IND S3IND S4IND S5IND + - U, I CPU X210B S6IND 1 2 GND 24V S1OUT MFO2 D E 3 4 F 5 +10V / 3mA MFI1 A 6 D I 7 GND 10V X2 U V W Rb1 Rb2 A Relay output S3OUT Changeover contact, 240 V AC / 5A, 24 V DC / 5 A (ohmic) B Digital input S1IND Digital signal, response time approx.16 ms (on), approx.10 Ps (off), Umax = 30 V, 10 mA at 24 V, PLC-compatible C Digital input S2IND ... S6IND Digital signal, response time approx.16 ms, PLC-compatible, Umax = 30 V, 10 mA at 24 V, frequency signal, 0 to30 V, 10 mA at 24 V, fmax = 150 kHz D Digital output S1OUT PLC-compatible, overload proof and short-circuit proof digital signal, 24 V, Imax = 40 mA E Multi function output MFO1 PLC-compatible, overload proof and short-circuit proof digital signal, 24 V, Imax = 40 mA, frequency signal, 0 to 24V, Imax = 40 mA, fmax = 150 kHz F Multi function input MFI1 Analog signal, resolution 12Bit, 0 to 10 V (Ri = 70 k:), 0 to 20 mA (Ri = 500 :), digital signal, response time approx. 16 ms, PLC-compatible, Umax=30 V, 0.4 mA at 24 V, 16 5.3 Mains Connection The mains connection of the frequency inverters is made via plug-in terminal X1. The mains fuses and cable cross-sections for the nominal operating point of the frequency inverter are to be as given in EN 60204-1 and DIN VDE 0298 part 4. According to UL/CSA, approved copper cables of class 1 with a temperature range of 60/75°C are to be used for the power cables, together with the corresponding mains fuses. The electrical installation is to be carried out in accordance with the equipment specifications of the standards and regulations to be applied. Caution: 5.3.1 The control, mains supply and motor cables must be laid spatially separated from each other. The cables connected to the frequency inverter may not be subjected to insulation testing with a higher test voltage without having taken suitable switching precautions beforehand. Frequency Inverters (0.55 to 3.0 kW) Mains connection 0.55 kW to 3.0 kW X1 Phoenix ZEC 1,5/ .. ST7,5 2 0.2 … 1.5 mm AWG 24 … 16 2 0.2 … 1.5 mm AWG 24 … 16 2 0.25 … 1.5 mm AWG 22 … 16 2 0.25 … 1.5 mm AWG 22 … 16 550 W … 1.1 kW + - + - L1 L2 L3 L1 N PE 1ph / 230V AC + - L1 L2 L3 L1 L2 L3 L1 L2 L3 PE 3ph / 230V AC 3ph / 400V AC L1 L2 PE 2ph / 230V AC 1.5 kW … 3.0 kW + - N L1 1ph / 230V AC 1 + - L1 L1 L2 L3 + - L1 L1 L2 L3 L1 L1 L2 L3 L2 L3 PE L1 3ph / 230V AC 3ph / 400V AC The 230V mains connection 1ph/N/PE and 2ph/PE with the mains current above 10A requires the connection with two terminals. Danger: PE L2 L1 2ph / 230V AC PE Plug-in terminal X1, which cannot be connected up with an incorrect polarity, may only be connected when not live and after being disconnected. The mains terminals and the DC terminals can still have dangerous voltages even after the frequency inverter has been properly disconnected. It is essential to wait several minutes before starting work to allow the DC link capacitors time to discharge fully. 17 5.3.2 Frequency Inverters (4.0 to 18.5 kW) Mains connection 4.0 kW to 18.5 kW X1 X1 L1 L2 L3 - + L1 L2 L3 PE 3ph / 400V AC 4.0 kW … 7.5 kW WAGO Serie 745 / 6qmm / RM7,5 0.2 … 6 mm2 AWG 24 … 10 0.2 … 6 mm2 AWG 24 … 10 0.25 … 4 mm2 AWG 22 … 12 0.25 … 4 mm2 AWG 22 … 16 Danger: 18 11 kW … 18.5 kW WAGO Serie 745 / 16qmm / RM10+15 0.2 … 16 mm2 AWG 24 … 6 0.2 … 16 mm2 AWG 24 … 6 0.25 … 10 mm2 AWG 22 … 8 0.25 … 10 mm2 AWG 22 … 8 The terminal X1 may only be connected when not live and after being disconnected. The motor terminals and the terminals of the brake resistor can still have dangerous voltages even after the frequency inverter has been properly disconnected. It is essential to wait several minutes before starting the installation work to allow the DC link capacitors time to discharge fully. 5.4 Motor Connection The connection to the motor and brake resistor at the frequency inverter is done via plug-in terminals X2. The shielding of the motor cable is to be connected on both sides to earth with good conductivity over a large area. The control, mains supply and motor cables must be laid spatially separated from each other. Note the limit values in accordance with the application, the length of the motor cable and the switching frequency. The general requirements of product standard EN 61800-3 are complied with in the case of a shielded motor cable of up to 50 m in length. Attention: 5.4.1 Frequency inverters 7.5 kW with a built-in EMC filter comply with the emission limit values of product standard EN 61800-3, for a motor cable length of up to 10 m. Optional filters can be used to meet any customerspecific requirements. Frequency Inverters (0.55 to 3.0 kW) Motor connection 0.55 kW to 3.0 kW Phoenix ZEC 1,5/ .. ST7,5 2 0.2 … 1.5 mm AWG 24 … 16 2 0.2 … 1.5 mm AWG 24 … 16 0.25 … 1.5 mm2 AWG 22 … 16 0.25 … 1.5 mm2 AWG 22 … 16 X2 X2 Rb1 Rb2 U V W U V W delta connection Danger: U V W star connection M 3~ Plug-in terminal X2, which cannot be connected up with an incorrect polarity, may only be connected when not live and after being disconnected. The motor terminals and the terminals of the brake resistor can still have dangerous voltages even after the frequency inverter has been properly disconnected. It is essential to wait several minutes before starting the installation work to allow the DC link capacitors time to discharge fully. 19 5.4.2 Frequency inverters (4.0 to 18.5 kW) Motor connection 4.0 kW to 18.5 kW X2 U V W Rb1 Rb2 X2 U V W delta connection star connection 4.0 kW … 7.5 kW WAGO Serie 745 / 6qmm / RM7,5 2 0.2 … 6 mm AWG 24 … 10 2 0.2 … 6 mm AWG 24 … 10 2 0.25 … 4 mm AWG 22 … 12 0.25 … 4 mm2 AWG 22 … 16 Danger: 20 M 3~ U V W 11 kW … 18.5 kW WAGO Serie 745 / 16qmm / RM10+15 2 0.2 … 16 mm AWG 24 … 6 2 0.2 … 16 mm AWG 24 … 6 2 0.25 … 10 mm AWG 22 … 8 0.25 … 10 mm2 AWG 22 … 8 The terminal X2 may only be connected when not live and after being disconnected. The motor terminals and the terminals of the brake resistor can still have dangerous voltages even after the frequency inverter has been properly disconnected. It is essential to wait several minutes before starting the installation work to allow the DC link capacitors time to discharge fully. 5.5 Control Terminals The control and software functionality can be configured as desired for functionally safe and economical operation. The brief instructions describe the factory settings. Caution: The control inputs and outputs, which cannot be connected up with an incorrect polarity, may only be connected when not live and after being disconnected. Control terminals M Wieland DST85 / RM3,5 2 0.14 … 1.5 mm AWG 30 … 16 0.14 … 1.5 mm2 AWG 30 … 16 2 0.25 … 1.0 mm AWG 22 … 18 0.25 … 1.0 mm2 AWG 22 … 18 X210A 1 +24V / 180mA 2 GND 24V 3 S1IND 4 S2IND 5 S3IND 6 S4IND 7 S5IND X210B 1 S6IND 2 GND 24V - + 3 S1OUT V 4 MFO1 5 +10V / 3mA 6 MFI1 7 GND 10V 0.2 … 0.3 Nm 1.8 … 2.7 lb-in Control terminal X210A Cl. Description Explanation/Use 1 Voltage output 24 V, Imax = 180 mA Supply voltage 2 Ground / GND 24 V 3 Digital input S1IND, Umax = 30 V, Controller release / acknowledge fault 10 mA at 24 V, PLC-compatible message 4 Digital input S2IND, Umax = 30 V, Programmable, 10 mA at 24 V, PLC-compatible Start clockwise (factory setting) 5 Digital input S3IND, Umax = 30 V, Programmable, 10 mA at 24 V, PLC-compatible Start anti-clockwise (factory setting) 6 Digital input S4IND, Umax = 30 V, Programmable, 10 mA at 24 V, PLC-compatible Data set change to 1 (factory setting) 7 Digital input S5IND, Umax = 30 V, Programmable, 10 mA at 24 V, PLC-compatible Data set change to 2 (factory setting) Control terminal X210B 1 Digital input S6IND, Umax = 30 V, Programmable, 10 mA at 24 V, PLC-compatible Motor thermal contact (factory setting) 2 Ground / GND 24 V 3 Digital output S1OUT, Programmable, U = 24 V, Imax = 40 mA, Operational message (factory setting) overload proof and short-circuit proof 4 Multifunction output MFO1, Programmable, pulse width modulated U = 24 V, Imax = 40 mA, signal that is proportional to the actual overload proof and short-circuit proof frequency (factory setting) 5 Reference output 10 V, Imax = 4 mA Supply reference value potentiometer 6 Multifunction input MFI1, 12 bit Programmable, Speed reference value (factory setting) 0 to 10 V, Ri = 70 k: 7 Ground / GND 10V - 21 The relay output that can be programmed as desired is linked with the monitoring function in the factory setting. Connection of the relay output is not absolutely essential for proper frequency inverter functioning. Relay output Phoenix ZEC 1,5/3ST5,0 0.2 … 1.5 mm2 AWG 24 … 16 X10 X10 1 2 3 S3OUT 0.2 … 1.5 mm2 AWG 24 … 16 0.25 … 1.5 mm2 AWG 22 … 16 0.25 … 1.5 mm2 AWG 22 … 16 Control terminal X10 Cl. Description Explanation/Use 1 Relay output, changeover contact, Programmable, to Response time approx. 40 ms, floating, Without fault message the contact 2 - 3 3 240 V AC / 5 A, 24 V DC / 5 A (ohmic) is closed (factory setting) These frequency inverters can easily be integrated into an automation concept due to the modular hardware components. These default or customer-specific modules are recognized during initialization and the controller functionality is automatically adapted to suit. The required information for installation and handling of the optional expansions can be found in the relevant documentation. Hardware modules Control unit KP500 A Connection of the optional control unit KP500 or an interface adapter KP232. A B C Danger: 22 Communications module CM B Plug-in section for connection to various communication protocols: x CM-232, RS232 interface x CM-485, RS485 interface x CM-LON, LON interface x CM-PDP, Profibus-DP interface x CM-CAN, CANopen interface C Expansion module EM Plug-in section for customer-specific customizing of the control inputs and outputs to various applications: x Enhanced speed sensor evaluation x Analog inputs and outputs x Digital inputs and outputs x EM-SYS, system bus Only carry out installation and dismantling work on the hardware modules once the frequency inverter concerned has been disconnected. It is essential to wait several minutes before starting work to allow the DC link capacitors time to discharge fully. 6 Control Unit KP500 Parameterization, parameter display and control of the frequency inverter can be done via the optional control unit. The control unit is not absolutely essential for operation of the frequency inverter and can be unplugged if required. A B C D F E G H I J A J B C D E F G H I Keys Starts the drive unit and changes to the CTRL menu. Press the RUN key to branch to the motor potentiometer function. STOP Changes to the CTRL menu and stops the drive unit. acknowledge fault Ÿ ź Navigation in the menu structure and selection of parameters. Increase and reduce parameter values. ENT Calls up parameters or makes a change within the menu structure. Confirms the selected function or parameter. ESC Quits the parameter or jumps back one level within the within the menu structure. Cancels the functions or resets the parameter value. FUN Changes over the functions of the keys and provides access to special functions. RUN Display Three-digit 7-segment display to show the parameter numbers Single-digit 7-segment display for the active data set, direction of rotation, etc. Display the selected menu branch: VAL Display actual values PARA Parameter selection and editing of the parameter values CTRL Selection of functions that can be used via the die control unit: SEtUP for commissioning ctrL Motor potentiometer and jog function tESt Equipment test Status and operational messages: WARN Warning of critical operational behaviour FAULT Fault switching-off, with the associated message RUN Flashing: ready for operation On continuously: operation and release of the output stage REM Active remote control via the interface connection F Function changeover via the FUN key Five-digit 7-segment display for parameter value and sign Physical unit of the displayed parameter value Active acceleration or deceleration ramp Current direction of rotation of the drive unit 23 6.1 Actual Values Menu The control unit displays a large number of actual values in the VAL menu branch, depending on the selected configuration and installed options. The brief instructions document a selection of parameters and the basic functions of the software. Further information is given in the operating instructions. ESC E ENT A ENT D ESC B A Use the cursor keys to select the desired number from the actual values shown in numeric order. The number is shown flashing with the active data set in the display. Ÿ+ź FUN , Ÿ FUN , ź Keys Change to the actual value parameter when switching on Display last actual value parameter (highest number) Display first actual value parameter (lowest number) B Press the ENT key to select the actual value that is to be displayed with the current parameter value, unit and active data set. C It is possible to monitor a specific actual value parameter as part of commissioning and troubleshooting. FUN , Ÿ FUN , ź FUN , ENT 24 C Keys Maximum actual value is continuously determined and displayed Minimum actual value is continuously determined and displayed Median of the actual value during the monitoring period D Press the ENT key to save the selected actual value as a parameter when switching on. The SEt message is displayed briefly with the parameter number. This actual value is automatically displayed in future when switching on the frequency inverter. E You can once again monitor and display the value once the parameters have been saved. Press the ESC key to change to the parameter selections in the VAL menu branch. 6.2 Parameters Menu The parameters that are queried during commissioning are selected from known applications and supplemented by additional settings in the PARA menu branch as required. The brief instructions describe the basic parameters and the basic functions of the software. Further information is given in the operating instructions. ESC E ENT A ENT D ESC B A C Use the cursor keys to select the desired number from the parameters shown in numeric order. The parameter number is shown flashing with the active data set in the display. Ÿ+ź FUN , Ÿ FUN , ź Keys Changes to the last parameter that was modified Display last parameter (highest number) Display first parameter (lowest number) B Press the ENT key to select the parameter, which is displayed with the parameter value, unit and active data set. C The cursor keys allow the parameter value to be changed. The value is to be changed or a mode of operation selected, regardless of the parameter. Ÿ+ź FUN , Ÿ FUN , ź FUN , ENT D Keys Parameter is reset to the factory setting Parameter is set to the highest value Parameter is set to the lowest value Change the data set in the case of switchable parameters Press the ENT key to save the parameter value. The SEt message is displayed briefly with the parameter number and data set. Press the ESC key if you wish to quit the parameter without making any changes. Messages Err1: EEPrO Parameter could not be saved Err2: StOP Parameter can only be read during operation Err3: Error Other fault E Once the parameter has been saved, you can change the value again if you wish, or else you should press the ESC key to switch to parameter selection. 25 6.3 Controlling the Motor via the Control Unit The control unit permits control of the motor parallel with the connected analog and digital control signals. Attention: Control of the drive unit via the control unit requires the release of the power component via the controller release S1IND digital input. Avoid any risks of severe personal injury or damage to valuable assets by ensuring that only suitably qualified technicians work on the equipment. Qualified persons are those who are familiar with the setting up, installation, commissioning and operation of frequency inverters and have the corresponding qualifications to carry out such work. Carefully read the documentation before starting the work and comply with the safety instructions. The CTRL menu branch can be reached by navigation within the menu structure. The CtrL function includes sub-functions that are displayed according to the operating point of the frequency inverter. Press the RUN key to go from any point within the menu structure to motor potentiometer function Pot or internal reference value int respectively. Motor potentiometer function Pot Use the cursor keys to set the output frequency of the frequency inverter from the minimum frequency 418 up to the maximum frequency 419. The acceleration corresponds to the factory setting (2 Hz/s) of the parameter Ramp KP-MPot 473. The parameters Acceleration 420 and Deceleration 421 are considered at lower values of acceleration. Internal reference value int The drive unit is in operation and the current actual value is displayed. Use the cursor keys to go to motor potentiometer function Pot, which causes that the current value for the frequency to be accepted. JOG frequency JOG Press the FUN key to change from internal reference value int or motor potentiometer function Pot respectively to the JOG frequency 489. The frequency is set with the aid of the cursor keys. ENT ESC FUN START STOP Key functions Changes over the direction of rotation, regardless of the control signal at the clockwise S2IND or anti-clockwise S3IND terminals. Quit the function and go back in the menu structure. Press the key to go to JOG frequency and start the drive unit. Releasing the key changes to the sub-function and stops the drive unit. Starts the drive unit; alternative to control signals S2IND or S3IND Stops the drive unit; alternative to control signals S2IND or S3IND Attention: 26 The ENT key produces a change in direction of rotation regardless of the signal at the clockwise S2IND or anti-clockwise S3IND terminals. If the minimum frequency 418 has been set to 0 Hz, a change in the sign of the frequency reference value produces a change in direction of rotation of the motor. 7 7.1 Commissioning the Frequency Inverter Turning On the Mains Voltage Once the installation work has been completed, you should check all control and power connections again before turning on the mains voltage. If all the electrical connections are correct, it is necessary to ensure that you switch off the release of the frequency inverter (control input S1IND open). After the mains is switched on, the frequency inverter carries out a self-test and the relay output (X10) reports "Fault". The frequency inverter concludes the self-test after a few seconds, and then relay (X10) pulls in and reports "no fault". Commissioning is called up automatically in the state as delivered and after resetting back to the factory settings. The control unit displays menu item “SEtUP“ from the CTRL menu branch. 7.2 Setup The commissioning of the frequency inverter determines all the relevant parameter settings for the desired application. Selection from the available parameters is done from known default applications for the drive unit technology. This makes it easier to select the most important parameters, but it in no way replaces a subsequent check by the user. Once the SETUP routine has been successfully concluded the actual value Actual frequency 241 is subsequently displayed from the VAL menu branch in the control unit. Attention: The commissioning includes a function for parameter identification. The parameters are determined by measurement and set accordingly. The motor should not have been run before starting the measurement, since some of the machine data depends on the operational temperature. The commissioning appears automatically in the state as delivered. In connection with a successful commissioning, you can select the CTRL sub-menu and call up the function again. Press the ENT key to go to the CTRL sub-menu. In this sub-menu you can select the “SEtUP“ menu item with the cursor keys and confirm it with the ENT key. Select the configuration 30 parameter with the ENT key and input the numbers 110 or 410 with the cursor keys (see the following section). End the input with the ENT key and switch to the following parameter. The hardware and software functionality is configured if the configuration was changed. Please confirm the desired configuration after initialization. ENT ENT 27 7.2.1 Configuration Configuration 30 determines the pin-outs and basic functions of the control and outputs and the software functions. The frequency inverter software offers several configurations to choose from. The configurations primarily differ in the way that the drive unit is controlled. These brief instructions include details on sensor-less control in Configuration 110 and sensor-less field-oriented control in Configuration 410. The speed is input as a frequency reference value via an analog signal. Analog and digital inputs are to be combined and supplemented by the optional communication protocols as an additional source of reference values. The speed of the drive unit is governed down once the set limits are reached so that the latter are not exceeded. Configuration 110, sensor-less control Configuration 110 includes the functions for variable speed control of a 3-phase machine in a large number of default applications. The motor speed is derived from the set relationship between the reference frequency and the required voltage. Configuration 410, sensor-less field-oriented control Configuration 410 includes the functions for sensor-less control of a 3-phase machine. The current motor speed is determined from the currents and voltages at that moment in combination with the machine parameters. Parallel switching of motors in this configuration is restrictedly possible. 7.2.2 Data Set The data set makes it possible to save parameter settings in four independent data sets. Data sets 1 to 4 are saved with the same parameter values in data set 0. By default the frequency inverter uses data set 1 unless data set switching is used. Setting Parameter dS 0 1 2 3 4 7.2.3 Function All data sets (DS0) (factory settings) Data set 1 (DS1) Data set 2 (DS2) Data set 3 (DS3) Data set 4 (DS4) Machine Data The machine data that is input in the following part of the commissioning is to be taken from the rating plate and the data sheet of the motor. The factory settings for the machine parameters relate to the nominal data of the frequency inverter and the associated 3-phase machine. The machine data required for the control and regulation process is calculated in the course of the commissioning from the settings, which have to be checked for plausibility. The rated values used in the factory settings must be checked by the user. Motor rated values 28 Para. No. Factory setting Unit Name / Function 370 371 372 374 375 376 UFUN IFUN FI type FI type 50,00 PFUN V A rpm Hz kW Rated voltage Rated current Rated speed Rated cos phi Rated frequency Mechanical rated output 7.2.4 Plausibility Check The checking of the machine data should only be skipped by a suitably qualified and experienced user. The configurations include complex control procedures that depend to a large extent on the correct machine parameters being entered. The warning and fault messages displayed during the testing and checking should therefore be noted carefully. If a critical state is detected during the commissioning, this is displayed in the control unit. A warning or fault message is displayed according to the deviation from the expected parameter value. The warning message can be acknowledged with the ENT key and the commissioning is continued. The parameter values that had been entered can be corrected subsequently by pressing the ESC key. Code SA000 SA001 SA002 SA003 SA004 Warning messages Measures / Remedy There are no warning messages. This message can also be read by an optional communication card. The rated voltage 370 is outside the FU nominal voltage range. The maximum nominal voltage is given on the rating plate of the frequency inverter. The rated current 371, the rated output 376 and the rated voltage 370 must be checked. The calculated efficiency is within the limits for a 3-phase motor. The rated cos phi 374 is outside the standard range (0.6 to 0.95). The rated speed 372 and the rated frequency 375 must be checked. The slip is within the limits for a 3-phase motor. If an fault message appears, check and input again the parameterized rated data. Repeat the commissioning until the rated values have been input without any faults. Only experienced users should terminate the commissioning prematurely by pressing the ESC key, since some of the rated data is not correct. Code SF000 SF001 SF002 SF003 SF004 SF005 SF006 SF007 Fault messages Measures / Remedy There are no fault messages The rated current 371 that was entered is too low. The rated current 371 is too high, related to the rated output 376 and the rated voltage 370. The rated cos phi 374 is wrong (more than 1 or less than 0.3). The slip frequency calculated from the rated data is negative. The rated speed 372 and the rated frequency 375 must be checked. The rated speed 372 and the rated frequency 375 that were entered must be checked, since the calculated slip frequency is too large. The overall output calculated from the rated data of the drive unit it lower that the figure that was entered for the rated output. The configuration that was set is not supported by the commissioning. Configurations 110 and 410 are described in these brief instructions and the unit is to be set accordingly. 29 7.2.5 Parameter Identification The selected configuration requires the knowledge of additional machine data that is not given on the rating plate of the 3-phase machine. The commissioning can measure the required machine data, supplement or alternative to the data sheet of the manufacturer. The values measured while the drive unit is at a standstill can be entered directly or in connection to a calculation for the parameter. The sequence and duration of the parameter identification varies according to the machine connected and the unit rating. Display PAidE is to be confirmed by pressing the ENT key. The connected load is evaluated in the subsequent course of parameter identification with the displayed signals. The commissioning changes over to the functions for parameter identification after checking the machine data that had been input. The safety functions of the frequency inverter prevent the release of the power component unless digital input S1IND is wired up. If a signal had already been applied at the start of commissioning, message FUF is not displayed. The parameter identification of the frequency inverter requires the release of the power component. Avoid any risks of severe personal injury or damage to valuable assets by ensuring that only suitably qualified technicians work on the equipment. Qualified persons are those who are familiar with the setting up, installation, commissioning and operation of frequency inverters and have the corresponding qualifications to carry out such work. Carefully read the documentation before starting the work and comply with the safety instructions. Warning: The concluding message rEAdY is to be confirmed with the ENT key. Cancelling by pressing the ESC key or by terminating the release of S1IND means that incomplete values are accepted. 7.2.6 Application Data The wide variety of applications for drive units, with the resulting parameter settings, require additional parameters to be checked. The parameters that are queried within the commissioning are selected from known applications and can be supplemented as required in the PARA menu. Frequency ramps Para. No. Factory setting Unit Name / Function 420 421 5.00 5.00 Hz/s Hz/s Acceleration Deceleration Attention: The deceleration of the drive is monitored in the standard parameter setting operation mode voltage controller 670. The deceleration ramp can be extended during rising DC-link voltage in regenerative operation or braking of the drive. Multifunction input MFI1 is to be parameterized in the mode of operation that corresponds to the reference value signal. Mode of operation 3 should only be selected by expert users wishing to use drive unit control via fixed frequency 1 480 and fixed frequency 2 481. Reference value signal Mode of operation MFI1 452 1 (Factory settings) 2 3 30 Name / Function Voltage signal, 0 to 10V Current signal, 0 to 20mA Digital fixed frequency changeover, 0 to 24V The control unit shows the End message that you should confirm with the ENT key. The commissioning of the frequency inverter is concluded with a reset and initialization of the frequency inverter. Relay output X10 reports an fault during initialization. The parameter actual frequency 241 that is defined in the factory settings is displayed in connection with an fault-free initialization of the frequency inverter. If a signal is applied to digital input 1 and digital input 2 or digital input 3, then the drive unit is accelerated to the set minimum frequency 418 (factory setting 3.50 Hz) The commissioning makes it easier for you to select the main parameters and determines additional rated data for the motor. If the settings for the parameters were determined via the optional operating software or the PARA menu branch of the control unit, display of the selected actual value is to be activated manually. The setup function appears when the frequency inverter is switched on, and you can quit this by pressing the ESC key. Change to the VAL menu branch and select the desired actual value that is to be displayed in future. Press the ENT key to display the value of the parameter and press the ENT key again to select the actual value for a new start. 7.3 Checking the Direction of Rotation The relationship between the reference value and the actual direction of rotation of the drive unit must be checked. The check should be made as follows. Input a reference value of around 10 % and briefly switch on the release for the inverter (control inputs FUF (S1IND) and STR (S2IND) for clockwise, or FUF (S1IND) and STL (S3IND) for anti-clockwise). Check that the motor shaft is turning in the right direction as the drive unit accelerates. In addition to checking the drive unit, the corresponding actual values and the operational messages can be read with the aid of the control unit. If the direction of rotation is wrong, for example, then swap over two of the motor at the terminals of the frequency inverter, e.g., U and V. The connection of the frequency inverter at the mains has no effect on the direction of rotation of the drive unit. Note: The commissioning of the frequency inverter is now completed and can now be supplemented by further settings in the PARA menu. The parameters that have been set have been chosen such that they are adequate in most cases concerning commissioning. Testing and checking additional settings that are relevant for the application is to be done on the basis of the operating instructions. 31 8 Basic Parameters 8.1 Menu Branch PARA The parameters shown in the PARA menu branch are set within the commissioning to some extent. The parameters documented in the brief instructions are to be supplemented by the information given in the operating instructions. Control level 28 - The brief instructions describe the parameters at control level 1. Control levels 2 or 3 should only be set by expert users. The higher control levels are described in the operating instructions. Setting: 1-3 Configuration 30 – The basic functions of the control inputs and outputs and the allocation of the software module is done within the configuration. Setting: 110 - Sensor-less control with v/f-characteristic, for speed control in a wide variety of standard applications. 410 - Sensor-less field-oriented control, for applications with a high level of functionality and dynamics Program(ming) 34 - All the parameters are reset to the factory settings, or a fault message is acknowledged (alternative to the signal at digital input S1IND). Setting: 4444 Revert to factory settings 123 Acknowledge fault Rated voltage 370 – Set the voltage stated on the rating plate of the 3-phase motor for the selected switching. Setting: 60.0 V – 800.0 V Rated current 371 – Set the rated current stated on the rating plate for the selected switching. Setting: 0.01IFIN - 10oIFIN Rated speed 372 - Set the value stated on the rating plate for the motor speed at the rated frequency. Setting: 96 rpm - 60,000 rpm Rated cos phi 374 – Enter the value stated on the rating plate of the 3-phase motor. Setting: 0.01 – 1.00 Rated frequency 375 – Set the rated frequency for the parameterized rated speed. Setting: 10.00 – 999.99 Mech. rated output 376 – Set the output in kilowatts stated on the rating plate of the 3-phase motor in. Setting: 0.1PFIN - 10PFIN Switching frequency 400 – The nominal rated point of the frequency inverter is defined for a switching frequency of 2 kHz. Higher switching frequencies require a reduction of the output current (see the technical data). Setting: 2 kHz, 4 kHz, 8 kHz, 10 kHz, 16 kHz Min. frequency 418 – The start command sent via the control unit or digital inputs S2IND, S3IND brings an acceleration of the drive unit up to the minimum frequency. Setting: 0.00 Hz – 999.99 Hz Max. frequency 419 – The speed range of the drive unit is limited by the maximum output frequency of the frequency inverter. Setting: 0.00 Hz – 999.99 Hz 32 Acceleration 420, Deceleration 421 – The ramps define how quickly the output frequency changes in the event of a reference value change or after a start, stop or braking command. Setting: 0.00 Hz/s – 999.99 Hz/s Mode of operation Multifunction input 452 - The reference value input at input MFI1 is to be parameterized in the mode of operation corresponding to the connected signal source. Setting: 1Voltage signal, 0 V – 10 V 2Current signal, 0 mA – 20 mA 3Digital fixed frequency changeover, digital 0 V – 24 V Fixed frequency 1 480, Fixed frequency 2 481 – Switching between the fixed frequencies is done via the fixed frequency changeover of the MFI1 input. It is possible to select fixed frequency from one of the four data sets via data set changeover S4IND, S5IND. You can parameterize up to 8 fixed frequencies and select them via the controller for the digital inputs an. Setting: 0,00 Hz - 999,99 Hz Mode of operation Digital output 1 530, Digital output 3 532 – Various monitoring functions can be allocated to digital output S1OUT and relay output S3OUT. Setting: 2Operational message, control signal at S1IND, S2IND or S3IND 3Fault message 11 Warning 40 Apply the electromechanical brake 1xx - Inverted mode of operation (LOW active) Mode of operation Analog operation MFO1 553 - output MFO1 supplies a pulse width-modulated signal (0 V - 10 V) that is proportional to an actual value. Setting: 7Actual frequency, 0 Hz – max. Frequency 418 20 Active current, 0 A – IFIN 30 Active power P, 0 kW – Rated mech. Output 376 50 Effective current, 0 A – IFIN 52 Machine voltage, 0 V – 1000 V Mode of operation Motor PTC 570 - Monitoring of the motor temperature protects the drive unit system. A suitable sensor is to be connected to digital input S6IND. Setting: 0Switched off 1Warning message 2Fault switching-off 3Fault switching-off, after 1 min 4Fault switching-off, after 5 min 5Fault switching-off, after 10 min Mode of operation Synchronization 645 - Synchronization of a rotating drive unit is helpful in a number of applications, such as with pumps and ventilation, or after acknowledging a fault switching-off. If the synchronization of the motor speed is not possible the function is terminated with a fault message. Setting: 0Switched off 10 Synchronization switched on Mode of operation Auto start 651 - Automatic starting up of the drive unit is only permitted as per regulation VDE 0113 (paragraphs 5.4, 5.5), VDE 0100 part 227 and the relevant national regulations. In general, it is necessary to ensure that there is not danger as a result of automatic starting up. Setting: 0Switched off, control command S1IND, S2IND or S3IND 1Auto start, control signal at S1IND, S2IND or S3IND 33 Mode of operation voltage controller 670 - By regenerative operation or braking the rising DC-link voltage is limited with the voltage controller or with an externally connected brake chopper resistor to prevent the tripping on overvoltage. Setting: 0Switched off, external brake resistor connected 1Overvoltage control, deceleration ramps controlled The following parameters are displayed in addition to the basic parameters in configuration 410. Integral time 1 722 – The control behaviour of configuration 410 can be adapted by the integral time of the speed controller dependent on the mechanical inertia torque. A lower value results more dynamically behaviour. Proportionally to the lower integral time the oscillation of the system rises. Setting: 0 – 60000 ms Limit current 728 – The speed and the torque can be controlled separately in configuration 410. The torque is limited to the rated torque if the limit current is set to the same as the rated current 371 of the motor. Setting: 0.0 A – oIFIN 8.2 Menu Branch VAL The actual values in the VAL menu branch simplify troubleshooting. Effective current 211 - Effective output current (motor current) of the frequency inverter calculated from measurement of the three motor phases. Display: 0.0 A – oIFIN Machine voltage 212 - The modulated output voltage of the frequency inverter, depending on the operational point of the motor. Display: 0.0 V – 1000.0 V Active power 213 – Calculated output of the 3-phase motor at the operational point as the product of the machine voltage, current and cos phi. Display: 0.0 kW – PFIN Actual speed 240 - The calculated speed of the 3-phase machine determined with the aid of the machine model and the current load point. Display: 0.00 rpm – 60,000 rpm Actual frequency 241 – The current actual output frequency of the frequency inverter, or the actual frequency of the drive unit calculated from the machine model. Display: 0.00 Hz – 999.99 Hz Current fault 259 - The cause for the tripping that occurred is displayed with the corresponding fault code. The current fault is displayed for the fault diagnosis. Display: F0000 ... F9999 Warnings 269 – If a critical state is detected, this is displayed via the WARN field. The warning code is read via parameter 269. Display: A0000 - A9999 Last fault 310 – The fault message is given immediately after an fault occurs. The frequency inverter attempts to clear some of the faults by itself, or to reset them via digital input S1IND. The last fault code is saved for fault diagnosis. Display: F0000 - F9999 34 9 Operation and Fault Diagnosis The operation of the frequency inverter and the connected load is constantly monitored. The troubleshooting details given in the brief instructions can be supplemented by the information given in the operating instructions. 9.1 Status Messages The red green LED’s provide information on the operational point of the frequency inverter. If the control unit is plugged in, status messages are also displayed by display elements RUN, WARN and FAULT. Status display Green LED Red LED Display Description off off No power supply on an initialization and self-test flashes off RUN flashes Ready for operation, no output signal on off RUN Operational message on flashes WARN Operational message, actual Warning 269 flashes flashes WARN Ready for operation, actual Warning 269 off flashes FAULT flashes Frequency inverter Fault Message 310 off on FAULT Fault Message 310, clear fault 9.2 Warning Messages The code that is read by the warnings 269 parameter can be made up of several different messages. For example, code A0088 is made up of the separate warning messages A0008 + A0080. Code A0000 A0001 A0002 A0004 A0008 A0010 A0020 A0080 A0400 A4000 Warning messages Meaning No warning messages. Frequency inverter overloaded (60 s), warning code A0002 or A0004 Overloading of the frequency inverter (1 s), check the load behaviour. Short-term overload, check the motor and application parameters Max. heat sink temperature reached, check the cooling and fan. Max. Inside temperature reached, check the cooling and fan. Speed reference values are being limited by a controller. Max. motor temperature reached, check the motor and sensor. Limit frequency reached, The output frequency is limited. DC link voltage has reached the minimum limit for that particular type 35 9.3 Fault Messages The fault code that is stored in parameter last Fault 310 after an fault occurs makes troubleshooting much easier. The fault code is made up of fault group FXX and the following code number XX. The fault message is cleared via the keys of the control unit and digital input S1IND. Code F00 00 F01 02 03 F02 00 01 F03 00 01 F04 00 03 F05 00 03 05 06 07 F07 00 01 02 03 04 05 06 36 F08 01 04 F11 00 01 F13 00 10 F14 01 07 Fault messages Meaning No fault has occurred Overload Frequency inverter overloaded (60 s), check the load behaviour Short-term overload (1 s), check the motor and application parameters Heat sink Heat sink temperature too high, check the cooling and fan Temperature sensor defective or ambient temperature too low Inside temperature Inside temperature too high, check the cooling and fan Inside temperature too low, check the electrical cabinet heating Motor connection Motor temperature too high or sensor defective, check the S6IND connection Motor phase failure, check the motor and wiring Output current Overloaded, check the load relationships and ramps Short circuit or earth fault, check the motor and wiring Unsymmetrical motor current, check the motor and wiring Motor phase current too high, check the motor and wiring Message from the phase monitoring, check the motor and wiring DC link voltage DC link voltage too high, check the deceleration ramps and brake resistor that is connected DC link voltage too low, check the mains voltage Mains failure, check the mains voltage and switching Phase failure, check the mains fuse and voltage Mains voltage UDC too high when switching on, check the voltage Mains voltage BC too high when switching on, check the voltage Mains voltage MC too high when switching on, check the voltage Electronics voltage Electronics voltage 24 V too low, check the terminals Electronics voltage too high, check the wiring of the terminals Output frequency Output frequency too high, check the control signals and settings Max. frequency reached by the controller, check the deceleration ramps and brake resistor that is connected Motor connection Earth fault at output, check the motor and wiring Min. current control, check the motor and wiring Control connection Reference value signal at multifunction input 1 missing, check the signal Overcurrent at multifunction input 1, check the signal * UNDER PREPARATION PER INFORMAZIONI 24 ORE - 365 GIORNI 800-442288 SEDE CENTRALE - HEADQUARTERS BONFIGLIOLI RIDUTTORI S.p.A. Via Giovanni XXIII, 7/A 40012 Lippo di Calderara di Reno - Bologna (ITALY) Tel. (+39) 051 6473111 Fax (+39) 051 6473126 www.bonfiglioli.com [email protected] SALES DEPARTMENT SALES DEPARTMENT INDUSTRIAL TRANSMISSION & AUTOMATION DRIVES MOBILE EQUIPMENT DRIVES BONFIGLIOLI RIDUTTORI S.p.A. Via Giovanni XXIII, 7/A 40012 Lippo di Calderara di Reno - Bologna (ITALY) Tel. (+39) 051 6473111 - Fax (+39) 051 6473126 [email protected] BONFIGLIOLI RIDUTTORI S.p.A. Via Enrico Mattei,12 - Z.l. Villa Selva - 47100 Forlì (ITALY) Tel. (+39) 0543 789111 Fax (+39) 0543 789242 - 0543 789245 [email protected] TORINO - Corso Susa, 242 - Palazzo Prisma 88 - 10098 Rivoli Tel. 011 9585116 - Fax 011 9587503 MILANO - Via Idiomi ang. Donizetti - 20094 Assago - Milano Tel. 0245716930 - Fax 0245712745 UFFICI VENDITE ITALIA - ITALY SALES OFFICES PARMA - Largo Luca Ganzi, 9/E Tel. 0521 987275 - Fax 0521 987368 DEPOSITI IN ITALIA - STOCK HOUSES IN ITALY ASSAGO (MILANO) Via Idiomi ang. Donizetti Tel. 02 48844710 / 02 4883395 - Fax 02 48844750 / 02 4883874 PADOVA - IX Strada,1 - Zona Industriale Tel. 049 8070911 - Fax 049 8074033 / 049 8073883 BONFIGLIOLI WORLDWIDE SUBSIDIARIES & BEST PARTNERS AUSTRALIA BONFIGLIOLI TRANSMISSION (Aust) Pty Ltd. 48-50 Adderly St. (East) - Auburn (Sydney) N.S.W. 2144 Tel. (+61) 2 9748 8955 - Fax (+61) 2 9748 8740 P.o. Box 6705 Silverwater NSW 2128 www.bonfiglioli.com.au - [email protected] BELGIUM N.V. ESCO TRANSMISSION S.A. Culliganlaan 3 - 1831 Machelem Diegem Tel. 0032 2 7204880 - Fax 0032 2 7212827 Tlx 21930 Escopo B www.escotrans.be - [email protected] CANADA BONFIGLIOLI CANADA INC. 2-7941 Jane Street - Concord, ONTARIO L4K 4L6 Tel. (+1) 905 7384466 - Fax (+1) 905 7389833 www.bnagear.com - [email protected] ENGLAND BONFIGLIOLI (UK) LIMITED 5 Grosvenor Grange - Woolston - Warrington Cheshire WA1 4SF Tel. (+44) 1925 852667 - Fax (+44) 1925 852668 www.bonfiglioliuk.co.uk - [email protected] FRANCE BONFIGLIOLI TRANSMISSIONS S.A. 14 Rue Eugène Pottier BP 19 - Zone Industrielle de Moimont II 95670 Marly la Ville - Tlx 688501 BONFI F Tel. (+33) 1 34474510 - Fax (+33) 1 34688800 www.bonfiglioli.fr - [email protected] GERMANY BONFIGLIOLI GETRIEBE GmbH Hamburger Straße 18 - 41540 Dormagen Tel. (+49) 2133 50260 - Fax (+49) 2133 502610 www.bonfiglioli.de - [email protected] VECTRON Elektronik GmbH Europark Fichtenhain A 6 47807 Krefeld Tel. (+49) 2151 83960 - Fax (+49) 2151 839699 www.vectron.net - [email protected] GREECE BONFIGLIOLI HELLAS S.A. O.T. 48A T.O. 230 - C.P. 570 22, Industrial Area - Thessaloniki Tel. (+30) 310 796456-7-8 - Fax (+30) 310 795903 www.bonfiglioli.gr - [email protected] HOLLAND ELECTRO STOKVIS AANDRIJSFTECHNIEK Loosterweg, 7 - 2215 TL Voorhout Tel. (+31) 252 219 123 - Fax (+31) 252 231 660 www.elsto.nl - [email protected] HUNGARY AGISYS AGITATORS & TRANSMISSIONS Ltd Fehérvari u. 98 - 1116 Budapest Tel. 0036 1 2061 477 - Fax 0036 1 2061 486 www.agisys.uk - [email protected] INDIA BONFIGLIOLI TRANSMISSIONS PVT Ltd. PLOT AC7-AC11 Sidco Industrial Estate Thirumudivakkam - Chennai 600 044 Tel. +91(0)44 4781035 / 4781036 / 4781037 Fax +91(0)44 4780091 / 4781904 - [email protected] POLAND POLPACK Sp. z o.o. - Ul. Chrobrego 135/137 - 87100 Torun Tel. 0048.56.6559235 - 6559236 - Fax 0048.56.6559238 www.polpack.com.pl - [email protected] SPAIN TECNOTRANS SABRE S.A. Pol. Ind. Zona Franca sector C, calle F, n°6 08040 Barcelona Tel. (+34) 93 4478400 - Fax (+34) 93 3360402 www.tecnotrans.com - [email protected] COD. VEC 127 R0 SOUTH AFRICA BONFIGLIOLI POWER TRANSMISSION Pty Ltd. 55 Galaxy Avenue, Linbro Business Park - Sandton Tel. (+27) 11 608 2030 OR Fax (+27) 11 608 2631 www.bonfiglioli.co.za [email protected] SWEDEN BONFIGLIOLI SKANDINAVIEN AB Kontorsgatan - 234 34 Lomma Tel. (+46) 40 412545 - Fax (+46) 40 414508 www.bonfiglioli.se - [email protected] THAILAND K.P.T MACHINERY (1993) CO.LTD. 259/83 Soi Phiboonves, Sukhumvit 71 Rd. Phrakanong-nur, Wattana, Bangkok 10110 Tel. 0066.2.3913030/7111998 Fax: 0066.2.7112852/3811308/3814905 www.kpt-group.com - [email protected] USA BONFIGLIOLI USA INC 1000 Worldwide Boulevard Hebron, KY 41048 Tel.: (+1) 859 334 3333 - Fax: (+1) 859 334 8888 www.bonfiglioliusa.com [email protected] [email protected] VENEZUELA MAQUINARIA Y ACCESSORIOS IND.-C.A. Calle 3B - Edif. Comindu - Planta Baja - Local B La Urbina - Caracas 1070 Tel. 0058.212.2413570 / 2425268 / 2418263 Fax: 0058.212.2424552 - Tlx: 24780 Maica V www.maica-ve.com - [email protected]