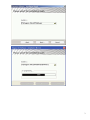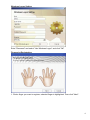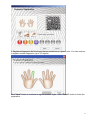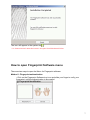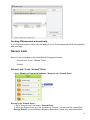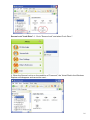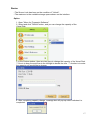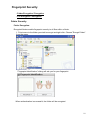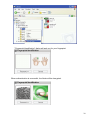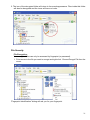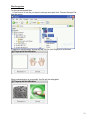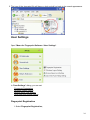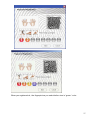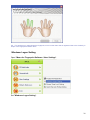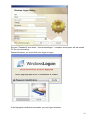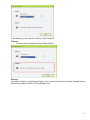
1
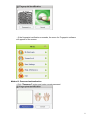
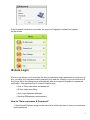
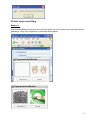
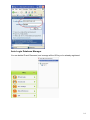
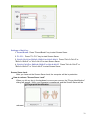
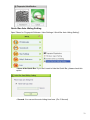
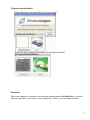
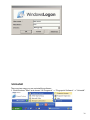
User Manual
MOBILE BIOMETRIC FINGERPRINT READER
System Requirements .................................................................................................................. 1
Installation Wizard ........................................................................................................................ 2
How to open Fingerprint Software menu ...................................................................................... 7
IE Auto Login .............................................................................................................................. 9
How to "Save username & Password" .......................................................................... 9
IE Auto Login auto-filling. ............................................................................................ 12
Auto Login Database Manager ................................................................................... 14
Sending ID&password automatically .......................................................................... 15
Secure Lock .............................................................................................................................. 15
Secure Lock "Lock / Unlock" Drive ............................................................................. 15
Resize ......................................................................................................................... 17
Fingerprint Security ................................................................................................................. 18
Folder Security ............................................................................................................ 18
File Security ................................................................................................................ 21
User Settings ............................................................................................................................ 24
Fingerprint Registration............................................................................................... 24
Windows Logon Setting .............................................................................................. 28
Screen Saver Lock Setting ......................................................................................... 30
Quick Bar Auto Hiding Setting .................................................................................... 33
About other users ....................................................................................................................... 34
Uninstall ...................................................................................................................................... 38
System Requirements
Recommended Pentium III or higher or other 100% compatible machines.
Recommended RAM of at least 256 MB or higher.
Support operating System: Windows 2000 SP4 / XP SP2.
Installation Wizard
Installation Wizard
License Agreement:
After you read, select "I accept the terms in the license agreement" and click "Next"
Custom Setup, you can change the installation path.
2
3
Windows Logon Setting:
Enter "Password" and select "Use Windows Logon" and click "OK"
Fingerprint Registration:
1. Click a finger you want to register, selected finger is highlighted. Then click "Next".
4
2. Place your finger on the sensor as shown in the middle of three pictures in the lower left
side. Continue removing and placing your finger until the "OK" button appear.
5
3. Registered fingerprint OK, the finger that you select turn in “green” color. You can continue
to register another fingerprint (up to 10 fingers).
Click "Next" button to continue to register another finger. Click "Finish" button to finish the
registration.
6
The icon will appear in the system tray
.
P.S: Please DO NOT delete files under C:\Program Files\FPSoftware\FPFiles.
How to open Fingerprint Software menu
There are two ways to open the Menu for Fingerprint software.
Method 1: Fingerprint authentication
• Click on the Fingerprint Software tray icon and slide your finger to verify your
fingerprint, until the authentication is successful.
7
• If the fingerprint verification succeeds, the menu for Fingerprint software
will appear on the screen.
Method 2: Password authentication
• Click "Password” button and enter correct password.
8
If the fingerprint verification succeeds, the menu for Fingerprint software will appear
on the screen.
IE Auto Login
IE Auto Login allows you to automate the entry of username and/or password on a web site. At
first, you save your username and/or password for a web site. When you go to the web site, IE
Auto Login fills in the dialog boxes automatically after a successful fingerprint or password
verification. This application is for Internet Explorer only.
• How to "Save username and password"
• IE Auto Login auto-filling
• Auto Login Database Manager
• Sending ID&password automatically
How to "Save username & Password"
1. Start Internet Explorer and go to the web site for which you want to store your username
and/or password.
9
2. Type your username and password. .
3. Click the
password".
icon on the taskbar of Internet Explorer and choose "Save username and
10
4. Verify your fingerprint or password.
5. After the verification succeeds, the username and/or Password are saved.
11
IE Auto Login auto-filling
Method 1.
Start Internet Explorer and go to the web site where you have saved your username and/or
password. Verify your fingerprint or password when asked.
12
Method 2.
You can also go to the web site directly without starting Internet Explorer via the Menu for
Fingerprint Access. Click IE Auto Login and choose the web site you want to go to. Internet
Explorer will automatically start and show the web site you have chosen. And your ID and/or
Password will automatically be filled in.
13
Auto Login Database Manager
You can delete ID and Password, and manage all the URLs you've already registered.
14
Sending ID&password automatically
If you choose the option, when visit the web site, your ID and password will fill automatically
and auto login.
Secure Lock
Secure Lock is installed in the Virtual Disk of Fingerprint Access.
• Secure Lock "Lock / UInlock " Drive
• Resize
Secure Lock "Lock / Unlock" Drive
• Open "Menu for Fingerprint Software / Secure Lock / Unlock Drive".
Secure Lock "Unlock Drive":
1. Go to "Secure Lock" and select "Unlock Drive".
2. When the Secure Lock is on the condition of "Unlock", you can see the Virtual Disk
Encrypt Disk (P :) in the Windows Explorer. Meanwhile, it acts as a virtual hard drive.
15
Secure Lock "Lock Drive": 1. Go to "Secure Lock" and select "Lock Drive ".
2. When the Secure Lock is on the condition of "Unmount", the Virtual Disk in the Windows
Explorer will disappear and cannot be used...
16
Resize
• The Secure Lock has been on the condition of "Unlock".
• The maximum is the available storage space shown on the interface.
Option
1. Open "Menu for Fingerprint Software".
2. Select and click "Resize" button, and you can change the capacity of the
Virtual Disk.
3. In the Resize window, there are two ways to change the capacity of the Virtual Disk.
** One is to drag the scroll bar to the left/right to decide the size. ** Another is to enter
the capacity you would like to change.
4. After completing capacity change, message box will pop-up which indicates it is
completed.
17
Fingerprint Security
• Folder Encryption / Decryption
• File Encryption / Decryption
Folder Security
Folder Encryption:
Encrypted folders enable fingerprint security to all files within a folder.
1. Point cursor to the folder you wish to encrypt and right-click. Choose "Encrypt Folder"
from the menu.
“Fingerprint Identification” dialog will ask you for your fingerprint.
When authentication is successful, the folder will be encrypted.
18
2. When authentication is successful, the folder (and files inside) will be encrypted. Files
inside this folder will also have a lock on their icons.
3.Moving files into an encrypted folder will cause those files to be automatically encrypted.
When removing files from an encrypted folder to a non-encrypted area, "Fingerprint
Authentication" dialog will ask you for your fingerprint, and the file will be decrypted.
Folder Decryption:
To decrypt encrypted files.
1. Right-click on the encrypted folder, and choose “Decrypt Folder “from the menu.
19
"Fingerprint Identification" dialog will ask you for your fingerprint.
When authentication is successful, the folder will be decrypted.
20
2. The icon of the decrypted folder will return to its normal appearance. Files inside this folder
will also be decrypted and the icons will have no locks.
File Security
File Encryption:
Your encrypted files can only be accessed by fingerprint (or password).
1. Point cursor to the file you want to encrypt and right-click. Choose Encrypt File from the
menu.
"Fingerprint Identification" dialog will ask you for your fingerprint.
21
When authentication is successful, the folder will be decrypted.
2. When authentication is successful, the file will be encrypted. Encrypted files will have a lock
on their icons.
22
File Decryption
To decrypt encrypted files.
1. Point cursor to the file you want to decrypt and right-click. Choose Decrypt File
from the menu.
"Fingerprint Identification" dialog will ask you for your fingerprint verification.
When authentication is successful, the file will be decrypted.
23
2. The icon of the decrypted file will have no lock and will go back to its normal appearance.
User Settings
Open "Menu for Fingerprint Software / User Settings".
In "User Settings" dialog, you can set:
Fingerprint Registration
Windows Logon Setting
Screen Saver Lock Setting
Quick Bar Auto Hiding Setting
Fingerprint Registration
1. Select Fingerprint Registration;
24
2.In the "Fingerprint Identification" windows, there are two ways to verify your fingerprint.
Method1.
* Finger Identification: Verify your previously registered fingerprint. The
green fingers show which fingers has been registered.
Method 2.
* Password: Click the "Password" button and enter your password if
you want to use it instead of your fingerprint.
25
3.Finger Registration Wizard will start. And you may register or delete your registered fingers.
• Green: Already registered finger(s).
• Blue: Non registered finger(s).
Place your finger on the sensor as shown in the middle of three pictures in the lower left side.
Continue removing and placing your finger until the “OK” button appear.
26
When you registered ok , the fingerprint as you select before turn in “green “ color
27
PS. This product may authenticate the fingerprint, which is other than what is registered due to the similarity in
shape of the fingerprint between them.
Windows Logon Setting
Open "Menu for Fingerprint Software / User Settings".
Set "Windows Logon Setting".
28
Set your “Password” and select “ Use windowslogon “ complete, and system will ask restart
PC for set new setting.
Restart Windows, you must slide your finger to logon.
If the fingerprint verification succeeds, you can logon windows.
29
Screen Saver Lock Setting
Introduction
When the "Screen Saver Lock" starts, only an authorized person can unlock the Screen Saver
by verifying his/her fingerprint or password. The Screen Saver Lock makes your PC more
secure.
The main function of "Screen Saver Lock" is to disable the keyboard and the mouse.
Open "Menu for Fingerprint Software / User Settings / Screen Saver Lock Setting
It will open the "Screen Saver Lock" dialog
30
In the dialog, you can set the "Hot Key" and "Timeout".
Timeout
Timeout set by Windows Screen Saver setting.
Hot Key
Just press "Hotkey" to start Screen Saver. You can set your favorite "Hotkey" through Screen
Saver Lock setting. Default is "Pause/Break" key.
31
Settings of Hot Key:
1. Pause/Break: Press "Pause/Break" key to start Screen Saver.
2. F1~F11: Press "F1~F11" key to start Screen Saver.
3. Ctrl+0~Ctrl+9 or Shift+0~Shift+9 or Alt+0~Alt+9: Press "Ctrl+0~Ctrl+9" or
"Shift+0~Shift+9" or "Alt+0~Alt+9" to start Screen Saver.
4. Ctrl+A~Ctrl+Z or Shift+A~Shift+Z or Alt+A~Alt+Z: Press "Ctrl+A~Ctrl+Z" or
"Shift+A~Shift+Z" or "Alt+A~Alt+Z" to start Screen Saver.
Screen Saver Lock
After you have set the Screen Saver Lock, the computer will be in protection.
How to release "Screen Saver Lock"
When you hit any key in the keyboard or move your mouse, the "Finger Identification”
dialog will appear. Verify your fingerprint or password, and the Screen Saver will be
released.
32
Quick Bar Auto Hiding Setting
Open "Menu for Fingerprint Software / User Settings / Quick Bar Auto Hiding Setting".
• Never hide Quick Bar: If you don't want to hide the Quick Bar, please check this
option.
• Second: You can set the auto hiding time here. (Ex: 5 Second)
33
About other users
On the same computer, has two or above users want to use <Fingerprint software>, must
installed by Administrator, then can join other users one by one.
• Create new user account and fingerprint
• Other users logon
Create new user account and fingerprint
1. Open Start / Settings / Control Panel / User Accounts / create a new account. (Ex: new
user) And restart.
2. Entry <Fingerprint Identification> windows, press <Cancel>, and press <Ctrl+Alt+Del>
to continue
34
3. After you input the < user name > and < password > correct, you can logon windows.
4. Click the fingerprint trayicon
. Starts to install <Fingerprint software>.
5. Set "Windows Logon Setting".
35
6. Finger Registration Wizard will start. And you can register or delete your registered
fingers. (See Fingerprint Registration).
Other users logon
• Fingerprint Identification
• Password
36
Fingerprint Identification:
Restart Windows, you must slide your finger to logon .
If the fingerprint verification succeeds, you can logon windows.
Password:
When user fingerprint verification not succeeds, please press <Ctrl+Alt+Del> to continue,
after you input the < user name > and < password > correct, you can logon windows.
37
Uninstall
There are two ways you can uninstall the software.
1. Click Windows "Start" and choose "All Programs" --> "Fingerprint Software" --> "Uninstall”.
38
2. Go to [Add or Remove Programs] in the Windows [Control Panel] and choose "Remove
Fingerprint Application" and click "Change/Remove".
"Uninstallation Wizard" will start.
(1) It will remove all of the files in the Fingerprint Software folder, Click ‘OK’.
(2) Verify your fingerprint, slide your correct fingerprint. If the fingerprint verification succeeds,
will start uninstall program.
39
(3) "Delete Fingerprint Software" & following messages will appear. Please choose the
answer carefully. Click "Yes" to complete the uninstallation.
(4) Uninstall completed, system will be restart.
P.S:If you delete Security Drive, all files in Security Drive will be lost.
40