1
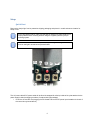
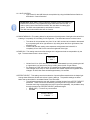
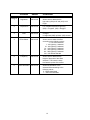
JAB Series Light
User Manual (IP60 Protection)
1
Table of Contents Before You Begin .....................................................................................................................................................3 What is Included ..................................................................................................................................................3 Unpacking Instructions ........................................................................................................................................3 Symbol Definitions ...............................................................................................................................................3 Safety Notes.........................................................................................................................................................3 Introduction .............................................................................................................................................................4 Product Description .............................................................................................................................................4 Features ...............................................................................................................................................................4 Setup........................................................................................................................................................................5 Mounting .............................................................................................................................................................5 AC Power .............................................................................................................................................................6 Control Selection .................................................................................................................................................7 Operation.................................................................................................................................................................7 UIM Operation .....................................................................................................................................................7 DMX Operation ..................................................................................................................................................12 Photometric Data...................................................................................................................................................14 Limited Warranty...................................................................................................................................................16 General Maintenance and Care, Contact Us..........................................................................................................17 2
Before You Begin What is Included •
•
•
•
•
•
User’s Manual
One (1) IP60 Rated JAB Series light fixture
AC Power Input cable with plug
o USA voltage (120Vac), three-prong plug standard
o One (1) 120/240v Adapter
o
o
o
Diffuser lens, three (3), 15 , 30 and 55
One (1) Yoke Pin with attaching hardware
User Interface Module , UIM (Included, if purchased – Optional)
Unpacking Instructions Immediately upon receipt of this light, carefully inspect the shipping packaging for any obvious signs of
damage from mishandling or exposure to the elements. If any is noted, please provide this information
to the shipper immediately so that the proper claims can be processed. Place packaging in upright
position (with labeling and markings in readable orientation) and open the top end of the carton. Verify
that all material shown above in the “What is included” section is present and in good condition.
Remove the light and associated material from the carton and place the light on a stable surface or
mounting configuration.
Symbol Definitions Note: This symbol indicates important information that should be
carefully considered and followed.
Note: This symbol indicates important safety information and
warnings. Special attention should be paid to reading,
understanding and heeding these warnings. Failure to
observe these warnings could result in damage to the fixture,
third-party equipment or harm to the user. Keep Light Dry
Note: This symbol indicates important information concerning the
operation or functions of this light.
3
Safety Notes The JAB Series light fixtures are for professional use only. Please Read Entire User Manual Before
Using Equipment.
• This light is intended for indoor use only. This unit is ETL, CSA & CE approved for IP60
protection.
• Only qualified and certified personnel should perform installation, not for household use.
• JAB Series lights should always be installed/mounted in a stable and secure location or mounting.
• Make sure that light is only used in dry location. Do not use light in or around falling water, wet
locations or moisture.
• Always allow adequate ventilation of the light. Never cover or in any way obstruct the louvered
openings in the light.
• If light is suspended either from above or below using yoke, make sure that a safety cable (not
supplied) is attached to the light and properly secured. The strength of the cable/chain should be
sized suitably to hold 6 times the weight the secured light.
• When mounting the light, make sure that only hardware rated for the weight and size of the fixture is
used and is in proper working condition.
• Never look directly into the light source while the fixture is turned on. Light source is very bright and
could cause damage to eyes.
• Do not probe or touch any interior features of the fixture. This includes the LED sources inside the
barrel of the light. Doing so may cause damage to the fixture and/or may present a shock or burn
hazard.
• Always make sure that the light fixture is connected to the proper power source with proper voltage
and current ratings. Also, make sure that adequate over current protection is provided for the circuit
as well.
Note: This light contains no user serviceable parts. Do not open
the light housing or attempt any repair or modification of the
light. Failure to observe this warning could result in damage
to the light, injury and/or voiding the limited warranty.
Warning! Inserting objects or fingers inside any openings or
connectors could result in a shock hazard/injury and
damage to the light.
Introduction Product Description The JAB series light is a professional grade, LED based fixture which provides exceptional light output
and control. The light is capable of either tethered remote or DMX control and offers a full array of
brightness settings as well as Strobe and Lightning functions.
Features •
•
•
Manual Control
UIM control
DMX control (Compatible with Slow and Fast speeds)
o Up to 500 selectable DMX addresses
o Daisy-chain operation of up to 32 lights in one string
o Controls Brightness, Fade, Strobe and Lightning modes
4
Setup Quick Start Remove the Aadyn light from its protective shipping packaging and place it in a safe and secure location for
setup or use.
Prior to proceeding further, make sure that light is resting on a stable surface or is
properly attached to a mounting location using the supplied yoke and yoke pin
mounting system.
Make note of the location of the inputs and outputs along with the light controls
found on the light’s control box as pictured below.
The AC power cable & DC power cable will be found tie wrapped & coiled up inside of the yoke attached to the
power supply inside the shipping container.(if ordered with light package)
• Uncoil the AC and DC cord plugging the DC female end into the DC power input located on the back of
the control box (pictured above)
5
Warning!
Lights operate on grounded 110Vac, 50/60Hz or 240Vac, 50/60Hz
AC Input. AC Supply Source must be sized properly and have
approved protection circuitry for safe operation. Take care to
observe all proper precautions when connecting power.
Warning!
Lights are intended for indoor operation and use only. Use in safe
and dry location only. KEEP FIXTURE DRY
•
Plug the male end of the AC power cord into an appropriate AC power source.
•
Turn on light by pressing the black power switch located in the upper left hand portion of the control box,
shown above.
•
Using the Selector switch located on the right side of the control box select the desired mode in which
you wish to operate the light. UIM, Local or DMX, see section 1.1 if the unit purchased is a Variable light,
the color temperature dial will be located on the same side of the box as the Mode Selector switch and
the color can be adjusted as desired using the dial for warm light, cool light or a mix of light.
•
Upon power up, the factory default setting will turn the light immediately to its full brightness unless a
specific “Power On” Setting which has been previously programmed into the light. This “Power On”
Setting will be covered later in these instructions.
•
If a UIM, optional remote controller is ordered with the light package, it will be located in a separate
box within the package the Jab light was shipped in. The length of the cable is 12’. Remove the UIM
from the box, uncoil the UIM cable and attach the metal connector on the cable to the UIM connector
located on the control box as pictured.
•
The display on the UIM will display the following Splash Screen message upon power up.
Aadyn Technology Remote Interface •
Using the Left/Right Arrow button, a desired brightness level can be selected. Other functions are
also available and can be viewed using the UIM by pressing the Up/Down arrow to the desired menu
function as detailed below in section 1.0, then pressing the (√) once a function has been selected.
All of these functions are covered later in these instructions.
•
The (X) button on the UIM is a non-latching douse switch which, when pressed, will momentarily
extinguish the light. Releasing the switch will allow the light to return to operation at its previous
setting.
AC Power JAB series lights operate on standard single phase AC power.
• Input voltage range: 100 – 277Vac
• Input frequency range: 50/60 Hz
6
Warning! Standard power cord supplied with JAB light is intended to connect
with standard, single-phase 110-120 Vac, 60 Hz USA circuit. An adaptor for use
with 240Vac, 50Hz European circuits is also included. Other power cords for
connection to other countries’ single phase circuits are available as options. No
other special adjustments or changes are required for operation at international
voltages.
Warning! Never connect JAB series lights to anything other than a singlephase circuit. Connection to three-phase power can/will cause serious damage
and/or bodily injury.
DC Power As an alternative to standard AC operation, JAB Hurricane lights can also operate on 30Vdc(max) power
provided by an external battery (not supplied).
•
•
Operational input DC voltage range: 22Vdc –30Vdc (max)
Light will not function at DC ranges above or below range shown
Warning! DC power connection from external battery (not supplied) must mate
properly with four pin power connector on back of light module. Contact AAdyn
Technology for further details or information.
Control Selection Control of the JAB Series light is by one of three means of interface: Local, UIM or DMX
Operation Local Operation In the Local Mode, the operation of the light is restricted to the controls on the light itself. The light can
be turned on or off via the input power switch on the back of the light. In addition to this, the light can be
momentarily extinguished by pressing the Douse button on the back of the unit. (Note: the Douse
button functions in all modes of operation.) The manual brightness control knob on the back of the
housing can be used to adjust the brightness of the light from full-off to full-on.
7
Functional Requirements
The Following sections provide all the functional details for the AAdyn User Interface Module (UIM)
1.0 UIM Functions •
•
The UIM will display a menu of parameters as listed below by scrolling up or down :
• BRIGHTNESS ADJ (Adjustment)
• FADE ADJ (Adjustment)
• EFFECT SELECT
• EFFECT FREQUENCY
• RECALL SETTING
• SAVE CUSTOM
• POWER ON SETTING
• RECALIBRATION PT (Point)
• SOFTWARE VERSION
• DMX BASE ADDRESS
• LIGHT CONTROL
Under each parameter, the UIM will display settings pertaining to the parameter for the user to
select. The settings will be:
1.1 DMX BASE ADDRESS
• This parameter shall be meaningful only if the next parameter is set to “DMX”.
• The address of the Aadyn lights can be set to any number between (001) and (512).
Assigning unique numbers to multiple lights will allow each of the lights to be controlled
(via DMX) independently of any other light. Assigning the same number to multiple
lights will result in all of the lights with the same address operating in unison.
Please Note: Although there are up to (500) unique addresses possible for
assignment under DMX control, the maximum number of lights that can be
connected together via the DMX In and Out connectors on the back of the
Aadyn lights is (32).
8
1.2 LIGHT CONTROL
• Light control for the JAB Series is accomplished by using the Mode Selector Switch as
described in “Control Selection”
.
Please Note: When DMX Control is selected, complete control of all Aadyn light
features and functions is accomplished through DMX rather than the UIM. In
order to return control from DMX to the UIM, see note above for setting light
control. For DMX control parameters, see section 3.0 below.
The UIM controls described below will not function.
1.3 BRIGHTNESS ADJ: This setting allows for adjustment of the brightness of the light to be varied from
a setting of completely off to a setting for full brightness. The associated screen is shown below:
•
•
The values for this parameter vary from 0% to 100% and can be increased or decreased
by one pressing the left or right buttons or by holding down the left or right buttons, fast
scrolled by five.
Please note that each setting value represents a brightness level where 0% is
completely off and 100% is the maximum brightness of the light.
1.4 FADE ADJ: This setting controls how fast changes in the brightness level are responded to by the
light. The associated screen is shown below:
FADE ADJ
← 000 →
•
•
Values from 0% to 100% that can be increased or decreased by one by pressing the left
or right buttons or a fast scroll by five by holding down the left or right buttons.
For example, a FADE ADJ value of 0% represents the fastest response to brightness
level changes and a value of 100% represents the slowest response to brightness level
changes. At 100% Max Fade will take approximately 3-4 seconds.
1.5 EFFECT SELECT: This setting controls the selection of special effects stored within the Aadyn light.
Among these effects are Strobe and various Lightning settings. The possible settings are listed
below and are described in more detail further in the document.
• The software presents the user with thirteen individual choices for the EFFECT SELECT
parameter. These choices are accessed by pressing the left or right arrows. Please
note that continuing to press either the left or right arrow repeatedly, it is possible to loop
through the entire list of EFFECT SELECT parameters again.
• NONE (OFF) – Turns off any current effect
• STROBE
EFFECT SELECT
← STROBE →
9
•
LIGHTNING1 SGL,
EFFECT SELECT
← LIGHTNING1 SGL →
•
LIGHTNING1 RPT,
EFFECT SELECT
← LIGHTNING1 RPT →
•
•
•
•
•
•
•
•
•
•
LIGHTNING2 SGL,
LIGHTNING2 RPT,
LIGHTNING3 SGL,
LIGHTNING3 RPT,
LIGHTNING4 SGL,
LIGHTNING4 RPT,
LIGHTNING5 SGL,
LIGHTNING5 RPT,
LIGHTNING CYCL
The choice shall change by one each time a right or left arrow button is pressed.
STROBE will make the LEDs emit pulses of light at a user designated frequency
and brightness. The brightness of the STROBE can be adjusted using the
BRIGHTNESS ADJUST as described earlier in this document. The frequency of the
STROBE can be adjusted by changing the value on the EFFECT FREQUENCY
screen. The values on this screen range from 0% to 100%.The pulse of the strobe
can be increased by adjusting the value of the Effect Frequency to a lower value
(toward 0%) or slowed down by selecting a higher value (toward 100%).
LIGHTNING# SGL (where # is 1 to 5 as shown above) makes the LEDs emit pulses of
varied length and brightness based on internal parameters to simulate 5 unique and
different lightning pulse patterns. SGL indicates that this sequence shall be shown only
once each time the (√) button is pressed. The brightness and length components of
lightning can be adjusted using the BRIGHTNESS ADJ and EFFECT FREQUENCY as
described in this document.
LIGHTNING# RPT (where # is 1 to 5 as shown above) operates in the same manner as
LIGHTNING# SGL, except that the Lightning scenario selected will continue to repeat
itself with a 2 second pause between cycles. To exit this function, once activated, it is
necessary to select another lightning setting or to select “NONE”. As described above,
the brightness and length components of lightning can be adjusted using the
BRIGHTNESS ADJ and EFFECT FREQUENCY.
LIGHTNING CYCLE is a means of displaying all five unique lightning patterns in a
sequential manner with a 2 second pause between each one. Once activated, it will
continue to scroll through patterns 1 through 5 and repeat until halted as described in
the previous paragraph.
•
•
•
•
1.6 EFFECT FREQUENCY
• The power on default of the EFFECT FREQUENCY parameter shall be 75%. This is a
mid-range value that works well with the effects stored on the Aadyn lights. This setting
is used primarily to adjust the timing of the STROBE and LIGHNING effects. This value
can be changed by the user to any setting from (0%) to (100%) and the resultant change
to the effect is as described above..
10
1.7 SAVE CUSTOM
• The UIM shows twelve (12) custom user choices which can be saved individually in the
Aadyn lights. These custom settings can be specific brightness levels of the light or
they can be particular effect settings for STROBE or LIGHTNING.
• In order to set a CUSTOM SETTING, the user first adjusts the light to the particular
operation desired. Then, using the UP/DOWN buttons on the UIM, the information
display is scrolled to the SAVE CUSTOM screen as shown.
SAVE CUSTOM
← CUSTOM 1 →
Using the Left/Right arrows, the user can select the particular CUSTOM setting they wish to save. Once this is
selected the CUSTOM setting can be saved by pressing the “√” button. Once pressed, the following screen will
be displayed.
SAVE CUSTOM
CUSTOM 1 SAVED
•
Please note that all settings are saved in the Aadyn lights and are not dependent of the
UIM being attached for operation.
1.8 RECALL SETTING
• The UIM can be used to recall any Custom setting saved in the Aadyn lights by the
particular number (1 through 12) that was previously stored by the user. Additionally,
there are three (3) PRESETS that can also be quickly recalled as well.
• PRESET 1: 100% of Full Brightness
• PRESET 2: 45% of Full Brightness
• PRESET 3: 25% of Full Brightness
1.9 POWER ON SETTING
• By default, each Aadyn light goes to 100% full brightness when the power switch is
turned on. If there is some other brightness level or effect that the user wishes the light
to power on with, this setting allows for making this change.
• In the POWER ON screen, the settings can be selected from any of the PRESETS or
CUSTOM settings described above. The settings can also be set to power on with the
LAST USED settings. This setting stores all of the parameters as currently set on the
Aadyn light into the light’s memory for recall when the light is turned on again.
•
1.10RECALIBRATION PT
The programming in the Aadyn lights monitors the usage of the lights and the LEDs
taking into account operating temperatures, light levels, type of effect selected and
duration to create an indication of when the light should be recalibrated. This is done to
insure the best and highest level of performance along with maintaining consistency of
the light output over the life of the light. This display on the UIM gives the user an
indication of the operating time remaining until recalibration is recommended.
1.11SOFTWARE VERSION
• The version of software installed in the Aadyn lights is displayed on the UIM for user
reference. The nomenclature used is “Major Version. Minor Version. Build”, for example
Version 1.0.3
11
2.0 Douse Switch •
•
The UIM has a momentary, non-latching douse switch shown as (“X”), which immediately
extinguishes the light and will remain extinguished until the douse switch has been released.
There is also a red switch located on the back of the Aadyn light. This douse switch responds in the
same manner as the douse switch on the UIM.
General Information
Please Note: The UIM is an interface that allows the user to control the
functions of the Aadyn lights. All actual software control and settings are
maintained within the Aadyn ECO light itself. Changes and control of these
settings are managed either through the UIM or through a DMX interface.
•
When changing values within a particular screen on the UIM, the rate of change in the scrolling values
will increase the longer the button is held down. This is for convenience to the user and to facilitate
quicker large changes.
•
If the UIM is removed after startup, the software within the Aadyn light will maintain the current
settings. If the UIM is reattached later, the splash screen (Aadyn Technology) will be displayed. When
the user presses an arrow button, it will return to the menu screen. .
DMX Operation 3.0 DMX Controller Interface •
•
The Aadyn light software accepts input from the DMX512 controller that transmit user requested
values of DMX update speeds up to 44Hz for BRIGHTNESS, FADE, EFFECT, EFFECT
FREQUENCY and EFFECT ACTIVATION.
The DMX output to the light is mapped as follows: Channels 1, 2,3, 4, 5 and 6 are used to control the
functions of the Aadyn lights.
12
Control
Value
Function
Channel
1
Brightness
000 to 255
Allows user to determine the
light value, (000) is off and (255) is full
bright
Channel
2
Color
Temperature
000 to 255
For Variable temperature light only
(000) = Tungsten, (255) = Daylight
Channel
3
Fade
000 to 255
Channel
4
Effect Select
000 to 255
Allows user to select the effect
according to the following values
0 - No effect selected
1 - 40 Lightning 1 selected
41 - 80 Lightning 2 selected
81 - 120 Lightning 3 selected
121 - 160 Lightning 4 selected
161 - 200 Lightning 5 selected
201 - 255 Strobe selected
Channel
5
Effect
Frequency
000 to 255
Allows user to determine the
length of the pulse of the effect
selected. The lower the value
the faster the pulse of the effect.
Channel
6
Effect Activation
000 to 255
Allows the activation of the
selected effect according to the
following values.
0 - Effect deactivated
1 – 255 Effect activated
Allows user to vary the response time to
changes
in brightness (000) quickest, (255) slowest
13
PHOTOMETRIC DATA FOR JAB SERIES FIXTURES
JAB Daylight
No Diffuser
@5 Feet @10 Feet @15 Feet
Lux
74,710
19,960
9,004
Foot Candles
6,940
1,854
836
15° Diffuser
@5 Feet @10 Feet @15 Feet
Lux
39,100
9,935
4,693
Foot Candles
3,632
923
436
30° Diffuser
@5 Feet @10 Feet @15 Feet
Lux
16,020
3,934
1,765
Foot Candles
1,488
366
164
55° Diffuser
@5 Feet @10 Feet @15 Feet
Lux
5,919
1,469
680
Foot Candles
550
136
63
JAB Tungsten
No Diffuser
@5 Feet @10 Feet @15 Feet
Lux
47,708
12,746
5,750
Foot Candles
4,432
1,184
534
15° Diffuser
@5 Feet @10 Feet @15 Feet
Lux
24,969
6,344
2,997
Foot Candles
2,320
589
278
30° Diffuser
@5 Feet @10 Feet @15 Feet
Lux
10,230
2,512
1,127
Foot Candles
950
233
105
55° Diffuser
@5 Feet @10 Feet @15 Feet
Lux
3,780
938
434
Foot Candles
351
87
40
14
JAB Variable
No Diffuser
@5 Feet @10 Feet @15 Feet
Lux
37,230
10,200
4,646
Foot Candles
3,459
948
432
15° Diffuser
@5 Feet @10 Feet @15 Feet
Lux
20,150
5,320
2,391
Foot Candles
1,872
494
222
30° Diffuser
@5 Feet @10 Feet @15 Feet
Lux
7,939
2,014
903
Foot Candles
674
187
84
55° Diffuser
@5 Feet @10 Feet @15 Feet
Lux
2,974
757
341
Foot Candles
276
70
32
Dime ns io ns
Length
Width
Height
Weight
339.0 mm
326.5 mm
554.9 mm
8.9 kg
13.3
12.9
21.8
19.5
in
in
in
lbs
15
Limited Warranty AADYN TECHNOLOGY, LLC
LIMITED WARRANTY
AAdyn Technology, LLC (“AAdynTech”) products are covered by a limited warranty against
manufacturing defects for two (2) years from the date of purchase by the original purchaser.
AAdynTech’s liability is limited, at AadynTech’s option, to repair or replacement of the product with
the same or an equivalent product and does not include installation costs, removal costs, or
transportation costs. AAdynTech reserves the right to determine whether the AAdynTech product is
defective. Damage due to normal wear and tear, incorrect installation, misuse, abuse, accident, or any
cause other than a manufacturing defect is not covered by the warranty. AAdynTech disclaims any
liability for damage to products, adapters, other property, or personal injury resulting in whole or in
part, from improper installation or use of its products. Components not manufactured by AAdynTech
are subject to the warranty or guarantee set forth by the manufacturer thereof, and then only to the
extent AAdynTech is able to enforce the warranty or guarantee.
In order to make a warranty claim, you must notify AAdynTech in writing within sixty (60)
days after your discovery of the defect, obtain from AAdynTech an RMA, then provide proof of
purchase, such as the invoice, and promptly return the product to AAdynTech or its authorized service
provider, freight prepaid.
THE FOREGOING WARRANTY PROVISIONS ARE EXCLUSIVE AND ARE GIVEN
AND ACCEPTED IN LIEU OF ANY AND ALL OTHER WARRANTIES, WHETHER EXPRESS
OR IMPLIED, INCLUDING WITHOUT LIMITATION ANY WARRANTY AGAINST
INFRINGEMENT AND ANY IMPLIED WARRANTIES OF MERCHANTABILITY OR FITNESS
FOR A PARTICULAR PURPOSE.
IN NO EVENT SHALL AADYNTECH BE LIABLE FOR INCIDENTAL,
COMPENSATORY, CONSEQUENTIAL, DIRECT, SPECIAL OR OTHER DAMAGES.
AADYNTECH’S AGGREGATE LIABILITY WITH RESPECT TO A DEFECTIVE PRODUCT
SHALL IN ANY EVENT BE LIMITED TO THE REPAIR OR REPLACEMENT OF THAT
DEFECTIVE PRODUCT OR, AT AADYNTECH’S OPTION, THE REIMBURSEMENT OF THE
PURCHASE PRICE THEREFOR.
This warranty is effective for purchases of AAdynTech’s product on or after the effective date
set forth below. AAdynTech reserves the right to modify this warranty from time to time. Any
modification of this warranty shall be effective for all orders placed with AAdynTech on or after the
effective date of such revised warranty.
Effective Date: November 11, 2014
All prices and specifications are subject to change without notice.
16
General Maintenance and Care This light is intended for indoor use only. When not in use, the light should be stored in a generally dry
and dust free area. General maintenance and care consists of making sure that the light always has
good ventilation and that nothing is obstructing free air flow through and around the light. Do not use
chemicals to clean light. Any cleaning of the light, especially the LED optics should be with a damp, not
wet, soft cloth that is non-abrasive.
Contact Us AAdyn Technology, LLC
80 Route 4 East, Suite 120
Paramus, NJ 07652
201-368-2800
www.aadyntech.com
17
18
19