1
SEDIT and S/REXX
User’s Guide and Reference Manual
SEDIT Release 5.06
S/REXX Release 3.06
Revision 01
Important Copyright Notice
Benaroya S.A.R.L. owns the copyright to the SEDIT, S/REXX and S/REXX
Debugger computer programs with all rights reserved. Under the copyright
laws, these programs may not be copied, in whole or part, without the written
consent of Benaroya S.A.R.L., except to install them onto a licensed computer
system.
Benaroya S.A.R.L. reserves the right to make changes in specifications and other information contained in this publication without prior notice, and the reader
should in all cases consult Benaroya S.A.R.L. to determine whether any such
changes have been made. This manual may not be reproduced and is intended
for the exclusive use of Benaroya’s customers.
The terms and conditions governing the sale of the programs licence software
consist solely of those set forth in the licence agreement included with this package. No statement contained in this publication shall be considered a warranty
by Benaroya S.A.R.L. for any purpose or give rise to any liability of Benaroya
S.A.R.L.
SEDIT, S/REXX and S/REXX Debugger are registered trademarks of Benaroya S.A.R.L.
UNIX is a trademark of X/OPEN Company LTD.
IBM is a registered trademark of International Business Machines.
OpenLook is a trademark of Novell.
KEDIT is a registered trademark of the Mansfield Software Group, Inc.
Table of Contents
Table of Contents
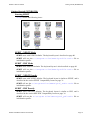
Installing SEDIT on UNIX Systems ............................................................1
Using a Grey Scale Monitor ....................................................................................2
Setting the Background Color .................................................................................2
Setting the Path ........................................................................................................2
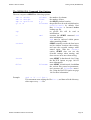
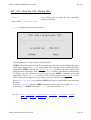
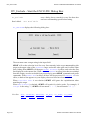
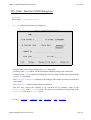
Setting the Password for CPU Bound Licenses ......................................................3
Setting the Keyboard Mapping ............................................................................... 6
Setting the MOTIF Resources ................................................................................ 7
Setting the Keyboard Translations for an ASCII Terminal .................................... 8
Using MKESC ....................................................................................................8
Installing SEDIT on WINDOWS Systems ................................................12
Installing S/REXX on UNIX Systems .......................................................15
Setting the Password in Fixed License Mode ...................................................... 16
Installing S/REXX on WINDOWS Systems .............................................19
Using the License Server ............................................................................21
Installing xserv on UNIX systems .........................................................................21
Installing xserv on WINDOWS systems .............................................................. 24
Using an Alternate Server .................................................................................... 26
Reserving Licenses on UNIX Systems ..................................................................26
Reserving Licenses on WINDOWS systems ........................................................26
Configuring a UNIX Heterogeneous Network ......................................................26
Setting the SEDIT Idle Time .................................................................................26
Setting the S/REXX Linger Time ..........................................................................27
Logging Activity on UNIX systems ......................................................................27
Usage Notes ...........................................................................................................27
Using XINFO ....................................................................................................... 29
Stopping the Server on UNIX Systems .................................................................29
Stopping the Server on WINDOWS Systems .......................................................29
SEDIT Compatibility issues .......................................................................31
XEDIT Compatibility Issues .................................................................................31
SEDIT Differences .......................................................................................... 33
ISPF/PDF Compatibility Issues ............................................................................ 36
Customizing SEDIT (UNIX) ................................................................................ 39
Using XED, SEDIT, PXED, PSEDIT or KEDIT .............................................39
Using XEDIT or PDF .......................................................................................39
Customizing SEDIT (WINDOWS) ...................................................................... 40
Using the XEDIT-MODE, PDF-MODE and KEDIT-MODE Icons ................40
Using the XEDIT-EXACTLY or PDF-EXACTLY Icons ................................40
SEDIT Reference Manual
Page 6
Table of Contents
SEDIT User’s Guide ...................................................................................41
The 3270 Screen Interface .....................................................................................41
Getting Started (UNIX) ........................................................................................ 44
Starting SEDIT Within DYALOG APL ...........................................................44
Starting SEDIT Under UNIX ...........................................................................44
The UNIX Command Line Options ................................................................ 46
Getting Started (WINDOWS) .............................................................................. 47
Starting SEDIT .................................................................................................47
SEDIT - XEDIT Mode .....................................................................................47
SEDIT - PDF Mode ..........................................................................................47
SEDIT - XEDIT Exactly ..................................................................................47
SEDIT - PDF Exactly .......................................................................................47
SEDIT - KEDIT Mode .................................................................................... 48
The WINDOWS Command Line Options ....................................................... 49
Using a UNIX Keyboard Layout ..................................................................... 50
Exploring the SEDIT SCREEN ........................................................................... 51
Moving Through a File ......................................................................................... 53
Editing Multiple Files ............................................................................................54
Using Function Keys on SUN Keyboards ............................................................ 56
Using Function Keys on IBM, SiliconGraphics and PCs Keyboards .................. 62
Using Function Keys on DEC/COMPAQ/HP TRUE64 station Keyboards ........ 68
Using Function Keys on HP Keyboards ............................................................... 74
Using Function Keys on WINDOWS .................................................................. 80
Using Function Keys in KEDIT Mode ................................................................. 87
Using Function Keys on ASCII Terminal Keyboards .......................................... 94
Using the Keyboard .............................................................................................. 97
Using the Default Buttons (UNIX) ....................................................................... 98
Using the Default MenuBar (WINDOWS) ...........................................................98
Using the DEFAULT Menu ............................................................................... 104
Prefix Commands ............................................................................................... 105
Single Prefix Commands ............................................................................... 106
Double Prefix Commands .............................................................................. 114
Overlaying Lines ........................................................................................... 118
Writing Prefix Macros ........................................................................................ 119
Using the Mouse on UNIX systems ................................................................... 123
Making a Linear Selection ..............................................................................123
The Sun Selection Related Keys .....................................................................123
The Other Workstations Selection Related Keys ...........................................123
Deleting the Selected Characters ....................................................................123
Copying the Selected Characters ................................................................... 124
Moving the Selected Characters .....................................................................124
Searching for Selected Characters ................................................................. 125
Making a Rectangular Selection .....................................................................125
Selecting Whole Lines ....................................................................................125
Moving Data to Other Windows .....................................................................125
Using the Mouse in MOTIF Mode ..................................................................... 126
Using the Mouse on WINDOWS Systems ......................................................... 127
Making a Linear Selection ..............................................................................127
The Selection Related Keys ............................................................................127
Page 7
SEDIT Reference Manual
Table of Contents
Deleting the Selected Characters ....................................................................127
Copying the Selected Characters ................................................................... 128
Searching for Selected Characters ..................................................................128
Making a Rectangular Selection .....................................................................128
Selecting Whole Lines ....................................................................................128
Scrolling ......................................................................................................... 129
Undoing .............................................................................................................. 130
Using MAKE ...................................................................................................... 131
Using ASCII Terminals ...................................................................................... 132
Using INTERNAL Macro Commands ............................................................... 133
Variable Substitution ......................................................................................133
Using EXTERNAL Macro Commands (UNIX Only) ....................................... 134
Using an Interpreted Language .......................................................................134
Using the C Language (UNIX Only) ............................................................. 138
Using S/REXX Macro Commands ..................................................................... 142
Using EXTRACT .......................................................................................... 144
Using the BATCH Option .................................................................................. 146
UNIX Examples ..............................................................................................147
WINDOWS Examples ....................................................................................148
SEDIT Command Reference Guide ........................................................149
Variable Substitution ...........................................................................................149
Avoiding Variable Substitution .......................................................................... 150
ACCess - Add Directory To the Path ................................................................. 151
Add - Add Lines ................................................................................................. 152
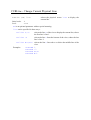
ALl - Global Selective Line Editing................................................................... 153
ALT - Change The Number of Alterations ........................................................ 154
APL - Pass a Command to APL ......................................................................... 154
ARBchar - Set Arbitrary Character .................................................................... 155
AUTOBin - Auto-Binary Feature ....................................................................... 156
AUTOExp - Auto-Expand Feature ..................................................................... 156
AUTOI - Auto-Indent Feature ............................................................................ 157
AUtosave - Auto-Save Feature........................................................................... 158
BACKUP - Set Backup Mode ............................................................................ 158
BAckward - Scroll Backward............................................................................. 159
BEEP - Set Beep Mode ...................................................................................... 159
BInary - Set Binary Mode .................................................................................. 160
Bottom - Bottom of File ..................................................................................... 161
BOUNDS - Set the Edit Boundaries .................................................................. 161
BUILTIN - Process a Built-in Command ........................................................... 161
BUtton - Create Button....................................................................................... 162
CANcel (XEDIT MODE)- Abandon Files ......................................................... 162
CANcel (ISPF MODE)- Cancel Edit Changes ................................................... 162
CAppend - Append Text .................................................................................... 163
CAPS - Control Automatic Character Conversion............................................. 164
CASE - Case Respect ......................................................................................... 165
CD - Change Directory....................................................................................... 166
CDElete - Delete Characters .............................................................................. 167
CEnter - Center Text .......................................................................................... 168
SEDIT Reference Manual
Page 8
Table of Contents
CENTER_End - End Connection with Codecenter............................................ 169
CENTER_Init - Initialize Connection with CodeCenter.................................... 170
CENTER_Send - Send Command to CodeCenter ............................................. 171
CFirst - Move Column Pointer ........................................................................... 172
Change (XEDIT MODE) - Change String ......................................................... 173
Change (ISPF MODE)- Change String .............................................................. 175
CInsert - Insert Characters.................................................................................. 178
CLAst - Move Column Pointer .......................................................................... 179
CLEARErrors - Clear Compiling Errors ............................................................ 179
CLocate - Locate Characters .............................................................................. 180
CLOSEConsole - Close the Console.................................................................. 181
CMDline - Set the Command Line Position ...................................................... 181
CN - Change Name String.................................................................................. 182
COLor - Set Color .............................................................................................. 184
COMmand - Execute a Command ..................................................................... 191
COMPIle - Compile a Program.......................................................................... 192
COMPLete - File Name Completion.................................................................. 196
COMPRess - Compress Data ............................................................................. 197
COpy (XEDIT MODE) - Copy File Lines ......................................................... 198
COpy (ISPF MODE) - Copy Data ..................................................................... 199
COUnt - Count String Occurrences.................................................................... 200
COVerlay - Selectively Replace Characters....................................................... 202
CREAte - Create a New File .............................................................................. 203
CReplace - Replace Characters .......................................................................... 204
CTags - Use a Tags File ..................................................................................... 205
CTLCHAR - Define Control Character ............................................................. 207
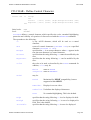
CURLine - Change Current Physical Line......................................................... 209
CURsor - Move Cursor ...................................................................................... 210
C_APLStop - Reverse APL Stop Setting ........................................................... 211
C_APLTrace - Reverse APL Trace Setting ........................................................ 211
C_Dup - Duplicate Cursor Line ......................................................................... 212
C_ENDCurl - Goto End of Current Line ........................................................... 212
C_ENDLine - Goto End of Cursor Line ............................................................. 212
C_ENDS - End Selection ................................................................................... 212
C_ENDSAll - End Selection at End of Line ...................................................... 213
C_ENDSR - End Rectangular Selection ............................................................ 213
C_EXT - Extend Field ........................................................................................ 213
C_LINEAdd - Add Line..................................................................................... 214
C_LINEDel - Delete Line .................................................................................. 214
C_SCRH - Split Screen Horizontally ................................................................. 214
C_SCRJ - Unsplit Screen ................................................................................... 214
C_SCRV - Split Screen Vertically ..................................................................... 215
C_SPlit - Split/Join Lines ................................................................................... 215
C_STARTLine - Goto Start of Cursor Line ....................................................... 215
C_STARTS - Start Selection .............................................................................. 216
DACCess- Add Directory to the CDPATH........................................................ 217
DELete (XEDIT MODE) - Delete Line ............................................................. 218
DELete (ISPF MODE) - Delete Line ................................................................. 219
DELAY - Display a String ................................................................................. 220
Page 9
SEDIT Reference Manual
Table of Contents
DFlist - Call Directory Editor ............................................................................. 220
DISPlay - Set Display Range ............................................................................. 221
Down/Next - Scroll Down.................................................................................. 222
DUPlicat - Current Line Duplication ................................................................. 223
DRELEase - Removes a Directory from the CDPATH ..................................... 224
DY_All - Start the ALL Dialog Box .................................................................. 225
DY_Exclude - Start the EXCLUDE Dialog Box ............................................... 226
DY_FInd - Start the FIND Dialog box............................................................... 227
DY_FILL - Start the FILL dialog box................................................................ 228
DY_FOnt - Set the Dialog Font ......................................................................... 228
DY_LASTFILES - Display Last Edited Files .................................................... 228
DY_OPEN (UNIX) - Start the OPEN Dialog Box ............................................ 229
DY_OPEN (WINDOWS) - Start the OPEN Dialog Box................................... 232
DY_SAVE (UNIX) - Start the SAVE Dialog Box ............................................ 233
DY_SAVE (WINDOWS) - Start the SAVE Dialog Box ................................... 236
DY_SHow - Start the SHOW Dialog Box ......................................................... 237
EDIT ................................................................................................................... 237
EMSG - Display Text......................................................................................... 238
END - End the Edit Session ............................................................................... 238
ESCAPEdelay - Set Escape Sequence Time-out ................................................ 238
EXClude (XEDIT MODE) - Global Selective Line Editing.............................. 239
EXCLude (ISPF MODE) - Exclude Lines from Display ................................... 239
EXIT / EEXIT - Exit .......................................................................................... 242
EXTract - Retrieve Information ......................................................................... 243
FBUtton - Set Directory Editor Buttons............................................................. 260
FD - Change File Directory ................................................................................ 260
FIle / FFile / KFIle / DOSFile - Save and Leave File ........................................ 261
FILECONV - File Conversion ........................................................................... 262
FILTer - Filter the Selection Contents ............................................................... 264
FINd (XEDIT MODE) - Find a Starting String ................................................. 265
FINd (ISPF MODE) - Find a Data String .......................................................... 266
FINDUp - Find a Starting String ........................................................................ 269
FLAth - Directory Editor Permissions Display .................................................. 270
FLDATE - Directory Editor Date Format .......................................................... 271
FLFile - File + FLIST ......................................................................................... 271
FFList - Call Directory Editor ............................................................................ 271
Flist - Call Directory Editor................................................................................ 272
FMACRO - Execute FLIST Macro .................................................................... 272
FLOW - Reformats Text .................................................................................... 273
Using the CURSOR Operand ........................................................................ 274
Using the CURSOR_STRICT Operand .........................................................274
FLPP - Directory Editor Parent Directory Display ............................................ 275
FLQuit - AQUIT + F .......................................................................................... 275
FN - Change Filename ........................................................................................ 275
FOLLOW - Follow Links................................................................................... 276
FONt - Change Font ........................................................................................... 276
FORMAT - Set Formatting Parameters ............................................................. 277
FORward - Scroll Forward................................................................................. 278
FT - Change Filetype.......................................................................................... 279
SEDIT Reference Manual
Page 10
Table of Contents
GET - Insert Data ............................................................................................... 280
GET_Panel - Fullscreen User Interface.............................................................. 281
GLOBALCase - Global File Case Handling ...................................................... 285
HAsh - Scan Directories ..................................................................................... 285
Help - Fullscreen Help........................................................................................ 286
HEX - Hexadecimal Target ................................................................................ 288
HEXType - Hexadecimal Display...................................................................... 289
HIghlight - Disable Highlight............................................................................. 291
HIStory - Set the History Length Buffer ............................................................ 291
HOme - Switch Cursor Position ........................................................................ 292
IMPcmscp - Implicit UNIX or WINDOWS Execution ..................................... 292
Input- Add a Text Line ....................................................................................... 293
ISOConv - Set ISO Conversion .......................................................................... 293
ISwitch - Switch Between files .......................................................................... 293
KEEPBLanks - Trailing Blanks Removal .......................................................... 294
KEYboard - Redefine Keyboard ........................................................................ 295
Using MKTRANS ..........................................................................................296
LASTFiles - Set the LASTFILES Parameters ................................................... 298
LASTLorc - Set LASTLORC Buffer ................................................................. 298
LEft - Scroll Left ................................................................................................ 299
LEFTAdjust - Left-Adjusting Text .................................................................... 300
LIMIT - Set File Size Limit ............................................................................... 301
Large Files support .........................................................................................301
LINECol ............................................................................................................. 301
LINENd - Separator Change .............................................................................. 302
LIsten - Listen for External Commands ............................................................. 303
Locate (XEDIT MODE) - Locate a Target ........................................................ 304
Locate (ISPF MODE) - Locate a Line ............................................................... 307
LOWercas - Translate Into Lowercase............................................................... 308
LRecl - Set Record Length ................................................................................. 309
MACRO - Execute a Macro ............................................................................... 310
MAN - Display UNIX Reference Manual Pages ............................................... 310
MARgins - Set Text Margins ............................................................................. 311
MAtch - Match Delimiters ................................................................................. 312
MBUtton - Create a Menu Button ...................................................................... 313
MENu - Create a Menu ...................................................................................... 314
MENUBar - Create a Menubar........................................................................... 316
MErge - Merge Two Set of Lines....................................................................... 318
MESsagesdir....................................................................................................... 320
METAKey - Set the Meta Key ........................................................................... 320
MODE - Set Various Modes .............................................................................. 322
MOUSEMode - Set Mouse Buttons ................................................................... 326
MOve - Move File Lines .................................................................................... 327
MSG - Display Text ........................................................................................... 328
N - Goto Nth Line ............................................................................................... 328
NEXTError - Error Scanning ............................................................................. 329
NEXTWord - Cursor Moving to Next Word ..................................................... 329
NFind - Find a Missing Starting String .............................................................. 330
NFINDUp - Find a Missing Starting String ....................................................... 330
Page 11
SEDIT Reference Manual
Table of Contents
NIS - Use NIS Users Database........................................................................... 331
NISG - Use NIS Groups Database ..................................................................... 331
NUMber / NUMBER_Screen - Display File Line Numbers .............................. 332
PENDing - Update the Pending List .................................................................. 333
PGDown - Scroll Down ..................................................................................... 334
PGUp - Scroll up ................................................................................................ 334
POINT - Assign a Symbolic Name .................................................................... 335
POWerinput - Set Power Input Mode ................................................................ 336
PREfix/ PREFIX_Screen - Change Prefix Mode............................................... 339
PREServe - Settings Preservation ...................................................................... 340
PREVWord - Cursor Moving to Previous Word ................................................ 341
PRINTFile (UNIX) - Print a File Hardcopy....................................................... 342
PRINTFile (WINDOWS) - Print a File Hardcopy ............................................. 343
PRINTScreen (UNIX) - Print a Screen Hardcopy ............................................. 344
PRINTScreen (WINDOWS) - Print a Screen Hardcopy.................................... 345
PRNOPAR - Workaround on a Print Dialog Windows bug .............................. 345
PRompt - Prompt user ........................................................................................ 345
PUT - Save Data................................................................................................. 346
PUTD - Save Data .............................................................................................. 347
PURge - Clear Macros........................................................................................ 348
PWD/W - Display Current Directory ................................................................. 348
Query - Query About Editing Options ............................................................... 348
QUIT / AQUIT / PQUIT / QQuit - Abandon File.............................................. 349
RChange (XEDIT MODE) - Regular Expression Change................................. 350
RChange (ISPF MODE) - Repeat Last Change ................................................. 351
READ - Place Terminal Information in the STACK ......................................... 352
READScreen - Read User Action ...................................................................... 355
RECYCLE - Use the Recycle Bin ...................................................................... 356
REDo - Cancel Last Undo .................................................................................. 356
REFRESH - Screen Update ................................................................................ 356
RELEase - Removes a Directory From the PATH............................................. 357
RELoad - Automatic Reload Feature ................................................................. 358
REPEat - Repeat a Command ............................................................................ 359
REPEATDelay - Set Auto-repeat Time-out ....................................................... 360
Replace (XEDIT MODE) - Replace Current Line ............................................. 360
Replace (ISPF MODE)- Replace Data ............................................................... 361
RESERved - Reserve a Specified Line on the Screen........................................ 362
RESet - Reset the Data Display.......................................................................... 364
RESTore - Settings Retrieval ............................................................................. 364
RFlist - Call Directory Editor ............................................................................. 365
RFINd - Repeat Last Find .................................................................................. 365
RIght - Scroll Right ............................................................................................ 365
RIGHTAdjust - Right-adjusting Text................................................................. 366
RTLF - Specific display mode for left to right fonts (Windows) ....................... 367
RW - Enable Read/Write Mode ......................................................................... 367
R/ - Regular Expression Search.......................................................................... 368
R-/ - Regular Expression Search ........................................................................ 371
SABER_End - End Connection with Saber-C ................................................... 371
SABER_Init - Initialize Connection with Saber-C ............................................ 372
SEDIT Reference Manual
Page 12
Table of Contents
SABER_Send - Send Command to Saber-C ...................................................... 373
SAve / SSave / KSAve/ DOSSave - Save File ................................................... 375
SAVECLEARUNDO - Set Clear Undo Status .................................................. 375
SCALe / SCALE_Screen - Set Scale Line ......................................................... 376
SChange - Selective String Change.................................................................... 377
SCKeys - Selective Change Confirmation Keys ................................................ 379
SCN - Selective Name String Change................................................................ 380
SCOpe - Set Selective Editing Scope................................................................. 382
SCReen - Split Screen ........................................................................................ 383
SCROllbar - Set Scrollbar .................................................................................. 385
SELect - Set Selection Level.............................................................................. 386
SELECTall - Set Selection Level on All Lines .................................................. 387
SEP - Separator Change ..................................................................................... 388
SEt - Set Function Keys ..................................................................................... 389
SETEnv - Set Environment Variable ................................................................. 398
SETP - Set Display String .................................................................................. 398
SHAdow - Set Selective Editing Display Mode ................................................ 399
SHBlank - Show Last Trailing Blank ................................................................. 399
SHEll - Execute a Shell Command .................................................................... 400
SHELLEXT - Set Default Execute Shell filetype (Windows) ........................... 400
SHift - Shift Lines .............................................................................................. 401
SHOw - Global Selective Line Editing .............................................................. 402
SHOWCdpath - Displays the Accessed Directories ........................................... 402
SHOWHistory - Show History ........................................................................... 402
SHOWPath - Displays the Accessed Directories ............................................... 403
SOrt, NSort - Sort a File ..................................................................................... 404
SORTRing - Sort the Ring ................................................................................. 405
SOS - Screen Operation Simulation ................................................................... 406
SPAN - Multiple Lines Search ........................................................................... 408
SPELL - Spelling Checker ................................................................................. 409
SPELL_Add - Update Private Dictionary .......................................................... 409
SPELL_Next - Search for Next Misspelled Word ............................................. 410
SPLTJOIN - Split/Join Lines ............................................................................. 410
SRChange - Selective Regular Expression Change ........................................... 411
STAck - Stack Lines........................................................................................... 413
STAMpdelay - Discrepancy Reload Setting ...................................................... 414
STATUS (Macro) - Displays All Settings ......................................................... 415
STAY - Current Line Move ............................................................................... 415
STop - Set APL stop........................................................................................... 416
STReam - Set Stream Status .............................................................................. 416
SWitch - Switch Between Files .......................................................................... 417
SYNonym - Set a Synonym ............................................................................... 418
SYNTax - Set Syntax Coloring .......................................................................... 419
S_COpy - Copy a Selection................................................................................ 422
S_CUt - Cut a Selection ..................................................................................... 422
S_Find - Find a Selection ................................................................................... 422
S_Help - Shows Help About a Selected Item ..................................................... 423
S_Lower - Translate Into Lowercase ................................................................. 423
S_LShift - Shift Left from Selection .................................................................. 423
Page 13
SEDIT Reference Manual
Table of Contents
S_MAN - Display Selected UNIX Reference Manual Pages ............................ 424
S_Paste - Retrieve a Selection............................................................................ 425
S_PRsh - Use Shelf When Getting a Primary Selection Request ...................... 426
S_RShift - Shift Right from Selection ................................................................ 426
S_Set - Set Selection .......................................................................................... 427
S_Upper - Translate into Uppercase................................................................... 428
S_Xed - Edit a Selected File ............................................................................... 428
TABExp - Expand Tabulations .......................................................................... 429
TABLine / TABLINE_Screen - Set Tabline ...................................................... 430
TABSet - Set Tabulations................................................................................... 431
TOolbar - Set Toolbar ........................................................................................ 432
TOP - Top of File ............................................................................................... 433
TRAce - Set APL Trace ..................................................................................... 433
Tree - Start the TREE Editor .............................................................................. 434
TREEScanlevel - Set TREE Scanning Level ..................................................... 434
TRUnc - Set Truncation Column ....................................................................... 435
UNButton - Remove Button............................................................................... 436
UNDo - Cancel Last File Modification .............................................................. 436
UNSetenv - Remove Environment Variable ...................................................... 436
UP- Scroll Up ..................................................................................................... 437
UPPercas - Translate Into Uppercase ................................................................. 438
VARblank - Ignore Successive Blanks .............................................................. 439
Verify / VERIFY_Screen - Set Columns ........................................................... 440
VERIFY_Save / VERIFY_SSave / VERIFY_KSave ........................................ 442
VIsible - Count Visible Lines............................................................................. 443
WHeel - Set Mouse Wheel Parameters .............................................................. 443
WIndows - Execute a WINDOWS Command ................................................... 443
WINSHRinktofit - Window Auto-Size Feature ................................................. 444
WRap - Wrap Around Feature ........................................................................... 444
WRTL - Write Left to Right ............................................................................... 445
XBin - Edit Binary Files ..................................................................................... 445
XEDit - Edit New Files ...................................................................................... 446
XF - Edit an APL Object .................................................................................... 447
XCSHell - Execute a Shell Command ............................................................... 448
XKB - Edit Files with Trailing Blanks ............................................................... 448
XKSHell - Execute a Shell Command ............................................................... 449
XSHell - Execute a Shell Command .................................................................. 449
XSHELLMax - Set Displayed XSHELL Files Limit......................................... 450
XSHOwhistory - Show History In Fullscreen Mode ......................................... 450
XTESTChars - Set the Font Testing Mode ........................................................ 451
Zone / ZONE_Screen - Set Zone........................................................................ 452
\ - Locate a Name String..................................................................................... 453
-\ - Locate a Name String ................................................................................... 454
? - Display Last Command ................................................................................. 454
?I - Display Last Command................................................................................ 455
= - Repeat Last Command .................................................................................. 455
# - Comments ..................................................................................................... 455
SEDIT Reference Manual
Page 14
Table of Contents
SEDIT Text Formatting Facilities ...........................................................457
Margins ................................................................................................................457
Formatting Text ...................................................................................................457
Wordwrap Feature ...............................................................................................457
The Directory Editor FLIST ....................................................................459
What Is It For? .....................................................................................................459
Using "Control-F" ................................................................................................461
Large Files support ..............................................................................................461
Getting Started .....................................................................................................461
Displaying Owner/Group/Timestamp ................................................................ 463
Using the Function Keys .................................................................................... 464
Using the Buttons ............................................................................................... 467
Mouse Editing a File ...........................................................................................468
Switching Permissions Display ...........................................................................468
Passing Commands ............................................................................................. 471
The Built-in Commands .................................................................................471
The Non-built-in Commands ......................................................................... 477
Overriding a Built-in Command .....................................................................477
Using S/REXX Macros Within FLIST .......................................................... 478
The Tree Editor .........................................................................................481
Getting Started .....................................................................................................481
Using the Mouse ................................................................................................. 483
Using the Buttons ................................................................................................484
Using the Function Keys .....................................................................................486
Changing the Default Printer on UNIX Systems ................................................487
Running SEDIT With CodeCenter .........................................................489
Using S/REXX ...........................................................................................493
Starting S/REXX on UNIX Systems ...................................................................493
Explicit Execution ..........................................................................................493
Automatic Execution ......................................................................................493
Starting S/REXX on WINDOWS Systems .........................................................494
Explicit Execution ..........................................................................................494
Choosing between srexx.exe and wsrexx.exe .................................................494
Automatic Execution ......................................................................................494
Using the WINDOWS Explorer .....................................................................495
Compiling a Program ..........................................................................................495
S/REXX Implementation .....................................................................................495
S/REXX Extensions ............................................................................................495
Static Scoping .................................................................................................495
Dynamic Memory Allocation ........................................................................ 497
The Operators Extensions ...............................................................................497
Important Note for Mainframe Users .............................................................497
Logical Operators .......................................................................................... 498
Dynamic Loading on UNIX Systems ............................................................ 499
Using OPTION NOLOAD .............................................................................501
Setting Default Options for UNIX or WINDOWS REXX Programs ............502
Page 15
SEDIT Reference Manual
Table of Contents
Setting Default Options for SEDIT REXX Macros .......................................502
Dynamic Loading on WINDOWS Systems .................................................. 503
Setting Default Options for WINDOWS REXX Programs ............................505
Extended PROCEDURE EXPOSE ............................................................... 506
Extended LEAVE and ITERATE .................................................................. 507
Using Backquotes ...........................................................................................507
Using { and } ..................................................................................................507
Using Bracket Indexing ................................................................................. 508
Using S/REXX within SEDIT .............................................................................509
S/REXX New or Extended Instructions ..................................................511
ADDRESS (UNIX) - Set Destination of Commands......................................... 512
ADDRESS (WINDOWS) - Set Destination of Commands ............................... 513
Using UNIX Shells on WINDOWS ...............................................................513
CD - Change Directory....................................................................................... 514
DESBUF - Clear Stack ....................................................................................... 514
DO - Controlled Loop ........................................................................................ 515
DROPBUF - Remove Stack ............................................................................... 516
EXECIO - Input/Output Operations................................................................... 517
GLOBALV - Share Variables ............................................................................ 523
LOWER - Lower Case Translation .................................................................... 527
MAKEBUF - Create Stack ................................................................................. 527
OPTION - Set Various Options.......................................................................... 528
PARSE - Parsing ................................................................................................ 529
SAYN - Terminal Output ................................................................................... 530
SAYR - Terminal Output ................................................................................... 530
SAYX - Displayed Execution ............................................................................ 531
SENTRIES - Query Stack .................................................................................. 531
TRACE - Debug Setting..................................................................................... 532
UPPER - Upper Case Translation ...................................................................... 534
UPPERW - Word Upper Case Translation ........................................................ 534
S/REXX New or Extended Built-in Functions .......................................535
ACOS - Arc Cosine ............................................................................................ 535
ActivateKeyboardLayout - Switches to an input locale identifier (Windows Only)
535
ARCH - Get Hardware Information ................................................................... 535
ARG - Returns Argument String ........................................................................ 536
ASIN - Arc Sine ................................................................................................. 536
ATAN - Arc Tangent .......................................................................................... 536
CHANGE - Change String ................................................................................. 536
CHARIN - Read Character Input Stream........................................................... 538
CHDIR - Change Directory................................................................................ 539
CLEAR or CLS - Clear the Screen ..................................................................... 539
CLOSE_CONS - Close a Console ..................................................................... 539
CONCAT - Concatenate Files............................................................................ 540
COS - Cosine ...................................................................................................... 540
COMMA - Add commas to a numerical string .................................................. 540
CP or COPY - Copy Files .................................................................................. 540
SEDIT Reference Manual
Page 16
Table of Contents
CPUID - Workstation CPU Identifier ................................................................ 541
CSH - Pass UNIX Command ............................................................................. 541
CUSERID, USERID - Get Userid ...................................................................... 541
CWD, GETCWD, GETWD - Get Current Directory ......................................... 542
C2O - Character to Octal .................................................................................... 542
DATE - Get Current Date ................................................................................... 542
DEL or RM - Delete Files .................................................................................. 543
DIR or LS - List Files ......................................................................................... 543
DY_ASCL - Add a Set of Strings to a Scrolled List .......................................... 544
DY_BEEP - Sound the Alarm ............................................................................ 544
DY_BUTTON - Make a Dialog Button Item ..................................................... 544
DY_BUTTON_COLOR - Change a Button Dialog Item Color ........................ 545
DY_CH - Make a Choice Dialog Item ............................................................... 545
DY_CH_COLOR - Change a Choice Dialog Item Color .................................. 546
DY_DESTROY - Destroy a Dialog Box ............................................................ 546
DY_DSCL - Remove a Set of Strings from a Scrolled List ............................... 546
DY_END - End a Dialog Box ............................................................................ 547
DY_FOCUS - Give a Dialog Input Item the Keyboard Focus........................... 548
DY_FONT - Set the Dialog Font ....................................................................... 548
DY_HEADER - Set the Dialog Box Header ...................................................... 548
DY_INPUT - Make a Dialog Input Item............................................................ 549
DY_INPUT_COLOR - Change an Input Dialog Item Color ............................. 549
DY_LABEL - Make a Dialog Label Item.......................................................... 550
DY_LABEL_COLOR - Change a Label Dialog Item Color ............................. 550
DY_MAP - Map a Dialog Box ........................................................................... 550
DY_OPEN (UNIX) - Displays the Contents of a Directory .............................. 551
DY_FOLDER (WINDOWS) - Browses for a Folder ....................................... 554
DY_OPEN (WINDOWS) - Displays the Contents of a Directory .................... 555
DY_PRINTER - Set the Default Printer ............................................................ 555
DY_PSCL - Set the First Displayed String ........................................................ 555
DY_REFRESH - Redraw the Dialog Box .......................................................... 556
DY_RSCL - Replace a String in a Scrolled List ................................................ 556
DY_SCH - Set a Choice Value .......................................................................... 556
DY_SINPUT - Set a Dialog Input Item Value ................................................... 556
DY_SCL - Make a Scrolled List Dialog Item .................................................... 557
DY_SCL_COLOR - Change a Scrolled List Dialog Item Color ....................... 561
DY_SLABEL - Set a Dialog Label Item Value ................................................. 561
DY_SSCL - Select or Unselect a String Within a Scrolled List ........................ 561
DY_START - Start a Dialog Box ...................................................................... 561
DY_STG - Set a Dialog Toggle Value............................................................... 562
DY_TG - Make a Dialog Toggle........................................................................ 563
DY_TG_COLOR - Change a Toggle Dialog Item Color .................................. 564
DY_UNMAP - Unmap a Dialog Box ................................................................ 564
DY_VINPUT - Get a Dialog Input Item Value .................................................. 564
DY_VCH - Get a Dialog Choice Value ............................................................. 564
DY_VSCL - Retrieve a Scrolled List Ranks and Contents of the Selected Strings 565
DY_VTG - Get a Dialog Toggle Item Value ..................................................... 565
DY_WARP - Set Mouse Handling ..................................................................... 565
EXEC - Pass UNIX Command Directly ............................................................ 565
Page 17
SEDIT Reference Manual
Table of Contents
EXECV - Pass UNIX Program Directly ............................................................ 566
EXTERNALS - Pending Input ........................................................................... 566
FD - Get File-Directory ...................................................................................... 567
FILECONV - UNIX or WINDOWS File Conversion ....................................... 567
FLFILES - Get FLIST Files ............................................................................... 567
FN - Get Filename .............................................................................................. 567
FOLLOW - Follow Symbolic Links .................................................................. 568
FORK - Spawn a New Process........................................................................... 569
FT - Get Filetype ................................................................................................ 570
FWC - Format With Comma .............................................................................. 570
GetAdaptersInfo - Get Free Disk Space (Windows Only)................................. 571
GETDISKSPACE - Get Free Disk Space .......................................................... 572
GETENV - Get Environment Variable .............................................................. 573
GETFILE - Get File Content .............................................................................. 573
GETPID - Process Identifier .............................................................................. 573
HOSTNAME - Workstation Hostname .............................................................. 573
INDEX - Find string ........................................................................................... 573
ISMAIN - Determines if routine is MAIN one .................................................. 573
JUSTIFY - Justify String .................................................................................... 574
KILL - Terminate a Process ............................................................................... 575
KSH - Pass UNIX Command ............................................................................. 575
LINEIN, LINEOUT - Input / Output ................................................................. 575
LN - Make Hard or Symbolic Links to File ....................................................... 577
MKDIR - Make a Directory ............................................................................... 577
MKLISTFILES - Group a list of files ................................................................ 577
MV or RENAME - Rename a File ..................................................................... 578
OPEN_CONS - Open a Console ........................................................................ 578
PARG - Parse Argument .................................................................................... 579
POS - Find string ................................................................................................ 581
QPID - Query Process Death .............................................................................. 581
RCHANGE - Change String using regular expressions ..................................... 581
REGISTRY_DEL - Delete REGISTRY Key Contents ...................................... 581
REGISTRY_GET - Retrieve REGISTRY Key Contents .................................. 583
REGISTRY_KEYS - REGISTRY Subkeys Enumeration ................................. 584
REGISTRY_SET - Set REGISTRY Key Contents ........................................... 586
REGISTRY_VALUES - REGISTRY Values Enumeration .............................. 587
RM / DEL / RECYCLE - Delete Files ............................................................... 588
RMDIR - Delete a Directory .............................................................................. 588
SCRIPT - Record Session .................................................................................. 588
SERVICE_CREATE - Create a Service ............................................................ 589
SERVICE_DELETE - Delete a Service ............................................................. 589
SERVICE_STOP - Stop a Service ..................................................................... 590
SERVICE_START - Start a Service .................................................................. 590
SERVICE_STATUS - Status of a Service ......................................................... 590
SetPriority - Sets the priority class for the current process (Windows only) ..... 591
ShellExecute - Performs an operation on a specified file (Windows only) ....... 592
SHGetKnownFolderPath - Retrieves the full path of a known folder (Windows only)
593
SETENV, PUTENV - Set Environment Variable.............................................. 594
SEDIT Reference Manual
Page 18
Table of Contents
SIN - Sine ........................................................................................................... 594
SLEEP - Suspend Execution .............................................................................. 594
SockAccept - Accept an Incoming Request ....................................................... 594
SockClose - Close a Socket ................................................................................ 594
SockBind - Bind a Socket .................................................................................. 595
SockConnect - Connect a Socket ....................................................................... 596
SockDropFuncs - Compatibility Function ......................................................... 597
SockGetHostByAddr - Search for Information for a Host ................................. 597
SockGetHostByName - Search for Information for a Host ................................ 598
SockGetHostId - Get the Dot Address of the Host ............................................. 599
SockGetPeerName - Get the Name of the Connected Peer ................................ 599
SockGetSockName - Get the Current Socket Name .......................................... 600
SockGetSockOpt - Get Socket Options .............................................................. 601
SockInit - Compatibility Function ...................................................................... 602
SockIoctl - Perform Special Operations on Socket ............................................ 602
SockListen - Listen for Incoming Requests ....................................................... 602
SockLoadFuncs - Compatibility Function ......................................................... 603
SockPSock_Errno - Last Error Code .................................................................. 603
SockRecv - Receive Data ................................................................................... 603
SockRecvFrom - Receive Data .......................................................................... 604
SockSelect - Monitor Sockets ............................................................................ 605
SockSend - Send Data ........................................................................................ 606
SockSendTo - Send Data.................................................................................... 607
SockSetSockOpt - Set Socket Options ............................................................... 608
SockShutDown - Close a Socket........................................................................ 609
SockSocket - Create a Socket ............................................................................. 609
SockSoClose - Close a Socket ............................................................................ 610
SockSock_Errno - Last Error Code .................................................................... 610
SockVersion - Version Number of Socket Library ............................................ 610
SORT - Sort a List.............................................................................................. 611
STATE / LSTATE - Query File State ................................................................ 612
STIME - Set System Time ................................................................................. 613
STREAM - Compatibility Function ................................................................... 613
SUBDIRS - Find Subdirectories ........................................................................ 613
SysCls - Clear the Screen ................................................................................... 613
SysFileDelete - Delete File................................................................................. 614
SysFileSearch - Scan File ................................................................................... 614
SysFileTree - Scan Directory ............................................................................. 615
SysGetKey - Read Character Input Stream ........................................................ 617
SysMkDir - Delete a Directory ........................................................................... 617
SysRmDir - Delete a Directory .......................................................................... 617
SysSearchPath - Search Files in Path ................................................................. 618
SysSetPriority - Change the Priority .................................................................. 618
SysSleep - Suspend Execution ........................................................................... 619
SYSTEM - Passes string to SHELL (Unix Only) .............................................. 620
SysTempFileName - Make a Unique File Name ............................................... 620
SysVersion - Operating System Description ...................................................... 620
TAN - Tangent ................................................................................................... 621
TBADD - Insert Table Line ............................................................................... 621
Page 19
SEDIT Reference Manual
Table of Contents
TBCLOSE - Close Current Table ....................................................................... 621
TBDEL - Delete Table Line ............................................................................... 621
TBDISPL - Display Table .................................................................................. 621
TBGET - Get Table Line .................................................................................... 622
TBOPEN - Open a Table .................................................................................... 622
TBPUT - Update Table Line .............................................................................. 622
TBSAVE - Save Table ....................................................................................... 623
TCSH - Pass UNIX Command ........................................................................... 623
TEE - Pass UNIX Command .............................................................................. 623
UNIX or SH - Pass UNIX Command ................................................................. 623
UNSETENV - Remove Environment Variable .................................................. 624
USLEEP - Suspend Execution ........................................................................... 624
UTIME - Change File Timestamp ...................................................................... 624
VALUE - Set or Retrieve a Variable .................................................................. 624
VERSION- Windowing Identifier ...................................................................... 624
WAITPID - Wait for a Process Termination...................................................... 625
WINDOWS - Pass WINDOWS Command ....................................................... 625
WIPE - Wipe Files.............................................................................................. 626
XHOME - Installation Directory ........................................................................ 626
S/REXX Dialog Management ..................................................................627
OpenLook Specifics ............................................................................................627
WINDOWS Specifics ..........................................................................................627
S/REXX Dialog Management within SEDIT .........................................631
S/REXX ISPF-like Tables ........................................................................637
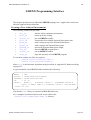
S/REXX Programming Interface ............................................................647
Creating a New Address Environment ................................................................647
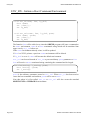
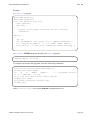
ENV_RX - Initiate a Host Command Environment........................................... 648
EXIT_RX - Cleans up and Exits ........................................................................ 650
GETVAL_RX - Get an S/REXX Variable......................................................... 651
PULL_RX - Extract External Data Queue Item................................................. 653
PUSH_RX - Add a String on Top of the External Data Queue ......................... 655
QUEUE_RX - Add a String to the External Data Queue................................... 656
QUEUED_RX - Query External Data Queue Length........................................ 658
RUN_RX - Run an S/REXX Program ............................................................... 660
SETVAL_RX - Set an S/REXX Variable. ......................................................... 663
STOP_RX - Stop an S/REXX Program. ............................................................ 665
Adding Built-in Functions .................................................................................. 667
Using the RXD Debugger .........................................................................671
Entering RXD Explicitly .....................................................................................671
Entering RXD Implicitly .....................................................................................671
Setting Stops ........................................................................................................674
Customizing RXD ...............................................................................................674
Using the Function Keys ............................................................................... 677
SEDIT Reference Manual
Page 20
Table of Contents
Appendix A: Keyboard Layouts ..............................................................679
SUN Type 3 Keyboard 3270 Simulation Layout ................................................680
SUN Type 4 Keyboard 3270 Simulation Layout ................................................681
SUN Type 5 Keyboard Layout ............................................................................682
SUN Keyboard Mapping .....................................................................................683
IBM, Silicon Graphics and PCs Keyboard Mapping ..........................................685
DEC/COMPAQ/HP TRUE64 Station Keyboard Mapping .................................687
HP Keyboard Mapping ........................................................................................689
WINDOWS Keyboard Mapping .........................................................................691
Character Mode Terminals Mapping ...................................................................693
Appendix B: Hardware String .................................................................695
SEDIT Release Notes ................................................................................697
The 3.60 File Editor Enhancements ....................................................................697
New Commands ..............................................................................................697
Miscellaneous .................................................................................................697
The 3.60 Directory Editor Enhancements ...........................................................698
The 3.60 Tree Editor Enhancements ...................................................................698
The 4.0 File Editor Enhancements ..................................................................... 699
New or Enhanced Commands ........................................................................699
Miscellaneous .................................................................................................700
The 4.0 Directory Editor Enhancements .............................................................701
The 4.0 Tree Editor Enhancements .....................................................................701
The 4.10 File Editor Enhancements ................................................................... 702
New or Enhanced Commands ........................................................................702
Miscellaneous .................................................................................................702
The 4.10 Directory Editor Enhancements ...........................................................703
The 4.10 Tree Editor Enhancements ...................................................................703
The 4.20 File Editor Enhancements ................................................................... 704
New or Enhanced Commands ........................................................................704
Miscellaneous .................................................................................................704
The 4.20 Directory Editor Enhancements .......................................................... 705
The 4.20 Tree Editor Enhancements ...................................................................705
The 4.30 File Editor Enhancements ................................................................... 706
New or Enhanced Commands ........................................................................706
Miscellaneous .................................................................................................706
The 4.30 Directory Editor Enhancements .......................................................... 707
The 4.30 Tree Editor Enhancements ...................................................................707
The 4.40 File Editor Enhancements ................................................................... 708
New or Enhanced Commands ........................................................................708
Miscellaneous .................................................................................................708
The 4.40 Directory Editor Enhancements ...........................................................709
The 4.50 File Editor Enhancements ................................................................... 710
New or Enhanced Commands ........................................................................710
Miscellaneous .................................................................................................710
The 4.50 Directory Editor Enhancements ...........................................................710
The 4.50 Tree Editor Enhancements ...................................................................710
The 4.60 File Editor Enhancements ................................................................... 711
Page 21
SEDIT Reference Manual
Table of Contents
New or Enhanced Commands ........................................................................711
Miscellaneous .................................................................................................711
The 4.60 Directory Editor Enhancements ...........................................................711
The 4.70 File Editor Enhancements ....................................................................711
New or Enhanced Commands ........................................................................711
Miscellaneous .................................................................................................711
The 4.70 Directory Editor Enhancements ...........................................................711
The 4.70 Tree Editor Enhancements ...................................................................711
The 4.80 File Editor Enhancements ....................................................................712
New or Enhanced Commands ........................................................................712
Miscellaneous .................................................................................................712
The 4.80 Directory Editor Enhancements ...........................................................712
The 5.00 File Editor Enhancements ....................................................................712
New or Enhanced Commands ........................................................................712
Miscellaneous .................................................................................................712
The 5.00 Directory Editor Enhancements ...........................................................712
.............................................................................................................................712
S/REXX Release Notes .............................................................................713
1.10 Enhancements ..............................................................................................713
Enhanced Built-in Functions ..........................................................................713
Miscellaneous .................................................................................................713
1.20 Enhancements ..............................................................................................713
New or Extended Instructions ........................................................................713
New Built-in Functions ...................................................................................713
Enhanced Built-in Functions ......................................................................... 714
Miscellaneous .................................................................................................714
2.00 Enhancements ..............................................................................................714
New or Extended Instructions ........................................................................714
New Built-in Functions ...................................................................................714
Miscellaneous .................................................................................................714
2.10 Enhancements ............................................................................................. 715
New or Enhanced Built-in Functions .............................................................715
Miscellaneous .................................................................................................715
2.20 Enhancements ............................................................................................. 716
New or Enhanced Built-in Functions .............................................................716
Miscellaneous .................................................................................................716
2.30 Enhancements ..............................................................................................716
New or Enhanced Built-in Functions .............................................................716
Miscellaneous ................................................................................................ 717
2.40 Enhancements ..............................................................................................717
New or Enhanced Built-in Functions .............................................................717
Miscellaneous .................................................................................................719
2.50 Enhancements ..............................................................................................719
New or Enhanced Built-in Functions .............................................................719
Miscellaneous .................................................................................................719
2.60 Enhancements ..............................................................................................719
New or Enhanced Built-in Functions .............................................................719
Miscellaneous .................................................................................................719
SEDIT Reference Manual
Page 22
Table of Contents
2.70 Enhancements ..............................................................................................720
Miscellaneous .................................................................................................720
2.80 Enhancements ..............................................................................................720
New or Enhanced Instruction .........................................................................720
New or Enhanced Built-in Functions .............................................................720
Miscellaneous .................................................................................................720
3.00 Enhancements ..............................................................................................720
New or Enhanced Built-in Functions .............................................................720
Miscellaneous .................................................................................................721
Page 23
SEDIT Reference Manual
Installing SEDIT on UNIX Systems
Installing SEDIT on UNIX Systems1
SEDIT can be installed in any directory. In this manual, it is assumed that SEDIT will be
installed in /home/xed.
First, the user must create a /home/xed directory. This procedure may require the user to
be the superuser. Type:
mkdir /home/xed
cd /home/xed
To load from a tape, use the procedure described in the READ THIS FIRST document.
To load from diskettes, use the procedure printed on each diskette.
The following files will then be loaded:
•
•
•
•
•
•
•
•
•
•
•
•
•
•
•
This file contains up-to-date information that may not be
included in the manual. Process this file carefully before
continuing the installation.
xed
The file editor calling script (in XEDIT foreground mode).
sedit
The file editor calling script (in XEDIT background mode).
pxed
The file editor calling script (in PDF foreground mode).
psedit
The file editor calling script (in PDF background mode).
fli
The directory editor calling script.
tree
The tree editor calling script.
profile.sedit
This file will be executed as a command macro when
SEDIT starts with the sedit, xed, psedit, pxed, fli
or tree commands.
xedit
The file editor calling script (in full XEDIT compatibility
mode).
prof_xedit.sedit This file will be executed as a command macro when
SEDIT starts with the xedit command.
pdf
The file editor calling script (in full PDF compatibility
mode).
prof_pdf.sedit
This file will be executed as a command macro when
SEDIT starts with the pdf command.
./xmac
A subdirectory containing useful macros.
XF
A workspace allowing SEDIT to be used within Dyalog
APL.
PROFILE.sedit
This file will be executed as a command macro when
SEDIT starts under Dyalog APL.
README
1. SEDIT and S/REXX are generally bundled together. Installing SEDIT will also install S/REXX, although different activation keys are needed.
SEDIT and S/REXX Reference Manual
Page 1
Installing SEDIT on UNIX Systems
Using a Grey Scale Monitor
If a grey scale monitor is used, the user must include the command "color off" in the
profile.sedit and/or PROFILE.sedit and/or prof_xedit.sedit files and/or
prof_pdf.sedit files.
Setting the Background Color
The profile.sedit initialization file (or the prof_xedit.sedit file when starting
SEDIT with the xedit command described on page 31, or the prof_pdf.sedit file
when starting SEDIT with the pdf command described on page 36) sets the background
color in accordance with the architecture SEDIT is running on. For example, on an IBM
station:
when arch = 'ibm' then do
'set_ibm'
if version ~= 'curses' then do
'color background 255 255 190'
To have a white background, replace 'color background 230 230 190' with
'color background 255 255 255'. See the COLOR command on page 184 for
more details.
Setting the Path
SEDIT has the ability to follow the path when searching for files. If the user wants a
particular path for SEDIT operations, an XPATH special environment variable must be
created int the .cshrc file. For example, if the system uses the C-SHELL, the user can
edit the .cshrc file and add the following lines:
#
General path
set path = (~ . /bin /usr/bin /usr/ucb /etc /usr/etc )
# Additional path for xed
set fpath = ($path /home/xed/font /usr/lib/fonts/fixedwidthfonts)
# Now we set XPATH
setenv XPATH "$fpath"
SEDIT may also use a XCDPATH environment variable while searching for directories,
processing the commands ACCESS, CD, FLIST, TREE, and FD in a way similar to that
used by the C-SHELL using $cdpath. If the user wants to use this facility, an XCDPATH
must be created in the .cshrc file. For example:
set cdpath = (.. ~ /home /usr /)
setenv XCDPATH "$cdpath"
Note that SEDIT ignores items which do not begin with a "/", and always searches first
for directories which root in the current directory.
The DACCESS command may be used to update the cdpath within SEDIT.
Page 2
SEDIT and S/REXX Reference Manual
Installing SEDIT on UNIX Systems
Setting the Password for CPU Bound Licenses
The user must type the following commands:
% cd /home/xed
% ./install sedit
# Assuming /home/xed is the installation directory
The user will be prompted for the information displayed in the password sheet. The
following is a typical installation example on an IBM RS/6000:
% ./install SEDIT
******** Beginning to install SEDIT
Do you want to add a new password ? y
Enter the HOSTNAME (I) :
Enter the UNAME (000003063100) :
Enter the PASSWORD () : 25674-75433-03258-71687
You have typed the following information:
HOSTNAME: I
UNAME
: 000003063100
PASSWORD: 25674-75433-03258-71687
OK ? y
Do you want to add a new password ? n
%
SEDIT and S/REXX Reference Manual
Page 3
Installing SEDIT on UNIX Systems
On the different workstations, the UNAME query will be replaced by one of the following:
Workstation
Query
Unix command
SUN SunOS
HOSTID
hostid
SUN Solaris
HOSTID
/usr/ucb/hostid
Siemens SINIX
HOSTID
hostid
IBM RS/6000
UNAME
uname -m
Hewlett Packard
UNAME
uname -i
Silicon Graphics
SYSID
sysinfo -s
Linux PC
SEDITID
./seditid
SCO PC
SEDITID
./seditid
Unixware PC
SEDITID
./seditid
Digital Equipment
ETHERNET ADDRESS
see below
CPU Identifier on Digital Equipment Stations
On DEC Alpha stations, the cpu identifier is the ethernet address, which can be displayed
by typing the following command:
% /usr/sbin/uerf -R -r 300 | more
********************************* ENTRY
1. ********************
----- EVENT INFORMATION ----EVENT CLASS
OS EVENT TYPE
SEQUENCE NUMBER
OPERATING SYSTEM
300.
0.
OPERATIONAL EVENT
SYSTEM STARTUP
DEC OSF/1
tu0: DEC TULIP Ethernet Interface,
_hardware address: 08-00-2B-E4-F3-0B
tu0: console mode: selecting AUI
%
The cpu identifier is the last four ethernet address bytes. In this example, it would be
2BE4F30B.
Alternately, the user may install SEDIT and type the following:
% cd xed
/home/xed
% ./seditid
2BE4F30B
%
Page 4
SEDIT and S/REXX Reference Manual
Installing SEDIT on UNIX Systems
install may also be used to modify existing passwords, or to add new passwords for
different workstations, allowing the user to centralize all the password information for
multiple workstations on the same network.
Example:
% ./install sedit
******** Beginning to install SEDIT
The following passwords have been installed:
1: HOSTNAME: I UNAME: 000003063100
PASSWORD: 25674-75433-03258-71687
Do you want to modify one of these passwords ? n
Do you want to add a new password ? y
Enter the HOSTNAME () :
It will be possible to start SEDIT now with one of the following commands:
pxed
psedit
starts SEDIT in the foreground in XEDIT
mode
starts SEDIT in the background in XEDIT
mode
starts SEDIT in the foreground in PDF mode
starts SEDIT in the background in PDF mode
xedit
pdf
starts SEDIT in full XEDIT compatible mode
starts SEDIT in full PDF compatible mode
xed
sedit
Note for advanced users:
install creates or updates the /home/xed/passwds file. The user can edit
and modify it directly to add, remove or modify passwords.
SEDIT and S/REXX Reference Manual
Page 5
Installing SEDIT on UNIX Systems
Setting the Keyboard Mapping
Depending on the command used to start it, SEDIT uses one of the following *.sedit
initialization macros:
Unix COMMAND
xed
Initialization macro
profile.sedit
sedit
pxed
psedit
xedit
profile.sedit
profile.sedit
profile.sedit
prof_xedit.sedit
pdf
prof_pdf.sedit
To simplify the keyboard mapping, the various SEDIT *.sedit initialization macros
automatically call the following macros:
•
set_sun_t5
•
•
•
•
•
•
•
•
set_sgi
set_ibm
set_alphapc
set_hp
set_linux
set_sco
set_uxw
set_sinix
for SUN workstations using the type 5 keyboard. Please
see SUN Type 5 Keyboard Layout on page 682 for
more information about fully using this keyboard.
for SiliconGraphics workstations.
for IBM RS/6000 workstations.
for a DEC Alpha station using a PC style keyboard.
for HP workstations using HP style keyboard.
for PCs running Linux.
for PCs running SCO UNIX.
for PCs running Unixware.
for Siemens workstations running SINIX.
The user can redefine every keyboard key using the KEYBOARD command described on
page 295. In addition, the keyboard can be mapped dynamically by using the menu button
described on page 101.
Using SUN Type 4 or Type 3 Keyboards
When a type 4 keyboard is in use on a SUN workstation, the set_sun_t5 statement in
the *.sedit files in use must be replaced with the set_sun_t4 statement. When a type
3 keyboard is in use on a SUN workstation, the set_sun_t5 statement must be replaced
with the set_sun_t3 statement.
Using HP PC-Style Keyboard
When a PC style keyboard is in use on a HP workstation, the set_hp statement in the
*.sedit files in use must be replaced with the set_hppc statement.
Using Native DEC Keyboard
When a native DEC keyboard is in use on an alpha workstation, the set_alphapc
statement in the *.sedit files in use must be replaced with the set_alpha statement.
Page 6
SEDIT and S/REXX Reference Manual
Installing SEDIT on UNIX Systems
Setting the MOTIF Resources
When using the MOTIF version, the user can customize various colors and fonts using the
X11 resources facilities, by including this resource description in the ~/.Xdefaults file.
SEDIT provides the following /home/xed/.Xdefaults file to be used as a template:
!
! menus
!
smenu*background:
smenu*foreground:
!smenu*fontList:
!smenu*fontList:
grey90
black
courier-bold-14
screen-bold-14
!
! popups
!
salert*background:
salert*foreground:
Wheat
Black
!
! editor buttons
!
sedit*panel*background: Wheat
sedit*panel*foreground: Black
!
! tree buttons
!
tree*tpanel*background: Wheat
tree*tpanel*foreground: Black
!
! tree scroolbars
!
tree*scrool*background: Wheat
tree*scrool*foreground: Black
!
! dialog boxes
!
dialog*background: Wheat
dialog*foreground: Black
It is recommended that the contents of this file be inserted in the private ~/.Xdefaults
file.
The user can override the setting described in the ~/.Xdefaults file by using the -xrm
starting option at SEDIT invocation.
Example:
xed -xrm ’"salert*background: red"’
All the color names supported by the system are generally located in the
/usr/lib/X11/rgb.txt file.
SEDIT and S/REXX Reference Manual
Page 7
Setting ASCII terminals
Installing SEDIT on UNIX Systems
Setting the Keyboard Translations for an ASCII Terminal
SEDIT can run on ASCII terminals.
Such terminals send escape sequences when the user presses a function or an arrow key.
When starting in ASCII terminal mode, SEDIT reads the TERM environment variable, and
then tries to load the keyboard/terminfo/l/$TERM.esc file describing these
escape sequences, where l is the first $TERM letter. SEDIT checks in the current directory
first, then in the home directory and finally in the installation directory.
SEDIT provides several *.esc files. However, if the terminal is not described by one of
these files, the user will receive the message "warning: no $TERM.esc file
available", and the terminal function keys might not work properly. SEDIT provides
the mkesc utility to easily generate such a file.
The *.esc files provided are derived from the usual terminfo files provided with
UNIX. These terminfo files are often incomplete with respect to the function keys, so it
is highly recommended that the user run mkesc for every ASCII terminal that will use
SEDIT.
Using MKESC
mkesc will create by default a description file in the /home/xed/keyboard directory,
so the user must have write authorization on this directory before starting. However, a
description file can be written in any other directory by passing the directory name as the
first argument. Every user can use a specific description file created by typing for example:
mkesc ~
The user must use mkesc on the terminal that is being described. mkesc "looks" at
each escape sequence generated in response to questions and equates these keys to the
received sequence.
Page 8
SEDIT and S/REXX Reference Manual
Installing SEDIT on UNIX Systems
Setting ASCII terminals
Type the following commands:
% cd /home/xed
% ./mkesc
This will display the following screen:
Press the "UP ARROW" Key
E
EXIT
S
SAVE
N
P
Next Key
Previous Key
F
B
Next Key type
Previous Key type
C
Cancel key
The user must now press the "UP ARROW" key, as indicated on the top of the screen.
SEDIT and S/REXX Reference Manual
Page 9
Setting ASCII terminals
Installing SEDIT on UNIX Systems
This will display (for example) the following screen:
Press the "RIGHT ARROW" Key
Key "UP ARROW" saved as ^[ [ A
E
EXIT
S
SAVE
N
P
Next Key
Previous Key
F
B
Next Key type
Previous Key type
C
Cancel key
This means that the "UP ARROW" key has been recorded as the "^[[A" escape sequence.
The keywords below have the following meanings:
•
•
•
•
•
E
S
N
P
F
• B
• C
terminates mkesc without saving changes.
saves the changes.
skips the current key.
returns to the previous key.
skips the current family key. The families are the following:
Up arrow key
Right arrow key
Down arrow key
Left arrow key
Left function keys
Top function keys
Right function keys
Insert key
Delete key
Numerical pad Enter key
Numerical pad + key
Numerical pad - key
returns to the previous family key.
cancels the key. You must choose this option if your terminal does not
support that key.
When saving the file, mkesc will backup the old file by appending a % character to the old
filename.
Page 10
SEDIT and S/REXX Reference Manual
Installing SEDIT on UNIX Systems
Setting ASCII terminals
Usage notes:
The right function keys are generally mapped as following:
R1
R2
R3
R4
R5
R6
R7
R9
Print Screen
Scroll Lock
Pause
Insert
Home
Page Up
End
Page Down
With the following physical layout:
R1
R2
R3
R4
R5
R6
R7
R9
If the escape sequence appears to be one character long, it means that the terminal does
not handle this key properly. In such a case, it is recommended the user cancel the key.
In these situations, mkesc will display a warning.
Most keyboards do not support the left keys named Li, so the user must type C to
cancel them.
Some of the top Fi keys may be used by the emulator directly, and will not be usable
by SEDIT.
Must emulators only support R4, R5, R6, R7 and R9 (**NOT** R8), so it is generally
recommended to cancel all the other Ri keys.
When prompted for the INSERT key, press INSERT, the same key used to define R4.
The Numerical pad keys generally need to be cancelled.
SEDIT and S/REXX Reference Manual
Page 11
Setting ASCII terminals
INSTALLING SEDIT ON WINDOWS
Installing SEDIT on WINDOWS Systems1
SEDIT can be installed in any directory. In this manual, it is assumed that SEDIT will be
installed in "C:\Program Files\SEDIT".
The user must run the setup.exe file.
Once the installation is done, setup displays the following screen:
1. SEDIT and S/REXX are generally bundled together. Installing SEDIT will also install S/REXX, although different activation keys are needed.
Page 12
SEDIT and S/REXX Reference Manual
INSTALLING SEDIT ON WINDOWS
Setting ASCII terminals
Clicking on the "Register SEDIT with CPU ID" button will display the following
screen:
Enter the activation key, and click on the "Register SEDIT" button. The first dialog
box is displayed again. If you do not need to register another product, click on the
"Cancel" button.
SEDIT can also be locked with the hostname (or computer name) rather than with the CPU
ID.
If you received and hostname locked key, click on the "Register SEDIT with
HOSTNAME" button::
Note for advanced users:
setup creates or updates the C:\Program Files\SEDIT\passwds file.
The user can edit and modify it directly to add, remove or modify activation keys.
SEDIT and S/REXX Reference Manual
Page 13
Setting ASCII terminals
INSTALLING SEDIT ON WINDOWS
Page 14
SEDIT and S/REXX Reference Manual
INSTALLING S/REXX ON UNIX
Installing S/REXX on UNIX Systems1
S/REXX can be installed in any directory. In this manual, it is assumed that S/REXX will
be installed in /home/xed.
First, the user must create a /home/xed directory. This procedure may require the user to
be the superuser. Type:
mkdir /home/xed
cd /home/xed
To load from a tape, use the procedure described in the READ THIS FIRST document.
To load from diskettes, use the procedure printed on each diskette.
1. SEDIT and S/REXX are generally bundled together. Installing S/REXX will also install SEDIT, although different activation keys are needed.
SEDIT and S/REXX Reference Manual
Page 15
INSTALLING S/REXX ON UNIX
Setting the Password in Fixed License Mode
The user must type the following commands:
% cd /home/xed
% ./install srexx
# Assuming /home/xed is the installation directory
The user will be prompted for the information displayed in the password sheet. The
following is a typical installation example on an IBM RS/6000:
% ./install srexx
******** Beginning to install S/REXX
Do you want to add a new password? y
Enter the HOSTNAME (I) :
Enter the UNAME (000003063100) :
Enter the PASSWORD () : 01455-32956-26199-54243
You have typed the following information:
HOSTNAME: I
UNAME
: 000003063100
PASSWORD: 01455-32956-26199-54243
OK ? y
Do you want to add a new password ? n
%
Page 16
SEDIT and S/REXX Reference Manual
INSTALLING S/REXX ON UNIX
On the different workstations, the UNAME query will be replaced by one of the following
UNIX commands:
Workstation
Query
UNIX command
SUN SunOS
HOSTID
hostid
SUN Solaris
HOSTID
/usr/ucb/hostid
Siemens SINIX
HOSTID
hostid
IBM RS/6000
UNAME
uname -m
Hewlett Packard
UNAME
uname -i
Silicon Graphics
SYSID
sysinfo -s
Linux PC
SEDITID
./seditid
SCO PC
SEDITID
./seditid
Unixware PC
SEDITID
./seditid
Digital Equipment
ETHERNET ADDRESS
see below
CPU Identifier on DEC/COMPAQ/HP TRUE64 Stations
On DEC Alpha stations, the cpu identifier is the ethernet address, which can be displayed
by typing the following command:
% /usr/sbin/uerf -R -r 300 | more
********************************* ENTRY
1. ********************
----- EVENT INFORMATION ----EVENT CLASS
OS EVENT TYPE
SEQUENCE NUMBER
OPERATING SYSTEM
300.
0.
OPERATIONAL EVENT
SYSTEM STARTUP
DEC OSF/1
tu0: DEC TULIP Ethernet Interface,
_hardware address: 08-00-2B-E4-F3-0B
tu0: console mode: selecting AUI
%
The cpu identifier is the last four ethernet address bytes. In this example, it would be
2BE4F30B.
./seditid can also be used in the SEDIT installation directory to display the cpu
identifier.
install may also be used to modify existing passwords or to add new passwords for
different workstations, allowing the user to centralize all the password information for
multiple workstations on the same network.
SEDIT and S/REXX Reference Manual
Page 17
INSTALLING S/REXX ON UNIX
Example:
% ./install srexx
******** Beginning to install S/REXX
The following passwords have been installed:
1: HOSTNAME: I UNAME: 000003063100
PASSWORD: 01455-32956-26199-54243
Do you want to modify one of these passwords ? n
Do you want to add a new password ? y
Enter the HOSTNAME () :
Note for advanced users:
install creates or updates the /home/xed/passwds file. The user can edit
and modify the passwds file directly to add, remove or modify passwords.
Page 18
SEDIT and S/REXX Reference Manual
INSTALLING S/REXX ON WINDOWS
Installing S/REXX on WINDOWS Systems1
S/REXX can be installed in any directory. In this manual, it is assumed that S/REXX will
be installed in "C:\Program Files\SEDIT".
The user must run the setup.exe file.
Once the installation is done, setup displays the following screen:
1. SEDIT and S/REXX are generally bundled together. Installing S/REXX will also install SEDIT, although different activation keys are needed.
SEDIT and S/REXX Reference Manual
Page 19
INSTALLING S/REXX ON WINDOWS
Clicking on the "Register S/REXX" button will display the following screen:
Enter the activation key, and click on the "Register S/REXX" button. The first dialog
box is displayed again. If you do not need to register another product, click on the
"Cancel" button.
Note for advanced users:
setup creates or updates the C:\Program Files\SEDIT\passwds file.
The user can edit and modify it directly to add, remove or modify activation keys.
Page 20
SEDIT and S/REXX Reference Manual
INSTALLING S/REXX ON WINDOWS
Using the License Server
Note: the license server should not be installed if a fixed license is used.
The same license server is used for both SEDIT and/or S/REXX. Throughout this chapter,
we will refer to the SEDIT software only for simplification. S/REXX will be mentioned
only when S/REXX specific information is provided.
SEDIT may run with a license server named xserv. In this case, SEDIT will be installed
only on one server workstation, and the other stations will have to mount the SEDIT
filesystem from that server. We will assume that SEDIT is installed in the server directory
/home/xed or C:\Program Files\SEDIT, but it may be installed anywhere.
Installing xserv on UNIX systems
To use xserv, the user must execute the following:
1)
Decide which workstation to install SEDIT on.
We will name this station xserver in the following explanations.
2)
Install the password information by typing the following commands:
% cd /home/xed
% ./install xserv
# Assuming /home/xed is the installation directory
The user will be prompted for the information displayed in the password sheet.
SEDIT and S/REXX Reference Manual
Page 21
INSTALLING S/REXX ON WINDOWS
This is a typical installation example on a SUN:
% ./install xserv
Do you want to install the license server for SEDIT? y
******** Beginning to install the license server "xserv"
Enter
Enter
Enter
Enter
Enter
Enter
Enter
Enter
Enter
the
the
the
the
the
the
the
the
the
HOSTNAME (sun1):
HOSTID (714021ca):
PASSWORD (): 27113-68498-24283-37166
SERIAL number (): 1202
PORT number (1112):
Expiration date (): none
VERSION (UNIX):
number of licenses (): 202
installation directory (/home/xed):
The server is configured with the following parameters:
HOSTNAME:
sun1
HOSTID:
714021ca
PASSWORD:
27113-68498-24283-37166
SERIAL:
1202
PORT:
1112
EXPIRE:
none
VERSION:
UNIX
LICENSES:
202
HOME:
/home/xed
Do you want to modify these settings ? n
Do you want to save these settings ? y
The "/home/xed/seditusers" file has been saved.
***
***
Warning: DO NOT install the license server for S/REXX
if you do not have an S/REXX license.
Do you want to install the license server for S/REXX? no
.
Do you want to start the license server ? y
... Checking for "xserv" processes; wait.
.... Starting "xserv"
xserv: checking for other servers with serial number 1202.
xserv: please wait for 10 seconds.
xserv: process 832 listening
xserv: process 836 listening
.... "xserv" started.
%
Page 22
SEDIT and S/REXX Reference Manual
INSTALLING S/REXX ON WINDOWS
3)
Make xserver start the /home/xed/xserv program at initialization.
For a SUN workstation running SunOS, the following statement must be included in
the /etc/rc.local file:
/home/xed/xserv /home/xed 30>/dev/console
On
a
Sun
workstation
/etc/rc3.d/S99xserv file:
running
Solaris,
create
the
following
#!/bin/sh
if [ -f /home/xed/xserv ]; then
echo "Starting SEDIT license server"
/home/xed/xserv /home/xed 30
fi
For an IBM RS/6000, issue the following command:
% mkitab "xserv:2:once:/home/xed/xserv /home/xed 30 > /dev/console 2>&1"
On HP systems, add the following line in the /etc/inittab file:
serv:34:once:/home/xed/xserv /home/xed 30
Note that the installation directory must be passed to xserv. The second parameter
passed to xserv (30 in these examples) is a delay value in seconds. If xserv is
started when the system is booting up, some resources may not be available, and
xserv may fail. Making xserv wait 30 seconds before start-up allows the system to
stabilize.
4)
Make the other network workstations that have the /home/xed xserver directory
mounted use the following command:
% mount xserver:/home/xed /home/xed
Note: A UNIX license server cannot be used with WINDOWS clients.
SEDIT and S/REXX Reference Manual
Page 23
INSTALLING S/REXX ON WINDOWS
Installing xserv on WINDOWS systems
To use xserv, the user must execute the following:
1)
Decide which workstation to install SEDIT and/or S/REXX on.
2)
Install SEDIT and/or S/REXX as described page 12 and page 19.
3)
Select the Start -> Program -> SEDIT -> License Server Setup menu
item.
The user will be prompted with the following screen:
Click on the Install License Server button, to get:
Page 24
SEDIT and S/REXX Reference Manual
INSTALLING S/REXX ON WINDOWS
Then, click on the Enter SEDIT key button, to get:
Once the licensing information for SEDIT and/or S/REXX has been entered, use the
Start the server button to start xserv. xserv will be installed as a WINDOWS
service, and will restart automatically when the server reboots.
Notes: You do not need to reboot the station when installing the license server.
WINDOWS 95 and WINDOWS 98 cannot be used as license servers.
A WINDOWS license server cannot be used with UNIX clients.
SEDIT and S/REXX Reference Manual
Page 25
INSTALLING S/REXX ON WINDOWS
Using an Alternate Server
The user may install SEDIT on an alternate server to be used, as a backup when the main
server is inoperable. The installation is the same as for the main server, with only a different
hostname and a different password. The serial number remains the same, which prevents
xserv from being used on both servers at the same time.
The users will have to mount the SEDIT files from the alternate server instead of the main
server.
Reserving Licenses on UNIX Systems
By adding the following statement in the seditusers or srexxusers file:
reserved jumbo :0.0
a license will be permanently allocated to the jumbo workstation, on the :0.0 display.
Reserving Licenses on WINDOWS systems
By adding the following statement in the seditusers or srexxusers file:
reserved jumbo
a license will be permanently allocated to the jumbo workstation.
Configuring a UNIX Heterogeneous Network
xserv is able to support a heterogeneous network. For example, to install xserv on a
SUN, and grant IBM users access to the floating licenses installed on a SUN, use install
on the SUN server as described above.
When SEDIT is installed, install creates a seditusers file. When S/REXX is
installed, install creates a srexxusers file.
Copying seditusers and/or srexxusers in the IBM SEDIT installation directory
will enable the use of the SUN xserv server by IBM users. install must not be used
on the IBM installation directory
Setting the SEDIT Idle Time
The following statement in the seditusers file:
idle 4
will make any user not using SEDIT for more than 4 hours lose their license. The license
will then be available to other users. Do not set an idle time for S/REXX, since an S/REXX
script may run for an indefinite amount of time.
Page 26
SEDIT and S/REXX Reference Manual
INSTALLING S/REXX ON WINDOWS
Setting the S/REXX Linger Time
The default value for the linger time is 5 minutes. To change the linger time, edit the
srexxusers file, and add the following line:
linger 10
Then, restart xserv. The linger time will be now set to 10 minutes. The linger time
allows a user to perform several edit and debug cycles without losing the license being used.
It is not recommended to set the linger time to low.
Logging Activity on UNIX systems
The license server xserv saves a log of its activity when started with the following
command:
% /home/xed/xserv -log /tmp/xserv.logfile /home/xed
Every time a user starts or ends using SEDIT, the logfile is updated, with information in the
following format:
xserv at 94/09/20 14:11:20:granting SEDIT license to process 8509 :0@C
xserv at 94/09/20 14:13:37:freeing SEDIT license from process 8509 @ C
Every time xinfo is used, the logfile is updated with the following information:
xserv(SEDIT): 1/2 1 available
...... hostname = C pid(s) = 8517@:0
To display the information requested by xinfo in a window other than the window xserv
was started from, type the following commands:
% xinfo
% cat /tmp/xserv.logfile
Usage Notes
Every time a user tries to start SEDIT, SEDIT asks the license server xserv for an
authorization. If xserv has not exhausted all of the available licenses, it permits SEDIT
to execute.
On UNIX systems, one SEDIT floating license allows any number of sessions on up to 4
displays connected to a given cpu. If the DISPLAY environment variable does not exist, and
on WINDOWS systems, xserv takes in account the userid.
When a user terminates an S/REXX session, S/REXX sends a message to xserv to release
the license. If that S/REXX session was the last session active on the given display, xserv
SEDIT and S/REXX Reference Manual
Page 27
INSTALLING S/REXX ON WINDOWS
waits for a specified amount of time called the linger time. If no request is received
during the linger time for that display, xserv will release the license.
When a user terminates an SEDIT session, SEDIT sends a message to xserv to release
one license. If that SEDIT session was the last one active on the given display, xserv can
now grant one more license to another display.
The user must not halt a workstation on which an SEDIT process is running. This would
prevent SEDIT from sending a message to xserv to release the user’s license, thus making
that license permanently in use. Should this happen by inadvertent error, the user must
restart the xserv process.
This is an example of how to kill and restart xserv on UNIX systems:
% cd /home/xed
% ./install xserv restart
Do you want to start the license server ? y
... Checking for "xserv" processes; wait.
The following "xserv" processes are running:
860 ?
861 ?
S
S
0:00 /home/xed/xserv
0:00 /home/xed/xserv
They must be killed before restarting the new license server.
Do you want to kill these processes? y
... killing 860
... killing 861
xserv: child died
.... All "xserv" processes killed; please wait for 10 seconds.
.... Starting "xserv"
xserv: checking for other servers with serial number 1001.
xserv: please wait for 10 seconds.
xserv: process 875 listening
xserv: process 879 listening
.... "xserv" started.
%
On WINDOWS systems, xserv is a service, and can be stopped and restarted using the
service manager located on the control panel.
Page 28
SEDIT and S/REXX Reference Manual
INSTALLING S/REXX ON WINDOWS
Using XINFO
xinfo is a utility that informs the user who is using SEDIT.
This is an example of xinfo usage on UNIX systems:
% cd /home/xed
% xinfo -s
C{xed}% xinfo -s
SEDIT licenses: 2/3 1 available
...... hostname = asterix pid(s) = 881 912
...... hostname = obelix
pid(s) = 12323
This means that 2 SEDIT licenses are in use. There are two sessions on the asterix
workstation, and one on the obelix workstation.
The -s option makes xinfo display the licensing information on the console. Used
without option, xinfo opens a dialog box for display.
On WINDOWS systems, use the Start -> Program -> SEDIT -> License
Server Query menu item.
Stopping the Server on UNIX Systems
xsdown is a utility that stops xserv.
This is an example of xsdown usage:
% cd /home/xed
% private/xsdown -s
xserv: exiting.
xserv: shutdown performed.
xserv: exiting with return code 0
C{xed}%
The -s option makes xsdown display the licensing information on the console. Used
without option, xsdown opens a dialog box for display.
The private subdirectory is configured to be accessible only by the root account, in order
to prevent other users from stopping the server.
Stopping the Server on WINDOWS Systems
xserv is a service, and can be stopped and restarted using the WINDOWS service
manager located on the control panel.
SEDIT and S/REXX Reference Manual
Page 29
INSTALLING S/REXX ON WINDOWS
Page 30
SEDIT and S/REXX Reference Manual
SEDIT COMPATIBILITY ISSUES
SEDIT Compatibility issues
XEDIT Compatibility Issues
SEDIT has been designed as an XEDIT enhancement rather than an exact copy. These
enhancements make some commands behave differently. Since experienced XEDIT users
may find these enhancements confusing at first, SEDIT provides the MODE command to
restore full XEDIT compatibility.
To configure SEDIT for full XEDIT compatibility, uncomment the following line in the
/home/xed/profile.sedit (UNIX) or
c:\Program Files\SEDIT\profile.sedit (WINDOWS) file by removing the
/* and */ comment characters:
/* ’set_xedit’ */
set_xedit is the /home/xed/xmac/set_xedit.x or
c:\Program Files\SEDIT\set_xedit.x macro, which calls the SEDIT MODE
command described on page 322.
To run SEDIT on ASCII terminals, uncomment the following statement:
/*
* If you want SEDIT to leave when quitting the last edited file,
* uncomment the following line
*/
/* ’mode autoexit on’ */
Remove these /* and */ comment signs
See the MODE command on page 322 for more details.
SEDIT and S/REXX Reference Manual
Page 31
XEDIT
SEDIT COMPATIBILITY ISSUES
To have the exact initial XEDIT key settings, the user may alternately start SEDIT by
typing on UNIX systems:
/home/xed/xedit
On WINDOWS systems, click on the XEDIT - Exactly icon.
This starts SEDIT with the /home/xed/prof_xedit.sedit or
c:\Program Files\SEDIT\prof_xedit.sedit profile.
The prof_xedit macro sets up SEDIT to be the closest to XEDIT, searches for a user
~/xeditprof.sedit file, and executes it when found.
Note: On WINDOWS systems, the HOME environment variable is usually not defined. In
this case, the "~/" or "~\" directory shortcut is translated into "C:\".
Note that on UNIX systems, using xedit rather than sedit to start SEDIT disables some
useful features, such as the Cut and Paste key settings.
xedit will assign the following function keys:
•
•
•
•
Page 32
F1
F2
F3
F4
HELP
SOS LINEADD
QUIT
SOS TABF
• F5
• F6
XEDIT
?
•
•
•
•
•
•
BACKWARD
FORWARD
=
RGTLEFT
SPLTJOIN
CURSOR HOME
F7
F8
F9
F10
F11
F12
adds a line at the cursor location.
exits the current file.
moves the cursor as if the NEXT_FIELD key
had been depressed.
switches to the next file in the ring.
recalls and displays previously entered
commands in a circular sequence.
repeats the last command without displaying it.
scrolls to the right, and then to the left.
splits or joins lines.
switches the cursor position between the
command and the data fields.
SEDIT and S/REXX Reference Manual
SEDIT COMPATIBILITY ISSUES
XEDIT
SEDIT Differences
The following XEDIT commands are not implemented in SEDIT:
•
•
•
•
•
•
•
•
•
•
•
•
•
•
•
•
•
•
•
ALTER
CMS (replaced with the SHELL and XSHELL commands)
CP
EXPAND
JOIN
LOAD
LPREFIX
MODIFY
OVERLAY
PARSE
RECOVER (replaced with the more powerful undo/redo feature)
RENUM
SET: APL BRKKEY COLPTR ESCAPE ETARCBCH ETMODE FILLER FMODE
FULLREAD IMAGE MASK MSGLINE MSGMOE NONDISP NULLS PAN PACK
RANGE REMOTE SERIAL SIDCODE SPILL TERMINAL TEXT TOFEOF
TRANSLAT
SI (replaced with the auto-indentation feature: typing ENTER at the end of the line
when no command is displayed in the command area adds a line, and places the cursor
with respect to the previous line indentation)
SOS: NULLS PFn POP PUSH
SPLIT (SPLITJOIN is implemented)
STATUS (Without operands, the SET command displays the function key setting in
fullscreen mode)
TRANSFER
TYPE
SEDIT and S/REXX Reference Manual
Page 33
XEDIT
SEDIT COMPATIBILITY ISSUES
The following EXTRACT operands are not supported by SEDIT:
ACTION
APL
BASEFT
BRKKEY
COLPTR
EDIRNAME
EFMODE
EFNAME
EFTYPE
EOF
EOL
ESCAPE
ETARBCH
ETMODE
FILLER
FMODE
FULLREAD
IMAGE
INPMODE
LIBNAME
LIBTYPE
LOCK
MASK
MEMBER
NBSCOPE
NONDISP
NULLS
PA
PACK
PFn
RANGE
REMOTE
SEQ8
SERIAL
SIDCODE
SPILL
TERMINAL
TEXT
TOF
TOPEOF
TOL
TRANSLAT
UNIQUEID
UNTIL
UPDATE
VERSHIFT
WINDOW
Compared to XEDIT, SEDIT features the following main differences:
•
•
The profile.sedit macro is executed only at initialization.
reprofile.sedit (or reprofile.ex) is executed every time a new file is
loaded.
Unlike XEDIT, in which the ALL command always refers to the complete file, the
SEDIT ALL command applies only to the visible lines. This can be overridden by
writing the following {install-dir}/xmac/all.sedit macro:
parse arg a
’command all’
’command all ’a
•
•
•
•
•
•
•
Page 34
The column targets do not support the | operand.
COMPRESS is a completely different command, meant only for APL users.
EMSG {message-id} is not supported. EMSG TEXT is supported.
HEXTYPE creates a new file in the ring.
INPUT needs an operand.
POWERINPUT does not display a blank screen. Instead, when set to ON, the file is
still displayed on the screen. When the cursor reaches the end of the MARGINS zone
during typing, a new line is created starting with the unfinished word the user was
typing on the previous line.
Most of the SEDIT commands display their status when used without an operand,
making it unnecessary to use the QUERY command. QUERY is nonetheless
implemented in SEDIT.
SEDIT and S/REXX Reference Manual
SEDIT COMPATIBILITY ISSUES
•
SCHANGE is a full command, to be entered with the following syntax:
sc/str1/str2/
•
•
•
XEDIT
arg1 arg2 arg3
The confirmation key (F12) can be changed with the SCKEYS command described
on page 379.
The SORT command does not accept a general target.
The ? buffer is associated with the entire session instead of being associated with a
file, and records only the strings entered in the command line.
There is no End Of File prefix zone.
When the set_xedit macro is not used within the profile, SEDIT features many
differences outlined in the description of the MODE command on page 322.
SEDIT and S/REXX Reference Manual
Page 35
ISPF/PDF
SEDIT COMPATIBILITY ISSUES
ISPF/PDF Compatibility Issues
SEDIT supports the following set of PDF commands:
BOUNDS
BUILTIN
CANCEL*
CAPS
CHANGE*
COPY*
CREATE
DELETE*
EDIT
END
EXCLUDE*
FIND*
LOCATE*
RCHANGE
REPLACE*
RESET
RFIND
The commands marked with an * have the same name as XEDIT commands.
SEDIT uses the MODE COMMAND status to choose between the ISPF/PDF and the XEDIT
behavior.
For example, when MODE COMMAND XEDIT is in effect:
•
•
FIND
PDFFIND
calls the XEDIT FIND command.
calls the PDF FIND command.
When MODE COMMAND PDF is in effect:
•
•
FIND
XEDFIND
calls the PDF FIND command.
calls the XEDIT FIND command.
To start SEDIT in XEDIT mode, use the following on UNIX systems:
{install-dir}/xed
starts SEDIT in the foreground.
{install-dir}/sedit
starts SEDIT in the background.
On WINDOWS systems, use the SEDIT - XEDIT mode icon.
To start SEDIT in PDF mode, use the following on UNIX systems:
{install-dir}/pxed
starts SEDIT in the foreground.
{install-dir}/psedit
starts SEDIT in the background.
On WINDOWS systems, use the SEDIT - PDF mode icon.
These scripts or icons use the standard profile.sedit initialization macro, which
assigns a complete set of function keys optimized for every type of supported keyboard. See
the sections "Using function keys on xxxx keyboards" for more information.
To have PDF-style function key settings, the user may alternately start SEDIT by typing on
UNIX systems:
{install-dir}/pdf
Page 36
SEDIT and S/REXX Reference Manual
SEDIT COMPATIBILITY ISSUES
ISPF/PDF
On WINDOWS systems, use the XEDIT - PDF Exactly icon.
The pdf script or icon starts SEDIT with the /home/xed/prof_pdf.sedit (or
C:\Program Files\prof_pdf.sedit) profile. This macro sets up SEDIT to
simulate PDF as closely as possible, searches for a user ~/pdfprof.sedit file, and
executes it when found.
Note: On WINDOWS systems, the HOME environment variable is usually not defined. In
this case, the "~/" or "~\" directory shortcut is translated into "C:\".
Note that on UNIX systems, using pdf rather than psedit to start SEDIT disables some
useful features, such as the Cut and Paste key settings.
pdf will assign the following function keys:
• F1
• F2
• F3
HELP
SCREEN 2
END
•
•
•
•
•
•
•
•
•
SWITCH
RFIND
RCHANGE
BACKWARD
FORWARD
LEFT 40
RIGHT 40
SOS TABCMDF
SCREEN 1
F4
F5
F6
F7
F8
F9
F10
F11
F12
splits the screen.
terminates the SEDIT session, after saving all
the modified files.
switches between files.
moves the cursor to the next screen.
unsplits the screen.
Usage Notes
Being derived from XEDIT, SEDIT brings to ISPF/PDF users some new, powerful
features.
The Editing Ring
SEDIT is able to edit any number of files simultaneously. To edit another file, simply type
edit filename.
To switch between files, the user may click with the left mouse button on the file name
displayed at the top of the window. The SWITCH and ISWITCH commands described on
page 417 and page 293 may also be used. Entering EDIT without an argument also switches
between files, but without the priority ordering provided by the SWITCH command.
Note that EDIT is a synonym to the XEDIT command described on page 446.
The Current Line
Most SEDIT commands apply from the current line, which is the line displayed in red on a
specific screen location. See the CURLINE command on page 209.
PDF commands do not use the current line concept. For example, FIND uses the argument
keyword (FIRST, LAST, etc...) to determine the search starting point.
SEDIT and S/REXX Reference Manual
Page 37
ISPF/PDF
SEDIT COMPATIBILITY ISSUES
Free File Manipulation
Although the CREATE and REPLACE commands are implemented, it is easier to use the
SAVE (page 375) and FN (page 275) commands to manage file names.
The FLIST utility described on page 459 is a powerful fullscreen file manager. Editing a
new file within FLIST is as simple as clicking on its name, or placing the cursor on it and
hitting the F4 key on ASCII terminals.
The PROFILE File
When SEDIT is invoked, it uses the profile.sedit REXX macro file as its
initialization macro.
profile.sedit is first searched for in the current directory, then in the user’s home
directory, and if still not found, in the SEDIT installation directory.
The -p option described on page 46 may be used to start SEDIT with a different profile file.
See Customizing SEDIT (UNIX) on page 39 for more information.
When a reprofile macro has been loaded at initialization by using the HASH command
described on page 285, reprofile will be used every time a new file is loaded.
This permits the reprofile macro to set up a different SEDIT environment for specific
files.
reprofile may be either a reprofile.sedit REXX macro or a reprofile.ex
external macro. See Using EXTERNAL Macro Commands (UNIX Only) on page 134 for
more information.
Page 38
SEDIT and S/REXX Reference Manual
SEDIT COMPATIBILITY ISSUES
CUSTOMIZING
Customizing SEDIT (UNIX)
Using XED, SEDIT, PXED, PSEDIT or KEDIT
When called by the XED, SEDIT, PXED, PSEDIT or KEDIT scripts, SEDIT uses the
standard profile.sedit initialization macro, which assigns a complete set of function
keys optimized for every type of supported keyboard. See "Using function keys on xxxx
keyboards" section for more information.
To customize the SEDIT session, copy the
{install-dir}/profile.sedit file into the user’s home directory:
% cp /home/xed/profile.sedit ~
Any SEDIT command added in this file must be surrounded by single or double quotes. We
recommend adding all user modifications at the end the file, after the comment line tagged
"START of user modification". For example, to change the function key settings
for F7 and F8:
/* START of user modification */
’set f7 pgup’
’set f8 pgdown’
/* END
of user modification */
Using XEDIT or PDF
XEDIT and PDF use a special profile file which checks for a ~/xeditprof.sedit or
~/pdfprof.sedit file and executes it when found.
Therefore, to customize the SEDIT session, the user must create an xeditprof.sedit
or pdfprof.sedit file into the user’s home directory from scratch.
Any SEDIT command in this file must be surrounded by single or double quotes.
For example, to change the function key settings for F7 and F8:
’set f7 rchange’
’set f8 rfind’
SEDIT and S/REXX Reference Manual
Page 39
CUSTOMIZING
SEDIT COMPATIBILITY ISSUES
Customizing SEDIT (WINDOWS)
Using the XEDIT-MODE, PDF-MODE and KEDIT-MODE Icons
When called by the XEDIT-MODE, PDF-MODE or KEDIT-MODE icons, SEDIT uses the
standard profile.sedit initialization macro, which assigns a complete set of function
keys.
See Using Function Keys on WINDOWS on page 80 for more information.
To customize the SEDIT session, the user must copy the
{install-dir}\profile.sedit file into the C:\ directory.
Any SEDIT command added in this file must be surrounded by single or double quotes. We
recommend adding all user modifications at the end the file, after the comment line tagged
"START of user modification". For example, to change the function key settings
for F7 and F8:
/* START of user modification */
’set f7 pgup’
’set f8 pgdown’
/* END
of user modification */
Using the XEDIT-EXACTLY or PDF-EXACTLY Icons
XEDIT and PDF use a special profile file which checks for a C:\xeditprof.sedit or
C:\pdfprof.sedit file and executes it when found.
Therefore, to customize the SEDIT session, the user must create an xeditprof.sedit
or pdfprof.sedit file into the C:\ directory from scratch:
Any SEDIT command in this file must be surrounded by single or double quotes. For
example, to change the function key settings for F7 and F8:
’set f7 rchange’
’set f8 rfind’
Page 40
SEDIT and S/REXX Reference Manual
SEDIT USER’S GUIDE
The 3270 screen interface
SEDIT User’s Guide
The 3270 Screen Interface
SEDIT has a user interface which emulates an IBM1 3270 terminal device. This means that
data is displayed using fields in a strictly WYSIWYG manner.
There are absolutely no invisible control characters on the screen. When the user sees a
space, it is an actual space, and the user can overtype it without entering spaces before it, as
required with most UNIX editors.
A field is an area of the screen on which alphanumeric data is written by the editor, and on
which either data or commands may be written. Some fields are input fields, which allow
data input, and others are output fields where data entry is prohibited. If data entry is
attempted on an output field the screen will flash.
There are a few keys which make it possible to move the cursor in a way similar to that of
a 3270 device:
•
NEXT FIELD
•
PREV FIELD
•
DOWN FIELD
•
UP FIELD
Key TAB will move the cursor to the next input field.
If there is no field at the right in the same line, the cursor will be
moved to the first input field on the line below.
Note: Type Control-TAB to enter a tabulation, or Control-t
when running in ASCII terminal mode.
The key Shift-TAB will move the cursor to the previous input
field.
If there is no field at the left on the same line, the cursor will be
moved to the last input field on the line before.
On DECstation keyboards, this function is assigned to the
SELECT (R6) key.
On HP keyboards, it is assigned to the Numerical Pad TAB key.
On Sun keyboards, the AltGraph key will move the cursor to
the first input field on the line below.
On DECstation keyboards, it is assigned to the PF4 (L4) key.
On HP keyboards, it is assigned to the Right Extended Char
key.
On other keyboards, this function is assigned to the right
Control key.
On Sun type 4 keyboards, the key Line feed will move the
cursor to the first input field on the upper line.
On DECstation keyboards, it is assigned to the PF3 (L3) key.
On HP keyboards, it is assigned to the Select key.
On other keyboards, this function is assigned to the right Alt key.
1. IBM is a registered trademark of International Business Machines, Inc.
SEDIT and S/REXX Reference Manual
Page 41
The 3270 screen interface
•
HOME
•
IHOME
SEDIT USER’S GUIDE
On Sun, IBM and SiliconGraphics keyboards, the Home key will
move the cursor to the first input field on the screen.
On HP keyboards, it is assigned to the key labeled with a . This
key is defined as the R7 key.
On Sun, IBM and SiliconGraphics keyboards, the key End key
will move the cursor to the last input field on the screen.
On HP keyboards, it is assigned to the Shift-R7 key.
The user can also move the cursor using the CURSOR KEYS or using the third mouse
button.
The following keys are used to manage data on a field:
Page 42
•
INS
•
CAPS
•
APL
•
ERASE EOF
•
DELETE
•
BACKSPACE
On Sun type 3 keyboards, the R11 key will toggle between
INSERT and REPLACE mode.
On HP keyboards, INS is assigned to the Ins Char key.
On other keyboards, this function is assigned to the Insert key.
On Sun type 3 keyboards, the R13 key will toggle between lower
case and caps-lock upper case mode. Unlike the standard CAPS
Sun Key, every key will be treated as shifted, not only alphabetical
keys.
On other keyboards, this function is assigned to the Caps Lock
key.
Note that function keys are not modified by the caps-lock status.
On Sun type 3 keyboards, the R15 key will toggle between
STANDARD and APL mode. APL mode is meaningless unless
using an APL font.
On Sun keyboards, the key L3 (usually labelled Props) will
clear the field starting at the cursor location.
When shifted, it will erase the entire field, and place the cursor at
the beginning of the field.
On HP keyboards, this function is assigned to the Reset key.
On IBM and SiliconGraphics keyboards, this function is assigned
to the Escape key. Control-Escape will erase the entire
field.
On WINDOWS systems, use Escape and Shift-Escape.
On DECstation keyboards, use the F13 key.
Key Delete (Remove on DECstations and Delete Char on
HP keyboards) will erase the character at the cursor location and
shift to the left all the characters remaining on the field to the right
of the cursor.
Key Back Space will erase the character at the left of the cursor
location. If the user is in INSERT mode, SEDIT will shift the
characters that remain to the right of the cursor to the left.
SEDIT and S/REXX Reference Manual
SEDIT USER’S GUIDE
The 3270 screen interface
Note: Most UNIX editors, such as VI, use tabulations to indent text. SEDIT does not do
this because using such control characters prevents using two dimensional features
such as rectangular selection.
So, if the user wants to edit files previously created with tabulations, the user may
use the TABEXP command to replace tabulations with spaces. The user may
simulate the standard UNIX tabulations using the TABSET command.
The following key is also useful:
•
PRINTSCREEN
On Sun keyboards, the Meta-L3 key will print a screen copy.
The meta key is labelled left or right on Sun type 3
keyboards, and ◊ on the type 4 and 5 keyboards.
On IBM and SiliconGraphics keyboards, the user must use the
Shift-Control-Escape key.
On HP keyboards, the meta key is the left Extended Char key,
and the user must use the Meta-Reset key.
On DECstation keyboards, the meta key is the Compose key, and
the user must use the Meta-F13 key.
SEDIT and S/REXX Reference Manual
Page 43
Getting started (UNIX)
SEDIT USER’S GUIDE
Getting Started (UNIX)
Starting SEDIT Within DYALOG APL
Under APL, the user must first copy the functions included in the /home/xed/XF
workspace, and then issue the command "XF'TEST'" to edit the APL object TEST. This
object may be any kind of APL object, but
OR object representation.
In case of a nested array, or of an object with rank greater than two, the user will see a two
dimensional display representation, but the user will not be allowed to issue the FILE
command to fix it in the active workspace.
The function XF maintains the last modification time in a variable named TSOBJ, and
SEDIT displays this information in the first screen line.
Starting SEDIT Under UNIX
To start SEDIT, use one of the following commands:
xed
starts SEDIT in the foreground in XEDIT
mode
sedit
pxed
psedit
starts SEDIT in the background in XEDIT
mode
starts SEDIT in the foreground in PDF mode
starts SEDIT in the background in PDF mode
xedit
pdf
starts SEDIT in full XEDIT compatible mode
starts SEDIT in full PDF compatible mode
kedit
starts SEDIT with a KEDIT-like keyboard
layout. See page 87.
After installing SEDIT, the user may type, for example:
% sedit test.c
Page 44
SEDIT and S/REXX Reference Manual
SEDIT USER’S GUIDE
Getting started (UNIX)
Assuming file test.c exists, the screen will look like this:
/usr/m1/test.c
test.c
00001
00002
00003
00004
Len:5
mod:
/*
* This is a sample file for SEDIT
*
*/
====> _
1:Q 2:E 3:Save 4:Sp 5:X 6:cu 7:U 8:D 9:? R1:h R3:=g S-R2:top S-R3:bot
Note: SEDIT looks for this test.c file in the current directory first. If it does not exist
in this directory, SEDIT searches in the directories described either in the
environment variable XPATH (if there is one) or in PATH, or in directories accessed
by the ACCESS command. If the file is not found, SEDIT starts with an empty file.
SEDIT and S/REXX Reference Manual
Page 45
Getting started (UNIX)
SEDIT USER’S GUIDE
The UNIX Command Line Options
The user can pass to SEDIT the following options:
-Ww or -width
-Wh or -height
-Wf or -font
-dy_font
-display
-Wp or -position
-WP or -icon_position
-xrm
columns
the number of columns.
lines
the number of lines.
fontname the font to be used at initialization.
fontname the font to be used by dialog boxes.
display
the X11 display to be used.
x y
the SEDIT window location.
x y
the SEDIT icon location.
’"resource"’
overrides a specific X11 resource when
running in the MOTIF mode. See
Setting the MOTIF Resources on page 7
for more details about X11 resources.
resource must be enclosed within ’"
and "’.
-p or -P
filename
-np
-c
’"cmd"’
-batch
-filec
Example:
filename
the profile file to be read at initialization,
profile.sedit by default. Note
that filename is executed before
loading any file.
no profile file will be read at
initialization.
executes the SEDIT command cmd
after initialization.
cmd must be enclosed within ’" and
"’.
starts SEDIT in batch mode. See Using
the BATCH Option on page 146 for
more information.
starts SEDIT in batch mode, loads first
the various files passed as parameters,
and executes the filename macro.
See Using the BATCH Option on page
146 for more information.
xed -c ’"f * c"’ foo.c
This statement starts editing the file foo.c, and then calls the directory
editor upon every *.c file.
If the sedit script is used to start SEDIT in the background, the user can pass to it the
same options.
Page 46
SEDIT and S/REXX Reference Manual
SEDIT USER’S GUIDE
Getting started (WINDOWS)
Getting Started (WINDOWS)
Starting SEDIT
setup creates the following icons:
SEDIT - XEDIT Mode
SEDIT starts with XEDIT defaults. The keyboard layout is descibed on page 80.
SEDIT will use the C:\Program Files\SEDIT\profile.sedit file as
initialization profile.
SEDIT - PDF Mode
SEDIT starts with PDF defaults. The keyboard layout is also described on page 80.
SEDIT will use the C:\Program Files\SEDIT\profile.sedit file as
initialization profile.
SEDIT - XEDIT Exactly
SEDIT starts with XEDIT defaults. The keyboard layout is similar to XEDIT, and is
described in the section XEDIT Compatibility Issues on page 31.
SEDIT will use the C:\Program Files\SEDIT\prof_xedit.sedit file as
initialization profile.
SEDIT - PDF Exactly
SEDIT starts with PDF defaults. The keyboard layout is similar to PDF, and is
described in the section ISPF/PDF Compatibility Issues on page 36.
SEDIT will use the C:\Program Files\SEDIT\prof_pdf.sedit file as
initialization profile.
SEDIT and S/REXX Reference Manual
Page 47
Getting started (WINDOWS)
SEDIT USER’S GUIDE
SEDIT - KEDIT Mode
SEDIT starts with KEDIT-like keyboard defaults. The keyboard layout is described on
page 87.
SEDIT will use the C:\Program Files\SEDIT\profile.sedit file as
initialization profile.
After starting SEDIT, the user may type, for example:
====> xed test.c
Assuming file test.c exists, the screen will look like this:
C:\Program Files\SEDIT\demo\demo1\test.c
test.c
00001
00002
00003
00004
Len:5
mod:
/*
* This is a sample file for SEDIT
*
*/
====> _
1:Q 2:E 3:Save 4:Sp 5:X 6:cu 7:U 8:D 9:? R1:h R3:=g S-R2:top S-R3:bot
Note: xed looks for this test.c file in the current directory first. If it does not exist,
SEDIT searches in the directories accessed by the ACCESS command. If the file is
not found, xed starts with an empty file.
Page 48
SEDIT and S/REXX Reference Manual
SEDIT USER’S GUIDE
Getting started (WINDOWS)
The WINDOWS Command Line Options
The user can pass to SEDIT the following options:
-Ww or -width
-Wh or -height
-Wp or -position
-p or -P
columns
lines
x y
filename
-np
-c
cmd
-noauto
-batch
-filec
Example:
filename
the number of columns.
the number of lines.
the SEDIT window location.
the profile file to be read at initialization,
profile.sedit by default. Note
that filename is executed before
loading any file.
no profile file will be read at
initialization.
executes the SEDIT command cmd
after initialization.
cmd must be enclosed within quotes
when containing blanks.
SEDIT normally records the font in use
and its window location when exiting,
and uses the recorded settings when
started again. With the -noauto
option, SEDIT does not use the
recorded settings when starting, and
does not save new ones when exiting.
starts SEDIT in batch mode. See Using
the BATCH Option on page 146 for
more information.
starts SEDIT in batch mode, loads first
the various files passed as parameters,
and executes the filename macro.
See Using the BATCH Option on page
146 for more information.
xed -c ’f * c’ foo.c
This statement starts editing the file foo.c, and then calls the directory
editor upon every *.c file.
SEDIT and S/REXX Reference Manual
Page 49
Getting started (WINDOWS)
SEDIT USER’S GUIDE
Using a UNIX Keyboard Layout
To start SEDIT with a UNIX like keyboard layout, edit the profile in use as described on
page 47 and uncomment the following line by removing the /* and */ comment
characters:
/* ’set_unix’ */
set_unix is the C:\Program Files\SEDIT\xmac\set_unix.x macro. The
keyboard layout will be modified in the following way:
KEY
WINDOWS SETTINGS
F2
adds a line below the cursor location
removes the selected characters
F3
saves the file
copies the selection into the clipboard
F4
splits or joins the current line
pastes from the clipboard
^a
selects all
adds a line below the cursor location
^A
selects all
^c
copies the selection into the clipboard compiles the current file
^C
compiles the current file
^g
Page 50
UNIX SETTINGS
compiles in debug mode
^G
compiles in debug mode
^s
opens the SAVE AS dialog box
splits or joins the current line
^x
removes the selected characters
starts editing the file selected with the
mouse
Mouse
Mode
Windows (see page 127)
Open Look (see page 123)
SEDIT and S/REXX Reference Manual
SEDIT USER’S GUIDE
Exploring the SEDIT screen
Exploring the SEDIT SCREEN
The screen is divided into 6 major types of fields:
1)
The STATUS FIELD:
/usr/m1/test.c
Len:5
mod:
indicates the full name of the file being edited, its length and shows an "*" behind
"mod:" when the file has been modified but not yet saved.
2)
The MESSAGE FIELD:
test.c
shows either the names of different files being edited at the same time or an error
message when necessary.
To switch from one file to another, click the filename in this field with the left or
center mouse button (M1/M2).
3)
The PREFIX FIELDS:
00005
give the number of each line displayed.
The user can type commands in these fields. The commands will affect only the
corresponding line.
4)
The DATA FIELDS:
This line is line 5 of this file
The user can modify the data by typing over it.
If the length of this field is not sufficient for the data, place the cursor on it and press
the F2 (extend feature) key.
SEDIT and S/REXX Reference Manual
Page 51
Exploring the SEDIT screen
5)
SEDIT USER’S GUIDE
The DIRECT INPUT FIELDS:
These are the fields between the last data field and the COMMAND FIELD, and
between the message field and the first data field.
The user can type in data directly. When the user validates the data entered by
pressing Return, new lines will be added to the file.
6)
The COMMAND FIELD:
====>
is used to pass commands to the editor.
Commands generally work from the CURRENT LINE towards the end of the file.
The CURRENT LINE is the line which is displayed on the 8th physical line of the
screen. If a color display is used, the current line will appear in red and the
corresponding prefix field appears bold-faced.
Note that the physical location of the CURRENT LINE may be changed with the
"CURL N" command.
The convention for command description is the following:
Add {N} means that the command ADD can be shortened by "A" or "AD", and
that the numerical parameter "N" may be omitted.
Note that any command may be entered in upper or lower case letters.
The user may also pass commands using buttons, or OpenLook style walking
menus. See the commands BUTTON and MENU for more information.
Page 52
SEDIT and S/REXX Reference Manual
SEDIT USER’S GUIDE
Moving through a file
Moving Through a File
1)
Entering commands
The user can go to line N by typing N followed by "Return" in the
COMMAND FIELD.
The user can scroll up N lines by typing "Up {N}".
The user can scroll down N lines by typing "Down {N}".
"TOP" moves the current line to the top of the file.
"Bottom" moves the current line to the bottom of the file.
2)
Using the function keys
A 3270 keyboard may use up to 24 functions named PF1 to PF24.
PF1 to PF12 are mapped on keys F1 to F12.
On old Sun keyboards, PF10 to PF12 are mapped on keys R1 to R3.
PF13 to PF24 are mapped on the same keys, modified by the shift key.
Key F7 scrolls up one page: the current line becomes the last line displayed.
Key F8 scrolls down one page: the last line displayed becomes the current line.
Keys PF19 (Shift-F7) and PF20 (Shift-F8) scrolls the whole screen: the last line
displayed becomes first, and vice versa.
3)
Using the mouse in OpenLook mode (the default mode on UNIX systems)
When the arrow is in a PREFIX FIELD, M1 and M2 (Left and Middle) keys
work like F7 and F8.
"Control-M1" will move the current line to the top of the file.
"Control-M2" will move the current line to the bottom of the file.
When the arrow is in the first screen line, M1 and M2 will scroll UP and DOWN
4 lines on the screen. When shifted, they will scroll 8 lines. When holding the
meta key, they will scroll one page.
M3 (the third mouse button) is usually used to move the cursor, but when
shifted, the line on which it is used will become the current line.
Note that the same can be achieved by typing "/" and "Return" in a PREFIX
FIELD.
4)
Using the mouse in WINDOWS mode
M1 is the left mouse button, and M3 is the right mouse button. When using a 3
button mouse, M2 is the middle mouse button.
When the arrow is in a PREFIX FIELD, "Control-M1" will move the
current line to the top of the file.
"Control-M2" will move the current line to the bottom of the file.
M3 is usually used to display a menu, but when shifted, the line on which it is
used will become the current line.
Note that the same can be achieved by typing "/" and "Return" in a PREFIX
FIELD.
SEDIT and S/REXX Reference Manual
Page 53
Editing Multiple Files
The basic command for editing a file is "xed unixname".
If there is no directory indicator such as "/", "./", "~/" or "\" on WINDOWS, the
current directory will be searched first. If not found, it will be looked for in the directories
described by the environment variable XPATH, or PATH.
The user can change the current directory using the CD command, or add a new directory in
the path by using the ACCESS command.
There are short-cuts to make editing another file easier. When editing a certain type of file,
for example "test.c", and the user wants to edit another file of the same type, for
example "test1.c", the user may type "x test1" instead of "xed test1.c".
There are also several abbreviations for the most frequent unix types of files:
"xc test"
"xf test"
"xp test"
"xh test"
"xt test"
"xm test"
"xx test"
"xi"
"xe test"
"xs test"
<===>
<===>
<===>
<===>
<===>
<===>
<===>
<===>
<===>
<===>
"xed
"xed
"xed
"xed
"xed
"xed
"xed
"xed
"xed
"xed
test.c"
test.f"
test.p"
test.h"
test.txt"
test.mem"
test.x"
.dbxinit"
test.ex"
test.sedit"
Under APL, you edit in priority another APL object, but nothing prevents you from editing
a UNIX file either by specifying a path with a "/", "~/" or "/" starting filename, or using
one of the above x{?} abbreviations.
SEDIT USER’S GUIDE
Editing multiples files
Assume that "x test1" or "xc test1" is typed. The screen will look like this:
/usr/m1/test1.c
test.c test1.c
00001
00002
00003
00004
00005
00006
Len:5
mod:
/*
* This is a second sample file for SEDIT
*
*
main()
/* This file is 6 lines long */
====> _
1:Q 2:E 3:Save 4:Sp 5:X 6:cu 7:U 8:D 9:? R1:h R3:=g S-R2:top S-R3:bot
The message field indicates that you are editing two files, named "test.c" and
"test1.c".
The user can switch between files either by using F5 or by clicking with the left or middle
mouse button on the name of the file.
SEDIT and S/REXX Reference Manual
Page 55
Using Function Keys un Sun keyboards
SEDIT USER’S GUIDE
Using Function Keys on SUN Keyboards
Most of the SUN function keys are dedicated to execute commands.
The Right function keys only available on Sun type 3 and type 4 keyboards are mapped
in the following way on type 5 keyboards:
•
•
•
•
•
•
•
R1
R2
R3
R7
R9
R13
R15
Print Screen
Scroll Lock
Pause
Home
Page Up
End
Page Down
See SUN Type 5 Keyboard Layout on page 682 for more details about the right function
keys.
The Left function keys are the following keys:
•
•
•
•
•
•
•
•
•
•
•
L1
L2
L3
L4
L5
L6
L7
L8
L9
L10
L11
Stop
Again
Props
Undo
Front
Copy
Open
Paste
Find
Cut
Help
The principal key definitions are referenced on the last line of the window.
Page 56
L2
MATCH
finds a matching delimiter. {[(< matches }])>.
L3
Erase end of field
clears the field starting at the cursor location.
Shift-L3
Erase all field
clears the entire field, and places the cursor at the beginning
of the field.
L4
UNDO
undoes the last action.
Shift-L4
REDO
undoes the last undo.
L6
S_COPY
copies the selection into the internal buffer named shelf.
L8
S_PASTE
pastes the shelf contents at the cursor location.
SEDIT and S/REXX Reference Manual
SEDIT USER’S GUIDE
Using Function Keys un Sun keyboards
Control-L8
S_PASTE PRIMARY
pastes the selection content at the cursor location. May be
used to retrieve the selection from another window.
Shift-L8
S_PASTE OVERLAY
overlays the shelf contents at the cursor location.
L9
S_FIND
searches a string matching the current selection.
L10
S_CUT
cuts the current selection.
F1
QUIT
is used to abandon the file without saving it. If the file has
been modified during the session, the user will be prompted
to confirm the key to quit.
Control-F1
FLQUIT
will do the same as F1, and then switch to the directory editor.
F2
C_EXT
is used to extend the length of the field selected by the cursor.
F3
SAVE
transforms the unchanged source file into a backup file by
appending a "%" to its name, and creates a new file with the
original name from the edited memory image, without exiting
it.
Shift-F3
FILE
saves the file and then presents a new screen.
Control-F3
FLFILE
will do the same as Shift-F3 and then switch to the directory
editor.
F4
C_SPLIT
when the cursor is before the last non-blank character, the
line will be split, with indentation if the auto-indent feature is
ON (See command "AUTOI on|off").
When the cursor is after the last non-blank character, the next
line will be joined to that one.
F5
SWITCH
moves from one file to another in a circular sequence.
Shift-F5
ISWITCH
does the same as F5 in a reversed sequence.
F6
C_ENDLINE
if the cursor is in a DATA FIELD, it will be moved to the end
of that field.
Shift-F6
C_ENDCURL
moves the cursor to the end of the CURRENT LINE FIELD.
SEDIT and S/REXX Reference Manual
Page 57
Using Function Keys un Sun keyboards
SEDIT USER’S GUIDE
F7
BACKWARD
scrolls backward one page.
Meta-F7
S_LSHIFT
the text from the column where the selection starts will be
moved to the left.
F8
FORWARD
scrolls forward one page.
Meta-F8
S_RSHIFT
the text from the column where the selection starts will be
moved to the right.
F9
?
displays the previous commands executed in the
COMMAND FIELD. The user can edit and re-execute them.
Shift-F9
?I
does the same as F9 in a reversed order.
Control-F9
XSHOWHISTORY
displays the commands memorized in the history buffer in
fullscreen mode.
Meta-F9
SHOWHISTORY
displays the commands memorized in the history buffer.
F10
CURSOR HOME
if the cursor is in a DATA FIELD, it will be moved to the
COMMAND FIELD. A subsequent action will restore its
previous location.
F12
=
repeats the last command without displaying it.
R1
COMPLETE
allows command line filename completion.
Shift-R1
COMPLETE REVERSE
allows command line filename completion in reverse order.
S-R2 or S-F11
TOP
moves the current line to the beginning of the file.
S-R3 or S-F12
BOT
moves the current line to the end of the file.
Control-R5
filter $xhome/filters/$arch/toggle_comment
comments in or out the selected or cursor lines.
Page 58
Control-Left-Arrow
moves the cursor to the previous word.
Control-Right-Arrow
moves the cursor to the next word.
Control-1
MACRO set_bookmark 1
sets the bookmark number 1 at the cursor location.
SEDIT and S/REXX Reference Manual
SEDIT USER’S GUIDE
Using Function Keys un Sun keyboards
Control-2
MACRO set_bookmark 2
sets the bookmark number 2 at the cursor location.
Control-3
MACRO set_bookmark 3
sets the bookmark number 3 at the cursor location.
Control-4
MACRO set_bookmark 4
sets the bookmark number 4 at the cursor location.
Control-5
MACRO set_bookmark 5
sets the bookmark number 4 at the cursor location.
Control-6
MACRO goto_bookmark 1
goes to the bookmark number 1.
Control-7
MACRO goto_bookmark 2
goes to the bookmark number 2.
Control-8
MACRO goto_bookmark 3
goes to the bookmark number 3.
Control-9
MACRO goto_bookmark 4
goes to the bookmark number 4.
Control-0
MACRO goto_bookmark 5
goes to the bookmark number 5.
Meta-0
MACRO rm_bookmarks
removes all the bookmarks on the current file.
Control-a
C_LINEADD
adds a line below the cursor location.
Control-c
MACRO smart_comp $name 0
compiles the current file, splits the screen, shows the error
messages and sets the cursor on the first error line. See the
compile command on page 192 for more details.
Control-C
MACRO smart_comp $name 1
compiles a file in the background.
Control-d
C_LINEDEL
deletes the line at the cursor location.
Control-f
equivalent to the "f" command (see Directory editor
section).
Control-g
same as Control-c, but in debug mode.
Control-G
same as Control-C, but in debug mode.
Control-h
C_SCRH
splits the screen horizontally at the cursor location.
Control-l
S_LOWER
translates the characters selected with the mouse into
lowercase.
Control-n
FLIST $fn *
calls the directory editor showing all the files with the same
SEDIT and S/REXX Reference Manual
Page 59
Using Function Keys un Sun keyboards
SEDIT USER’S GUIDE
filename as the current file.
Page 60
Control-p
SHELL lpr -h $name &
prints the current file.
Control-r
TREE
calls the tree editor.
Control-u
S_UPPER
translates the characters selected with the mouse into
uppercase.
Control-U
S_UPPER WORD
translates the first letter of each selected word with the mouse
into uppercase.
Control-v
C_SCRV
splits the screen vertically at the cursor location.
Control-w
C_SCRJ
restarts with an unsplit screen.
Control-x
S_XED
starts editing a file selected with the mouse or at the cursor
location, after expanding the selection to a word and
appending the currently edited filetype.
Control-z
LEFT 0
resets the original VERIFY setting, displaying all the
columns.
Control--
NEXTERROR
after a compilation is executed with the Control-c command,
the cursor moves to the next error.
Control-=
C_DUP
duplicates the line at the cursor location.
Shift+Control-a
MACRO adjust_cursor
sets the start of the line at the cursor position.
Shift+Control-c
CENTER
centers the line at the cursor location.
Shift+Control-f
FLOW
formats the paragraph at the cursor location.
Shift+Control-o
S_PASTE OVERLAY SHELF
overlays the contents of the clipboard at the cursor location.
Shift+Control-w
MACRO del_word
deletes the word at the cursor location.
Meta-+
MACRO toggle_display
toggles between viewing the entire file and viewing the
selected lines.
Meta-=
MACRO dup_line
duplicates the cursor or the current line.
SEDIT and S/REXX Reference Manual
SEDIT USER’S GUIDE
Using Function Keys un Sun keyboards
Meta-u
S_SET OFF
cancels the current selection.
Meta-x
S_XED
starts editing a file selected with the mouse or at the cursor
location, after expanding the selection to a word and
appending the currently edited filetype.
SEDIT and S/REXX Reference Manual
Page 61
Using Function Keys on IBM, SiliconGraphics and PCs keyboards
SEDIT USER’S GUIDE
Using Function Keys on IBM, SiliconGraphics and PCs Keyboards
Most of the function keys are dedicated to execute commands.
The Right function keys (only available on Sun keyboards) are mapped in the following
way:
•
•
•
•
•
•
•
•
R1
R2
R3
R4
R5
R6
R7
R9
Print Screen
Scroll Lock
Pause
Insert
Home
Page Up
End
Page Down
With the following physical layout:
R1
R2
R3
R4
R5
R6
R7
R9
The principal key definitions are referenced on the last line of the window.
Page 62
Escape
Erase end of field
clears the field starting at the cursor location.
Control-Escape
Erase all field
clears the entire field, and places the cursor at the beginning
of the field.
F1
S_FIND
searches a string matching the current selection.
F2
S_CUT
cuts the current selection.
F3
S_COPY
copies the selection into the internal buffer named shelf.
F4
S_PASTE
pastes the shelf contents at the cursor location.
SEDIT and S/REXX Reference Manual
SEDIT USER’S GUIDE
Using Function Keys on IBM, SiliconGraphics and PCs key-
Control-F4
S_PASTE PRIMARY
pastes the selection content at the cursor location. May be
used to retrieve the selection from another window.
Shift-F4
S_PASTE OVERLAY
overlays the shelf contents at the cursor location.
F5
SWITCH
moves from one file to another in a circular sequence.
Shift-F5
ISWITCH
does the same as F5 in a reversed sequence.
F6
C_ENDLINE
if the cursor is in a DATA FIELD it will be moved to the end
of that field.
Shift-F6
C_ENDCURL
moves the cursor to the end of the CURRENT LINE FIELD.
F7
BACKWARD
scrolls backward one page.
Meta-F7
S_LSHIFT
the text from the column where the selection starts will be
moved to the left.
F8
FORWARD
scrolls forward one page.
Meta-F8
S_RSHIFT
the text from the column where the selection starts will be
moved to the right.
F9
?
displays the previous commands executed in the
COMMAND FIELD. The user can edit and re-execute them.
Shift-F9
?I
does the same as F9 in a reversed order.
Control-F9
XSHOWHISTORY
displays the commands memorized in the history buffer in
fullscreen mode.
Meta-F9
SHOWHISTORY
displays the commands memorized in the history buffer.
F10
CURSOR HOME
if the cursor is in a DATA FIELD, it will be moved to the
COMMAND FIELD. A subsequent action will restore its
previous location.
F11
UNDO
undoes the last action.
Shift-F11
REDO
undoes the last undo.
SEDIT and S/REXX Reference Manual
Page 63
Using Function Keys on IBM, SiliconGraphics and PCs keyboards
SEDIT USER’S GUIDE
F12
=
repeats the last command without displaying it.
R1
QUIT
is used to abandon the file without saving it. If the file has
been modified during the session, the user will be prompted
to confirm the key to quit.
Control-R1
FLQUIT
will do the same as R1, and then switch to the directory
editor.
R2
COMPLETE
allows command line filename completion.
Shift-R2
COMPLETE REVERSE
allows command line filename completion in reverse order.
R3
SAVE1
transforms the unchanged source file into a backup file by
appending a "%" to its name, and creates a new file with the
original name from the edited memory image, without exiting
it.
Shift-R3
FILE
saves the file and then presents a new screen.
Shift-R6
TOP
moves the current line to the beginning of the file.
Shift-R9
BOT
moves the current line to the end of the file.
Control-R3
FLFILE
will do the same as Shift-R3 and then switch to the directory
editor.
Control-PageUp
filter $xhome/filters/$arch/toggle_comment
comments in or out the selected or cursor lines.
Control-Left-Arrow
moves the cursor to the previous word.
Control-Right-Arrow
moves the cursor to the next word.
Control-1
MACRO set_bookmark 1
sets the bookmark number 1 at the cursor location.
Control-2
MACRO set_bookmark 2
sets the bookmark number 2 at the cursor location.
Control-3
MACRO set_bookmark 3
sets the bookmark number 3 at the cursor location.
Control-4
MACRO set_bookmark 4
sets the bookmark number 4 at the cursor location.
1. On UNIXWARE PCs, the R3 key is not available. The SAVE function is assigned to the R2 key.
Page 64
SEDIT and S/REXX Reference Manual
SEDIT USER’S GUIDE
Using Function Keys on IBM, SiliconGraphics and PCs key-
Control-5
MACRO set_bookmark 5
sets the bookmark number 4 at the cursor location.
Control-6
MACRO goto_bookmark 1
goes to the bookmark number 1.
Control-7
MACRO goto_bookmark 2
goes to the bookmark number 2.
Control-8
MACRO goto_bookmark 3
goes to the bookmark number 3.
Control-9
MACRO goto_bookmark 4
goes to the bookmark number 4.
Control-0
MACRO goto_bookmark 5
goes to the bookmark number 5.
Meta-0
MACRO rm_bookmarks
removes all the bookmarks on the current file.
Control-a
C_LINEAdd
adds a line below the cursor location.
Control-c
MACRO smart_comp $name 0
compiles the current file, splits the screen, shows the error
messages and sets the cursor on the first error line. See the
compile command on page 192 for more details.
Control-C
MACRO smart_comp $name 1
compiles a file in the background.
Control-d
C_LINEDEL
deletes the line at the cursor location.
Control-f
equivalent to the "f" command (see Directory editor
section).
Control-g
same as Control-c, but in debug mode.
Control-G
same as Control-C, but in debug mode.
Control-h
C_SCRH
splits the screen horizontally at the cursor location.
Control-l
S_Lower
translates the characters selected with the mouse into
lowercase.
Control-m
MATCH
finds a matching delimiter. {[(< matches }])>.
Control-n
f $fn *
calls the directory editor showing all the files with the same
filename as the current file.
Control-p
SHELL lpr -h $name &
prints the current file.
SEDIT and S/REXX Reference Manual
Page 65
Using Function Keys on IBM, SiliconGraphics and PCs keyboards
Page 66
SEDIT USER’S GUIDE
Control-r
TREE
calls the tree editor.
Control-s
C_SPLIT
when the cursor is before the last non-blank character, the
line will be split, with indentation if the auto-indent feature is
ON (See command "AUTOI on|off").
When the cursor is after the last non-blank character, the next
line will be joined to that one.
Control-u
S_UPPER
translates the characters selected with the mouse into
uppercase.
Control-U
S_UPPER WORD
translates the first letter of each selected word with the mouse
into uppercase.
Control-v
C_SCRV
splits the screen vertically at the cursor location.
Control-w
C_SCRJ
restarts with an unsplit screen.
Control-x
S_XED
starts editing a file selected with the mouse, after expanding
the selection to a word and appending the currently edited
filetype.
Control-z
LEFT 0
resets the original verify setting, displaying all the columns.
Control--
NEXTERROR
after a compilation is executed with the Control-c command,
the cursor moves to the next error.
Control-=
C_DUP
duplicates the line at the cursor location.
Shift+Control-a
MACRO adjust_cursor
sets the start of the line at the cursor position.
Shift+Control-c
CENTER
centers the line at the cursor location.
Shift+Control-f
FLOW
formats the paragraph at the cursor location.
Shift+Control-o
S_PASTE OVERLAY SHELF
overlays the contents of the clipboard at the cursor location.
Shift+Control-w
MACRO del_word
deletes the word at the cursor location.
Meta-+
MACRO toggle_display
toggles between viewing the entire file and viewing the
selected lines.
SEDIT and S/REXX Reference Manual
SEDIT USER’S GUIDE
Using Function Keys on IBM, SiliconGraphics and PCs key-
Meta-=
MACRO dup_line
duplicates the cursor or the current line.
Meta-u
S_SET OFF
cancels the current selection.
Meta-x
S_XED
starts editing a file selected with the mouse or at the cursor
location, after expanding the selection to a word and
appending the currently edited filetype.
SEDIT and S/REXX Reference Manual
Page 67
Using Function Keys on DECstation keyboards
SEDIT USER’S GUIDE
Using Function Keys on DEC/COMPAQ/HP TRUE64 station Keyboards
If the user is using a PC style keyboard, the user must insert in the *.sedit files described
on page 6 the set_alpha statement. In this case, the function keys will match the IBM
layout described on page 62.
Most of the function keys are dedicated to execute commands.
The Right and Left function keys (only available on Sun keyboards) are mapped in the
following way:
•
•
•
•
•
•
•
•
•
R4
R5
R6
R7
R9
L1
L2
L3
L4
Find
Insert Here
Select
Previous screen
Next screen
PF1
PF2
PF3
PF4
Using the following physical layout:
F15
F16
R4
R5
R6
R7
F17
F18
F19
F20
L1
L2
L3
L4
R9
The principal key definitions are referenced on the last line of the window.
Page 68
F1
S_FIND
searches a string matching the current selection.
F2
S_CUT
cuts the current selection.
F3
S_COPY
copies the selection into the internal buffer named shelf.
F4
S_PASTE
pastes the shelf contents at the cursor location.
Control-F4
S_PASTE PRIMARY
pastes the selection content at the cursor location. May be
used to retrieve the selection from another window.
SEDIT and S/REXX Reference Manual
SEDIT USER’S GUIDE
Using Function Keys on DECstation keyboards
Shift-F4
S_PASTE OVERLAY
overlays the shelf contents at the cursor location.
F5
SWITCH
moves from one file to another in a circular sequence.
Shift-F5
ISWITCH
does the same as F5 in a reversed sequence.
F6
C_ENDLINE
if the cursor is in a DATA FIELD it will be moved to the end
of that field.
Shift-F6
C_ENDCURL
moves the cursor to the end of the CURRENT LINE FIELD.
F7
BACKWARD
scrolls backward one page.
Meta-F7
S_LSHIFT
the text from the column where the selection starts will be
moved to the left.
F8
FORWARD
scrolls forward one page.
Meta-F8
S_RSHIFT
the text from the column where the selection starts will be
moved to the right.
F9
?
displays the previous commands executed in the
COMMAND FIELD. The user can edit and re-execute them.
Shift-F9
?I
does the same as F9 as above in a reversed order.
Control-F9
XSHOWHISTORY
displays the commands memorized in the history buffer in
fullscreen mode.
Meta-F9
SHOWHISTORY
displays the commands memorized in the history buffer.
F10
CURSOR HOME
if the cursor is in a DATA FIELD, it will be moved to the
COMMAND FIELD. A subsequent action will restore its
previous location.
F11
UNDO
undoes the last action.
Shift-F11
REDO
undoes the last undo.
F12
=
repeats the last command without displaying it.
SEDIT and S/REXX Reference Manual
Page 69
Using Function Keys on DECstation keyboards
Page 70
SEDIT USER’S GUIDE
F13
Erase end of field
clears the field starting at the cursor location.
Shift-F13
Erase all field
clears the entire field, and places the cursor at the beginning
of the field.
F14
FILTER $xhome/filters/$arch/toggle_comment
comments in or out the selected or cursor lines.
F15
HELP
displays the help panel.
S-F15
HELP TASK
displays the help task panel.
F16
SAVE
transforms the unchanged source file into a backup file by
appending a "%" to its name, and creates a new file with the
original name from the edited memory image, without exiting
it.
Shift-F16
FILE
saves the file and then presents a new screen.
L1 (Labelled PF1)
QUIT
is used to abandon the file without saving it. If the file has
been modified during the session, the user will be prompted
to confirm the key to quit.
Control-L1
FLQUIT
will do the same as L1, and then switch to the directory editor.
L2
MATCH
finds a matching delimiter. {[(< matches }])>.
L3
3270 UP FIELD
moves the cursor to the first input field on the upper line.
L4
3270 DOWN FIELD
moves the cursor to the first input field on the lower line.
R7
BACKWARD
scrolls backward one page.
Shift-R7
TOP
moves the current line to the beginning of the file.
R9
FORWARD
scrolls forward one page.
Shift-R9
BOT
moves the current line to the end of the file.
Control-Left-Arrow
moves the cursor to the previous word.
Control-Right-Arrow
moves the cursor to the next word.
SEDIT and S/REXX Reference Manual
SEDIT USER’S GUIDE
Using Function Keys on DECstation keyboards
Control-1
MACRO set_bookmark 1
sets the bookmark number 1 at the cursor location.
Control-2
MACRO set_bookmark 2
sets the bookmark number 2 at the cursor location.
Control-3
MACRO set_bookmark 3
sets the bookmark number 3 at the cursor location.
Control-4
MACRO set_bookmark 4
sets the bookmark number 4 at the cursor location.
Control-5
MACRO set_bookmark 5
sets the bookmark number 4 at the cursor location.
Control-6
MACRO goto_bookmark 1
goes to the bookmark number 1.
Control-7
MACRO goto_bookmark 2
goes to the bookmark number 2.
Control-8
MACRO goto_bookmark 3
goes to the bookmark number 3.
Control-9
MACRO goto_bookmark 4
goes to the bookmark number 4.
Control-0
MACRO goto_bookmark 5
goes to the bookmark number 5.
Meta-0
MACRO rm_bookmarks
removes all the bookmarks on the current file.
Control-a
C_LINEADD
adds a line below the cursor location.
Control-c
MACRO smart_comp $name 0
compiles the current file, splits the screen, shows the error
messages and sets the cursor on the first error line. See the
compile command on page 192 for more details.
Control-C
MACRO smart_comp $name 1
compiles a file in the background.
Control-d
C_LINEDEL
deletes the line at the cursor location.
Control-f
equivalent to the "f" command (see Directory editor
section).
Control-g
same as Control-c, but in debug mode.
Control-G
same as Control-C, but in debug mode.
Control-h
C_SCRH
splits the screen horizontally at the cursor location.
Control-l
S_LOWER
translates the characters selected with the mouse into
lowercase.
SEDIT and S/REXX Reference Manual
Page 71
Using Function Keys on DECstation keyboards
Page 72
SEDIT USER’S GUIDE
Control-n
f $fn *
calls the directory editor showing all the files with the same
filename as the current file.
Control-p
SHELL lpr -h $name &
prints the current file.
Control-r
TREE
calls the tree editor.
Control-s
C_SPLIT
when the cursor is before the last non-blank character, the
line will be split, with indentation if the auto-indent feature is
ON (See command "AUTOI on|off").
When the cursor is after the last non-blank character, the next
line will be joined to that one.
Control-u
S_UPPER
translates the characters selected with the mouse into
uppercase.
Control-U
S_UPPER WORD
translates the first letter of each selected word with the mouse
into uppercase.
Control-v
C_SCRV
splits the screen vertically at the cursor location.
Control-w
C_SCRJ
restarts with an unsplit screen.
Control-x
S_XED
starts editing a file selected with the mouse, after expanding
the selection to a word and appending the currently edited
filetype.
Control-z
LEFT 0
resets the original verify setting, displaying all the columns.
Control--
NEXTERROR
after a compilation is executed with the Control-c command,
the cursor moves to the next error.
Control-=
C_DUP
duplicates the line at the cursor location.
Shift+Control-a
MACRO adjust_cursor
sets the start of the line at the cursor position.
Shift+Control-c
CENTER
centers the line at the cursor location.
Shift+Control-f
FLOW
formats the paragraph at the cursor location.
Shift+Control-o
S_PASTE OVERLAY SHELF
overlays the contents of the clipboard at the cursor location.
SEDIT and S/REXX Reference Manual
SEDIT USER’S GUIDE
Using Function Keys on DECstation keyboards
Shift+Control-w
MACRO del_word
deletes the word at the cursor location.
Meta-+
MACRO toggle_display
toggles between viewing the entire file and viewing the
selected lines.
Meta-=
MACRO dup_line
duplicates the cursor or the current line.
Meta-u
S_SET OFF
cancels the current selection.
Meta-x
S_XED
starts editing a file selected with the mouse or at the cursor
location, after expanding the selection to a word and
appending the currently edited filetype.
SEDIT and S/REXX Reference Manual
Page 73
Using Function Keys on HP keyboards
SEDIT USER’S GUIDE
Using Function Keys on HP Keyboards
If the user is using a PC style keyboard, the user must insert in the *.sedit files described
on page 6 the set_hppc statement. In this case, the function keys will match the IBM
layout described on page 62.
Most of the function keys are dedicated to execute commands. The Right and Left
function keys (only available on Sun keyboards) are mapped in the following way:
•
•
•
•
•
•
•
•
•
•
•
•
•
•
•
L1
L2
L3
L4
L6
R1
R2
R3
R4
R5
R6
R7
R9
R11
R13
Reset
Stop
Menu
User
Print
Clear
Clear Display
Insert Line
Delete Line
Insert Char
Delete Char
Prev
Next
Numerical Pad Tab Key
Using the following physical layout:
L1
L2
F1
F2
F3
F4
L3
L4
F5
F6
F7
F8
R1
R2
R3
R4
R5
R6
R7
R9
R11
L6
The principal key definitions are referenced on the last line of the window.
Page 74
SEDIT and S/REXX Reference Manual
SEDIT USER’S GUIDE
Using Function Keys on HP keyboards
L1
Erase end of field
clears the field starting at the cursor location.
Shift-L1
Erase all field
clears the entire field, and places the cursor at the beginning
of the field.
L6
COMPLETE
allows command line filename completion.
Shift-L6
COMPLETE REVERSE
allows command line filename completion in reverse order.
F1
S_FIND
searches a string matching the current selection.
F2
S_CUT
cuts the current selection.
F3
S_COPY
copies the selection into the internal buffer named shelf.
F4
S_PASTE
pastes the shelf contents at the cursor location.
Control-F4
S_PASTE PRIMARY
pastes the selection contents at the cursor location. May be
used to retrieve the selection from another window.
Shift-F4
S_PASTE OVERLAY
overlays the shelf contents at the cursor location.
F5
SWITCH
moves from one file to another in a circular sequence.
Shift-F5
ISWITCH
does the same as F5 in a reversed sequence.
F6
C_ENDLine
if the cursor is in a DATA FIELD it will be moved to the end
of that field.
Shift-F6
C_ENDCURL
moves the cursor to the end of the CURRENT LINE FIELD.
F7
BACKWARD
scrolls backward one page.
Meta-F7
S_LSHIFT
the text from the column where the selection starts will be
moved to the left.
F8
FORWARD
scrolls forward one page.
Meta-F8
S_RSHIFT
the text from the column where the selection starts will be
moved to the right.
SEDIT and S/REXX Reference Manual
Page 75
Using Function Keys on HP keyboards
Page 76
SEDIT USER’S GUIDE
F9
?
displays the previous commands executed in the
COMMAND FIELD. The user can edit and re-execute them.
Shift-F9
?I
does the same as above in a reversed order.
Control-F9
XSHOWHISTORY
displays the commands memorized in the history buffer in
fullscreen mode.
Meta-F9
SHOWHISTORY
displays the commands memorized in the history buffer.
F10
CURSOR HOME
if the cursor is in a DATA FIELD, it will be moved to the
COMMAND FIELD. A subsequent action will restore its
previous location.
F11
UNDO
undoes the last action.
Shift-F11
REDO
undoes the last undo.
F12
=
repeats the last command without displaying it.
R1
QUIT
is used to abandon the file without saving it. If the file has
been modified during the session, the user will be prompted
to confirm the key to quit.
Control-R1
FLQUIT
will do the same as R1, and then switch to the directory
editor.
R2
SAVE
transforms the unchanged source file into a backup file by
appending a "%" to its name, and creates a new file with the
original name from the edited memory image, without exiting
it.
Shift-R2
FILE
saves the file and then presents a new screen.
Control-R2
FLFILE
will do the same as Shift-R2 and then switch to the directory
editor.
R9
BACKWARD
scrolls backward one page.
Shift-R9
TOP
moves the current line to the beginning of the file.
R11
FORWARD
scrolls forward one page.
SEDIT and S/REXX Reference Manual
SEDIT USER’S GUIDE
Shift-R11
Control-R9
Using Function Keys on HP keyboards
BOT
moves the current line to the end of the file.
FILTER $xhome/filters/hp/toggle_comment
comments in or out the selected or cursor lines.
Control-Left-Arrow
moves the cursor to the previous word.
Control-Right-Arrow
moves the cursor to the next word.
Control-1
MACRO set_bookmark 1
sets the bookmark number 1 at the cursor location.
Control-2
MACRO set_bookmark 2
sets the bookmark number 2 at the cursor location.
Control-3
MACRO set_bookmark 3
sets the bookmark number 3 at the cursor location.
Control-4
MACRO set_bookmark 4
sets the bookmark number 4 at the cursor location.
Control-5
MACRO set_bookmark 5
sets the bookmark number 4 at the cursor location.
Control-6
MACRO goto_bookmark 1
goes to the bookmark number 1.
Control-7
MACRO goto_bookmark 2
goes to the bookmark number 2.
Control-8
MACRO goto_bookmark 3
goes to the bookmark number 3.
Control-9
MACRO goto_bookmark 4
goes to the bookmark number 4.
Control-0
MACRO goto_bookmark 5
goes to the bookmark number 5.
Meta-0
MACRO rm_bookmarks
removes all the bookmarks on the current file.
Control-a
C_LINEAdd
adds a line below the cursor location.
Control-c
MACRO smart_comp $name 0
compiles the current file, splits the screen, shows the error
messages and sets the cursor on the first error line. See the
compile command on page 192 for more details.
Control-C
MACRO smart_comp $name 1
compiles a file in the background.
Control-d
C_LINEDEL
deletes the line at the cursor location.
Control-f
equivalent to the "f" command (see Directory editor
section).
Control-g
same as Control-c, but in debug mode.
SEDIT and S/REXX Reference Manual
Page 77
Using Function Keys on HP keyboards
Page 78
SEDIT USER’S GUIDE
Control-G
same as Control-C, but in debug mode.
Control-h
C_SCRH
splits the screen horizontally at the cursor location.
Control-l
S_LOWER
translates the characters selected with the mouse into
lowercase.
Control-m
MATCH
finds a matching delimiter. {[(< matches }])>.
Control-n
f $fn *
calls the directory editor showing all the files with the same
filename as the current file.
Control-p
SHELL lpr -h $name &
prints the current file.
Control-r
TREE
calls the tree editor.
Control-s
C_SPLIT
when the cursor is before the last non-blank character, the
line will be split, with indentation if the auto-indent feature is
ON (See command "AUTOI on|off").
When the cursor is after the last non-blank character, the next
line will be joined to that one.
Control-u
S_UPPER
translates the characters selected with the mouse into
uppercase.
Control-U
S_UPPER WORD
translates the first letter of each selected word with the mouse
into uppercase.
Control-v
C_SCRV
splits the screen vertically at the cursor location.
Control-w
C_SCRJ
restarts with an unsplit screen.
Control-x
S_Xed
starts editing a file selected with the mouse, after expanding
the selection to a word and appending the currently edited
filetype.
Control-z
LEFT 0
resets the original verify setting, displaying all the columns.
Control--
NEXTERROR
after a compilation is executed with the Control-c command,
the cursor moves to the next error.
Control-=
C_DUP
duplicates the line at the cursor location.
SEDIT and S/REXX Reference Manual
SEDIT USER’S GUIDE
Using Function Keys on HP keyboards
Shift+Control-a
MACRO adjust_cursor
sets the start of the line at the cursor position.
Shift+Control-c
CENTER
centers the line at the cursor location.
Shift+Control-f
FLOW
formats the paragraph at the cursor location.
Shift+Control-o
S_PASTE OVERLAY SHELF
overlays the contents of the clipboard at the cursor location.
Shift+Control-w
MACRO del_word
deletes the word at the cursor location.
Meta-+
MACRO toggle_display
toggles between viewing the entire file and viewing the
selected lines.
Meta-=
MACRO dup_line
duplicates the cursor or the current line.
Meta-u
S_SET OFF
cancels the current selection.
Meta-x
S_XED
starts editing a file selected with the mouse or at the cursor
location, after expanding the selection to a word and
appending the currently edited filetype.
SEDIT and S/REXX Reference Manual
Page 79
Using Function Keys on WINDOWS
SEDIT USER’S GUIDE
Using Function Keys on WINDOWS
Most of the function keys are dedicated to execute commands. The Right function keys
are mapped in the following way:
•
•
•
•
•
•
•
•
•
•
•
•
R1
R2
R3
R4
R5
R6
R7
R8
R9
R10
R12
R14
Print Screen
Scroll Lock
Pause
Insert
Home
Page Up
End
Up Arrow
Page Down
Left Arrow
Right Arrow
Down Arrow
Using the following physical layout:
R1
R2
R3
R4
R5
R6
R7
R9
The principal key definitions are referenced on the last line of the window.
Page 80
Escape
Erase end of field
clears the field starting at the cursor location.
Shift-Escape
Erase all field
clears the entire field, and places the cursor at the beginning
of the field.
F1
S_FIND
searches a string matching the current selection.
Shift-F1
S_FIND
searches backwards a string matching the current selection.
Control-F1
S_FIND
searches a word matching the current selection.
SEDIT and S/REXX Reference Manual
SEDIT USER’S GUIDE
Using Function Keys on WINDOWS
F2
C_LINEADD
adds a line below the cursor location.
Shift-F2
C_EXT
is used to extend the length of the field selected by the cursor.
F3
SAVE
transforms the unchanged source file into a backup file by
appending a "%" to its name, and creates a new file with the
original name from the edited memory image, without exiting
it.
Shift-F3
FILE
saves the file and then presents a new screen.
Control-F3
FLFILE
saves the file, quits the file and then switches to FLIST.
F4
C_SPLIT
when the cursor is before the last non-blank character, the
line will be split, with indentation if the auto-indent feature is
ON (See the AUTOINDENT command).
When the cursor is after the last non-blank character, the next
line will be joined to that one.
F5
SWITCH
moves from one file to another in a circular sequence.
Shift-F5
ISWITCH
does the same as F5 in a reversed sequence.
F6
C_ENDLINE
if the cursor is in a DATA FIELD it will be moved to the end
of that field.
Shift-F6
C_ENDCURL
moves the cursor to the end of the CURRENT LINE FIELD.
F7
BACKWARD
scrolls backward one page.
Shift-F7
PGUP
scrolls backward one screen.
Control-F7
LEFT40
scrolls left 40 columns.
Meta-F7
S_LSHIFT
the text from the column where the selection starts will be
moved to the left.
F8
FORWARD
scrolls forward one page.
Shift-F8
PGDOWN
scrolls forward one screen.
SEDIT and S/REXX Reference Manual
Page 81
Using Function Keys on WINDOWS
Page 82
SEDIT USER’S GUIDE
Control-F8
RIGHT40
scrolls right 40 columns.
Meta-F8
S_RSHIFT
the text from the column where the selection starts will be
moved to the right.
F9
?
displays the previous commands executed in the
COMMAND FIELD. The user can edit and re-execute them.
Shift-F9
?I
does the same as F9 in a reversed order.
Control-F9
XSHOWHISTORY
displays the commands memorized in the history buffer in
fullscreen mode.
Meta-F9
SHOWHISTORY
displays the commands memorized in the history buffer.
F10
CURSOR HOME
if the cursor is in a DATA FIELD, it will be moved to the
COMMAND FIELD. A subsequent action will restore its
previous location.
Control-F10
DELAY.HOME
(. is the command separator)
clears the command field without moving the cursor.
F11
UNDO
undoes the last action.
Shift-F11
REDO
undoes the last undo.
F12
=
repeats the last command without displaying it.
PrintScreen
AQUIT
is used to abandon the file without saving it. If the file has
been modified during the session, the user will be prompted
to confirm the key to quit.
Control-PrintScreen
FLQUIT
will do the same as PrintScreen (R1), and then switch to the
directory editor.
ScrollLock
COMPLETE
allows command line filename completion.
Shift-ScrollLock
COMPLETE REVERSE
allows command line filename completion in reverse order.
SEDIT and S/REXX Reference Manual
SEDIT USER’S GUIDE
Using Function Keys on WINDOWS
Pause
SAVE
transforms the unchanged source file into a backup file by
appending a "%" to its name, and creates a new file with the
original name from the edited memory image, without exiting
it.
Shift-PageUp
TOP
moves the current line to the beginning of the file.
Control-PageUp
FILTER $xhome/filters/$arch/toggle_comment
comments in or out the selected or cursor lines.
Shift-PageDown
BOT
moves the current line to the end of the file.
Control-Left-Arrow
moves the cursor to the previous word.
Control-Right-Arrow
moves the cursor to the next word.
Control-1
MACRO set_bookmark 1
sets the bookmark number 1 at the cursor location.
Control-2
MACRO set_bookmark 2
sets the bookmark number 2 at the cursor location.
Control-3
MACRO set_bookmark 3
sets the bookmark number 3 at the cursor location.
Control-4
MACRO set_bookmark 4
sets the bookmark number 4 at the cursor location.
Control-5
MACRO set_bookmark 5
sets the bookmark number 4 at the cursor location.
Control-6
MACRO goto_bookmark 1
goes to the bookmark number 1.
Control-7
MACRO goto_bookmark 2
goes to the bookmark number 2.
Control-8
MACRO goto_bookmark 3
goes to the bookmark number 3.
Control-9
MACRO goto_bookmark 4
goes to the bookmark number 4.
Control-0
MACRO goto_bookmark 5
goes to the bookmark number 5.
Meta-0
MACRO rm_bookmarks
removes all the bookmarks on the current file.
Control-a
S_SET ALL
all of the file will be selected.
Control-c
S_COPY
copies the selection into the clipboard (or shelf).
SEDIT and S/REXX Reference Manual
Page 83
Using Function Keys on WINDOWS
Page 84
SEDIT USER’S GUIDE
Shift-Control-c
MACRO smart_comp $name 0
compiles the current file, splits the screen, shows the error
messages and sets the cursor on the first error line.
Control-d
C_LINEDEL
deletes the line at the cursor location.
Control-f
equivalent to the FLIST command (see the Directory editor
section).
Shift-Control-f
FLOW
formats the paragraph corresponding to the cursor location.
Shift-Control-g
same as Shift-Control-c, but in debug mode.
Control-h
C_SCRH
splits the screen horizontally at the cursor location.
Shift-Control-h
S_HELP
starts editing the help file selected with the mouse. If the
selection is one character wide, it will be expanded to the
word.
Control-l
S_LOWER
translates the characters selected with the mouse into
lowercase.
Shift-Control-l
LEFTADJUST
positions the first non-blank character at the left margin
defined with the MARGIN command.
Control-m
MATCH
finds a matching delimiter. {[(< matches }])>.
Shift-Control-m
MATCH CURSOR
finds a matching delimiter. {[(< matches }])>, and moves
the cursor at that location.
Control-n
f "$fn" *
calls the directory editor showing all the files with the same
filename as the current file.
Shift-Control-n
f "$fn" * "$fd"
calls the directory editor showing all the files with the same
filename as the current file in the same directory as the
current file.
Control-p
PRINTFILE
prints the current file.
Control-q
AQUIT
is used to abandon the file without saving it. If the file has
been modified during the session, the user will be prompted
to confirm the key to quit.
Control-r
TREE
calls the tree editor.
SEDIT and S/REXX Reference Manual
SEDIT USER’S GUIDE
Using Function Keys on WINDOWS
Shift-Control-r
RIGHTADJUST
positions the last non-blank character at the right margin
defined with the MARGIN command.
Control-s
DY_SAVE
calls the standard SAVE AS dialog box.
Control-t
TREE
calls the TREE editor.
Control-u
S_UPPER
translates the characters selected with the mouse into
uppercase.
Control-U
S_UPPER WORD
translates the first letter of each selected word with the mouse
into uppercase.
Control-v
S_PASTE SHELF
pastes the clipboard (or shelf) contents at the cursor
location.
Control-V
S_PASTE SHELF OVERLAY
overlays the clipboard (or shelf) contents at the cursor
location.
Control-w
C_SCRJ
restarts with an unsplit screen.
Control-x
S_CUT
cuts the current selection, placing it in the clipboard.
Shift-Control-x
S_XED
starts editing a file selected with the mouse, after expanding
the selection to a word and appending the currently edited
filetype.
Control-z
UNDO
undoes the last action.
Control--
NEXTERROR
after a compilation is executed with the Shift-Control-c
command, the cursor moves to the next error.
Control-=
C_DUP
duplicates the line at the cursor location.
Shift+Control-a
MACRO adjust_cursor
sets the start of the line at the cursor position.
Shift+Control-c
CENTER
centers the line at the cursor location.
Shift+Control-f
FLOW
formats the paragraph at the cursor location.
Shift+Control-o
S_PASTE OVERLAY SHELF
overlays the contents of the clipboard at the cursor location.
SEDIT and S/REXX Reference Manual
Page 85
Using Function Keys on WINDOWS
Page 86
SEDIT USER’S GUIDE
Shift+Control-w
MACRO del_word
deletes the word at the cursor location.
Meta-+
MACRO toggle_display
toggles between viewing the entire file and viewing the
selected lines.
Meta-=
MACRO dup_line
duplicates the cursor or the current line.
Meta-u
S_SET OFF
cancels the current selection.
Meta-x
S_XED
starts editing a file selected with the mouse or at the cursor
location, after expanding the selection to a word and
appending the currently edited filetype.
SEDIT and S/REXX Reference Manual
SEDIT USER’S GUIDE
Using Function Keys in KEDIT mode
Using Function Keys in KEDIT Mode
The principal key definitions are referenced on the last line of the window.
On SUN stations:
L2
MATCH
finds a matching delimiter. {[(< matches }])>.
L3
Erase end of field
clears the field starting at the cursor location.
Shift-L3
Erase all field
clears the entire field, and places the cursor at the beginning
of the field.
L4
UNDO
undoes the last action.
Shift-L4
REDO
undoes the last undo.
L6
S_COPY
copies the selection into the internal buffer named shelf.
L8
S_PASTE
pastes the shelf contents at the cursor location.
Control-L8
S_PASTE PRIMARY
pastes the selection content at the cursor location. May be
used to retrieve the selection from another window.
Shift-L8
S_PASTE OVERLAY
overlays the clipboard contents at the cursor location.
L9
S_FIND
searches a string matching the current selection.
L10
S_CUT
cuts the current selection.
On other stations:
Escape
Erase end of field
clears the field starting at the cursor location.
Shift-Escape
Erase all field
clears the entire field, and places the cursor at the beginning
of the field.
On all stations:
F1
MACRO ahelp
displays the on-line PDF help.
F2
MACRO add_line
adds a new line below the cursor or current line.
SEDIT and S/REXX Reference Manual
Page 87
Using Function Keys in KEDIT mode
SEDIT USER’S GUIDE
F3
QUIT
is used to abandon the file without saving it. If the file has
been modified during the session, the user will be prompted
to confirm the key to quit.
F4
SOS TABF
moves the cursor to the next tab column.
F5
MACRO cursor_to_curr
the cursor lines becomes the current line.
F6
?
displays the previous commands executed in the
COMMAND FIELD. The user can edit and re-execute them.
F7
MACRO beg_line
moves the cursor to the beginning of the line.
F8
MACRO dup_line
duplicates the cursor or the current line.
F9
=
repeats the last command without displaying it.
F10
HOME
if the cursor is in a DATA FIELD, it will be moved to the
COMMAND FIELD. A subsequent action will restore its
previous location.
F11
C_SPLIT STAY
when the cursor is before the last non-blank character, the
line will be split, with indentation if the auto-indent feature is
ON (See command "AUTOI on|off").
When the cursor is after the last non-blank character, the next
line will be joined to that one.
Page 88
F12
CURSOR CMDLINE
moves the cursor to the command line.
PrintScreen
AQUIT
is used to abandon the file without saving it. If the file has
been modified during the session, the user will be prompted
to confirm the key to quit.
Control-PrintScreen
FLQUIT
will do the same as PrintScreen, and then switch to the
directory editor.
ScrollLock
COMPLETE
allows command line filename completion.
Shift-ScrollLock
COMPLETE REVERSE
allows command line filename completion in reverse order.
SEDIT and S/REXX Reference Manual
SEDIT USER’S GUIDE
Using Function Keys in KEDIT mode
Pause
SAVE
transforms the unchanged source file into a backup file by
appending a "%" to its name, and creates a new file with the
original name from the edited memory image, without exiting
it.
Shift-F1
MACRO locate_redo
reissues the last LOCATE command.
Shift-F2
MACRO goto_current
moves the cursor to the current line.
Shift-F3
MATCH
finds a matching delimiter. {[(< matches }])>.
Shift-F4
SWITCH
moves from one file to another in a circular sequence.
Shift-F5
S_UPPER
translates the characters selected with the mouse into
uppercase.
Shift-F6
S_LOWER
translates the characters selected with the mouse into
lowercase.
Shift-F7
S_LSHIFT
the text from the column where the selection starts will be
moved to the left.
Shift-F8
S_RSHIFT
the text from the column where the selection starts will be
moved to the right.
Shift-F9
LEFT 40
scrolls the displayed data 40 columns to the left.
Shift-F10
RIGHT 40
scrolls the displayed data 40 columns to the right.
Shift-F11
TOP
the first line becomes the current line.
Shift-F12
HOME
if the cursor is in a DATA FIELD, it will be moved to the
COMMAND FIELD. A subsequent action will restore its
previous location.
Control-F1
UNDO
undoes the last action.
Control-F2
REDO
undoes the last undo.
Control-a
S_SET ALL
all of the file will be selected.
SEDIT and S/REXX Reference Manual
Page 89
Using Function Keys in KEDIT mode
Page 90
SEDIT USER’S GUIDE
Control-c
S_COPY
copies the selection into the clipboard (or shelf).
Control-f
DY_FIND
displays the FIND dialog box.
Control-h
DY_FIND
displays the FIND dialog box.
Control-i
MACRO dy_fill
fills a block with a specified string.
Control-l
LEFTADJUST
left adjusts the text at the cursor or command line location.
Control-n
NEWFILE
initiates a new file.
Control-o
MACRO dy_open
opens the OPEN dialog box.
Control-p
PRINTFILE
on WINDOWS systems, opens the print dialog box. On
UNIX systems, prints the file.
Control-r
RIGHTADJUST
right adjusts the text at the cursor or command line location.
Control-s
SAVE
transforms the unchanged source file into a backup file by
appending a "%" to its name, and creates a new file with the
original name from the edited memory image, without exiting
it.
Control-t
TREE
starts the TREE editor.
Control-u
S_UPPER
translates the characters selected with the mouse into
uppercase.
Control-U
S_UPPER WORD
translates the first letter of each selected word with the mouse
into uppercase.
Control-v
S_PASTE INSERT SHELF
pastes the clipboard contents at the cursor location.
Control-w
C_SCRJ
restarts with an unsplit screen.
Control-x
S_CUT
cuts the current selection.
Control-y
REDO
undoes the last undo.
Control-z
UNDO
undoes the last action.
SEDIT and S/REXX Reference Manual
SEDIT USER’S GUIDE
Using Function Keys in KEDIT mode
Shift+Control-a
MACRO adjust_cursor
adjusts the text at the cursor location.
Shift+Control-c
CENTER
centers the line at the cursor location.
Shift+Control-f
FLOW
formats the paragraph at the cursor location.
Shift+Control-l
LEFTADJUST
left adjusts the text at the cursor location.
Shift+Control-o
S_PASTE OVERLAY SHELF
overlays the clipboard contents at the cursor location.
Shift+Control-p
MACRO new_para
stars a new paragraph at the cursor location.
Shift+Control-w
MACRO del_word
deletes one word at the cursor location.
Shift+Control-x
FLIST * * ..
displays the parent directory.
Meta-b
C_ENDSR
marks a rectangular selection.
Meta-c
MACRO copy_and_paste
copies the selection into the clipboard (or shelf) and
then pastes it at the cursor location. The selection is
unmarked.
Meta-d
MACRO delete_line
deletes the cursor or the current line.
Meta-g
S_CUT
cuts the current selection.
Meta-j
MACRO force_join
overlays the next line at the cursor location.
Meta-k
MACRO copy_and_paste 1
copies the selection into the clipboard (or shelf) and
then pastes it at the cursor location. The selection remains
marked.
Meta-l
C_ENDS
marks a linear selection.
Meta-m
MACRO move_block
removes a marked block, and pastes it at the cursor location.
Meta-r
UNDO
undoes the last action.
Meta-s
MACRO split_only
splits the line at the cursor location.
SEDIT and S/REXX Reference Manual
Page 91
Using Function Keys in KEDIT mode
SEDIT USER’S GUIDE
Meta-u
S_SET OFF
unmarks the current selection.
Meta-x
S_XED
starts editing a file selected with the mouse or at the cursor
location, after expanding the selection to a word and
appending the currently edited filetype.
Meta-z
C_ENDS
marks a linear selection.
Meta-+
MACRO toggle_display
toggles between viewing the complete file and viewing
selected lines.
Meta-=
MACRO dup_line
duplicate the cursor or the current line.
Meta-0
MACRO rm_bookmarks
removes all the bookmarks.
Meta-1
MACRO set_bookmark 1
sets the bookmark number 1 at the cursor location.
Meta-2
MACRO set_bookmark 2
sets the bookmark number 2 at the cursor location.
Meta-3
MACRO set_bookmark 3
sets the bookmark number 3 at the cursor location.
Meta-4
MACRO goto_bookmark 1
goes to the bookmark number 1.
Meta-5
MACRO goto_bookmark 2
goes to the bookmark number 2.
Meta-6
MACRO goto_bookmark 3
goes to the bookmark number 3.
Enter
MACRO enter_split
when no command is present on the command line, splits the
line at the cursor location.
Control-Enter
MACRO start_nextline
goes to the start of the next line.
Shift+Control+Enter
MACRO toggle_prefix_file
toggles between the data and the prefix area.
Control-Up-Arrow
?
displays the previous commands executed in the
COMMAND FIELD. The user can edit and re-execute them.
Control-Down-Arrow ?i
does the same as Control-Up-Arrow in a reversed order.
Control-Left-Arrow
Page 92
PREVWORD
moves the cursor to the previous word.
SEDIT and S/REXX Reference Manual
SEDIT USER’S GUIDE
Using Function Keys in KEDIT mode
Control-Right-Arrow
NEXTWORD
moves the cursor to the next word.
Shift-Up-Arrow
MACRO extsel_up
extends the selection up one line.
Shift-Down-Arrow
MACRO extsel_down
extends the selection down one line.
Shift-Left-Arrow
MACRO extsel_left
extends the selection one character left.
Shift-Right-Arrow
MACRO extsel_right
extends the selection one character right.
Shift+Control-Left-Arrow
MACRO extsel_leftw
extends the selection one word left.
Shift+Control-Right-Arrow
MACRO extsel_rightw
extends the selection one word right.
Home
C_STARTL
moves the cursor to the start of the line.
End
C_ENDL
moves the cursor to the end of the line.
Shift+Home
MACRO extsel_start
extends the selection to the start of the line.
Shift+End
MACRO extsel_end
extends the selection to the end of the line.
Control-Home
MACRO goto_start
moves to the beginning of the file.
Control-End
MACRO goto_end
moves to the end of the file.
Shift+Control-Home
MACRO extsel_startf
extends the selection to the beginning of the file.
Shift+Control-End
MACRO extsel_endf
extends the selection to the end of the file.
Shift-Page-Up
MACRO extsel_wback
extends the selection one window backward.
Shift-Page-Down
MACRO extsel_wfor
extends the selection one window forward.
SEDIT and S/REXX Reference Manual
Page 93
Using Function Keys on ASCII terminal keyboards
SEDIT USER’S GUIDE
Using Function Keys on ASCII Terminal Keyboards
Most of the function keys are dedicated to execute commands. The Right function keys
(only available on Sun keyboards) are generally mapped in the following way:
•
•
•
•
•
•
•
•
R1
R2
R3
R4
R5
R6
R7
R9
Print Screen
Scroll Lock
Pause
Insert
Home
Page Up
End
Page Down
Using the following physical layout:
R1
R2
R3
R4
R5
R6
R7
R9
The principal key definitions are referenced on the last line of the window.
Page 94
Escape
Erase end of field
clears the field starting at the cursor location.
F1
QUIT
is used to abandon the file without saving it. If the file has
been modified during the session, the user will be prompted
to confirm the key to quit.
F2
NEXTERROR
after a compilation executed with the Control-c command,
moves the cursor to the next error.
F3
SAVE
transforms the unchanged source file into a backup file by
appending a "%" to its name, and creates a new file with the
original name from the edited memory image, without exiting
it.
SEDIT and S/REXX Reference Manual
SEDIT USER’S GUIDE
Using Function Keys on ASCII terminal keyboards
F4
C_SPLIT
when the cursor is before the last non-blank character, the
line will be split, with indentation if the auto-indent feature is
ON (See command "AUTOI on|off").
When the cursor is after the last non-blank character, the next
line will be joined to that one.
F5
SWITCH
moves from one file to another in a circular sequence.
F6
C_ENDLINE
if the cursor is in a DATA FIELD, it will be moved to the end
of that field.
F7
BACKWARD
scrolls backward one page.
F8
FORWARD
scrolls forward one page.
F9
?
displays the previous commands executed in the
COMMAND FIELD. The user can edit and re-execute them.
F10
CURSOR HOME
if the cursor is in a DATA FIELD, it will be moved to the
COMMAND FIELD. A subsequent action will restore its
previous location.
F11
UNDO
undoes the last action.
F12
=
repeats the last command without displaying it.
Control-a
C_LINEADD
adds a line below the cursor location.
Control-b
C_STARTS
starts the selection at the cursor location.
Control-c
MACRO smart_comp $name 0
compiles the current file, splits the screen, shows the error
messages and sets the cursor on the first error line. See the
compile command on page 192 for more details.
Control-d
C_LINEDEL
deletes the line at the cursor location.
Control-e
C_ENDS
extends the selection at the cursor location.
Control-f
enters the DOWN-FIELD 3270 command. It cannot be
changed.
Control-g
same as Control-c, but in debug mode.
Control-h
enters a Backspace. It cannot be changed.
SEDIT and S/REXX Reference Manual
Page 95
Using Function Keys on ASCII terminal keyboards
Page 96
SEDIT USER’S GUIDE
Control-i
enters the NEXT-FIELD 3270 command. It cannot be
changed.
Control-j
enters the UP-FIELD 3270 command. It cannot be changed.
Control-l
enters the line-feed command separator. It cannot be
changed.
Control-m
is equivalent to the Return or the Enter key. It cannot be
changed.
Control-n
C_ENDSR
extends the selection at the cursor location, making it
rectangular.
Control-o
S_COPY
copies the selection into the internal buffer named shelf.
Control-p
SHELL lpr -h $name &
prints the current file.
Control-r
REFRESH Clear
redraws the whole screen.
Control-t
enters the tab character. It cannot be changed.
Control-u
S_UPPER
translates into uppercase the characters selected with the
Control-b, Control-e and Control-n commands.
Control-v
C_SCRV
splits the screen vertically at the cursor location.
Control-w
C_SCRJ
restarts with an unsplit screen.
Control-x
S_XED
sets a selection at the cursor location, expands the selection to
a word, appends the currently edited filetype and starts
editing this file.
Control-y
S_PASTE
pastes the shelf contents at the cursor location.
Control-z
LEFT 0
resets the original verify setting, displaying all the columns.
SEDIT and S/REXX Reference Manual
SEDIT USER’S GUIDE
Using the keyboard
Using the Keyboard
The best way to move to a distant location is to use the third mouse button.
The best way to move to the first character of a field is to use PREV FIELD (R7 for Sun
type 3 keyboards, and Shift-Tab for other ones) or NEXT FIELD (Tab) key. This is
much faster and easier than using the arrow keys.
The best way to access a PREFIX FIELD is to use DOWN FIELD (Line-feed or
AltGraph for Sun keyboards, Right Extend-Char for HP, Right Control for IBM
and SiliconGraphics keyboards, and PF4 for DECstation keyboards) or UP FIELD
(Alternate for Sun keyboards, Select for HP, Right Alt for IBM and
SiliconGraphics keyboards, and PF3 for DECstation keyboards).
The best way to move to the COMMAND FIELD is to use the CURSOR HOME command,
which is mapped to key F10.
Key R6 on Sun workstations, or key HOME gives access to the first PREFIX field, or the
first DIRECT INPUT field.
The best way to clear a field is to use the ERASE EOF key (L3 on Sun workstations, F13
on DECstations, Reset on HP workstations and Escape on others). This will clear the
field from the cursor location to the end of the field.
Shift-ERASE EOF (or Control-ERASE EOF with the MWM window manager) will
erase the entire field, and place the cursor at the beginning of the field.
Remember that the insert key (R11 on Sun workstations with a type 3 keyboard) toggles
between insert and replace mode.
SEDIT and S/REXX Reference Manual
Page 97
Using the default buttons
SEDIT USER’S GUIDE
Using the Default Buttons (UNIX)
The standard /home/xed/profile.sedit initialization macro creates a set of menu
buttons:
Clicking with the third mouse button displays a menu.
Clicking with the left mouse button executes directly the first menu item.
Using the Default MenuBar (WINDOWS)
The standard C:\Program Files\SEDIT\profile.sedit initialization macro
creates the following menubar:
Clicking with the left mouse button displays a menu.
The menubar can be modified by editing the
C:\Program Files\SEDIT\sedit.menubar file.
Page 98
SEDIT and S/REXX Reference Manual
SEDIT USER’S GUIDE
Using the default buttons
The File Menu
Save
Save & Leave
transforms the unchanged source file into a backup file
by appending a "%" to its name, and creates a new file
from the edited memory image, without exiting it.
saves the file and then presents a new screen.
Leave
is used to abandon the file without saving it. If the file
has been modified during the session, the user will be
prompted to confirm.
Save As ...
starts the DY_SAVE dialog box described on page 233.
Open ...
starts the DY_OPEN dialog box described on page 229.
Open <Selection>
Exit
Exit with memory
opens the file selected with the mouse.
exits SEDIT.
exits SEDIT. The next time SEDIT is started in the
same directory, it will load the same files it was editing
before it was exited.
On UNIX systems, the File menu can be customized by modifying the
/home/xed/file.bu file.
The CD Menu
On Windows, allows to change the current directory using an extended Windows dialog box
similar to the Open File one:
SEDIT and S/REXX Reference Manual
Page 99
Using the default buttons
SEDIT USER’S GUIDE
The EDIT Menu
Find
Find ...
finds the selected characters.
starts the DY_FIND dialog box described on page 227.
Copy
saves the selection.
Paste
retrieves the previously saved selection at the cursor
location.
Cut
deletes the current selection, saving it for further use by
the Paste facility.
Undo
Undo ALL
Redo
undoes the last editing action.
undoes all the editing actions done since the last Save.
redoes the last undone editing action.
Show ALL
shows all the file lines.
Show
ShowALL
...
starts the DY_ALL dialog box described on page 225.
Show
Showmore
ALL...
starts the DY_SHOW dialog box described on page 237.
Show
HideALL
...
starts the DY_EXCLUDE dialog box described on page
226.
On UNIX systems, the EDIT menu can be customized by modifying the
/home/xed/edit.bu file.
Page 100
SEDIT and S/REXX Reference Manual
SEDIT USER’S GUIDE
Using the default buttons
The SPECIAL Menu
First line
selects the first line as the current line.
Last line
selects the last line as the current line.
Print
Keyboard
prints the current file.
(UNIX specific)
sets up various keyboards. The user will need to use it
when displaying SEDIT on a different platform than the
one it was started from.
Spell
(UNIX specific)
creates 3 buttons for spell-checking purposes.
Tab
replaces tabulations by the appropriate number of
spaces, either for the current file or for the selected lines.
Screen
AX
Toolbar
splits or unsplits the screen.
(UNIX specific)
sets up the UNIX execution authorization upon the
current file.
(WINDOWS specific)
toggles ON and OFF the toolbar display.
Close Console
(WINDOWS specific)
closes the DOS console opened by S/REXX when using
input or output REXX statements.
Keyboard
(WINDOWS specific)
sets up the keyboard either in WINDOWS mode, or in
UNIX mode. See page 50 for more information.
SEDIT and S/REXX Reference Manual
Page 101
Using the default buttons
SEDIT USER’S GUIDE
When selecting the SPELL menu item, the user creates the following buttons:
Spell
spell-checks the current file, and highlights the first
misspelled word in reverse video.
Next_w
highlights the next misspelled word.
Add_w
adds the highlighted word to your private dictionary.
On UNIX systems, the SPECIAL menu can be customized by modifying the
/home/xed/sp.bu file.
The COMPILE Menu
Make
issues the UNIX make command upon the current file,
and displays the result within SEDIT.
Compile Inside
compiles the current file, and displays the result within
SEDIT.
Compile Outside
compiles the current file in a different sub-process,
returning the keyboard to the user immediately. The
compilation messages are displayed in the window
where SEDIT is started from.
Next error
after a make or a compile, sets the current line to the
next error line and sets the cursor on that line.
Lint Inside
runs the UNIX lint command within SEDIT.
Lint Outside
runs the UNIX lint command in a different
sub-process, returning the keyboard to the user
immediately.
Edit Macros
edits the S/REXX macros used to compile files.
On UNIX systems, the COMPILE menu can be customized by modifying the
/home/xed/comp.bu file.
Page 102
SEDIT and S/REXX Reference Manual
SEDIT USER’S GUIDE
Using the default buttons
The FLIST Menu
The FLIST menu allows the user to start FLIST upon various directories, and can be
customized on UNIX systems by modifying the /home/xed/f.bu file.
On Windows, an additional Browse item starts an extended dialog box, allowing the user
to select a directory which contents will be displayed by FLIST.
The TREE Menu
The TREE menu allows the user to start TREE upon various directories, and can be
customized on UNIX systems by modifying the /home/xed/tree.bu file.
The HELP Menu
The HELP menu allows the user to display either command or task help, and can be
customized on UNIX systems by modifying the /home/xed/help.bu file.
SEDIT and S/REXX Reference Manual
Page 103
Using the default menu
SEDIT USER’S GUIDE
Using the DEFAULT Menu
The SEDIT menu is activated by depressing the third mouse button on the first or second
screen line:
FILE
EDIT
SPECIAL
COMPILE
FLIST
TREE
HELP
MENU
The seven first items are similar to the menu buttons described on page 98.
The X submenu of the MENU item edits the sedit.menu file, allowing the user to
customize the menu. The DO submenu activates the changes.
Page 104
SEDIT and S/REXX Reference Manual
Prefix Commands
The prefix commands are commands the user can type in a PREFIX FIELD in order to
directly manipulate a data line. There are two types of prefix commands:
*
Single prefix commands (such as D {N}) which act on ONE or N lines.
*
Double prefix commands (such as DD) which act on a group of lines localized by the
command entered in two prefix fields.
The command MODE PREFIX XEDIT or MODE PREFIX ISPF allows the user to switch
between the IBM XEDIT editor behavior and the ISPF/PDF behavior. The default is the
XEDIT behavior.
SEDIT takes into account only the characters which are entered by the user in the prefix
area. These characters are decoded in the following manner:
•
•
•
•
•
Any number is interpreted as an operand.
An * is taken as an operand. For a built-in prefix command, an * is replaced by a
number equal to the number of lines remaining in the file after the prefix command
position. D* deletes all the remaining lines.
If a prefix command name starts with a letter, it will end at the first character which
is not a letter.
If a prefix command name starts with a non-alphabetic character, it will end at the
first blank, alphabetic character, or number.
Whatever follows a name is interpreted as an operand.
For example:
PREFIX
NAME
OP1
OP2
OP3
*d
d
*
NULL
NULL
4i12
i
4
12
NULL
%zzz
%
zzz
NULL
NULL
<<4
<<
4
NULL
NULL
12d<w
d
12
<w
NULL
Prefix commands
SEDIT USER’S GUIDE
Single Prefix Commands
SEDIT features 16 single prefix commands:
Add (or I as "Insert")
Copy
Delete
Put
Duplicate (' is the APL quote)
(or R as "Replace" in ISPF mode)
/
Replace
G
Get
E
Extend
>
Shift right
<
Shift left
M
Move
X
eXclude
S
Show
SCale Set scale line
Tabl Set tabline
.symb assigns the symb string to be a symbolic name for the matched line. If symb has
been already assigned to another line, this older line will no longer be assigned this
symbolic name.
A
C
D
PU
' or ’
The M and C commands need one of the following line indicators:
F
P
O
OO
Page 106
Following (or A as After in ISPF mode)
Previous (or B as Before in ISPF mode)
Overlay
Overlay
SEDIT and S/REXX Reference Manual
SEDIT USER’S GUIDE
A
Prefix commands
adds a specified number of lines:
00001 /*
00002 * This is a second sample file for SEDIT
a2003 *
00004 *
00005 main()
00006 /* This file is 6 lines long */
gives:
00001
00002
00003
00004
00005
00006
00007
00008
/*
* This is a second sample file for SEDIT
*
*
main()
/* This file is 6 lines long
*/
Note: Only the number the user enters in the prefix field will be used to determine the
number of lines to be added. Any previous number found in the field will be
ignored. On color displays, the character typed will appear in blue.
The user can insert a line by typing ’Control-A’ at the cursor location as well.
When the auto-indent feature is on (command AUTOI ON), which is the default
when the editor is started, the cursor is automatically placed on the first inserted
line. The indentation is identical to that of the previous line.
D
deletes a specified number of lines. It works in the same way as A.
D* deletes all subsequent lines.
SEDIT and S/REXX Reference Manual
Page 107
Prefix commands
C
SEDIT USER’S GUIDE
is used with the P(previous) or F(following) indicators to copy one line:
00001
c0002
00003
f0004
00005
00006
/*
* This is a second sample file for SEDIT
*
*
main()
/* This file is 6 lines long */
gives:
00001
00002
00003
00004
00005
00006
00007
Page 108
/*
* This is a second sample file for SEDIT
*
*
* This is a second sample file for SEDIT
main()
/* This file is 6 lines long */
SEDIT and S/REXX Reference Manual
SEDIT USER’S GUIDE
PU
Prefix commands
is used to save the contents of the lines selected in an internal buffer. These lines
may be moved to the file being edited by the G prefix command.
00001
PU202
00003
00004
00005
00006
/*
* This is a second sample file for SEDIT
*
*
main()
/* This file is 6 lines long */
and:
00001
00002
00003
0G004
00005
00006
/*
* This is a second sample file for SEDIT
*
*
main()
/* This file is 6 lines long */
gives:
00001
00002
00003
00004
00005
00006
00007
00008
/*
* This is a second sample file for SEDIT
*
*
* This is a second sample file for SEDIT
*
main()
/* This file is 6 lines long */
SEDIT and S/REXX Reference Manual
Page 109
Prefix commands
"
SEDIT USER’S GUIDE
or ’ (apostrophe) or ' (APL quote) copies the lines selected:
00001
"202
00003
00004
00005
00006
/*
* This is a second sample file for SEDIT
*
*
main()
/* This file is 6 lines long
*/
/*
* This is a second
* This is a second
* This is a second
*
*
main()
/* This file is 6
*/
gives:
00001
00002
00003
00004
00005
00006
00007
00006
sample file for SEDIT
sample file for SEDIT
sample file for SEDIT
lines long
Note: The user can also duplicate a line by typing ’Control-=’ on the cursor location.
Page 110
/
(slash) chooses the selected line as the current line.
This can also be done by clicking the line with the shift-third mouse button.
G
gets the lines previously saved by PU.
SEDIT and S/REXX Reference Manual
SEDIT USER’S GUIDE
Prefix commands
extends the data field and places the cursor at the last non-blank character. Its
action is similar to that of the F2 key.
E
00001
00002
e0003
00004
00005
00006
/*
* This is a second sample file for SEDIT
* This is a second sample file for SEDIT
*
*
main()
gives:
00001
00002
00003
/*
* This is a second sample file for SEDIT
* This is a second sample file for SEDIT_
00004
00005
00006
*
*
main()
>{N}
shifts data N positions to the right on the selected line.
<{N}
shifts data N positions to the left on the selected line. < sounds the alarm when the
left of the line is truncated.
When the user is editing a FORTRAN file (for example test.f), if the first character is a
tabulation or some single alphabetical character, the shifting will proceed from the second
column. If the line begins with a label the shifting will proceed from the first non-blank
character in order to preserve that label.
>6001
>4002
>3003
c
.
100
This is a comment
do 100 i=1,1000
k = k+1
gives:
00001
00002
00003
c
.
100
SEDIT and S/REXX Reference Manual
This is a comment
do 100 i=1,1000
k = k+1
Page 111
Prefix commands
M
SEDIT USER’S GUIDE
is used with the P(previous) or F(following) indicators to move one line:
00001
m0002
00003
f0004
00005
00006
/*
* This is a second sample file for SEDIT
*
*
main()
/* This file is 6 lines long */
gives:
00001
00002
00003
00004
00005
00006
X
/*
*
*
* This is a second sample file for SEDIT
main()
/* This file is 6 lines long */
excludes a line from display:
00001
x0002
00003
00004
00005
00006
/*
* This is a second sample file for SEDIT
*
*
main()
/* This file is 6 lines long */
gives:
00001
00002
00003
00004
00005
00006
Page 112
/*
--------- 1 line not displayed ------*
*
main()
/* This file is 6 lines long */
SEDIT and S/REXX Reference Manual
SEDIT USER’S GUIDE
Prefix commands
shows excluded lines represented by a shadow line:
S
00001
s0002
00003
00004
00005
00006
/*
----------- 1 line not displayed -------*
*
main()
/* This file is 6 lines long */
gives:
00001
00002
00003
00004
00005
00006
/*
* This is a second sample file for SEDIT
*
*
main()
/* This file is 6 lines long */
Sn
S-n
shows the first n hidden lines.
shows the last n hidden lines.
SCale
sets the scale line to be displayed at this location.
Tabl
sets the tabline to be displayed at this location.
.symb assigns the symb string to be a symbolic name for the matched line. If symb has
been already assigned to another line, this older line will no longer be assigned this
symbolic name.
SEDIT and S/REXX Reference Manual
Page 113
Double prefix commands
SEDIT USER’S GUIDE
Double Prefix Commands
A double prefix command is a command which acts on a sequence of lines.
The prefix must appear on the first and the last line.
SEDIT features 8 double prefix commands:
CC
MM
DD
PP
"" or ’’
>>
<<
XX
Copy
Move
Delete
Put
Duplicate (or RR in ISPF mode)
Shift right
Shift left
eXclude
Note: Any prefix command which needs another prefix command to be executed, as M
needs F, is called a PENDING command.
Pending commands remain in the prefix field and will be executed when the
associated prefix command is entered. This allows the user to scroll through the file.
To erase all pending commands, type RESET in the COMMAND FIELD.
Delete a pending command by typing spaces over it.
Page 114
SEDIT and S/REXX Reference Manual
SEDIT USER’S GUIDE
CC
Double prefix commands
copies a group of lines:
cc001
000cc
00003
f0004
00005
00006
/*
*
*
* This is a second sample file for SEDIT
main()
/* This file is 6 lines long */
gives:
00001
00002
00003
00004
00005
00006
00007
00008
/*
*
*
* This is a second sample file for SEDIT
/*
*
main()
/* This file is 6 lines long */
SEDIT and S/REXX Reference Manual
Page 115
Double prefix commands
MM
SEDIT USER’S GUIDE
moves a group of lines:
mm001
000mm
00003
f0004
00005
00006
/*
*
*
* This is a second sample file for SEDIT
main()
/* This file is 6 lines long */
gives:
00001
00002
00003
00004
00005
00006
Page 116
*
* This is a second sample file for SEDIT
/*
*
main()
/* This file is 6 lines long */
DD
deletes a group of lines.
PP
saves a group of lines into the internal buffer.
""
or ’’ duplicates a group of lines.
SEDIT and S/REXX Reference Manual
SEDIT USER’S GUIDE
>>
Double prefix commands
or << shifts a group of lines. << sounds the alarm when the left of the line is
truncated.
>>301
00002
0>>03
c
.
100
This is a comment
do 100 i=1,1000
k = k+1
gives:
00001
00002
00003
XX
c
.
100
This is a comment
do 100 i=1,1000
k = k+1
excludes a group of lines from display.
00001
xx002
00003
xx004
00005
00006
/*
* This is a second sample file for SEDIT
*
*
main()
/* This file is 6 lines long */
gives:
00001
00002
00005
00006
/*
------------ 3 lines not displayed ----------main()
/* This file is 6 lines long */
SEDIT and S/REXX Reference Manual
Page 117
Double prefix commands
SEDIT USER’S GUIDE
Overlaying Lines
The O or OO line commands specify the destination of data that is to be copied by the C and
CC prefix commands or moved by the M and MM prefix commands.
Only blanks characters in the lines specified with O or OO are overlaid with corresponding
characters from the source lines specified with the C, CC, M or MM prefix commands. Only
characters within the column boundaries specified with the ZONE command are overlaid.
The number of source and receiving lines may be different. If there are more receiving lines,
the source lines are repeated until all the receiving lines are processed.
00000
oo001
00002
00003
oo004
cc005
00006
cc008
1 1234
12345
1234567
2 1234
12345
1234567
3 1234
12345
1234567
4 1234
12345
1234567
5 abcdefghijklmnopqrstuvwxyzABCDEFGHI
----------- 2 lines not displayed ----------6 ABCDEFGHIJKLMNOPQRSTUVWXYZabcdefghi
gives:
00000
00001
00002
00003
00004
00005
00006
00008
Page 118
1 a1234fghij12345pqrs1234567ABCDEFGHI
2 A1234FGHIJ12345PQRS1234567abcdefghi
3 a1234fghij12345pqrs1234567ABCDEFGHI
4 A1234FGHIJ12345PQRS1234567abcdefghi
5 abcdefghijklmnopqrstuvwxyzABCDEFGHI
----------- 2 lines not displayed ----------6 ABCDEFGHIJKLMNOPQRSTUVWXYZabcdefghi
SEDIT and S/REXX Reference Manual
SEDIT USER’S GUIDE
Prefix macros
Writing Prefix Macros
SEDIT allows the user to write prefix macros, which are entered in the same way the
built-in prefix commands are. There are several steps to follow to create a prefix macro:
•
•
•
Create an S/REXX or an external macro. For example, we will discuss the making
of the supplied uumac.sedit S/REXX macro.
This macro will be saved in a specific macro directory. uumac is the
{install-dir}/xmac/uumac.sedit file.
Issue a HASH {install-dir}/xmac (in this example) command. This HASH
command is automatically issued by the profile.sedit standard initialization
macro. We recommend the user create a specific directory for the user’s macros.
Create synonyms for that uumac macro. For example:
prefix
prefix
prefix
prefix
prefix
prefix
prefix
prefix
synonym
synonym
synonym
synonym
synonym
synonym
synonym
synonym
u
uu
l
ll
U
UU
L
LL
uumac
uumac
uumac
uumac
uumac
uumac
uumac
uumac
Once the macro terminates, SEDIT restores the current line and the current file.
To actually modify the current line, a prefix macro must issue a command such as:
:12pending on /
Once all the prefix macros end, the pending list is scanned and executed again: the / prefix
command will be performed upon line 12. Line 12 will become the current line.
SEDIT and S/REXX Reference Manual
Page 119
Prefix macros
SEDIT USER’S GUIDE
uumac.sedit is the following:
parse arg pref ff line op1 op2 op3
if pref ~= 'PREFIX' then
{ 'emsg uumac: must be invoqued as a PREFIX macro.'
exit
}
select
when ff = 'SHADOW' then
{ 'emsg uumac: not on a shadow line.'
exit
}
when ff = 'CLEAR' then
{ 'msg uumac: aborted.'
exit
}
when ff = 'SET' then
{ parse source . . . . . name .
if lower(name[1]) = 'l' then cmd = 'command lowercas'
else
cmd = 'command uppercas'
if length(name) = 1 then
{ /*
* Simple form macro (L or U)
*/
':'line
if op1 = '' then op1 = 1
cmd op1
exit
}
/*
* Double form macro (LL or UU)
*/
'extract/pending block' name ':0 :'line
if pending.0 ~= 0 then
{ ':'pending.1' pending off'
cmd ':'line+1
}
else ':'line 'command pending block' name
exit
}
end
Page 120
SEDIT and S/REXX Reference Manual
SEDIT USER’S GUIDE
Prefix macros
parse arg pref ff line op1 op2 op3
The macro receives the following arguments:
pref
PREFIX
flags a prefix call.
SET
SHADOW
the selected line is a data line.
the selected line is a shadow line. The corresponding
file line is not visible.
the user has cleared a pending macro by typing
spaces.
ff
CLEAR
line
the line number on which the prefix macro was
entered.
op1, op2, op2
the macro operands, as described on the Prefix
Commands section.
parse source . . . . . name .
if lower(name[1]) = 'l' then cmd = 'command lowercas'
else
cmd = 'command uppercas'
When name starts with a l, the macro will translate the matched lines into lowercase, by
using the LOWERCAS command. Otherwise, the UPPERCAS command will be used.
When writing an external prefix macro, the user may use the EXTRACT/SOURCE/ facility
to determine the name of the macro.
if length(name) = 1 then
{ /*
* Simple form macro (L or U)
*/
':'line
if op1 = '' then op1 = 1
cmd op1
exit
}
When the user enters a synonym to the uumac macro, name contains this synonym,
allowing the macro to know if a single form (U) or a double form (UU) was used.
The single form is handled by executing the LOWERCAS or UPPERCAS command
immediately.
SEDIT and S/REXX Reference Manual
Page 121
Prefix macros
SEDIT USER’S GUIDE
’extract/pending block' name ':0 :'line
if pending.0 ~= 0 then
{ ':'pending.1' pending off'
cmd ':'line+1
}
else ':'line 'command pending block' name
Before a prefix macro starts, it is removed from the pending list. Therefore, the first time a
double form macro, such as UU, is executed, it does not belong to the pending list, and
pending.0 is set to 0. The ':'line 'command pending block' name
command places this macro in the pending list again.
The second time UU will be executed, pending.0 will not be 0, and uumac will execute
the LOWERCAS or UPPERCAS command starting at the line the first UU string was found
up to the line the second UU string was found. Remember that UPPERCAS:12 means up to
but not including the line 12.
See the EXTRACT command on page 252 and the PENDING command on page 333 for
more information.
Page 122
SEDIT and S/REXX Reference Manual
SEDIT USER’S GUIDE
Using the Mouse on UNIX systems
Using the Mouse on UNIX systems
On UNIX systems, the default MOUSEMODE value is OPENLOOK.
Using the mouse to scroll is explained in the section Moving Through a File on page 53.
There is another important mouse application: moving data. This SEDIT feature resembles
the Sun Textedit mouse move-text feature.
Making a Linear Selection
The left mouse button starts a selection. One click selects a character which will appear in
reverse video.
Clicking several times in less than a .4 second interval is called a multi-click.
Multi-click twice will select a word.
Multi-click 3 times will select a line.
The user can select a line by shifting the middle mouse button as well, which is faster than
clicking 3 times.
The user can cancel any selection by shifting the left mouse button.
The middle mouse button allows the user to extend a selection.
The Sun Selection Related Keys
• COPY-SELECTION
• PASTE-SELECTION
• FIND-SELECTION
• CUT-SELECTION
• META-KEY
L6
L8
L9
L10
◊ key on type 4 or 5 keyboards, and Left and Right
keys on old type 3 keyboards.
The Other Workstations Selection Related Keys
• COPY-SELECTION
• PASTE-SELECTION
• FIND-SELECTION
• CUT-SELECTION
• META-KEY
F3
F4
F1
F2
Left Alt key on IBM and SiliconGraphics.
Compose key on DECstations.
Left Extend Char key on HP keyboards.
Deleting the Selected Characters
To delete a selection, press the CUT key.
Note that there is no control character on the screen. To remove an entire line using the CUT
key (L10/F2), multi-click 3 times or use the Shift-M2 mouse button.
If only the first and the last characters of the line are selected, the line will be cleared without
deleting it.
SEDIT and S/REXX Reference Manual
Page 123
Using the Mouse on UNIX systems
SEDIT USER’S GUIDE
Copying the Selected Characters
There are three ways to copy a selection.
•
COPY then PASTE
1)
2)
3)
4)
Make a selection.
Use the COPY key (L6/F3) to store a copy of the characters selected in
an internal buffer.
Move the cursor to the destination.
Depress the PASTE key (L8/F4).
Note that the cursor position is independent of the selection.
To copy text to the current cursor location, make a selection and depress COPY and PASTE.
The cursor will be moved to the end of the text copied.
•
SELECT and COPY
1)
2)
3)
4)
Make a selection.
Press and hold the COPY (L6/F3) key.
Move the cursor with the LEFT mouse button.
Release the COPY key.
Select and Copy is a faster way to copy selected text to a location other than where the
cursor is located.
•
PASTE and SELECT
1)
2)
3)
Press and hold the PASTE (L8/F4) key
Make a selection.
Release the PASTE key.
Paste and Select is an alternate way to copy characters to the cursor location. It resembles
the Sun secondary selections, but it uses the same buffer as the two previous methods.
To overlay the copy instead of inserting it, hold down the shift-key when proceeding. In
this case, no lines will be inserted in the file.
Moving the Selected Characters
To move a set of selected characters, do a PENDING-DELETE selection by using
Control-M1 and Control-M2, and then proceed to copy the text selected.
When using a color display, the selected characters will appear in pink.
Page 124
SEDIT and S/REXX Reference Manual
SEDIT USER’S GUIDE
Using the Mouse on UNIX systems
Searching for Selected Characters
Once a selection is completed, the FIND key (L9/F1) may be used in various ways:
FIND
finds the next string identical to the string selected.
Shift-FIND
finds backward the next identical string.
Control-FIND
finds the next identical name: if the user selects "i" SEDIT
will find it in "i=3" but not in "if (".
Shift-Control-FIND
finds backward the next identical name.
Making a Rectangular Selection
A selection made holding the META key will be rectangular instead of linear.
A rectangular selection can be used in the same way as a linear one, with a few differences:
•
•
•
A line cannot be deleted, only its content is deleted.
New lines are not inserted when the selection is more than one line.
On a color display, the first character selected appears in green and the last one in
orange.
Selecting Whole Lines
Multi-click 3 times will select a line. There are two shortcuts to select lines more easily:
•
•
Press SHIFT and the middle mouse button. Dragging the mouse then will extend
the selection line by line.
Move the mouse on the fields located between the prefix fields and the data fields,
and press the first mouse button. The mouse shape changes when it is located on
the line selection fields. Dragging the mouse then will extend the selection line by
line.
Moving Data to Other Windows
When SEDIT is running in the Open Look environment, data can be moved to other
windows using the COPY and PASTE method.
When running the MOTIF SEDIT version, use the primary selections to move data to any
XTERM windows.
To move text from SEDIT to XTERM, select the text, move the mouse into the XTERM
window and press the middle mouse button.
To move text from XTERM to SEDIT, select the text, move the mouse into the SEDIT
window and press Control-PASTE (F4 or L8).
When MOUSEMODE MOTIF is in effect, the middle mouse button may be used instead of
Control-PASTE.
SEDIT and S/REXX Reference Manual
Page 125
Using the Mouse on UNIX systems
SEDIT USER’S GUIDE
Using the Mouse in MOTIF Mode
When adding the following statement in the profile.sedit initialization macro file:
’mousemode motif’
the mouse buttons perform in the following way:
Page 126
M1
starts a selection.
M1 (dragged)
extends a selection.
Shift-M1
extends a selection.
M2
pastes the current selection at the cursor location.
Control-M3
cancels the selection.
SEDIT and S/REXX Reference Manual
SEDIT USER’S GUIDE
Using the Mouse on Windows systems
Using the Mouse on WINDOWS Systems
Note: The UNIX mouse settings described on page 123 are more powerful than the
default WINDOWS settings. To use UNIX settings on WINDOWS, a 3 button
mouse is needed. Then, add in the profile.sedit file the "set_unix" macro
call.
Making a Linear Selection
On WINDOWS systems, the default MOUSEMODE value is WINDOWS.
In this mode, the keyboard and mouse behave in similar ways to most WINDOWS
applications. The main difference is that the cursor can be moved independently of the
selection. The Delete key removes only the character at the cursor location. To remove
the selected characters, the ^x key must be used.
Clicking the left mouse button moves the cursor, without changing the current selection.
Dragging the left mouse button starts a selection, displaying a character which will appear
in reverse video.
Clicking several times in less than a .4 second interval is called a multi-click.
Multi-click twice will select a word.
Multi-click 3 times will select a line.
The user can cancel any selection by shifting the right mouse button.
Shifting the left mouse button allows the user to extend a selection.
The Selection Related Keys
• COPY-SELECTION
• PASTE-SELECTION
• FIND-SELECTION
• CUT-SELECTION
• META-KEY
Control-c
Control-v
F1
Control-x
Left Alt key
Deleting the Selected Characters
To delete a selection, press the CUT key.
Note that there is no control character on the screen. To remove an entire line using the CUT
key (^x), multi-click 3 times.
If only the first and the last characters of the line are selected, the line will be cleared without
deleting it.
SEDIT and S/REXX Reference Manual
Page 127
Using the Mouse on Windows systems
SEDIT USER’S GUIDE
Copying the Selected Characters
Unlike with the OPENLOOK or MOTIF MOUSEMODE settings described on page 124, there
is only one way to copy characters:
•
COPY then PASTE
1)
2)
3)
4)
Make a selection.
Use the COPY key (^c) to store a copy of the characters selected in an
internal buffer.
Move the cursor to the destination.
Depress the PASTE key (^v).
To overlay the copy instead of inserting it, hold down the shift-key when proceeding. In
this case, no lines will be inserted in the file.
Note that the mouse and keyboard UNIX settings described on page 50 offer many more
capabilities, but require a 3 button mouse.
Searching for Selected Characters
Once selection is accomplished, the FIND key (F1) may be used in various ways:
FIND
finds the next string identical to the string selected.
Shift-FIND
finds backward the next identical string.
Control-FIND
finds the next identical name: if the user selects "i" SEDIT
will find it in "i=3" but not in "if (".
Shift-Control-FIND
finds backward the next identical name.
Making a Rectangular Selection
A selection made holding the Left Alt key will be rectangular instead of linear.
A rectangular selection can be used in the same way as a linear one, with a few differences:
•
•
A line cannot be deleted, only its content is deleted.
New lines are not inserted when the selection is more than one line.
Selecting Whole Lines
Multi-click 3 times will select a line. There are two shortcuts to select lines more easily:
•
•
Page 128
When using a 3 buttons mouse, press SHIFT and the middle mouse button.
Dragging the mouse then will extend the selection line by line.
Move the mouse on the fields located between the prefix fields and the data fields,
and press the first mouse button. The mouse shape changes when it is located on
the line selection fields. Dragging the mouse then will extend the selection line by
line.
SEDIT and S/REXX Reference Manual
SEDIT USER’S GUIDE
Using the Mouse on Windows systems
Scrolling
The mouse wheel allows to scroll up and down.
When Shift is depressed, SEDIT scrolls 4 lines at a time. The WHEEL command can change
this setting.
When Control is depressed, SEDIT scrolls one page.
When Shift and Control are both depressed, SEDIT goes to the first or the last file line.
SEDIT and S/REXX Reference Manual
Page 129
Using the Mouse on Windows systems
SEDIT USER’S GUIDE
Undoing
On Sun workstations, the UNDO key is mapped to the L2 key. On others workstations, it is
mapped to the F11 key.
Pressing the UNDO key undoes the last action. The user can undo until cancelling all
modifications in the file.
Pressing Shift-UNDO restores the modifications undone by the UNDO key.
Note that all modifications undone are lost if the file is modified before pressing
Shift-UNDO.
The undo memory is reset every time a file is saved.
Page 130
SEDIT and S/REXX Reference Manual
SEDIT USER’S GUIDE
Using the Mouse on Windows systems
Using MAKE
The following make.x macro is provided in the {install-dir}/xmac directory:
compile make $argv
This allows the user to call the UNIX make program builder by simply issuing, for
example, the following command directly within SEDIT:
====> make splitfile
The make macro calls the COMPILE SEDIT command using the make splitfile
string as argument.
COMPILE will run the make program in a different subprocess, split the screen, display the
make output, and call directly the NEXTERROR command.
The NEXTERROR command will attempt to parse the make output in order to load the file
in error, and set the cursor upon the first line in error.
For example, the following make output could be displayed:
Typing ^- (Control -) when running in a windowing environment, or F2 when running with
an ASCII terminal will call the NEXTERROR command, which will load the
splitfile.c file, and set the cursor upon line 24.
SEDIT and S/REXX Reference Manual
Page 131
Using ASCII terminals
SEDIT USER’S GUIDE
Using ASCII Terminals
At initialization, SEDIT checks the environment to start in the appropriate mode.
If the OPENWINHOME environment variable exists, it will start in the OPEN WINDOWS1
mode. If OPENWINHOME does not exist, but DISPLAY does, it will start in the MOTIF
mode. Otherwise, SEDIT starts in ASCII mode.
Before being able to use the function keys in ASCII mode, the user must use the mkesc
utility described on page 8.
The ASCII mode offers only a subset of the SEDIT facilities:
•
•
•
•
There is no mouse support, and therefore no menu and no button support.
It is not possible for SEDIT to know the "shift", "control" and "meta" key
state. Therefore, it is not possible to assign a specific command to function keys
when holding down these modifier keys. For example, "set s-f1 flquit" will
not make SEDIT call the "flquit" command when hitting "shift-f1".
For the same reason, "set ^A command" will not be recognized. Only
"set ^a command" will be recognized.
The following "^cc" keys cannot be changed:
^t enters the tab character (instead of ^tab).
^i enters the next-field 3270 command.
^j enters the up-field 3270 command.
^f enters the down-field 3270 command (instead of the Alt key on Suns,
and the right Control key on other workstations)
^h enters a backspace.
^l enters the line-feed separator character.
^m is equivalent to the Return or Enter key.
The tree editor is not supported.
1. Sun only.
Page 132
SEDIT and S/REXX Reference Manual
SEDIT USER’S GUIDE
Using ASCII terminals
Using INTERNAL Macro Commands
An SEDIT internal macro is a file with an "x" filetype which is called from the SEDIT
environment.
In order to make a file available for such usage, the user must first enter (for example in the
"profile.sedit" initialization file) the "hash {dir1 {dir2} {...}}"
command.
Then, if the command searched for corresponds to the filename of one of these files, every
line of this particular file will be executed as a command.
Note that macro names are case sensitive and SEDIT commands are not.
A macro can call another macro, but recursive calls are not allowed.
Note that if the user edits an "*.x" file, the user need not enter a "hash" command again
after saving it, the internal hash table will be updated.
"hash" does not automatically start to avoid initialization delay because macro commands
are optional.
Example:
Assume there is a file named "/home/user1/xmac/xff.x"
containing the line "x $1.F". If the user includes the command "hash
/home/user1/xmac" in the "profile.sedit" file, typing "xff
prog1" will start editing file "prog1.F".
Variable Substitution
When executing a macro, SEDIT will replace any string like "$i" with the argument
number i passed at invocation. For a file "/usr/m1/test.f", and a macro call like
"macroname arg1 arg2", the following substitutions will take place:
$0
$1
$argv
$fn
$lfn
$ft
$fd
$name
$xhome
expands to
expands to
expands to
expands to
expands to
expands to
expands to
expands to
expands to
$arch
expands to
Example:
macroname
arg1
arg1 arg2
test
/usr/m1/test
f
/usr/m1
/usr/m1/test.f
the installation directory (usually /home/xed or
C:\Program Files\SEDIT)
the hardware dependent string described in Appendix B:
Hardware String on page 695.
"set ^p shell lpr $name &" will allow the UNIX user to print
the
currently
edited
file
by
typing
"control-p".
SEDIT and S/REXX Reference Manual
Page 133
Using EXTERNAL macro commands
SEDIT USER’S GUIDE
Using EXTERNAL Macro Commands (UNIX Only)
An external macro command is a file with an "ex" filetype which is called from the SEDIT
environment.
In order to make a file available for such usage, the user must first enter (for example in the
"profile.sedit" initialization file) the "hash {dir1 {dir2} {...}}"
command. This macro can be written in any interpreted language able to call UNIX
commands and retrieve their result, such as the C-SHELL language, or in C.
"reprofile.ex" is a particular file which is executed every time SEDIT loads a new
file.
Using an Interpreted Language
SEDIT provides two modules which enable communication between the C-SHELL
language (for example) and itself:
• sends arg1 {arg2} {...}
sends the argi parameters to SEDIT to be executed as
SEDIT commands. A command failure will stop the
process.
• extract arg
retrieves from SEDIT the requested arg value.
arg may be any one of the words described on page 243.
Page 134
SEDIT and S/REXX Reference Manual
SEDIT USER’S GUIDE
Using EXTERNAL macro commands
SEDIT provides the /home/xed/xmac/Bye.ex macro:
SEDIT and S/REXX Reference Manual
Page 135
Using EXTERNAL macro commands
SEDIT USER’S GUIDE
#! /bin/csh -f
#
# Saves in the file "./restart.x" the files currently
# edited for further use by the "profile.sedit" macro
#
set a = ‘extract ring‘
if ( $a[2] == ’0’ ) then
sends ’exit’
exit(0)
endif
set a = ($a[3-])
if (-e restart.x ) then
rm restart.x
endif
touch restart.x
foreach ff ($a)
echo $ff
echo "xed $ff" >> restart.x
sends "xed $ff"
set line = ‘extract line‘
echo ":$line[1]" >> restart.x
end
sends ’cancel’ ’exit’
This macro saves every edited file name into the "restart.x" file, and then terminates
the SEDIT session. Since the "profile.sedit" file searches for the "restart.x"
file at SEDIT initialization, the next time the user starts SEDIT in the same directory, the
macro "profile.sedit" will load the same files edited when the user left SEDIT, and
set up the current line at its previous location.
Note that the user needs to process the command "hash $xhome/xmac" in the
"profile.sedit" file before calling this macro.
Page 136
SEDIT and S/REXX Reference Manual
SEDIT USER’S GUIDE
Using EXTERNAL macro commands
Usage notes:
•
•
•
•
•
•
Commands sent to SEDIT must be embedded within quotes since every word
passed to the ’sends’ module will be treated as a single command.
’sends down 2’ is not the same as ’sends "down 2"’.
It will be faster to pass multiple arguments to the ’sends’ module. ’sends
"top" "down 2"’ will perform faster that ’sends "top"’ followed by
’sends "down 2"’.
The macro file must have execution permission.
If the macro attempts to read from its standard input, SEDIT must run in the
foreground.
An external macro can be stopped by typing Control-C.
SEDIT and S/REXX Reference Manual
Page 137
Using EXTERNAL macro commands
SEDIT USER’S GUIDE
Using the C Language (UNIX Only)
SEDIT provides the "/home/xed/lib/$arch/libex.a" library, which allows the
user to write external C macros.
This library provides the following routines:
#include "ex_sedit.h"
int sends(com)
char *com;
char *extract(value)
char *value;
void extract2(r_char, r_int, value)
char ***r_char, *value;
int **r_int;
void free_extract(r_char, r_int)
char ***r_char;
int **r_int;
void ex_ini();
void ex_end(rc)
int rc;
ex_sedit.h
is located in the "/home/xed/include"
directory.
ex_ini
initiates the connection with SEDIT. It must be the
first routine called.
sends
is used to send the null terminated string com to
SEDIT to be executed as a command. sends will
return the SEDIT return code. 0 will indicate that the
command succeeded.
extract
is used to retrieve an internal SEDIT value. value
is a keyword similar to those described in the section
"Using an interpreted language".
extract is an obsolete routine replaced by the
more usable extract2 routine.
Page 138
SEDIT and S/REXX Reference Manual
SEDIT USER’S GUIDE
Using EXTERNAL macro commands
extract2
is used to retrieve an internal SEDIT value. value
is a keyword similar to those described in the section
"Using an interpreted language".
r_char is allocated with the extracted values stored
as characters. A NULL value may be passed when
this information is not needed.
r_int is allocated with the extracted values stored
as integers. A NULL value may be passed when this
information is not needed.
free_extract
releases previously
memory.
ex_end
terminates the connection with SEDIT, and then
performs the "exit(rc)" system call.
SEDIT and S/REXX Reference Manual
extract2()
allocated
Page 139
Using EXTERNAL macro commands
SEDIT USER’S GUIDE
The file "/home/xed/demo/demo_ex/invsel.c" is an example of such a macro:
/*
* invsel: makes every visible line invisible, and vice-versa.
*/
#include <stdio.h>
#include "ex_sedit.h"
#define DBX_SLEEP 0
main()
{
char **r_display, buff[50], bu_vi[50], bu_invi[50];
int *display, *line, *sele, lex;
register i;
ex_ini();
#if DBX_SLEEP
fprintf(stderr, "invsel: process %d sleeping\n", getpid());
i = 1;
while(i)
usleep(100000);
#endif
sends("preserve");
sends("scope all");
/* We need it for scanning the file line by
line */
sends ("bot");
extract2(&r_display, &display, "display");
extract2(NULL, &line, "line");
sprintf (bu_invi, "select %d", display[2] + 1);
sprintf (bu_vi,
"select %d", display[1]);
for (i=1; i<=line[1]; i++)
{ sprintf(buff, ":%d", i);
sends(buff);
extract2(NULL, &sele, "select");
if (sele[1]>= display[1]
sends(bu_invi);
else
sends(bu_vi);
&&
sele[1]<= display[2])
free_extract(NULL, &sele);
}
free_extract(&r_display, &display);
free_extract(NULL, &line);
sends("restore");
sends("top");
ex_end(0);
}
Page 140
SEDIT and S/REXX Reference Manual
SEDIT USER’S GUIDE
Using EXTERNAL macro commands
To create the macro "invsel.ex", use the following commands:
% cd /home/xed/demo/demo_ex
% cc -o invsel.ex invsel.c -I/home/xed/include
-L/home/xed/lib/arch -lex -lc -lm
% chmod a+x invsel.ex
Where arch is the hardware dependent string described in Appendix B: Hardware String
on page 695.
Then issue the command "hash /home/xed/demo/demo_ex" command within
SEDIT. The user can now run invsel as an SEDIT command.
SEDIT and S/REXX Reference Manual
Page 141
S/REXX:macro commands
SEDIT USER’S GUIDE
Using S/REXX Macro Commands
An S/REXX macro command is a file with an sedit filetype which is called from the
SEDIT environment.
In order to make a macro file available for such usage, the user must first enter (for example
in the profile.sedit initialization file) the "HASH {dir1 {dir2} {...}}"
command described on page 285.
profile.sedit is a particular macro file which is searched for first in the current
directory, then in the user’s home directory (C:\ on WINDOWS systems) and finally in
the SEDIT installation directory. profile.sedit tailors SEDIT to satisfy the user’s
preferences, for example to emulate an editor with which the user is familiar and to set the
function keys to conform the user’s workstation.
reprofile.sedit is a particular file which is executed every time SEDIT loads a new
file.
All the S/REXX instructions and built-in functions are available within the SEDIT
environment. The extract command described in page 243 may be used to transfer
information from SEDIT to S/REXX variables.
Usage notes:
•
•
•
•
•
Page 142
Once made available with the HASH command, a macro may be used by typing its
filename in the command field.
Commands to be executed by SEDIT must be surrounded by single or double
quotes, including the extract command, which is an SEDIT command and not
an S/REXX command.
The default macro address value is ADDRESS SEDIT. It can be changed by using
the ADDRESS command described on page 512.
When running S/REXX within SEDIT in a UNIX windowing environment such
as OPEN WINDOWS or MOTIF, all input and output operations are redirected
to the window SEDIT was started from.
In order to allow the input operations to execute properly, SEDIT must run in the
foreground.
Starting SEDIT in the background with a command like "xed &" or "sedit" will
make SEDIT hang every time a TRACE ? or a PULL instruction is executed.
When running S/REXX within SEDIT on WINDOWS, all input and output
operations are redirected to a console window created by S/REXX.This console
window can be removed by the Special-Close Console menubar item.
SEDIT and S/REXX Reference Manual
SEDIT USER’S GUIDE
S/REXX:macro commands
The {install-dir}/xmac/bye.sedit is an S/REXX macro example:
/*
* Saves in the file "./restart.x" the files currently
* edited for further use by the "profile.sedit" macro
*/
’prompt OK to quit ?’
if rc <> 0 then exit
’extract /ring’
if ring.1 <> ’0’ then
do
’extract /name’
if state(’restart.x’) then address unix ’rm restart.x’
do i = 2 to ring.0
call lineout ’restart.x’, ’xed ’ring.i
’xed ’ring.i
"extract /line/rw"
call lineout ’restart.x’, ’:’line.1
call lineout ’restart.x’, ’rw’ rw.1
end
call lineout ’restart.x’,
call lineout ’restart.x’
’xed ’name.1
’cancel’
end
’exit’
The profile.sedit macro executes the restart.x macro created by the
bye.sedit macro, allowing the user to restart SEDIT editing the same files the user was
editing before leaving SEDIT by using the bye command.
SEDIT and S/REXX Reference Manual
Page 143
S/REXX:macro commands
SEDIT USER’S GUIDE
Using EXTRACT
EXTRACT is used to retrieve information from SEDIT. EXTRACT can be used in 2 ways.
The command method:
/*
* downline: moves the cursor down one line
*
*
Usage in a profile file:
*
*
’autoi off’
*
’set enter ignore downline’
*
*/
signal on novalue
’extract/cursor/size/nbfile’
if nbfile.1 = 0 then return
if cursor.3 ~= -1 then
{ line = cursor.3 + 1
if line <= size.1 then ’cursor file ’line 1 ’priority
100’
}
else
{ /*
* Prefix zone ??
*/
’extract/prefix/lscreen’
if prefix.1 ~= ’ON’ then return
if (prefix.2 = ’LEFT’ & cursor.2 <= 5) |,
(prefix.2 = ’RIGHT’ & cursor.2 >= lscreen.2-5) then
{ line = cursor.1 + 1
if line < lscreen.1-1 then ’cursor screen ’line 1
’priority 29’
}
}
EXTRACT is used as an SEDIT command (’extract/cursor’) which sets the variables
corresponding to the requested extraction (cursor.0, cursor.1, ...).
Page 144
SEDIT and S/REXX Reference Manual
SEDIT USER’S GUIDE
S/REXX:macro commands
The built-in method:
/*
* downline: moves the cursor down one line
*
*
Usage in a profile file:
*
*
’autoi off’
*
’set enter ignore downline’
*
*/
signal on novalue
if nbfile.1() = 0 then return
if cursor.3() ~= -1 then
{ line = cursor.3 + 1
if line <= size.1() then ’cursor file ’line 1 ’priority
100’
}
else
{ /*
* Prefix zone ??
*/
if prefix.1() ~= ’ON’ then return
if (prefix.2 = ’LEFT’ & cursor.2 <= 5) |,
(prefix.2 = ’RIGHT’ & cursor.2 >= lscreen.2()-5) then
{ line = cursor.1 + 1
if line < lscreen.1()-1 then ’cursor screen ’line 1
’priority 29’
}
}
Calling any prefix.n() built-in performs an ’extract/prefix’ command, and
returns the prefix.n value. The remaining prefix.i variables can then be used
directly.
Note: When extracting an important amount of data, such as with ’extract/file’, use
the built-in method only with the first call (nb_lines = file.0()), and then
use the generated variables (data = file.23456). Using the built-in method
every time (data = file.23456()) would extract the entire file repeatedely,
which would result in a significant overhead.
SEDIT and S/REXX Reference Manual
Page 145
S/REXX:macro commands
SEDIT USER’S GUIDE
Using the BATCH Option
When started with the -batch or -filec option, SEDIT runs in the following mode:
•
•
•
•
•
The SEDIT window is not displayed.
No profile is used at initialization. Use the "-p filename" option to use
filename.sedit as initialization profile.
Once SEDIT is done processing commands submitted with the "-c command"
option, or processing the macro file submitted with the -filec option, SEDIT
exits. SEDIT will quit all files, including unsaved modified files.
Error messages are saved in the sedit.@messages file when SEDIT exits. The
MESSAGESDIR command can be used to specify the location of this file.
The following commands are silently ignored:
BUTTON
COLOR
COMPILE
COMPLETE
CREATE
C_APLSTOP
C_APLTRACE
C_DUP
C_ENDCURL
C_ENDLINE
C_ENDS
C_ENDSALL
C_ENDSR
C_EXT
C_LINEADD
C_LINEDEL
C_SCRH
C_SCRJ
C_SCRV
C_SPLIT
C_STARTLINE
C_STARTS
DY_ALL
DY_EXCLUDE
DY_FIND
DY_FONT
DY_SHOW
FLFILE
•
Page 146
FLIST
FLQUIT
FONT
GET_PANEL
HELP
LISTEN
MBUTTON
MENU
MENUBAR
NEXTERROR
PDFCOPY
PDFREPLACE
PRINTSCREEN
PROMPT
READ
READSCREEN
REFRESH
RFLIST
SCHANGE
SCN
SCREEN
SCROLLBAR
SET
SETP
SOS
SPELL
SPELL_ADD
SPELL_NEXT
SRCHANGE
TOOLBAR
TREE
UNBUTTON
XCSHELL
XKSHELL
XSHELL
XTCSHELL
XWINDOWS
On WINDOWS systems, PRINTFILE is also silently ignored.
SEDIT and S/REXX Reference Manual
SEDIT USER’S GUIDE
•
S/REXX:macro commands
The following commands behave differently:
AQUIT
performs as PQUIT.
EXIT
unconditionally exits, without checking for modified
files.
FILE and SAVE
If the file name has been changed during the editing
session so that it is identical to that of an existing file,
or if the file has been modified by another user,
FILE and SAVE do not overwrite the existing file.
IMPCMSCP
is OFF by default.
PRINTFILE (UNIX)
needs the PRINTER, DAEMON, WIDTH and
HEIGHT parameters.
UNIX Examples
xed -batch -c ’"change/first/last"’ -c file sample.c
first loads the sample.c file, then performs the change/first/last command,
performs the file command and finally exits.
Bracketing a command with ’" and "’ is necessary because xed is a shell script.
xed runs in the foreground: if this command is issued from a program, the program will
pause until xed exits.
Note that xed starts in XEDIT mode.
xed -batch -c ’"mode command ispf"’ -c ’"change first last
all"’ -c end sample.c
applies the PDF change command to sample.c.
xed -batch -c ’"pdfchange first last all"’ -c end sample.c
applies the PDF change command to sample.c.
xed -batch -p batch1
runs the batch1.sedit macro and exits. Note that typing "xed -batch -p batch1
sample.c" would run batch1.sedit before loading sample.c.
SEDIT and S/REXX Reference Manual
Page 147
S/REXX:macro commands
SEDIT USER’S GUIDE
xed -filec batch1 sample.c
loads the sample.c file, loads the batch1.sedit macro, runs batch1.sedit and
exits.
WINDOWS Examples
xed -batch -c "change/first/last" -c file sample.c
first loads the sample.c file, then performs the change/first/last command,
performs the file command and finally exits.
xed.exe runs in the background: if this command is issued from a program, the program
will not pause until xed exits.
Note that xed starts in XEDIT mode.
xed -batch -c "mode command ispf" -c "change first last
all" -c end sample.c
applies the PDF change command to sample.c.
xed -batch -c "pdfchange first last all" -c end sample.c
applies the PDF change command to sample.c.
xed -batch -p batch1
runs the batch1.sedit macro and exits. Note that typing "xed -batch -p batch1
sample.c" would run batch1.sedit before loading sample.c.
xed -filec batch1 sample.c
loads the sample.c file, loads the batch1.sedit macro, runs batch1.sedit and
exits.
Note: Windows considers single quotes as being part of an argument, so -c ’sort’ for
example will pass ’sort’ instead of sort to SEDIT. Use double quotes if you need
to pass commands with embedded blanks.
Page 148
SEDIT and S/REXX Reference Manual
SEDIT COMMAND REFERENCE GUIDE
Abstract
SEDIT Command Reference Guide
Commands are entered in the COMMAND FIELD. They are executed with the "Return"
or "Enter" key.
Several commands can be entered at the same time using the line-feed separator.
This character will appear as a period. You can disable this feature or change the separator
with the SEP or LINEND command. The LINEND command on page 302 explains how to
enter the line-feed character.
For example, "xf test./var1" will start editing the "test.f" file and then search
for a "var1" string.
Throughout the command reference guide, the following file naming convention is used:
For any file such as "/usr/m1/test.f":
"/usr/m1" is called
"test"
is called
"f"
is called
"filedirectory".
"filename".
"filetype".
Most commands assume the current line location as a starting position.
The current line is usually displayed in red at the eighth physical line of the screen, and the
corresponding prefix field appears bold-faced.
Variable Substitution
For any command except "set" or "button", and for a file "/usr/m1/test.f", the
following substitutions will take place:
$fn
$lfn
$ft
$fd
$name
$xhome
expands to
expands to
expands to
expands to
expands to
expands to
$arch
expands to
SEDIT and S/REXX Reference Manual
test
/usr/m1/test
f
/usr/m1
/usr/m1/test.f
the installation directory (usually /home/xed or
C:\Program Files\SEDIT)
the hardware-dependent string described in Appendix B:
Hardware String on page 695.
Page 149
Abstract
SEDIT COMMAND REFERENCE GUIDE
Avoiding Variable Substitution
When the $ sign is escaped with a backslash, substitution does not occur:
\$fn
expands to
\\$arch expands to
c/\$fd/\$arch
$fn
\sun4 for a SPARC workstation.
changes the $fd string with the $arch string.
When ARBCHAR is set to ON $, variable substitution does not occur within the ALL,
CHANGE, CLOCATE, CDELETE, CN, SCHANGE, SCN, /, and -/ commands, which use $
as arbitrary character.
The MODE EXPAND command described on page 325 allows to disable the variable
substitution.
Page 150
SEDIT and S/REXX Reference Manual
SEDIT COMMAND REFERENCE GUIDE
ACC
ACCess - Add Directory To the Path
ACCess dir {dir2 {..}}
ACCESS adds the various diri directories to the path in which SEDIT looks for files.
If diri does not start with a standard directory indicator ( / . ~ ), SEDIT will search first
in the current directory and then through the directories described in the cdpath. See the
DACCESS command for more information on the cdpath.
If diri contains blanks, it must be surrounded with quotes or double quotes. If a directory
contains a quote or a double quote, the quote must be escaped with a backslash.
Examples:
acc
acc
acc
acc
acc
acc
acc
acc
Assume the home directory is "usr/m1" and the current directory is
"/usr/m1/dir1".
dir2
will access
/usr/m1/dir2 directory
dir2
a second time will move /usr/m1/dir2 in second position.
~/dir3 will access /usr/m1/dir3 directory
./dir4 will access /usr/m1/dir1/dir4 directory
../dir4 will access /usr/dir4 directory
"c:\Program Files" will access the WINDOWS Program Files directory.
~/quote\"dir will access the ~/quote"dir directory.
~/foo ~/test will access these 2 directories.
The user will receive the message ".... Accessed in xx".
See the directory editor FLIST section for "xx" use.
Reordering Accessed Directories
Accessing the same directory twice places it in second position in the path. The first position
is always the current directory.
This may be useful when files with the same name exist in different directories, and the user
wants to edit in priority files within a given directory.
For example, there may be a wsrc directory containing WINDOWS source files, and a
msrc directory containing sources files for the same project in the MOTIF environment.
The current directory might be either a wobj or a mobj directory.
Before working with the MOTIF files, issue an "acc msrc msrc" command. Similarly,
"acc wsrc wsrc" would place the wsrc directory before the msrc directory.
See Also: DACCESS, DRELEASE, RELEASE, SHOWPATH, SHOWCDPATH
SEDIT and S/REXX Reference Manual
Page 151
ADD
SEDIT COMMAND REFERENCE GUIDE
Add - Add Lines
inserts 1 or N line(s) starting at the current line
location.
Add {N}
Scope:
Return Codes:
Page 152
Display
0
5
Normal
Invalid Number
SEDIT and S/REXX Reference Manual
SEDIT COMMAND REFERENCE GUIDE
ALL
ALl - Global Selective Line Editing
ALl { target }
Scope:
selects the lines containing the target specified.
Display
If target is not specified, SEDIT will set the selection level for every line in the file to
the upper value of the DISPLAY range, making all of them visible.
If target is specified, SEDIT will set the selection level for every line currently in the
scope matching this target to the upper value of the DISPLAY range, and to this value plus
one for all the other lines, hiding them. SEDIT will then put SCOPE DISPLAY in effect,
and select the first line displayed as the current line. With SCOPE DISPLAY in effect, lines
that are excluded from the display are also excluded from processing by most SEDIT
commands and prefix commands. With SCOPE ALL in effect, all lines will be processed.
If SHADOW ON is in effect, a shadow line appears on your display wherever lines have been
excluded.
target may be one of the following:
•
•
•
•
•
•
•
•
/string{/} will select every line containing string. Note that the last /
is optional unless string ends with a / or a blank.
~/string{/} will select every line not containing string.
\string{/} will select every line containing the name string.
~\string{/} will select every line not containing the name string.
r/exp{/}
will select every line matching the regular expression exp.
~r/exp{/}
will select every line not matching the regular expression exp.
Blank
will select every blank line.
~Blank
will select every non-blank line.
See the R/ command for a complete regular expression syntax description.
It is possible to mix several targets by using the AND (&) or the OR (|) operator.
& and | characters are treated as logical characters when enclosed with a valid delimiter,
such as '/' or 'r/'.
To imbed an & or a | character within a target such as "&/" where the & is not to be
considered as a logical operator, the user must escape the logical character with a \.
Examples:
will select every line containing the names i or k.
"if (j==1)" will not be selected.
"i=3" and "k++" will be.
all /if/&\k will select every line containing the string if
and the name k. "if (k==3)" will be selected.
all ~\i
will select every line not containing the name i.
all //**//
will select every line containing the string /**/.
Note that the last / is required here because the
string ends with a /.
all b
will select every blank line.
all r/[A-Z] will select every line containing an uppercase letter.
all/str/\&/a/ will select every line containing "str/&/a".
all \i/|\k
SEDIT and S/REXX Reference Manual
Page 153
APL
SEDIT COMMAND REFERENCE GUIDE
Return Codes:
0
2
5
Normal
Target not found
Invalid Operand
See Also: DISPLAY, DY_ALL, EXCLUDE, R/, SCOPE, SELECT, SHADOW,
SHOW, VISIBLE
ALT - Change The Number of Alterations
ALT {NA {NS}}
Scope:
changes the number of alterations.
File
If NA is specified, the number of alterations that have been made to the file since the last
AUTOSAVE operation is set to NA.
If NS is specified, the number of alterations that have been made to the file since the last
save operation is set to NS. If NS is 0 and SAVECLEARUNDO is set to ON, the undo memory
is cleared.
Used without arguments, ALT displays the number of alterations that have been made to the
file since the last AUTOSAVE operation and since the last save.
See Also: AUTOSAVE, SAVECLEARUNDO
APL - Pass a Command to APL
APL {command}
APL transmits the command string to Dyalog APL for execution and displays the possible
result in the message field.
Used without parameter, APL returns to Dyalog APL.
To get back to SEDIT, the user must type the
Note:
Page 154
APL instruction.
It is not necessary to type APL if command starts with "ρ" or "
".
SEDIT and S/REXX Reference Manual
SEDIT COMMAND REFERENCE GUIDE
ARBCHAR
ARBchar - Set Arbitrary Character
ARBchar ON|OFF {char}
Initial value:
Level:
defines an arbitrary character to be used by string
matching commands.
OFF $
Global
ARBCHAR without arguments displays the current status.
When ARBCHAR is ON, the ALL, CHANGE, CLOCATE, CDELETE, CN, SCH, SCN, /, and
-/ commands use the char character as an arbitrary separation character. The variable
substitution described on page 150 will not occur.
Examples:
/the$plane/
will locate the big plane as well as the last plane.
clocate/[$]
will locate the first bracketed expression.
Every time an arbitrary character is matched with a string in a change command, the
matched string is memorized in an internal buffer, and will be used to replace the equivalent
arbitrary character found in the second string passed to the change command.
Examples:
If the scanned file contains the following line:
all birds can fly in the sky
Typing:
c/all$can$sky/most$may$air
Changes the line to:
most birds may fly in the air
Typing:
c/$string/string/
deletes all characters that precede string.
Typing:
c/string$/string/
deletes all characters that follow string.
The second string may not contain more arbitrary characters than the first string.
See Also: ALL, CHANGE, CLOCATE, CDELETE, CN, SCHANGE, SCN, /, -/
SEDIT and S/REXX Reference Manual
Page 155
AUTOBIN
SEDIT COMMAND REFERENCE GUIDE
AUTOBin - Auto-Binary Feature
AUTOBin ON|OFF {c1 .. cn} sets the auto-binary feature ON or OFF.
Initial value:
Level:
ON 0x09 0x0A 0x0C 0x0D 0x1A
Global
When AUTOBIN is set to ON, before loading a file, SEDIT checks the first 1024 characters
of this file, and sets the BINARY mode to ON when it finds control characters not generally
found within text files which value is lower than 0x20, and different from the ci characters
which are allowed in text files.
The ci characters can be specified in decimal (nn) or hexadecimal (0xnn or x’nn’)
format.
By default, SEDIT removes all trailing blanks in every line when loading a file, when
editing a line and when saving a file. SEDIT also searches for the WINDOWS control
characters ^M and ^Z, and automatically removes them from display setting the loaded file
FILECONV to WINDOWS.
Trailing blanks are generally meaningless within text files, but may be essential within
binary files. When BINARY is set to ON, SEDIT does not remove trailing blanks setting
KEEPBLANKS to 1, does not check for WINDOWS file control characters and always sets
the loaded file FILECONV to UNIX.
In addition, SEDIT does not write a new line character after the last file line. When reading
a file in binary mode, if SEDIT finds a new line character at the end of the file, SEDIT
displays an empty line at the end of the file.
Examples:
autob
autob on
autob on 9 0x0a x’0c’
See Also: BINARY, FILECONV, KEEPBLANKS, SHBLANK, XBIN, XKB
AUTOExp - Auto-Expand Feature
AUTOExp ON|OFF
Initial value:
Level:
sets the autoexpand feature ON or OFF.
ON
Global
When autoexpand is on, the data fields expand automatically when necessary. This happens
when the cursor reaches the end of a line while typing, or when the last non-blank character
reaches the end of a line in insertion mode.
It is useful to disable this feature if the user does not want to be allowed to write beyond a
certain column.
Page 156
SEDIT and S/REXX Reference Manual
SEDIT COMMAND REFERENCE GUIDE
AUTOI
For example, FORTRAN users may start SEDIT with the parameter "-width 78", and
set the command "AUTOEXP OFF" in the "profile.sedit" file. This will create 72
column wide data fields when PREFIX is on.
See Also: POWERINPUT
AUTOI - Auto-Indent Feature
AUTOI ON|OFf {Stay | Nostay}
sets the auto-indent feature ON or OFF.
Initial value:
Level:
ON STAY
Global
When auto-indent is ON:
•
•
Typing "Return" when the cursor is at the end of a data line without any
character located in the command field will insert a line.
When inserting lines, the cursor is automatically placed on the first inserted line.
The indentation is identical to that of the previous line, and with the same number
of starting tabulations.
When NOSTAY is in effect, typing "Return" when the cursor is on a data line, but before
the last non-blank character will place the cursor on the command field. This behavior
mimics the IBM XEDIT editor behavior.
AUTOI without arguments displays the auto-indent status.
Note: When the ENTER key is defined, by using the SET ENTER command, the
auto-indentation is disabled.
See Also: SET
SEDIT and S/REXX Reference Manual
Page 157
AUTOSAVE
SEDIT COMMAND REFERENCE GUIDE
AUtosave - Auto-Save Feature
sets or resets the automatic save feature.
AUtosave N|OFF dir
Initial value:
Level:
OFF
Global
When AUTOSAVE is ON, the current file will be saved in the directory dir each time the
specified number N of alterations is reached.
The file will be saved with the name "autosaveppp_fd_fn.ft" where:
•
•
•
•
is the current SEDIT process number.
is the current file filedirectory.
is the current file filename.
is the current file filetype.
ppp
fd
fn
ft
AUTOSAVE without arguments displays the autosave status.
Note: When AUTOSAVE is in effect, the SAVE and FILE commands will erase the
previous autosaved file. QUIT will not.
BACKUP - Set Backup Mode
sets backup mode ON or OFF.
BACKUP ON|OFF {STR}
Initial value:
Level:
ON %
Global
By default, the FILE and SAVE commands save the previous content of the current file into
a backup file by appending a % character to the file’s name.
When BACKUP is OFF, SEDIT erases the backup file after a successful save. Should an
error happen during the save operation, the backup file would not be erased.
STR specifies the backup string.
If STR contains blanks, it must be surrounded with quotes or double quotes. If STR contains
a quote or a double quote, the quote must be escaped with a backslash.
Examples:
backup
backup
backup
backup
off
on .back
on "% %"
on \’
the backup strings contains a blank.
the backup string is a simple quote.
See Also: FILE, SAVE
Page 158
SEDIT and S/REXX Reference Manual
SEDIT COMMAND REFERENCE GUIDE
BACKWARD
BAckward - Scroll Backward
scrolls up N pages; the current line becomes the last
line displayed. This process is repeated N times.
BAckward {N | *}
Scope:
Display
BACKWARD 0 makes the last file line the current line.
BACKWARD * makes the top of file to be the current line.
When the current line is the top of file, and when MODE SCROLL WRAP is in effect,
BACKWARD makes the last line to be the current line.
This command is mapped to the F7 key by default.
Return Codes:
0
1
5
Normal
Top Of File Reached
Invalid Operand
See Also: MODE
BEEP - Set Beep Mode
BEEP {ON|OFF}
Initial value:
enables or disables the warning beep.
ON
SEDIT sounds a warning beep when the user types an unknown command with IMPCMSCP
set to OFF, and when a locate or change command does not find the target string.
BEEP OFF disables the warning beep.
BEEP without arguments displays the BEEP status.
SEDIT and S/REXX Reference Manual
Page 159
BInary - Set Binary Mode
BInary ON|OFF {FT string} disables or enables binary mode.
Initial value:
Level:
ON FT o a (UNIX)
ON FT com obj lib exe dll (WINDOWS)
OFF FT *
File
By default, SEDIT removes all trailing blanks in every line when loading a file, when
editing a line and when saving a file. SEDIT also searches for the WINDOWS control
characters ^M and ^Z, and automatically removes them from display setting the loaded file
FILECONV to WINDOWS.
Trailing blanks are generally meaningless within text files, but may be essential within
binary files. When BINARY is set to ON, SEDIT does not remove trailing blanks setting
KEEPBLANKS to 1, does not check for WINDOWS file control characters and always sets
the loaded file FILECONV to UNIX.
In addition, SEDIT does not write a new line character after the last file line. When reading
a file in binary mode, if SEDIT finds a new line character at the end of the file, SEDIT
displays an empty line at the end of the file.
When not running in character mode, when SHBLANK is set to ON (the default), and when
the last character in a line is a blank, SEDIT displays a thin vertical bar just after that last
blank character.
If you specify FT string, this setting will become the default for every new file with a
string filetype. If FT is *, this will be the default for any file. A period (.) may be used
if no filetype is required. This setting is also applied to the current file, unless its filetype
does not match FT.
To force the opening of a file in BINARY ON mode, the user can use the XBIN command.
Examples:
bi on
bi on ft o
SEDIT sets BINARY mode ON for files with
an ".o" extension.
Notes: KEEPBLANKS ON is not sufficient to preserve binary files integrity. Use BINARY
ON or XBIN instead.
Using BINARY ON on a file already loaded is not sufficient to preserve its integrity
since trailing blanks removal and control character checking is done at load time
before the file is actually displayed. Use either XBIN file or BINARY ON FT xx
before loading file.xx.
When AUTOBIN is set to ON, SEDIT checks the file contents in order to set the
binary mode automatically.
See Also: AUTOBIN, FILECONV, KEEPBLANKS, SHBLANK, XBIN, XKB
SEDIT COMMAND REFERENCE GUIDE
BOTTOM
Bottom - Bottom of File
selects the last line as the current line.
Bottom
Scope:
Display
BOUNDS - Set the Edit Boundaries
BOUNDS is a synonym for the VERIFY command. See page 440 for more details.
BUILTIN - Process a Built-in Command
BUILTIN is a synonym for the COMMAND command. See page 191 for more details.
SEDIT and S/REXX Reference Manual
Page 161
BUTTON
SEDIT COMMAND REFERENCE GUIDE
BUtton - Create Button
BUtton string1 string2
Available on:
Batch Mode:
creates a button using string1 as a label.
UNIX
Not Available
When selected with the left mouse button, the string "string2" is executed as a
command. With this command, the "Control-line-feed" separator is disabled,
allowing the user to program several commands on the same button.
Example:
bu COMP shell cc -g -c -o $fn.o $fn.c &
Clicking on COMP will compile the C program currently edited.
See Also: MBUTTON, UNBUTTON, LINEND, SEP
CANcel (XEDIT MODE)- Abandon Files
XEDCANcel
CANcel
abandons all unmodified files.
When MODE COMMAND XEDIT is in effect, CANCEL calls the XEDIT mode XEDCANCEL
command. PDFCANCEL may be used to call the ISPF/PDF mode CANCEL command.
CANcel (ISPF MODE)- Cancel Edit Changes
PDFCANcel
CANcel
abandons the current file, without saving any of the
changes.
When MODE COMMAND ISPF is in effect, CANCEL calls the ISPF mode PDFCANCEL
command. XEDCANCEL may be used to call the XEDIT mode CANCEL command.
PDFCANCEL is identical to the XEDIT QQUIT command described on page 349.
Page 162
SEDIT and S/REXX Reference Manual
SEDIT COMMAND REFERENCE GUIDE
CAPPEND
CAppend - Append Text
appends text to the end of the current line.
CAppend {text}
If text is not specified, the column pointer will be placed after the end of the current line.
text starts after the first blank following the command cappend, which allows the user
to enter blanks. The column pointer will be placed under the first appended character.
Example:
Current line:
00001
i = 3
<...|....1....+....2....+....3....+....4....+....5....+....6
=====> CAPPEND
00001
;
/* This was a syntax error */
i = 3 ;
/* This was a syntax error */
<...+|...1....+....2....+....3....+....4....+....5....+....6
SEDIT and S/REXX Reference Manual
Page 163
CAPS
SEDIT COMMAND REFERENCE GUIDE
CAPS - Control Automatic Character Conversion
CAPS {ON|OFF}
Initial value:
Level:
enables or disables case conversion.
OFF
File
CAPS without argument is the same as CAPS ON.
When CAPS ON is in effect, SEDIT will translate lowercase letters to uppercase whenever
data is retrieved for editing.
When CAPS OFF is in effect, SEDIT respects the capitalization.
CAPS applies to the current file, and is an ISPF/PDF compatible subset of the XEDIT CASE
command.
To automatically set CAPS ON for every new file, the user may enter the following
command:
case u ft *
See Also: CASE, CHANGE, CN, SCH, SCN, S_FIND, R/, R-/, /, -/, \, -\
Page 164
SEDIT and S/REXX Reference Manual
SEDIT COMMAND REFERENCE GUIDE
CASE
CASE - Case Respect
CASE {Mixed|Uppercase} {Respect|Ignore} {CRespect|CIgnore} {SRespect|SIgnore}
{Ft string}
enables or disables case respect.
Initial value:
Level:
Mixed Respect CRespect SRespect ft *
File
If CASE UPPERCASE is in effect, SEDIT will translate lowercase letters to uppercase.
If FT string is specified, this setting will become the default for every new file with a
string filetype. If FT is *, this will be the default for any file. If FT is a period, it will
concern files with no filetype. This setting is also applied to the current file, unless its
filetype does not match FT.
Examples:
case u r ft f
case r ft *
case i ft .
will create FORTRAN uppercase files.
If CASE IGNORE is in effect, SEDIT will not consider capitalization when searching
strings.
Example:
case i
/Old/
will find old.
If CASE CIGNORE is in effect, SEDIT will not consider capitalization when changing
strings.
Example:
case ci
c/Old/new/
will change old with new.
If CASE SIGNORE is in effect, SEDIT will not consider capitalization when the SORT
command is applied.
Example:
case si
sort *
will sort the current file ignoring capitalization.
See Also: CAPS, CHANGE, CN, SCH, SCN, SORT, S_FIND, R/, R-/, /,
-/, \, -\
SEDIT and S/REXX Reference Manual
Page 165
CD - Change Directory
CD directory-name
changes the current directory.
If the directory is not valid, an error message is
displayed.
If directory-name does not start with a standard directory indicator ( / . ~ ), SEDIT
will search first in the current directory and then through the directories in the cdpath
accessed with the DACCESS command.
If directory-name contains blanks, it must be surrounded with quotes or double
quotes. If a directory contains a quote or a double quote, the quote must be escaped with a
backslash.
Examples:
Assume the home directory is /usr/m1, and the current directory is
/usr/m1/dir1.
cd
cd
cd
cd
cd
See Also: DACCESS
dir2
will switch to
~/dir3
will switch to
./dir4
will switch to
../dir5 will switch to
"c:\Program Files"
will switch to
/usr/m1/dir2 directory
/usr/m1/dir3 directory
/usr/m1/dir1/dir4 directory
/usr/m1/dir5 directory
c:\Program Files
SEDIT COMMAND REFERENCE GUIDE
CDELETE
CDElete - Delete Characters
deletes characters starting at the current column
pointer position up to, but not including, the column
target c-target.
CDElete c-target
Scope:
Display
The target must be in the ZONE range in order to be located.
c-target may be one of the following:
:N
-N
{+}N
/text{/}
-/text{/}
\text{/}
-\text{/}
moves the column pointer to column N.
moves the column pointer N columns to the left.
moves the column pointer N columns to the right.
searches the string text.
searches backward the string text.
searches the word text. "\i/" will spot "i" in "i=3" but
not in "if(".
searches backward the word text.
If STREAM ON is in effect, SEDIT searches each line in the file. If STREAM OFF is in
effect, SEDIT searches only the current line.
Example:
Current line:
00001
if ( a == 1 || b == 2 )
<...+....1..|.+....2....+....3....+....4....+....5....+....6
=====> cde / )
00001
if ( a == 1 )
<...+....1....+....2.|..+....3....+....4....+....5....+....6
See Also: STREAM, ZONE
SEDIT and S/REXX Reference Manual
Page 167
CEnter - Center Text
centers text defined by target operand.
CEnter {target}
Scope:
All
CENTER reformats a portion of the current file defined by the target operand. CENTER
centers the text within the current margins defined with the MARGINS command.
target may be one of the following:
All
Sel
:N
+N
-N
+* or *
-*
.symb
string expression
The entire file is formatted.
Centers the selected lines. If the selection is rectangular,
CENTER centers the contents of the selected area, the text
outside the selection not being modified.
Up to but not including the line N.
Down N lines.
Up N lines.
Down to the end of file.
Up to the top of file.
Up or Down to the line which has been assigned the .symb
symbolic name by using the POINT command, or a .symb
prefix command.
Defines a group of characters to be located.
The general format of a string expression is the following:
{+|-}{~}/string1{/{&}|{|}{~}/string2 ..... }
See the LOCATE command on page 304 for a precise string expression definition.
When target is not specified, CENTER formats the line corresponding to the cursor
location. When the cursor is not located upon a line of the current file, CENTER reformats
the current line.
Examples:
CENTER
CENTER all
CENTER sel
CENTER /str/
See Also: FLOW, FORMAT, LEFTADJUST, LOCATE, MARGINS, POWERINPUT,
RIGHTADJUST
SEDIT COMMAND REFERENCE GUIDE
CENTER_END
CENTER_End - End Connection with Codecenter
terminates a connection with the CodeCenter 4.x
software1.
CENTER_End
Available on:
UNIX
This command makes SEDIT stop listening on the socket opened with the CENTER_INIT
command. It also makes SEDIT stop being the current CodeCenter EDIT session.
Note that SEDIT will notice if the CodeCenter process it is connected to ends, and
automatically execute a CENTER_END command.
The CENTER_XXX commands are intended to be used with the CodeCenter 4.x release.
Please see the SABER_XXX commands when running CodeCenter 3.x.
See Also: CENTER_INIT, CENTER_SEND, LISTEN, SABER_END,
SABER_INIT, SABER_SEND
1. Saber-C and CodeCenter are trademarks of CenterLine Software, Inc.
SEDIT and S/REXX Reference Manual
Page 169
CENTER_INIT
SEDIT COMMAND REFERENCE GUIDE
CENTER_Init - Initialize Connection with CodeCenter
CENTER_Init
Available on:
starts a connection with the CodeCenter 4.x
software1.
UNIX
CodeCenter 4.x uses what is called a CLMS session to achieve communication between the
core CodeCenter session and auxiliary services, such as an EDIT or COMPILE server.
If SEDIT finds that only one CLMS session is running, it will establish the connection with
it immediately. If more than one CLMS session is running, SEDIT will display a fullscreen
panel showing all the CLMS identifiers, and the user will have to click with the mouse on
the identifier of the CLMS session to be talked to using the CENTER_Send command.
Establishing a connection with a CLMS session will make SEDIT the current EDIT server.
All editing requests made within CodeCenter will be sent to SEDIT.
The CENTER_XXX commands are intended to be used with the CodeCenter 4.x release.
Please see the SABER_XXX commands when running CodeCenter 3.x.
Note that since CENTER_Init is dependent on another vendor’s product, future releases
of CodeCenter may not be compatible with this interface.
See Also: CENTER_END, CENTER_SEND, LISTEN, SABER_END,
SABER_INIT, SABER_SEND
1. Saber-C and CodeCenter are trademarks of CenterLine Software, Inc.
The CodeCenter integration is not available on all platforms and all operating systems.
Page 170
SEDIT and S/REXX Reference Manual
SEDIT COMMAND REFERENCE GUIDE
CENTER_SEND
CENTER_Send - Send Command to CodeCenter
sends cmd to the CodeCenter1 CLMS session which
has been recognized by the CENTER_INIT
command.
CENTER_Send cmd
Available on:
UNIX
If no connection has been established with a CenterLine CLMS session, SEDIT executes a
CENTER_INIT command. Then, SEDIT sends cmd to that session.
The file "sedit.menu" contains the following lines to uncomment if you are using
CodeCenter:
"CENTER" MENU
"load "
MENU
".c" center_send load $fn.c
".o" center_send load $fn.o
"load "
"unload"
"swap "
"stop "
"stop
"ini
"list
"end
"CENTER" END
"
"
"
"
END
center_send unload $fn
center_send swap $fn
MENU
"stop in" center_send stop in $fn
"stop at" Center_stopat
END
center_init
center_send list $fn
center_end
1. Saber-C and CodeCenter are trademarks of CenterLine Software, Inc.
SEDIT and S/REXX Reference Manual
Page 171
CFIRST
SEDIT COMMAND REFERENCE GUIDE
Center_stopat is the "$xhome/xmac/Center_stopat.ex" macro, and sets a
stop in the current file at the cursor location:
#! /bin/csh -f
#
# Center_stopat: sets a stop at the cursor line
#
set cursor = ‘extract cursor‘
if ( $cursor[4] == -1 ) then
sends ’emsg .... Center_stopat: invalid cursor position’
exit 0
endif
set fname = ‘extract fname‘
set ftype = ‘extract ftype‘
set a = ’center_send stop "’"$fname[2]""$ftype[2]"’":’$cursor[4]
sends "$a"
The CENTER_XXX commands are intended to be used with the CodeCenter 4.x release.
Please see the SABER_XXX commands when running CodeCenter 3.x.
See Also: CENTER_END, CENTER_INIT, LISTEN, SABER_END, SABER_INIT
SABER_SEND
CFirst - Move Column Pointer
CFirst
moves the column pointer to the beginning of the
zone.
See Also: ZONE
Page 172
SEDIT and S/REXX Reference Manual
SEDIT COMMAND REFERENCE GUIDE
CH
Change (XEDIT MODE) - Change String
Change
XEDChange
/string1/string2{/{target {N|*} {P}}}
changes string1 with string2.
Scope:
Display
When MODE COMMAND XEDIT is in effect, CHANGE calls the XEDIT mode XEDCHANGE
command. PDFCHANGE may be used to call the ISPF/PDF mode CHANGE command.
/ may be replaced with any delimiting character that does not appear in the character
strings involved in the replacement.
target defines the number of lines to be scanned for a match. Lines are changed starting
with the current line, up to but not including the target line. target may be one of the
following:
:N
N or +N
+* or *
.symb
string expression
Up to but not including the Nth line.
N lines.
The end of file.
The line which has been assigned the .symb symbolic name by
using the POINT command, or a .symb prefix command.
Defines a group of characters to be located.
The general format of a string expression is the following:
{+|-}{~}/string1{/{&}|{|}{~}/string2 ..... }
See the LOCATE command on page 304 for a precise string expression definition.
When target is omitted, all lines between the current line and the end of file will be
scanned. However, if MODE CHANGE ONE is in effect, only the first line will be changed.
N is the number of occurrences of string1 to be changed on each line.
If omitted, all occurrences of string1 will be changed. However, if MODE CHANGE ONE
is in effect, only the first occurrence will be changed.
If specified as *, all occurrences of string1 will be changed.
P is the relative number of the first occurrence of string1 to be changed in each line. Its
default value is 1.
When string1 is omitted, string2 is inserted in the column which has a value defined
by the first ZONE command operand (initially 1).
When HEX ON is in effect, the stringi operands may be entered as hexadecimal values.
SEDIT and S/REXX Reference Manual
Page 173
Examples:
c
c
c
c
/i=2/i=3/
.a=b/3.a=c/3.
./**/..
/test// :100 1 2
c //string
c /x’31’/x’32’
c/k/i//if
arbchar on @
zone 25 40
c/@//**
will turn "i=2" in "i=3"
will turn "a=b/3" in "a=c/3"
will delete all "/**/" strings
will delete the second "test" occurrence in
each line until line 100
will insert string in the first zone column
with HEX ON in effect, changes all "1" with
"2".
will turn "k" in "i" until the first line
containing the "if" string.
will remove the columns 25 to 40.
If CASE CIGNORE is in effect, SEDIT will not consider capitalization when changing
strings.
Example:
case ci
c/Old/new/
will change old with new.
Note: The ZONE command allows the user to choose the starting and ending columns to
be scanned.
See Also: ARBCHAR, BEEP, CASE, CN, HEX, LOCATE, MODE, RCHANGE,
SRCHANGE, SCHANGE, SCN, STAY, ZONE
SEDIT COMMAND REFERENCE GUIDE
CH
Change (ISPF MODE)- Change String
Change
str1 str2 {range} {NEXT }
PDFChange
{ALL }
CHG
{FIRST}
{LAST }
{PREV }
{CHARS } {X } {col1 {col2}
{PREFIX} {NX}
{SUFFIX}
{WORD }
When MODE COMMAND ISPF is in effect, CHANGE calls the ISPF mode PDFCHANGE
command. XEDCHANGE may be used to call the XEDIT mode CHANGE command.
CHANGE changes str1 with str2.
When CHANGE encounters a group of nonblank characters separated by more than one
blank, CHANGE attempts to maintain the positional relationship between groups.
For example, the following data and commands:
1
333
abc1
zcr333
def
kfl
====> chg 1 AAA all
====> chg 333 B all
would result in:
AAA
B
abcAAA
zcrB
def
kfl
str1 and str2 may be one of the following:
*
(str1 only) The string used with the last FIND/EXCLUDE/CHANGE
command.
Simple string
Any series of characters not starting with a single or double quote (’ or ") and
not containing any embedded blanks. The search will be case insensitive.
Delimited string
Any string enclosed by single or double quotes. The search will be case
insensitive.
Hexadecimal string
Any delimited string of valid hexadecimal characters, preceded or followed by
the character X, such as X’3132’ or ’3132’x. The search will be case
sensitive.
SEDIT and S/REXX Reference Manual
Page 175
CH
SEDIT COMMAND REFERENCE GUIDE
Character string
Any delimited string, preceded or followed by the character C, such as
C’ab cd’ or ’ab cd’c. The search will be case sensitive.
Picture string (str1)
Any delimited string, preceded or followed by the character P, such as
P’ab cd’ or ’ab cd’p. The search will be case sensitive.
Within a picture string, the following special characters may be used:
=
~
.
#
@
<
>
$
means any character.
means any character that is not a blank.
means a character which generally cannot be displayed. SEDIT
will consider this any character which has a decimal value of less
than 32.
means any numeric character.
means any non-numeric character.
means any alphabetic character.
means any lowercase alphabetic character.
means any uppercase alphabetic character.
means any special character, neither alphabetic or numeric.
Picture string (str2)
Any delimited string, preceded or followed by the character P, such as
P’ab cd’ or ’ab cd’p.
Within a picture string, the following special characters may be used:
=
means the same character as in str1.
<
means the same character as in str1 translated in lowercase.
>
means the same character as in str1 translated in uppercase.
str2 must be the same length as str1.
CHANGE considers the following arguments:
range
Two labels that identify the lines to be searched for.
A label may be created by typing a .xxxx string on a prefix zone, or by using
the XEDIT POINT command described on page 335.
A label may also be one of the ISPF/PDF predefined labels:
.zf or .zfirst
the first line.
.zl or .zlast
the last line.
.zcsr
the cursor line
When omitted, range defaults to .zfirst .zlast.
Page 176
NEXT
Starts at the first position after the current cursor location and searches forward.
NEXT is the default. When the cursor is not located on the data, the search starts
from the first displayed line.
ALL
Starts at the top of the file and searches forward to find all occurrences of the
string.
FIRST
Starts at the top of the file and searches forward to find the first occurrence of
the string.
SEDIT and S/REXX Reference Manual
SEDIT COMMAND REFERENCE GUIDE
CH
LAST
Starts at the bottom of the file and searches backward to find the last occurrence
of the string.
PREV
Starts at the cursor location and searches backward to find the previous
occurrence of the string. When the cursor is not located on the data, the search
starts from the last displayed line
CHARS
Locates str anywhere the characters match. This is the default.
PREFIX
Locates str at the beginning of a word:
find ab matches "abc", but does not match "ab" or "cabd" or "dab".
SUFFIX
Locates str at the end of a word:
find ab matches "cab", but does not match "ab" or "cabd" or "abc".
WORD
Locates str as a whole word:
find ab matches "d ab e", but does not match "cabd" or "abc".
X
Scans only lines that are excluded from the display.
NX
Scans only lines that are not excluded from the display.
col1 and col2
The columns FIND is to search. When omitted, the columns are limited by the
BOUNDS setting described on page 161.
Example:
chg p’>###str’ p’<===abc’ all
could change "T123str" with "t123abc".
Return Codes:
0
4
5
6
7
12
Normal
String Not Found
* has been used on the first CHANGE call
Invalid Hexadecimal String
Invalid Label
Syntax Error
See Also: BOUNDS, EXCLUDE, FIND, SEEK, VERIFY
SEDIT and S/REXX Reference Manual
Page 177
CINSERT
SEDIT COMMAND REFERENCE GUIDE
CInsert - Insert Characters
CInsert text
inserts characters at the column pointer position.
The column pointer must be in the ZONE range.
Example:
Current line:
00001
if ( a == 1 )
<...+....1..|.+....2....+....3....+....4....+....5....+....6
=====> ci || a == 2 (one blank typed in after the 2)
00001
if ( a == 1 || a == 2 )
<...+....1..|.+....2....+....3....+....4....+....5....+....6
See Also: ZONE
Page 178
SEDIT and S/REXX Reference Manual
SEDIT COMMAND REFERENCE GUIDE
CLAST
CLAst - Move Column Pointer
moves the column pointer to the end of the zone.
CLAst
Examples:
=====> ZONE 2 30
Current line:
00001
i = 3;
.<..|....1....+....2....+....>....+....4....+....5....+....6
=====> CLAST
00001
i = 3 ;
.<..+....1....+....2....+....|....+....4....+....5....+....6
See Also: ZONE
CLEARErrors - Clear Compiling Errors
CLEARErrors
removes the line symbolic names assigned by the
COMPILE command.
See Also: COMPILE
SEDIT and S/REXX Reference Manual
Page 179
CLOCATE
SEDIT COMMAND REFERENCE GUIDE
CLocate - Locate Characters
searches for c-target.
CLocate c-target
Scope:
Display
CLOCATE scans the file searching for the column target c-target, and moves the column
pointer to that target. The search starts with the column following or preceding the column
pointer in the current line.
The target must be in the ZONE range in order to be located.
c-target may be one of the following:
:N
-N
{+}N
/text{/}
-/text{/}
\text{/}
-\text{/}
moves the column pointer to column N.
moves the column pointer N columns to the left.
moves the column pointer N columns to the right.
searches the string text.
searches backward the string text.
searches the word text. "\i/" will spot "i" in "i=3" but
not in "if(".
searches backward the word text.
If STREAM ON is in effect, SEDIT searches each line on the file. If STREAM OFF is in
effect, SEDIT searches only the current line.
Example:
Current line:
00001
i = 3
<|..+....1....+....2....+....3....+....4....+....5....+....6
=====> CL/3
00001
i = 3
<...|....1....+....2....+....3....+....4....+....5....+....6
See Also: STREAM, ZONE
Page 180
SEDIT and S/REXX Reference Manual
SEDIT COMMAND REFERENCE GUIDE
CMDLINE
CLOSEConsole - Close the Console
Available on:
WINDOWS
When an S/REXX macro uses a standard output statement within a WINDOWS
environment, such as a SAY statement, SEDIT creates a console window to display the
output.
CLOSECONSOLE removes such a console.
CMDline - Set the Command Line Position
CMDline ON | OFf | Top | Bottom
Initial value:
Level:
changes the command line position.
ON BOTTOM
View
CMDLINE ON enables the command line on the screen at its previous location.
CMDLINE OFF removes the command line from the screen.
CMDLINE TOP sets the command line on the top of the logical screen.
CMDLINE BOTTOM sets the command line on the bottom of the logical screen.
When CMDLINE is OFF, using the HOME or CURSOR HOME command restores the
command line in order to let the user process a command. Once the command is processed,
the command line is removed. Using the ? command has the same effect.
The command line is always displayed when no file is currently being edited.
Note that the CURSOR HOME command is mapped to the F10 key, and the ? command is
mapped to the F9 key.
Examples:
cmd t
cmdline off top
See Also: CURSOR, HOME, ?, ?I
SEDIT and S/REXX Reference Manual
Page 181
CN
SEDIT COMMAND REFERENCE GUIDE
CN - Change Name String
CN /string1/string2{/{target {N|*} {P}}}
changes name string1 with string2.
Scope:
Display
A name is a string which is preceded or followed by an invalid C variable character. This
command is very useful in modifying a variable.
/ may be any delimiting character that does not appear in the character strings involved in
the replacement.
target defines the number of lines to be scanned for a match. Lines are changed starting
with the current line, up to but not including the target line. target may be one of the
following:
:N
N or +N
+* or *
.symb
string expression
Up to but not including the Nth line.
N lines.
The end of file.
The line which has been assigned the .symb symbolic name by
using the POINT command, or a .symb prefix command.
Defines a group of characters to be located.
The general format of a string expression is the following:
{+|-}{~}/string1{/{&}|{|}{~}/string2 ..... }
See the LOCATE command on page 304 for a precise string expression definition.
When target is omitted, all lines between the current line and the end of file will be
scanned. However, if MODE CHANGE ONE is in effect, only the first line will be changed.
N is the number of occurrences of string1 to be changed on each line.
If omitted, all occurrences of string1 will be treated. However, if MODE CHANGE ONE
is in effect, only the first occurrence will be changed.
If specified as *, all occurrences of string1 will be treated.
P is the relative number of the first occurrence of string1 to be changed in each line. Its
default value is 1.
When string1 is omitted, string2 is inserted in the column which has a value defined
by the first ZONE command operand (initially 1).
When HEX ON is in effect, the stringi operands may be entered as hexadecimal values.
Page 182
SEDIT and S/REXX Reference Manual
SEDIT COMMAND REFERENCE GUIDE
Example:
CN
cn /i/j/will turn name "i" in "j" but will leave unchanged
string "if".
If CASE CIGNORE is in effect, SEDIT will not consider capitalization when changing
strings.
Example:
case ci
cn/Old/new/
will change old with new.
Note: The ZONE command allows the user to choose the starting and ending columns to
be scanned.
See Also: ARBCHAR, CASE, CHANGE, HEX, LOCATE, MODE, SCHANGE, SCN,
STAY, ZONE
SEDIT and S/REXX Reference Manual
Page 183
COLOR
SEDIT COMMAND REFERENCE GUIDE
COLor - Set Color
COlor
enables / disables color.
ON|OFF
COlor field|* color
associates a specific color with the field area, or
with all fields when * is specified.
COlor colorid r g b
changes the red/green/blue setting for the color
colorid.
Initial value:
Level:
ON
Global
Color off must be included in your profile.sedit file when you use a grey scale
monitor.
field can be any of the fields listed below:
For the file editor:
Arrow
CMdline
CURLine
CURrent
CURSor
Edited
Filearea
Idline
MOd
MSgline
Nocurrent
PDelete
POint
PEnding
PFline
PRefix
REnd
RStart
SCale
SHadow
SIze
Tabline
Page 184
the arrow pointing to the command line.
the line where the commands are entered.
the current line.
when no message is displayed, the message field shows the files
currently in the editing ring. The file actually displayed will be
highlighted with the color specified.
the cursor and the display of the INSERT status.
when no message is displayed, the message field shows the files
currently in the editing ring. The files not displayed will be
highlighted with the color specified when modifed.
the file data area, excluding the current line.
the file identification on line 1 on the logical screen.
the field indicating the number of file modifications.
the field used to display messages.
when no message is displayed, the message field shows the files
currently in the editing ring. The files not displayed will be
highlighted with the color specified when not modifed.
the pending-delete selections.
the symbolic names in the prefix area.
the pending commands in the prefix area.
the function keys line.
the prefix area.
the last character selected with a rectangular selection.
the first character selected with a rectangular selection.
the scale line.
the shadow lines resulting from selective editing.
the field indicating the file size.
the line displaying tabulations.
SEDIT and S/REXX Reference Manual
SEDIT COMMAND REFERENCE GUIDE
COLOR
For the directory editor:
FL_Cmdline
FL_Directories
FL_Idline
FL_MOde
FL_MSgline
FL_Names
FL_Pfline
FL_Removed
FL_Size
the lines where the commands are entered.
the lines where the accessed directories are displayed.
the level identification on line 1 on the screen.
the field where the file modes are displayed.
the field used to display messages.
the field used to display the filenames.
the function keys line.
the files which have been removed by the rm command.
the field where the file sizes are displayed.
For the tree editor:
TR_Box
TR_CPBox
TR_CUrrent
TR_HBox
TR_HIdden
the color used to draw a box around a directory name.
the color used to draw a box after selecting it for a directory copy
or move operation.
the color used to draw a box around the current directory.
the color used to highlight a box when moving the mouse pointer
with a key depressed.
the color used to draw a box around a directory with hidden
subdirectories.
color can be any one of the following colors:
Aquamarine
BEige
BLAck
BLUe
BRown
CAdetblue
CHArtreuse
CHOcolate
COral
Cyan
DARKGOLdenrod
DARKOLIvegreen
DARKSLATEBlue
DARKSLATEGray
DEeppink
DImgray
FIrebrick
FOrestgreen
GOld
SEDIT and S/REXX Reference Manual
INdianred
Indigo
KHaki
LAwngreen
LEmonchiffon
LIGHTCyan
LIGHTGOLDENRODYellow
LIGHTGoldenrod
LIGHTSEagreen
LIGHTSLateblue
MAGENTA2
MAGenta
MAROON2
MARoon
MEDIUMAquamarine
MEDIUMSEagreen
MEDIUMSPringgreen
MIdnightblue
MOccasin
Orange
PALEGoldenrod
PALETurquoise
PInk
PUrple
ROSybrown
ROYalblue
Red
SADdlebrown
SALmon
SIenna
SLATEBlue
SLATEGray
SPringgreen
STeelblue
TUrquoise
VIOLETRed
WHEat
White
Page 185
COLOR
SEDIT COMMAND REFERENCE GUIDE
Green
HOtpink
OLivedrab
ORchid
Yellow
In addition, "color background r g b" and "color foreground r g b" may
be used to change the background and foreground colors.
r g b can be any integer between 0 and 255. The WHITE and BLACK colors cannot be
changed. WHITE is always 255 255 255, and BLACK 0 0 0.
Initial values (UNIX):
ARROW
CMDLINE
CURLINE
CURRENT
EDITED
FILEAREA
IDLINE
MOD
MSGLINE
NOCURRENT
POINT
PDELETE
PENDING
PFLINE
PREFIX
REND
RSTART
SCALE
SHADOW
SIZE
TABLINE
FL_CMDLINE
FL_DIRECTORIES
FL_IDLINE
FL_MODE
FL_MSGLINE
FL_NAMES
FL_PFLINE
FL_REMOVED
FL_SIZE
TR_BOX
TR_CPBOX
TR_CURRENT
TR_HBOX
Page 186
PINK
BLACK
RED
MAROON
RED
BLACK
MAROON
BLUE
RED
BLUE
RED
MAGENTA2
BLUE
MAROON
MAROON2
ORANGE
GREEN
GREEN
BLUE
MAROON
BLUE
BLACK
MAROON2
MAROON
BLACK
RED
BLACK
MAROON
BLUE
MAROON2
MAROON2
MAGENTA
BLUE
RED
SEDIT and S/REXX Reference Manual
SEDIT COMMAND REFERENCE GUIDE
COLOR
TR_HIDDEN
MAGENTA
AQUAMARINE
BACKGROUND
FOREGROUND
BEIGE
BLUE
BROWN
CADETBLUE
CHARTREUSE
CHOCOLATE
CORAL
CYAN
DARKGOLDENROD
DARKOLIVEGREEN
DARKSLATEBLUE
DARKSLATEGRAY
DEEPPINK
DIMGRAY
FIREBRICK
FOREGROUND
FORESTGREEN
GOLD
GREEN
HOTPINK
INDIANRED
INDIGO
KHAKI
LAWNGREEN
LEMONCHIFFON
LIGHTCYAN
LIGHTGOLDENROD
LIGHTGOLDENRODYELLOW
LIGHTSEAGREEN
LIGHTSLATEBLUE
MAGENTA
MAGENTA2
MAROON
MAROON2
MEDIUMAQUAMARINE
MEDIUMSEAGREEN
MEDIUMSPRINGGREEN
MIDNIGHTBLUE
127
255
0
245
0
165
95
127
210
255
0
184
85
72
47
255
105
178
0
34
255
0
255
205
0
240
124
255
224
238
250
32
132
128
255
232
133
50
60
0
25
SEDIT and S/REXX Reference Manual
255
255
0
245
0
42
158
255
105
127
255
134
107
61
79
20
105
34
0
139
215
255
105
92
115
230
252
250
255
221
250
178
112
0
0
157
74
100
179
250
25
212
190
0
220
255
42
160
0
30
80
255
11
47
139
79
147
105
34
0
34
0
0
180
92
255
140
0
205
255
130
210
170
255
128
255
0
0
85
113
154
112
Page 187
COLOR
SEDIT COMMAND REFERENCE GUIDE
MOCCASIN
OLIVEDRAB
ORANGE
ORCHID
PALEGOLDENROD
PALETURQUOISE
PINK
PURPLE
RED
ROSYBROWN
ROYALBLUE
SADDLEBROWN
SALMON
SIENNA
SLATEBLUE
SLATEGRAY
SPRINGGREEN
STEELBLUE
TURQUOISE
VIOLETRED
WHEAT
WHITE
YELLOW
255
107
192
218
238
175
185
128
255
188
65
139
250
160
106
112
0
70
32
8
245
255
200
228
142
64
112
232
238
125
0
0
143
105
69
128
82
90
128
255
130
112
32
222
255
200
181
35
0
214
170
238
107
178
0
143
225
19
114
45
205
144
127
180
104
144
179
255
0
Initial values (WINDOWS):
ARROW
CMDLINE
CURLINE
CURRENT
CURSOR
EDITED
FILEAREA
FL_CMDLINE
FL_DIRECTORIES
FL_IDLINE
FL_MODE
FL_MSGLINE
FL_NAMES
FL_PFLINE
FL_REMOVED
FL_SIZE
IDLINE
MOD
Page 188
PINK
BLACK
RED
MAROON
BLUE
RED
BLACK
BLACK
MAROON2
MAROON
BLACK
RED
BLACK
MAROON
BLUE
MAROON2
MAROON
BLUE
SEDIT and S/REXX Reference Manual
SEDIT COMMAND REFERENCE GUIDE
COLOR
MSGLINE
NOCURRENT
PDELETE
PENDING
PFLINE
POINT
PREFIX
REND
RSTART
SCALE
SHADOW
SIZE
TABLINE
TR_BOX
TR_CPBOX
TR_CURRENT
TR_HBOX
TR_HIDDEN
RED
BLUE
MAGENTA2
BLUE
MAROON
RED
MAROON2
ORANGE
GREEN
RED
BLUE
MAROON
BLUE
MAROON2
MAGENTA
BLUE
RED
MAGENTA
BACKGROUND
FOREGROUND
AQUAMARINE
BEIGE
BLUE
BROWN
CADETBLUE
CHARTREUSE
CHOCOLATE
CORAL
CYAN
DARKGOLDENROD
DARKOLIVEGREEN
DARKSLATEBLUE
DARKSLATEGRAY
DEEPPINK
DIMGRAY
FIREBRICK
FORESTGREEN
GOLD
GREEN
HOTPINK
INDIANRED
INDIGO
255
0
127
4
0
165
95
10
210
255
0
184
85
72
47
255
105
178
34
255
0
255
205
0
SEDIT and S/REXX Reference Manual
255
0
255
130
0
42
158
184
105
127
181
134
107
61
79
20
105
34
139
215
255
105
92
115
190
0
212
92
255
42
160
57
30
80
181
11
47
139
79
147
105
34
34
0
0
180
92
255
Page 189
COLOR
SEDIT COMMAND REFERENCE GUIDE
KHAKI
LAWNGREEN
LEMONCHIFFON
LIGHTCYAN
LIGHTGOLDENROD
LIGHTGOLDENRODYELLOW
LIGHTSEAGREEN
LIGHTSLATEBLUE
MAGENTA
MAGENTA2
MAROON
MAROON2
MEDIUMAQUAMARINE
MEDIUMSEAGREEN
MEDIUMSPRINGGREEN
MIDNIGHTBLUE
MOCCASIN
OLIVEDRAB
ORANGE
ORCHID
PALEGOLDENROD
PALETURQUOISE
PINK
PURPLE
RED
ROSYBROWN
ROYALBLUE
SADDLEBROWN
SALMON
SIENNA
SLATEBLUE
SLATEGRAY
SPRINGGREEN
STEELBLUE
TURQUOISE
VIOLETRED
WHEAT
WHITE
YELLOW
240
124
170
0
238
223
32
132
128
128
66
133
50
60
0
25
255
107
192
218
238
175
185
128
255
188
65
139
250
160
106
112
0
70
32
8
245
255
200
230
252
58
202
221
26
178
112
0
128
45
74
100
179
250
25
228
142
64
112
232
238
125
0
0
143
105
69
128
82
90
128
255
130
112
32
222
255
200
140
0
252
202
130
174
170
255
128
0
19
0
85
113
154
112
181
35
0
214
170
238
107
178
0
143
225
19
114
45
205
144
127
180
104
144
179
255
0
The macro {install-dir}/xmac/resetcolor.x may be used as a template for
setting colors.
The macro {install-dir}/xmac/reverse.x may be used to work in reverse video
mode.
Page 190
SEDIT and S/REXX Reference Manual
SEDIT COMMAND REFERENCE GUIDE
COMMAND
COMmand - Execute a Command
executes an SEDIT command without first checking
if command is a macro or a synonym.
COMmand command
Normally, SEDIT gives priority to a macro or a synonym over a built-in command.
COMMAND is useful to override a macro with the same name as a built-in command.
You may, for example, create a cd macro which will execute a set of ACCESS and
DACCESS commands depending on the name of the directory passed to it, and then issue
the real command cd command without calling itself recursively.
Return Codes:
nn
-1
0
Return code of the command specified as operand
Command not found
Normal
See Also: MACRO, SYNONYM
SEDIT and S/REXX Reference Manual
Page 191
COMPILE
SEDIT COMMAND REFERENCE GUIDE
COMPIle - Compile a Program
COMPIle cmd {&}
executes the UNIX or WINDOWS command cmd,
and displays its result in an SEDIT window.
COMPIle -Load
loads the sedit_compile.rules file.
Batch Mode:
Not Available
Without a final &, COMPILE first executes the cmd string in a subshell, like the shell
command would do.
If the file sedit_compile.rules has not yet been loaded, SEDIT loads it. Then, if the
screen is not yet split, SEDIT splits the screen horizontally and displays the error messages
issued by the command cmd in the upper screen.
SEDIT will match these error messages with the rules described in the
sedit_compile.rules file. It will set the current line to the line containing the first
error, and place the cursor on the current line.
Calling the NEXTERROR command afterwards will move the current line and the cursor to
the next error in the file. The NEXTERROR command is assigned by default to the ^- key.
Every line in error will be assigned a symbolic name equal to its line number, displayed in
red in the prefix area, and used by the NEXTERROR command. This allows NEXTERROR
to find the lines in error even when the user adds or deletes lines. These symbolic names can
be removed with the CLEARERRORS command.
With a final &, compile executes cmd in the background and displays the error messages in
the window SEDIT was started from on UNIX systems1.
On WINDOWS systems, the cmd application may create its own console.
COMPILE -LOAD searches for the sedit_compile.rules file in the current
directory. If not found, SEDIT searches in the home directory and if still not found, in the
installation directory. Once found, this file will be loaded and used as a pattern for error
matching.
1. This facility is not available on UNIX ASCII terminals, since the cmd output would overwrite the
SEDIT screen.
Page 192
SEDIT and S/REXX Reference Manual
SEDIT COMMAND REFERENCE GUIDE
COMPILE
This is an example of the sedit_compile.rules file on SUN workstations:
#
# Rules for FORTRAN files
#
f:
line [0-9][0-9]*
F:
line [0-9][0-9]*
#
# Rules for C files
#
c:
line [0-9][0-9]*
[0-9][0-9]*: Can’t
#
# A rule for lint
#
\.c([0-9][0-9]*)
h:
line [0-9][0-9]*
\.c([0-9][0-9]*)
\.c([0-9][0-9]*)
Blank lines or lines starting with a # are ignored.
f:
matches any file with a f filetype, or in other words, a FORTRAN file. The subsequent lines,
until the next filetype descriptor, are regular expressions matching the error messages
issued by the compiler. These rules must start with a blank or a tabulation, which will not
be part of the rule.
See the R/ command for a complete regular expression syntax description.
SEDIT and S/REXX Reference Manual
Page 193
COMPILE
SEDIT COMMAND REFERENCE GUIDE
For example:
line [0-9][0-9]*
matches a line with the string "line ", followed by at least one number between 0 and 9,
such as:
"foo.f", line 1: Error: unclassifiable statement
The standard profile binds the xmac/smart_comp.sedit macro to the ^c key on
UNIX stations, and on ^C (Shift-Control-c) on WINDOWS systems.
This macro checks for the current filetype, and calls the COMPILE command with the usual
C, C++ or FORTRAN compiler.
The ^g key does the same using the debug version of this macro (xmac/smart_compd).
^G and ^C will compile the current file in the background on UNIX systems.
A compilation may be cancelled by hitting the ^c key again.
The user can unsplit the screen afterwards by hitting the ^w key.
Page 194
SEDIT and S/REXX Reference Manual
SEDIT COMMAND REFERENCE GUIDE
COMPILE
Special Options
When finding an error, most compilers print first the name of the source file, and then the
number of the line in error. Some compilers may print a line such as:
line23(13)
where line is not the name of the source file, and where the first number is not the error
line number. To deal with such compilers, SEDIT accepts the following syntax within the
rules file:
b:2 nosource
line[0-9][0-9]*([0-9][0-9]*)
The numerical value after the colon, 2 in this example, indicates that the second numerical
value is the line number.
The nosource keyword indicates that the source file is not displayed within the error
message.
See Also: CLEARERRORS, C_SCRH, C_SRCRJ, C_SCRV, MESSAGESDIR,
NEXTERROR, R/, SCREEN, SHELL
SEDIT and S/REXX Reference Manual
Page 195
COMPLETE
SEDIT COMMAND REFERENCE GUIDE
COMPLete - File Name Completion
COMPLete {Reverse}
Batch Mode:
allows command line file name completion.
Not Available
The COMPLETE command must be assigned to a function key, which is called here the
trigger. When a partial file name is typed in the command field, hitting the trigger will make
SEDIT try to fill in the remaining characters of a matching file name from the current
directory, or from the directory typed in the command field when the partial file name
contains a "/" character.
If several matches are possible, SEDIT will beep and display the first match. Hitting again
the trigger will display the next match. Hitting Shift-trigger, which must be assigned the
"COMPLETE REVERSE" command, will reverse the display order.
COMPLETE is assigned to the following keys, according to the workstation in use:
Page 196
SUN
IBM RS/6000
SiliconGraphics
R1 (PrintScreen)
R2 (ScrollLock)
R2 (ScrollLock)
DecStations
HP
HP with PC keyboards
WINDOWS
L3
L6
R2 (ScrollLock)
R2 (ScrollLock)
SEDIT and S/REXX Reference Manual
SEDIT COMMAND REFERENCE GUIDE
COMPRESS
COMPRess - Compress Data
compresses data for an APL function or operator in
the same way
FX would do, but in respect to
trailing comments position.
COMPRess
Scope:
All file
This command is mapped to the F11 key by default when running under APL.
Example:
Before using F11:
After using F11:
SEDIT and S/REXX Reference Manual
Page 197
COPY
SEDIT COMMAND REFERENCE GUIDE
COpy (XEDIT MODE) - Copy File Lines
COpy target1 target2
XEDCOpy target1 target2
When MODE COMMAND XEDIT is in effect, COPY calls the XEDIT mode XEDCOPY
command. PDFCOPY may be used to call the ISPF/PDF mode COPY command.
COPY copies the number of lines defined by target1, starting from the current line, at the
location defined by target2.
The last copied line becomes the current line.
target may be one of the following:
:N
N or +N
-N
+* or *
-*
.symb
string expression
Up to but not including the Nth line.
N lines.
Up N lines.
The end of file.
The top of file.
The line which has been assigned the .symb symbolic name by
using the POINT command, or a .symb prefix command.
Defines a group of characters to be located.
The general format of a string expression is the following:
{+|-}{~}/string1{/{&}|{|}{~}/string2 ..... }
See the LOCATE command on page 304 for a precise string expression definition.
Examples:
Return Codes:
Page 198
copy 2 :5
copy /str /main
0
2
5
copies 2 lines after the line 5.
copies the lines up to but not including the
str string after the line including the main
string.
Normal
Target Not Found
Invalid Operand
SEDIT and S/REXX Reference Manual
SEDIT COMMAND REFERENCE GUIDE
COPY
COpy (ISPF MODE) - Copy Data
COpy
{file}
PDFCOpy
Batch Mode:
{AFTER label}
{BEFORE label}
Not Available
When MODE COMMAND ISPF is in effect, COPY calls the ISPF mode PDFCOPY command.
XEDCOPY may be used to call the XEDIT mode COPY command.
COPY specifies a file to be copied into the data being edited.
A file. SEDIT will first search for it in the current directory, and then in the
directories described in the PATH environment variable, or accessed by using
the ACCESS command.
When file is omitted, SEDIT displays the following fullscreen panel:
file
------------------------------- COPY -----------------------------Copy from file ===>
First line
===>
Last
===>
line
Press Enter to copy, F3 or ^c to cancel
The user must specify the file name, and the first and last line to be copied.
AFTER label
The data will be copied after the specified label.
A label may be created by typing a .xxxx string on a prefix zone, or by using
the XEDIT POINT command described on page 335.
A label may also be one of the ISPF/PDF predefined labels:
.zf or .zfirst
the first line.
.zl or .zlast
the last line.
.zcsr
the cursor line.
BEFORE label
The data will be copied before the specified label.
When a destination label is not specified, the user must enter an A (or F when
MODE PREFIX XEDIT in effect) or an B (or P) in a prefix zone to specify the
destination.
Specifying a prefix destination can be done either before or after using the
COPY command.
Examples:
copy ./foo1 after .a
copy
copy before .zcsr
SEDIT and S/REXX Reference Manual
Page 199
COUNT
SEDIT COMMAND REFERENCE GUIDE
COUnt - Count String Occurrences
COUnt /str{/} {target}
COUNT displays the number of times a the str string appears in the lines defined by
target, starting from the current line.
/ is the first non-blank character found after the COUNT command.
target may be one of the following:
:N
N or +N
-N
+* or *
-*
.symb
string expression
Up to but not including the Nth line.
N lines.
Up N lines.
The end of file.
The top of file.
The line which has been assigned the .symb symbolic name by
using the POINT command, or a .symb prefix command.
Defines a group of characters to be located.
The general format of a string expression is the following:
{+|-}{~}/string1{/{&}|{|}{~}/string2 ..... }
See the LOCATE command on page 304 for a precise string expression definition.
When omitted, target defaults to the value of 1.
COUNT displays the following message:
Found nn occurrences.
In a macro, the EXTRACT/LASTMSG/ command may be used to retrieve the number of
occurrences.
Page 200
SEDIT and S/REXX Reference Manual
SEDIT COMMAND REFERENCE GUIDE
Examples:
count/foo//main
COUNT
counts the occurrences up to but not
including the line including the main string.
count;/**/;:5
Return Codes:
0
2
5
Normal
Target Not Found
Invalid Operand
See Also: STAY
SEDIT and S/REXX Reference Manual
Page 201
COVERLAY
SEDIT COMMAND REFERENCE GUIDE
COVerlay - Selectively Replace Characters
COVerlay text
selectively replaces characters in the current line
with text.
An underscore character in the text operand replaces the corresponding character in the
current line with a blank.
A blank character in the text operand does not alter the corresponding character in the
current line.
No replacement will take place if the column pointer is out of the ZONE range.
The column pointer will not be moved.
Example:
Current line:
00001
i = 3; \* This is a bad comment */
<...|....1....+....2....+....3....+....4....+....5....+....6
=====> cov 4_;/
00001
i = 4 ;/* This is a bad comment */
<...|....1....+....2....+....3....+....4....+....5....+....6
See Also: ZONE
Page 202
SEDIT and S/REXX Reference Manual
SEDIT COMMAND REFERENCE GUIDE
CREATE
CREAte - Create a New File
CREAte {file} {range}
Batch Mode:
saves data into a new file.
Not Available
CREATE saves the data being edited into a file.
file
A file which does not exist. Use the REPLACE ISPF/PDF command when
updating an existing file.
When file is omitted, SEDIT displays the following fullscreen panel:
------------------------------ CREATE -----------------------------Create file ===>
Press Enter to create, F3 or ^c to cancel
range
Two labels that identify the lines to be saved.
A label may be created by typing a .xxxx string on a prefix zone, or by using
the XEDIT POINT command described on page 335.
A label may also be one of the ISPF/PDF predefined labels:
.zf or .zfirst
the first line.
.zl or .zlast
the last line.
.zcsr
the cursor line
When a range is not specified, the user must enter either a C, CC, M or a MM
prefix command in a prefix zone to specify the lines to be copied.
Specifying a prefix origin can be done either before or after using the CREATE
command.
Examples:
create ~/foo .a .zl
create .a .b
create
See Also: FILE, REPLACE, SAVE
SEDIT and S/REXX Reference Manual
Page 203
CREPLACE
SEDIT COMMAND REFERENCE GUIDE
CReplace - Replace Characters
CReplace text
replaces characters in the current line with text.
No replacement will take place if the column pointer is out of the ZONE range.
The column pointer will not be moved.
Example:
Current line:
00001
i = 3; \* This is a bad comment */
<...|....1....+....2....+....3....+....4....+....5....+....6
=====> cr 4;
00001
/
i = 4; /* This is a bad comment */
<...|....1....+....2....+....3....+....4....+....5....+....6
See Also: ZONE
Page 204
SEDIT and S/REXX Reference Manual
SEDIT COMMAND REFERENCE GUIDE
CTAGS
CTags - Use a Tags File
CTags ON|OFF {tag_file}
Initial value:
Level:
enables or disables the use of tag_file as a target
file.
ON tags
Global
CTAGS without arguments displays the current status.
Very often, programmers include several functions in the same file. For example, the user
could have the following "test.c" file:
main()
{
printf ("main called\n");
sub1();
}
sub1()
{
printf ("sub1 called\n");
}
The UNIX "ctags" command (and not the SEDIT one) is used to create a tags file
giving the locations of specified objects in a group of files.
Typing in a terminal window the command "ctags test.c" will create the following
"tags" file:
Mtest
sub1
test.c
test.c
/^main()$/
/^sub1()$/
This file indicates that the target function "sub1" is located in the "test.c" file.
If "ctags" is ON, when starting a new file "sub1.c", SEDIT proceeds as follows:
•
•
•
•
First, SEDIT searches for that file in the current directory.
If not found, SEDIT searches for a file "tag_file".
If "tag_file" is found, SEDIT scans it for the target "sub1". The file
associated with this target ("test.c" in this example), must have the same
filetype as the new file ("c" in this example).
If the new file has a "c" filetype, the associated file may also have a "h" filetype.
Then, if not found, SEDIT will repeat this process in each directory described in
the PATH or XPATH environment variable.
If not found at all, SEDIT will create a new file in the editing ring.
SEDIT and S/REXX Reference Manual
Page 205
CTAGS
SEDIT COMMAND REFERENCE GUIDE
Note that unlike the UNIX editor VI, the user need not specify a tags file to be processed
when starting a new file.
The user may, for example, just select a letter in the word sub1, and use the S_XED
command (by typing Control-X) to load the "test.c" file, even if located in another
directory. Then, SEDIT will set the current line at the location given by the tags file
searching pattern (here "/^sub1()$/").
If SEDIT does not find this pattern, it will display an error message.
Page 206
SEDIT and S/REXX Reference Manual
SEDIT COMMAND REFERENCE GUIDE
CTLCHAR
CTLCHAR - Define Control Character
CTLchar cmd
cc
Escape
OFF
Protect
{color} {exthi} {Hight|Nohigh|Invisible} {PSs}
Noprotect {color} {exthi} {Hight|Nohigh|Invisible} {PSs}
OFF
Initial value:
Level:
OFF
Global
CTLCHAR defines a control character which specifies the color, extended highlighting,
protection and visibility of a portion of a line reserved with the RESERVED command.
The operands are the following:
cc
OFF
Escape
Protect
Noprotect
color
is any ASCII character, which will be used as a control
character.
resets all control characters (CTLCHAR OFF), or a specified
character (CTLCHAR cc OFF).
specifies that cc is an escape character: when cc appears in the
text, the next character is a control character.
specifies that the string following cc cannot be modified by the
user.
specifies that the string following cc can be modified by the
user.
the color to be used, as described by the COLOR command. In
addition, color may be:
White
same as BLACK
Turquoise same as MAGENTA
exthi
may be:
BLink
Maintained for XEDIT compatibility, but not
supported within SEDIT.
REVvideo
Displays in reverse video.
Underline Underlines the displayed characters.
None
High
Nohigh
Invisible
No extended highlighting. This is the default.
specifies that the string following cc is to be displayed in bold.
specifies that the string following cc is not to be displayed in
bold. This is the default.
specifies that the string following cc is not to be displayed.
SEDIT and S/REXX Reference Manual
Page 207
CTLCHAR
SEDIT COMMAND REFERENCE GUIDE
PSs
Maintained for XEDIT compatibility, but not supported within
SEDIT.
Without operands, CTLCHAR displays the control characters in usage.
Examples:
ctlchar @ escape
defines @ as an escape character.
ctlchar & noprotect red revvideo nohigh
reserved m+1 noh Enter your name: @&
defines an input red field displayed in reverse video.
See Also: MODE, READ, RESERVED
Page 208
SEDIT and S/REXX Reference Manual
CURLine - Change Current Physical Line
selects the physical screen line to display the
current line.
CURLine {ON} line
Initial value:
Level:
8
View
ON is an optional parameter with no special meaning.
line can be specified in three ways:
CUrline n|+n
selects the line n of the view to display the current line, where
the first line is line 1.
CUrline -n
selects the line n from the bottom of the view, where the last
line is line -1.
CUrline M+n|M-n selects the line n lines above or below the middle line of the
view.
Examples:
CURLINE
CURLINE
CURLINE
CURLINE
2
-3
ON M
M+2
CURSOR
SEDIT COMMAND REFERENCE GUIDE
CURsor - Move Cursor
CURsor |
|
|
|
|
CMdline
Column
File
Home
Screen
{colno{Priority N}}
{Priority N}
lineo {colno{Priority N}}
{Priority N}
lineo {colno{Priority N}}
CURSOR moves the cursor to the specified position.
CMdline
moves the cursor to the command line in the column colno relative to the first
command field column. If not specified, colno will be set to 1.
Column
moves the cursor to the current line in the current column position.
File
moves the cursor to the specified file line and column position. If colno is not
specified and the cursor is within the file area, the cursor will be placed in the same
column. Otherwise, the cursor is placed in the first column. If colno is specified as
0, the cursor is placed in the first column of the corresponding prefix field.
Home
if the cursor is on a data field, it will be moved to the command line. If it is on the
command line, it will move to its last position in the file if possible.
CURsor Home is a synonym for the HOME command.
When CMDLINE is OFF, using the CURSOR HOME command restores the command
line to allow the user to pass a command. Once the command is processed, the
command line is removed.
Screen
moves the cursor relative to the beginning of the split screen. If colno is not
specified, the cursor will be placed in the same column where it was.
Priority N
is the priority number assigned to the cursor displacement. When SEDIT updates the
screen, the highest priority will define the position of the cursor.
N should be specified as greater than or equal to 0, and lower than 256. When
omitted, N defaults to 257.
When using either Enter or a function Key, the cursor position on the screen is memorized
with a priority set to 20.
The various prefix commands move the cursor using the following priorities:
A or I
E
/
" or ’
M
C
S
Page 210
60
60
50
40
30
30
30
SEDIT and S/REXX Reference Manual
SEDIT COMMAND REFERENCE GUIDE
< or >
G
Scale
Tabl
PU
X
D
C_APLSTOP
30
30
30
30
30
30
10
The set_xedit macro assigns the "ignore cursor cmdline 1 priority 30"
string to the Enter (or Return on some keyboards) key.
Note: the screen will be updated only when using the REFRESH command.
See Also: CMDLINE, HOME, REFRESH
C_APLStop - Reverse APL Stop Setting
reverse the stop setting for the APL function
currently edited at the cursor location.
C_APLStop
Scope:
Batch Mode:
Display
Not Available
The prefix command field will be underlined when the stop is on.
This command is mapped to the ^s key by default.
C_APLTrace - Reverse APL Trace Setting
reverse the trace setting for the APL function
currently edited at the cursor location.
C_APLTrace
Scope:
Batch Mode:
Display
Not Available
The data field will be underlined when the trace is on.
This command is mapped to the ^e key by default.
SEDIT and S/REXX Reference Manual
Page 211
C_DUP
SEDIT COMMAND REFERENCE GUIDE
C_Dup - Duplicate Cursor Line
duplicates the line at the cursor location.
C_Dup
Scope:
Batch Mode:
Display
Not Available
This command is mapped to the ^= key by default.
C_ENDCurl - Goto End of Current Line
the cursor will be moved to the end of the
CURRENT LINE FIELD.
C_ENDCurl
Scope:
Batch Mode:
Display
Not Available
This command is mapped to the S-F6 (PF18) key by default.
C_ENDLine - Goto End of Cursor Line
C_ENDLine
If the cursor is in a DATA FIELD or in the command line, it will be moved to the end of
the data displayed on that field. If not, it will be moved to the end of the data displayed on
the CURRENT LINE FIELD.
Scope:
Batch Mode:
Display
Not Available
This command is mapped to the F6 key by default.
C_ENDS - End Selection
extends the selection at the cursor location.
C_ENDS
Batch Mode:
Not Available
If the selection already ends at the cursor location, the selection will be cancelled.
C_ENDS is intended to replace the second mouse button when running in ASCII mode.
This command is mapped to the ^e key by default when running in ASCII mode.
Page 212
SEDIT and S/REXX Reference Manual
SEDIT COMMAND REFERENCE GUIDE
C_ENDSALL
See Also: C_ENDSALL, C_ENDSR, C_STARTS
C_ENDSAll - End Selection at End of Line
extends the selection at the end of the line where the
cursor is located.
C_ENDSAll
Batch Mode:
Not Available
C_ENDSALL is intended to replace the shifted second mouse button when running in ASCII
mode.
See Also: C_ENDS, C_ENDSR, C_STARTS
C_ENDSR - End Rectangular Selection
extends the selection at the cursor location, making it
rectangular.
C_ENDSR
Batch Mode:
Not Available
If the selection already ends at the cursor location, the selection will be cancelled.
C_ENDSR is intended to replace the second mouse button when running in ASCII mode.
This command is mapped to the ^n key by default when running in ASCII mode.
See Also: C_ENDSALL, C_ENDS, C_STARTS
C_EXT - Extend Field
extends the length of the field selected by the cursor.
C_EXT
Scope:
Batch Mode:
Display
Not Available
This command is mapped to the F2 key by default.
SEDIT and S/REXX Reference Manual
Page 213
C_LINEADD
SEDIT COMMAND REFERENCE GUIDE
C_LINEAdd - Add Line
adds a line below the cursor location.
C_LINEAdd
Scope:
Batch Mode:
Display
Not Available
This command is mapped to the ^a key by default.
C_LINEDel - Delete Line
deletes the line at the cursor location.
C_LINEDel
Scope:
Batch Mode:
Display
Not Available
This command is mapped to the ^d key by default.
C_SCRH - Split Screen Horizontally
splits the screen horizontally at the cursor location.
C_SCRH
Batch Mode:
Not Available
This command is mapped to the ^h key by default.
See Also: SCREEN
C_SCRJ - Unsplit Screen
restarts with an unsplit screen.
C_SCRJ
Batch Mode:
Not Available
This command is mapped to the ^w key by default.
See Also: SCREEN
Page 214
SEDIT and S/REXX Reference Manual
SEDIT COMMAND REFERENCE GUIDE
C_SCRV
C_SCRV - Split Screen Vertically
splits the screen vertically at the cursor location.
C_SCRV
Batch Mode:
Not Available
This command is mapped to the ^v key by default.
See Also: SCREEN
C_SPlit - Split/Join Lines
C_SPLIT {Stay|Nostay}
Scope:
Batch Mode:
when the cursor is before the last non-blank
character, the line will be split, with indentation if the
auto-indent feature is on. When the cursor is after the
last non-blank character, the next line will be joined
to the current location.
Display
Not Available
If STAY is specified, the cursor remains at the same location. Otherwise, the cursor is
moved to the new line with proper indentation respect.
This command is mapped to the F4 key on Sun keyboards, and to the ^s key on other ones.
See Also: AUTOI, SPLTJOIN
C_STARTLine - Goto Start of Cursor Line
C_STARTLine
Scope:
Batch Mode:
if the cursor is in a DATA FIELD it will be moved to
the start of that field. If not, it will be moved to the
start of the CURRENT LINE FIELD.
Display
Not Available
SEDIT and S/REXX Reference Manual
Page 215
C_STARTS
SEDIT COMMAND REFERENCE GUIDE
C_STARTS - Start Selection
starts the selection at the cursor location.
C_STARTS
Batch Mode:
Not Available
C_STARTS is intended to replace the first mouse button when running in ASCII mode.
This command is mapped to the ^b key when running in ASCII mode.
See Also: C_ENDS, C_ENDSALL
Page 216
C_ENDSR
SEDIT and S/REXX Reference Manual
SEDIT COMMAND REFERENCE GUIDE
DACC
DACCess- Add Directory to the CDPATH
DACCess dir {dir2 {..}}
add directories to the cdpath.
DACCESS adds the diri directories to the cdpath in which SEDIT searches for
directories.
When searching for directories, SEDIT uses the cdpath content. DACCESS extends
dynamically the cdpath.
Note that if a XCDPATH environment variable exists when SEDIT starts, it is used to
initialize the cdpath.
If diri does not start with a standard directory indicator ( / . ~ ), SEDIT will search first
in the current directory and then through the directories described in the cdpath.
If diri contains blanks, it must be surrounded with quotes or double quotes. If a directory
contains a quote or a double quote, the quote must be escaped with a backslash.
Example:
Assume your home directory is "usr/m1", and "/usr/m1/dir2"
exists.
dacc dir2 will add the "/usr/m1/dir2" directory.
Then, if "/usr/m1/dir2/dir3" exists, typing "cd dir3" will change the current
directory to it without the need to specify the whole pathname.
dacc "c:/Program Files"
Quotes are used to specify a directory with embedded blanks.
See Also: ACCESS, CD, DRELEASE, FLIST, FD, RELEASE, SHOWPATH,
SHOWCDPATH
SEDIT and S/REXX Reference Manual
Page 217
DELETE
SEDIT COMMAND REFERENCE GUIDE
DELete (XEDIT MODE) - Delete Line
DELete
XEDDELete
Scope:
{target}
will delete lines starting with the current line.
Display
When MODE COMMAND XEDIT is in effect, DELETE calls the XEDIT mode XEDDELETE
command. PDFDELETE may be used to call the ISPF/PDF mode DELETE command.
target defines the number of lines to be deleted. Lines are deleted starting with the
current line, up to but not including the target line. target may be one of the following:
:N
N or +N
-N
+* or *
-*
.symb
string expression
Up to but not including the Nth line.
N lines.
Up N lines.
The end of file.
The top of file.
The line which has been assigned the .symb symbolic name by
using the POINT command, or a .symb prefix command.
Defines a group of characters to be located.
The general format of a string expression is the following:
{+|-}{~}/string1{/{&}|{|}{~}/string2 ..... }
See the LOCATE command on page 304 for a precise string expression definition.
If target is omitted, a value of 1 is assumed.
On a forward delete, the line following the last deleted line becomes the current line. On a
backward delete, the line preceding the last deleted line becomes the current line.
Examples:
del
del:5
del*
deletes one line.
deletes all lines up to line 4.
deletes the rest of the file.
See Also: ALL, SCOPE, SELECT
Page 218
SEDIT and S/REXX Reference Manual
SEDIT COMMAND REFERENCE GUIDE
DELETE
DELete (ISPF MODE) - Delete Line
DELete
PDFDELete
{ALL} {X} {NX} {range}
deletes lines from the currently edited file.
When MODE COMMAND ISPF is in effect, DELETE calls the ISPF mode PDFDELETE
command. XEDDELETE may be used to call the XEDIT mode DELETE command.
DELETE deletes lines from the currently edited file.
ALL
deletes all the lines, from the start to the bottom of the file.
range
Two labels that identify the lines to be deleted.
A label may be created by typing a .xxxx string on a prefix zone, or by using
the XEDIT POINT command described on page 335.
A label may also be one of the ISPF/PDF predefined labels:
.zf or .zfirst
the first line.
.zl or .zlast
the last line.
.zcsr
the cursor line
X
deletes only lines that are excluded from the display.
NX
deletes only lines that are not excluded from the display.
Examples:
Return Codes:
delete
delete
delete
delete
0
1
5
SEDIT and S/REXX Reference Manual
all
all x
all nx
.a .zcsr x
Normal
End Of File Reached
Invalid Operand
Page 219
DISPLAY
SEDIT COMMAND REFERENCE GUIDE
DELAY - Display a String
DELAY {string}
displays a string in the command field.
This command displays a string in the command field, allowing further editing. Its main
usage is with the SET command. If string is missing, the command field will be cleared.
Examples:
set r5 delay fn test
Pressing key R5 will display "fn test" in
the command field and set the cursor after
"test".
set r1 delay.cursor home
(. is the Control-Line-Feed separator)
Pressing key R1 will clear the command
field, and then restore the cursor position.
DFlist - Call Directory Editor
DFlist { FN {FT {FM}}}
Batch Mode:
will call the directory editor upon directories.
Not Available
DFLIST only displays directories. See The Directory Editor FLIST on page 459 for further
explanations.
See Also: DACCESS, DFLIST, FLIST,
Page 220
FLATH, FLPP, FMACRO, RFLIST
SEDIT and S/REXX Reference Manual
SEDIT COMMAND REFERENCE GUIDE
DISPLAY
DISPlay - Set Display Range
DISPlay {n1 {n2}}
Initial value:
Level:
will display lines whose selection level falls into the
range n1 through n2.
0 0
View
Each line in the file has a number associated with it, called its selection level, which is set
to zero by default and may be modified by the commands ALL and SELECT, and by the
prefix commands X and S. When a line selection level does not fall in the range n1 through
n2, it will not be displayed.
If n2 is omitted, it will assume the value of n1.
If n2 is *, it will assume the maximum value 2147483648.
If both n1 and n2 are omitted, the current setting will be displayed.
With SHADOW ON (by default) excluded lines are shown by a shadow line indicating the
number of excluded lines. With SHADOW OFF, excluded lines are not represented.
With SCOPE DISPLAY (by default) most SEDIT commands and prefix commands will
not apply to the excluded lines. With SCOPE ALL, commands will apply to all lines.
See Also: ALL, SCOPE, SELECT, SHADOW, VISIBLE
SEDIT and S/REXX Reference Manual
Page 221
DOWN
SEDIT COMMAND REFERENCE GUIDE
Down/Next - Scroll Down
will scroll down N lines.
Down {N|*}
Scope:
Display
If N is omitted, a value of 1 is assumed. Down * makes the End Of File the current line.
Next is a synonym to the Down command.
Return Codes:
Page 222
0
1
5
Normal
End Of File Reached
Invalid Operand
SEDIT and S/REXX Reference Manual
SEDIT COMMAND REFERENCE GUIDE
DUPLICAT
DUPlicat - Current Line Duplication
DUPlicat {N {target}}
duplicates N times the lines defined by target.
DUPLICAT duplicates N times the lines defined by target starting with the current line.
When N or target is omitted, a value of 1 is assumed. The last line duplicated becomes
the current line.
target defines the number of lines to be duplicated. Lines are duplicated starting with
the current line, up to but not including the target line. target may be one of the
following:
:N
N or +N
+* or *
.symb
string expression
Up to but not including the Nth line.
N lines.
The end of file.
The line which has been assigned the .symb symbolic name by
using the POINT command, or a .symb prefix command.
Defines a group of characters to be located.
The general format of a string expression is the following:
{+|-}{~}/string1{/{&}|{|}{~}/string2 ..... }
See the LOCATE command on page 304 for a precise string expression definition.
See Also: C_DUP
SEDIT and S/REXX Reference Manual
Page 223
DRELEASE
SEDIT COMMAND REFERENCE GUIDE
DRELEase - Removes a Directory from the CDPATH
DRELEase {dir1 {dir2 ...}}
DRELEASE removes from the cdpath directories accessed with the DACCESS command.
If the diri directory is not accessed, or is the home directory, DRELEASE silently ignores
it.
DRELEASE * removes all the directories from the cdpath, except the home directory.
DRELEASE without arguments scans the cdpath, and removes nonexistent directories.
See Also: DACCESS, SHOWCDPATH
Page 224
SEDIT and S/REXX Reference Manual
SEDIT COMMAND REFERENCE GUIDE
DY_ALL
DY_All - Start the ALL Dialog Box
uses a dialog box to search for lines containing
specified text string.
DY_All
Batch Mode:
Not Available
DY_ALL displays the following dialog box:
The user must enter a target string in the input field.
SEDIT will set the selection level for every line currently in the scope matching this target
to the upper value of the DISPLAY range, and to this value plus one for all the other lines,
hiding them. SEDIT will then put SCOPE DISPLAY in effect, and select the first line
displayed as the current line. With SCOPE DISPLAY in effect, lines that are excluded from
the display are also excluded from processing by most SEDIT commands and prefix
commands. With SCOPE ALL in effect, all lines will be processed. If SHADOW ON is in
effect, a shadow line appears on your display wherever lines have been excluded.
When Consider Case is not checked, SEDIT will ignore capitalization when matching
the target.
When Whole Word is checked, SEDIT will match a whole word. For example, if target
is the string "i", SEDIT will match "i = 3", but will not match "if ()".
See Also: ALL, DISPLAY, DY_EXCLUDE, DY_FONT, DY_SHOW, SCOPE,
SELECT, SHADOW, VISIBLE
SEDIT and S/REXX Reference Manual
Page 225
DY_EXCLUDE
SEDIT COMMAND REFERENCE GUIDE
DY_Exclude - Start the EXCLUDE Dialog Box
uses a dialog box to search for every line that does
not have text matching specified text string.
DY_Exclude
Batch Mode:
Not Available
DY_EXCLUDE displays the following dialog box:
The user must enter a target string in the input field.
SEDIT will set the selection level for every line currently in the scope not matching this
target to the upper value of the DISPLAY range, and to this value plus one for all the other
lines, hiding them. SEDIT will then put SCOPE DISPLAY in effect, and select the first
line displayed as the current line. With SCOPE DISPLAY in effect, lines that are excluded
from the display are also excluded from processing by most SEDIT commands and prefix
commands. With SCOPE ALL in effect, all lines will be processed. If SHADOW ON is in
effect, a shadow line appears on your display wherever lines have been excluded.
When Consider Case is not checked, SEDIT will ignore the capitalization when
matching the target.
When Whole Word is checked, SEDIT will search for whole words. For example, if
target is the string "i", SEDIT will not match "i = 3", but will match "if ()".
See Also: ALL, DISPLAY, EXCLUDE, DY_ALL, DY_FONT, DY_SHOW,
SCOPE, SELECT, SHADOW
Page 226
SEDIT and S/REXX Reference Manual
SEDIT COMMAND REFERENCE GUIDE
DY_FIND
DY_FInd - Start the FIND Dialog box
DY_FInd
Batch Mode:
Not Available
DY_FIND displays the following dialog box:
The user must enter a target string in the FIND input field.
Clicking on the Find button will select the first matching string in the current file.
Clicking on the Change button will change the selected string with the string entered in the
CHANGE TO input field.
The Change & Find Again button does the change, and searches for the next occurrence
of the target.
The Change All button changes all the occurrences.
The user may restrict the columns to be searched for by entering values in the
From Column and To Column fields. The lines to be searched for are specified in the
From Line and in the To Line fields.
See Also: CHANGE, SCHANGE, CN, DY_FONT, SCN, S_FIND
SEDIT and S/REXX Reference Manual
Page 227
DY_FONT
SEDIT COMMAND REFERENCE GUIDE
DY_FILL - Start the FILL dialog box
opens a dialog box to enter a text string which will be
used to fill a rectangular area.
DY_FILL
The user must make a rectangular selection before calling DY_FILL. See Making a
Rectangular Selection on page 125 and on page 128 for more information.
DY_FILL is the /home/xed/xmac/dy_fill.sedit macro.
DY_FOnt - Set the Dialog Font
DY_FOnt fontname
Batch Mode:
make the various dialog boxes use the fontname
font.
Not Available
See Also: DY_ALL, DY_EXCLUDE, DY_FIND, DY_OPEN, DY_SAVE,
DY_SHOW, DY_EXCLUDE, DY_SHOW
DY_LASTFILES - Display Last Edited Files
DY_LASTFILES {ht_scrl {la_scrl}}
DY_LASTFILES is the {install-dir}/xmac/dy_lastfiles.sedit macro,
which displays the last opened files, allowing the user to open them again.
ht_scrl
the number of rows used by the scrolled list to display the files.
ht_scrl defaults to 15 when omitted.
la_scrl
the width of the scrolled list. la_scrl defaults to 50 when omitted.
See Also: LASTFILES
Page 228
SEDIT and S/REXX Reference Manual
SEDIT COMMAND REFERENCE GUIDE
DY_OPEN
DY_OPEN (UNIX) - Start the OPEN Dialog Box
DY_OPEN {dir {filt-f {filt-d {lg_reg}}}}
opens a dialog box to match text strings contained in
files and directories.
Unlike with the SEDIT 4.0 release, DY_OPEN is not an SEDIT command, but the
/home/xed/xmac/dy_open.sedit macro.
DY_OPEN displays the following dialog box:
File input zone
Directory input zone
Directories
Files
File filter input zone
Directory filter input zone
dir
is the directory to be scanned. When omitted, the current directory will
be scanned. When dir is the special //last string, the directory of the
last opened file with the DY_OPEN macro will be scanned.
filt_f
is the filter used to select which files are to be displayed. When omitted,
it defaults to *, which means any file. When the regular expression
switch is off, * means any set of characters. a*df* would for example
match a_123.dfte.
Several filters can be specified by using a ; separator.
Example:*.c;*.h
filt_d
is the filter used to select which directories are to be displayed.
lg_reg
when set to 1, toggles on the regular expression search. When omitted,
or set to 0, toggles off the regular expression search.
SEDIT and S/REXX Reference Manual
Page 229
DY_OPEN
SEDIT COMMAND REFERENCE GUIDE
A regular expression is a character string used to describe, in an extended way, a
string to be matched. It uses special characters, called meta characters to describe
the match to be done.
The meta characters are the following:
^
$
\<
\>
.
[]
\(
\)
*
matches only at the beginning of a line.
matches only at the end of a line.
matches only at the beginning of a word.
matches only at the end of a word.
matches any single character.
matches any character in a character class.
delimits the start of a subexpression. It is available for VI
compatibility, but has no special meaning.
delimits the end of a subexpression. It is available for VI
compatibility, but has no special meaning.
repeats the preceding 0 or more times.
If you want to use a meta character as an ordinary character, you must precede it with
a backslash (\) character.
Examples:
^af
matches the string "af" only at the beginning of a line.
af$
matches the string "af" only at the end of a line.
dc.......is
matches the string "dc" followed by any 7 characters followed by the string "is".
[A-Z][a-z]
[A-Z]
[a-z]
means any character from A to Z.
means any character from a to z.
The whole expression above matches any alphabetical string starting with a capital
Page 230
SEDIT and S/REXX Reference Manual
SEDIT COMMAND REFERENCE GUIDE
DY_OPEN
letter.
The string "File001" will be matched. "F001" will not.
Note that the meta characters are not treated specially when enclosed in brackets:
[.$]
matches the string ".$". Without brackets, the user should type:
\.\$
for the same match.
Supported User Actions
The user can perform the following actions:
• Clicking once with the left mouse button upon a displayed file selects this file, and
displays its name in the file input zone.
• With the MOTIF version, holding the Shift key down while clicking extends
the selection to several contiguous files. Holding the Control key down extends
the selection to another, possibly non-contiguous, file.
• Double clicking on a file makes DY_OPEN return. This file will be opened.
• Clicking once with the left mouse button upon a displayed directory selects this
directory, and displays its name in the directory input zone.
• Double clicking on a displayed directory initiates a scan of this directory.
• Using the Return or Enter key when the keyboard focus is in the File input
zone makes DY_OPEN return. The file displayed in that File input zone will be
opened.
• Using the Return or Enter key when the keyboard focus is in the Directory
input zone initiates a scan of the directory displayed in that zone. When this
directory name does not start with a / or a ~, it will be considered as a subdirectory
of the previously scanned directory.
• Using the Return or Enter key when the keyboard focus is in the File or
Directory filter zone initiates a new scan of the previously scanned directory.
• Clicking on the OPEN button makes DY_OPEN return. The selected files will be
opened.
• Clicking on the CANCEL button makes DY_OPEN return without further action.
• Clicking on the SCAN button initiates a new scan of the previously scanned
directory.
See Also: ACCESS, DY_LASTFILES, XEDIT
SEDIT and S/REXX Reference Manual
Page 231
DY_OPEN
SEDIT COMMAND REFERENCE GUIDE
DY_OPEN (WINDOWS) - Start the OPEN Dialog Box
DY_OPEN {dir {filt-f}}
opens a dialog box to match text strings contained in
files and directories.
DY_OPEN is not an SEDIT command, but the
C:\Program Files\SEDIT\xmac\dy_open.sedit macro.
DY_OPEN displays the standard WINDOWS OPEN FILE dialog box.
dir
is the directory to be scanned. When omitted, the current directory will
be scanned. When dir is the special //last string, the directory of the
last opened file with the DY_OPEN macro will be scanned.
filt_f
is the filter used to select which files are to be displayed. When omitted,
it defaults to *.*, which means any file.
Several filters can be specified by using a ; separator.
Example:*.c;*.h
See Also: ACCESS, DY_LASTFILES, XEDIT
Page 232
SEDIT and S/REXX Reference Manual
SEDIT COMMAND REFERENCE GUIDE
DY_SAVE
DY_SAVE (UNIX) - Start the SAVE Dialog Box
DY_SAVE {dir {filt-f {filt-d {lg_reg}}}}
opens a dialog box to save the current file.
Unlike with the SEDIT 4.0 release, DY_SAVE is not an SEDIT command, but the
/home/xed/xmac/dy_save.sedit macro.
DY_SAVE displays the following dialog box:
File input zone
Directory input zone
Directories
Files
File filter input zone
Directory filter input zone
dir
is the directory to be scanned. When omitted, the directory of the current
file will be scanned.
filt_f
is the filter used to select which files are to be displayed. When omitted,
it defaults to *, which means any file. When the regular expression
switch is off, * means any set of characters. a*df* would for example
match a_123.dfte.
filt_d
is the filter used to select which directories are to be displayed.
lg_reg
when set to 1, toggles on the regular expression search. When omitted,
or set to 0, toggles off the regular expression search.
A regular expression is a character string used to describe, in an extended way, a
string to be matched. It uses special characters, called meta characters to describe
the match to be done.
SEDIT and S/REXX Reference Manual
Page 233
DY_OPEN
SEDIT COMMAND REFERENCE GUIDE
The meta characters are the following:
^
$
\<
\>
.
[]
\(
\)
*
matches only at the beginning of a line.
matches only at the end of a line.
matches only at the beginning of a word.
matches only at the end of a word.
matches any single character.
matches any character in a character class.
delimits the start of a subexpression. It is available for VI
compatibility, but has no special meaning.
delimits the end of a subexpression. It is available for VI
compatibility, but has no special meaning.
repeats the preceding 0 or more times.
If you want to use a meta character as an ordinary character, you must precede it with
a backslash (\) character.
Examples:
^af
matches the string "af" only at the beginning of a line.
af$
matches the string "af" only at the end of a line.
dc.......is
matches the string "dc" followed by any 7 characters followed by the string "is".
[A-Z][a-z]
[A-Z]
[a-z]
means any character from A to Z.
means any character from a to z.
The whole expression above matches any alphabetical string starting with a capital
letter.
The string "File001" will be matched. "F001" will not.
Note that the meta characters are not treated specially when enclosed in brackets:
Page 234
SEDIT and S/REXX Reference Manual
SEDIT COMMAND REFERENCE GUIDE
DY_OPEN
[.$]
matches the string ".$". Without brackets, the user should type:
\.\$
for the same match.
When DOS File is checked, SEDIT adds a ^M character at the end of each line, and a ^Z
character at the end of the file, thus making the file compatible with personal computers
using the DOS operating system.
When Keep Time-Stamp is checked, SEDIT leaves unchanged the saved file timestamp.
When Overwrite is checked, SEDIT does not check for an existing file before saving the
file.
Supported User Actions
The user can perform the following actions:
• Clicking once with the left mouse button upon a displayed file selects this file, and
displays its name in the file input zone.
• Double clicking on a file makes DY_SAVE return. The current file will be renamed
accordingly to the selected file, and saved.
• Clicking once with the left mouse button upon a displayed directory selects this
directory, and displays its name in the directory input zone.
• Double clicking on a displayed directory initiates a scan of this directory.
• Using the Return or Enter key when the keyboard focus is in the File input
zone makes DY_SAVE return. If the name of the file is displayed in the File input
zone, the current file will be renamed accordingly to this name, and saved.
• Using the Return or Enter key when the keyboard focus is in the Directory
input zone initiates a scan of the directory displayed in that zone. When this
directory name does not start with a / or a ~, it will be considered as a subdirectory
of the previously scanned directory.
• Using the Return or Enter key when the keyboard focus is in the File or
Directory filter zone initiates a new scan of the previously scanned directory.
• Clicking on the SAVE button makes DY_SAVE return. If the name of the file is
displayed in the File input zone, the current file will be renamed accordingly to this
name, and saved.
• Clicking on the CANCEL button makes DY_SAVE return without performing
further action.
SEDIT and S/REXX Reference Manual
Page 235
DY_SAVE
SEDIT COMMAND REFERENCE GUIDE
• Clicking on the SCAN button initiates a new scan of the previously scanned
directory.
See Also: FILE, SAVE
DY_SAVE (WINDOWS) - Start the SAVE Dialog Box
DY_SAVE {dir {filt-f}}
opens a dialog box to save the current file.
DY_SAVE is not an SEDIT command, but the
C:\Program Files\SEDIT\xmac\dy_save.sedit macro.
DY_SAVE displays the standard WINDOWS SAVE FILE dialog box
dir
is the directory to be scanned. When omitted, the directory of the current
file will be scanned.
filt_f
is the filter used to select which files are to be displayed. When omitted,
it defaults to *.*, which means any file.
See Also: FILE, SAVE
Page 236
SEDIT and S/REXX Reference Manual
SEDIT COMMAND REFERENCE GUIDE
DY_SHOW
DY_SHow - Start the SHOW Dialog Box
DY_SHow
Batch Mode:
Not Available
DY_SHOW displays the following dialog box:
The user must enter a target string in the input field.
SEDIT will scan all the lines not displayed matching the target in order to display them.
When Consider Case is not checked, SEDIT will ignore the capitalization when
matching the target.
When Whole Word is checked, SEDIT will search for whole words. For example, if
target is the string "i", SEDIT will match "i = 3", but will not match "if ()".
See Also: ALL, DISPLAY, DY_ALL, DY_EXCLUDE, SCOPE, SELECT,
SHADOW, SHOW
EDIT
EDIT is an ISPDF/PDF synonym to the XEDIT command described on page 446.
SEDIT and S/REXX Reference Manual
Page 237
EMSG
SEDIT COMMAND REFERENCE GUIDE
EMSG - Display Text
displays text in the message field and sounds the
alarm.
EMSG text
See Also: MSG
END - End the Edit Session
END
END saves all the modified files, and terminates the SEDIT session.
See Also: EXIT, EEXIT, FILE, SAVE
ESCAPEdelay - Set Escape Sequence Time-out
ESCAPEdelay {nn}
Initial value:
sets ASCII terminals escape sequence time-out.
4
ESCAPEDELAY without argument displays the current value.
ASCII terminals send to SEDIT an escape sequence every time the user hits a function key,
such as the F1 key.
An escape sequence starts with the ^[ escape character, and is followed by an arbitrary
length set of characters. For example, a VT100 ASCII terminal sends a ^[OP string to
identify the F1 key.
In order to decide when the escape sequence is complete, SEDIT uses a time-out of nn
tenths of a second. When no more characters are received during this elapsed time, SEDIT
decides that the escape sequence has ended, and treats the following characters as user typed
characters.
The default ESCAPEDELAY value is generally a good choice. However, when using
SEDIT with a very slow connection, such as a SLIP connection using a 9600 baud modem,
it may be necessary to increase the ESCAPEDELAY value.
ESCAPEDELAY is ignored when SEDIT is not in ASCII terminal mode.
Page 238
SEDIT and S/REXX Reference Manual
SEDIT COMMAND REFERENCE GUIDE
EXCLUDE
EXClude (XEDIT MODE) - Global Selective Line Editing
EXClude
XEDEXClude
Scope:
{target}
selects the lines not containing the target specified.
Display
When MODE COMMAND XEDIT is in effect, EXCLUDE calls the XEDIT mode
XEDEXCLUDE command. PDFEXCLUDE may be used to call the ISPF/PDF mode
EXCLUDE command.
EXCLUDE is like the ALL command, except that the matched lines are excluded from
display, instead of being kept.
See the ALL command on page 153 for a description of the target operand.
See Also: ALL, SHOW
EXCLude (ISPF MODE) - Exclude Lines from Display
EXCLude
str {range} {NEXT }
PDFEXCLude
{ALL }
{FIRST}
{LAST }
{PREV }
{CHARS } {X } {col1 {col2}
{PREFIX} {NX}
{SUFFIX}
{WORD }
When MODE COMMAND ISPF is in effect, EXCLUDE calls the ISPF mode PDFEXCLUDE
command. XEDEXCLUDE may be used to call the XEDIT mode EXCLUDE command.
EXCLUDE searches lines that contains the str PDF string and then excludes those lines
from display.
A PDF string may be the following kind of string:
*
The string used with the last FIND/EXCLUDE/CHANGE/SEEK command.
Simple string
Any series of characters not starting with a single or double quote (’ or ") and
not containing any embedded blanks. The search will be case insensitive.
Delimited string
Any string enclosed by single or double quotes. The search will be case
insensitive.
Hexadecimal string
Any delimited string of valid hexadecimal characters, preceded or followed by
the character X, such as X’3132’ or ’3132’x. The search will be case
sensitive.
SEDIT and S/REXX Reference Manual
Page 239
EXCLUDE
SEDIT COMMAND REFERENCE GUIDE
Character string
Any delimited string, preceded or followed by the character C, such as
C’ab cd’ or ’ab cd’c. The search will be case sensitive.
Picture string
Any delimited string, preceded or followed by the character P, such as
P’ab cd’ or ’ab cd’p. The search will be case sensitive.
Within a picture string, the following special characters may be used:
=
~
.
#
@
<
>
$
means any character.
means any character that is not a blank.
means a character which generally cannot be displayed. SEDIT
will consider this any character which has a decimal value of less
than 32.
means any numeric character.
means any non-numeric character.
means any alphabetic character.
means any lowercase alphabetic character.
means any uppercase alphabetic character.
means any special character, neither alphabetic or numeric.
EXCLUDE considers the following arguments:
range
Two labels that identify the lines to be searched for.
A label may be created by typing a .xxxx string on a prefix zone, or by using
the XEDIT POINT command described on page 335.
A label may also be one of the ISPF/PDF predefined labels:
.zf or .zfirst
the first line.
.zl or .zlast
the last line.
.zcsr
the cursor line
When omitted, range defaults to .zfirst .zlast.
Page 240
NEXT
Starts at the first position after the current cursor location and searches forward.
NEXT is the default. When the cursor is not located on the data, the search start
from the first displayed line.
ALL
Starts at the top of the file and searches forward to find all occurrences of the
string.
FIRST
Starts at the top of the file and searches forward to find the first occurrence of
the string.
LAST
Starts at the bottom of the file and searches backward to find the last occurrence
of the string.
PREV
Starts at the cursor location and searches backward to find the previous
occurrence of the string. When the cursor is not located on the data, the search
start from the last displayed line
CHARS
Locates str anywhere the characters match. This is the default.
PREFIX
Locates str at the beginning of a word:
find ab matches "abc", but does not match "ab" or "cabd" or "dab".
SEDIT and S/REXX Reference Manual
SEDIT COMMAND REFERENCE GUIDE
EXCLUDE
SUFFIX
Locates str at the end of a word:
find ab matches "cab", but does not match "ab" or "cabd" or "abc".
WORD
Locates str as a whole word:
find ab matches "d ab e", but does not match "cabd" or "abc".
X
Scans only lines that are excluded from the display.
NX
Scans only lines that are not excluded from the display.
col1 and col2
The columns EXCLUDE is to search. When omitted, the columns are limited by
the BOUNDS setting described on page 161.
Examples:
exclude
exclude
exclude
exclude
Return Codes:
’ab cd’
c’ab cd’
x’31’ last
p’>###"
0
4
5
6
7
12
matches ’ab cd’ as well as ’Ab Cd’.
matches only ’ab cd’.
matches the last ’1’ character.
could match ’A123’.
Normal
String Not Found
* has been used on the first EXCLUDE call
Invalid Hexadecimal String
Invalid Label
Syntax Error
See Also: BOUNDS, CHANGE, FIND, SEEK, VERIFY
SEDIT and S/REXX Reference Manual
Page 241
EXIT
SEDIT COMMAND REFERENCE GUIDE
EXIT / EEXIT - Exit
EXIT {Save|Nosave}
will terminate SEDIT if no modified file is currently
active in the editor. When SEDIT runs in batch
mode, EXIT will unconditionally terminate SEDIT.
EEXIT {Save|Nosave}
will unconditionally terminate SEDIT.
On WINDOWS systems, SEDIT normally records the font in use and its window location
when exiting, and uses the recorded settings when started again. When Nosave is
specified, SEDIT does not save these settings. When SEDIT has been started with the
-noauto option, SEDIT does not record its settings by default. Using the Save option
will make EXIT and EEXIT save these settings.
If one or more files have been modified, EXIT will be displayed as a prompt in an alert box.
Note that you can use the frame menu for the same purpose only if no modified file is
currently edited.
Page 242
SEDIT and S/REXX Reference Manual
SEDIT COMMAND REFERENCE GUIDE
EXTRACT
EXTract - Retrieve Information
EXTract arg
is used within S/REXX or external macros to
retrieve information from SEDIT.
EXTRACT may only be used within an external or an S/REXX macro. The syntax used
depends on the macro language. See the examples discussed in the Using EXTERNAL
Macro Commands (UNIX Only) section on page 134 and in Using S/REXX Macro
Commands on page 142.
EXTRACT returns a string we will name str. The first str word named str[0] is a
number indicating the str length.
SEDIT and S/REXX Reference Manual
Page 243
EXTRACT
SEDIT COMMAND REFERENCE GUIDE
arg may be any one of the following words:
ALT
ARBchar
ARCH
AUTOExpand
AUTOI
AUtosave
BInary
CASE
CDpath
CLipboard
CMDline
COLOR
CRing
COLumn
CTags
CTLchar
CURLine
CURSor
DISPlay
=
ENTer
ENViron
EXTRACT
FDirectory
FILE
FLscreen
FName
FONt
FORMAT
FType
HEX
Page 244
HIghlight
IMPcmscp
INSert
KEEPBlanks
LASTLorc
LASTmsg
LENgth
LFName
LIne
LRecl
LScreen
MACRO
MARgins
MATCH
MOUSEMODE
NAme
NBFile
NBSCope
NUMber
PENDing
Point
POWerinput
PREfix
PROFile
PWD
REClevel
RESERved
REXX
RING
RMATCH
RW
SCALE
SCOPE
SELECTION
SElect
SEP
SET
SHBlank
SHADow
SIZe
SOftbench
SOURCE
SPAN
STAY
STReam
SYNonym
TABLine
TABS
TARGet
TRUnc
VARblank
Verify
VIsible
VERsion
Width
WRap
XEDlast
Xhome
XSHell
Zone
SEDIT and S/REXX Reference Manual
SEDIT COMMAND REFERENCE GUIDE
EXTRACT
ALT
returns the number of alterations that have been made to the file.
str[0]
str[1]
str[2]
number of variables returned
number of modifications since the last
autosave
number of modifications since the last save
ARBchar
returns the current ARBCHAR setting defined by the ARBCHAR command.
str[0]
str[1]
str[2]
number of variables returned
ON | OFF
arbitrary character.
ARCH
returns the hardware-dependent string described in Appendix B: Hardware String on
page 695.
str[0]
str[1]
number of variables returned
hardware dependent string
AUTOExpand
returns the current AUTOEXPAND status defined by the AUTOEXPAND command.
str[0]
str[1]
number of variables returned
ON | OFF
AUtosave
returns the current autosave status defined by the AUTOSAVE command.
str[0]
str[1]
str[2]
str[3]
str[4]
number of variables returned
OFF | N
autosave file full name
number of modifications since the last
autosave
autosave directory
AUTOI
returns the current auto-indent status defined by the AUTOI command.
str[0]
str[1]
str[2]
number of variables returned
ON | OFF
STAY | NOSTAY
BInary
returns the current binary status defined by the BINARY command.
str[0]
str[1]
number of variables returned
ON | OFF
CASE
returns the current CASE setting defined by the CASE command.
str[0]
str[1]
number of variables returned
RESPECT | IGNORE
SEDIT and S/REXX Reference Manual
Page 245
EXTRACT
SEDIT COMMAND REFERENCE GUIDE
CDpath
returns the directories described in the cdpath accessed by the DACCESS command.
str[0]
str[i]
number of variables returned
directory name
CLipboard {Raw}1
returns the contents of the clipboard. When Raw is not specified, the contents will be
split line by line, and any ^M character found at the end of a line will be discarded.
str[0]
str[i]
number of variables returned
line number i contents
CMDline
returns the current command line location defined by the CMDLINE command.
str[0]
str[1]
str[2]
str[3]
number of variables returned
TOP|BOTTOM|OFF
line number on the logical screen. Not returned
when CMDLINE is OFF.
content of the command line. Not returned when the
command line is empty.
COLOR {field | color-id | *}
returns the color associated with field, or the RGB value associated with
color-id or all information about all fields and color-ids. See the color
command for more information about field and color-id.
str[0]
str[i]
number of variables returned
color or R G B values
CRing
returns the current file ring number. If N files are currently edited, str[1] ranges
from 1 to N.
str[0]
str[1]
number of variables returned
current file ring number
COLumn
returns the column number of the column pointer
str[0]
str[1]
number of variables returned
current column pointer
CTags
returns the current TAGS setting defined by the CTAGS command.
str[0]
str[1]
str[2]
number of variables returned
ON | OFF
TAGFILE
CTLchar
returns the escape character, and all control characters, if any, defined by the CTLCHAR
command.
1. Only available in the S/REXX environment.
Page 246
SEDIT and S/REXX Reference Manual
SEDIT COMMAND REFERENCE GUIDE
str[0]
str[1]
str[2]
str[3]
EXTRACT
number of variables returned
ON|OFF
escape character
list of control characters (if any)
CURLine
returns the line number of the current line defined by the CURLine command.
str[0]
str[1]
str[2]
str[3]
number of variables returned
line number on the screen
line number on the screen
line content
CURSor
returns the current and the previous position of the cursor to the logical screen, the
current and the previous position of the cursor in the file, the current mouse file ring
number and the current position of the mouse in the file.
str[0]
str[1]
str[2]
str[3]
str[4]
str[5]
str[6]
str[7]
str[8]
str[9]
str[10]
str[11]
str[12]
number of variables returned
line position of the cursor on screen
column position of the cursor on screen
line position of the cursor in file, or -1
when not on a data field
column position of the cursor in file, or -1
when not on a data field
previous line position of the cursor on
screen
previous column position of the cursor on
screen
previous line position of the cursor in file
previous column position of the cursor in
file
current mouse file ring number
line position of the mouse in file
column position of the mouse in file
line position of the cursor in file when the
cursor is on the corresponding prefix field,
or -1 when not on a prefix field
DISPlay
returns the range of selection levels defined by the DISPLAY command.
str[0]
str[1]
str[2]
number of variables returned
start of display range
end of display range
=
returns the command which will be executed when using the = command.
str[0]
str[1]
number of variables returned
the command in the = buffer
SEDIT and S/REXX Reference Manual
Page 247
EXTRACT
SEDIT COMMAND REFERENCE GUIDE
ENTer1
returns the ENTER, Shift-ENTER, Control-ENTER,
Meta-ENTER,
Shift+Control-ENTER, Shift+Meta-ENTER, Control+Meta-ENTER,
Shift+Control+Meta-ENTER keys definitions.
str[0]
str[1]
str[2]
str[3]
str[4]
str[5]
str[6]
str[7]
str[8]
str[9]
str[10]
str[11]
str[12]
str[13]
str[14]
str[15]
str[16]
number of variables returned
BEFORE|AFTER|ONLY|IGNORE
ENTER definition
BEFORE|AFTER|ONLY|IGNORE
SHIFT-ENTER definition
BEFORE|AFTER|ONLY|IGNORE
CONTROL-ENTER definition
BEFORE|AFTER|ONLY|IGNORE
META-ENTER definition
BEFORE|AFTER|ONLY|IGNORE
SHIFT+CONTROL-ENTER definition
BEFORE|AFTER|ONLY|IGNORE
SHIFT+META-ENTER definition
BEFORE|AFTER|ONLY|IGNORE
CONTROL+META-ENTER definition
BEFORE|AFTER|ONLY|IGNORE
SHIFT+CONTROL+META-ENTER definition
ENViron VARNAME
returns the VARNAME environment variable.
str[0]
str[1]
number of variables returned, or 0 if VARNAME
is empty or does not exists.
VARNAME content.
EXTRACT
returns this keyword list.
str[0]
str[i]
number of variables returned
keyword
FDirectory
returns the current file filedirectory.
str[0]
str[1]
number of variables returned
filedirectory
FILE2
returns the contents of all file lines.
file.0
file.i
number of variables returned
content of the line number i
FLscreen
returns the first and last line number of the current file displayed on the screen.
1. Only available in the S/REXX environment.
2. Only available in the S/REXX environment.
Page 248
SEDIT and S/REXX Reference Manual
SEDIT COMMAND REFERENCE GUIDE
str[0]
str[1]
str[2]
EXTRACT
number of variables returned
first line
last line
FName
returns the current file filename
str[0]
str[1]
number of variables returned
filename
FONt
returns the current active font name.
str[0]
str[1]
number of variables returned
active font name
FORMAT
returns the current FORMAT settings defined by the FORMAT command.
str[0]
str[1]
str[2]
str[3]
number of variables returned
JUSTIFY or NOJUSTIFY
BLANK or EXTENDED
SINGLE or DOUBLE
FType
returns the current file filetype preceded with a period if the current file has an
extension (such as ".c"), or "0" if it does not. Note that this is slightly different from
the $ft expansion within an internal macro.
str[0]
str[1]
number of variables returned
extension
HEX
returns the current HEX setting defined by the HEX command.
str[0]
str[1]
number of variables returned
ON | OFF
HIghlight
returns the current HIGHLIGHT status defined by the HIGHLIGHT command.
str[0]
str[1]
number of variables returned
ON | OFF
IMPcmscp
returns the current IMPCMSCP setting defined by the IMPCMSCP command.
str[0]
str[1]
number of variables returned
ON | OFF | XON
INSert
returns the keyboard insertion mode status.
str[0]
str[1]
number of variables returned
ON | OFF
KEEPBlanks
returns the current status defined by the KEEPBLANKS command.
SEDIT and S/REXX Reference Manual
Page 249
EXTRACT
SEDIT COMMAND REFERENCE GUIDE
str[0]
str[1]
number of variables returned
ON | OFF
LASTLorc
returns the string passed to the LOCATE, CHANGE, SCHANGE, CN, SCN, FIND,
FINDUP, NFIND and NFINDUP commands. This string can be modified by the SET
LASTLORC command.
str[0]
str[1]
number of variables returned
string parameter
LASTmsg
returns the last message issued by SEDIT.
str[0]
str[1]
number of variables returned
last message
LENgth
returns the current line length. Note that SEDIT always deletes the trailing blanks.
str[0]
str[1]
number of variables returned
current line length
LFName
returns the current file filename preceded with its filedirectory.
str[0]
str[1]
number of variables returned
long filename
LIne
returns the current line number in the file.
str[0]
str[1]
number of variables returned
line number
LRecl
returns the current LRECL status defined by the LRECL command.
str[0]
str[1]
number of variables returned
* | N
LScreen
returns the following information about the split screens:
str[0]
str[1]
str[2]
str[3]
str[4]
str[5]
str[6]
number of variables returned
number of lines of the split screen
number of columns of the split screen
top left line number
top left column number
number of lines
number of columns
MACRO
returns the current MACRO setting defined by the SET MACRO command.
str[0]
str[1]
Page 250
number of variables returned
ON | OFF
SEDIT and S/REXX Reference Manual
SEDIT COMMAND REFERENCE GUIDE
EXTRACT
MARGINS
returns the current MARGINS settings defined by the MARGINS command.
str[0]
str[1]
str[2]
str[3]
number of variables returned
left margin
right margin
indent margin
MATCH1
returns the strings matched with the arbitrary character when the last string matching
command was performed with ARBCHAR set to ON.
match.0
match.i
number of variables returned
content of the match number i
Example:
If the file contains the following line:
all birds can fly in the sky
The following S/REXX macro:
’arbchar on #’
’/all#fly#sky’
’extract/match’
’say "’match.0’" "’ match.1’" "’ match.2’"’
will print the following:
"2" " birds can " " in the "
MOUSEMode
returns the current MOUSEMODE setting defined by the MOUSEMODE command.
str[0]
str[1]
number of variables returned
OPENLOOK | MOTIF | FULLMOTIF | WINDOWS
NAme
returns the complete file name.
str[0]
str[1]
number of variables returned
name
NBFile
returns the number of files in the editing ring.
str[0]
str[1]
number of variables returned
number of files
NBScope
When SCOPE is set to DISPLAY, returns the number of lines within the current scope,
1. Only available in the S/REXX environment.
SEDIT and S/REXX Reference Manual
Page 251
EXTRACT
SEDIT COMMAND REFERENCE GUIDE
and the offset of the current line within that number.
When SCOPE is set to ALL, returns the number of lines of the file, and the current line
number.
When the Top Of File is the current line, then str[2] = 0
str[0]
str[1]
str[2]
number of variables returned
number of lines within the current scope
position of the current line within the scope
NUMber
returns the current NUMBER status defined by the NUMBER command.
str[0]
str[1]
number of variables returned
ON | OFF
PENDing {BLOCK} {OLDNAME} name|* {target1 {target2}}
returns information about the pending lists described in the PENDING command on
page 333.
str[0]
str[1]
str[2]
str[3]
str[4]
str[5]
str[6]
Page 252
BLOCK indicates that only the block pending
list is to be searched for.
OLDNAME indicates that the specified name is
the original name of the prefix command or
macro. When OLDNAME is not specified, name
is assumed to be a synonym defined by the
PREFIX SYNONYM command.
name is the prefix command or macro to be
searched for. When specified as *, the first
pending list entry will be searched for.
target1 indicates the beginning of the range
in the file where the associated prefix
command or macro must be located. target1
will be located starting at the top of the
file. When omitted, target1 defaults to 0.
target2 indicates the end of the range in the
file where the associated prefix command or
macro must be located. target2 will be
located starting at the line defined by
target1. When omitted, target2 defaults to
the end of file.
7, or 0 when no pending entry is found
line number in the file
newname - the name entered in the prefix area
oldname - the real macro name
BLOCK when the matching entry belongs to the
block list, or null string otherwise
op1, or null string when the first operand
does not exist
op2, or null string when the second operand
does not exist
SEDIT and S/REXX Reference Manual
SEDIT COMMAND REFERENCE GUIDE
str[7]
EXTRACT
op3, or null string when the third operand
does not exist
Within an external macro, the null string is
the "" string.
Point
returns the symbolic names associated with the current line.
str[0]
str[1]
1, or 0 when no symbolic name is associated
line number followed by the symbolic names
Point *1
returns all the symbolic names.
str[0]
str[i]
number of variables returned
line number followed by the symbolic names
POWerinput
returns the current input mode status defined by the POWERINPUT command.
str[0]
str[1]
number of variables returned
ON | OFF
PREfix2
returns the current prefix setting defined by the PREFIX command.
str[0]
str[1]
str[2]
number of variables returned
ON | OFF
LEFT | RGHT
PREfix Synonym newname
returns the original oldname associated with newname defined by the PREFIX
SYNONYM command.
str[0]
str[1]
number of variables returned
oldname
PREfix Synonym *
returns both the newname and the oldname associated with every prefix macro
synonym defined by the PREFIX SYNONYM command.
str[0]
str[i]
number of variables returned
newname oldname
PROFile
returns the name of the file used at initialization as the profile.
str[0]
str[1]
number of variables returned
profile file name
PWD
returns the current SEDIT directory. Note that since an external macro executes in a
different process, its current directory may be different from SEDIT’s directory.
1. Only available in the S/REXX environment.
2. Only available in the S/REXX environment.
SEDIT and S/REXX Reference Manual
Page 253
EXTRACT
SEDIT COMMAND REFERENCE GUIDE
str[0]
str[1]
number of variables returned
current directory
REClevel1
returns the recursion level of the S/REXX macro currently running.
str[0]
str[1]
number of variables returned
recursion level
RESERved
returns a list reserved line numbers.
str[0]
str[1]
number of variables returned
list of reserved line numbers
RESERved *2
returns the status of every reserved line.
str[0]
str[i]
number of variables returned
linenum color exthi PSs HIGH|NOHIGH text
REXX
returns information about the availability of S/REXX macros.
str[0]
str[1]
number of variables returned
0 when S/REXX macros are not available
1 when S/REXX macros are available
RING
returns information about the files currently being edited.
str[0]
str[1]
str[i]
number of variables returned
number of files in the ring
full file name
RMATCH
returns the matching line and column numbers, and the string matched with the last
regular expression search performed by the R/ command.
str[0]
str[1]
str[2]
str[3]
number of variables returned
matching line number
matching column number
string matched
Example:
Assuming line 7 of the current file is:
0007 na
102
and the following command has been issued:
1. Only available in the S/REXX environment.
2. Only available in the S/REXX environment.
Page 254
SEDIT and S/REXX Reference Manual
SEDIT COMMAND REFERENCE GUIDE
EXTRACT
====> r/a *[1-9][0-3]
rmatch.1 will contain: 7
rmatch.2 will contain: 2
rmatch.3 will contain: a
10
RW
returns the current RW status defined by the RW command.
str[0]
str[1]
number of variables returned
ON | OFF
SCALE
returns information about the scale line defined by the SCALE command.
str[0]
str[1]
str[2]
str[3]
number of variables returned
ON | OFF
scale line
scale line
SCOPE
returns information about the scope status defined by the SCOPE command.
str[0]
str[1]
number of variables returned
ALL | DISPLAY
SELECTION
returns information about the current selection.
str[0]
str[1]
str[2]
str[3]
str[4]
str[5]
str[6]
str[7]
str[8]
number of variables returned
the full name of the file holding the
selection
LINEAR | RECTANGULAR
PENDING | NOPENDING
starting line
starting column
ending line
ending column (-1 if including the ending
virtual newline "\n" line termination)
selection content. Each line is delimited by
a newline "\n" character
SElect
returns the current line selection level and the maximum file selection level defined by
the SELECT command.
str[0]
str[1]
str[2]
number of variables returned
current line selection level
maximum file selection level
str[3]1
a string of numbers showing the selection
level for every line of the file.
1. Only available in the S/REXX environment.
SEDIT and S/REXX Reference Manual
Page 255
EXTRACT
SEDIT COMMAND REFERENCE GUIDE
SEP
returns information about the separator defined by the SEP command.
str[0]
str[1]
str[2]
number of variables returned
ON | OFF
separator character
SET
returns the current keyboard function key settings defined by the SET command.
str[0]
str[i]
number of variables returned
key description
SHBlank
returns the current status defined by the SHBLANK command.
str[0]
str[1]
number of variables returned
ON | OFF
SHADow
returns the current shadow status defined by the SHADOW command.
str[0]
str[1]
number of variables returned
ON | OFF
SIZe
returns the current file length.
str[0]
str[1]
number of variables returned
file length
SOftbench
returns 1 when the current SEDIT session is a WorkBench EDIT session.
str[0]
str[1]
number of variables returned
0 | 1
SOURCE
returns the name of the currently executed macro or prefix macro.
str[0]
str[1]
number of variables returned
macro name
SPAN
returns the current span setting defined by the SPAN command.
str[0]
str[1]
str[2]
str[3]
number of variables returned
ON|OFF
BLANK|NOBLANK
N or *
STAY
returns the current STAY setting defined by the STAY command.
str[0]
str[1]
number of variables returned
ON | OFF
STReam
returns the current STREAM status defined by the STREAM command.
Page 256
SEDIT and S/REXX Reference Manual
SEDIT COMMAND REFERENCE GUIDE
str[0]
str[1]
EXTRACT
number of variables returned
ON | OFF
SYNonym1
returns the current SYNONYM status.
str[0]
str[1]
number of variables returned
ON | OFF
SYNonym name1
returns the information about the name synonym.
str[0]
str[1]
str[2]
str[3]
str[4]
number of variables returned
name
length of minimum abbreviation
definition
linend character if specified, or an empty
string
SYNonym *1
returns the information about all the synonyms.
str[0]
str[i]
number of variables returned
name abbreviation {linend character}
definition
TABLine
returns information about the tabulation line defined by the TABLINE command.
str[0]
str[1]
str[2]
str[3]
number of variables returned
ON | OFF
tab line
tab line
TABS
returns the tabulation column numbers defined by the TABS command.
str[0]
str[1]
number of variables returned
tabulation columns
TARGet
returns the following data after a character string match with a LOCATE or CLOCATE
target: line and column number of the first and last character in the string.
After a target specification as an absolute line number, a relative displacement or a line
name, returns the line number and current column position.
When a target is specified with a logical & operator, the last match will be taken into
account.
str[0]
str[1]
str[2]
str[3]
number of variables returned
line number of the first character
column number of the first character
line number of the last character
1. Only available in the S/REXX environment.
SEDIT and S/REXX Reference Manual
Page 257
EXTRACT
SEDIT COMMAND REFERENCE GUIDE
str[4]
column number of the last character
TRUnc
returns the current TRUNC status defined by the TRUNC command.
str[0]
str[1]
number of variables returned
* | N
VARblank
returns the current VARBLANK status defined by the VARBLANK command.
str[0]
str[1]
number of variables returned
ON | OFF
Verify
returns the verify columns defined by the VERIFY command.
str[0]
str[1]
number of variables returned
OFF
VIsible
returns the number of visible lines.
str[0]
str[1]
number of variables returned
number of visible lines
VERsion
returns the current SEDIT version identifier.
str[0]
str[1]
number of variables returned
identifier:
xview when running the Open Windows version.
motif when running the MOTIF version.
curses when running in ASCII terminal mode.
windows when running the WINDOWS version.
XEDLast
returns the argument passed to the last XEDIT command.
str[0]
str[1]
number of variables returned
argument
Xhome
returns the SEDIT installation directory.
str[0]
str[1]
number of variables returned
installation directory
Width
returns the length of the longest line in the current file.
str[0]
str[1]
number of variables returned
length of the longest line
WRap
returns the current WRAP setting as defined by the WRAP command.
str[0]
Page 258
number of variables returned
SEDIT and S/REXX Reference Manual
SEDIT COMMAND REFERENCE GUIDE
str[1]
EXTRACT
ON | OFF
XSHell
returns the name of the last file created by the XSHELL, XCSHELL or XKSHELL
commands.
str[0]
str[1]
number of variables returned
name of the file
Zone
returns the zone columns as defined by the ZONE command.
str[0]
str[1]
str[2]
number of variables returned
starting zone column
ending zone column
SEDIT and S/REXX Reference Manual
Page 259
FBUtton - Set Directory Editor Buttons
FBUtton ON|OFf
When FBUTTON is set to ON, the directory editor supports its own set of buttons.
See Using the Buttons on page 467 for more information.
FD - Change File Directory
FD directory-name
renames the filedirectory component of the file being
edited.
If directory-name does not start with a standard directory indicator ( / . ~ ), SEDIT
will search first in the current directory and then through the directories in the cdpath
initialized with the DACCESS command.
If directory-name contains blanks, it must be surrounded with quotes or double
quotes. If a directory name contains a quote or a double quote, the quote must be escaped
with a backslash.
Examples:
when editing /usr/m1/test.f:
fd /usr/m2 will change the name to /usr/m2/test2.f
fd essai will change the name to /home/m1/essai/test.f, if
this directory exists and the cdpath initialized with the DACCESS
command contains the string /home/m1.
fd "Program Files" will change the name to
c:\Program Files\test.f
if this directory exists and the cdpath initialized with the DACCESS
command contains the string c:\.
fd is not allowed alone.
See Also: DACCESS
SEDIT COMMAND REFERENCE GUIDE
FILE
FIle / FFile / KFIle / DOSFile - Save and Leave File
FIle / FFile / KFIle/ DOSFile {fn {ft {fd}}
These commands transform the unchanged source file into a backup file by appending a
"%" to its name, creating a new file with the original name from the edited memory image,
and then discontinuing the editing session. When SAVECLEARUNDO is set to ON (the
default), the undo memory is reset.
When SEDIT is not running in batch mode, if the file name has been changed during the
editing session so that it is identical to that of an existing file, or if the file has been modified
by another user, FILE will ask for a confirmation to overwrite the existing file. FFILE will
not. When SEDIT is running in batch mode, FILE does not overwrite the existing file.
The KFILE command performs the same function as the FILE command, but leaves the
saved file timestamp unchanged. This may be useful, for example, when the modified file
is an include file. Using KFILE will prevent a following make command from recompiling
every file which relies on the saved file.
The DOSFILE command performs the same function as the FILE command, but adds a ^M
character at the end of each line, and a ^Z character at the end of the file, thus making the
file compatible with personal computers using the DOS operating system.
If fn is specified, the filename of the file will be changed before saving.
If ft is specified, the filetype of the file will be changed before saving.
If fd is specified, the filedirectory of the file will be changed before saving.
Under APL, the APL object will be fixed in the workspace. Should an error occur, the line
at which the error occurred becomes the current line.
Warning:
When KEEPBLANKS is set to OFF, SEDIT removes all trailing blanks in
every line before saving a file. Do not save a file (such as an "*.o" file)
where trailing blanks are part of the data.
See Also: BACKUP, KEEPBLANKS, DY_SAVE, RW, SAVE, SAVECLEARUNDO,
VERIFY_SAVE
SEDIT and S/REXX Reference Manual
Page 261
FILECONV
SEDIT COMMAND REFERENCE GUIDE
FILECONV - File Conversion
FILEConv CurrentFile {HowToRead {HowToCreate}
Initial value (UNIX):
Initial value (WINDOWS):
UNIX
AUTO UNIX
WINDOWS AUTO WINDOWS
HowToRead Level:
HowToCreate Level:
CurrentFile Level:
Global
Global
File
Every file in the SEDIT ring has a UNIX or WINDOWS status.
Within a UNIX file, lines are separated by the newline \n character.
Within a WINDOWS file, lines are separated by the ^M character followed by the newline
\n character.
CurrentFile
HowToRead
HowToCreate
Windows|Unix
WINDOWS
When the file is saved to disk, lines are separated by the
^M character followed by the newline \n character.
UNIX
When the file is saved to disk, lines are separated by the
newline \n character.
.
A period can be used as a place holder. This allows to
specify HowToCreate or HowToRead without
changing CurrentFile.
Auto|Unix
AUTO
SEDIT determines automatically the type of the file read
from storage by checking the existence of ^M characters.
^M characters preceding a newline character are not
displayed on the screen.
UNIX
SEDIT always considers the file a UNIX file. ^M
characters are displayed on the screen.
.
A period can be used as a place holder. This allows to
specify HowToCreate without changing
HowToRead.
Windows|Unix
WINDOWS
A new file is a WINDOWS file. This is the default on
WINDOWS systems.
UNIX
A new file is a UNIX file. This is the default on UNIX
systems.
Without parameters, FILECONV displays its current status.
Page 262
SEDIT and S/REXX Reference Manual
SEDIT COMMAND REFERENCE GUIDE
FILECONV
Notes: The OpenLook, MOTIF and WINDOWS versions of SEDIT display on the upper
border of the window a [U] symbol when the current file is a UNIX file, and a [W]
symbol when the current file is a WINDOWS file.
On UNIX systems, the name of a WINDOWS file displayed on the first screen line
is followed with a [W] symbol.
On WINDOWS systems, the name of a UNIX file displayed on the first screen line
is followed with a [U] symbol.
Examples:
FILEC U A U
FILEC W
changes only the HowToCreate parameter.
A WINDOWS file displayed on a UNIX system:
See Also: FILE, SAVE
SEDIT and S/REXX Reference Manual
Page 263
FILTER
SEDIT COMMAND REFERENCE GUIDE
FILTer - Filter the Selection Contents
FILTer {time-out nn} filtername {options}
sends the selection content to an external filter.
filtername must be an external program, able to retrieve data from its standard input,
process it in some way and then send it back using its standard output.
nn is an optional time-out. If not specified, it will be set to 10 seconds.
options may be any option passed to filtername.
If the current file has no selection, SEDIT will select the cursor line.
SEDIT proceeds in the following manner:
•
•
•
•
It deletes the selection, as if the CUT key had been used.
It sends the shelf (the cut buffer) to filtername.
It retrieves the data sent by filtername into the shelf.
It does a paste, as if the PASTE key had been used.
A filter example is {install-dir}/filters/toggle_comment.c.
This filter is useful within C programs, allowing the user to comment in or out the selected
or cursor lines.
On Sun workstations, the standard profile.sedit file assigns toggle_comment to
Control-R5 in the following manner:
set c-r5 filter $xhome/filters/$arch/toggle_comment
On HP workstations, it is assigned to the Control-R9 (or Control-Prev) key:
set c-r9 filter $xhome/filters/toggle_comment
On other workstations, it is assigned to the Control-R6 (or Control-Page-Up) key:
set c-r6 filter $xhome/filters/toggle_comment
Note: use the -Bstatic flag when compiling a filter on a SunOS Sun workstation for
shorter response time.
Page 264
SEDIT and S/REXX Reference Manual
SEDIT COMMAND REFERENCE GUIDE
FIND
FINd (XEDIT MODE) - Find a Starting String
FINd
str
XEDFINd
str
searches forward for a line that starts with str.
When MODE COMMAND XEDIT is in effect, FIND calls the XEDIT mode XEDFIND
command. PDFFIND may be used to call the ISPF/PDF mode FIND command.
FIND searches forward for a line that starts with str.
When str contains imbedded blanks, those character positions in the file line are ignored.
When str contains underscore characters (_), those character positions in the file line must
be blank.
When WRAP is set to OFF, the search continues down to the end of the file.
When WRAP is set to ON, the search will wrap to the first line in the file, and continue down
to the current line.
See Also: FINDUP, NFIND, NFINDUP, STAY, WRAP
SEDIT and S/REXX Reference Manual
Page 265
FIND
SEDIT COMMAND REFERENCE GUIDE
FINd (ISPF MODE) - Find a Data String
FINd
PDFFINd
str {range} {NEXT }
{ALL }
{FIRST}
{LAST }
{PREV }
{CHARS } {X } {col1 {col2}
{PREFIX} {NX}
{SUFFIX}
{WORD }
When MODE COMMAND ISPF is in effect, FIND calls the ISPF mode PDFFIND command.
XEDFIND may be used to call the XEDIT mode FIND command.
FIND searches a line that contains the str PDF string. A PDF string may be the following
kind of string:
*
The string used with the last FIND/EXCLUDE/CHANGE/SEEK command.
Simple string
Any series of characters not starting with a single or double quote (’ or ") and
not containing any embedded blanks. The search will be case insensitive.
Delimited string
Any string enclosed by single or double quotes. The search will be case
insensitive.
Hexadecimal string
Any delimited string of valid hexadecimal characters, preceded or followed by
the character X, such as X’3132’ or ’3132’x. The search will be case
sensitive.
Character string
Any delimited string, preceded or followed by the character C, such as
C’ab cd’ or ’ab cd’c. The search will be case sensitive.
Picture string
Any delimited string, preceded or followed by the character P, such as
P’ab cd’ or ’ab cd’p. The search will be case sensitive.
Within a picture string, the following special characters may be used:
=
~
.
#
@
<
>
$
means any character.
means any character that is not a blank.
means a character which generally cannot be displayed. SEDIT
will consider this any character which has a decimal value of less
than 32.
means any numeric character.
means any non-numeric character.
means any alphabetic character.
means any lowercase alphabetic character.
means any uppercase alphabetic character.
means any special character, neither alphabetic or numeric.
FIND considers the following arguments:
Page 266
SEDIT and S/REXX Reference Manual
SEDIT COMMAND REFERENCE GUIDE
range
FIND
Two labels that identify the lines to be searched for.
A label may be created by typing a .xxxx string on a prefix zone, or by using
the XEDIT POINT command described on page 335.
A label may also be one of the ISPF/PDF predefined labels:
.zf or .zfirst
the first line.
.zl or .zlast
the last line.
.zcsr
the cursor line
When omitted, range defaults to .zfirst .zlast.
NEXT
Starts at the first position after the current cursor location and searches forward.
NEXT is the default. When the cursor is not located on the data, the search start
from the first displayed line.
ALL
Starts at the top of the file and searches forward to find all occurrences of the
string.
FIRST
Starts at the top of the file and searches forward to find the first occurrence of
the string.
LAST
Starts at the bottom of the file and searches backward to find the last occurrence
of the string.
PREV
Starts at the cursor location and searches backward to find the previous
occurrence of the string. When the cursor is not located on the data, the search
start from the last displayed line
CHARS
Locates str anywhere the characters match. This is the default.
PREFIX
Locates str at the beginning of a word:
find ab matches "abc", but does not match "ab" or "cabd" or "dab".
SUFFIX
Locates str at the end of a word:
find ab matches "cab", but does not match "ab" or "cabd" or "abc".
WORD
Locates str as a whole word:
find ab matches "d ab e", but does not match "cabd" or "abc".
X
Scans only lines that are excluded from the display.
NX
Scans only lines that are not excluded from the display.
col1 and col2
The columns FIND is to search. When omitted, the columns are limited by the
BOUNDS setting described on page 161.
Examples:
find
find
find
find
’ab cd’
c’ab cd’
x’31’ last
p’>###"
SEDIT and S/REXX Reference Manual
matches ’ab cd’ as well as ’Ab Cd’.
matches only ’ab cd’.
matches the last ’1’ character.
could match ’A123’.
Page 267
FIND
SEDIT COMMAND REFERENCE GUIDE
Return Codes:
0
4
5
6
7
12
Normal
String Not Found
* has been used on the first FIND call
Invalid Hexadecimal String
Invalid Label
Syntax Error
See Also: BOUNDS, EXCLUDE, CHANGE, SEEK, VERIFY
Page 268
SEDIT and S/REXX Reference Manual
SEDIT COMMAND REFERENCE GUIDE
FINDUP
FINDUp - Find a Starting String
FINDUp
str
FUp
str
searches backward for a line that starts with str.
When str contains imbedded blanks, those character positions in the file line are ignored.
When str contains underscore characters (_), those character positions in the file line must
be blank.
When WRAP is set to OFF, the search continues up to the start of the file.
When WRAP is set to ON, the search will wrap to the last file line, and continue up to the
current line.
See Also: FIND, NFIND, NFINDUP, STAY, WRAP
SEDIT and S/REXX Reference Manual
Page 269
FLATH
SEDIT COMMAND REFERENCE GUIDE
FLAth - Directory Editor Permissions Display
FLAth {ON|OFF}
Initial value:
ON
FLATH without argument displays the current value.
When FLATH is ON, the FLIST directory editor displays the file related permissions:
Level 0
40 Files
-rw-rw-rw- test
.f
a
-rw-rw-rw- test1
.f
a
-rw-rw-rw- include
.h
a
-rw-rw-rw- command*
a
a : /usr/m1
|
b : /usr/m1/cmd |
c : /usr/bin
|
d : /usr/etc
|
e : /etc
1:/SN 3:END 4:XED 5:SWITCH
1 OF 40
..............................
..............................
..............................
..............................
1207
457
11111
9870
16/02/88
06/02/88
11/01/88
16/04/87
01:19
13:31
18:44
21:44
6:/SB 7:U 8:D 9:/SD 10:/ST 11:-> 12:CAN
When FLATH is OFF, the FLIST directory editor does not display the file related
permissions:
Level 0
40 Files
test
.f
a
........................................
test1
.f
a
........................................
include
.h
a
........................................
command*
a
........................................
a : /usr/m1
|
b : /usr/m1/cmd |
c : /usr/bin
|
d : /usr/etc
|
e : /etc
1:/SN 3:END 4:XED 5:SWITCH 6:/SB 7:U 8:D 9:/SD
1 OF 40
1207
457
11111
9870
16/02/88
06/02/88
11/01/88
16/04/87
01:19
13:31
18:44
21:44
10:/ST 11:-> 12:CAN
allowing more space for displaying long file names.
When FLIST is running, typing ^a (Control-a) switches the FLATH mode.
Page 270
SEDIT and S/REXX Reference Manual
SEDIT COMMAND REFERENCE GUIDE
FLDATE
FLDATE - Directory Editor Date Format
FLDATE {Europe|Us}
Initial value:
defines if date is displayed in European or American
format.
EUROPE
When FLDATE is set to EUROPE, FLIST displays dates using the DD/MM/YY format.
When FLDATE is set to US, FLIST displays dates using the MM/DD/YY format.
FLFile - File + FLIST
executes a FILE command and then switches to the
directory editor.
FLFile
Batch Mode:
Not Available
This command is mapped to the ^F3 key on Sun workstations, and ^R3 (^Pause) on other
workstations. See The Directory Editor FLIST on page 459 for further explanations.
Warning:
Being a text editor, SEDIT removes all trailing blanks in every line before
saving a file. Do not save a file (such as an "*.o" file) where trailing
blanks are part of the data.
FFList - Call Directory Editor
FFList { FN {FT {FM}}}
Batch Mode:
will call the directory editor upon non-directories
files.
Not Available
FFLIST only displays non-directories. See The Directory Editor FLIST on page 459 for
further explanations.
See Also: DACCESS, DFLIST, FLIST,
SEDIT and S/REXX Reference Manual
FLATH, FLPP, FMACRO, RFLIST
Page 271
FLIST
SEDIT COMMAND REFERENCE GUIDE
Flist - Call Directory Editor
Flist { FN {FT {FM}}}
Batch Mode:
will call the directory editor.
Not Available
This command is mapped to the ^f key by default. See The Directory Editor FLIST on page
459 for further explanations.
See Also: DACCESS, DFLIST, FFLIST,
FLATH, FLPP, FMACRO, RFLIST
FMACRO - Execute FLIST Macro
FMAcro
Initial value:
Level:
ON|OFF
OFF
Global
When FMACRO is OFF, FLIST looks for native commands before looking for macros.
When FMACRO is ON, FLIST looks for macros before looking for native commands. See
Using S/REXX Macros Within FLIST section on page 478 for more information.
Page 272
SEDIT and S/REXX Reference Manual
FLOW - Reformats Text
FLOW {target}
Scope:
left justifies text and sets text within margins.
All
This command is mapped to the Shift-Control-F (^F) key by default.
FLOW reformats a portion of the current file defined by the target operand. FLOW adjusts
the text within a paragraph so that all lines start at the left margin column (the first line starts
at the paragraph indent column though), and all lines end before the right margin.
According to the settings defined by the FORMAT command described on page 277, FLOW
may justify every line, and insert one or two spaces at the end of each sentence.
The margins and paragraph indent values are set with the MARGINS command described
on page 311.
target may be one of the following:
All
Cursor
CURSOR_Strict
:N
+N
-N
+* or *
-*
.symb
string expression
All of the file is formatted.
Has a special meaning. See below.
Has a special meaning. See below.
Up to but not including the line N.
Down N lines.
Up N lines.
Down to the end of file.
Up to the top of file.
Up or Down to the line which has been assigned the .symb
symbolic name by using the POINT command, or a .symb
prefix command.
Defines a group of characters to be located.
The general format of a string expression is the following:
{+|-}{~}/string1{/{&}|{|}{~}/string2 ..... }
See the LOCATE command on page 304 for a precise string expression definition.
When target is not specified, FLOW formats the paragraph corresponding to the cursor
location. When the cursor is not located upon a line of the current file, FLOW reformats the
paragraph corresponding to the current line. If the cursor or the current line is a blank line,
FLOW searches for the next non-blank line to locate the start of the paragraph to format.
The cursor is moved to the line below the last line processed by the FLOW command.
Examples:
FLOW
FLOW
FLOW
FLOW
FLOW
all
cursor
cursor_strict
/str/
FLOW
SEDIT COMMAND REFERENCE GUIDE
Using the CURSOR Operand
Consider the following text:
00001 target
defines the number of lines to be scanned for a match. Lines are
changed starting with the current line, up to but not including the target line. target
may be one of the following:
With the cursor located here
With MARGINS set to "5 72 +0", FLOW will reformat that text in the following way:
00001
00002
00003
target defines the number of lines to be scanned for a match. Lines
are changed starting with the current line, up to but not including
the target line. target may be one of the following:
FLOW CURSOR does not modify the part of the data line located at the left of the cursor, and
aligns the following lines between the cursor location and the right margin:
00001 target
00002
00003
00004
defines the number of lines to be scanned for a match.
Lines are changed starting with the current line, up to
but not including the target line. target may be one of
the following:
Using the CURSOR_STRICT Operand
The CURSOR_STRICT operand is similar to the CURSOR operand. The only difference is
that SEDIT considers that the phrase starts at the cursor line instead of looking backwards
for the start of the phrase.
See Also: CENTER, FORMAT, LEFTADJUST, LOCATE, MARGINS,
POWERINPUT, RIGHTADJUST, TRUNC
Page 274
SEDIT and S/REXX Reference Manual
SEDIT COMMAND REFERENCE GUIDE
FLPP
FLPP - Directory Editor Parent Directory Display
FLPP {ON|OFF}
Initial value:
ON
FLPP without argument displays the current value.
When FLPP is ON, the FLIST directory editor displays a ".." string. Clicking on this
string opens a new FLIST level on the parent directory.
FLQuit - AQUIT + F
executes a AQUIT command and then switches to
the directory editor.
FLQuit
Batch Mode:
Not Available
This command is mapped to the ^F1 key on Sun workstations, and ^R1
(^Print-Screen) on other workstations.
FN - Change Filename
renames the filename component of the file being
edited.
FN {filename}
If filename contains a period ("."), the filetype will be changed too.
If filename contains blanks, it must be surrounded with quotes or double quotes. If a
filename contains a quote or a double quote, the quote must be escaped with a backslash.
Example:
assume /usr/m1/test.f is the file currently being edited:
fn test2 will change the name to/usr/m1/test2.f
fn will change the name to /usr/m1/.f
fn test2.c will change the name to /usr/m1/test2.c
fn "a b" will change the name to /usr/m1/a b.c
SEDIT and S/REXX Reference Manual
Page 275
FOLLOW - Follow Links
FOLLOW {ON | OFF}
Initial value:
Level:
ON
Global
When FOLLOW is ON, SEDIT checks to see if a loaded file is a symbolic link, and replaces
it with the file to which the symbolic link points.
FOLLOW OFF disables this behavior. This may be useful when using automounted
directories, in which real names are often confusing for the end user.
Without parameters, FOLLOW displays its current setting.
Examples:
FOLLOW OFF
FOLLOW
See Also: XEDIT
FONt - Change Font
FONt
{fontname}
Query FONt
Batch Mode:
Not Available
With no parameters, the command FONT shows in a fullscreen manner the available fonts
on the server.
A font may be selected by clicking on its name with the left mouse button.
A return to the editor is achieved by pressing the F1 key.
Depressing the F2 key or ^m adds a fonts.files file in the editing ring, containing all
the font names.
QUERY FONT displays the active font.
FORMAT - Set Formatting Parameters
FORMAT
Initial value:
Level:
{Justify|Nojustify}
{Blank|Extended|DOT|DOTExtended
{NONE|Single|DOUble}
NOJUSTIFY BLANK DOUBLE
File
FORMAT affects how paragraphs are formatted by the FLOW command, and how FLOW
determines the start and the end of a paragraph.
Justify
the paragraphs are justified within the margins defined with the
MARGINS command.
Nojustify
the paragraphs are not justified.
Blank
paragraphs are separated with a blank line.
Extended
paragraphs may also be separated with a blank line. In addition, a new
paragraph is encountered if the left margin value is 1, and a line starts
with a tabulation character, a blank character, a colon or a period.
DOT
paragraphs may also be separated with a blank line. In addition, a new
paragraph is encountered if the previous line ends with one of the
following characters:
! . ?
DOTExtended combines the DOT and EXTENDED rules.
Single
one space is inserted after each sentence. A sentence is a string of
characters within a paragraph ending with one of the following
characters:
! . ?
and followed by an uppercase character.
DOUble
two spaces are inserted after each sentence.
NONE
no spaces are inserted after each sentence.
These arguments can be entered in any order.
Without an argument, FORMAT displays the current setting.
Examples:
FORMAT B N S
FORMAT
See Also: CENTER, FLOW, LEFTADJUST, MARGINS, POWERINPUT,
RIGHTADJUST, TRUNC
FORWARD
SEDIT COMMAND REFERENCE GUIDE
FORward - Scroll Forward
FORward {N | *}
Scope:
scrolls down N pages: the last line displayed
becomes the current line N times.
Display
FORWARD 0 makes the first line in the file become the current line.
FORWARD * makes the end of file the current line.
When the current line is the end of file, and when MODE SCROLL WRAP is in effect,
FORWARD makes the first line the current line.
This command is mapped to the F8 key by default.
Return Codes:
0
1
5
Normal
End Of File Reached
Invalid Operand
See Also: MODE
Page 278
SEDIT and S/REXX Reference Manual
SEDIT COMMAND REFERENCE GUIDE
FT
FT - Change Filetype
FT {filetype}
renames the filetype component of the file being
edited.
If filetype contains blanks, it must be surrounded with quotes or double quotes. If a
filetype contains a quote or a double quote, the quote must be escaped with a backslash.
Examples:
assume /usr/m1/test.f is the file currently being edited:
ft p will change the name to /usr/m1/test2.p
ft will change the name to /usr/m1/test
ft "c d" will change the name to /usr/m1/test/c d
SEDIT and S/REXX Reference Manual
Page 279
GET
SEDIT COMMAND REFERENCE GUIDE
GET - Insert Data
inserts data.
Get {fn {ft {fd{ firstrec{ numrec}}}}}
Get {fn{ firstrec{ numrec}}}
Without parameters, GET inserts data previously saved either by a PUT command or by a
PU/PP prefix command at the current line location.
With parameters, GET will construct the file name to be searched for according to fn, ft
and fd.
fn is the filename part of the file. However, if fn starts with "~", "/", "./" or "../", fn
will be considered as a full UNIX or WINDOWS name, and ft and fd must not be
specified.
ft is the filetype part of the file. When ft is omitted, the filetype of the current edited file
will be used. When ft is specified as a period (.), no filetype will be used.
fd is the directory to be searched for. When not specified, or specified as a question mark
(?), all the directories described in the PATH (or XPATH) environment variable, or accessed
with the ACCESS command, will be searched for.
firstrec is the first line number to be inserted. When not specified, the first line in the
file will be the first inserted line.
numrec specifies the number of lines to be inserted. When not specified, or specified as *,
all the lines following the line firstrec will be inserted.
When MODE GET NOSTAY is in effect, the last inserted line becomes the current line.
Examples:
If "test.f" is the file currently being edited:
get
get
get
get
get
test1
test1 F
test1 .
./test1
test1 . ? 2 5
get ~/test1 2 5
get
will load test1.f
will load test1.F
will load test1
will load ./test1
will load 5 lines starting at line 2 of the
test1 file, searching for this file in the
accessed directories.
does the same with ~/test1.
will insert data previously saved by a PUT
command.
Under APL, "get LIST" will insert the APL object "LIST".
See Also: ACCESS, MODE, PUT
Page 280
SEDIT and S/REXX Reference Manual
SEDIT COMMAND REFERENCE GUIDE
GET_PANEL
GET_Panel - Fullscreen User Interface
GET_Panel
Batch Mode:
|
|
|
|
panelfile
refresh panelfile
cursor nme panelfile
refresh cursor nme panelfile
Not Available
When the refresh option is specified, GET_PANEL displays the panel without waiting
for a user action.
When the cursor nme option is specified, GET_PANEL places the cursor on the nme
field.
If panelfile does not start with a directory indicator, like "/", "./", "~/", it will be
searched for in the current directory first.
If not found, it will be searched for in the directories described by the environment variable
XPATH, or PATH, or in the directories accessed by the command ACCESS.
Then, a fullscreen panel instance of panelfile will be displayed. The user will be able
to fill in the input fields, and enter an action keystroke such as "return" or "F2".
After this action keystroke, SEDIT will save the contents of each input field into an
environment variable whose name is the field name, save the action keystroke in the
RETURN environment variable, save the mouse position in the MOUSE environment
variable, save the cursor position in the CURSOR environment variable and return to the
editor.
SEDIT and S/REXX Reference Manual
Page 281
GET_PANEL
SEDIT COMMAND REFERENCE GUIDE
The file {install-dir}/demo/sample_panel is an example of such a file:
*
*
*
Sample panel for the "get_panel" command
Button "Quit"
"Save"
name
header
start
2 1
size
1 90
color
maroon
hi
normal
type
output
content "
*********************
*********************"
*
* Sample
*
name
start
size
color
hi
type
content
PANEL HEADER
output field
output1
4 1
1 13
black
normal
output
Enter option:
*
* Sample input field
*
name
OPTION
start
4 15
size
1 20
color
red
hi
normal
type
input
intensity 1
content
Option 0
menu
"Option 1" "Option 2" "Option 3"
Page 282
SEDIT and S/REXX Reference Manual
SEDIT COMMAND REFERENCE GUIDE
Typing get_panel
following screen:
Quit
GET_PANEL
{install-dir}/demo/sample_panel will display the
Save
****************** PANEL HEADER ******************
Enter option: Option 0
Clicking with the third mouse button on the Option 0 field will bring up the following
menu:
Option 1
Option 2
Option 3
Releasing the mouse will fill this field with the selected option.
Typing ^r will redraw the original screen.
Typing ^c will cancel the get_panel command without further reading.
Clicking on the first button (Quit) will fill the RETURN variable with the string B1.
Each field is described by the following attributes:
Name nme
nme is the environment variable which will be used to store
the field content.
STart y x
the line and column starting location. Upper-left corner is 1
1.
SIze ll cc
the field size: ll is the number of lines, cc is the number of
columns.
Color col
col is the field color. See the COLOR command on page 184
for a complete list of all available colors.
Hightlight hlt
hlt is the hightlight which will be used:
Normal
Underline
Reverse
Type tpe
tpe may be one of the following:
Input
Output
SEDIT and S/REXX Reference Manual
No hightlight.
The field will be underlined.
The field will be displayed in reverse
video.
You are allowed to type any character.
You are not allowed to type anything. The
field content will not be saved in the nme
environment variable.
Page 283
GET_PANEL
SEDIT COMMAND REFERENCE GUIDE
Numerical
You are allowed to type any numeric
character.
Menu string1 {string2 ..}
A menu made with the different strings will be displayed each
time the user clicks on the field with the third mouse button.
The field will be filled with the selected string.
Intensity 0|1|2
A 0 intensity allows the user to create a field whose contents
are not displayed.
A 2 intensity displays characters in bold.
CONtent cnt
The original field content. If the nme environment variable
already exist, its contents will override the cnt value. cnt
may start with an optional ".
The content cnt field may be omitted.
Note: The created environment variables will be defined in the SEDIT main process.
Since external macros run on different processes, the user cannot call the
get_panel command within an external macro, and then get the results directly
in the same macro. The user must use the extract environ facility to retrieve
the SEDIT environment variables.
Page 284
SEDIT and S/REXX Reference Manual
SEDIT COMMAND REFERENCE GUIDE
GLOBALCASE
GLOBALCase - Global File Case Handling
GLOBALCase {Respect|Ignore}
Initial value (UNIX):
Initial value (WINDOWS):
RESPECT
IGNORE
The GLOBALCASE setting is used on the following occasions:
•
•
When the XEDIT command is used, SEDIT checks if the requested file is in the
editing ring before attempting to load it from disk. When GLOBALCASE is set to
IGNORE, the checking is not case sensitive.
When loading a new file in the editing ring, SEDIT checks the filetype of the file
to match a filetype described with the SYNTAX command to apply the
corresponding syntactic rules. When GLOBALCASE is set to IGNORE, the
checking is not case sensitive.
Without parameters, GLOBALCASE displays its current setting.
HAsh - Scan Directories
HAsh {dir1 {dir2} {..}}
HASH scans every directory passed as an argument, searching and loading in memory every
*.x, *.ex and *.sedit file. These files will then be available as macro commands.
If no directory is specified, every directory described in the PATH or XPATH environment
variables will be scanned.
Any of the dirn entries may also be a file instead of a directory.
SEDIT and S/REXX Reference Manual
Page 285
HELP
SEDIT COMMAND REFERENCE GUIDE
Help - Fullscreen Help
Help
Shows in fullscreen mode all the available SEDIT
commands help files.
Help helpfile
Displays the command related helpfile help file.
If helpfile is not a command related help file, the
TASK and the REXX related help files will be
searched for.
Help TASK
Shows in fullscreen mode all the available task
related help files.
HELP Task helpfile
Displays the TASK related helpfile file.
Help REXX
Shows in fullscreen mode all the available S/REXX
related help files.
HELP Rexx helpfile
Displays the S/REXX related helpfile file.
Help -dir drd
The directory drd will be used when scanning for
help files. By default, HELP uses the
$xhome/help directory.
Batch Mode:
Not Available
HELP without arguments displays the following screen:
*****
#
*
+*
+
-*
-/
-\
/
:
=
?
?i
\
access
add
all
apl
aquit
arbchar
autoexp
autoi
Click or Tab+Return to display help
autosave
backup
backward
bottom
bounds
builtin
button
c_aplstop
c_apltrace
c_dup
c_endcurl
c_endline
c_ends
c_endsr
c_ext
c_lineadd
c_linedel
c_scrh
c_scrj
c_scrv
c_split
c_startline
c_starts
cancel
cappend
caps
case
cd
cdelete
center
center_end
center_init
center_send
cfirst
change
chg
cinsert
clast
clearerrors
clocate
cmdline
cn
color
command
*****
compile
complete
compress
copy
count
coverlay
create
creplace
ctags
ctlchar
curline
cursor
daccess
delay
delete
display
down
duplicat
dy_all
dy_exclude
dy_find
dy_font
1/^c:QUIT 5:task 7:Scroll up 8:Scroll down S-F11:top S-F12:bot
Page 286
SEDIT and S/REXX Reference Manual
SEDIT COMMAND REFERENCE GUIDE
HELP
Clicking on any item such as "cursor" loads the corresponding help file in Read Only
mode. To customize and save this help file, you must issue the RW ON command before
issuing the SAVE command.
On ASCII terminals, move the cursor (using the TAB key for example) and depress the
Return or Enter key.
Depressing the F5 key shows a similar task help panel.
Depressing the F5 key again shows a similar S/REXX help panel.
HELP cmd immediately loads the cmd related file. The command cmd can be abbreviated
in the same way it can be used within SEDIT.
HELP task displays the task fullscreen panel.
HELP rexx displays the S/REXX help fullscreen panel.
Examples:
h h
help
help
help
help
help
help
displays these help manual pages.
task
hi
rexx
prefix
t prefix
displays the HIGHLIGHT help file.
displays the S/REXX help files.
displays the PREFIX command help file.
displays the PREFIX task help file.
On Sun workstations, the command HELP is mapped to the L11/HELP key by default.
HELP TASK is mapped to Shift-HELP, and HELP REXX to Control-HELP.
See Also: RW
SEDIT and S/REXX Reference Manual
Page 287
HEX - Hexadecimal Target
HEX ON|OFF
Initial value:
OFF
When HEX is set to ON, targets and string operands may be specified in hexadecimal
notation.
Examples:
hex on
c /x’31’/x’32’
/x’31’
See Also: CHANGE, /
changes all "1" with "2".
searches for "1".
SEDIT COMMAND REFERENCE GUIDE
HEXTYPE
HEXType - Hexadecimal Display
creates a new file displaying the current file content
in both hexadecimal and ASCII representation.
HEXType { target }
When target is not specified, the current line will be typed.
target defines the number of lines to be typed. Lines are typed starting with the current
line, up to but not including the target line. target may be one of the following:
:N
N or +N
+* or *
.symb
string expression
Up to but not including the Nth line.
N lines.
The end of file.
The line which has been assigned the .symb symbolic name by
using the POINT command, or a .symb prefix command.
Defines a group of characters to be located.
The general format of a string expression is the following:
{+|-}{~}/string1{/{&}|{|}{~}/string2 ..... }
See the LOCATE command on page 304 for a precise string expression definition.
The last typed line becomes the current line.
The new file will be named $fn.hextype, where $fn is the currently edited file
filename.
Example:
assume the user is editing the following "test.c" file:
/usr/m1/test.c
test.c
00001
00002
00003
00004
00005
00006
Len:6
mod:
/*
* test file
*/
main()
{
}
SEDIT and S/REXX Reference Manual
Page 289
HEXTYPE
SEDIT COMMAND REFERENCE GUIDE
Typing hextype /{/ will create the following test.hextype file:
/usr/m1/test.hextype
test.c test.hextype
00001
00002
00003
00004
00005
00006
00007
00008
Page 290
Len:6
mod:
2F2A
/ *
202A2020 74657374 2066696C 65
*
t e s t
f i l e
202A2F
* /
6D61696E 2829
m a i n ( )
SEDIT and S/REXX Reference Manual
SEDIT COMMAND REFERENCE GUIDE
HIGHLIGHT
HIghlight - Disable Highlight
HIghlight ON|OFF
Initial value:
Level:
sets the highlight feature ON or OFF.
ON
Global
Some ASCII terminals do not properly display reverse video characters. In such cases,
review the "profile.sedit" macro to execute the "highlight off" command
when running SEDIT on that terminal.
Example:
If your are running a "wyse50" terminal, type the following bold-faced line:
if version = ’curses’ then
do
/*
* If your terminal does not handle reverse video characters,
* ucomment and update the following lines
*/
/* if $TERM = ’??my-terminal??’ then "highlight off" */
if $TERM = ’wyse50’ then "highlight off"
HIGHLIGHT without arguments displays the highlight status.
HIStory - Set the History Length Buffer
HIStory {N}
Initial value:
Level:
10
Global
HISTORY sets to N the length of the history buffer where the commands entered in the
command field are saved. These commands may be redisplayed by using the ? and ?I
commands, generally assigned to the F9 and Shift F9 keys.
When N is not specified, the current value will be displayed.
See Also: SHOWHISTORY, XSHOWHISTORY, ?, ?I
SEDIT and S/REXX Reference Manual
Page 291
HOME
SEDIT COMMAND REFERENCE GUIDE
HOme - Switch Cursor Position
If the cursor is in a DATA FIELD, it will be moved
to the COMMAND FIELD. A subsequent action will
restore its previous location.
HOme
This command is a shortcut for the "cursor home" command and is mapped to the F10
key by default.
When CMDLINE is OFF, using the HOME or CURSOR HOME command restores the
command line in order to let the user enter a command. Once the command is processed,
the command line is removed.
See Also: CMDLINE, CURSOR
IMPcmscp - Implicit UNIX or WINDOWS Execution
IMPcmscp
Initial value:
Level:
ON|XON|OFF
XON (non-batch mode)
OFF (batch mode)
Global
When IMPCMSCP is OFF, SEDIT issues an error message when the user types an unknown
command. If BEEP is ON (the default), SEDIT sounds a warning beep.
On UNIX systems, when IMPCMSCP is ON, SEDIT passes to the Bourne Shell sh any
unknown command, and displays its results in the window SEDIT was started from. If the
command ends with an & sign, this command will run in the background.
When IMPCMSCP is XON, SEDIT also passes the unknown command to sh, but retrieves
its results within an editable file. A final & sign will be ignored.
On WINDOWS systems, ON and XON execute the unknown command directly in a similar
way.
See Also: BEEP, MESSAGESDIR, SHELL, XSHELL
Page 292
SEDIT and S/REXX Reference Manual
SEDIT COMMAND REFERENCE GUIDE
INPUT
Input- Add a Text Line
Input {text}
adds a line after the current line.
A new line will be inserted after the current line. If text is omitted, the line will be a blank
line.
ISOConv - Set ISO Conversion
ISOConv ON|OFF
Initial value:
Level:
sets the automatic ISO conversion ON or OFF.
ON
Global
On some architectures, the keyboard always sends to the application ISO8859-1 characters,
while the environment setting may require the use of native font sets, such as IBM-850
characters on IBMs and Roman8 on HPs.
When ISOCONV is set to ON, automatic conversion between ISO8859-1 set and native
set will take place.
The README FIRST document explains what architectures currently support this
conversion.
A side effect of the ISOCONV ON command is that it will unload any translation table
loaded with the KEYBOARD command.
See Also: KEYBOARD
ISwitch - Switch Between files
ISwitch
allows the user to switch from one file to another in
a circular sequence in reversed order.
This command is mapped to the S-F5 key by default.
When the user is editing multiple files, using F5 and Shift-F5 will toggle between two
of them without visiting others.
See Also: SWITCH
SEDIT and S/REXX Reference Manual
Page 293
KEEPBLanks - Trailing Blanks Removal
KEEPBLanks ON|OFF {FT string}
disables or enables the automatic removal of trailing
blanks.
Initial value:
Level:
OFF FT *
File
By default, SEDIT removes all trailing blanks in every line when loading a file, when
editing a line and when saving a file.
Trailing blanks are generally meaningless within text files, but may be essential within
binary files. When KEEPBLANKS is set to ON, SEDIT does not remove trailing blanks.
In addition, when not running in character mode, when SHBLANK is set to ON (the default),
and when the last character in a line is a blank, SEDIT displays a thin vertical bar just after
that last blank character.
If you specify FT string, this setting will become the default for every new file with a
string filetype. If FT is *, this will be the default for any file. A period (.) may be used
if no filetype is required. This setting is also applied to the current file, unless its filetype
does not match FT.
To force the opening of a file in KEEPBLANKS ON mode, the user can use the XKB
command.
Examples:
keepbl on
keepbl on ft o
SEDIT will not remove blanks on files with
an ".o" extension.
Notes: KEEPBLANKS ON is not sufficient to preserve binary files integrity. Use BINARY
ON or XBIN instead.
Using KEEPBLANKS ON on a file already loaded is not sufficient to preserve its
integrity since trailing blanks removal is done at load time before the file is actually
displayed. Use either XKB file or KEEPBLANKS ON FT xx before loading
file.xx
See Also: AUTOBIN, BINARY, SHBLANK, XBIN, XKB
SEDIT COMMAND REFERENCE GUIDE
KEYBOARD
KEYboard - Redefine Keyboard
KEYboard filename {type}
redefines the keyboard according to the file
filename.
type is an optional parameter specifying the keyboard type:
• 1
• 2
means an older style Sun keyboard with 9 top keys.
means a newer style Sun keyboard with 12 top keys.
"filename" is a file describing the keyboard mapping.
If the file name does not start with a directory indicator such as ".", "/" or "~", the
current directory will be searched first, and then the directories described either in the
environment variable XPATH (if there is one) or in PATH, or in directories accessed by the
ACCESS command.
If filename is a single period, it will be ignored, allowing the user to specify the keyboard
type without redefining the keyboard.
A blank line or a line starting with "*", "#" or "+" will be ignored.
Every line must contain three fields separated by a colon:
• The rank
0 means non-APL standard mode.
1 means non-APL shifted mode.
2 means non-APL meta mode.
3 means APL standard mode.
4 means APL shifted mode.
5 means APL meta mode.
6 describes the real physical keyboard. It must be used
only if the keyboard is not an English QWERTY keyboard.
In this case, all the keys must be described.
• The emitted character
is the character sent by the standard keyboard in non-APL
mode.
• The displayed character
is the character mapped on the key corresponding to the
emitted character as described above. A 0x00 value will
inhibit the key. If the rank is 6, it must be the standard
upper character.
A character may be described either quoted or in hexadecimal. The meta key is labelled left
or right on Sun type 3 keyboards, and ◊ on the new type 4 keyboards.
Examples:
0:'0':'0'
maps the '0' character to the '0' sun keyboard
key in the non-APL standard mode.
4:’i’:0xD4
maps the iota APL character to the shift-i key
in the APL shifted mode.
The hexadecimal value for a character is the value it has in the font used to display it.
Note that the "Escape" key may be redefined for that usage by setting "0x1B" in the
emitted character field.
SEDIT and S/REXX Reference Manual
Page 295
SEDIT on UNIX systems is distributed with two keyboard translation samples:
•
/home/xed/keyboard/STANDARD.TRANS
This file redefines the keyboard mapping to its original built-in setting.
If the user wants to use this setting (described in Appendix A), the user must start
DYALOG APL with the script "/home/xed/aplsedit" in order to have the
same keyboard mapping within APL.
This setting is more logical than the default DYALOG APL setting because almost
every character common to APL and non-APL modes is mapped to the same
location.
•
/home/xed/keyboard/DYALOG.TRANS
This file redefines the keyboard mapping according to the usual DYALOG APL
Sun keyboard mapping.
To use either one of these files, the user may include the command KEYBOARD in the
"PROFILE.sedit" file for APL usage, and in the "profile.sedit" file for UNIX
or WINDOWS usage.
Examples:
keyboard DYALOG.TRANS
keyboard . 2
keyboard STANDARD.TRANS 1
Using MKTRANS
mktrans is only available on UNIX systems.
mktrans is a utility which automatically generates a ./keyboard/$1.TRANS
keyboard translation table, where $1 is the first argument passed to mktrans. The user
must have write authorization on the current directory before starting.
The user must run mktrans using the keyboard the translation table is meant to.
For example, to create a /home/xed/keyboard/MY.TRANS translation table, type the
following commands:
% cd /home/xed
% ./mktrans MY
SEDIT COMMAND REFERENCE GUIDE
KEYBOARD
This will display the following screen:
Use every key and then type ^n
Type ^c to cancel
The user must now use every ASCII key available on the keyboard. The functions or control
keys, such as F1 or Shift must not be used.
When all the keys are typed in, the user must type Control-n (hold down the control key,
and then type n while the control key is down).
When running on an ASCII terminal, the user will then have to hold down the shift key, and
while keeping this key down, use again every ASCII key in same order. This step is not
necessary when running the MOTIF mktrans version.
This translation table may now be used within the profile.sedit initialization file in
the following manner:
’keyboard $xhome/keyboard/MY.TRANS’
SEDIT and S/REXX Reference Manual
Page 297
LASTFILES
SEDIT COMMAND REFERENCE GUIDE
LASTFiles - Set the LASTFILES Parameters
LASTFiles {ON|OFF {N {loc}}
Initial value:
Level:
ON 30 ~/sedit.lastfiles
Global
When LASTFILES is ON, SEDIT saves in the loc file the names of the N last opened files.
The {install-dir}/xmac/dy_lastfiles.sedit macro can be used to display
the last opened files, allowing the user to open them again.
dy_lastfiles is assigned by default to the File - Open Last files menu.
Note: On WINDOWS systems, the HOME environment variable is usually not defined. In
this case, the "~/" or "~\" directory shortcut is translated into "C:\".
See Also: DY_LASTFILES
LASTLorc - Set LASTLORC Buffer
LASTLorc {string}
sets the LASTLORC buffer.
QUERY LASTLorc
displays the LASTLORC buffer.
Initial value:
Level:
Empty string
Global
The LASTLORC buffer memorizes the string passed to the LOCATE, CHANGE, SCHANGE,
CN, SCN, FIND, FINDUP, NFIND and NFINDUP commands.
When string is not specified, the LASTLORC buffer is set to a zero length string.
See Also: LOCATE, CHANGE, SCHANGE, CN, SCN, FIND, FINDUP, NFIND,
NFINDUP
Page 298
SEDIT and S/REXX Reference Manual
SEDIT COMMAND REFERENCE GUIDE
LEFT
LEft - Scroll Left
LEft {N}
is used to alter the columns that are to be displayed.
"startc" is the first column.
"endc" is the last column.
If N is omitted a value of 1 is assumed.
If N is 0, the original setting will be restored.
In all other cases, "startc" and "endc" will be decremented by N, shifting the data to
the right by N positions.
The command "Left 40" is mapped to the C-F7 key by default.
See Also: RIGHT, VERIFY
SEDIT and S/REXX Reference Manual
Page 299
LEFTAdjust - Left-Adjusting Text
LEFTAdjust {target}
Scope:
All
This command is mapped to the Shift-Control-L (^L) key by default.
LEFTADJUST reformats a portion of the current file defined by the target operand.
LEFTADJUST positions the first non-blank character at the left margin defined with the
MARGINS command.
target may be one of the following:
All
Sel
:N
+N
-N
+* or *
-*
.symb
string expression
All the file is formatted.
Left-adjusts the selected lines. If the selection is rectangular,
LEFTADJUST left-adjusts the contents of the selected area, the
text outside the selection not being modified.
Up to but not including the line N.
Down N lines.
Up N lines.
Down to the end of file.
Up to the top of file.
Up or Down to the line which has been assigned the .symb
symbolic name by using the POINT command, or a .symb
prefix command.
Defines a group of characters to be located.
The general format of a string expression is the following:
{+|-}{~}/string1{/{&}|{|}{~}/string2 ..... }
See the LOCATE command on page 304 for a precise string expression definition.
When target is not specified, LEFTADJUST formats the line corresponding to the cursor
location. When the cursor is not located upon a line of the current file, LEFTADJUST
reformats the current line.
Examples:
LEFTADJUST
LEFTADJUST all
LEFTADJUST sel
LEFTADJUST /str/
See Also: CENTER, FLOW, FORMAT, LOCATE, MARGINS, POWERINPUT,
RIGHTADJUST
SEDIT COMMAND REFERENCE GUIDE
LIMIT
LIMIT - Set File Size Limit
LIMIT {nn{m}}
Initial value:
Level:
0
Global
The m modifier may be one of the following:
Kilobyte. One kilobyte is 1024 bytes.
Megabyte. One megabyte is 1024 kilobytes.
Gigabyte. One gigabyte is 1024 megabytes.
Terabyte. One terabyte is 1024 gigabytes.
K
M
G
T
When LIMIT is set to 0, SEDIT accepts any file to edit.
When LIMIT is set to nn, SEDIT will not open a file larger than nn bytes.
Examples:
limit
limit 0
limit 1e6
limit 100m
displays the current limit.
removes any size limitation.
forbids editing any file larger than 1000000 bytes.
forbids editing any file larger than 104,857,600 bytes.
Large Files support
A large file is a file larger than 2,147,483,647 bytes. SEDIT supports large files on the
operating systems displayed when typing HELP LARGEFILES.
However, the length of a line is limited to 2,147,483,647 characters, and the number of lines
is also limited to 2,147,483,647 lines.
The amount of memory needed by SEDIT to edit a file increases when the average line size
decreases. Editing a file of 1GB whose average line size is 80 bytes requires 2GB of
memory.
See Also: XEDIT
LINECol
LINECol {ON|OFF}
Initial value:
Level:
sets the line/column display ON or OFF.
ON
Global
When LINECOL is on, SEDIT displays the line and column number corresponding to the
cursor position when the cursor is placed on a data field.
SEDIT and S/REXX Reference Manual
Page 301
LINEND
SEDIT COMMAND REFERENCE GUIDE
LINENd - Separator Change
enables or disables the character separator when
passing commands.
LINENd ON|OFF {value}
Initial value:
Level:
line-feed
Global
value is an optional parameter specifying the separator between commands. It is
originally set to line-feed.
line-feed is assigned to the following keys, depending on the workstation in use:
SUN Type 4 keyboard
SUN Type 5 keyboard
Control-line-feed
Control-AltGraph
IBM RS/6000
SiliconGraphics
DecStations
DecStations with PC keyboards
HP
Control-Right-Alt
Control-Right-Alt
Control-PF3
Control-Right-Alt
Control-Select
HP with PC keyboards
ASCII terminals
Windows systems
Control-Right-Alt
Control-l
Control-Right-Alt
The SEP command is a synonym to the LINEND command.
Examples:
linend on ;
top;c /i/j/
sets the separator to ";".
changes every "i" to "j" from the beginning of
the file.
See Also: SEP
Page 302
SEDIT and S/REXX Reference Manual
SEDIT COMMAND REFERENCE GUIDE
LISTEN
LIsten - Listen for External Commands
Available on:
UNIX
Batch Mode:
Not Available
LIsten nnn
makes SEDIT listen on a socket for commands sent
by another application program. The socket port
number will be nnn.
LIsten OFF
stops SEDIT listening.
The "$xhome/saber/send_sedit.c" file is an example of how to communicate with
SEDIT from another application.
SEDIT and S/REXX Reference Manual
Page 303
LOCATE
SEDIT COMMAND REFERENCE GUIDE
Locate (XEDIT MODE) - Locate a Target
XEDLocate
Locate
:
/
+
~
.
*
N
target
end-target
end-target
end-target
end-target
end-target
end-target
{cmd}
When MODE COMMAND XEDIT is in effect, LOCATE calls the XEDIT mode XEDLOCATE
command. PDFLOCATE may be used to call the ISPF/PDF mode LOCATE command.
The LOCATE command scans the file looking for the specified target.
When the target is reached, cmd will be executed as a standard SEDIT command.
When target starts with one of the ":/+-~.*" special characters, or with a digit, the
LOCATE keyword may be omitted.
target may be one of the following:
:N
N
+N
-N
+* or *
-*
.symb
string expression
The Nth line becomes the current line.
When MODE NUMBER GOTO is in effect, the Nth line becomes
the current line. The is the SEDIT default behavior.
When MODE NUMBER SCROLL is in effect, SEDIT scrolls
down N lines. This mode is the default when SEDIT is started
with the /home/xed/xedit command.
When used as another command operand, such as delete N,
N always means N lines.
Scrolls down N lines.
Scrolls up N lines.
The end of file.
The top of file.
The line which has been assigned the .symb symbolic name by
using the POINT command, or a .symb prefix command.
Defines a group of characters to be located.
The general format of a string expression is the following:
{+|-}{~}/string1{/{&}|{|}{~}/string2 ..... }
Page 304
SEDIT and S/REXX Reference Manual
SEDIT COMMAND REFERENCE GUIDE
LOCATE
The search direction is toward the end of the file (+), which is the default, or toward the top
of the file (-).
The not (~) symbol means that SEDIT is to locate a file line which does not contain the
specified string.
string may be a character string, such as Hello, or a hexadecimal string, such as
x’313233’ when HEX ON is in effect. The ARBCHAR command allows the user to specify
strings with imbedded arbitrary characters.
The trailing / delimiter is necessary only when string ends with blanks, or when a
logical operator is following.
The / delimiter is in fact the first non-blank character found after the locate command. It
must be a slash when the LOCATE keyword is omitted. /Hello or LOCATE;Hello is the
same command. The delimiter cannot be a period.
The OR | symbol means that the matched line must match the target before the |, or the
target after the |.
The AND & symbol means that the matched line must match the target before the &, and the
target after the &.
Notes: The ZONE command allows the user to choose the starting and ending columns to
be scanned.
When MODE LOCATE NOSTAY is in effect (the SEDIT default), these columns are
also restricted by the VERIFY column definition: the user can only scan the visible
part of the file. The cursor will be moved to the beginning of the target. A
subsequent search will start at the cursor location.
When MODE LOCATE STAY is in effect (the XEDIT behavior), the cursors stays in
the command line, the search is not restricted by the VERIFY setting, and the next
search will start on the next (or previous) line.
When WRAP is set to ON, SEDIT continues the search up to the line preceding the
current line within the / or +/ commands. The search is continued following the
current line within the -/ command.
When WRAP is set to OFF, the search ends at the end (of top) of file.
SEDIT and S/REXX Reference Manual
Page 305
LOCATE
SEDIT COMMAND REFERENCE GUIDE
Examples:
/test
searches for the test string.
/
searches again for the test string.
/test /add
searches for the "test " string, and adds one
line after the matched line.
/a=b/cf/
searches for the a=b/cf string.
/a=b/cf
searches for the a=b string, and executes the
cf command.
///
searches for the / character.
3
the line 3 becomes the current line, or scrolls down 3
lines when MODE NUMBER SCROLL is in effect.
:4add3
adds 3 lines after the line 4.
/str/&/x’31’ searches for a line containing both str and 1.
x’31’ is the ASCII value of the "1" character.
.part1 add2
Return Codes:
0
1
2
5
adds 2 lines after the line which has been assigned the
.part1 symbolic name.
Normal
TOF or EOF reached
Target Not Found
Invalid Operand
See Also: ARBCHAR, BEEP, CASE, MODE, POINT, STAY, ZONE, WRAP, R/,
R-/, \, -\
Page 306
SEDIT and S/REXX Reference Manual
SEDIT COMMAND REFERENCE GUIDE
LOCATE
Locate (ISPF MODE) - Locate a Line
Locate
PDFLocate
{FIRST
{LAST
{NEXT
{PREV
Locate
.xxxx
Locate
number
}
}
}
}
{COMMAND }
{ERROR
}
{EXCLUDED}
{X
}
{LABEL
}
{range}
When MODE COMMAND ISPF is in effect, LOCATE calls the ISPF mode PDFLOCATE
command. XEDLOCATE may be used to call the XEDIT mode LOCATE command.
LOCATE positions the current line to the targeted line.
.xxxx
positions the current line on the line labelled .xxxx.
number
positions the current line on the line number.
FIRST
to search from the first line, proceeding forward.
LAST
to search from the last line, proceeding backward.
NEXT
to search from the first displayed line, proceeding forward. NEXT is the default.
PREV
to search from the first displayed line, backward.
COMMAND to search for a line with a pending prefix command.
ERROR
to search for a line with a compilation error.
EXCLUDED or X
to search for an excluded line.
LABEL
to search for a line with any label.
range
Two labels that identify the lines to be searched for.
A label may be created by typing a .xxxx string on a prefix zone, or by using
the XEDIT POINT command described on page 335.
A label may also be one of the ISPF/PDF predefined labels:
.zf or .zfirst
the first line.
.zl or .zlast
the last line.
.zcsr
the cursor line.
Examples:
l3
goes to line 3.
l command last
searches for the last pending command.
l first error .a .b
See Also: COMPILE, NEXTERROR
SEDIT and S/REXX Reference Manual
Page 307
LOWERCAS
SEDIT COMMAND REFERENCE GUIDE
LOWercas - Translate Into Lowercase
LOWercas {target}
Scope:
Display
target defines the number of lines to be translated into lowercase. Lines are translated
starting with the current line, up to but not including the target line. target may be one
of the following:
:N
N or +N
-N
+* or *
-*
.symb
string expression
Up to but not including the Nth line.
N lines.
Up N lines.
The end of file.
The top of file.
The line which has been assigned the .symb symbolic name by
using the POINT command, or a .symb prefix command.
Defines a group of characters to be located.
The general format of a string expression is the following:
{+|-}{~}/string1{/{&}|{|}{~}/string2 ..... }
See the LOCATE command on page 304 for a precise string expression definition.
If target is omitted, a value of 1 is assumed.
Examples:
low
low:5
lowercas*
translates one line.
translates all lines up to line 4.
translates the rest of the file.
See Also: STAY, S_LOWER
Page 308
SEDIT and S/REXX Reference Manual
SEDIT COMMAND REFERENCE GUIDE
LRECL
LRecl - Set Record Length
LRecl *|N {FT string}
Initial value:
Level:
sets the line length.
*
File
When the record length is set to the * value, no change will occur to the file when it is
written to disk.
When the record length is set to the N value, saving a file will create a file in which every
line length will be N bytes.
Lines longer than N will be truncated, and lines shorter than N will be padded with spaces.
If FT string is specified, this setting will become the default for every new file with a
string filetype.
If FT is *, this will be the default for any file.
If FT is a period, this will become the default for files with no filetype. This setting is also
applied to the current file, unless its filetype does not match FT.
Examples:
lrecl 80 ft f
will create 80 character wide FORTRAN
files.
lrecl *
lr 92 ft .
See Also: TRUNC
SEDIT and S/REXX Reference Manual
Page 309
MACRO
SEDIT COMMAND REFERENCE GUIDE
MACRO - Execute a Macro
MACRO
mac
SET MACRO
ON|OFF
displays ON or OFF.
QUERY MACRO
Initial value:
Level:
OFF
Global
When SET MACRO is OFF, SEDIT looks for native commands before looking for macros.
When SET MACRO is ON, SEDIT looks for macros before looking for native commands.
MACRO mac allows the mac macro to execute without checking for native commands or for
synonyms.
MACRO also allows calls to a macro ending with non-alphabetic characters. For example,
"PUT2" usually means "PUT 2". MACRO PUT2 means "execute the macro named PUT2".
In particular, the macros set_sun_t3, set_sun_t4 and set_sun_t5 must be
executed by entering "macro set_sun_ti".
See Also: COMMAND
MAN - Display UNIX Reference Manual Pages
displays the UNIX reference manual pages in the
same format as the UNIX man command.
MAN string
MAN creates a new file word.man in the editing ring, where word is string with spaces
replaced by the _ underscore character. If word.man already exists, it will be overwritten.
Examples:
man open
man -k file
creates the open.man file.
creates the -k_file.man file.
See Also: MESSAGESDIR, S_MAN
Page 310
SEDIT and S/REXX Reference Manual
MARgins - Set Text Margins
MARgins left right|* { {+|-} indent}
Initial value:
Level:
1 72 +0
File
The MARGINS settings are used by the CENTER, FLOW, FORMAT, LEFTADJUST,
POWERINPUT and RIGHTADJUST commands.
left
is the left margin. The left margin must be less than or equal to the right margin.
right
is the right margin. When specified as an asterisk, the right margin is set to the
same value as the truncation column defined with the TRUNC command.
indent
is the paragraph indent column. indent may be specified as an absolute
column number (“2”), or as a displacement relative to the left margin (“+3” or
“-5”).
If indent has been specified as a displacement, when the left and right
margins are changed again, using the MARGIN command without specifying an
indent parameter, the paragraph indent column is reset to the new left
value plus the previous indent value.
The scale line defined with the SCALE command displays a ^ character at the left margin
position, a @ character at the first line indent position and a $ character at the right margin
position.
Without any argument, MARGINS displays the current setting.
Examples:
MAR 2 75
The left margin is set to 2, the right margin is set to 75, and the paragraph
indent column is unchanged.
MAR 2 75 +10
The paragraph indent column is set to 12.
MAR 10 50
The left margin is set to 10, the right margin is set to 50, and the paragraph
indent column is set to 20.
MAR 2 75 10
The paragraph indent column is set to 10.
MAR 12 55
The left margin is set to 10, the right margin is set to 55, and the paragraph
indent column remains unchanged, keeping the previous absolute 10
value.
MAR
displays the current settings.
MATCH
SEDIT COMMAND REFERENCE GUIDE
See Also: CENTER, FLOW, FORMAT, LEFTADJUST, POWERINPUT,
RIGHTADJUST, SCALE, TRUNC
MAtch - Match Delimiters
MAtch {Sel | Cursor}
finds a matching delimiter.
MATCH SEL
If there is a selection within the current file, SEDIT attempts to match
the first selected character. If not, SEDIT attempts to match the
character at the current cursor position.
If this character is one of the ’{[(<’ delimiters, SEDIT searches for
its matching delimiter (’}])>’), and sets a rectangular selection
displaying the bounds between delimiters.
MATCH CURSOR
SEDIT attempts to match the character at the current cursor position.
If this character is one of the ’{[(<’ delimiters, SEDIT searches for
its matching delimiter (’}])>’), and moves the cursor to the
matching delimiter, scrolling the file if necessary.
MATCH is mapped to the L2 key on Sun workstations by default, and to ^m on other
workstations.
MATCH CURSOR is assigned to Shift-L2, and ^M (Shift-Control-m).
Page 312
SEDIT and S/REXX Reference Manual
SEDIT COMMAND REFERENCE GUIDE
MBUTTON
MBUtton - Create a Menu Button
creates a button using string1 as a label. The
menu described by the ff file will be attached to that
button.
MBUtton string1 ff
Available on:
Batch Mode:
UNIX
Not Available
Using the left mouse button selects the first menu choice directly. Using the right mouse
button displays the menu.
Example:
mbu FILE /home/xed/ff
where /home/xed/ff is the following:
" Save current file
" Save and leave current file
" Abandon current file
" quit " quit
" qquit " qquit
" Abandon current file
"
"
"
save
file
MENU
"
END
The first string (for instance " Save and leave current file ") is displayed
within the menu, and the second string (for instance file) is executed as a command when
the first one is selected with the third mouse button. When the second string is the string
MENU, it starts a pullright menu which must end with a matching END string.
ff may reference another file as described on page 315.
See Also: BUTTON
SEDIT and S/REXX Reference Manual
Page 313
MENU
SEDIT COMMAND REFERENCE GUIDE
MENu - Create a Menu
MENu filemenu
Batch Mode:
creates a walking menu described by the file
filemenu.
Not Available
filemenu is a file with a specific format.
If it does not start with a directory indicator such as "./", "/" or "~",it will be searched
for in the current directory first, and then in the directories described either in the
environment variable XPATH (if there is one) or in PATH, or in directories accessed by the
ACCESS command.
Once this command is completed, there will be two ways to activate the menu:
•
•
Pressing the right mouse button, while holding the meta-key 1.
Moving the mouse cursor to one of the first two screen lines, and pressing the right
mouse button.
Example:
"
"
"
"
FILE "
MENU
Save current file
Save and leave current file
Abandon current file
" quit " quit
" qquit " qquit
" Abandon current file
" FILE "
END
"Special"
MENU $xhome/sp.bu
"
"
"
save
file
MENU
"
END
The first string (for instance " Save and leave current file ") is displayed
within the menu, and the second string (for instance file) is executed as a command when
the first one is selected with the right mouse button. When the second string is the string
MENU, it starts a pullright menu which must end with a matching END string.
1. See page 123 (UNIX) or page 127 (WINDOWS) for the meta-key definition.
Page 314
SEDIT and S/REXX Reference Manual
SEDIT COMMAND REFERENCE GUIDE
MENU
Including the Contents of a Different File
The following syntax:
"LABEL" MENU filename
will create a LABEL pullright menu, using the contents of the filename file. If
filename starts with $xhome/, $xhome/ will be replaced with the actual SEDIT
installation directory.
If the $xhome/sp.bu file contains the following data:
"First line"
"Last line"
"Print"
top
bot
shell lpr $name &
the example on page 314 will expand to:
"
"
"
"
FILE "
MENU
Save current file
"
Save and leave current file "
Abandon current file
"
" quit " quit
" qquit " qquit
" Abandon current file
"
" FILE "
END
"Special" MENU
"First line"
top
"Last line"
bot
"Print"
shell lpr $name &
"Special" END
save
file
MENU
END
The following syntax:
INCLUDE filename
will include the contents of the filename file.
An included file may reference another file using the same syntax.
SEDIT and S/REXX Reference Manual
Page 315
MENU
SEDIT COMMAND REFERENCE GUIDE
MENUBar - Create a Menubar
creates a menubar described by the file
filemenu.
MENUBar filemenu
Available on:
Batch Mode:
WINDOWS
Not Available
filemenu is a file with a specific format.
If it does not start with a directory indicator such as ".\", "\" or "~\",it will be searched
for in the current directory first, and then in the directories accessed by the ACCESS
command.
The C:\Program Files\SEDIT\sedit.menubar file is an example of such a file:
"File" MENU
"Save"
"Save && Leave"
"Leave"
save
file
MENU
"If not modified"
"Anyway"
"Leave"
"Save As ..."
"Open ..."
quit
qquit
END
dy_save
MENU
"Last"
dy_open //last
"Current" dy_open .
"C:\"
dy_open C:\
END
s_xed
..." dy_lastfiles
printfile
printscreen
prompt_exit
bye
"Open ..."
"Open <Selection>"
"Last Edited Files
"Print File ..."
"Print Screen ..."
"Exit"
"Exit with memory"
"File" END
"Edit" MENU
"Find"
s_find
"Find ..."
dy_find
"Copy"
s_copy
"Paste"
s_paste
"Cut"
s_cut
"Undo"
undo
"Undo all"
undo all
"Redo"
redo
"Show ALL"
all
"Show ..."
dy_all
"Show more ..."
dy_show
"Hide ..."
dy_exclude
"Exchange ..."
dy_exch
"Edit" END
Page 316
SEDIT and S/REXX Reference Manual
SEDIT COMMAND REFERENCE GUIDE
MENU
The first string (for instance "Save") is displayed within the menu, and the second string
(for instance save) is executed as a command when the first one is selected with the first
mouse button. When the second string is the string MENU, it starts a pullright menu which
must end with a matching END string.
The menubar displayed will be the following:
filemenu may reference another file as described on page 315.
SEDIT and S/REXX Reference Manual
Page 317
MERGE
SEDIT COMMAND REFERENCE GUIDE
MErge - Merge Two Set of Lines
MErge target1 target2 {col}
MERGE overlays the set of lines starting from the current line up to the line defined by
target1 on the set of lines starting with the line defined by target2.
The first set of lines is first shifted to the right to the column defined by the col value.
When omitted, col defaults to the value of 1.
When the column position of the first set of lines contains a blank, the contents of the same
column on the second set of line remains unchanged.
The two set of lines are not allowed to overlap.
The last merged line becomes the current line, and the first set of lines is deleted.
target may be one of the following:
:N
N or +N
-N
+* or *
-*
.symb
string expression
Up to but not including the Nth line.
N lines.
Up N lines.
The end of file.
The top of file.
The line which has been assigned the .symb symbolic name by
using the POINT command, or a .symb prefix command.
Defines a group of characters to be located.
The general format of a string expression is the following:
{+|-}{~}/string1{/{&}|{|}{~}/string2 ..... }
See the LOCATE command on page 304 for a precise string expression definition.
Page 318
SEDIT and S/REXX Reference Manual
SEDIT COMMAND REFERENCE GUIDE
MERGE
Example:
Assuming the following file, with line 7 being the current line:
00000
00001
00002
00003
00004
00005
00006
00007
00008
00009
123456789
12345678901234
123456789012345678
aa
aa
aa
a b c dA B C D
b c dA B C D a
b c dA B C D a b c d e f g h i j
Typing
merge 3 :1 2
will display:
00000
00001 a1b3c5dA8B C D
00002
b2c4dA7B9C1D3a
00003 b1c3dA6B8C0D2a4b6c8d e f g h i j
00004 aa
00005 aa
00006 aa
Line 3 will be the new current line.
SEDIT and S/REXX Reference Manual
Page 319
METAKEY
SEDIT COMMAND REFERENCE GUIDE
MESsagesdir
MESsagesdir {dirname}
Initial value:
changes the internal messages directory.
.
When more than one error message is to be displayed, or when using the MAN, COMPILE
or various SHELL commands, SEDIT creates a new file in the editing ring. The directory
of this file is the current "." directory by default, and can be changed with the
MESSAGESDIR command.
Without any argument, MESSAGESDIR displays the current setting.
See Also: COMPILE, IMPCMSCP, MAN, WINDOWS, XCSHELL, XKSHELL,
XSHELL
METAKey - Set the Meta Key
METAKey hexval
Available on:
changes the meta key definition.
UNIX, MOTIF version.
The meta key is described in the "Using the Mouse" sections on page 123 and page 127
The meta key is automatically set by the set server xxx command. The set command
is used by the set_xxx macros, such as set_sunt5 or set_ibm, called by the
profile.sedit initialization macro.
However, when running the MOTIF SEDIT version on a non-standard X terminal, it is
possible that the code emitted by the terminal meta key does not match the workstation
standard keyboard meta key code.
The METAKEY command allows the user to register the hexadecimal value sent by the
terminal when the meta key is used. This value can be determined by starting the X11 xev
program, and by using the meta key upon the xev window.
Page 320
SEDIT and S/REXX Reference Manual
SEDIT COMMAND REFERENCE GUIDE
METAKEY
Example:
% xev
{ using the meta key upon the xev window }
KeyRelease event, serial 17, synthetic NO, window 0x1700001,
root 0x80079, subw 0x0, time 1160548353, (102,115), root:(107,141),
state 0x8, keycode 127 (keysym 0xffe7, Meta_L), same_screen YES,
XLookupString gives 0 characters: ""
would lead to the following METAKEY usage:
====> metakey ffe7
See Also: SET
SEDIT and S/REXX Reference Manual
Page 321
MODE
SEDIT COMMAND REFERENCE GUIDE
MODE - Set Various Modes
MODE keyword values
set values according to keyword.
Initial values: Locate Nostay
Prefix Xedit
Autoexit Off
Number Goto
Change All
Redisplay On
Topline 0
CUrsor 1
Get Nostay
NOtimp On
SCroll Nowrap
REServed Skip
COmmand Xedit
EXpand On Noenv
MODE provides a way to customize the behavior of various SEDIT commands.
keyword may be one of the following:
MODE Locate Stay|Nostay
changes the cursor behavior when using the various
locate commands.
When locate nostay is in effect, searching for a string using the commands
/, -/, \, -\ places the cursor upon the first matching string. In addition,
the search columns are also restricted by the VERIFY column definition; the
user can only scan the visible part of the file
When locate stay is in effect, the cursor remains in the command field.
The search columns are only restricted by the ZONE column definition. This
mode is mainly provided for XEDIT compatibility.
MODE Prefix Xedit
makes the prefix commands similar to the IBM
XEDIT editor.
MODE Prefix Ispf
makes the prefix commands similar to the IBM ISPF
editor.
See Prefix Commands on page 105 for more details.
Since ISPF users generally use the "e" command to start editing a file, when
"mode prefix ispf" is on, the user cannot use the "e" command to delete
a file within the directory editor. Only the "rm" command can be used for that
purpose. See page 475 for more details.
MODE Topline 0|1
Page 322
SEDIT and S/REXX Reference Manual
SEDIT COMMAND REFERENCE GUIDE
MODE
When topline 0 is in effect, SEDIT uses a virtual line 0 as TOP OF FILE
line.
This allows the user, for example, to insert data before the first line in the file
by typing:
top
get
When topline 1 is in effect, SEDIT uses the first line in the file as TOP OF
FILE line.
This mode is mainly provided for previous SEDIT release compatibility, since
a macro behavior may be affected when topline 0 is in effect.
MODE CUrsor Wrap|N
When cursor wrap is in effect, the cursor wraps around the screen when it
reaches the top or the bottom of the screen.
When cursor N is in effect, SEDIT scrolls N lines when the cursor reaches
the top or the bottom of the displayed file data.
MODE Get Stay|Nostay
When get stay is in effect, the current line is not modified by a GET, a PUT
or a PUTD command.
MODE Autoexit ON|OFf
ON makes SEDIT exit after a QUIT or a FILE
command is applied to the last edited file.
This mode is mainly provided for XEDIT compatibility. If the user desires to
set it when running in ASCII terminal mode, the command
"mode autoexit on"
must
be
included
in
the
"/home/xed/profile.sedit" S/REXX macro:
/*
* If you want SEDIT to leave when quitting the last edited file,
* uncomment the following line
*/
/* ’mode autoexit on’ */
Remove the /* and */ comment signs
MODE Number Goto|Scroll
changes the SEDIT behavior when entering a single
number on the command line.
When Number Goto is in effect, entering N makes the current line become
the Nth file line.
SEDIT and S/REXX Reference Manual
Page 323
MODE
SEDIT COMMAND REFERENCE GUIDE
When Number Scroll is in effect, entering N makes the current line
increased by N. This mode is mainly provided for XEDIT compatibility.
MODE Change All|One
changes the SEDIT behavior when entering a
change command without specifying the number of
items to be changed.
When Change All is in effect, entering "c /i/j/" will turn every i into j.
When Change One is in effect, entering "c /i/j/" will turn the first i into
j.
This mode is mainly provided for XEDIT compatibility.
MODE Redisplay ON|OFf
ON makes SEDIT redisplay a command in error in
the command field.
OFF is mainly provided for XEDIT compatibility.
MODE NOtimp On|OFf
When MODE NOTIMP is ON, SEDIT recognizes the following XEDIT
commands:
SET
SET
SET
SET
SET
SET
SET
SET
SET
SET
SET
SET
SET
SET
SET
SET
ALT
APL
BRKkey
COLPtr
ESCape
ETARBCH
ETMODE
FILler
FMode
FULLread
IMage
LASTLorc
MASK
MSGLine
MSGMode
NONDisp
SET
SET
SET
SET
SET
SET
SET
SET
SET
SET
SET
SET
SET
SET
SET
NULls
PA1
PA2
PA3
PACK
RANge
RECfm
REMOte
SERial
SIDcode
SPILL
TERMinal
TEXT
TOPEOF
TRANSLat
This mode is mainly provided for XEDIT compatibility, allowing existing
XEDIT macros to run without error messages.
Note that these commands, which are not implemented, do not perform any
action.
MODE Get Stay|Nostay
When get stay is in effect, the current line is not modified by a GET, a PUT
or a PUTD command.
Page 324
SEDIT and S/REXX Reference Manual
SEDIT COMMAND REFERENCE GUIDE
MODE
MODE Scroll Wrap|Nowrap
When scroll wrap is in effect, the BACKWARD, FORWARD, PGUP and
PGDOWN commands wrap when they reach the end of the file.
MODE REServed Skip|Noskip
Sets the way SEDIT handles control characters. See the RESERVED command
on page 363 for more details.
MODE COmmand Xedit
makes the commands similar to the IBM XEDIT editor.
MODE COmmand Ispf
makes the commands similar to the IBM ISPF/PDF editor.
MODE EXpand ON|OFf {Env|Noenv}
When MODE EXPAND is ON, the variable substitutions described on page 149
take place.
In addition, if MODE EXPAND ON ENV is in effect, all strings starting with a $
not previously substituted will be replaced by the contents of the UNIX or
WINDOWS environment variable with the same name.
Example:setenv mydir /home/proj1/vital
cd $mydir
(makes /home/proj1/vital current)
See Also: AUTOI, CHANGE, CN, FILE, FFILE, LOCATE, QUIT, QQUIT,
R/, R-/, \, -\
SEDIT and S/REXX Reference Manual
Page 325
MOUSEMODE
SEDIT COMMAND REFERENCE GUIDE
MOUSEMode - Set Mouse Buttons
MOUSEMode {Openlook||OPENLOOKW|Motif|Fullmotif|Windows}
Initial value (UNIX):
Initial value (WINDOWS):
Level:
Openlook
Windows
Global
When MOUSEMODE is set to OPENLOOK, the mouse buttons function in the following way:
M1
starts a selection.
M1 (dragged)
moves the selection start.
Shift-M1
cancels the selection.
M2
extends the selection.
Shift-M2
selects a line.
M3
moves the cursor, or displays the menu created with the
MENU command when the mouse pointer is located on one of
the two first screen lines.
Shift-M3
makes a line the current line.
Control-M3
cancels the selection.
When MOUSEMODE is set to OPENLOOKW, the mouse buttons function in the following
way:
M1
starts a selection.
M1 (dragged)
extends a selection.
Shift-Control-M1cancels the selection.
Shift-M1
selects a line.
M2
extends the selection.
Shift-M2
selects a line.
M3
moves the cursor, or displays the menu created with the
MENU command when the mouse pointer is located on one of
the two first screen lines.
Shift-M3
makes a line the current line.
Control-M3
cancels the selection.
MOUSEMODE OPENLOOKW is better suited to using a mouse with a wheel than
MOUSEMODE OPENLOOK.
When MOUSEMODE is set to MOTIF, the mouse buttons function in the following way:
Page 326
M1
starts a selection.
M1 (dragged)
extends a selection.
Shift-M1
extends a selection.
M2
pastes the current selection at the cursor location.
SEDIT and S/REXX Reference Manual
SEDIT COMMAND REFERENCE GUIDE
MOVE
Shift-M2
selects a line.
M3
moves the cursor, or displays the menu created with the
MENU command when the mouse pointer is located on one of
the two first screen lines.
Shift-M3
makes a line the current line.
Control-M3
cancels the selection.
When MOUSEMODE is set to FULLMOTIF or WINDOWS, the mouse buttons function in the
following way:
M1
moves the cursor.
M1 (dragged)
starts and extends the selection.
Shift-M1
extends the selection.
M2
pastes the current selection at the cursor location.
Shift-M2
selects a line.
M3
always displays the menu created with the MENU command.
Shift-M3
makes a line the current line.
Control-M3
cancels the selection.
Without any argument, MOUSEMODE displays the current setting.
MOve - Move File Lines
MOve target1 target2
MOVE moves the number of lines defined by target1, starting from the current line, to
the location defined by target2. The last moved line becomes the current line.
target may be one of the following:
:N
N or +N
-N
+* or *
-*
.symb
string expression
Up to but not including the Nth line.
N lines.
Up N lines.
The end of file.
The top of file.
The line which has been assigned the .symb symbolic name by
using the POINT command, or a .symb prefix command.
Defines a group of characters to be located.
The general format of a string expression is the following:
{+|-}{~}/string1{/{&}|{|}{~}/string2 ..... }
SEDIT and S/REXX Reference Manual
Page 327
MSG
SEDIT COMMAND REFERENCE GUIDE
See the LOCATE command on page 304 for a precise string expression definition.
Examples:
move 2 :5
move /str /main
Return Codes:
0
2
5
moves 2 lines after the line 5.
moves the lines up to but not including the
str string after the line including the main
string.
Normal
Target Not Found
Invalid Operand
MSG - Display Text
displays text in the message field.
MSG {text}
MSG does not sound the alarm. EMSG does.
If text is omitted, MSG clears all the pending messages.
When more than one message is issued from a macro, SEDIT creates a new file in the
editing ring showing all the messages.
See Also: EMSG
N - Goto Nth Line
N
Scope:
Display
If MODE NUMBER GOTO is in effect, the Nth lines becomes the current line.
If MODE NUMBER SCROLL is in effect, the current line is increased by N.
Examples:
3
4put5
goes to line 3 (or scrolls down 3 lines)
goes to line 4 and executes the command put5.
See Also: DOWN, MODE, NEXT
Page 328
SEDIT and S/REXX Reference Manual
SEDIT COMMAND REFERENCE GUIDE
NEXTERROR
NEXTError - Error Scanning
scans the file $fn.compile.
NEXTError
Batch Mode:
Not Available
The command COMPILE creates a file with the same filename as the compiled file but with
the filetype compile.
NEXTERROR scans this file looking for patterns matching the error rules described in the
file sedit_compile.rules. See the command COMPILE on page 192 for more details
about this file.
If found, SEDIT sets the current line to the error line and places the cursor on that line.
This command is mapped to the ^- key, or to the F2 key when running in ASCII terminal
mode.
See Also: COMPILE, R/, R-/
NEXTWord - Cursor Moving to Next Word
moves the cursor to the next word.
NEXTWord
Available on:
OPENLOOK, MOTIF and WINDOWS
When the cursor is located on a data field, NEXTWORD scans to the right of the cursor
position. If NEXTWORD finds the start of a word, the cursor is moved onto that position.
When the end of the line is reached without a match, the process is repeated on the next
lines.
NEXTWORD is mapped to the Control-Right-Arrow (C-R12) key when not running
in ASCII terminal mode.
See Also: PREVWORD
SEDIT and S/REXX Reference Manual
Page 329
NFIND
SEDIT COMMAND REFERENCE GUIDE
NFind - Find a Missing Starting String
NFind str
NFIND searches forward for a line that does not start with str.
When str contains imbedded blanks, those character positions in the file line are ignored.
When str contains underscore characters (_), those character positions in the file line must
be blank.
When WRAP is set to OFF, the search continues down to the end of the file.
When WRAP is set to ON, the search will wrap to the first line in the file, and continue down
to the current line.
See Also: FIND, FINDUP, NFINDUP, WRAP
NFINDUp - Find a Missing Starting String
NFINDUp
str
NFUp
str
NFINDUP searches backward for a line that does not start with str.
When str contains imbedded blanks, those character positions in the file line are ignored.
When str contains underscore characters (_), those character positions in the file line must
be blank.
When WRAP is set to OFF, the search continues up to the start of the file.
When WRAP is set to ON, the search will wrap to the last file line, and continue up to the
current line.
See Also: FIND, FINDUP, NFIND, WRAP
Page 330
SEDIT and S/REXX Reference Manual
NIS - Use NIS Users Database
NIS
Initial value:
Level:
Available on:
{ON|OFF {cmd}}
OFF ypcat passwd
Global
UNIX
By default, SEDIT searches for the home directories of users (such as ~john) scanning the
/etc/passwd file. FLIST also uses this file to display the owner names of files.
When a NIS data base is in usage, the contents of /etc/passwd is irrelevant. With NIS
ON, SEDIT issues a ypcat passwd command to retrieve the list of users.
When cmd is provided, SEDIT will use cmd instead of ypcat passwd.
Without any argument, NIS displays the current setting.
Examples:
nis off
nis on
nis on ypcat -d domain2 passwd
nis
See Also: NISG
NISG - Use NIS Groups Database
NISG
Initial value:
Level:
Available on:
{ON|OFF {cmd}}
OFF ypcat group
Global
UNIX
By default, FLIST searches for group names of files scanning the /etc/group file.
When a NIS data base is in usage, the contents of /etc/group is irrelevant. With NIS
ON, FLIST issues a ypcat group command to retrieve the list of groups.
When cmd is provided, FLIST will use cmd instead of ypcat group.
Without any argument, NISG displays the current setting.
Examples:
See Also: NIS
nisg off
nisg on
nisg on ypcat -d domain2 group
nisg
NUMBER / NUMBER_SCREEN
SEDIT COMMAND REFERENCE GUIDE
NUMber / NUMBER_Screen - Display File Line Numbers
NUMber
Initial value:
Level:
ON|OFF
ON
File and View
NUMBER_Screen
Initial value:
Level:
ON|OFF
ON
View
SEDIT maintains a separate NUMBER setting for each file and each view of this file defined
with the SCREEN command.
The NUMBER_SCREEN command updates the default NUMBER setting of the current view,
which is applied to every newly loaded file.
The NUMBER command applies to the current file on the current view.
When NUMBER is ON, the prefix area displays the corresponding file line number.
When NUMBER is OFF, the prefix area displays equal signs (=====).
See Also: PREFIX
Page 332
SEDIT and S/REXX Reference Manual
SEDIT COMMAND REFERENCE GUIDE
PENDING
PENDing - Update the Pending List
PENDing
ON|BLOCK|ERROR
OFF
Query PENDing
{BLOCK} {OLDNAME} name|*
Level:
string
File
SEDIT manages the prefix macros and commands which have not yet been executed within
3 pending lists:
•
•
•
The immediate pending list, which records the single prefix macros, such as A or D.
The block pending list, which records the double prefix macros, such as DD or MM.
The error pending list, which records invalid prefix commands.
PENDING applies to the current line.
PENDING ON str adds str to the immediate pending list.
PENDING BLOCK str adds str to the block pending list.
PENDING ERROR str adds str to the error pending list.
PENDING OFF removes any pending prefix command or macro related to the current line.
QUERY PENDING displays information about the pending lists.
BLOCK indicates that only the block pending list is to be checked.
OLDNAME indicates that the specified name is the original name of the prefix command or
macro.
name is the name of the prefix command or macro. When OLDNAME is not specified, name
is assumed to be a synonym defined by the PREFIX SYNONYM command.
When name is specified as *, information about all pending prefix commands and macros
will be displayed. The information is displayed in the following form:
Line n:’name’, Oldname=’oldname’, OP1=’op1’, OP2=’op2’, OP3=’op3’
See Also: PREFIX
SEDIT and S/REXX Reference Manual
Page 333
PGDOWN
SEDIT COMMAND REFERENCE GUIDE
PGDown - Scroll Down
PGDown {N | *}
Scope:
scrolls down N screens: the last line displayed
becomes the first line displayed N times.
Display
PGDOWN 0 makes the first line in the file the current line.
PGDOWN * makes the end of file the current line.
When the current line is the end of file, and when MODE SCROLL WRAP is in effect,
PGDOWN makes the first line to be the current line.
This command is mapped to the S-F8 key by default.
Return Codes:
0
1
5
Normal
End Of File Reached
Invalid Operand
See Also: MODE
PGUp - Scroll up
PGUp {N | *}
Scope:
scrolls up N screens: the first line displayed becomes
the last line displayed N times.
Display
PGUP 0 makes the last file line the current line.
PGUP * makes the top of file the current line.
When the current line is the top of file, and when MODE SCROLL WRAP is in effect, PGUP
makes the last line to be the current line.
This command is mapped to the S-F7 key by default.
Return Codes:
0
1
5
Normal
Top Of File Reached
Invalid Operand
See Also: MODE
Page 334
SEDIT and S/REXX Reference Manual
SEDIT COMMAND REFERENCE GUIDE
POINT
POINT - Assign a Symbolic Name
Point {.symb {OFF}}
Point * {OFF}
Level:
File
POINT is used to assign a symbolic name to the current line. This symbolic name can be
used as a general target operand within the commands supporting targets, such as LOCATE
or CHANGE.
POINT .symb assigns the name .symb to the current line.
POINT .symb OFF removes the symbolic name .symb without changing the current line.
POINT * displays all the symbolic names.
POINT * OFF removes all the symbolic names.
POINT without operands displays the current line’s symbolic name, or a white string when
no symbolic name has been assigned to that line.
A symbolic name may also be assigned by typing .symb in the corresponding prefix area.
Notes: The COMPILE command creates symbolic names which do not start with a period.
The NEXTERROR command uses these symbolic names to set the cursor on the line
with the error, even when the file has been edited by adding or removing lines.
It is possible to assign several names to the line.
The prefix area displays the first assigned symbolic name instead of the line
number. The COLOR command allows the user to choose the color for displaying
symbolic names.
Examples:
p.start1
assigns .start1 to the current line.
p*off
removes all the symbolic names.
point *
displays all the symbolic names.
See Also: COLOR, COMPILE, CLEARERRORS, NEXTERROR, LOCATE
SEDIT and S/REXX Reference Manual
Page 335
POWERINPUT
SEDIT COMMAND REFERENCE GUIDE
POWerinput - Set Power Input Mode
POWerinput {ON|OFf} {Previous|Noprevious} {Move|NOMove} {Ft
xxx}
Initial value:
Level:
OFF PREVIOUS MOVE
File
When POWERINPUT is ON and when the cursor reaches the right column defined with the
MARGINS column, or the data field end of line, a new line is automatically created. If
POWERINPUT is ON MOVE, the last word of the cursor line is moved to the new line at the
left column defined with the MARGINS command, and the cursor is moved to the end of this
word. Then, the current line number is increased by one. When POWERINPUT is ON, the
AUTOEXP feature is disabled.
Inserting a character within a line will have the same effect when the last line character
spills after the right column defined with the MARGINS command or the end of field.
When POWERINPUT is ON PREVIOUS, SEDIT checks the lines before the cursor’s line,
searching for the start of the paragraph. A paragraph ends with a . : ; ? or ! punctuation sign,
or is followed by an empty line. SEDIT moves as many words as possible from the
beginning of the cursor’s line to the end of the previous line up to the right margin column.
If the keyboard is in INSERT mode, SEDIT searches the following lines to find the end of
the paragraph in order to properly insert the word at the cursor location.
When POWERINPUT is ON NOPREVIOUS, SEDIT does not move words to the end of the
previous line nor does it search for the end of the current paragraph.
When POWERINPUT is ON NOMOVE, SEDIT does not move the word at the cursor’s
location. SEDIT creates a new line, and moves the cursor at the left column defined with
the MARGINS command.
If Ft xxx is specified, this setting will become the default for every new file with a xxx
filetype.
If Ft is *, this will become the default for every file.
If Ft is a period, it will select files with no filetype. This setting is also applied to the current
file, unless its filetype does not match Ft.
POWERINPUT without arguments displays the current power input mode.
Page 336
SEDIT and S/REXX Reference Manual
SEDIT COMMAND REFERENCE GUIDE
POWERINPUT
Examples
Assuming the following commands:
MARGINS 5 50
POWERINPUT ON PREVIOUS MOVE
00009
00010
00011
00012
When POWERINPUT is ON and when the cursor
reaches the data field end of line, a
new line is automatically created, the last word of the
|...^....1....+....2....+....3....+....4....+....$....+....6
00013
cursor line is moved to the new line, and th
00014
cursor is moved to the end of this
00015
Typing an "e" will produce the following result:
00009
00010
00011
00012
00013
When POWERINPUT is ON and when the cursor
reaches the data field end of line, a new
line is automatically created, the last word
of the cursor line is moved to the new line,
|...^....1....+....2....+....3....+....4....+....$....+....6
00014
and the
00015
cursor is moved to the end of this
00016
The POWERINPUT ON NOPREVIOUS NOMOVE mode is suited for source files similar to
COBOL files, when typing over the column 72 requires the creation of an empty new line,
and the cursor to be moved on this new line column 7.
Assuming the following commands:
MARGINS 7 72
POWERINPUT ON NOPREVIOUS NOMOVE
VERIFY 7 72
00000
^..1....+....2....+....3....+....4....+....5....+....6....+....7.$
00001 0x"202020205768656E20504F574552494E505554206973204F4E20616E642077
00002
-
Typing a "0" will produce the following result:
00000
^..1....+....2....+....3....+....4....+....5....+....6....+....7.$
00001 0x"202020205768656E20504F574552494E505554206973204F4E20616E6420770
00002
00003 -
SEDIT and S/REXX Reference Manual
Page 337
POWERINPUT
SEDIT COMMAND REFERENCE GUIDE
Using the reprofile.sedit Facility
When a reprofile macro has been loaded at initialization by using the HASH command
described on page 285, reprofile will be used every time a new file is loaded. This
permits the reprofile macro to set up a different SEDIT environment for specific files.
To set up the MARGINS and POWERINPUT according to specific files, the user could write
the following reprofile.sedit macro:
signal on novalue
’extract/name’
select
when ft(name.1) = ’.txt’ then
{ ’margins 1 70’
’powerinput on previous move’
’verify 1 *’
}
when ft(name.1) = ’.cobol’ then
{ ’margins 7 72’
’powerinput on noprevious nomove’
’verify 7 72’
}
otherwise nop
end
See Also: AUTOEXP, MARGINS
Page 338
SEDIT and S/REXX Reference Manual
SEDIT COMMAND REFERENCE GUIDE
PREFIX / PREFIX_SCREEN
PREfix/ PREFIX_Screen - Change Prefix Mode
PREfix ON|OFF|Nulls {Left | Right}
Initial value:
Level:
ON LEFT
File and View
PREFIX_Screen ON|OFF|Nulls {Left | Right}
Initial value:
Level:
ON LEFT
View
SEDIT maintains a separate PREFIX setting for each file and each view of this file defined
with the SCREEN command.
The PREFIX_SCREEN command updates the default PREFIX setting of the current view,
which is applied to every newly loaded file.
The PREFIX command applies to the current file on the current view.
With PREFIX ON, SEDIT displays a five-character prefix area for each file line on the
screen, which may be before that line (PREFIX ON LEFT), or after that line (PREFIX
ON RIGHT). PREFIX NULLS is identical to PREFIX ON.
Prefix commands can be entered in the prefix area.
When the mouse is in the prefix area, buttons M1 and M2 are used to scroll the file.
When no prefix area is displayed, the user can scroll with the mouse by positioning the
mouse cursor on the first logical screen line. See the “Using the mouse” section for more
information about scrolling.
PREfix Synonym newname oldname
defines a newname synonym to the oldname prefix macro.
PREfix Synonym *|newname
PREFIX SYNONYM * displays all the defined newnames/oldnames values.
PREFIX SYNONYM oldname displays the defined newname/oldname value. When no
newname synonym is defined, PREFIX SYNONYM oldname displays:
oldname oldname
See Also: NUMBER
SEDIT and S/REXX Reference Manual
Page 339
PRESERVE
SEDIT COMMAND REFERENCE GUIDE
PREServe - Settings Preservation
PREServe
PRESERVE is meant to be used within an SEDIT macro to save several settings until a
subsequent RESTORE command is issued.
The following global settings are saved:
AUTOEXPAND
AUTOINDENT
AUTOSAVE
ARBCHAR
COLOR
CTAGS
HEX
IMPCMSCP
LIMIT
LINEND
MACRO
MODE
SEP
SPAN
STAY
STREAM
SYNONYM1
VARBLANK
WRAP
The following file related settings are saved:
CASE
FD
FN
FT
LRECL
PREFIX
RELOAD
RW
TABSET
TRUNC
VERIFY
ZONE
File related settings are always restored to the file which was the current file at the time the
PRESERVE command was issued.
1. Only the ON|OFF setting is saved.
Page 340
SEDIT and S/REXX Reference Manual
SEDIT COMMAND REFERENCE GUIDE
PREVWORD
The following screen-related settings are saved:
CMDLINE
CURLINE
DISPLAY
NUMBER
PREFIX_SCREEN
SCALE
SCOPE
SHADOW
TABLINE
VERIFY_SCREEN
ZONE_SCREEN
The RESTORE command applies the screen-related settings to the current screen.
See Also: RESTORE, SCREEN
PREVWord - Cursor Moving to Previous Word
PREVWord
moves the cursor to the previous word.
Available on: OPENLOOK, MOTIF and WINDOWS
When the cursor is located on a data field, PREVWORD scans to the left of the cursor
position. If PREVWORD finds the start of a word, the cursor is moved onto that position.
When the start of the line is reached without a match, the process is repeated on the previous
lines.
PREVWORD is mapped to the Control-Left-Arrow (C-R10) key when not running in
ASCII terminal mode.
See Also: NEXTWORD
SEDIT and S/REXX Reference Manual
Page 341
PRINTFILE
SEDIT COMMAND REFERENCE GUIDE
PRINTFile (UNIX) - Print a File Hardcopy
Scope:
Display
PRINTFile {ON|OFF|ONEJ|OFFEJ {printer daemon width height}}
PRINTFILE prints the contents of the current file. PRINTFILE uses the internal SEDIT
image of the file.
When running SEDIT in character mode, the six parameters must be specified.
When the four last parameters are not specified, SEDIT displays the following dialog box:
on
print line numbers. This is the default value.
onej
print line numbers and start a new page whenever an "eject" string
is found. The "eject" string must be followed and preceded with a
blank or tabulation character to be recognized.
off
do not print line numbers.
offej
do not print line numbers and start a new page whenever an "eject"
string is found.
printer
the printer to be used.
daemon
the command to be used to print. Typically lp or lpr.
width
the number of columns of the printer.
height
the number of lines by page.
When SEDIT is running in batch mode, the PRINTER, DAEMON, WIDTH and HEIGHT
parameters are not optional.
See Also: ALL, PRINTSCREEN
Page 342
SEDIT and S/REXX Reference Manual
SEDIT COMMAND REFERENCE GUIDE
PRINTFILE
PRINTFile (WINDOWS) - Print a File Hardcopy
Scope:
Display
PRINTFile {ON|OFF|ONEJ|OFFEJ {width {height} {printer {raw}}}}
Batch Mode: Not Available
PRINTFILE prints the contents of the current file. PRINTFILE uses the internal SEDIT
image of the file.
on
print line numbers. This is the default value.
onej
print line numbers and start a new page whenever an "eject" string
is found. The "eject" string must be followed and preceded with a
blank or tabulation character to be recognized.
off
do not print line numbers.
offej
do not print line numbers and start a new page whenever an "eject"
string is found.
width
the number of columns of the printer. When not specified, SEDIT
uses the default value provided by the system.
height
the number of lines by page. When not specified, SEDIT uses the
default value provided by the system.
printer
the name of the printer to be used. If not specified, SEDIT will
display the standard PRINT dialog.
raw
when specified, the printer will be opened in RAW mode, bypassing
the printer driver.
See Also: ALL, PRINTSCREEN
SEDIT and S/REXX Reference Manual
Page 343
PRINTSCREEN
SEDIT COMMAND REFERENCE GUIDE
PRINTScreen (UNIX) - Print a Screen Hardcopy
PRINTScreen {printer {daemon}}
Initial value:
lp lpr
lp lp
on BSD systems
on System V systems
Scope:
Batch Mode:
Global
Not Available
When printer is not specified, PRINTSCREEN prints a hardcopy of the screen.
When printer is specified, it becomes the default printer for both the PRINTSCREEN
facility and for TREE. No printing occurs.
When daemon is also specified, it becomes the default UNIX command used to print. No
printing occurs.
When not running in ASCII terminal mode, this command is mapped to the meta-L3 key
on Sun Workstations, to the Compose-F13 key on DECstations and to the
Shift-Control-Escape key on other workstations.
These keys are not available when running in ASCII terminal mode, so the user must either
enter the PRINTSCREEN command in the command field, or assign it to any available
function key.
See Also: PRINTFILE
Page 344
SEDIT and S/REXX Reference Manual
SEDIT COMMAND REFERENCE GUIDE
PRINTSCREEN
PRINTScreen (WINDOWS) - Print a Screen Hardcopy
prints a hardcopy of the screen.
PRINTScreen
Batch Mode:
Not Available
See Also: PRINTFILE
PRNOPAR - Workaround on a Print Dialog Windows bug
PRNOPAR ON|OFF
Initial value:
Level:
OFF
Global
On some Windows systems, randomly, the usual print dialog crashes when called to be
displayed.
Setting PRNOPAR to ON switches to an older dialog which may not present the same
problem.
PRompt - Prompt user
PRompt string
Batch Mode:
prompts the user with the message string.
Not Available
string will appear in an alert box, with the two buttons "Continue" and "Cancel".
If the user chooses "Continue", the return code will be 0. Otherwise, it will be 1.
It is possible to display up to 4 lines by using the "\n" separator within string.
Example:
prompt Do you really want\nto exit?
SEDIT and S/REXX Reference Manual
Page 345
PUT
SEDIT COMMAND REFERENCE GUIDE
PUT - Save Data
{target {fn {ft {fd}}} inserts lines from the currently edited file.
PUT
Scope:
Display
target defines the number of lines to be inserted, starting from the current line. target
may be one of the following:
:N
N or +N
+* or *
.symb
string expression
Up to but not including the Nth line.
N lines.
The end of file.
The line which has been assigned the .symb symbolic name by
using the POINT command, or a .symb prefix command.
Defines a group of characters to be located.
The general format of a string expression is the following:
{+|-}{~}/string1{/{&}|{|}{~}/string2 ..... }
See the LOCATE command on page 304 for a precise string expression definition.
If target is omitted, a value of 1 is assumed.
When MODE GET NOSTAY is in effect, the target line becomes the current line.
When fn ft fd are omitted, the lines are saved into a temporary buffer used by the GET
command, or the G prefix command, allowing the user to copy data.
fn specifies the filename part of the file into which lines will be inserted. When specified
as =, the current file filename will be used. When specified as a period (.), no filename will
be used.
If fn starts with "~", "/", "./" or "../", and ft are fd are not specified, fn will be
considered as a full UNIX or WINDOWS name.
ft specifies the filetype (such as c for a foo.c file) part of the file into which lines will
be inserted. When omitted or specified as =, the current file filetype will be used.When
specified as a period (.), no extension will be used.
fd specifies the directory part of the file into which lines will be inserted. When omitted or
specified as =, the current file directory will be used.
When the specified file exists, the lines are added to the end of that file. Otherwise, SEDIT
displays the following message:
Creating new file: "xxxxxxxx"
Page 346
SEDIT and S/REXX Reference Manual
SEDIT COMMAND REFERENCE GUIDE
Examples:
PUTD
If line 10 is the current line, and foo.c is the current file:
P 5
will save lines 10 through 14.
P :20
will save lines 10 through 19.
P*
will save up to the end of the file.
P;main;==~/pro
will insert the lines up the main string into
the ~/pro/foo.c file. Note that you must
not use the / as the string target main
delimiter, because it appears into the ~/pro
filename.
P1 = . =
will insert one line in the foo file.
P* ~/pro/a will insert lines into the ~/pro/a file.
See Also: GET, MODE, PUTD
PUTD - Save Data
PUTD
Scope:
{target {fn {ft {fd}}} inserts lines from the currently edited file.
Display
PUTD executes a PUT command, and then deletes the lines which have been saved.
See Also: GET, MODE, PUT
SEDIT and S/REXX Reference Manual
Page 347
PURGE
SEDIT COMMAND REFERENCE GUIDE
PURge - Clear Macros
PURge {macroname | *}
removes from storage the macro macroname.
If you specify *, all the macros will be cleared.
Without parameters, PURGE will prompt the user for a confirmation before removing all the
macros.
PWD/W - Display Current Directory
PWD or W
displays the current directory in the message field.
Note that this directory is displayed at the window top border as well.
Query - Query About Editing Options
Query setting
Within SEDIT, using a command without parameters displays its setting. For example,
typing VERIFY displays the verify setting.
Within the IBM XEDIT editor, you must use the QUERY command for that purpose,
typing for example QUERY VERIFY.
The SEDIT QUERY command allows the prefix QUERY as well, in order to maintain strict
compatibility with XEDIT.
Page 348
SEDIT and S/REXX Reference Manual
SEDIT COMMAND REFERENCE GUIDE
QUIT
QUIT / AQUIT / PQUIT / QQuit - Abandon File
AQUIT {N}
abandons the file being edited if it has not been modified since last stored. If the file has
been modified, AQUIT will ask for an F1 key confirmation. If this command is called by a
button, the prompt will be displayed in an alert box.
When SEDIT runs in batch mode, AQUIT performs as PQUIT.
PQUIT {N}
abandons the file being edited if it has not been modified since last stored. Otherwise, it does
not quit the modified file, and issues the following message:
File has been changed; type QQUIT to quit anyway
In addition, PQUIT clears the S/REXX stack.
QUIT {N} or QQuit {N}
unconditionally abandons the file being edited.
By default, SEDIT defines the following synonym:
synonym quit 4 aquit
Therefore, using QUIT will in fact call the AQUIT command. Use COMMAND QUIT or
QQUIT to override this synonym and issue the command QUIT.
The optional N value specifies the QUIT return code, overriding the default return code as
described below.
Return Codes:
0
1
5
12
N
SEDIT and S/REXX Reference Manual
Normal
Only one file was edited
Invalid parameter
File has been changed (PQUIT only)
The number specified as operand
Page 349
RCHANGE
SEDIT COMMAND REFERENCE GUIDE
RChange (XEDIT MODE) - Regular Expression Change
RChange
XEDRChange
/regex/string{/{target {N|*} {P}}}
changes the regular expression regex with string.
Scope:
Display
When MODE COMMAND XEDIT is in effect, RCHANGE calls the XEDIT mode
XEDRCHANGE command. PDFRCHANGE may be used to call the ISPF/PDF mode CHANGE
command.
/ may be replaced with any delimiting character that does not appear in the character
strings involved in the replacement.
A regular expression is a character string used to describe, in an extended way, a string to
be matched. It uses special characters, called meta characters to describe the match to be
done. See the R/ command on page 368 for a complete description of regular expressions.
target defines the number of lines to be scanned for a match. Lines are changed starting
with the current line, up to but not including the target line. target may be one of the
following:
:N
N or +N
+* or *
.symb
string expression
Up to but not including the Nth line.
N lines.
The end of file.
The line which has been assigned the .symb symbolic name by
using the POINT command, or a .symb prefix command.
Defines a group of characters to be located.
The general format of a string expression is the following:
{+|-}{~}/string1{/{&}|{|}{~}/string2 ..... }
See the LOCATE command on page 304 for a precise string expression definition.
When target is omitted, all lines between the current line and the end of file will be
scanned. However, if MODE CHANGE ONE is in effect, only the first line will be changed.
N is the number of occurrences of regex to be changed on each line.
If omitted, all occurrences of regex will be changed. However, if MODE CHANGE ONE is
in effect, only the first occurrence will be changed.
If specified as *, all occurrences of regex will be changed.
P is the relative number of the first occurrence of string to be changed in each line. Its
default value is 1.
Page 350
SEDIT and S/REXX Reference Manual
When regex is omitted, string is inserted in the column which has a value defined by
the first ZONE command operand (initially 1).
When ARBCHAR is ON, all occurrences of the arbitrary character in string will be
changed with the string matching regex.
Examples:
will turn every number into a ?
rc/[0-9]/?/
arbchar on @
rc/[a-z]/(@)/**
rc/$/.123/**
will enclose every lowercase alphabetical
character within parenthesis.
will add the ’.123’ string at the end of each
line.
If CASE CIGNORE is in effect, SEDIT will not consider capitalization when changing
strings.
Example:
case ci
rc/Old/new/
will change old with new.
Note: The ZONE command allows the user to choose the starting and ending columns to
be scanned.
See Also: ARBCHAR, CASE, CHANGE, CN, HEX, LOCATE, MODE, R/,
SCHANGE, SCN, SRCHANGE, STAY, ZONE
RChange (ISPF MODE) - Repeat Last Change
RChange
PDFRChange
RCHANGE repeats the last ISPF/PDF PDFCHANGE command described on page 175.
When MODE COMMAND ISPF is in effect, RCHANGE calls the ISPF mode PDFRCHANGE
command. XEDCHANGE may be used to call the XEDIT mode RCHANGE command.
READ
SEDIT COMMAND REFERENCE GUIDE
READ - Place Terminal Information in the STACK
READ
Cmdline
All
Nochange
Batch Mode:
|{Tag|Notag}
{Number} |
{Number} |
Not Available
READ waits for a user action. It is intended to be called from an S/REXX macro, placing
information in the REXX stack. READ does not perform any operation when the stack is not
empty.
The operands are the following:
Cmdline
All
Nochange
Number
Tag
Notag
only the command input area is to be stacked. This is the default.
all lines changed on the screen are to be stacked. In addition, the
file currently edited will be updated with these changes.
all lines changed on the screen are to be stacked. The file
currently edited will not be updated with these changes.
the stacked information relative to changed lines will be prefixed
by the corresponding file number.
a tag identifying the origin of the line will be added at the
beginning of each stacked line.
no tags are added. This is the default.
Using READ CMDLINE
If a string str was entered on the command line:
-
Using the Enter or Return key will stack str.
-
Using a function key, such as F1, L2, R6 or ^a will stack the definition of that key,
or nothing when this key is not defined. str will be ignored. SEDIT function keys
are equivalent to XEDIT ’ONLY’ keys.
If nothing was entered on the command line:
Page 352
-
Using the Enter or Return key will stack nothing.
-
Using a function key will stack the definition of that key, or nothing when this key
is not defined.
SEDIT and S/REXX Reference Manual
SEDIT COMMAND REFERENCE GUIDE
READ
Using READ ALL Or READ NOCHANGE
Each modified field is stacked as a separate line. The stack will contain:
1)
The definition of the function key pressed, when this key is defined. The
Enter key definition is always ignored within SEDIT.
2)
The lines, prefix and input reserved areas changed on the screen.
3)
The command line, when not empty.
Using the TAG Operand
With the TAG operand, each stacked line is preceded by a string tag, which identifies the
modified field:
CMD
FIL
PFK
PFR
PFL
PRF
CTL
RES
MOU
CLI
identifies the command line.
identifies a file line.
identifies a top function key, such as F1 or PF12.
identifies a right function key, such as R2.
identifies a left function key, such as L3.
identifies a prefix area.
identifies a control key, such as ^a.
identifies a reserved input field.
identifies the use of a mouse button.
identifies the use of the left mouse button on a sensitive field. When READ
is waiting for a user action, the file data fields and the reserved fields are
mouse sensitive: they display in reverse video when selected with the left
mouse button, and make READ return when the mouse button is released.
The tag is followed by additional information, and by the str modified field content:
CMD str
str is the string entered in the command line.
FIL n1 n2 {n3} str
n1 n2 are the line and column number of the beginning of the field on the screen.
n3 is the corresponding file line number. n3 is returned only when the NUMBER option
has been specified.
PFK n str, PFR n str, PFL n str
n is the number of the function key that was pressed.
str is the key definition.
Function keys are stacked LIFO.
SEDIT and S/REXX Reference Manual
Page 353
READ
SEDIT COMMAND REFERENCE GUIDE
CTL n str
n is the ASCII value of the key that was pressed. For example, if ^a was entered, n
value is a.
str is the key definition.
Control keys are stacked LIFO.
RES n1 n2 str
n1 n2 are the line and column number of the reserved field on the screen. str is the
field content.
MOU n
n is the number of the mouse button that was pressed.
CLI n1 n2 {n3}
n1 n2 are the line and column number of the beginning of the field on the screen.
n3 is the corresponding file line number, or 0 when clicking over a field which is not
a file data field. n3 is returned only when the NUMBER option has been specified.
See Also: CTLCHAR, MODE, READSCREN, RESERVED
Page 354
SEDIT and S/REXX Reference Manual
SEDIT COMMAND REFERENCE GUIDE
READSCREEN
READScreen - Read User Action
READScreen
Batch Mode:
Not Available
READSCREEN waits for a user action, allowing input only in the command field when
called from an external macro. When called from an S/REXX macro, READSCREEN also
allows input in the data fields.
When issued from a external macro, READSCREEN creates the following environment
variables:
RDS_ACTION
the action keystroke, such as "return" or "F2".
RDS_CMD
the command line content.
RDS_MOUL
when the user clicks on a data field, this variable
is set to the corresponding line number. Otherwise,
it is set to -1.
RDS_MOUC
the corresponding column line number, or -1.
RDS_CUL
the cursor file line number, or -1 when the cursor is not
on a data field.
RDS_CUC
the corresponding column line number, or -1.
Note: The created environment variables will be defined in the SEDIT main process.
Since external macros run on different processes, the user cannot call the
READSCREEN command within an external macro, and use directly the
environment variables in the same macro. The user must use the EXTRACT
ENVIRON command instead.
When issued from an S/REXX macro, READSCREEN creates REXX variables instead of
creating environment variables. In addition, all modified lines and prefix fields are recorded
in the following variables:
rds_num.0
rds_num.i
rds_cnt.i
the number of modified data fields.
the corresponding file line number.
the corresponding line content modified by the user.
rds_num_pre.0
rds_num_pre.i
rds_cnt_pre.i
the number of modified prefix fields.
the corresponding file line number.
the corresponding prefix content modified by the user.
SEDIT and S/REXX Reference Manual
Page 355
REDO
SEDIT COMMAND REFERENCE GUIDE
When reserved fields have been created with the RESERVED command, READSCREEN
creates also the following variables:
rds_res.0
rds_res.i
the number of modified reserved data fields.
the corresponding field content: the first word is the
screen line number, the second word is the screen
column number, and the following is the data typed in
the field.
The current file is not modified. It is the responsibility of the calling macro to acknowledge
the modifications, by using for example the REPLACE command, or to ignore them.
RECYCLE - Use the Recycle Bin
Initial value:
Level:
ON
Global
RECycle {ON | OFF}
sets ON or OFF the recycle bin facility.
On WINDOWS systems, when RECYCLE is ON, removing files from FLIST, or files and
directories from TREE, moves then into the recycle bin.
RECYCLE without arguments displays the RECYCLE status.
REDo - Cancel Last Undo
cancels the last undo operation.
REDo
The redo memory is reset every time the file is modified by the user.
This command is mapped to the S-L4 key on Sun workstations, and to the S-F11 key on
other workstations.
REFRESH - Screen Update
REFRESH {Clear}
Batch Mode:
updates the display.
Not Available
REFRESH is intended to be used within external macros in order to update the display.
When running in ASCII terminal mode, the clear option allows you to clear the screen
before updating it. In this mode, "REFRESH CLEAR" is mapped to the ^r key.
Page 356
SEDIT and S/REXX Reference Manual
SEDIT COMMAND REFERENCE GUIDE
RELEASE
RELEase - Removes a Directory From the PATH
RELEase {dir1 {dir2 ...}}
RELEASE removes from the path directories accessed with the ACCESS command.
If the diri directory is not accessed, or is the current directory, RELEASE silently ignores
it.
RELEASE * removes all the directories from the path, except the current directory and, on
UNIX systems, the following set of standard directories:
/usr/bin /bin /usr/lib /etc /usr/etc /usr/ucb
RELEASE without arguments scans the path, and removes nonexistent directories.
See Also: ACCESS, SHOWPATH
SEDIT and S/REXX Reference Manual
Page 357
RELOAD
SEDIT COMMAND REFERENCE GUIDE
RELoad - Automatic Reload Feature
RELoad ON|OFF {*}
Initial value:
Level:
sets the automatic reload feature ON or OFF.
ON
File
When RELOAD is set to ON, SEDIT checks all the currently loaded files under the following
circumstances:
•
•
•
When SEDIT loses the keyboard focus, and then receives it again.
When the user switches from one file to another.
When the user loads a new file.
If SEDIT determines that a file has been externally modified, SEDIT saves the previous
image of the file that it had loaded into memory (after appending to its name the %
character), and then reloads the newly modified file.
A file is determined to be modified when its time stamp is older than the time stamp SEDIT
memorized when loading that file. With mounted file systems, especially between a UNIX
system and a WINDOWS system when using a CIFS UNIX client like the Sharity TM
software, there may be a discrepancy between the time stamp memorized by SEDIT, and
the actual time stamp on the WINDOWS file system. The STAMPDELAY command allows
SEDIT to ignore a given amount of discrepancy between time stamps in order to avoid
spurious reloads.
When * is specified, the supplied reload status will be used for every new file.
RELOAD OFF * disables the reload facility for every newly loaded file.
See Also: STAMPDELAY
Page 358
SEDIT and S/REXX Reference Manual
SEDIT COMMAND REFERENCE GUIDE
REPEAT
REPEat - Repeat a Command
repeats the last entered command.
REPEat {target}
Scope:
Display
target defines the number of times the current line pointer will be moved.
:N
N or +N
-N
+* or *
-*
.symb
string expression
Up to the Nth line.
N lines.
Up N lines.
The end of file.
The top of file.
The line which has been assigned the .symb symbolic name by
using the POINT command, or a .symb prefix command.
Defines a group of characters to be located.
The general format of a string expression is the following:
{+|-}{~}/string1{/{&}|{|}{~}/string2 ..... }
See the LOCATE command on page 304 for a precise string expression definition.
If target is omitted, a value of 1 is assumed.
When target is in a forward direction, REPEAT is equivalent to:
next 1
=
When target is in a backward direction, REPEAT is equivalent to:
up 1
=
REPEATS ends when the specified target is reached, or when the executed command
returns a non-zero value, or when the top or bottom of file is reached.
Examples:
repeat
repeat/main
repeats the last command on the next line.
repeats the last command until finding a main string.
See Also: ?, =
SEDIT and S/REXX Reference Manual
Page 359
REPEATDELAY
SEDIT COMMAND REFERENCE GUIDE
REPEATDelay - Set Auto-repeat Time-out
REPEATDelay {key1 key2 mouse1 mouse2}
Initial values: 120 30 30 30 (UNIX)
400 50 60 60 (WINDOWS)
REPEATDELAY without arguments displays the current values.
When the user depresses a function key, such as F1 or R9, SEDIT performs the command
assigned to that key, and then waits for key1 milliseconds. If that key has not been released
during this interval, SEDIT performs the command again. Then, the command will be
performed again every key2 milliseconds until the key is released.
mouse1 and mouse2 control in the same way the auto-repeat time-out associated with the
mouse buttons when they are used to scroll the file, as described page 53.
REPEATDELAY is ignored when SEDIT is in ASCII terminal mode.
Note: On some platforms, there is a keyboard native auto-repeat feature which takes
precedence over the SEDIT auto-repeat feature.
Replace (XEDIT MODE) - Replace Current Line
Replace
XEDReplace
text
replaces the current line with text.
When MODE COMMAND XEDIT is in effect, REPLACE calls the XEDIT mode
XEDREPLACE command. PDFREPLACE may be used to call the ISPF/PDF mode
REPLACE command.
Page 360
SEDIT and S/REXX Reference Manual
SEDIT COMMAND REFERENCE GUIDE
REPLACE
Replace (ISPF MODE)- Replace Data
Replace
PDFReplace
Batch Mode:
{file} {range}
Not Available
When MODE COMMAND ISPF is in effect, REPLACE calls the ISPF mode PDFREPLACE
command. XEDREPLACE may be used to call the XEDIT mode REPLACE command.
REPLACE saves the data being edited into a UNIX file.
file
A file which may exist.
When file is omitted, SEDIT displays the following fullscreen panel:
----------------------------- REPLACE -----------------------------Replace file ===>
Press Enter to replace, F3 or ^c to cancel
range
Two labels that identify the lines to be saved.
A label may be created by typing a .xxxx string on a prefix zone, or by using
the XEDIT POINT command described on page 335.
A label may also be one of the ISPF/PDF predefined labels:
.zf or .zfirst
the first line.
.zl or .zlast
the last line.
.zcsr
the cursor line
When a range is not specified, the user must enter either a C, CC, M or a MM
prefix command in a prefix zone to specify the lines to be copied.
Specifying a prefix origin can be done either before or after using the CREATE
command.
Examples:
r ~/foo .a .zl
replace .a .b
replace
See Also: CREATE, FILE, SAVE
SEDIT and S/REXX Reference Manual
Page 361
RESERVED
SEDIT COMMAND REFERENCE GUIDE
RESERved - Reserve a Specified Line on the Screen
RESERved
M{+n|-n}
{+|-} n
Level:
File
{color} {exthi} {PSs} High
Nohigh
Off
{text}
RESERVED reserves a given line of the logical screen, specifying the color, extended
highlighting, and visibility of that line.
The operands are the following:
M{+n|-n}
{+}n
-n
OFF
color
M stands for the middle of the screen, rounded up for odd-sized
screens, with an optional offset to that position.
specifies n lines from the top of the screen.
specifies n lines from the bottom of the screen.
frees a previously reserved line.
the color to be used, as described by the COLOR command. In
addition, color may be:
White
same as BLACK
Turquoise same as MAGENTA
exthi
may be:
BLink
Maintained for XEDIT compatibility, but not
supported within SEDIT.
REVvideo
Displays in reverse video.
Underline Underlines the displayed characters.
None
High
Nohigh
PSs
text
Page 362
No extended highlighting. This is the default.
specifies that the string text is to be displayed in bold.
specifies that the string text is not to be displayed in bold. This
is the default.
maintained for XEDIT compatibility, but not supported within
SEDIT.
is the text to be displayed. It may imbed control characters
defined by the CTLCHAR command.
SEDIT and S/REXX Reference Manual
SEDIT COMMAND REFERENCE GUIDE
Example:
RESERVED
ctlchar @ escape
ctlchar & noprotect red revvideo nohigh
reserved m+1 noh Enter your name: @&
allows the user to define an input red field displayed in reverse
video.
Without operands, RESERVED displays the line numbers reserved.
Usage Notes
•
On 3270 devices, a control character occupies one blank space. Thus, a command
such as reserved m+1 noh Enter your name:@&John would display:
Enter your name: John
This limitation is implemented for strict XEDIT compatibility. However, it is
possible to remove it by using the MODE RESERVED NOSKIP command, which
would allow the user to display:
Enter your name:John
•
•
•
RESERVED +N, RESERVED M{+|-}N and RESERVED -N are treated as different
lines, even if they fall on the same line. In order to be removed, a reserved line must
be specified in the same way it was specified when it was reserved.
Reserved lines are file specific. To reserve lines every time a new file is loaded, the
RESERVED command must be used within the reprofile.ex or
reprofile.sedit macro. reprofile is executed every time a new file is
loaded, while profile is only executed at initialization.
The SETP command allocates permanently one or more lines of the screen, and is
more suitable for displaying non-file related function keys information.
SETP without arguments frees the previously allocated line.
See Also: CTLCHAR, MODE, READ, SETP
SEDIT and S/REXX Reference Manual
Page 363
RESET
SEDIT COMMAND REFERENCE GUIDE
RESet - Reset the Data Display
RESet
{COmmand}
{ERror}
{EXcluded}
{X}
{Label}
RESET clears line-related conditions.
COmmand
removes all pending prefix commands.
ERror
removes the line symbolic names assigned by the COMPILE
command.
EXcluded or X redisplays any excluded line.
Label
removes .xxxx labels
When MODE COMMAND ISPF is in effect, RESET without argument is the same as RESET
COMMAND ERROR EXCLUDED.
When MODE COMMAND XEDIT is in effect, RESET without argument is the same as
RESET COMMAND.
See Also: ALL, CLEARERRORS, POINT
RESTore - Settings Retrieval
RESTore
RESTORE retrieves the settings saved by the PRESERVE command.
See the PRESERVE command for a list of the settings affected by the RESTORE command.
See Also: PRESERVE
Page 364
SEDIT and S/REXX Reference Manual
SEDIT COMMAND REFERENCE GUIDE
RFLIST
RFlist - Call Directory Editor
RFlist { FN {FT {FM}}}
Batch Mode:
will call the directory editor.
Not Available
RFLIST uses regular expressions to match files. See The Directory Editor FLIST on page
459 for further explanations.
See Also: DACCESS, DFLIST, FFLIST, FLIST
RFINd - Repeat Last Find
RFINd
RFIND repeats the last ISPF/PDF PDFFIND command described on page 266.
RIght - Scroll Right
RIght {N}
is used to alter the columns that are to be displayed.
"startc" is the first column.
"endc" is the last column.
If N is omitted a value of 1 is assumed.
If N is 0, the original setting will be restored.
In all other cases, "startc" and "endc" will be increased by N, shifting the data to the
left by N positions
The command "RIGHT 40" is mapped to the C-F8 key by default.
See Also: LEFT, VERIFY
SEDIT and S/REXX Reference Manual
Page 365
RIGHTAdjust - Right-adjusting Text
RIGHTAdjust {target}
Scope:
All
This command is mapped to the Shift-Control-R (^R) key by default.
RIGHTADJUST reformats a portion of the current file defined by the target operand.
RIGHTADJUST positions the last non-blank character at the right margin defined with the
MARGINS command.
target may be one of the following:
All
Sel
:N
+N
-N
+* or *
-*
.symb
string expression
All the file is formatted.
Right-adjusts the selected lines. If the selection is rectangular,
RIGHTADJUST right-adjusts the contents of the selected area,
the text outside the selection not being modified.
Up to but not including the line N.
Down N lines.
Up N lines.
Down to the end of file.
Up to the top of file.
Up or Down to the line which has been assigned the .symb
symbolic name by using the POINT command, or a .symb
prefix command.
Defines a group of characters to be located.
The general format of a string expression is the following:
{+|-}{~}/string1{/{&}|{|}{~}/string2 ..... }
See the LOCATE command on page 304 for a precise string expression definition.
When target is not specified, RIGHTADJUST formats the line corresponding to the
cursor location. When the cursor is not located upon a line of the current file,
RIGHTADJUST reformats the current line.
Examples:
RIGHTADJUST
RIGHTADJUST all
RIGHTADJUST sel
RIGHTADJUST /str/
See Also: CENTER, FLOW, FORMAT, LEFTADJUST, LOCATE, MARGINS,
POWERINPUT
SEDIT COMMAND REFERENCE GUIDE
RW
RTLF - Specific display mode for left to right fonts (Windows)
RTLF { ON | OFF }
Initial value:
Level:
OFF
Global
On Windows, some fonts meant to be used right to left (for example, some Hebrew fonts)
are not displayed properly by SEDIT.
RTLF ON enables a specific write mode that corrects this problem. Display can be slower
when RTLF is ON over slow RDP connections.
See Also: WRTL
RW - Enable Read/Write Mode
RW { ON | OFF }
Initial value:
Level:
enables or disables the save and file commands.
ON
File
When RW is OFF, the associated file cannot be saved. This is the default when loading a file
using the HELP command.
See Also: FILE, SAVE
SEDIT and S/REXX Reference Manual
Page 367
R/
SEDIT COMMAND REFERENCE GUIDE
R/ - Regular Expression Search
searches for the first string matching the regular
expression regex starting from the current line and
proceeding in descending order.
R/regex{/}
Scope:
Display
The cursor will be moved to the beginning of the string.
The last / is optional, unless the string ends with a / or a space.
A regular expression is a character string used to describe, in an extended way, a string to
be matched. It uses special characters, called meta characters to describe the match to be
done.
The meta characters are the following:
^
$
\<
\>
.
[]
\(
\)
*
matches only at the beginning of a line.
matches only at the end of a line.
matches only at the beginning of a word.
matches only at the end of a word.
matches any single character.
matches any character in a character class.
delimits the start of a subexpression. It is available for VI compatibility,
but has no special meaning.
delimits the end of a subexpression. It is available for VI compatibility,
but has no special meaning.
repeats the preceding 0 or more times.
If you want to use a meta character as an ordinary character, you must precede it with a
backslash (\) character.
Page 368
SEDIT and S/REXX Reference Manual
SEDIT COMMAND REFERENCE GUIDE
R/
Examples:
r/^The
matches the string "The" only at the beginning of a line.
r/The$
matches the string "The" only at the end of a line.
r/\<i\>
matches the string "i" in "i=3" but not in "if( k == 2)".
r/The.......is
matches the string "The" followed by any 7 characters followed by the string "is".
"The color is" will be matched. "The moon is" will not.
r/[A-Z][a-z]
[A-Z]
[a-z]
means any character from A to Z.
means any character from a to z.
The whole expression above matches any alphabetical string starting with a capital letter.
The string "The" will be matched. "L12" will not
Note that the meta characters are not treated specially when enclosed in brackets:
r/[.]
matches the string ".". Without brackets, the user should type:
SEDIT and S/REXX Reference Manual
Page 369
R/
SEDIT COMMAND REFERENCE GUIDE
r/\.
for the same match.
r/[0-9][0-9]*\.[0-9][0-9]*
[0-9]
[0-9]*
\.
means at least one character between 0 and 9.
means 0 or more characters between 0 and 9.
means a period. The period must be preceded with a \, otherwise it
would mean any character.
The whole expression above matches numbers like "12.32". It does not match ".32" or
"12.".
Notes: The ZONE command allows the user to choose the starting and ending columns to
be scanned.
When MODE LOCATE NOSTAY is in effect (the SEDIT default), these columns are
also restricted by the VERIFY column definition; the user can only scan the visible
part of the file. The cursor will be moved to the beginning of the target. A
subsequent search will start at the cursor location.
When MODE LOCATE STAY is in effect (the XEDIT behavior), the cursor stays in
the command line, the search is not restricted by the VERIFY setting, and the next
search will start on the next (or previous) line.
When WRAP is set to ON, SEDIT continues the search up to the line preceding the
current line within the R/ command. The search is continued following the current
line within the R-/ command.
When WRAP is set to OFF, the search ends at the end (of top) of file.
The EXTRACT/RMATCH/ command can be used within a macro to retrieve the
matched string.
See Also: ALL, CASE, COMPILE, EXTRACT, MODE, RCHANGE, R-/, VERIFY,
WRAP, ZONE, /, -/, \, -\
Page 370
SEDIT and S/REXX Reference Manual
SEDIT COMMAND REFERENCE GUIDE
R-/
R-/ - Regular Expression Search
R-/regex{/}
Scope:
searches for the first string matching the regular
expression regex starting from the current line and
proceeding in ascending order.
Display
The cursor will be moved to the beginning of the string.
The last / is optional, unless the string ends with a / or a space.
See the R/ command on page 368 for a complete regular expression syntax description.
See Also: ALL, CASE, COMPILE, MODE, R/, VERIFY, ZONE, /, -/, \, -\
SABER_End - End Connection with Saber-C
SABER_End
terminates a connection with the Saber-C 3.x
software1.
This command makes SEDIT stop listening on the socket opened with the SABER_INIT
command.
Note that SEDIT will notice if the Saber process to which it is connected ends, and
automatically execute a SABER_END command without notifying the user.
The SABER_XXX commands are intended to be used with the Saber-C or CodeCenter 3.x
release.
Please see the CENTER_XXX commands when running CodeCenter 4.x.
See Also: CENTER_END, CENTER_INIT, CENTER_SEND, LISTEN,
SABER_INIT, SABER_SEND
1. Saber-C and CodeCenter are trademarks of CenterLine Software, Inc.
SEDIT and S/REXX Reference Manual
Page 371
SABER_INIT
SEDIT COMMAND REFERENCE GUIDE
SABER_Init - Initialize Connection with Saber-C
SABER_Init
starts a connection with the Saber-C 3.x software1.
Saber-C 3.01 and 3.1 listens for commands on a socket whose number is described in the
files "/tmp/saber.socket.nnn" or "/tmp/sabsocketnnn", where nnn is the
Saber-C process number.
If SEDIT finds that only one Saber-C process is running, it will establish the connection
with it immediately. If more than one Saber-C process is running, SEDIT will display a
fullscreen panel showing all the Saber-C process numbers, and the user will have to click
with the mouse on the process to be communicated with to using the SABER_Send
command.
The SABER_XXX commands are intended to be used with the Saber-C or CodeCenter 3.x
release.
Please see the CENTER_XXX commands when running CodeCenter 4.x.
See Also: CENTER_END, CENTER_INIT, CENTER_SEND,
LISTEN, SABER_END, SABER_SEND
1. Saber-C and CodeCenter are trademarks of CenterLine Software, Inc.
Page 372
SEDIT and S/REXX Reference Manual
SEDIT COMMAND REFERENCE GUIDE
SABER_SEND
SABER_Send - Send Command to Saber-C
sends cmd to the Saber-C1 process which has been
recognized by the SABER_INIT command.
SABER_Send cmd
If no connection has been established with a Saber-C process, SEDIT executes a
SABER_INIT command. Then, SEDIT sends cmd to that process, and listens on the
socket opened. If Saber-C returns a string, SEDIT prints it in the window it was started
from.
Note that the user can continue to use SEDIT normally, even if Saber-C does not answer.
The user may insert the following lines in the file "sedit.menu" in order to be able to
send commands using the mouse:
"SABER" MENU
"load
"
MENU
".c" saber_send load $fn.c
".o" saber_send load $fn.o
"load "
"unload"
"swap "
"stop "
"stop
"ini
"list
"read
"
"
"
"
"read
"end
"SABER" END
"
"
END
saber_send unload $fn
saber_send swap $fn
MENU
"stop in" saber_send stop in $fn
"stop at" Saber_stopat
END
saber_init
saber_send list $fn
MENU
"ON " listen 1999
"OFF " listen off
END
saber_end
1. Saber-C and CodeCenter are trademarks of CenterLine Software, Inc.
SEDIT and S/REXX Reference Manual
Page 373
SABER_SEND
SEDIT COMMAND REFERENCE GUIDE
Saber_stopat is the "$xhome/xmac/Saber_stopat.ex" macro, and sets a stop
in the current file at the cursor location:
#! /bin/csh -f
#
# Saber_stopat: sets a stop at the cursor line
#
set cursor = ‘extract cursor‘
if ( $cursor[4] == -1 ) then
sends ’emsg .... Saber_stopat: invalid cursor position’
exit 0
endif
set fname = ‘extract fname‘
set ftype = ‘extract ftype‘
set a = ’saber_send stop "’"$fname[2]""$ftype[2]"’":’$cursor[4]
sends "$a"
The SABER_XXX commands are intended to be used with the Saber-C or CodeCenter 3.x
release.
Please see the CENTER_XXX commands when running CodeCenter 4.x.
See Also: CENTER_END, CENTER_INIT, CENTER_SEND,
LISTEN, SABER_END, SABER_INIT
Page 374
SEDIT and S/REXX Reference Manual
SEDIT COMMAND REFERENCE GUIDE
SAVE
SAve / SSave / KSAve/ DOSSave - Save File
SAve / SSave / KSAve / DOSSAve {fn {ft {fd}}
These commands transform the unchanged source file into a backup file by appending a
"%" to its name, and create a new file from the edited memory image, and continue the
editing session. When SAVECLEARUNDO is set to ON (the default), the undo memory is
reset.
When SEDIT is not running in batch mode, if the file name has been changed during the
editing session so that it is identical to that of an existing file, or if the file has been modified
by another user, SAVE will ask for a confirmation to overwrite the existing file. SSAVE will
not. When SEDIT is running in batch mode, SAVE does not overwrite the existing file.
The KSAVE command performs the same function as the SAVE command, but leaves
unchanged the saved file timestamp. This may be useful, for example, when the modified
file is an include file. Using KSAVE will prevent a following make command from
recompiling every file which relies on the saved file.
The DOSSAVE command performs the same function as the SAVE command, but adds a ^M
character at the end of each line, and a ^Z character at the end of the file, thus making the
file compatible with Personal Computers using the DOS operating system.
Under APL, SEDIT will first create a "./APLOBJ" directory and then try to save the
current object in this directory. This save may fail if the object name contains APL
characters not allowed in a UNIX or WINDOWS name.
If fn is specified, the filename of the file will be changed before saving.
If ft is specified, the filetype of the file will be changed before saving.
If fd is specified, the filedirectory of the file will be changed before saving.
Warning:
When KEEPBLANKS is set to OFF, SEDIT removes all trailing blanks in
every line before saving a file. Do not save a file (such as a "*.o" file)
where trailing blanks are part of the data.
See Also: BACKUP, KEEPBLANKS, DY_SAVE, FILE, RW, VERIFY_SAVE,
SAVECLEARUNDO
SAVECLEARUNDO - Set Clear Undo Status
SAVEClearundo {ON | OFF}
Initial value:
Level:
ON
Global
When SAVECLEARUNDO is ON, the undo memory is reset every time the file is saved.
SEDIT and S/REXX Reference Manual
Page 375
SCALe / SCALE_Screen - Set Scale Line
SCALe
ON|OFF {line}
Initial value:
Level:
OFF 3
File and View
SCALE_Screen
Initial value:
Level:
ON|OFF {line}
OFF 3
View
SEDIT maintains a separate SCALE setting for each file and each view of this file defined
with the SCREEN command.
The SCALE_SCREEN command updates the default SCALE setting of the current view,
which is applied to every newly loaded file.
The SCALE command applies to the current file on the current view. SCALE selects the
physical line on which the scale line is to be displayed.
With SCALE ON in effect, SEDIT displays a scale line in the input field area, which shows
column indications according to the verify setting. It indicates where every fifth column
is located. The left and right zone columns are indicated by < and >. The column pointer
is indicated with a |. If the tabline is set on the same location as the scale line, the
tab information will also appear on the scale line.
The scale line displays also a ^ character at the left margin position, a @ character at the first
line indent position and a $ character at the right margin position.
Clicking with the first mouse button on the scale line changes the first VERIFY setting to
the corresponding column. This allows to scroll the file display to the right up to this
column.
line can be specified in three ways:
n|+n
selects the line n of the view to display the current line, where
the first line is line 1.
-n
selects the line n from the bottom of the view, where the last
line is line -1.
M+n|M-n
selects the line n lines above or below the middle line of the
view.
Examples:
SCALE
SCALE
SCALE
SCALE
ON 2
ON -3
ON M
OFF M+2
See Also: CLOCATE, MARGINS, TABLINE, VERIFY
SEDIT COMMAND REFERENCE GUIDE
SCHANGE
SChange - Selective String Change
SChange /string1/string2{/{target {N|*} {P}}}
changes string1 with string2 asking for
confirmation at each occurrence.
Scope:
Batch Mode:
Display
Not Available
/ may be any delimiting character that does not appear in the character strings involved in
the replacement.
target defines the number of lines to be scanned for a match. Lines are changed starting
with the current line, up to but not including the target line. target may be one of the
following:
:N
N or +N
+* or *
.symb
string expression
Up to but not including the Nth line.
N lines.
The end of file.
The line which has been assigned the .symb symbolic name by
using the POINT command, or a .symb prefix command.
Defines a group of characters to be located.
The general format of a string expression is the following:
{+|-}{~}/string1{/{&}|{|}{~}/string2 ..... }
See the LOCATE command on page 304 for a precise string expression definition.
When target is omitted, all lines between the current line and the end of the file will be
scanned. However, if MODE CHANGE ONE is in effect, only the first line will be changed.
N is the number of occurrences of string1 to be changed on each line.
If omitted, all occurrences of string1 will be changed. However, if MODE CHANGE ONE
is in effect, only the first occurrence will be changed.
If specified as *, all occurrences of string1 will be changed.
P is the relative number of the first occurrence of string1 to be changed in each line. Its
default value is 1.
When string1 is omitted, string2 is inserted in the column which value is defined by
the first ZONE command operand (initially 1).
When HEX ON is in effect, the stringi operands may be entered as hexadecimal values.
Every time string1 is found, SEDIT will pause.
Pressing the F12 key will make the change and the command will resume execution.
Pressing F1 will terminate the command.
Pressing Control-F12 will make all of the requested changes asked for without pausing
again.
SEDIT and S/REXX Reference Manual
Page 377
Pressing any other key will proceed to the next occurrence of string1 without processing
a change.
During a pause, the last window line will indicate the above key’s definition. All fields will
be turned into output fields, preventing any typing in them, and the "undo" feature will be
disabled.
Examples:
sc /i=2/i=3/
sc .a=b/3.a=c/3.
sc ./**/..
sc/te//:100 1 2
sc //string
sc /x’31’/x’32’
sc/k/i//if
will turn "i=2" to "i=3"
will turn "a=b/3" to "a=c/3"
will delete all "/**/" strings
will delete the second "te" occurrence in
each line until line 100
will insert string in the first zone column
with HEX ON in effect, changes all "1" with
"2".
will turn "k" in "i" until the first line
containing the "if" string.
If CASE CIGNORE is in effect, SEDIT will not consider capitalization when changing
strings.
Example:
case ci
sch/Old/new/ will change old with new.
Notes: The ZONE command allows the user to choose the starting and ending columns to
be scanned.
The SCKEYS command allows the user to modify the confirmation keys.
See Also: ARBCHAR, CASE, CHANGE, CN, HEX, LOCATE, MODE, SCKEYS,
SCN, SRCHANGE, STAY, ZONE
SEDIT COMMAND REFERENCE GUIDE
SCKEYS
SCKeys - Selective Change Confirmation Keys
SCKeys {key_quit key_do}
Initial values:
Level:
1 12
Global
SCKEYS modifies the confirmation keys used by the SCHANGE, SRCHANGE and SCN
commands.
key_quit
The top function key used to stop the changes.
key_do
The top function key used to confirm a change.
SCKEYS without arguments displays the current values.
Example:
sckeys 3 4
See Also: SCHANGE, SRCHANGE,
SEDIT and S/REXX Reference Manual
SCN
Page 379
SCN
SEDIT COMMAND REFERENCE GUIDE
SCN - Selective Name String Change
SCN /string1/string2{/{target {N|*} {P}}}
changes name string1 with string2, asking for
confirmation at each occurrence of string1.
Scope:
Batch Mode:
Display
Not Available
A name is a string which is preceded or followed by an invalid C variable character. This
command is very useful in modifying a variable.
/ may be any delimiting character that does not appear in the character strings involved in
the replacement.
target defines the number of lines to be scanned for a match. Lines are changed starting
with the current line, up to but not including the target line. target may be one of the
following:
:N
N or +N
+* or *
.symb
string expression
Up to but not including the Nth line.
N lines.
The end of file.
The line which has been assigned the .symb symbolic name by
using the POINT command, or a .symb prefix command.
Defines a group of characters to be located.
The general format of a string expression is the following:
{+|-}{~}/string1{/{&}|{|}{~}/string2 ..... }
See the LOCATE command on page 304 for a precise string expression definition.
When target is omitted, all lines between the current line and the end of file will be
scanned. However, if MODE CHANGE ONE is in effect, only the first line will be changed.
N is the number of occurrences of string1 to be changed on each line.
If omitted, all occurrences of string1 will be treated. However, if MODE CHANGE ONE
is in effect, only the first occurrence will be changed.
If specified as *, all occurrences of string1 will be treated.
P is the relative number of the first occurrence of string1 to be changed in each line. Its
default value is 1.
When string1 is omitted, string2 is inserted in the column which has a value defined
by the first ZONE command operand (initially 1).
When HEX ON is in effect, the stringi operands may be entered as hexadecimal values.
Every time string1 is found, SEDIT will pause.
Pressing the F12 key will make the change and the command will resume execution.
Pressing F1 will terminate the command.
Page 380
SEDIT and S/REXX Reference Manual
SEDIT COMMAND REFERENCE GUIDE
SCN
Pressing Control-F12 will make all the changes without pausing.
Pressing any other key will pass to the next occurrence of string1 without processing a
change.
During a pause, the last window line will indicate the above key’s definition. All fields will
be turned into output fields, preventing any typing in them, and the "undo" feature will be
disabled.
Example:
scn /i/j/
will turn name "i" in "j" but will leave unchanged
string "if".
If CASE CIGNORE is in effect, SEDIT will not consider capitalization when changing
strings.
Example:
case ci
scn/Old/new/ will change old with new.
Notes: The ZONE command allows the user to choose the starting and ending columns to
be scanned.
The SCKEYS command allows the user to modify the confirmation keys.
See Also: ARBCHAR, CASE, CHANGE, CN, HEX, LOCATE, MODE, SCHANGE,
SCKEYS, STAY, ZONE
SEDIT and S/REXX Reference Manual
Page 381
SCOPE
SEDIT COMMAND REFERENCE GUIDE
SCOpe - Set Selective Editing Scope
SCOpe {All | Display}
Initial value:
Level:
selects the selective editing scope.
DISPLAY
View
Each line in the file has a number associated with it, called its selection level, which is set
to zero by default and may be modified by the commands ALL and SELECT, and by the
prefix commands X and S. When a line selection level does not fall in the DISPLAY range,
it will not be displayed.
With SCOPE DISPLAY (the default) most SEDIT commands and prefix commands will
not apply to the excluded lines. With SCOPE ALL, SEDIT commands will apply to all
lines.
With no argument, SCOPE will display the current setting.
See Also: ALL, DISPLAY, SELECT, SHADOW
Page 382
SEDIT and S/REXX Reference Manual
SEDIT COMMAND REFERENCE GUIDE
SCREEN
SCReen - Split Screen
SCReen
N{Horizontal | Vertical}
Sizel1 {l2 {l3 ...}}
Linesl1 {l2 {l3 ...}}
Widthc1 {c2 {c3 ...}}
Columnsc1 {c2 {c3 ...}}
Define ll1 cc1 y1 x1 {ll2 cc2 y3 x2 {....}}
Batch Mode:
Not Available
SCREEN N or SCREEN N HORIZONTAL
creates N horizontally arranged identical screens.
SCREEN N VERTICAL
creates N vertically arranged identical screens.
SCREEN SIZE or SCREEN LINES
creates horizontally arranged screens, where li is the number of lines in each screen.
The last screen will extend to the SEDIT window bottom.
SCREEN WIDTH or SCREEN COLUMNS
creates vertically arranged screens, where ci is the number of columns in each
screen. The last screen will extend to the SEDIT window right side.
SCREEN DEFINE
creates screens according to the specified layout:
•
•
•
•
lli
cci
yi
xi
is the number of lines.
is the number of columns.
is the line number of the screen upper-left corner.
is the column number of the screen upper-left corner.
SEDIT and S/REXX Reference Manual
Page 383
SCREEN
SEDIT COMMAND REFERENCE GUIDE
Examples:
screen 2 v
creates 2 identical vertical screens.
screen s 12 15 8
creates 3 horizontal screens.
screen w 39 49
creates 2 vertical screens
screen d 16 38 1 1 16 40 1 39 8 78 17 1
creates 3 screens with the following layout:
(1, 1)
(1, 39)
16 x 38
16 x 40
(17, 1)
8 x 78
See Also: C_SCRH, C_SCRJ, C_SCRV
Page 384
SEDIT and S/REXX Reference Manual
SEDIT COMMAND REFERENCE GUIDE
SCROLLBAR
SCROllbar - Set Scrollbar
SCROllbar ON | OFF
Initial value:
Level:
Available on:
Batch Mode:
enables or disables scrollbar usage.
ON
Global
UNIX
Not Available
When SCROLLBAR is ON, and when running the MOTIF or OpenLook SEDIT version, a
vertical scrollbar is displayed on the main window. This scrollbar allows the user to scroll
through current file.
When the screen has been split, the scrollbar scrolls through the file which contains the
cursor.
See Also: C_SCRH, C_SCRJ, C_SCRV, SCREEN
SEDIT and S/REXX Reference Manual
Page 385
SELECT
SEDIT COMMAND REFERENCE GUIDE
SELect - Set Selection Level
SELect {+|-}N {target}
Initial value:
Level:
Scope:
sets the selection level of lines in the current file.
0
File
Display
Each line in the file has a number associated with it, called its selection level, which is set
to zero by default and may be modified by the commands ALL and SELECT, and by the
prefix commands X and S. When a line selection level does not fall in the DISPLAY range,
it will not be displayed.
With SCOPE DISPLAY (by default) most SEDIT commands and prefix commands will
not apply to the excluded lines. With SCOPE ALL, commands will apply to all lines.
With SHADOW ON, SEDIT will display a shadow line to represent each group of excluded
lines. With SHADOW OFF, SEDIT will not display these lines at all.
The first argument is the value to set to the lines described by the second argument:
•
•
•
N
+N
-N
will set the value to N.
will add N to the current selection level.
will substract N to the current selection level.
target describes the file area to be modified:
All
Sel
:N
N or +N
-N
+* or *
-*
.symb
string expression
will set the selection level for all lines in the file.
will set the selection level for all lines selected with the mouse.
Up to but not including the Nth line.
N lines.
Up N lines.
The end of file.
The top of file.
The line which has been assigned the .symb symbolic name by
using the POINT command, or a .symb prefix command.
Defines a group of characters to be located.
The general format of a string expression is the following:
{+|-}{~}/string1{/{&}|{|}{~}/string2 ..... }
See the LOCATE command on page 304 for a precise string expression definition.
If target is omitted, a value of 1 is assumed.
See Also: ALL, DISPLAY, SCOPE, SELECTALL, SHADOW, STAY, VISIBLE
Page 386
SEDIT and S/REXX Reference Manual
SEDIT COMMAND REFERENCE GUIDE
SELECT
SELECTall - Set Selection Level on All Lines
SELECTAll {N1 {N2{..}}}
Initial value:
Level:
Scope:
sets the selection level of all lines in the current file.
0
File
Display
Each line in the file has a number associated with it, called its selection level, which is set
to zero by default and may be modified by the commands ALL and SELECT, and by the
prefix commands X and S. When a line selection level does not fall in the DISPLAY range,
it will not be displayed.
SELECTALL uses the Ni arguments to set the selection level of all the lines. If there are
less Ni arguments than lines in the file, SELECTALL uses the Ni arguments cycliquelly.
Example:
selecta 1 0
hides every other line.
See Also: ALL, DISPLAY, SCOPE, SELECT, SHADOW, STAY, VISIBLE
SEDIT and S/REXX Reference Manual
Page 387
SEP
SEDIT COMMAND REFERENCE GUIDE
SEP - Separator Change
enables or disables the character separator when
passing commands.
SEP ON|OFF {value}
Initial value:
Level:
line-feed
Global
value is an optional parameter specifying the separator between commands. It is
originally set to line-feed.
line-feed is assigned to the following keys, depending on the workstation in use:
SUN Type 4 keyboard
SUN Type 5 keyboard
Control-line-feed
Control-AltGraph
IBM RS/6000
SiliconGraphics
DecStations
DecStations with PC keyboards
HP
Control-Right-Alt
Control-Right-Alt
Control-PF3
Control-Right-Alt
Control-Select
HP with PC keyboards
ASCII terminals
Windows systems
Control-Right-Alt
Control-l
Control-Right-Alt
The LINEND command is a synonym to the SEP command.
Examples:
sep on ;
top;c /i/j/
sets the separator to ";".
changes every "i" to "j" from the beginning of
the file.
See Also: LINEND
Page 388
SEDIT and S/REXX Reference Manual
SEDIT COMMAND REFERENCE GUIDE
SET
SEt - Set Function Keys
Batch Mode:
Not Available
First Mode:
SET
|
|
|
|
|
|
|
|
SET
{modifier}
{modifier}
{modifier}
{modifier}
{modifier}
PFk
{ {keyword} string}
Fk
Rk
SymbName
Lk
enter
^cc
M-cc
?
The first mode is used to assign a function key to a string which is executed as a command
when this key is pressed.
When used without string, it will clear the key definition.
modifier may be one of the following:
scm-
s+cs+mm+cs+m+c-
specifies that the Shift key must be held down.
specifies that the Control key must be held down.
specifies that the Meta key must be held down.
The Meta key is labelled Left or Right on old Sun type 3
keyboards, and ◊ on the Sun type 4 or type 5 keyboards.
On DECstations, the meta key is the Compose key.
On HP keyboards, the meta key is the Left Extend Char key.
On most other keyboards, the meta key is the left Alt key.
specifies that the Shift and the Control keys must be held
down.
specifies that the Shift and the Meta keys must be held down.
specifies that the Meta and the Control keys must be held
down.
specifies that the Shift, Control and Meta keys must be
held down
Note: when specifying several modifiers, the order is irrelevant. set s+c-f1 is the same
as set c+s-f1.
SEDIT and S/REXX Reference Manual
Page 389
SET
SEDIT COMMAND REFERENCE GUIDE
SymbName may be one of the following:
UpArrow
DownArrow
LeftArrow
RightArrow
Home
End
PrintScreen
ScrollLock
Pause
specifies the up arrow key. UpArrow is internally changed to
R8.
specifies the down arrow key. DownArrow is internally
changed to R14.
specifies the left arrow key. LeftArrow is internally changed
to R10.
specifies the right arrow key. RightArrow is internally
changed to R12.
specifies the key labelled Home on PC-like keyboards. The
corresponding Ri value depends on the platform.
specifies the key labelled End on PC-like keyboards. The
corresponding Ri value depends on the platform. End is not
available with DEC/COMPAQ/HP ALPHA TRUE64
keyboards.
specifies the key labelled PrintScreen on PC-like
keyboards. PrintScreen is internally changed to R1.
specifies the key labelled ScrollLock on PC-like keyboards.
ScrollLock is internally changed to R2.
specifies the key labelled Pause on PC-like keyboards. Pause
is internally changed to R3.
Note: SymbName is not case sensitive. uparrow is the same as UpArrow.
With the SET command, the separator defined with the SEP or LINEND command is
disabled, which allows the user to program several commands on the same key.
PFk means a 3270 equivalent PF key function.
PF1 - PF9 are mapped to F1 - F9 top keys.
PF10 - PF12 are mapped to R1 - R3 Sun right keys with the old Sun 9 top keys keyboard,
and to F10 - F12 top keys with the other keyboards. The user must use the
KEYBOARD . 1 command in its profile.sedit or PROFILE.sedit file to specify
the old keyboard.
PF13 - PF24 are the same as PF1 - PF12 with the shift key held down.
PF25 - PF36 are the same as PF1 - PF12 with the control key held down.
PF37 - PF48 are the same as PF1 - PF12 with the meta key held down.
R1 - R15 are Sun right keys.
L1 - L10 are Sun left keys. L11 is the Sun HELP key.
Page 390
SEDIT and S/REXX Reference Manual
SEDIT COMMAND REFERENCE GUIDE
SET
The Left function keys are the following keys:
•
•
•
•
•
•
•
•
•
•
•
L1
L2
L3
L4
L5
L6
L7
L8
L9
L10
L11
Stop
Again
Props
Undo
Front
Copy
Open
Paste
Find
Cut
Help
On IBM, SiliconGraphics and HP PC-like keyboards, and on WINDOWS systems, the
right keys are mapped in the following way:
•
•
•
•
•
•
•
•
•
•
•
•
R1
R2
R3
R4
R5
R6
R7
R8
R9
R10
R12
R14
Print Screen
Scroll Lock
Pause
Insert
Home
Page Up
End
Up Arrow
Page Down
Left Arrow
Right Arrow
Down Arrow
With the following physical layout:
SEDIT and S/REXX Reference Manual
R1
R2
R3
R4
R5
R6
R7
R9
Page 391
SET
SEDIT COMMAND REFERENCE GUIDE
On HP keyboards, the right and left keys are mapped in the following way:
•
•
•
•
•
•
•
•
•
•
•
•
•
•
•
L1
L2
L3
L4
L6
R1
R2
R3
R4
R5
R6
R7
R9
R11
R13
Reset
Stop
Menu
User
Print
Clear
Clear Display
Insert Line
Delete Line
Insert Char
Delete Char
Prev
Next
Numerical Pad Tab Key
With the following physical layout:
L1
L2
F1
F2
F3
F4
L3
L4
F5
F6
F7
F8
R1
R2
R3
R4
R5
R6
R7
R9
R11
L6
Page 392
SEDIT and S/REXX Reference Manual
SEDIT COMMAND REFERENCE GUIDE
SET
On DECstation keyboards, the mapping is the following
•
•
•
•
•
•
•
•
•
R4
R5
R6
R7
R9
L1
L2
L3
L4
Find
Insert Here
Select
Previous screen
Next screen
PF1
PF2
PF3
PF4
With the following physical layout:
F15
F16
R4
R5
R6
R7
F17
F18
F19
F20
L1
L2
L3
L4
R9
The user can specify a shift, control or meta condition by adding a "S-", "C-" or
"M-" prefix to the Rk or Lk definition.
^cc
sets "Control-cc", where cc is any character. However, when running in
ASCII terminal mode, the user can only use characters ranging from ’a’ to ’z’, with
the exceptions described below.
M-cc sets "Meta-cc", where cc is any character. This facility is not supported on
ASCII terminals.
?
or no argument at all displays the key setting in a fullscreen manner.
The user can edit them directly. Once edited, the user must first depress the Enter
or Return key to validate the changes, and then return to the editor by depressing
the F1 key.
Depressing the F2 key adds a setkey.sedit file in the editing ring, containing
all the key definitions and all the other editor settings.
SEDIT and S/REXX Reference Manual
Page 393
SET
SEDIT COMMAND REFERENCE GUIDE
When running in ASCII terminal mode, the following restrictions apply:
•
•
•
It is not possible to know the "shift", "control" and "meta" key state.
Therefore, it is not possible to assign a specific command to function keys when
holding down these modifier keys. For example, "set s-f1 flquit" will not
make SEDIT call the "flquit" command when hitting "shift-f1".
For the same reason, "set ^A command" will not be recognized. Only
"set ^a command" will be.
The following "^cc" keys cannot be changed:
^t enters the tab character (instead of ^tab).
^i enters the next-field 3270 command.
^j enters the up-field 3270 command.
^f enters the down-field 3270 command.
^h enters a backspace.
^l enters the line-feed separator character.
^m is equivalent to the Return or Enter key.
"set M-cc" is not supported.
Examples:
set pf15 cn /i/il/
set s-f3 cn /i/il/
set m-r4 \i
set ^q /i.del (. means "line-feed" separator)
Control-q will search and delete the next line containing "i"
character. Note that an error condition (like not finding "i") will stop the
process.
set ^Q QQUIT
Shift-Control-q
set c-r12 c_endl
set s-r8 top
set s-uparrow top
set m-r14 bot
set m-a s_set all
will quit the current file, even if modified.
Control-Right-Arrow moves the
cursor to the end of the line.
Shift-Up-Arrow selects the first line as
the current line.
is the same as set s-r8 top
Meta-Down-Arrow selects the last line
as the current line.
Meta-a selects all of the current file.
Note: When the ENTER key is defined, by using the SET ENTER command, the
auto-indentation is disabled. See the AUTOI command on page 157 for more
details.
Page 394
SEDIT and S/REXX Reference Manual
SEDIT COMMAND REFERENCE GUIDE
SET
Second Mode:
SET
|
|
|
|
|
|
|
|
|
HOME
IHOME
PREV_FIELD
INS
CAPS
APL
DOWN_FIELD
UP_FIELD
EOF
|
|
|
|
|
|
|
|
|
PFk
{S-} {C-}
{S-} {C-}
{S-} {C-}
{S-} {C-}
ALT
LF
ESCAPE
^cc
{M-}Fk
{M-}Rk
{M-}Lk
{M-}SymbName
The second mode is used to modify the 3270 simulation keys.
SymbName is described on page 390.
ALT is the key labelled Alt on Sun keyboards, the right Extend Char key on HP
keyboards, and the right Control key on other workstations.
LF is the key labelled Line Feed on Sun keyboards, the Select key on HP keyboards,
and the right Alt key on other workstations.
ESCAPE is the Esc key.
^cc sets "Control-cc", where cc is any character between ’a’ and ’z’.
For a Sun workstation, the original setting is:
HOME
IHOME
PREV_FIELD
INS
CAPS
APL
DOWN_FIELD
UP_FIELD
EOF
R6
R9
R7
R11
R13
R15
ALT
LF
L3
See The 3270 Screen Interface on page 41 for a full 3270 functions description.
Note: with non-US keyboards, it is necessary to remove the default right ALT key
"down_field" assignment.
This is achieved by adding in the profile the "set down_field" command after
the architecture dependent "set_xxx" keyboard setting macro has been called.
On IBM stations for example, the keyboard setting macro is "set_ibm".
Examples:
set APL
disables the R15 APL key
set HOME R6
sets the 3270 HOME command to key R6
set HOME
set R6 CURSOR HOME sets the SEDIT CURSOR HOME command to
R6
SEDIT and S/REXX Reference Manual
Page 395
SET
SEDIT COMMAND REFERENCE GUIDE
Third Mode:
SET BACKSPACE ^h | ^?
Depending on the ASCII terminal in use, the BackSpace key may send either the ^h or
the ^? character.
By default, SEDIT recognizes the ^h character as the BackSpace character, and ^? as
the Delete character.
Issuing the "SET BACKSPACE ^?" command reverses its behavior.
If a terminal such as this is in use, edit the "/home/xed/profile.sedit" macro, and
add the following bold-faced line:
if version = ’curses’ then
do
if $TERM = ’MyTerminal’ then ’set backspace ^?’
SET SERVER serv
When running the MOTIF version, this command allows the user to start SEDIT on a
particular workstation (for example an IBM workstation), and to display it on another one
(for example a DEC workstation) using the -display hostname:0 option, letting
SEDIT know about the peculiarities of the remote server.
serv may be one of the following:
Display Workstation
Page 396
serv value
Sun Sparc
sun
PC with Solaris X86
i86pc
SiliconGraphics
sgi
Ultrix DecStation
dec
Digital Unix TRUE64 DecStation
alpha
Digital Unix TRUE64 DecStation with a PC keyboard
alphapc
IBM RS/6000
ibm
Hewlett Packard
hp
Hewlett Packard with a PC keyboard
hppc
PC with Linux
linux
PC with SCO
sco
PC with Unixware
unixware
SEDIT and S/REXX Reference Manual
SEDIT COMMAND REFERENCE GUIDE
Display Workstation
Siemens
SET
serv value
siemens
SET NBKEYS nb_left nb_top nb_right
This command makes SEDIT aware of the real number of left, top and right keys, so it can
handle the shift, control and meta modifiers properly.
The macros /home/xed/xmac/set_xxxx use these 3 SET commands, so the user
should never have to worry about them. Just use set_dec to display on a
DEC/COMPAQ/HP, set_ibm to display on an IBM, and so on.
Fourth Mode:
Within the IBM XEDIT editor, the SET command allows the user to set various editing
modes, such as the verify mode, by typing, for example, "set verify 1 3" instead of
"verify 1 3".
The SEDIT SET command allows the prefix SET as well in order to maintain strict
compatibility with XEDIT.
See Also: METAKEY, XTESTCHARS
SEDIT and S/REXX Reference Manual
Page 397
SETENV
SEDIT COMMAND REFERENCE GUIDE
SETEnv - Set Environment Variable
SETEnv var {expr}
sets the environment variable var to the value
expr.
Without expr, SETENV sets the environment variable var to an empty (null) value.
See Also: UNSETENV
SETP - Set Display String
SETP {string}
Batch Mode:
will display string at the last window line every
time SEDIT pauses.
Not Available
This command is intended to be used in the "profile.sedit" macro when the original
key setting is modified.
If string contains the "\n" line separator, it will be split into several lines according to
the number of separators.
When string is omitted, the last window line is returned to the editor.
Examples:
setp "1:Q 2:Ne 3:S
displays one help line.
4:Sp"
setp "1:Q 2:Ne 3:S 4:Sp\n6:cu 7:U 8:D 9:? 10:H"
displays two help lines.
setp
frees the last window line.
Page 398
SEDIT and S/REXX Reference Manual
SEDIT COMMAND REFERENCE GUIDE
SHADOW
SHAdow - Set Selective Editing Display Mode
SHAdow {ON | OFF}
Initial value:
Level:
sets the way SEDIT displays excluded lines.
ON
View
Each line in the file has a number associated with it, called its selection level which is set to
zero by default and may be modified by the commands ALL and SELECT, and by the prefix
commands X and S. When a line selection level does not fall in the DISPLAY range, it will
not be displayed.
With SHADOW ON, SEDIT will display a shadow line to represent each group of excluded
lines. With SHADOW OFF, SEDIT will not display these lines.
With no argument, SHADOW will display the current setting.
See Also: ALL, DISPLAY, SELECT, SCOPE
SHBlank - Show Last Trailing Blank
SHBlank ON|OFF
Initial value:
Level:
disables or enables the last trailing blank display.
ON
Global
By default, SEDIT removes all trailing blanks in every line when loading a file, when
editing a line and when saving a file. The KEEPBLANKS, BINARY, XKB and XBIN
commands allow the user to edit a file without removing trailing blanks.
When SHBLANK is ON, and when not working in character mode, SEDIT flags the last
trailing blank position displaying a thin vertical bar after that blank.
Note: KEEPBLANKS ON is not sufficient to preserve binary files integrity. Use BINARY
ON or XBIN instead.
See Also: AUTOBIN, BINARY, KEEPBLANKS, XBIN, XKB
SEDIT and S/REXX Reference Manual
Page 399
SHELL
SEDIT COMMAND REFERENCE GUIDE
SHEll - Execute a Shell Command
SHEll
command
transmits the string command to the operating
system for execution.
If command ends with a "&", command will be placed in the background1. Otherwise,
command will execute in the foreground, and SEDIT will wait until command ends.
When running in the foreground, command can be interrupted by typing ^c.
On UNIX systems, the command is processed by the /bin/sh default shell.
On WINDOWS systems, the command is processed directly by the operating system.
SHELL is a synonym to the WINDOWS command.
Example:
shell lpr $name &
will print the current UNIX file.
See Also: IMPCMSCP, WINDOWS, XSHELL
SHELLEXT - Set Default Execute Shell filetype (Windows)
SHELLEXT {ft1 ft2 .... ftn}
sets the file extensions to be passed to the
WINDOWS default Shell environment when
clicked on within FLIST.
Initial Values: exe pdf gif jpg jpeg png tif tiff pnx bmp doc fm
xls msi
Level:
Global
On WINDOWS systems, clicking on a file whose filetype is defined by SHELLEXT will
start the default action with this file.
For example, a PDF file could be opened with Acrobat Reader.
Without arguments, SHELLEXT displays its current settings.
Example:
shellext exe pdf msi "w eird"
will reset the SHELLEXT filetypes to the ones above.
1. This facility is not available on ASCII terminals, since the command output would overwrite the SEDIT screen.
Page 400
SEDIT and S/REXX Reference Manual
SEDIT COMMAND REFERENCE GUIDE
SHIFT
SHift - Shift Lines
SHift Left|Right {cols {target}}
Scope:
Display
SHIFT allows the user to shift data to the left, or to the right. SHIFT affects text from the
left zone column.
cols specifies the number of columns the data is to be shifted. When omitted, a value of 1
is assumed.
target defines the number of lines to be shifted. Lines are shifted starting with the
current line, up to but not including the target line. target may be one of the following:
:N
N or +N
-N
+* or *
-*
.symb
string expression
Up to but not including the Nth line.
N lines.
Up N lines.
The end of file.
The top of file.
The line which has been assigned the .symb symbolic name by
using the POINT command, or a .symb prefix command.
Defines a group of characters to be located.
The general format of a string expression is the following:
{+|-}{~}/string1{/{&}|{|}{~}/string2 ..... }
See the LOCATE command on page 304 for a precise string expression definition.
If target is omitted, a value of 1 is assumed.
The <, <<, > and >> prefix commands may be used for the same purpose.
Examples:
shift l
shifts one line.
sh r 3 /main shifts all lines up to the line containing the main
string.
See Also: STAY, ZONE
SEDIT and S/REXX Reference Manual
Page 401
SHOW
SEDIT COMMAND REFERENCE GUIDE
SHOw - Global Selective Line Editing
SHOw { target }
Scope:
selects the hidden lines containing the target
specified.
Display
SHOW scans the lines previously hidden by the ALL or the EXCLUDE commands, showing
all the lines matching the target operand.
See the ALL command for a description of the target operand.
See Also: ALL, EXCLUDE
SHOWCdpath - Displays the Accessed Directories
SHOWCdpath
SHOWCDPATH displays the directories in the cdpath.
SHOWCDPATH could display for example:
/home/m1/ | /home/
/usr/
| /home/xed/
See Also: DACCESS, DRELEASE
SHOWHistory - Show History
SHOWHistory
Shows history.
SHOWHISTORY displays the commands memorized in the history buffer.
This command is mapped to the M-F9 key by default.
See Also: XSHOWHISTORY, HISTORY, ?, ?I
Page 402
SEDIT and S/REXX Reference Manual
SEDIT COMMAND REFERENCE GUIDE
SHOWPATH
SHOWPath - Displays the Accessed Directories
SHOWPath
SHOWPATH displays the directories in the path, together with their filemodes.
SHOWPATH could display for example:
a : /home | b : /usr/ucb | c : /usr/bin | d : /usr/lib
e : /etc | f : /usr/etc
See Also: ACCESS, FLIST, RELEASE
SEDIT and S/REXX Reference Manual
Page 403
SOrt, NSort - Sort a File
SOrt target {{Ascending|Descending} n1 m1} .....
sorts the current file.
NSort target {{Ascending|Descending} n1 m1} .....
sorts the current file in natural order.
Scope:
DISPLAY
target indicates what lines will be sorted. It can be entered in the following ways:
•
•
•
•
•
:n
n
*
All
Sel
will sort from the current line up to but not including the line n.
will sort n lines starting at the current line.
will sort all the lines starting at the current line
will sort the entire file. This is the default if no target is specified.
will sort the selected lines. If the selection is rectangular, the
columns to be sorted will be that of the selection, the only extra
parameter allowed being ASCENDING or DESCENDING.
The columns to be sorted will be determined by the {ni mi} pairs. If omitted, the current
zone setting will used. If mi is an asterisk ("*"), the right zone column will be used.
There can be any number of sort fields.
The sort fields may be preceded with ASCENDING or DESCENDING which indicates the
order in which to sort the field, and all subsequent fields, until another ASCENDING or
DESCENDING parameter is encountered.
The default is sorting in ascending order.
Example:
sort
sort * a 1 12 d 18 *
sort s d 13 *
will sort all the file.
If CASE SIGNORE is in effect, SEDIT will not consider capitalization when the SORT
command is applied.
Example:
case si
sort *
will sort the current file ignoring capitalization.
NSORT is identical to SORT, except that decimal integer substrings are compared on their
numeric value1.
1. The natural order sorting algorithm was written by Martin Pool. See http://sourcefrog.net/projects/natsort/.
SEDIT COMMAND REFERENCE GUIDE
SORTRING
Consider the following file:
0001
0002
0003
0004
0005
a1
a2
a10
a12
a3
SORT * will re-order it this way:
0001
0002
0003
0004
0005
a1
a10
a12
a2
a3
and NSORT *:
0001
0002
0003
0004
0005
a1
a2
a3
a10
a12
See Also: ALL, CASE
SORTRing - Sort the Ring
SORTRing
sorts the ring.
The files in the ring are normally displayed in the order they have been loaded. SORTRING
displays the files in alphabetical order.
SEDIT and S/REXX Reference Manual
Page 405
SOS
SEDIT COMMAND REFERENCE GUIDE
SOS - Screen Operation Simulation
SOS
Batch Mode:
Alarm
BAckspace
CLEAR
INSertON|OFf|Toggle
INPut string
LINEAdd
LINEDel
TABB{N}
TABCmd
TABCMDB{N}
TABCMDF{N}
TABF{N}
Not Available
SOS Alarm
sounds the terminal bell the next time the screen is refreshed.
SOS BAckspace
moves the cursor as the BACKSPACE key would do.
SOS CLEAR
clears and redraws the screen. This is a synonym for the REFRESH CLEAR
command.
SOS INSert ON|OFf|TOGGLE
sets the INSERT mode ON or OFF immediately.
SOS TOGGLE will toggle the INSERT mode only when all characters entered with a
previous SOS INPUT command have been processed.
SOS INPut string
inserts string at the cursor location.
SOS LINEAdd
adds a line below the cursor location. This is a synonym for the C_LINEADD
command.
SOS LINEDel
deletes the line at the cursor location. This is a synonym for the C_LINEDEL
command.
Page 406
SEDIT and S/REXX Reference Manual
SEDIT COMMAND REFERENCE GUIDE
SOS
SOS TABB {N}
moves the cursor as if the PREV_FIELD key had been depressed N times. If not
specified, N assumes the value of one.
SOS TABCmd
sets the cursor at the command field for the screen in which it currently resides.
SOS TABCMDB {N}
sets the cursor to the N previously encountered command field. Useful to switch to a
different screen within a macro and pass a command into that screen. If not specified,
N assumes the value of one.
SOS TABCMDF {N}
sets the cursor to the N following encountered command field. Useful to switch to a
different screen within a macro and pass a command to that screen. If not specified,
N assumes the value of one.
SOS TABF {N}
moves the cursor as if the NEXT_FIELD key had been depressed N times. If not
specified, N assumes the value of one.
See Also: C_LINEADD, C_LINEDEL, REFRESH
SEDIT and S/REXX Reference Manual
Page 407
SPAN
SEDIT COMMAND REFERENCE GUIDE
SPAN - Multiple Lines Search
SPAN ON|OFF {Blank|Noblank {N|*}}
Initial value:
Level:
OFF BLANK 2
File
SPAN ON specifies that during a search, N lines are to be concatenated, allowing SEDIT to
find a string starting on one line, and ending on the following lines.
SPAN OFF specifies that a character string must be included on the same line in order to be
found.
When a truncation column has been specified with the TRUNC command, lines are padded
with blanks in order to match the truncation length. Otherwise, trailing blanks are deleted
before concatenation.
BLANK specifies that one more additional blank character is inserted between consecutive
lines.
NOBLANK specifies that no additional blank character is inserted between consecutive lines.
N specifies the number of lines that a string can span. If specified as *, the rest of the file is
searched.
When the searched columns are restricted with the ZONE command, only the portion of
lines defined by the ZONE values are concatenated.
Return Codes:
0
5
Normal
Invalid Operand
See Also: LOCATE, ZONE
Page 408
SEDIT and S/REXX Reference Manual
SEDIT COMMAND REFERENCE GUIDE
SPELL
SPELL - Spelling Checker
checks the current file for spelling errors.
SPELL
Scope:
Available on:
Batch Mode:
ALL
UNIX
Not Available
SPELL looks for the sedit_spell script file first in the current directory, then in the
home directory and finally in the installation directory.
This script looks for an sedit.dictionary private dictionary in the same set of
directories, and then calls the UNIX SPELL command, using this private dictionary when
found.
Then, SEDIT highlights in reverse video the first misspelled word, and places the cursor on
it.
The user may then type the correction. Remember that typing on selected characters deletes
them and sets the keyboard in insert mode.
After correction, the user may use the SPELL_NEXT command to look for the next
misspelled word, or the SPELL_ADD command to add this word to the private dictionary.
The SEDIT main menu "SPELL" item creates 3 buttons with the 3 spelling commands.
See Also: SPELL_ADD, SPELL_NEXT
SPELL_Add - Update Private Dictionary
SPELL_Add {ff}
Available on:
Batch Mode:
adds the current misspelled word to a private
dictionary.
UNIX
Not Available
SPELL_ADD looks for the ff file first in the current directory, then in the home directory
and finally in the installation directory.
If ff is not specified, it will be set to sedit.dictionary.
Then, the current misspelled word will be added to the ff file, and ff will be sorted for a
proper subsequent use with the SPELL command1.
See Also: SPELL, SPELL_NEXT
1. Some UNIX SPELL commands (SiliconGraphics for instance) do not allow private dictionary use.
SEDIT and S/REXX Reference Manual
Page 409
SPELL_NEXT
SEDIT COMMAND REFERENCE GUIDE
SPELL_Next - Search for Next Misspelled Word
displays the next misspelled word in reverse video
and sets the cursor on it.
SPELL_Next
Available on:
Batch Mode:
UNIX
Not Available
The user may then type the correction. Remember that typing on selected characters deletes
them and sets the keyboard in insert mode.
See Also: SPELL, SPELL_ADD
SPLTJOIN - Split/Join Lines
SPLTJOIN {Stay|Nostay}
Scope:
when the cursor is before the last non-blank
character, the line will be split, with indentation if the
auto-indent feature is on. When the cursor is after the
last non-blank character, the next line will be joined
to the current location.
Display
If NOSTAY is specified, the cursor is moved to the new line with proper indentation.
Otherwise, the cursor remains at the same location.
See Also: AUTOI, C_SPLIT
Page 410
SEDIT and S/REXX Reference Manual
SEDIT COMMAND REFERENCE GUIDE
SRCHANGE
SRChange - Selective Regular Expression Change
SRChange
/regex/string{/{target {N|*} {P}}}
changes the regular expression regex with string asking for
confirmation at each occurrence.
Scope:
Batch Mode:
Display
Not Available
/ may be replaced with any delimiting character that does not appear in the character
strings involved in the replacement.
A regular expression is a character string used to describe, in an extended way, a string to
be matched. It uses special characters, called meta characters to describe the match to be
done. See the R/ command on page 368 for a complete description of regular expressions.
target defines the number of lines to be scanned for a match. Lines are changed starting
with the current line, up to but not including the target line. target may be one of the
following:
:N
N or +N
+* or *
.symb
string expression
Up to but not including the Nth line.
N lines.
The end of file.
The line which has been assigned the .symb symbolic name by
using the POINT command, or a .symb prefix command.
Defines a group of characters to be located.
The general format of a string expression is the following:
{+|-}{~}/string1{/{&}|{|}{~}/string2 ..... }
See the LOCATE command on page 304 for a precise string expression definition.
When target is omitted, all lines between the current line and the end of file will be
scanned. However, if MODE CHANGE ONE is in effect, only the first line will be changed.
N is the number of occurrences of regex to be changed on each line.
If omitted, all occurrences of regex will be changed. However, if MODE CHANGE ONE is
in effect, only the first occurrence will be changed.
If specified as *, all occurrences of regex will be changed.
P is the relative number of the first occurrence of string to be changed in each line. Its
default value is 1.
When regex is omitted, string is inserted in the column which value is defined by the
first ZONE command operand (initially 1).
Every time regex is found, SEDIT will pause.
SEDIT and S/REXX Reference Manual
Page 411
Pressing the F12 key will make the change and the command will resume execution.
Pressing F1 will terminate the command.
Pressing Control-F12 will make all of the requested changes asked for without pausing
again.
Pressing any other key will proceed to the next occurrence of regex without processing a
change.
During a pause, the last window line will indicate the above key’s definition. All fields will
be turned into output fields, preventing any typing in them, and the "undo" feature will be
disabled.
When ARBCHAR is ON, all occurrences of the arbitrary character in string will be
changed with the string matching regex.
Examples:
src/[0-9]/?/
arbchar on @
src/[a-z]/(@)/**
will turn every number into a ?
will enclose every lowercase alphabetical
character within parenthesis.
If CASE CIGNORE is in effect, SEDIT will not consider capitalization when changing
strings.
Notes: The ZONE command allows the user to choose the starting and ending columns to
be scanned.
The SCKEYS command allows the user to modify the confirmation keys.
See Also: ARBCHAR, CASE, CHANGE, CN, HEX, LOCATE, MODE, RCHANGE,
SCHANGE, SCKEYS, SCN, STAY, ZONE
SEDIT COMMAND REFERENCE GUIDE
STACK
STAck - Stack Lines
STAck {target {col {len|*}}}
Scope:
Display
STACK allows the user to place the lines starting at the current line up to the line specified
by target in the S/REXX stack. S/REXX can retrieve these lines by using the PARSE PULL
instruction.
target defines the number of lines to be stacked. Lines are stacked starting with the
current line, up to but not including the target line. target may be one of the following:
:N
N or +N
-N
+* or *
-*
.symb
string expression
Up to but not including the Nth line.
N lines.
Up N lines.
The end of file.
The top of file.
The line which has been assigned the .symb symbolic name by
using the POINT command, or a .symb prefix command.
Defines a group of characters to be located.
The general format of a string expression is the following:
{+|-}{~}/string1{/{&}|{|}{~}/string2 ..... }
See the LOCATE command on page 304 for a precise string expression definition.
If target is omitted, a value of 1 is assumed.
cols specifies the starting column to be stacked. When omitted, a value of 1 is assumed.
len specifies the number of columns to be stacked. When specified as *, or when not
specified, the line will be stacked up to the last non-blank character.
In any case, the last stacked column is less or equal to the truncation column defined by the
LRECL command.
Example:
stack*5 20
See Also: LRECL
SEDIT and S/REXX Reference Manual
Page 413
STAMPDELAY
SEDIT COMMAND REFERENCE GUIDE
STAMpdelay - Discrepancy Reload Setting
STAMpdelay root time
sets the allowed discrepancy for the auto-reload
feature.
STAMpdelay Off
removes all time stamp delays.
STAMpdelay
displays the current time stamp delays.
Initial value:
Level:
Not Set
Global
When RELOAD is set to ON, SEDIT checks all the currently loaded files under the following
circumstances:
•
•
•
When SEDIT loses the keyboard focus, and then receives it again.
When the user switches from one file to another.
When the user loads a new file.
If SEDIT determines that a file has been externally modified, SEDIT saves the previous
image of the file that it had loaded into memory (after appending to its name the %
character), and then reloads the newly modified file.
A file is determined to be modified when its time stamp is older than the time stamp SEDIT
memorized when loading that file. With mounted file systems, especially between a UNIX
system and a WINDOWS system when using a CIFS UNIX client like the Sharity TM
software, there may be a discrepancy between the time stamp memorized by SEDIT, and
the actual time stamp on the WINDOWS file system. The STAMPDELAY command allows
SEDIT to ignore a given amount of discrepancy between time stamps in order to avoid
spurious reloads.
Examples:
stampdelay /home.nt 8
stampdelay /home.nt4 8
SEDIT will accept an 8 seconds time stamp discrepancy before reloading
any file starting with /home.nt or /home.nt4.
See Also: RELOAD
Page 414
SEDIT and S/REXX Reference Manual
SEDIT COMMAND REFERENCE GUIDE
STATUS
STATUS (Macro) - Displays All Settings
STATUS {filename}
displays all the current settings, or creates a
filename.sedit macro.
filename.sedit is an automatically generated macro which can be used to restore all
the current settings.
See Also: SET
STAY - Current Line Move
STAY ON|OFF
Initial value:
OFF
When STAY is OFF, the current line becomes the Top Of File, or the End Of File, when a
target search does not succeed after one of the following commands: FIND, NFIND,
FINDUP, NFINDUP and LOCATE.
In addition, the last line examined or acted upon becomes the new current line for the
following commands: CHANGE, CN, SCHANGE, SCN, COUNT, LOWERCAS, UPPERCAS,
SELECT and SHIFT.
When STAY is ON, the pointer does not move.
SEDIT and S/REXX Reference Manual
Page 415
STop - Set APL stop
STop
ON|ALL|OFF {FILE|SEL}
changes the stop setting for an APL function or
operator.
Scope:
Display
The first argument has the following meaning:
•
•
•
ON
ALL
OFF
will set a stop for every non-comment line.
will set a stop for every line.
will remove every stop.
The second optional argument has the following meaning:
•
FILE
•
SEL
Examples:
will apply the changes to the entire function or operator. This is the default
if omitted.
will apply the changes to the selected lines.
See Using the Mouse on UNIX systems on page 123 for more details
about making a linear or rectangular selection.
"stop on" will set a stop for every non-comment line.
"stop all file" will set a stop for every line.
"stop off sel" will remove every stop on the selected lines.
The prefix command field will be underlined when the stop is on.
STReam - Set Stream Status
STReam {ON | OFF}
When STREAM is ON, the entire file is searched for a column target in a CDELETE or a
CLOCATE command.
When STREAM is OFF, only the current line is searched.
Without argument, STREAM displays the current status.
See Also: CDELETE, CLOCATE
SEDIT COMMAND REFERENCE GUIDE
SWITCH
SWitch - Switch Between Files
SWitch
allows the user to switch from one file to another in
a circular sequence.
When the user switches to a file using the mouse or the command XEDIT, the file vacated
acquires the highest priority so that the next SWITCH command returns the user to the file
just vacated.
This command is mapped to the F5 key by default.
When the user is editing multiple files, using F5 and Shift-F5 will toggle between two
of them without visiting others.
See Also: ISWITCH, XEDIT
SEDIT and S/REXX Reference Manual
Page 417
SYNONYM
SEDIT COMMAND REFERENCE GUIDE
SYNonym - Set a Synonym
SYNonym ON | OFf
SYNonym {LINEND cc} alias {N} cmd
SYNonym CLEAR alias
Query SYNonym name
Query SYNonym *
Initial value:
ON
synonym quit 4 command aquit
When SYNONYM is ON, SEDIT looks for the aliases defined by the second SYNONYM
command format, where:
LINEND cc
specifies that the cc character acts as the command
separator.
alias
is the synonym to the cmd command. cmd cannot be
another synonym itself.
N
is the minimum alias abbreviation.
cmd
is the command to be entered when alias is used.
CLEAR
suppresses the alias definition. CLEAR must be
entered in capital letters.
QUERY SYNONYM name displays the name synonym, its minimum abbreviation and
everything else that was specified to specify that synonym. If name was not defined, only
name is displayed.
QUERY SYNONYM * displays the same information for every defined synonym.
Examples:
syn
syn
syn
syn
linend ; deltop 4 top;del
remove 3 del
fx f * x
CLEAR deltop
q syn deltop
displays:
SYNONYM LINEND ; deltop delt top;del
A synonym can be overridden by using the COMMAND command.
See Also: COMMAND
Page 418
SEDIT and S/REXX Reference Manual
SEDIT COMMAND REFERENCE GUIDE
SYNTAX
SYNTax - Set Syntax Coloring
SYNTax ON|OFF|GON|GOFF
SYNTax
filename
Initial value:
Level:
ON GON
File and Global
SYNTAX GON|GOFF
enables or disables syntax coloring on a global level.
SYNTAX ON|OFF
enables or disables syntax coloring for the current file. Syntax coloring will be
performed for a given file when both SYNTAX GON and SYNTAX ON for that
file are in effect.
SYNTAX filename
reads the filename file.
filename describes the way syntax coloring must be performed, and to which file.
filename may contain the following items:
filetype ft1 {ft2 {ft3 ....}}}
specifies that the syntax description applies to any file with a fti extension.
firstline w1 {w2 {w3 ....}}}
specifies that the syntax description applies to any file which first line contains
any of the wi words.
end
specifies the end of a filetype of firstline bloc.
string color stringtype
color specifies the color used to display strings. See the COLOR command on
page 184 for a list of available colors.
stringtype may be one of the following:
c
a C like string. Embedded quotes within a string must be prefixed
with a backslash. A backslash must also be prefixed with a
backslash.
Example: "abcde\"fgh\\ijk"
rexx
a REXX like string. Embedded quotes must be doubled.
Example: "abcde""fgh\ijk"
fortran
a FORTRAN like string. Embedded quotes within a C string must
be prefixed with a backslash or doubled. A backslash must also be
prefixed with a backslash.
Example: "abcde\"fgh\\ijk""lmn"
cobol
a COBOL like string. Embedded quotes must be doubled.
Example: "abcde""fgh\ijk"
SEDIT and S/REXX Reference Manual
Page 419
SYNTAX
SEDIT COMMAND REFERENCE GUIDE
comment color commenttype
comment specifies the color used to display comments. See the COLOR
command on page 184 for a list of available colors.
commenttype may be one of the following:
c
C and C++ like comments, delimited with /* and */, or starting
with // until the end of the line.
rexx
REXX like comments, delimited with /* and */. Unlike C, the
REXX language allows for nested comments, such as:
/*
/* */
*/
S/REXX and SEDIT also treat a line starting with a # as a
comment.
fortran
FORTRAN like comments. A line starting with a d, D, c, C, * or
a ! is a comment line.
The end of line after a ! character found outside a string is also a
comment.
In addition, some FORTRAN compilers allow the use of the C
preprocessor. Therefore, blocs delimited with /* and */ are also
comments.
sh
UNIX shells like comments. The end of line after a # character
found outside a string is a comment.
latex
LATEX like comments. The end of line after a % character is a
comment.
cobol
COBOL like comments. A character other than a blank or a minus
(-) on column 7 indicates a comment statement.
keyword color kw1 {kw2 {kw3 ....}}}
specifies the color used to display the words kwi.
variable standard|object
when "variable object" is specified, keywords will be recognized in strings like:
document.createElement("h1");"
case ignore|respect
case ignore specifies that the keywords are not case sensitive.
case respect specifies that the keywords are case sensitive.
match color1 {color2 {color3 ....}}}
specifies the colors used to match the {}, () and [] delimiters.
cpp color1 {color2 {color3 ....}}}
specifies the colors used to match the C preprocessor #if, #ifdef and
#ifndef constructs with their #else and #endif counterpart.
Note: The colors used to display strings and comments must no be used within a
keyword, match or cpp definition.
Page 420
SEDIT and S/REXX Reference Manual
SEDIT COMMAND REFERENCE GUIDE
SYNTAX
On UNIX systems, the /home/xed/syntax/reverse file is an example intended to
be used when displaying in reverse video mode:
*
* C and C++ files
*
filetype c c++ h
comment steelblue c
string forestgreen c
case respect
keyword coral struct union auto extern register typedef
static sizeof break continue default entry goto if else for
do while switch case int char float double long short
unsigned enum void volatile return
match maroon lemonchiffon red orchid deeppink lightcyan
rosybrown
lightseagreen
cyan
sienna
springgreen
lightgoldenrod sienna
cpp maroon lemonchiffon red orchid deeppink lightcyan
rosybrown
lightseagreen
cyan
sienna
springgreen
lightgoldenrod sienna
end
*
* C-SHELL scripts
*
firstline csh sh ksh tcsh
comment steelblue sh
string forestgreen c
case ignore
keyword coral if then else do forever endif foreach end
case esac echo set
match
red
blue
maroon
lemonchiffon
lightcyan
lightgoldenrod lightgoldenrodyellow lightseagreen orchid
rosybrown sienna springgreen
end
Note that some single long lines, such as the keyword lines, are displayed wrapped.
SEDIT and S/REXX Reference Manual
Page 421
S_COPY
SEDIT COMMAND REFERENCE GUIDE
S_COpy - Copy a Selection
S_COpy {Replace|Add {str}} copies the selection or the str string into the
internal buffer.
Without argument, the selection is copied into the internal buffer. See Copying the Selected
Characters on page 124 for more details.
Replace str
The str string overlays the internal buffer.
Add str
The str string is added as a new line into the internal buffer.
S_COPY is mapped to the L6 key on Sun workstations, and to the F3 key on other
workstations.
On WINDOWS systems, S_COPY is mapped to ^c.
S_CUt - Cut a Selection
S_CUt
removes the selected characters.
See Deleting the Selected Characters on page 123 for more details.
This command is mapped to the L10 key on Sun workstations, and to the F2 key on other
workstations.
On WINDOWS systems, S_CUT is mapped to ^x.
S_Find - Find a Selection
S_Find
searches for selected characters.
See Searching for Selected Characters on page 125 for more details.
This command is mapped to the L9, S-L9 and C-L9 keys on Sun workstations, and to the
F1 key on other workstations.
If there is no current selection, S_FIND remembers the last selection.
On WINDOWS systems, S_FIND is mapped to F1.
See Also: CASE
Page 422
SEDIT and S/REXX Reference Manual
SEDIT COMMAND REFERENCE GUIDE
S_HELP
S_Help - Shows Help About a Selected Item
starts editing the help file selected with the mouse.
S_Help
If the selection is one character wide, it will be expanded to the word.
This command is mapped to the ^H key by default.
S_Lower - Translate Into Lowercase
translates the characters selected with the mouse into
lowercase.
S_Lower
Scope:
Display
This command is mapped to the ^l key by default.
See Also: LOWERCAS
S_LShift - Shift Left from Selection
S_LShift {cols}
S_LShift considers the current selection. The text from the column where the selection
starts will be moved to the left.
cols specifies the number of columns the data is to be shifted. When omitted, a value of 1
is assumed.
This command is mapped to the M-F7 key by default.
See Also: SHIFT, S_RSHIFT
SEDIT and S/REXX Reference Manual
Page 423
S_MAN
SEDIT COMMAND REFERENCE GUIDE
S_MAN - Display Selected UNIX Reference Manual Pages
S_MAN
displays the UNIX reference manual pages in the
same format as the UNIX man command, according
to the current selection.
If the selection is one character wide, it will be expanded to the word. If there is no current
selection, the first word at or before the cursor position will be chosen.
S_MAN creates a new file word.man in the editing ring, where word is the selected or
expanded word with spaces replaced by the _ underscore character.
If word.man already exists, it will be overridden.
This command is mapped to the ^X (Shift-Control-x) key by default.
See Also: MAN
Page 424
SEDIT and S/REXX Reference Manual
SEDIT COMMAND REFERENCE GUIDE
S_PASTE
S_Paste - Retrieve a Selection
S_Paste
{Insert|Overlay} {Clipboard|Shelf|Primary}
{line column}
retrieves previously saved characters.
INSERT
specifies that the characters retrieved will be inserted on the screen.
This is the default when no keyword is specified, and when the
S_PASTE command is assigned to a non-shifted key, such as L8 or
F4.
OVERLAY
specifies that the characters retrieved will overlay the characters on
the screen. This is the default when no keyword is specified, and
when the S_PASTE command is assigned to a shifted key, such as
S-L8 or S-F4.
SHELF
specifies that the characters retrieved will be the characters saved by
the S_COPY command into the SHELF.
The SHELF is the standard cut and paste buffer used by OpenLook
applications. This is the default when no keyword is specified, and
when the S_PASTE command is assigned to a non-controlled key,
such as L8 or F4.
CLIPBOARD
is a synonym to SHELF. The CLIPBOARD terminology is used with
WINDOWS applications.
PRIMARY
specifies that the characters retrieved will be the characters currently
selected with the mouse.
This is the standard cut and paste buffer used by MOTIF
applications. This is the default when no keyword is specified, and
when the S_PASTE command is assigned to a controlled key, such
as C-L8 or C-F4.
LINE COLUMN
when LINE and COLUMN are not specified, S_PASTE inserts or
overlays data at the cursor location. When LINE and COLUMN are
specified, S_PASTE inserts or overlays data at the specified line and
column.
See Copying the Selected Characters on page 124 for more details.
Examples:
s_paste
s_paste 3 80
s_paste c o 12 79
This command is mapped to the L8 key on Sun workstations, and to the F4 key on other
UNIX workstations.
On WINDOWS systems, S_PASTE CLIPBOARD is mapped to the ^v key.
SEDIT and S/REXX Reference Manual
Page 425
S_PRSH
SEDIT COMMAND REFERENCE GUIDE
S_PRsh - Use Shelf When Getting a Primary Selection Request
S_PRsh
When SEDIT receives a request for the primary selection, it will return instead the data
saved by a S_COPY command into the Shelf (or Clipboard).
S_PRSH action is cancelled the next time a selection is made.
S_RShift - Shift Right from Selection
S_RShift {cols}
S_RShift considers the current selection. The text from the column where the selection
starts will be moved to the right.
cols specifies the number of columns the data is to be shifted. When omitted, a value of 1
is assumed.
This command is mapped to the M-F8 key by default.
See Also: SHIFT, S_LSHIFT
Page 426
SEDIT and S/REXX Reference Manual
SEDIT COMMAND REFERENCE GUIDE
S_SET
S_Set - Set Selection
S_Set |
|
[Linear | Rectangular] [Pending | Nopending] line1 col1 line2 col2
All
| Off
S_Set is intended to be used within macros to set the primary selection. The character
selected will be highlighted in reverse video. The parameters are the following:
Linear
The selection is a linear selection.
Rectangular
The selection is a rectangular selection.
Pending
The selection is a pending delete selection.
Nopending
The selection is not a pending delete selection.
line1
The first selection line relative to the file.
col1
The starting selection column.
line2
The last selection line.
col2
The last selection column. -1 or * means the complete line, including the virtual
invisible "\n" newline character.
All
All of the file will be selected.
Off
The current selection is cancelled.
See Using the Mouse on UNIX systems on page 123 or Using the Mouse on WINDOWS
Systems on page 127 for more details about selections.
Examples:
s_set
s_set
s_set
s_set
all
l n 1 2 5 8
l p 2 5 12 -1
off
SEDIT and S/REXX Reference Manual
Page 427
S_UPPER
SEDIT COMMAND REFERENCE GUIDE
S_Upper - Translate into Uppercase
S_Upper {All|Word}
Scope:
translates the characters selected with the mouse into
uppercase.
Display
All
specifies that all the selected characters are to be translated. ALL is
the default when no argument is specified.
Word
specifies that only the first character of each selected word is to be
translated.
S_UPPER ALL is mapped to the ^u key by default, and S_UPPER WORD is mapped to ^U
(Shift+Control+u).
See Also: UPPERCAS
S_Xed - Edit a Selected File
S_Xed
starts editing the file selected with the mouse.
If the selection is one character wide, it will be expanded to the word and the currently
edited file filetype will be appended to it.
On UNIX systems, S_XED is mapped to the ^x key.
On WINDOWS systems, S_XED is mapped to the ^X key.
Page 428
SEDIT and S/REXX Reference Manual
TABExp - Expand Tabulations
TABExp {All|Notf} {File|Sel} {N}
expands the tabulations into spaces.
Scope:
Display
The first optional argument has the following meaning:
•
•
All
Notf
will expand every tabulation with spaces. This is the default if omitted.
will expand every tabulation with spaces. However, the first
tabulation will be kept.
This feature is useful with files such as FORTRAN files where the first
tabulation has a special meaning.
The second optional argument has the following meaning:
•
•
File
Sel
will apply the changes to the entire file. This is the default if omitted.
will apply the changes to the selected lines.
See Using the Mouse on UNIX systems on page 123 or Using the Mouse
on WINDOWS Systems on page 127 for more details about making a
linear or rectangular selection.
The third optional argument is the number of spaces required for an indentation. The default
value is 8.
Examples:
"tabe" will expand all tabulations for every line.
"tabe n s" will expand the selected lines keeping the first tabulation.
TABLine / TABLINE_Screen - Set Tabline
TABLine
Initial value:
Level:
ON|OFF {line}
OFF 4
File and View
TABLINE_Screen
Initial value:
Level:
ON|OFF {line}
OFF 4
View
SEDIT maintains a separate TABLINE setting for each file and each view of this file
defined with the SCREEN command.
The TABLINE_SCREEN command updates the default TABLINE setting of the current
view, which is applied to every newly loaded file.
The TABLINE command applies to the current file on the current view.
TABLINE selects the physical line to display the tabline.
With TABLINE ON in effect, SEDIT displays a tabline in the input field area, which shows
the position of each tab column set by the TABSET command. If the tabline is set on the
same location as the scale line, the tab information will also appear on the scale
line.
line can be specified in three ways:
n|+n
selects the line n of the view to display the current line, where
the first line is line 1.
-n
selects the line n from the bottom of the view, where the last
line is line -1.
M+n|M-n
selects the line n lines above or below the middle line of the
view.
Examples:
TABL
TABL
TABL
TABL
ON 2
ON -3
ON M
OFF M+2
See Also: SCALE, TABSET
SEDIT COMMAND REFERENCE GUIDE
TABSET
TABSet - Set Tabulations
TABSet n1 {n2 n3 ...} {Ft string}
TABSet Incr n {Ft string}
TABSet None
sets the tab columns.
Initial value:
Level:
None
File
Usually, the TAB and R7 keys are used to switch from one input field to another. Using the
TABSET command, the user may define fixed positions in the input DATA fields. Then,
hitting the TAB or the R7 key will move the cursor from one tab position to the following
or preceding one.
With the first form of the TABSET command, the user enters a list of tab columns. If Ft
string is specified, this setting will become the default for every new file with a string
filetype.
If Ft is *, this will become the default for every file.
If FT is a period, it will select files with no filetype. This setting is also applied to the current
file, unless its filetype does not match Ft.
With the second form of the TABSET command, the user specifies an increment n and
SEDIT sets tabs in column 1 and every n columns thereafter.
TABSET NONE will cancel all tab columns in every file.
Examples:
tabs 1 6 72 ft f
tabs i 8 ft *
tabs n
tabs 1 12 20 ft .
tabs 1 9 17
SEDIT and S/REXX Reference Manual
will set 3 tab columns for every *.f new
file.
will set a tab column every 8 spaces for
every file.
will cancel all tab columns.
will set 3 tab columns for every file with
no filetype (such as /home/xed/cod).
will set 3 tab columns for the current file
only.
Page 431
TOOLBAR
SEDIT COMMAND REFERENCE GUIDE
TOolbar - Set Toolbar
TOolbar
{ON|OFf|Switch}
Initial value:
Level:
OFF
Global
Available on:
Batch Mode:
WINDOWS
Not Available
TOOLBAR ON displays the following toolbar:
which perform the following actions:
QUIT
abandons the file being edited if it has not been modified since last
stored.
NEW
creates a blank new file in memory.
OPEN
displays the OPEN FILE dialog box.
SAVE
saves the current file.
FILE
saves and then abandons the current file.
CUT
removes the selected characters.
COPY
copies the selection into the clipboard.
PASTE
retrieves previously saved characters.
PASTE OVERLAY
retrieves previously saved characters in overlay mode.
UPPER
translates the characters selected with the mouse into uppercase.
LOWER
translates the characters selected with the mouse into lowercase.
SHIFT LEFT
shifts to the left, according to the selection.
SHIFT RIGHT
shifts to the right, according to the selection.
PRINT
prints the contents of the current file, after displaying the PRINT
dialog box.
UNDO
cancels the last file modification.
REDO
cancels the last undo operation.
FIND
searches for selected characters.
FIND UP
searches backward for selected characters
TOOLBAR OFF
removes the toolbar.
TOOLBAR SWITCH toggles ON and OFF the toolbar.
TOOLBAR
Page 432
without arguments displays the current toolbar status.
SEDIT and S/REXX Reference Manual
TOP - Top of File
selects the first line as the current line.
TOP
Scope:
Display
This command is mapped to the Sun S-R2 (S-Scroll-Lock on other workstations) key.
TRAce - Set APL Trace
TRAce
ON|ALL|OFF {FILE|SEL}
changes trace setting for an APL function or
operator.
Scope:
Display
The first argument has the following meaning:
•
•
•
ON
ALL
OFF
will set a trace for every non-comment line.
will set a trace for every line.
will remove every trace.
The second optional argument has the following meaning:
•
FILE
•
SEL
Examples:
will apply the changes to the entire function or operator. This is the default
if omitted.
will apply the changes to the selected lines.
See Using the Mouse on UNIX systems on page 123 or Using the Mouse
on WINDOWS Systems on page 127 for more details about making a
linear or rectangular selection.
"trace on" will set a trace for every non-comment line.
"trace all file" will set a trace for every line.
"trace off sel" will remove every trace on the selected lines.
The data field will be underlined when the trace is on.
TREE
SEDIT COMMAND REFERENCE GUIDE
Tree - Start the TREE Editor
calls the tree editor.
Tree {dir}
Batch Mode:
Not Available
This command is mapped to the ^r key by default.
See The Tree Editor on page 481 for further explanations.
TREEScanlevel - Set TREE Scanning Level
TREEScanlevel {N}
Initial value:
0
When TREESCANLEVEL is set to 0 (the default), all the subdirectories belonging to the
same filesystem as the top level filesystem are scanned.
Once the scan is over, SEDIT saves the result in a file named sedit.treemap in order
to avoid initialization delay at the next call. If the directory layout is modified outside
SEDIT, TREE is not automatically updated.
When TREESCANLEVEL is set to a positive value N, TREE ignores any
sedit.treemap already existing. TREE rescans the disk at every call, to a depth of N
subdirectories. Initialization time will be longer than TREESCANLEVEL equal 0, but the
display is always accurate.
See Also: TREE
Page 434
SEDIT and S/REXX Reference Manual
SEDIT COMMAND REFERENCE GUIDE
TRUNC
TRUnc - Set Truncation Column
TRUnc *|N {FT string}
Initial value:
Level:
sets the truncation column.
*
File
* specifies that no truncation is to take place.
N specifies the column at which truncation occurs.
If FT string is specified, this setting will become the default for every new file with a
string filetype.
If FT is *, this will be the default for any file.
If FT is a period, it will concern files with no filetype. This setting is also applied to the
current file, unless its filetype does not match FT.
Examples:
trunc 80 ft f
will set the truncation column for
FORTRAN files.
trunc *
trunc 92 ft .
See Also: LRECL
SEDIT and S/REXX Reference Manual
Page 435
UNBUTTON
SEDIT COMMAND REFERENCE GUIDE
UNButton - Remove Button
UNButton
Available on:
Batch Mode:
{button}
removes button "button", or all buttons if
"button" is omitted.
UNIX
Not Available
UNDo - Cancel Last File Modification
UNDo {ALL|N}
UNDO cancels the last file modification.
UNDO ALL cancels all the modifications.
UNDO 3 cancels the last 3 file modifications.
When SAVECLEARUNDO is set to ON (the default), the undo memory is reset every time
the file is saved.
UNDO is mapped to the L4 key on Sun workstations, and to the F11 key on other
workstations.
See Also: REDO, SAVECLEARUNDO
UNSetenv - Remove Environment Variable
UNSetenv var
removes variable var from the environment.
See Also: SETENV
Page 436
SEDIT and S/REXX Reference Manual
SEDIT COMMAND REFERENCE GUIDE
UP
UP- Scroll Up
scrolls up N lines.
Up {N|*}
Scope:
Display
If N is omitted, a value of 1 is assumed. UP * makes the Top Of File the current line.
Return Codes:
0
1
5
SEDIT and S/REXX Reference Manual
Normal
Top Of File Reached
Invalid Operand
Page 437
UPPERCAS
SEDIT COMMAND REFERENCE GUIDE
UPPercas - Translate Into Uppercase
UPPercas {target}
Scope:
Display
target defines the number of lines to be translated into uppercase. Lines are translated
starting with the current line, up to but not including the target line. target may be one
of the following:
:N
N or +N
-N
+* or *
-*
.symb
string expression
Up to but not including the Nth line.
N lines.
Up N lines.
The end of file.
The top of file.
The line which has been assigned the .symb symbolic name by
using the POINT command, or a .symb prefix command.
Defines a group of characters to be located.
The general format of a string expression is the following:
{+|-}{~}/string1{/{&}|{|}{~}/string2 ..... }
See the LOCATE command on page 304 for a precise string expression definition.
If target is omitted, a value of 1 is assumed.
Examples:
upp
upp:5
uppercas*
translates one line.
translates all lines up to line 4.
translates the rest of the file.
See Also: STAY, S_UPPER
Page 438
SEDIT and S/REXX Reference Manual
SEDIT COMMAND REFERENCE GUIDE
UPPERCAS
VARblank - Ignore Successive Blanks
VARblank ON|OFF
Initial value:
Level:
OFF
FILE
When VARBLANK is set to ON, the number of blanks between strings does not matter in
searching for a target.
Without parameters, VARBLANK displays its setting.
Example:
/the
SEDIT and S/REXX Reference Manual
mouse/
matches "the mouse"
Page 439
VERIFY/VERIFY_SCREEN
SEDIT COMMAND REFERENCE GUIDE
Verify / VERIFY_Screen - Set Columns
Verify {{ON|OFF} {{Hex} start1 {end1}} {{Hex} start2 {end2}} {....}}
VERIFY defines the columns that are to be displayed on the current file on the current
screen.
Initial value:
Level:
1 2147483647
File and View
VERIFY_Screen{{ON|OFF} {{Hex} start1 {end1}} {{Hex} start2 {end2}}
{....}}
VERIFY_SCREEN defines the default columns that are to be displayed for every newly
loaded file on the current screen.
Initial value:
Level:
1 2147483647
View
SEDIT maintains a separate VERIFY setting for each file and each view of this file defined
with the SCREEN command.
The VERIFY_SCREEN command updates the default VERIFY setting of the current view,
which is applied to every newly loaded file.
The VERIFY command applies to the current file on the current view.
ON and OFF have no special meaning within SEDIT. They are retained for XEDIT
compatibility.
starti is the first column.
endi is the last column.
Hex displays the data in hexadecimal notation.
With no parameters at all, VERIFY displays the current setting.
If end1 is omitted, it will be set in such a way that the length to be displayed matches the
data field length. This particular setting is useful with vertically split screens.
The commands "left 0" or "right 0" restore the original setting.
If start1 is negative, the length to be displayed will match the data field length every time
a new view is created by splitting or unsplitting the screen, or when resizing the main
window. In addition, it will enable the SEDIT fullshift feature described below.
When displaying data in hexadecimal notation, SEDIT does not allow the newline "0A"
character to be typed in.
Page 440
SEDIT and S/REXX Reference Manual
SEDIT COMMAND REFERENCE GUIDE
Examples:
VERIFY/VERIFY_SCREEN
"v 1 74" will set display columns from 1 to 74.
"v" will display the setting "1 74".
"v -1" will enable the automatch feature when splitting the screen,
and will enable the fullshift mode.
"v" will display the setting "-1 74"
"v 1" will set the setting to "1 74" if the screen is 80 columns wide,
and cancel the automatch feature.
"v 1 20 h 1 20" will display the columns from 1 to 20 in both ASCII
and hexadecimal notation.
"verify_s 1 79" sets the default VERIFY for every newly loaded file.
The FULLSHIFT Mode
When displaying a subset of the file columns, by using for example the v 1 command, the
characters located outside of the screen are not affected by the Delete, Backspace or
ERASE END OF FIELD keys.
When in fullshift mode, the invisible characters located on the right of the screen are erased
by the ERASE END OF FIELD key, and shifted to the left by the Delete key, and by
the Backspace key when in INSERT mode.
See Also: LEFT, RIGHT, SCALE, C_SCRH, C_SCRJ, C_SCRV,
MODE LOCATE, SCREEN, VERIFY_SAVE
SEDIT and S/REXX Reference Manual
Page 441
VERIFY_SAVE
SEDIT COMMAND REFERENCE GUIDE
VERIFY_Save / VERIFY_SSave / VERIFY_KSave
VERIFY_SAve / VERIFY_SSave / VERIFY_KSAve {fn {ft {fd}}
These commands transform the unchanged source file into a backup file by appending a
"%" to its name, and create a new file using the edited memory image and the VERIFY
settings.
If the file name has been changed during the editing session so that it is identical to the name
of an existing file, or if the file has been modified by another user, VERIFY_SAVE will ask
for a confirmation before overwriting the existing file. VERIFY_SSAVE will not.
The VERIFY_KSAVE command performs the same function as the VERIFY_SAVE
command, but leaves the saved file timestamp unchanged. This may be useful, for example,
when the modified file is an include file. Using VERIFY_KSAVE will prevent a following
make command from recompiling every file which relies on the saved file.
If fn is specified, the filename of the file will be changed before saving.
If ft is specified, the filetype of the file will be changed before saving.
If fd is specified, the filedirectory of the file will be changed before saving.
VERIFY_SAVE does not heed the TRUNC, LRECL and KEEPBLANKS settings. If the
second value of a pair of VERIFY column is *, VERIFY_SAVE will save from the first
column up to the length of the line.
Example:
xed testfile
verify 20 30 1 10 70 90
verify_save testfile cols
saves the columns 20 to 30, 1 to 10 and 70 to 90 in the testfile.cols
file.
Warning:
Using VERIFY_SAVE without argument will overwrite the current file
with a possibly truncated version of this file.
See Also: VERIFY
Page 442
SEDIT and S/REXX Reference Manual
SEDIT COMMAND REFERENCE GUIDE
WINDOWS
VIsible - Count Visible Lines
VIsible
Each line in the file has a number associated with it, called its selection level, which is set
to zero by default. It may be modified by the commands ALL and SELECT, and by the
prefix commands X and S. When a line selection level does not fall in the DISPLAY range,
it will not be displayed.
VISIBLE displays the number of visible lines.
See Also: ALL, DISPLAY, DY_ALL, EXCLUDE, R/, SCOPE, SELECT,
SHADOW, SHOW
WHeel - Set Mouse Wheel Parameters
WHeel N1 N2
Initial value:
Level:
1 4
Global
On Windows systems, the mouse wheel allows to scroll up and down N1 lines at a time.
When Shift is depressed, SEDIT scrolls N2 lines at a time.
When Control is depressed, SEDIT scrolls one page.
When Shift and Control are both depressed, SEDIT goes to the first or the last file line.
Without paramaters, WHEEL displays the N1 and N2 values.
WIndows - Execute a WINDOWS Command
WIndows
command
transmits the string command to the operating
system for execution.
If command ends with a "&", command will be placed in the background1. Otherwise,
command will execute in the foreground, and SEDIT will wait until command ends.
When running in the foreground, command can be interrupted by typing ^c.
1. This facility is not available on UNIX ASCII terminals, since the command output would overwrite
the SEDIT screen.
SEDIT and S/REXX Reference Manual
Page 443
WINSHRINKTOFIT
SEDIT COMMAND REFERENCE GUIDE
On WINDOWS systems, the command is processed directly by the operating system.
WINDOWS is a synonym to the SHELL command.
On UNIX systems, the command is processed by the /bin/sh default shell.
Examples:
starts the nmake program in the
background.
wi nmake&
See Also: IMPCMSCP, MESSAGESDIR, SHELL, XSHELL
WINSHRinktofit - Window Auto-Size Feature
WINSHRinktofit ON|OFF
Initial value:
Level:
sets the window auto-size feature ON or OFF.
ON
Global
When WINSHRINKTOFIT is set to ON, SEDIT automatically changes its window’s width
and height to a multiple of the current font character width and height.
Some PC window managers can react to the automatic resize by resizing the SEDIT
window, which makes SEDIT resize it again, entering an infinite loop. Setting
WINSHRINKTOFIT to OFF in the profile prevents that from happening.
WRap - Wrap Around Feature
WRap ON|OFF
Initial value:
Level:
sets the wrap around feature ON or OFF.
ON
Global
When WRAP is set to ON, SEDIT continues the search up to the line preceding the current
line within the / and R/ commands. The search is continued following the current line
within the -/ and R-/ commands.
Within the CDELETE and CLOCATE commands, the search is continued up to the character
preceding (or following) the column pointer.
When WRAP is set to OFF, the search ends at the end (of top) of file.
See Also: CDELETE, CLOCATE, R/, R-/, /, -/
Page 444
SEDIT and S/REXX Reference Manual
SEDIT COMMAND REFERENCE GUIDE
BINARY
WRTL - Write Left to Right
WRTL { ON | OFF | T}
Initial value:
Level:
OFF
Global
WRTL ON moves the cursor right to left when typing.
WRTL T toggles ON and OFF the WRTL mode
See Also: RTLF
XBin - Edit Binary Files
XBin
{name {name2 {...}}
starts editing the specified files in binary mode.
By default, SEDIT removes all trailing blanks in every line when loading a file, when
editing a line and when saving a file. SEDIT also searches for the WINDOWS control
characters ^M and ^Z, and automatically removes then from display setting the loaded file
FILECONV to WINDOWS.
Trailing blanks are generally meaningless within text files, but may be essential within
binary files. When BINARY is set to ON, SEDIT does not remove trailing blanks setting
KEEPBLANKS to 1, does not check for the WINDOWS control characters and always sets
the loaded file FILECONV to UNIX.
In addition, when not running in character mode, when SHBLANK is set to ON (the default),
and when the last character in a line is a blank, SEDIT displays a thin vertical bar just after
that last blank character.
See Also: AUTOBIN, FILECONV, BINARY, KEEPBLANKS, SHBLANK, XKB
SEDIT and S/REXX Reference Manual
Page 445
XEDit - Edit New Files
XEDit
{name {name2 {...}}
starts editing the specified files.
When namei is omitted, XEDIT switches from one edited file to another in a circular
sequence.
If namei contains blanks, it must be surrounded with quotes or double quotes. If a file
name contains a quote or a double quote, the quote must be escaped with a backslash.
If namei does not start with a directory indicator, like "/", "./", "~/" or "\" on
WINDOWS, namei will first search in the current directory.
If not found, it will be searched for in the directories described by the environment variable
XPATH, or PATH, or accessed with the ACCESS command.
There are some short-cuts to make editing another file easier.
When the user is editing a certain type of file, for example "test.c", and the user wants
to edit another file of the same type, for example "test1.c", "x test1" may be typed
instead of "xed test1.c".
Note "x test1.f" can be typed to override this "x" feature.
XED is required only if the user does not want to append any filetype.
There are also several abbreviations for the most frequent types of files:
"xc test"
"xf test"
"xp test"
"xh test"
"xt test"
"xm test"
"xx test"
"xi"
"xe test"
"xs test"
<===>
<===>
<===>
<===>
<===>
<===>
<===>
<===>
<===>
<===>
"xed
"xed
"xed
"xed
"xed
"xed
"xed
"xed
"xed
"xed
test.c"
test.f"
test.p"
test.h"
test.txt"
test.mem"
test.x"
.dbxinit"
test.ex"
test.sedit"
Notes: It is possible to limit the size of files to be edited by using the LIMIT command.
Use XBIN to edit a binary file.
Use XBLANK to preserve and dsiplay trailing blanks.
Examples:
xed test.c
x foo
now, edits foo.c
x "a b" c d
edits 3 files. The first file name is "a b". Quotes are
necessary.
xed a\"b
xed ’a"b’
edits the a"b file.
does the same.
See Also: ACCESS, FOLLOW, ISWITCH, LIMIT, SWITCH, XBIN, XKB
SEDIT COMMAND REFERENCE GUIDE
XF
XF - Edit an APL Object
{LINE} XF 'NAME'
starts editing object 'NAME' at line 'LINE'
XF is an APL function supplied within the /home/xed/XF workspace able to edit any
kind of APL object, but
OR object representation. The only restriction relates to the
character
AV[0] which cannot be edited.
In the case of a nested array, or of an object with rank greater than two, the user will receive
a two dimensional display representation, but the user will not be allowed to issue the
"file" command to fix it in the active workspace.
The function XF maintains the date/time of the last modification in a variable named
TSOBJ, and SEDIT displays this information in the first screen line.
LINE will become the current line. If omitted, it will assume the value of 0 for a function
or an operator, and 1 for any other object.
As a shortcut, the command may be entered in the following way:
XF 'NAME' 3
instead of 3 XF 'NAME'
This may be useful if the string " XF'" is assigned to some Fi key.
On Sun workstations, this can be done by inserting the "mapi F2 xf'" string in the
"~/.ttyswrc" file before starting the APL shelltool.
When the state indicator is not empty, typing "XF''" will edit the currently stopped
function.
SEDIT and S/REXX Reference Manual
Page 447
XCSHELL
SEDIT COMMAND REFERENCE GUIDE
XCSHell - Execute a Shell Command
XCSHell command
Available on:
Batch Mode:
transmits the string command to the C-shell csh for
execution, and displays the result within SEDIT.
UNIX
Not Available
XCSHELL creates a nnn.xshell file, where nnn is a number between 1 and the value
set with the XSHELLMAX command (10 by default) chosen not to overwrite a previously
created file when possible. The name of the last created file can be retrieved with the
EXTRACT/XSHELL command. nnn.xshell exists only in the editing ring. The SAVE
or FILE command must be used to save it to disk.
Example:
xcsh ls -Ftla ~/foo
See Also: EXTRACT, MESSAGESDIR, SHELL, XSHELL, XSHELLMAX, XKSHELL
XKB - Edit Files with Trailing Blanks
XKB
{name {name2 {...}}
starts editing the specified files in KEEPBLANKS ON
mode.
By default, SEDIT removes all trailing blanks in every line when loading a file, when
editing a line and when saving a file.
Trailing blanks are generally meaningless within text files, but may be essential within data
files. When KEEPBLANKS is set to ON, SEDIT does not remove trailing blanks setting
KEEPBLANKS to 1.
In addition, when not running in character mode, when SHBLANK is set to ON (the default),
and when the last character in a line is a blank, SEDIT displays a thin vertical bar just after
that last blank character.
Notes: XKB is not sufficient to preserve binary files integrity. Use BINARY ON or XBIN
instead.
See Also: AUTOBIN, BINARY, KEEPBLANKS, SHBLANK, XBIN
Page 448
SEDIT and S/REXX Reference Manual
SEDIT COMMAND REFERENCE GUIDE
XSHELL
XKSHell - Execute a Shell Command
XKSHell command
Available on:
Batch Mode:
transmits the string command to the Korn shell ksh
for execution, and displays the result within SEDIT.
UNIX
Not Available
XKSHELL creates a nnn.xshell file, where nnn is a number between 1 and the value
set with the XSHELLMAX command (10 by default) chosen not to overwrite a previously
created file when possible. The name of the last created file can be retrieved with the
EXTRACT/XSHELL command. nnn.xshell exists only in the editing ring. The SAVE
or FILE command must be used to save it to disk.
Example:
xksh ls -Ftla ~/foo
See Also: EXTRACT, MESSAGESDIR, SHELL, XCSHELL, XSHELL, XSHELLMAX
XSHell - Execute a Shell Command
XSHell command
Batch Mode:
Not Available
On UNIX systems, XSHELL transmits the string command to the Bourne shell sh for
execution, and displays the result within SEDIT.
On WINDOWS systems, XSHELL executes the command directly.
XSHELL creates a nnn.xshell file, where nnn is a number between 1 and the value set
with the XSHELLMAX command (10 by default) chosen not to overwrite a previously
created file when possible. The name of the last created file can be retrieved with the
EXTRACT/XSHELL command. nnn.xshell exists only in the editing ring. The SAVE
or FILE command must be used to save it to disk.
Example:
xsh ls -Ftla /usr/john/foo
Note: The Bourne shell does not allow the use of the ~ home directory meta character.
See Also: EXTRACT, MESSAGESDIR, SHELL, XCSHELL, XKSHELL, XSHELLMAX
SEDIT and S/REXX Reference Manual
Page 449
XSHOWHISTORY
SEDIT COMMAND REFERENCE GUIDE
XSHELLMax - Set Displayed XSHELL Files Limit
XSHELLMax {max}
Initial value:
Level:
sets the maximum number of nn.xshell
displayed files.
10
Global
The various XSHELL commands create a nnn.xshell file, where nnn is a number
between 1 and max.
See Also: MESSAGESDIR, XCSHELL, XKSHELL, XSHELL
XSHOwhistory - Show History In Fullscreen Mode
XSHOwhistory
Batch Mode:
Shows history in fullscreen mode.
Not Available
XSHOWHISTORY displays the commands memorized in the history buffer in fullscreen
mode.
Clicking on a command with the first mouse button brings it in the command line.
Shift-clicking with the first mouse button or clicking with the middle mouse button executes
the command.
Moving the cursor in front of a command, using for example the TAB key, and pressing
Enter or Return brings it in the command line.
This command is mapped to the Control-F9 key by default.
See Also: SHOWHISTORY, HISTORY, ?, ?I
Page 450
SEDIT and S/REXX Reference Manual
SEDIT COMMAND REFERENCE GUIDE
XTESTCHARS
XTESTChars - Set the Font Testing Mode
XTESTChars ON | OFF
Initial value:
Level:
Available on:
OFF
Global
UNIX
When XTESTCHARS is ON, SEDIT checks the width and the height of the character to be
displayed. When either of these values is 0, SEDIT displays a quotation mark (?) instead
of displaying the character. This allows the user to use X Windows fonts in which some
characters are not defined.
However, on many X11 servers, the character size information is often wrong, misleading
SEDIT to display quotation marks for valid characters.
When XTESTCHARS is OFF, SEDIT systematically displays quotation marks for
characters with a decimal value of less than 32, and does not check the size information for
characters above that value.
The set server xxxx command sets XTESTCHARS OFF.
Since the set_xxx keyboard macros used in the profile.sedit initialization file call
the set server command, it is necessary to put the XTESTCHARS command behind
these macros.
Example:
when arch = 'sun4' | arch = 'sun3' | arch = 'sparc' then do
'set_sun_t5'
if $DISPLAY = "NCD:0" then ’xtestchars off’
This profile modification calls the XTESTCHARS command when a SUN is displaying on
an X terminal which DISPLAY is NCD:0.
See Also: SET SERVER
SEDIT and S/REXX Reference Manual
Page 451
ZONE / ZONE_Screen
SEDIT COMMAND REFERENCE GUIDE
Zone / ZONE_Screen - Set Zone
Zone {zone1 {zone2}}
Initial value:
Level:
1 2147483647
File and View
ZONE_Screen {zone1 {zone2}}
Initial value:
Level:
1 2147483647
View
SEDIT maintains a separate ZONE setting for each file and each view of this file defined
with the SCREEN command.
The ZONE_SCREEN command updates the default ZONE setting of the current view, which
is applied to every newly loaded file.
The ZONE command applies to the current file on the current view.
ZONE sets the zone to be searched by the commands "R/", "R-/", "/", "-/", "\",
"-\", "CHANGE", "CN".
zone1 is the starting left column.
zone2 is the ending right column. When omitted, it assumes the value of 2147483647.
Without any argument, ZONE displays the current setting.
Page 452
SEDIT and S/REXX Reference Manual
SEDIT COMMAND REFERENCE GUIDE
\
\ - Locate a Name String
will search for the name string starting at the current
line in descending order.
\{string}{/}
Scope:
Display
The cursor will be moved to the beginning of the string.
The last / is optional, unless the string ends with a / or a space.
If string is omitted, \ remembers the string passed at the previous invocation.
Examples:
\i
will find "i" in "a=i" but not in "a=ij"
\test/
\
searches again for the test name.
\a=b/c/
\//
Note: The "zone" command allows the user to choose the starting and ending columns
to be scanned.
These columns are also restricted by the VERIFY columns definition: the user can
only scan the visible part of the file.
See Also: ARBCHAR, CASE, MODE, VERIFY, ZONE
SEDIT and S/REXX Reference Manual
Page 453
-\
SEDIT COMMAND REFERENCE GUIDE
-\ - Locate a Name String
-\{string}{/}
Scope:
will search for the name string starting at the current
line in ascending order.
Display
The cursor will be moved to the beginning of the string.
The last / is optional, unless the string ends with a / or a space.
If string is omitted, -\ remembers the string passed at the previous invocation.
Note: The "zone" command allows the user to choose the starting and ending columns
to be scanned.
These columns are also restricted by the VERIFY columns definition: the user can
only scan the visible part of the file.
See Also: ARBCHAR, CASE, MODE, VERIFY, ZONE
? - Display Last Command
?
displays the last N commands in a circular sequence.
This command is mapped to the F9 key by default.
The length N of the history buffer can be changed with the HISTORY command described
on page 291.
When CMDLINE is OFF, using the ? command restores the command line in order to let the
user enter a command. Once the command is processed, the command line is removed.
When the command line contains one character, ? will only display the commands starting
with this character.
See Also: CMDLINE, HISTORY, SHOWHISTORY, XSHOWHISTORY
Page 454
SEDIT and S/REXX Reference Manual
SEDIT COMMAND REFERENCE GUIDE
?I
?I - Display Last Command
displays the last N commands in a reversed circular
way.
?I
This command is mapped to the S-F9 key by default.
The length N of the history buffer can be changed with the HISTORY command described
on page 291.
When CMDLINE is OFF, using the ?I command restores the command line in order to let
the user pass a command. Once the command is processed, the command line is removed.
When the command line contains one character, ?I will only display the commands starting
with this character.
See Also: CMDLINE, HISTORY, SHOWHISTORY, XSHOWHISTORY
= - Repeat Last Command
=
repeats the last command without displaying it.
set = string
the next time = is used, string will be executed.
= is mapped to the F12 key by default.
When cmd is specified, cmd is executed before the = action is taken.
Example:
add
=:3
adds a line.
adds a line after the line 3.
# - Comments
#
SEDIT and S/REXX Reference Manual
starts a comment line; useful in macro files.
Page 455
#
Page 456
SEDIT COMMAND REFERENCE GUIDE
SEDIT and S/REXX Reference Manual
TEXT FORMATTING
SEDIT Text Formatting Facilities
Margins
The miscellaneous text formatting commands use the margins set with the MARGINS
command described on page 311.
MARGINS 2 72 +4
sets the left margin to 2 and the right margin to 72. The first line of every paragraph will
begin on column 6.
The margin settings are file specific. The default margin values are set to 1 72 +0.
In order to modify the default margins, the user may use the reprofile.ex or
reprofile.sedit initialization macro which is executed every time a file is loaded.
For example, to set the default margins to 2 75 +3 for every *.doc document, the user
could use the following S/REXX reprofile.sedit macro:
'extract /ftype'
if ftype.1 = '.doc' then ’margins 2 75 +3’
Formatting Text
The FORMAT command described on page 277 specifies the way the FLOW command
described on page 273 identifies and formats paragraphs.
FLOW is assigned by default to the Shift-Control-F (^F) key.
When pressing ^F, the first word of the paragraph is placed at the paragraph indent column,
and the rest of the paragraph is placed to fit the left and right margins. If specified with the
FORMAT command, the text will be justified.
The CENTER command described on page 168 centers a line of text between the left and
right margins.
The LEFTADJUST (^L) command described on page 300 positions a line of text at the left
margin.
The RIGHTADJUST (^R) command described on page 366 positions a line of text at the
right margin.
Wordwrap Feature
When POWERINPUT is ON and the cursor reaches the end of a line, a new line is
automatically created, the last word of the cursor line is moved to the new line and the
cursor is moved to the end of this word. Then, the current line number is increased by one.
SEDIT and S/REXX Reference Manual
Page 457
TEXT FORMATTING
Page 458
SEDIT and S/REXX Reference Manual
The directory editor
What is it for ?
The Directory Editor FLIST
What Is It For?
The directory editor FLIST is a fullscreen file browser which allows the user to pass
various commands directly against files.
Throughout this chapter, the file naming convention is the following:
For any file such as "/usr/m1/test.f":
•
•
•
"/usr/m1" is called filedirectory.
"test" is called filename.
"f" is called filetype.
In FLIST, all files are referenced by passing an individual filename (FN), a filetype (FT)
and a filedirectory (FD).
The format of the 4 FLIST commands is:
Flist
{ FN { FT { FD } } }
RFlist
{ FN { FT { FD } } }
FFList
{ FN { FT { FD } } }
DFlist
{ FN { FT { FD } } }
where:
FN is the filename of all files to be displayed.
If an asterisk ("*") is entered here, all file-names will be selected.
A single period (".") will select files with no filename.
FT is the filetype of all files to be displayed.
If FT is omitted or if an asterisk ("*") is entered here, all file-types will be
selected.
A single period (".") will select files with no filetype.
FLIST considers the following special meta characters:
*
?
matches any set of characters.
matches any (one) character.
RFLIST considers the following special meta characters:
^
$
\<
\>
.
[]
matches only at the beginning of a line.
matches only at the end of a line.
matches only at the beginning of a word.
matches only at the end of a word.
matches any single character.
matches any character in a character class.
SEDIT and S/REXX Reference Manual
Page 459
cdpath
The directory editor
delimits the start of a subexpression. It is available for VI
compatibility, but has no special meaning.
delimits the end of a subexpression. It is available for VI
compatibility, but has no special meaning.
repeats the preceding 0 or more times.
\(
\)
*
If you want to use a meta character as an ordinary character, you must precede it with
a backslash (\) character.
DFLIST displays only directories.
FFLIST displays only non-directories.
FD is the filedirectory of the files to be displayed.
If FD is a string of 1 or 2 alphabetical characters, such as "a" or "za", it represents
an abbreviation for the directories currently accessed via the PATH or XPATH
environment variable. The user may override this feature by typing
"Shift-Return" instead of "Return".
The order of the file-directories is alphabetical:
"a" means the first one.
"b" the second one.
etc...
The first directory will always be the current directory, regardless of its position in
the UNIX path.
If FD starts with a directory indicator, such as "/", "./", "~/", it will be treated
like a standard directory. Otherwise, SEDIT will search first in the current directory
and then through the directories in the cdpath accessed with the DACCESS
command.
If FD is more than 2 alphabetical characters, FLIST will treat it as a directory-name.
If FD contains blanks, it must be surrounded with quotes or double quotes. If a
directory contains a quote or a double quote, the quote must be escaped with a
backslash.
Examples:
Assume a cdpath and a home directory as "/usr/m1".
will scan all the files in the current directory.
will do the same.
will do the same.
will scan for all files with no filename in the
current directory.
* h ~/dir1 will scan for every "/usr/m1/dir1/*.h" file.
* h dir1
is a short-cut to do the same.
* * *
will scan all the files in all PATH directories.
test* f
will scan all the test*.f files in the current
directory.
* * a
(followed by "Shift-Return") will scan the
directory "/home/m1/a"
f
f * * a
f * * ~
f . *
f
f
f
f
f
Page 460
SEDIT and S/REXX Reference Manual
The directory editor
Getting started
would match for example "aZb1234c".
would match every file starting with an uppercase
letter.
f * * "c:\Program Files"
quotes are necessary.
f a?b*c
rf ^[A-Z}
Using "Control-F"
If no directory editor session is active, entering "Control-F" is equivalent to the FLIST
command.
Once the directory editor is started, "Control-F" will switch between the file and the
directory editor.
Large Files support
A large file is a file larger than 2,147,483,647 bytes. SEDIT supports large files and FLIST
displays correctly large files length on the operating systems displayed when typing HELP
LARGEFILES.
Getting Started
Type f in the command field, and then hit the "Return" key.
The screen will look like this:
Level 0
40 Files
-rw-rw-rw- test
.f
a
-rw-rw-rw- test
.f
a
-rw-rw-rw- include
.h
a
-rw-rw-rw- command*
a
a : /usr/m1
|
b : /usr/m1/cmd |
c : /usr/bin
|
d : /usr/etc
|
e : /etc
1:/SN 3:END 4:XED 5:SWITCH
1 OF 40
..............................
..............................
..............................
..............................
1207
457
11111
9870
16/02/88
06/02/88
11/01/88
16/04/87
01:19
13:31
18:44
21:44
6:/SB 7:U 8:D 9:/SD 10:/ST 11:-> 12:CAN
The format used is similar to the "ls -l" UNIX command.
The first line indicates the current level. Each time the user calls the directory editor, a new
level is created.
Key F3 cancels the current level, and key F12 cancels all levels and returns to the file
editor.
The second line is the message field.
The next four lines (in this short example) are the work area; they show the selected files in
a reversed time order. Also displayed are the permission indicators, the filename, the
filetype, the filedirectory abbreviation, the input field filled with tabulations ("............."),
the file length, and the time of the last modification.
SEDIT and S/REXX Reference Manual
Page 461
Getting started
The directory editor
The next five lines indicate the directory abbreviations corresponding to the PATH
environment variable. In this example, in the ".cshrc" file, the user may have:
set path = (/usr/m1 /usr/m1/cmd /usr/bin /usr/etc /etc)
Note that the current directory is always the first to appear.
A cd command passed to the file editor will cancel all directory editor levels.
Page 462
SEDIT and S/REXX Reference Manual
The directory editor
Getting started
Displaying Owner/Group/Timestamp
When FLIST is running, typing ^h (Control-h) displays the file related time-stamps:
Level 0
40 Files
-rw-rw-rw- test
-rw-rw-rw- test1
-rw-rw-rw- include
-rw-rw-rw- command*
a : /usr/m1
|
b : /usr/m1/cmd |
1 OF 40
.f
.f
.h
a
a
a
a
..............................
..............................
..............................
..............................
1207
457
11111
9870
16/02/88
06/02/88
11/01/88
16/04/87
01:19
13:31
18:44
21:44
1:/SN 3:END 4:XED 5:SWITCH 6:/SB 7:U 8:D 9:/SD 10:/ST 11:-> 12:CAN
Typing ^o (Control-o) displays the file related owners:
Level 0
40 Files
-rw-rw-rw- test
-rw-rw-rw- test1
-rw-rw-rw- include
-rw-rw-rw- command*
a : /usr/m1
|
b : /usr/m1/cmd |
1 OF 40
.f
.f
.h
a
a
a
a
..............................
..............................
..............................
..............................
1207
457
11111
9870
O: john
O: root
O: bin
O: root
1:/SN 3:END 4:XED 5:SWITCH 6:/SB 7:U 8:D 9:/SD 10:/ST 11:-> 12:CAN
Typing ^g (Control-g) displays the file related groups (UNIX only):
Level 0
40 Files
-rw-rw-rw- test
-rw-rw-rw- test1
-rw-rw-rw- include
-rw-rw-rw- command*
a : /usr/m1
|
b : /usr/m1/cmd |
1 OF 40
.f
.f
.h
a
a
a
a
..............................
..............................
..............................
..............................
1207
457
11111
9870
G: team1
G: operator
G: wheel
G: wheel
1:/SN 3:END 4:XED 5:SWITCH 6:/SB 7:U 8:D 9:/SD 10:/ST 11:-> 12:CAN
SEDIT and S/REXX Reference Manual
Page 463
Getting started
The directory editor
Using the Function Keys
The principal function key definitions are referenced on the last line of the window.
Level 0
40 Files
-rw-rw-rw- test
-rw-rw-rw- test1
-rw-rw-rw- include
-rw-rw-rw- command*
a : /usr/m1
|
b : /usr/m1/cmd |
1 OF 40
.f
.f
.h
a
a
a
a
..............................
..............................
..............................
..............................
1207
457
11111
9870
G: users
G: root
G: operator
G: wheel
1:/SN 3:END 4:XED 5:SWITCH 6:/SB 7:U 8:D 9:/SD 10:/ST 11:-> 12:CAN
Page 464
F1
SORT BY NAME
files will be displayed sorted by their filename.
files with no filename, like .dbxinit, will be displayed
first.
Shift-F1
SORT BY NAME in reversed order.
F2
generates an SEDIT file with the same content displayed
within FLIST.
Shift-F2
generates an SEDIT file with the full names of the files
displayed within FLIST.
F3
END
will terminate the current directory editor level. If this level
is the last one, it will return to the file editor.
F4
XED
opens for editing the file pointed by the cursor.
F5
SWITCH
switches between different directory editor levels.
Shift-F5 does the same as above in reversed order.
This key has the same behavior in XED and FLIST.
F6
SORT BY SIZE
files will be displayed in the decreasing order of their sizes.
Shift-F6
SORT BY SIZE in reversed order
F7
UP
if the mouse is in the work area, the user can scroll up the
files. If it is in the directory indicator area, the user can scroll
up the directory indicator display.
F8
DOWN
if the mouse is in the work area, the user can scroll down the
files. If it is in the directory indicator area, the user can scroll
down the directory indicator display.
SEDIT and S/REXX Reference Manual
The directory editor
Getting started
F9
SORT BY DATE
the files will be displayed beginning with the latest.
This is the initial default.
Shift-F9
SORT BY DATE in reversed order.
F10
SORT BY FILETYPE
files will be displayed in a filetype alphabetical order.
files with no filetype, like "module", will be displayed first.
Shift-F10
SORT BY FILETYPE in reversed order.
F11
EXTENSION
this key is used when data is longer than the input zone.
A screen similar to the following will be displayed:
Level 0
40 Files
1 OF 40
-rw-rw-rw- test
.f
a ................................................................................
-rw-rw-rw- test
.f
a ..............................
457
06/02/88 13:31
-rw-rw-rw- include
.h
a ..............................
11111
11/01/88 18:44
-rw-rw-rw- command*
a ..............................
9870
16/04/87 21:44
a : /usr/m1
|
b : /usr/m1/cmd |
c : /usr/bin
|
d : /usr/etc
|
e : /etc
1:/SN 3:END 4:XED 5:SWITCH 6:/SB 7:U 8:D 9:/SD 10:/ST 11:-> 12:CAN
Shift-F11
will scroll up to the first file.
F12
CANCEL
will cancel all directory editor levels and return to the file
editor.
Shift-F12
will scroll up to the last file.
HOME
On WINDOWS systems, moves the cursor to the start of the
input field.
On UNIX systems, moves the cursor to the first input
field.When the 3270 HOME simulation is cleared with a
command such as ’set home’ in the profile, the HOME key
moves the cursor to the start of the input field.
Control-HOME
will scroll up to the first file.
END
On WINDOWS systems, moves the cursor to the end of the
typed command.
On UNIX systems, moves the cursor to the last input
field.When the 3270 IHOME simulation is cleared with a
command such as ’set ihome’ in the profile, the END key
moves the cursor to the start of the typed command.
SEDIT and S/REXX Reference Manual
Page 465
Getting started
The directory editor
Control-END
will scroll up to the last file.
Control-m1
generates an SEDIT file with the same contents displayed
within FLIST.
Control-M1
generates an SEDIT file with the full names of the files
displayed within FLIST.
Control-n
will initiate a new directory editor level scanning for all files
with the filename indicated by the cursor.
The user may do the same by typing "f /n *".
Control-t
will initiate a new directory editor level scanning for all files
with the filetype indicated by the cursor.
The user may do the same by typing "f * /t".
Control-f
will switch to the file editor.
Control-x
does the same as above.
Control-r
will switch to the tree editor. See The Tree Editor on page
481 for further explanations.
Control-y
will scroll up to the first file.
Control-u
will scroll down to the last file.
Control-v
will scroll up the directory indicator display.
Control-b
will scroll down the directory indicator display.
Control-w
clears the input fields in the work area.
Control-e
initiates a scan, without creating a new level. It can be used
to refresh the display when the corresponding directory has
been modified outside SEDIT.
Control-a
toggles ON and OFF the display of the file related
permissions.
Control-h
displays the file related time-stamps.
Control-o
displays the file related owners.
Control-g
displays the file related groups.
1. Not in ASCII terminal mode.
Page 466
SEDIT and S/REXX Reference Manual
The directory editor
Getting started
Using the Buttons
If the following statement:
’FBUTTON ON’
is included in the profile.sedit initialization macro, FLIST displays the following set
of menu buttons:
Clicking with the third mouse button on UNIX systems displays a menu.
Clicking with the left mouse button directly executes the first menu item.
On WINDOWS systems, the left mouse button displays the menu.
The Sort menu
By Name
Files will be displayed sorted by their filename.
By Type
Files will be displayed in a filetype alphabetical order.
By Size
Files will be displayed in the decreasing order of their
sizes.
By Date
Files will be displayed beginning with the latest.
The New menu
Same Filename
Will initiate a new directory editor level scanning for all
files with the filename indicated by the cursor.
Same Filetype
Will initiate a new directory editor level scanning for all
files with the filetype indicated by the cursor.
Same Directory
Will initiate a new directory editor level scanning for all
files with the same directory as the file indicated by the
cursor.
SEDIT and S/REXX Reference Manual
Page 467
Getting started
The directory editor
The End menu
Return
Returns to the caller, either XED or TREE.
End Level
Will terminate the current directory editor level. If this
is the last level, it will return to the file editor.
End All Levels
Will cancel all directory editor levels and return to the
file editor.
The simple buttons
Top
The first file will be displayed on the first screen line.
Bot
The last file will be displayed on the last screen line.
Make File
Tree
Generates an SEDIT file with the same contents
displayed within FLIST.
Will switch to the tree editor.
Mouse Editing a File
Clicking with the leftmost mouse button on the filename part of a file will start editing this
file.
On WINDOWS systems, clicking on an *.exe file executes this file.
Switching Permissions Display
When FLIST is running, typing ^a (Control-a) switches the permissions display mode.
Page 468
SEDIT and S/REXX Reference Manual
The directory editor
Getting started
By default, the FLIST directory editor displays the file related permissions:
Level 0
40 Files
-rw-rw-rw- test
.f
a
-rw-rw-rw- test1
.f
a
-rw-rw-rw- include
.h
a
-rw-rw-rw- command*
a
a : /usr/m1
|
b : /usr/m1/cmd |
c : /usr/bin
|
d : /usr/etc
|
e : /etc
1:/SN 3:END 4:XED 5:SWITCH
SEDIT and S/REXX Reference Manual
1 OF 40
..............................
..............................
..............................
..............................
1207
457
11111
9870
16/02/88
06/02/88
11/01/88
16/04/87
01:19
13:31
18:44
21:44
6:/SB 7:U 8:D 9:/SD 10:/ST 11:-> 12:CAN
Page 469
Getting started
The directory editor
Typing ^a will switch the display to:
Level 0
40 Files
test
.f
a
........................................
test1
.f
a
........................................
include
.h
a
........................................
command*
a
........................................
a : /usr/m1
|
b : /usr/m1/cmd |
c : /usr/bin
|
d : /usr/etc
|
e : /etc
1:/SN 3:END 4:XED 5:SWITCH 6:/SB 7:U 8:D 9:/SD
1 OF 40
1207
457
11111
9870
16/02/88
06/02/88
11/01/88
16/04/87
01:19
13:31
18:44
21:44
10:/ST 11:-> 12:CAN
This allows more space for displaying long file names.
The permissions display mode may also be changed by using the FLATH SEDIT command.
Page 470
SEDIT and S/REXX Reference Manual
The directory editor
Passing commands
Passing Commands
The Built-in Commands
The built-in commands are commands which are specific to the directory editor. Their
syntax is quite different from that of the corresponding UNIX commands.
Once executed, they are flagged by a "*" character when successful or by a "?" when they
fail. The user may type a command, scroll using the mouse or the function keys, type
another command and then execute them by pressing the return key. If the user changes
the sort order before executing these pending commands, they will be commented out with
a "#" character.
* # or ?
starting commands are comments and will not be
executed.
?
alone redisplays the last command.
Bottom
will scroll up to the last file.
F, RF, DF, FF
commands are similar to the *FLIST commands
passed in the file editor, with some exceptions:
•
Level 0
The implicit directory is not the current directory but the filedirectory of the file it
is applied to.
For example:
40 Files
-rw-rw-rw- test
-rw-rw-rw- include
-rw-rw-rw- command*
a : /usr/m1
|
b : /usr/m1/cmd |
1 OF 40
.f
.h
b
b
b
f * * ./dup
..............................
..............................
457
11111
9870
06/02/88 13:31
11/01/88 18:44
16/04/87 21:44
initiates a new directory editor level searching all the
"/usr/m1/cmd/dup/*.*" files.
•
Level 0
The user may type /n which means "same filename"
/twhich means "same filetype"
40 Files
-rw-rw-rw- test
-rw-rw-rw- include
-rw-rw-rw- command*
a : /usr/m1
|
b : /usr/m1/cmd |
1 OF 40
.f
.h
b
b
b
f /n *
..............................
..............................
457
11111
9870
06/02/88 13:31
11/01/88 18:44
16/04/87 21:44
initiates a new directory editor level searching all the
"/usr/m1/cmd/test.* " files.
SEDIT and S/REXX Reference Manual
Page 471
Passing commands
The directory editor
Cp or Copy
command is an IBM CMS-style copyfile command.
It applies directly to the file indicated by the cursor.
Its syntax is Cp FN FT FD {(Rep {Oldd} }
FN is the filename of the newly created file.
FT is its filetype.
FD is its filedirectory.
The user may use = to indicate that the component is the same as that of the
matching file.
Rep is an optional indicator which allows the user to overwrite an existing file.
If the user does not specify it, SEDIT will not allow the file to be overwritten.
Oldd is an optional indicator which allows the user to preserve the source file
modification time.
Usage note: CP without arguments brings the filename, filetype and the = sign
on the corresponding command line, allowing easy editing.
Level 0
40 Files
-rw-rw-rw- test1
-rw-rw-rw- include
-rw-rw-rw- command*
a : /usr/m1
|
b : /usr/m1/cmd |
1 OF 40
.f
.h
b
b
b
cp = oldf a (r
..............................
..............................
457
11111
9870
06/02/88 13:31
11/01/88 18:44
16/04/87 21:44
will copy /usr/m1/cmd/test1.f to /usr/m1/test1.oldf.
Level 0
40 Files
-rw-rw-rw- test1
-rw-rw-rw- include
-rw-rw-rw- command*
a : /usr/m1
|
b : /usr/m1/cmd |
1 OF 40
.f
.h
b
b
b
cp = = ./dup
..............................
..............................
457
11111
9870
06/02/88 13:31
11/01/88 18:44
16/04/87 21:44
will copy /usr/m1/cmd/test1.f to /usr/m1/cmd/dup/test1.f.
Page 472
SEDIT and S/REXX Reference Manual
The directory editor
Passing commands
passes the matching complete UNIX filename and
the name built with the arguments to the UNIX
diff command.
Diff
Level 0
40 Files
-rw-rw-rw- test
-rw-rw-rw- include
-rw-rw-rw- test
a : /usr/m1
|
b : /usr/m1/cmd |
1 OF 40
.f
b
.h
b
oldf b
d = oldf =
..............................
..............................
457
11111
9870
06/02/88 13:31
11/01/88 18:44
16/04/87 21:44
executes the UNIX
diff /usr/m1/cmd/test.f /usr/m1/cmd/test.oldf
command, and displays the result within SEDIT.
Usage note: DIFF without arguments brings the filename, filetype and the =
sign on the corresponding command line, allowing easy editing.
SEDIT and S/REXX Reference Manual
Page 473
Passing commands
The directory editor
Mv or Ren
command is an IBM CMS-style movefile command.
It applies directly to the file indicated by the cursor.
its syntax is Mv FN FT FD {(Rep {Oldd} }
Level 0
40 Files
-rw-rw-rw- test1
-rw-rw-rw- include
-rw-rw-rw- command*
a : /usr/m1
|
b : /usr/m1/cmd |
1 OF 40
.f
.h
b
b
b
mv = = ./dup
..............................
..............................
457
11111
9870
06/02/88 13:31
11/01/88 18:44
16/04/87 21:44
will move /usr/m1/cmd/test1.f to /usr/m1/cmd/dup/test1.f.
If the user replaces a displayed file using the MV command, that file will be
displayed in blue, its length will be replaced with a "xxxxxxx" string, and its
first letter by a "|".
Level 0
40 Files
-rw-rw-rw- test1
-rw-rw-rw- test2
-rw-rw-rw- command*
a : /usr/m1
|
b : /usr/m1/cmd |
1 OF 40
.f
.f
b
b
b
mv test2 = = (r
..............................
..............................
457
11111
9870
06/02/88 13:31
11/01/88 18:44
16/04/87 21:44
gives:
Level 0
40 Files
-rw-rw-rw- test2
-rw-rw-rw- |est2
-rw-rw-rw- command*
a : /usr/m1
|
b : /usr/m1/cmd |
1 OF 40
.f
.f
b
b
b
..............................
..............................
..............................
457
xxxxx
9870
06/02/88 14:06
11/01/88 18:44
16/04/87 21:44
Every directory editor level will be updated.
Usage note: MV without arguments brings the filename, filetype and the = sign
on the corresponding command line, allowing easy editing.
O
Page 474
on Windows, calls the ShellExecute() API on
the corresponding file, executing the default
Windows action.
SEDIT and S/REXX Reference Manual
The directory editor
Passing commands
RM or E
command is used with no argument to delete the
matching file.
Once a file has been erased, it is displayed in blue and its length is replaced with
a "xxxxxxx" string.
Level 0
40 Files
-rw-rw-rw- test1
-rw-rw-rw- test2
-rw-rw-rw- command*
a : /usr/m1
|
b : /usr/m1/cmd |
1 OF 40
.f
.f
b
b
b
rm
..............................
..............................
457
11111
9870
06/02/88 13:31
11/01/88 18:44
16/04/87 21:44
gives:
Level 0
40 Files
-rw-rw-rw- test1
-rw-rw-rw- test2
-rw-rw-rw- command*
a : /usr/m1
|
b : /usr/m1/cmd |
1 OF 40
.f
.f
b
b
b
*rm
..............................
..............................
xxxxx
11111
9870
06/02/88 13:31
11/01/88 18:44
16/04/87 21:44
Notes: Since ISPF users generally use the "e" command to start editing a file, when
"mode prefix ispf" is on, the user cannot use the "e" command to delete a
file. Only the "rm" command can be used for that purpose.
On WINDOWS systems, when RECYCLE is ON, removing files moves then into
the recycle bin.
Top
will scroll up to the first file.
Xed
starts editing the matching file.
This command allows the user to start editing several files at once. If the user
wants to edit only one file, the F4 function key may be used.
XBin
starts editing the matching file in binary mode. See
the BINARY command on page 160 for more
information.
XKb
starts editing the matching file with KEEPBLANKS
set to ON. See the KEEPBLANKS command on page
294 for more information.
WIPE
wipes the selected file. WIPE is in fact the
wipe.flist macro, and uses the WIPE()
S/REXX buil-in described page 626.
SEDIT and S/REXX Reference Manual
Page 475
Passing commands
The directory editor
repeats the preceding command
=
Level 0
40 Files
-rw-rw-rw- test1
-rw-rw-rw- test2
-rw-rw-rw- test3
-rw-rw-rw- test4
a : /usr/m1
|
b : /usr/m1/cmd |
1 OF 40
.f
.f
.f
.f
b
b
b
b
cp = oldf = (rep
=............................
=............................
=............................
457
11111
9870
9870
06/02/88
11/01/88
16/04/87
16/04/87
13:31
18:44
21:44
21:44
will copy these four files and give:
Level 0
40 Files
-rw-rw-rw- test1
-rw-rw-rw- test2
-rw-rw-rw- test3
-rw-rw-rw- test4
-rw-rw-rw- test1
-rw-rw-rw- test2
-rw-rw-rw- test3
-rw-rw-rw- test4
a : /usr/m1
b : /usr/m1/cmd
Page 476
1 OF 40
.f
.f
.f
.f
.oldf
.oldf
.oldf
.oldf
b
b
b
b
b
b
b
b
*cp = oldf = (rep
*cp = oldf = (rep
*cp = oldf = (rep
*cp = oldf = (rep
..............................
..............................
..............................
..............................
457
11111
9870
9870
457
11111
9870
9870
06/02/88
11/01/88
16/04/87
16/04/87
06/02/88
11/01/88
16/04/87
16/04/87
13:31
18:44
21:44
21:44
13:31
18:44
21:44
21:44
|
|
SEDIT and S/REXX Reference Manual
The Non-built-in Commands
When the user passes a command other than a built-in command, that command is passed
directly to the shell followed by the matching complete UNIX or WINDOWS filename.
Note that this command may be interrupted by typing ^c at any time.
Level 0
40 Files
-rw-rw-rw- private
.f
a
-rw-rw-rw- test2
.f
b
-rw-rw-rw- command*
b
a : /usr/m1
b : /usr/m1/cmd
c : /usr/lib/fonts/fixedwidthfonts
1 OF 40
chmod o-w
..............................
..............................
|
|
|
457
11111
9870
06/02/88 13:31
11/01/88 18:44
16/04/87 21:44
will modify the permissions for the UNIX file /usr/m1/private.f.
Overriding a Built-in Command
If the user validates a command by typing "Control-return" instead of "Return",
there will be no checking for built-in commands. This is useful if the user wants to pass a
synonym of a built-in command to the shell.
This facility is not available when SEDIT runs in character mode.
S/REXX:macro commands
The directory editor
Using S/REXX Macros Within FLIST
An S/REXX macro command is a file with an flist filetype which is called from the
FLIST environment.
In order to make a macro file available for such usage, the user must first enter (for example
in the profile.sedit initialization file) the "HASH {dir1 {dir2} {...}}"
command described on page 285.
The default profile load all the macros located in the {install-dir}/xmac directory.
xmac contains the following utime.flist sample macro:
/*
* utime: MACRO sample used within FLIST
*
* Usage example:
*
* -rw-rw-r-- restart.x a utime 1/1/1998 12:03:13
*
* utime will be called as
*
* call utime "{a directory}/restart.x", "1/1/1998 12:03:13"
*
*/
signal on novalue
option mixed setenv
parse arg file, args
if args = ’’ then return 0
parse var args jj’/’mm’/’yy hh’:’mi’:’ss
if hh = ’’ then hh = 0
if mi = ’’ then mi = 0
if ss = ’’ then ss = 0
rep = utime(file, jj, mm, yy, hh, mi, ss)
if rep = 0 then return 0
’msg utime: Unable to change "’file’" timestamp.’
’msg reason: ’rep
return 1
Typing the macro name (utime) in one of the FLIST input fields calls the macro with 2
arguments. The first argument is the complete file name (including the directory part), and
the second is the optional string entered after the macro name.
When the macro returns 0, FLIST remains active. When the macro returns 1, FLIST
returns to the file editor.
In this example, utime parses the entered date and then uses the S/REXX utime()
built-in to modify the time stamp of the corresponding file.
Page 478
SEDIT and S/REXX Reference Manual
The directory editor
S/REXX:macro commands
When FMACRO is OFF (the default), FLIST looks for built-in commands first before
looking for macros.
When FMACRO is ON, FLIST looks for macros first before looking for built-in commands.
FMACRO ON allows to override built-in FLIST commands such as the cp command.
The FLFILES() built-in described on page 567 can be used to retrieve the names of the
files displayed in the current FLIST level.
SEDIT and S/REXX Reference Manual
Page 479
S/REXX:macro commands
Page 480
The directory editor
SEDIT and S/REXX Reference Manual
The tree editor
Getting started
The Tree Editor
Getting Started
The tree editor TREE allows the user to graphically visualize the directory layout.
The format of the TREE command is:
Tree {dir}
where dir is the directory to start the scan. If
omitted, the scan will start at the home directory.
When TREESCANLEVEL is set to 0 (the default), all the subdirectories belonging to the
same filesystem as the dir filesystem are scanned.
Once the scan is over, SEDIT saves the result in a file named sedit.treemap in order
to avoid initialization delay at the next call. If the directory layout is modified outside
SEDIT, TREE is not automatically updated.
When TREESCANLEVEL is set to a positive value N, TREE ignores any
sedit.treemap already existing. TREE rescans the disk at every call, to a depth of N
subdirectories. Initialization time will be longer than TREESCANLEVEL equal 0, but the
display is always accurate.
To modify the TREESCANLEVEL during an SEDIT session, issue for example the
following command in the SEDIT command field:
=====> TREES 1
To set the default TREESCANLEVEL, add for example in the user’s profile.sedit
initialization macro file:
’TREES 1’
SEDIT and S/REXX Reference Manual
Page 481
Getting started
The tree editor
Assume the user types t /usr, the screen will then look like this:
Page 482
SEDIT and S/REXX Reference Manual
The tree editor
Getting started
Using the Mouse
Note: On WINDOWS systems with a 2 button mouse, the rightmost button acts as the
third M3 button on a 3 button mouse. M1 is the leftmost button, and M2, the center
button on a 3 button mouse is not available.
When selecting a directory with the leftmost mouse button, a new directory editor level is
started on this directory.
To return to the tree editor, the user just has to type ^r.
When the user selects a directory with the center mouse button, this directory becomes the
current directory. Note that the current directory appears in blue on color displays, and
bold-faced on monochrome displays. On WINDOWS systems with a 2 button mouse, use
the Shift-Left button instead.
When changing the current directory, all the directory editor levels will be lost.
When the user selects a directory with the rightmost mouse button, the following menu pops
up:
DOWN
HIDE
RENAME
MKDIR
CLONE
MOVE
COPY
EMPTY
RM -R
WIPE
• DOWN
• HIDE
• RENAME
• MKDIR
• CLONE
• MOVE
restarts the tree editor upon the selected directory. If the selected
directory is the current tree root, the string DOWN will be replaced by
the string UP, and choosing that item will restart the tree editor on the
current tree root parent.
undisplays all the selected directory subdirectories. If the user clicks
again over that directory, the string HIDE will be replaced with the
string SHOW, allowing a redisplay of the hidden directories.
pops up a dialog box asking for a new name for the selected directory.
pops up a dialog box asking for a new subdirectory name.
pops up a dialog box asking for a new directory name. A new directory
identical to the selected one, including all sub-directories, will be
created using the new name.
highlights the selected directory and changes the mouse pointer adding
a small M to it. Then the user will have to choose a destination directory
by clicking over it with M1 or M2. To cancel the operation, just click out
of any directory box.
SEDIT and S/REXX Reference Manual
Page 483
Getting started
The tree editor
• COPY
• EMPTY
• REMOVE
• RM -R
• WIPE
highlights the selected directory and changes the mouse pointer adding
a small C to it. Then the user will have to choose a destination directory
by clicking over it with M1 or M2. To cancel the operation, just click out
of any directory box.
pops up a dialog box asking confirmation and then deletes all files in the
selected directory. On WINDOWS systems, when RECYCLE is ON,
files will be moved to the recycle bin.
pops up a dialog box asking confirmation and them removes the whole
selected directory, after removing all its files if necessary. On
WINDOWS systems, when RECYCLE is ON, files will be moved
individually to the recycle bin.
pops up a dialog box asking confirmation and then removes the selected
directory, and all its subdirectories. On WINDOWS systems, when
RECYCLE is ON, the designated directory will be moved globally to the
recycle bin.
pops up a dialog box asking confirmation and then wipes all files in the
selected directory. See The WIPE S/REXX routine page 626 for more
information.
Note that, unlike the UNIX "cp -R" command, SEDIT respects symbolic links while
copying directories. MOVE and COPY will also work across file systems.
WARNING: deleting files cannot be undone. Be very careful when using the EMPTY
and REMOVE facilities.
Using the Buttons
The DONE button, or the F1 key will terminate the tree editor and return to the caller, either
XED or FLIST.
The SCAN button or the F10 key will again scan the directories, updating the display if any
changes are found since the last scan. Note that once the scan is over, SEDIT saves the
result in a file named sedit.treemap in order to avoid initialization delay at the next
call.
SCAN automatically hides subdirectories belonging to file systems other than the initial
dir file system.
The SCAN ALL button or the F11 key will scan the directories without hiding
subdirectories belonging to other files systems.
The RET button or the F3 key will return to the caller. A subsequent call to TREE without
argument will cause the tree editor to resume where it was left off.
The XED button or the ^x key will return to the file editor. A subsequent call to TREE
without argument will resume the tree editor at the point the user left it.
The FLIST button or the ^f key will return to the directory editor. A subsequent call to
TREE without argument will resume the tree editor at the point the user left it.
On UNIX systems, the button PRINT will pop up a menu asking the user for the following
items:
• Printer
• Width
Page 484
the name of the printer to be used.
the number of columns the printer features. Use the Tab key or
SEDIT and S/REXX Reference Manual
The tree editor
Getting started
the left mouse button to toggle between these two items.
SEDIT and S/REXX Reference Manual
Page 485
Getting started
The tree editor
• Line drawing set
APL if the printer uses the DYALOG APL line drawing set.
PC8 if the printer uses the IBM PC8 character set.
None if the printer does not feature any line drawing set.
The button CANCEL, or depressing the L1 key 1 will cancel
the print.
The button OK, or depressing the Return key will start the
print.
Using the Function Keys
TREE supports the following function keys:
F1
terminates the tree editor and returns to the caller, either XED
or FLIST.
F3
returns to the caller. A subsequent call to TREE without
argument will resume the tree editor at the point the user left
it.
F7
scrolls up one page.
F8
scrolls down one page.
F10
scans the directories, updating the display if any changes are
found since the last scan.
F11
scans the directories without hiding subdirectories belonging
to other files systems.
Home
scrolls up to the first directory.
End
scrolls down to the last directory.
PageUp
scrolls up one page.
PageDown
scrolls down one page.
Control-f
returns to the directory editor. A subsequent call to TREE
without argument will cause the tree editor to resume where
it was left off.
Control-e
scrolls down to the last directory.
Control-h
scrolls up to the first directory.
Control-p
pops up the print dialog box.
1. Sun only
Page 486
SEDIT and S/REXX Reference Manual
The tree editor
Control-s
Control-x
Getting started
asks for a search string and scrolls to the first directory
matching this string. Within the search string, a * character
means any set of characters, and a ? character means any
character.
Examples:
se* matches sedit and select.
?edit matches xedit and sedit, but not
regedit.
Notes:
When GLOBALCASE is set to IGNORE (the
default on WINDOWS systems), the matching
is case insensitive.
On Sun keyboards, the FIND key can also be
used for the same purpose.
Entering an empty string searches for the last
entered string.
returns to the file editor. A subsequent call to TREE without
argument will cause the tree editor to resume where it was left
off.
Changing the Default Printer on UNIX Systems
On UNIX systems, the PRINTSCREEN command described page 344 changes the default
TREE printer and printing daemon.
SEDIT and S/REXX Reference Manual
Page 487
Getting started
Page 488
The tree editor
SEDIT and S/REXX Reference Manual
Running SEDIT with CodeCenter
CodeCenter
Running SEDIT With CodeCenter
SEDIT may run as an EDIT session for the CodeCenter1 4.x software2.
To set up communication between SEDIT and CodeCenter, uncomment the following
lines in the file {instal-dir-SEDIT}/sedit.menu:
"CENTER" MENU
"load
"
MENU
".c" c_load center
".o" c_load center o
"load "
"unload"
"swap "
END
c_unload center
MENU
"--> c " c_swap center c
"--> o " c_swap center o
"swap " END
"stop " MENU
"stop in" c_stop
center
"stop at" c_stopat center
"stop " END
"ini
" center_ini
"list " c_list center
"xref " saber_xref center
"run
" center_send run
"build " center_send build
"end
" center_end
"CENTER" END
Then type the following SEDIT command:
====> menu $xhome/sedit.menu
1. CodeCenter and Saber-C are trademarks of CenterLine Software, Inc.
2. CodeCenter is not supported on all platforms and operating systems.
SEDIT and S/REXX Reference Manual
Page 489
CodeCenter
Running SEDIT with CodeCenter
This will create the following menu items:
load
unload
swap
stop
llist
ini
end
.c
.o
stop in
stop at
The menu items have the following meaning:
load
.o
makes CodeCenter load the current file in object (*.o) mode.
load
.c
makes CodeCenter load the current file in source (*.c) mode.
swap
makes CodeCenter swap the current file. If it was loaded in
object mode, it will be reloaded in source mode.
stop
in
makes CodeCenter set a stop in the currently edited file.
stop
at
makes CodeCenter set a stop at the cursor location in the
currently edited file.
list
makes CodeCenter display the current file.
ini
causes SEDIT to start being a CodeCenter EDIT session.
end
causes SEDIT to stop being a CodeCenter EDIT session.
You may also uncomment the following line in the profile.sedit file:
/*
'set ^s ONLY c_stopat center'
'set ^S ONLY c_split'
'mbutton Center center.bu'
'hash $xhome/xmac/center'
*/
Page 490
SEDIT and S/REXX Reference Manual
Running SEDIT with CodeCenter
CodeCenter
which gives:
'set ^s ONLY c_stopat center'
'set ^S ONLY c_split'
'mbutton Center center.bu'
'hash $xhome/xmac/center'
Typing ^s (Control-s) will set a stop at the cursor location.
Note: these commands applies to CodeCenter 4.x. If you are using Saber-C (or
CodeCenter) 3.x, please type the following SEDIT command:
====> HELP SABER
SEDIT and S/REXX Reference Manual
Page 491
CodeCenter
Page 492
Running SEDIT with CodeCenter
SEDIT and S/REXX Reference Manual
USING S/REXX
EXECUTION
Using S/REXX
Starting S/REXX on UNIX Systems
To execute an S/REXX program, the user must first create a text file containing the
S/REXX source program by using a text editor, such as SEDIT. Once the program is
created, there are two ways to execute it.
Explicit Execution
Assuming the user has created a file called fname, the user must type the following
command:
% /home/xed/srexx fname
The % sign is the UNIX prompt and is not part of the command.
If the /home/xed directory has been installed in the current path, the user may simply
type:
% srexx fname
Note that srexx searches fname in the directories described in the PATH environment
variable.
Automatic Execution
The first line of the source program must contain the following entry:
#! /home/xed/srexx
The program must be set for execution permission with the following command:
% chmod a+x fname
SEDIT and S/REXX Reference Manual
Page 493
EXECUTION
USING S/REXX
Then, the user can start the program by typing:
% fname
Note: when using SEDIT to create an automatic S/REXX program, the SEDIT save
function will recognize the first line "#! ....." statement and automatically set
up the execution authorizations.
Starting S/REXX on WINDOWS Systems
To execute an S/REXX program, the user must first create a text file containing the
S/REXX source program by using a text editor. Once the program is created, there are three
ways to execute it.
Explicit Execution
Assuming the user has created a file called fname, the user must type the following
command in a DOS window:
"C:\Program Files\SEDIT\srexx" fname
If the C:\Program Files\SEDIT directory has been installed in the current path, the
user may simply type:
srexx fname
Note that srexx searches fname in the directories described in the PATH environment
variable.
Choosing between srexx.exe and wsrexx.exe
srexx.exe is a console application, meant to be used from a DOS window. Error
messages will be displayed on the DOS window it was started from. When starting
srexx.exe using a WINDOWS icon, a DOS console is displayed at initialisation.
wsrexx.exe is a WINDOWS graphical application. Error messages will be displayed on
a dialog box. A DOS console will be displayed only when using a standard input-output
rexx instruction, such as the SAY instruction. The CLOSE_CONS() built-in can be used to
close such a console.
Automatic Execution
Unlike UNIX systems, WINDOWS does not provide a way to associate a text script to a
specific interpreter. We suggest the user create a c:\myprogs\fname.bat file for
every c:\myprogs\fname S/REXX program with the following content:
"C:\Program Files\SEDIT\srexx" c:\myprogs\fname
Page 494
SEDIT and S/REXX Reference Manual
USING S/REXX
LIMITS
Assuming that the c:\myprogs directory is in the current path, the user may then type:
fname
to start the fname S/REXX program.
Note:
Use double quotes when the installation directory contains blank characters.
c:\Program Files\SEDIT\srexx fname without quotes would fail.
Using the WINDOWS Explorer
We suggest the user give a .srx extension to all S/REXX programs which must be started
with the file manager. Any other extension not in use by the system, such as the .bat
extension, can be used though.
Then, double click on a .srx S/REXX file, and the WINDOWS Explorer will ask for the
application name to associate with such a file.
Compiling a Program
To prepare a non-modifiable version of the test source program, issue the following
command:
ccsr -o test_user test
This creates a test_user program, which on UNIX systems may be run directly by
typing its name. On WINDOWS systems, the explicit execution mode described on page
494 must be used to start test_user.
When simply typing ccsr test, ccsr creates a test.sr output file.
S/REXX Implementation
S/REXX complies with the REXX 4.0 language as defined in Cowlishaw’s book “The
REXX Language”, with the sole following restriction:
S/REXX uses the workstation floating point coprocessor for numeric computation. This
limits the NUMERIC DIGITS setting to a maximum of 15.
When NUMERIC DIGITS is higher than 9, usual coprocessor rounding errors will occur.
Since UNIX commands never return a negative value when they fail, the default TRACE
setting is TRACE ERROR instead of TRACE NORMAL.
S/REXX Extensions
Static Scoping
Usual REXX implementations rely on dynamic scoping. This means that the source program
is examined one line at a time, and its translation relies only on the previously interpreted
lines.
SEDIT and S/REXX Reference Manual
Page 495
EXTENSIONS
USING S/REXX
For efficiency considerations, S/REXX has been built more as a compiler than an
interpreter. The whole program is analyzed and compiled before execution starts. This
makes S/REXX run faster than a purely interpreted language, and allows the programmer
to detect syntax errors as soon as the program is loaded.
Detection of syntax errors by the programmer eliminates the discovery by end users of
syntax errors in code paths not previously executed.
Page 496
SEDIT and S/REXX Reference Manual
USING S/REXX
EXTENSIONS
Dynamic Memory Allocation
S/REXX uses dynamic memory allocation for all its internal buffers.
This means there is no internal limitation of any kind.
In particular:
•
•
•
•
•
The number of lines or REXX clauses within a single program are not limited.
The complexity of an expression and the number of nested parenthesis are not
limited.
The number of created variables, the length of a symbol describing a variable and
the length of the contents of a variable are not limited.
The number of recursive subprograms calls is not limited.
The number of arguments passed to a subroutine is not limited.
The only limitations are the system limitations:
•
•
The amount of virtual memory available.
The size of the C stack. The usual stack size will allow tens of thousands of nested
parenthesis and thousands of recursive calls. The system administrator should be
able to increase the C stack size if needed.
The Operators Extensions
The following operators may be typed in the following way:
NOT
NOT EQUAL
STRICTLY NOT EQUAL
GREATER OR EQUAL
STRICTLY GREATER OR EQUAL
LOWER OR EQUAL
STRICTLY LOWER OR EQUAL
~ \ ^
\= /= ~= ^=
\== /== ~==
>= /< \< ~<
>>= /<< \<<
<= /> \> ~>
<<= />> \>>
<> ><
^==
^<
~<< ^<<
^>
~>> ^>>
Important Note for Mainframe Users
Mainframe keyboards often do not offer the | character. Therefore, IBM REXX considers
! as being the OR operator, and !! as being the concatenation operator.
The REXX language definition specifies that the ! character may be used within variables.
Therefore, “aa!!bb” is treated by S/REXX as a variable whose name is “aa!!bb”, and
“a ! b” as the concatenation of 3 variables: “a||’ ’||!||’ ’||b”
When porting an IBM REXX procedure to S/REXX, the user will have to replace all ! with
|.
SEDIT and S/REXX Reference Manual
Page 497
EXTENSIONS
USING S/REXX
Logical Operators
When evaluating an expression such as:
expr1 & expr2
If expr1 evaluates to 0, expr2 will not be evaluated, and expr1 & expr2 will evaluate
to 0.
This feature allows the user to write statements such as:
say ’Enter a positive number’
pull rep .
if datatype(rep) = ’NUM’ & rep > 0 then call do_something rep
else
say ’Invalid number’
If the user types an invalid number, such as ".qa1212", the expression rep > 0 will not
be evaluated. Many REXX implementations would evaluate it anyway, thus leading to an
interpretation error.
Similarly, when evaluating:
expr1 | expr2
If expr1 evaluates to 1, expr2 will not be evaluated, and expr1 | expr2 will evaluate
to 1.
Page 498
SEDIT and S/REXX Reference Manual
USING S/REXX
DYNAMIC LOADING
Dynamic Loading on UNIX Systems
Modern programming languages, such as C or FORTRAN 77, allow the user to build a
collection of general utility routines and incorporate them into different programs when
needed.
These utility routines can share global variables with the main program by using external
variables in C and common blocks in FORTRAN.
S/REXX supports dynamic loading, allowing the use of external source routines.
For example, consider the following routine:
#! /home/xed/srexx
say ’Enter a positive number’
pull rep .
if test_nump(rep) then call do_something rep
else
say ’Invalid number’
When encountering the test_nump() statement, S/REXX will proceed in the following
way:
1) S/REXX searches for an internal routine named test_nump. An internal routine is a
sequence of REXX instructions inside the same source file, which start at the label
test_nump.
If the word test_nump is enclosed with quotes, this step is bypassed.
2) If test_nump is not found, S/REXX searches for a built-in routine, such as the
date() routine, which is defined as part of the language.
3) If test_nump is not found, other REXX implementations will stop and issue an error
message. Some implementations will try to load an external program named
test_nump, but by creating a different process (UNIX) or a different work area
(VM/CMS), thus making it impossible to exchange global variables between the main
program and the subroutine test_nump.
S/REXX will look for a file test_nump in the directories described by the PATH
environment variable, and if found, will dynamically append it to the end of the main
file, making it available as an internal routine.
To hide dynamically loaded subroutine variables, the user may use the procedure
{expose} instruction.
For example, assume the user’s PATH is the following:
.:/bin:/usr/bin:/etc:/usr/ucb:/user/john/srexx_macs
We will assume the user stores all his S/REXX routines in the directory
/user/john/srexx_macs.
SEDIT and S/REXX Reference Manual
Page 499
DYNAMIC LOADING
USING S/REXX
If /user/john/srexx_macs/test_nump is the following:
#! /home/xed/srexx
if datatype(rep) = ’NUM’ & rep > 0 then return 1
else
return 0
The main program will be updated in the following way:
#! /home/xed/srexx
say ’Enter a positive number’
pull rep .
if test_nump(rep) then call do_something rep
else
say ’Invalid number’
exit
test_nump:
if datatype(rep) = ’NUM’ & rep > 0 then return 1
else
return 0
Note that to be recognized as an S/REXX subroutine, the first line of the file must start with
the characters #! followed by a sentence including the word srexx.
An external routine may also be called by using its absolute pathname. An absolute
pathname is a string enclosed in quotes, starting with / . or ~.
Examples:
call "/user/john/srexx_macs/test_nump" rep
call "~/test_nump" rep
call "./test_nump" rep
Page 500
SEDIT and S/REXX Reference Manual
USING S/REXX
DYNAMIC LOADING
Notes: since most UNIX filenames are typed in lower case, an external subroutine will be
searched for in lower case, unless explicitly typed in upper case and enclosed in
quotes.
OPTION NOLOAD prevents S/REXX from loading external routines.
Using EXIT inside a dynamically loaded procedure is the same as using EXIT
within an internal procedure. The current REXX program is terminated. Use
RETURN to return to the caller.
Unlike with S/REXX 2.10, the PATH environment variable is parsed at every
external routine invocation. Therefore, It is possible to add the directory containing
the external macros within an S/REXX program.
option setenv mixed
$PATH = $PATH||’:/users/john/srexx_macs’
if test_nump(rep) then call do_something rep
else
say ’Invalid number’
Using OPTION NOLOAD
Consider the following example:
#! /home/xed/srexx
OPTION NOLOAD
say ’Enter a positive number’
pull rep .
if test_nump(rep) then call do_something rep
else
say ’Invalid number’
When encountering the test_nump() statement, S/REXX will proceed in the following
way:
1) First, S/REXX searches for an internal routine named test_nump. An internal
routine is a sequence of REXX instructions inside the same source file, which start at
the label test_nump.
If the word test_nump is enclosed with quotes, this step is bypassed.
2) If test_nump is not found, S/REXX searches for a built-in routine, such as the
date() routine, which is defined as part of the language.
SEDIT and S/REXX Reference Manual
Page 501
DYNAMIC LOADING
USING S/REXX
3) If test_nump is not found, S/REXX will look for a file test_nump in the
directories described by the PATH environment variable, and if found, will pass it to
the default environment.
Note that to be recognized as an S/REXX external subroutine, the first line of the file must
start with the characters #! followed by a sentence including the word srexx.
An external routine may also be called by using its absolute pathname. An absolute
pathname is a string enclosed in quotes, starting with / . or ~.
Examples:
call "/user/john/srexx_macs/test_nump" rep
call "~/test_nump" rep
call "./test_nump" rep
Notes: since most UNIX filenames are typed in lower case, an external subroutine will be
searched for in lower case, unless explicitly typed in upper case and enclosed in
quotes.
Using EXIT inside an external routine terminates only the external routine.
An external routine can only return a number to the caller.
Setting Default Options for UNIX or WINDOWS REXX Programs
When an S/REXX programs starts, S/REXX searches for a .srexxrc file in the user’s
home directory. If not found, S/REXX searches .srexxrc in the S/REXX installation
directory.
If .srexxrc is found, S/REXX executes all the REXX statements included in this file
before executing the actual program.
This allows the user to change the default options.
Consider, for example, the following /home/xed/.srexxrc file:
OPTION NOLOAD
TRACE NORMAL
The default S/REXX settings related to external routines and TRACE command will be
identical to the IBM REXX settings.
Note: the ccsr compiler reads the .srexxrc file at the compile time. The compiled file
will not reread the .srexxrc file when executed.
Setting Default Options for SEDIT REXX Macros
When an S/REXX SEDIT macro starts, S/REXX searches for an sedit.srexxrc file
in the user’s home directory. If not found, S/REXX searches sedit.srexxrc in the
S/REXX installation directory.
If sedit.srexxrc is found, S/REXX executes all the REXX statements included in this
file before executing the actual program.
Page 502
SEDIT and S/REXX Reference Manual
USING S/REXX
DYNAMIC LOADING
Dynamic Loading on WINDOWS Systems
Modern programming languages, such as C or FORTRAN 77, allow the user to build a
collection of general utility routines and incorporate them into different programs when
needed.
These utility routines can share global variables with the main program by using external
variables in C and common blocks in FORTRAN.
S/REXX supports dynamic loading, allowing the use of external source routines.
For example, consider the following routine:
say ’Enter a positive number’
pull rep .
if test_nump(rep) then call do_something rep
else
say ’Invalid number’
When encountering the test_nump() statement, S/REXX will proceed in the following
way:
1) S/REXX searches for an internal routine named test_nump. An internal routine is a
sequence of REXX instructions inside the same source file, which start at the label
test_nump.
If the word test_nump is enclosed with quotes, this step is bypassed.
2) If test_nump is not found, S/REXX searches for a built-in routine, such as the
date() routine, which is defined as part of the language.
3) If test_nump is not found, other REXX implementations will stop and issue an error
message. Some implementations will try to load an external program named
test_nump, but by creating a different process (UNIX) or a different work area
(VM/CMS), thus making it impossible to exchange global variables between the main
program and the subroutine test_nump.
S/REXX will look for a file test_nump in the directories described by the PATH
environment variable. If test_nump exists, its first line must start with the characters
#! followed by a sentence including the word srexx.
If test_nump does not exists, or is not appropriate, S/REXX searches for a
test_nump.srx file, which does not need to start with a specific sentence.
When found, S/REXX will dynamically append test_nump (or test_nump.srx)
to the end of the main file, making it available as an internal routine.
To hide dynamically loaded subroutine variables, the user may use the procedure
{expose} instruction.
For example, assume the user’s PATH is the following:
.;c:\john\srexx_macs;c:\nt
SEDIT and S/REXX Reference Manual
Page 503
DYNAMIC LOADING
USING S/REXX
We will assume the user stores all their S/REXX routines in the directory
c:\john\srexx_macs.
If c:\john\srexx_macs\test_nump is the following:
#! srexx
if datatype(rep) = ’NUM’ & rep > 0 then return 1
else
return 0
The main program will be updated in the following way:
say ’Enter a positive number’
pull rep .
if test_nump(rep) then call do_something rep
else
say ’Invalid number’
exit
test_nump:
if datatype(rep) = ’NUM’ & rep > 0 then return 1
else
return 0
An external routine may also be called by using its absolute pathname. An absolute
pathname is a string enclosed in quotes, starting with x: \ / ./ .\ or ~.
Examples:
call "c:\john\srexx_macs\test_nump" rep
call ".\test_nump" rep
Page 504
SEDIT and S/REXX Reference Manual
USING S/REXX
DYNAMIC LOADING
Notes: OPTION NOLOAD prevents S/REXX from loading external routines.
Using EXIT inside a dynamically loaded procedure is the same as using EXIT
within an internal procedure. The current REXX program is terminated. Use
RETURN to return to the caller.
Unlike with S/REXX 2.10, the PATH environment variable is parsed at every
external routine invocation. Therefore, It is possible to add the directory containing
the external macros within an S/REXX program.
option setenv mixed
$PATH = $PATH||’;c:\john\srexx_macs’
if test_nump(rep) then call do_something rep
else
say ’Invalid number’
Setting Default Options for WINDOWS REXX Programs
When an S/REXX programs starts, S/REXX searches for a HOME environment variable. If
found, S/REXX searches for [a .srexxrc file in the directory described by this HOME
environment variable.
If HOME does not exist, S/REXX searches for a .srexxrc file in the C:\ directory.
If .srexxrc is not found in the C:\ directory, S/REXX searches .srexxrc in the
S/REXX installation directory.
If .srexxrc is found, S/REXX executes all the REXX statements included in this file
before executing the actual program. This allows the user to change the default options.
For example, consider for example the following
C:\Program Files\SEDIT\.srexxrc file:
OPTION NOLOAD
TRACE NORMAL
The default S/REXX settings related to external routines and TRACE command will be
identical to the IBM REXX settings.
Note: the ccsr compiler reads the .srexxrc file at the compile time. The compiled file
will not reread the .srexxrc file when executed.
SEDIT and S/REXX Reference Manual
Page 505
PROCEDURE
USING S/REXX
Extended PROCEDURE EXPOSE
In order to allow external routines to be used either stand-alone or as dynamically loaded
routines, the PROCEDURE {EXPOSE} statement can be found anywhere and any number
of times.
If found within a main program, it will be ignored.
If found twice in an internal routine, the EXPOSE statement will be used to update the
exposed variable list. The second PROCEDURE statement will be ignored.
Example:
#! /home/xed/srexx
procedure expose a
/* This is ignored */
arg a .
call manage_arg a
/*
* Do some processing with the variable whose name is the contents
* of A
*/
exit
manage_arg:procedure
arg var_name . /* var_name is hidden: it will not affect the caller */
/*
* Make the variable whose name is the contents of VAR_NAME available
* to the caller
*/
interpret ’procedure expose ’var_name
/* Do something */
return
Page 506
SEDIT and S/REXX Reference Manual
USING S/REXX
BACKQUOTES
Extended LEAVE and ITERATE
The LEAVE and ITERATE instructions may be used within an INTERPRET clause.
Example:
do i = 1 to 5
if i = 3 then interpret ’leave ’var_name
/* ..... */
end
Using Backquotes
Within a REXX expression, it is possible to retrieve the result of a UNIX or WINDOWS
command by surrounding it with backquotes.
Example:
a = ‘"hostname"‘ /* Puts the workstation hostname in the A variable */
Note that commands must be enclosed with single or double quotes, in order to prevent the
usual REXX variable substitution.
Using { and }
For a better legibility, the user may use the "{" character instead of "DO ;", and "}" instead
of "END".
Example:
if a < 0 then
{ ’Prompt Invalid line number’
exit 2
}
else
{
SEDIT and S/REXX Reference Manual
Page 507
INDEXING
USING S/REXX
Using Bracket Indexing
S/REXX allows the user to set or to retrieve substrings by using bracket indexing.
The following syntax is supported for an assignment:
SYMBOL = expr
The usual REXX assignment.
SYMBOL[expr1] = expr
The string resulting from the expr evaluation overlays SYMBOL at the expr1
column. SYMBOL is padded with blanks when expr1 is greater than its length.
SYMBOL[expr1:expr2] = expr
The string resulting from the expr evaluation overlays SYMBOL at the expr1
column, until the expr2 column. SYMBOL is padded with blanks when expr1 is
greater than its length.
When expr is longer than expr2-expr1+1, expr is truncated.
When expr is shorter then expr2-expr1+1, expr is used from left to right in a
cyclical way.
SYMBOL[expr1:] = expr
Is equivalent to SYMBOL[expr1:lenght(SYMBOL)] = expr
If expr1 is greater than the SYMBOL length, an empty string is returned.
SYMBOL[:expr2] = expr
Is equivalent to SYMBOL[1:expr2] = expr
The following syntax is supported for a REXX expression:
SYMBOL[expr1] or (expr)[expr1]
The character located at the expr1 column. When expr1 is greater than the SYMBOL
or expr length, a space is returned.
SYMBOL[expr1:expr2] or (expr)[expr1:expr2]
The characters located between the expr1 and expr2 columns. Spaces are returned
for indexes located above the SYMBOL or expr length
SYMBOL[expr1:] or (expr)[expr1:]
Is the same as
SYMBOL[expr1:length(SYMBOL], or expr[expr1:length(SYMBOL].
SYMBOL[:expr2] or (expr)[:expr2]
Is the same as
SYMBOL[1:expr2], or expr[1:expr2].
Page 508
SEDIT and S/REXX Reference Manual
USING S/REXX
SEDIT
Examples:
a = ’12345’;a[2] = ’bcd’
say a
/* displays "1bcd5"
*/
a = ’12345678’;a[2:6] = ’BC’
say a
/* displays "1BCBCB78"
*/
a =
say
say
say
say
*/
*/
*/
*/
’12345678’;
a[2]
a[3:5]
a[:3]
a[8:12]
a = ’1234’; b = ’abcd’
say (a||b)[4:5]
/*
/*
/*
/*
displays
displays
displays
displays
"2"
"345"
"123"
"8
"
/* displays "4a"
*/
Using S/REXX within SEDIT
When running S/REXX within SEDIT in a windowing environment such as OPEN
WINDOWS or MOTIF, all input and output operations are redirected to the window
SEDIT was started from.
In order to allow the input operations to execute properly, SEDIT must run in the
foreground.
Starting SEDIT in the background with a command like "xed &" or "sedit" will make
SEDIT hang every time a TRACE ? or a PULL instruction is executed.
SEDIT and S/REXX Reference Manual
Page 509
SEDIT
Page 510
USING S/REXX
SEDIT and S/REXX Reference Manual
NEW INSTRUCTIONS
S/REXX New or Extended Instructions
This chapter describes new or extended instructions not described in Cowlishaw’s book,
"The REXX Language".
SEDIT and S/REXX Reference Manual
Page 511
ADDRESS
NEW INSTRUCTIONS
ADDRESS (UNIX) - Set Destination of Commands
ADDRESS | env {exprc}
| {VALUE} exprv
The env destination may be one of the following:
UNIX
The Bourne Shell sh. This is the default when S/REXX runs standalone.
SH
Same as UNIX.
WINDOWS
Same as UNIX.
CSH
The C Shell csh.
TCSH
The tcsh shell.
KSH
The Korn Shell ksh.
EXEC
S/REXX attempts to execute directly the string passed to the EXEC
environment without using any UNIX shell. The PATH is not searched and the
usual shell redirection ">" and pipe "|" characters are not treated specifically.
Shell meta characters like "*" are also passed without expansion.
SEDIT
Available only in SEDIT macros. This is the default when S/REXX runs
under SEDIT.
Examples:
ADDRESS CSH
’ls ~/.cshrc’
/* ~ would not work with ADDRESS SH */
/*
* To list a file actually named "*"
*/
ADDRESS EXEC
’/bin/ls -Ftla *’ /* ’ls’ would not work */
Page 512
SEDIT and S/REXX Reference Manual
NEW INSTRUCTIONS
ADDRESS
ADDRESS (WINDOWS) - Set Destination of Commands
ADDRESS | env {exprc}
| {VALUE} exprv
On WINDOWS systems, the env destination may be one of the following:
WINDOWS
The default WINDOWS command interpreter. This is the default when
S/REXX runs standalone.
First, the WINDOWS environment checks if the passed command is one of the
following DOS commands:
ASSOC CLS COPY DIR DEL ERASE FTYPE MD MOVE RD REN RENAME
START TIME TYPE VER VERIFY VOL
and starts a DOS interpreter instance to execute them. Note that using
equivalent built-ins such as DEL(), COPY(), MKDIR(), RENAME() or
RMDIR() within S/REXX is much faster than using a DOS command
For any other command, S/REXX searches in every directory in the path first
for an expr.exe file, then for an expr.com file and finally for an
expr.bat file.
UNIX
Same as WINDOWS.
SEDIT
Available only in SEDIT macros. This is the default when S/REXX runs
under SEDIT.
Using UNIX Shells on WINDOWS
It is possible to install UNIX-like shells on WINDOWS systems.
S/REXX ADDRESS supports the SH, CSH, TCSH and KSH keywords to address such
shells. S/REXX will use an environment variable with the same name to find a shell.
For example, if the user has installed the Hamilton C-SHELL in c:\hamilton\bin, the
user may create a CSH environment variable in the following way:
option mixed setenv
$CSH = ’c:\hamilton\bin\csh.exe -FXC’
ADDRESS CSH
’ls -Ftl +a ~’
SEDIT and S/REXX Reference Manual
Page 513
CD
NEW INSTRUCTIONS
CD - Change Directory
makes dir the current directory.
CD {dir}
The user may use the ~ . UNIX directory meta characters to specify a location.
Examples:
CD
makes the home directory current.
CD ’~’
has the same effect.
CD ’~/foo’ if the home directory is /users/john, makes
/users/john/foo the current directory.
CD ’..’
if the current directory is /users/john, makes
/users the current directory.
Note: the UNIX directory meta characters must be enclosed in quotes.
On WINDOWS systems, the HOME environment variable is usually not defined. In
this case, the "~/" or "~\" directory shortcut is translated into "C:\".
DESBUF - Clear Stack
DESBUF is not part of the S/REXX language, but for VM/CMS compatibility it is
implemented as an extension of the UNIX or WINDOWS environment. Therefore, it is
recommended to enclose it in quotes in order to prevent the normal S/REXX variable
substitution.
DESBUF format is:
DESBUF
clears the program stack buffer.
See Also: DROPBUF, MAKEBUF, SENTRIES
Page 514
SEDIT and S/REXX Reference Manual
NEW INSTRUCTIONS
DO
DO - Controlled Loop
The DO instruction offers the following extension:
DO name IN expr;
END {symbol};
The variable name will be assigned to every word of the REXX expression expr. A word
is a set of characters surrounded by any number of blanks, tabulations or \n end of line
character.
Examples:
DO a IN ’word1 word2 word3’
say a
end a
displays:
word1
word2
word3
The following routine:
DO a IN ‘"ls"‘
if state(a, 'd') then sayx 'du -s 'a
end a
shows the size of all the subdirectories.
SEDIT and S/REXX Reference Manual
Page 515
DROPBUF
NEW INSTRUCTIONS
DROPBUF - Remove Stack
DROPBUF is not part of the S/REXX language, but for VM/CMS compatibility it is
implemented as an extension of the UNIX or WINDOWS environment. Therefore, it is
recommended to enclose it in quotes in order to prevent the normal S/REXX variable
substitution.
DROPBUF format is:
DROPBUF {n}
removes the specified stack buffer.
n specifies the number of the first stack buffer to be removed. DROPBUF will remove all
stack buffers which number is greater than n.
When n is not specified, the most recently created buffer is removed.
See Also: DESBUF, MAKEBUF, SENTRIES
Page 516
SEDIT and S/REXX Reference Manual
NEW INSTRUCTIONS
EXECIO
EXECIO - Input/Output Operations
EXECIO is not part of the S/REXX language, but for VM/CMS compatibility it is
implemented as an extension of the UNIX or WINDOWS environment. Therefore, it is
recommended to enclose it in quotes in order to prevent the normal S/REXX variable
substitution.
EXECIO format is:
EXECIO |lines
|
|*
|
|
|
|
|
|
|
|
|DISKR
|
|DISKW
|
|
|DISKI
|
|
|DISKD
|
|PRINT
fn ft {fd {linenum}} {({FINIs} A B}
fn ft fd {linenum
{recfm {lrecl}}}
{({FINIs} B C D}
fn ft fd {linenum
{recfm {lrecl}}}
{({FINIs} B C D}
fn ft fd {linenum}
{(FINIs}
printer
{({FINIs} B C D E}
Options formats:
(A)
{Find /string/}
{LOcate /string/}
{Avoid /string/}
{Zone n1 n2}
(B)
{Margins n1 n2}
{STRIP}
(C)
{CAse U|M}
(D)
{STring xxx}
(E)
{Columns n}
SEDIT and S/REXX Reference Manual
{FIFO|LIFO}
{NOTYPE
{SKip}
{STEm xxx}
{VAR vvv}
Page 517
EXECIO
NEW INSTRUCTIONS
where:
lines
is the number of processed lines. lines must be any non-negative integer.
With the VAR option, lines must be 1.
An asterisk * indicates that the operation is to terminate when a 0-length line
is read during an output operation, or when an end-of-file condition is detected
during an input operation.
When lines is specified as zero (0), no I/O operation takes place other than
closing the file or printer when the FINIS option is specified.
For a DISKW or PRINT operation, if the STEM operand has not been specified
and the lines operand exceeds the number of lines available on the program
stack, S/REXX waits for user input at the terminal the S/REXX program was
started from. If lines has been specified as a *, reading an empty line
terminates the operation.
DISKR
reads lines from a disk file to the stack or S/REXX variables.
DISKW
writes lines from the stack, S/REXX variables or command line to a disk file.
When using the DISKW function to write in the middle of a file, for example
to write a string at line 10 of a 2000 line file, S/REXX does not truncate the
file at line 10. Instead, it checks the string length, compares it to the original
line 10 length, and moves the remainder of the file either to the left (shortening
the file) or to the right, depending on whether the new line is shorter (left) or
longer (right) than the original line. With large files, this process may take a
while.
DISKI
inserts lines from the stack, S/REXX variables or command line to a disk file
before the specified line. The remainder of the file is moved to the right. With
large files, this process may take a while.
DISKD
removes the specified lines. The line pointer remains unchanged.
PRINT (UNIX)
writes lines from the stack, S/REXX variables or command line to the printer
defined by the printer operand. S/REXX keeps these lines in memory
until the FINIS operand is used to close the printer. Several printers may be
opened simultaneously.
PRINT (WINDOWS)
writes lines from the stack, S/REXX variables or command line to the printer
named printer. When printer is specified as an *, the default printer is
used. printer can be specified within quotes. S/REXX keeps these lines
in memory until the FINIS operand is used to close the printer. Only one
printer may be opened at a time. The default printer can be changed with the
dy_printer built-in function.
Page 518
recfm
is implemented for VM/CMS compatibility. It must be V or F. When F is
specified, the default lrecl is 80.
lrecl
specifies the length of each updated line of the file. When the data is larger
than this length, it is truncated. When the data is shorter, it is padded with
blanks.
SEDIT and S/REXX Reference Manual
NEW INSTRUCTIONS
fn
EXECIO
is the filename part of the file. A period (.) may be used if no filename is
required.
When fd is specified as a period (.), fn may be the full UNIX or
WINDOWS pathname, including the file-directory and filetype parts. This
allows the user to use a UNIX or WINDOWS like way to describe a file, such
as:
execio 1 diskw ~/foo.c . .(
instead of the VM/CMS way, such as:
execio 1 diskw foo c ~(
ft
is the filetype part of the file. A period (.) may be used if no filetype is
required.
fd
is the directory part of the file. When fd is not specified or specified as an
asterisk (*) during an input operation, all the directories described in the
PATH environment variable are searched.
linenum
is the absolute line number where a file operation is to begin. When not
specified, or specified as 0, reading begins at the first line, and writing at the
last line for the first operation. Subsequent operations will resume at the line
where the previous operation ended.
FINIs
causes the specified file or printer to be closed.
A subsequent DISKR operation will return the first line in the file.
A subsequent DISKW operation will append data at the end of the file.
A subsequent PRINT operation will start a new print job.
Option A
FInd
writes 2 strings to the stack LIFO (last-in first-out) by default, or FIFO
(first-in first-out) when the FIFO option is specified:
1)
the contents of the first matched line.
2)
the relative and absolute line numbers of the first line that begins with
the string specified between delimiters. The delimiter is the first
non-blank character found after the FIND keyword. It does not need to
be a /.
The ZONE option allows the user to search for a string starting at the
specified n1 column. n2-n1 must be greater than the length of
string.
When used with the STEM xxx option, FIND will update the xxxn variables
in the following way:
SEDIT and S/REXX Reference Manual
Page 519
EXECIO
NEW INSTRUCTIONS
1)
xxx0 is set to 2.
2)
xxx1 is filled with the first line that matches the condition.
3)
xxx2 is filled with the relative and absolute line numbers. The relative
line number is the number of lines scanned before the match occurs.
LOcate
is like the FIND option, except the string may occur any place within a line
(or zone portion of that line).
Avoid
is like the LOCATE option, except the search is for a line (or zone portion of
that line) that does not contain the specified characters.
Zone
restricts the portion of the lines searched during a FIND, LOCATE or AVOID
operation.
The search is performed between columns n1 and n2 (inclusive). If n2 is
specified as *, the search is performed through the end of the line.
FIFO
the lines are written to the stack in first-in first-out order. This is the default,
except for the FIND, LOCATE or AVOID operations.
LIFO
the lines are written to the stack in last-in first-out order. This is the default for
the FIND, LOCATE or AVOID operations.
SKIP
prevents a read operation from writing to the stack.
Option B
Margins
specifies that only columns n1 through n2 (inclusive) are to be processed. If
n2 is specified as *, the process is performed through the end of the line.
STRIP
removes the trailing blanks from any output lines or lines returned.
NOTYPE
suppresses the display of any S/REXX messages when an I/O error occurs.
STEm xxx the variables xxxn will be used to supply input data for output-type
operations. They will be the destination for output for the input-type
operations.
xxx1 is the first used or created variable, xxx2 the second, and so on. xxx0
will be set to the number of lines returned for the input-type operations.
VAR vvv
the variable vvv will be used to supply input data for output-type operations.
It will be the destination for output for the input-type operations.
When VAR is specified, lines must be specified as 1.
Option C
Page 520
Case U
the data read is translated to uppercase.
Case M
the data read is not translated. This is the default.
SEDIT and S/REXX Reference Manual
NEW INSTRUCTIONS
EXECIO
Option D
STRING
supplies output data explicitly. Any characters following the STRING
keyword are treated as string data. Therefore, STRING must be the final
option on the command line.
The EXECIO return codes have the following meanings:
0
2
3
24
28
29
101
2008
Success.
End of file condition on DISKR operation.
No match when using a FIND/LOCATE/AVOID option.
Bad parameter list.
File not found.
Invalid printer (WINDOWS only)
I/O error.
Invalid STEM or VAR operand.
Option E
Columns NOn WINDOWS systems, EXECIO uses the WINDOWS printer API to
determine the number of available columns for printing, and wraps larger
lines.
When specified, N overrides this computed width.
Notes: On WINDOWS systems, the HOME environment variable is usually not defined. In
this case, the "~/" or "~\" directory shortcut is translated into "C:\".
If fn, ft or fd contains blanks, they must be surrounded with quotes or double
quotes.
SEDIT and S/REXX Reference Manual
Page 521
EXECIO
NEW INSTRUCTIONS
Examples:
’execio 2 diskr foo c ../usr/john 5(stem ff.’
places lines 5 and 6 of the ../usr/john/foo.c file into the ff.1 and ff.2 variables.
ff.0 is set to 2.
’execio 1 diskr foo c ../usr/john’
since the ../usr/john/foo.c file was not closed by the previous EXECIO call, the
next line (line 7) is placed into the stack.
’execio 2 diskw foo . ~ 7 f 90(finis stem ff.’
writes the contents of ff.1 and ff.2 into the ~/foo file, starting at line 7, and padding
those lines with blanks up to 90 columns. The ~/foo file is closed at EXECIO termination.
Note the use of the period (.) placeholder to specify that the file does not have any filetype.
’execio * diskr . cshrc ~(find $setenv$ stem ff.’
scans the ~/.cshrc file, looking for the setenv string. Note the use of the period (.)
placeholder to specify that the file does not have any filename.
’execio 1 diskw foo c ~(string /* NOTREACHED */’
adds the string /* NOTREACHED */ at the end of the file ~/foo.c
’execio * diskr profile sedit "c:\Program Files\SEDIT"(stem ff.’
or:
’execio * diskr "c:\Program Files\SEDIT profile.sedit" . .(stem
ff.’
reads the "c:\Program Files\SEDIT\profile.sedit" file.
’execio * PRINT "LASERJET IIISI" (stem ff.’
on WINDOWS, prints on the "LASERJET IIISI" printer. Quotes are mandatory when
the name of the printer contains blanks.
’execio * PRINT * (stem ff.’
on WINDOWS, prints on the default printer.
Page 522
SEDIT and S/REXX Reference Manual
NEW INSTRUCTIONS
GLOBALV
GLOBALV - Share Variables
GLOBALV is not part of the S/REXX language, but for VM/CMS compatibility it is
implemented as an extension of the UNIX, WINDOWS or SEDIT environment.
Therefore, it is recommended to enclose it in quotes in order to prevent the normal S/REXX
variable substitution.
When OPTION NOGLOBALV is in effect, the initial processing relative to the GLOBALV
command does not take place, and GLOBALV will not be recognized as an extension to the
UNIX, WINDOWS or SEDITenvironment.
GLOBALV format is:
globalv|init
|
|{select{grp}}
|
|{select{grp}}
name2{....}}
|{select{grp}}
name2{....}}
|{select{grp}}
name2{....}}
|
|{select{grp}}
|{select{grp}}
|{select{grp}}
|{select{grp}}
|{select{grp}}
|
|{select{grp}}
|{select{grp}}
|
|{select{grp}}
|{select{grp}}
|{select{grp}}
|
|{select{grp}}
...}}}
|
|
|{select{grp}}
|
|grplist
|grpstack
SEDIT and S/REXX Reference Manual
set
name1
{val1
sets
name1
{val1
setp
name1
{val1
setl
setls
setsl
setlp
setpl
name
name
name
name
name
list
stack
{name1 {name2 ...}}
{name1 {name2 ...}}
put
puts
putp
name1 {name2 {...}}
name1 {name2 {...}}
name1 {name2 {...}}
get
{name1
{val}
{val}
{val}
{val}
{val}
{name2
purge
Page 523
GLOBALV
NEW INSTRUCTIONS
An S/REXX script, called the parent, can start several other S/REXX scripts, either by
using the UNIX or WINDOWS environment, or the CALL command when OPTION
NOLOAD is in effect.
The GLOBALV command lets an S/REXX script and its descendants share a common set of
values, and also retain them for subsequent use by other parents.
GLOBALV maintains groups of variables in the GLOBALDIR/srexx.globalv
directory. By default, GLOBALDIR is the home ~ directory on UNIX, and the C:\
directory on WINDOWS.
GLOBADIR can be changed by creating a GLOBALVHOME environment variable. That can
be done at the start of the parent S/REXX script:
call setenv "GLOBALVDIR", "/tmp"
GLOBALV supports use of more than one group. This allows for grouping distinct variables
that are either related or often used together.
Variables defined for the current parent S/REXX script are retained in the
GLOBALDIR/srexx.globalv/storage.xxxx directory, where xxxx is unique to
the parent script. Those required longer than a single parent existence are retained in the
GLOBALDIR/srexx.globalv/session and
GLOBALDIR/srexx.globalv/lasting files.
These two files and a third file (GLOBALDIR/srexx.globalv/initial) are the
source from which GLOBALV creates and initializes the variable or variables in the
storage.xxxx file. The initial file is normally created by the user as an alternative
way of defining a large number of initial variables.
init
allocates and initializes global variable or variables in the storage.xxxx
file from the variables stored in the lasting, session, and initial
files. Variables defined in the session file override identical variables
defined in the lasting file, which override identical variables defined in the
initial file.
GLOBALV INIT is performed automatically if not explicitly requested before
other GLOBALV requests.
select {grp}
identifies the global variable group that is the subject of this or subsequent
calls. If no function is specified, GLOBALV sets the default group for
subsequent calls. The default is set to the grp group or to unnamed if grp
is not specified. A GLOBALV SELECT command that does specify a function
affects only the group specified in the command. It has no effect on setting or
resetting the default group.
SET, SETS, SETP name1 {{val1 name2{....}}
assigns the vali values to the namei variables. SET fields are delimited by
blanks and the values cannot contain any blanks. (Use the SETL command for
such values.) If vali is not specified, the value is assumed to be an empty
string. SET adds the assignments in the selected or default global variable
group in storage. SETS adds or replaces the assignments in the selected or
default group and appends it to the session file. SETP adds or replaces the
assignments in the selected or default group and appends it to the lasting
file.
Page 524
SEDIT and S/REXX Reference Manual
NEW INSTRUCTIONS
GLOBALV
SETL, SETLS, SETSL, SETLP, SETPL name {val}
assigns the specified literal val value, which may contain blanks, to the
name variable. The first blank following the name delimits the name from the
value field and is not part of the value. All characters following this blank
(including any other blanks) are part of the value. If val is not specified, the
value is assumed to be an empty string.
SETL adds the assignment in the selected or default global variable group in
storage. SETLS adds the assignment in the selected or default group and
appends it to the session file. SETSL is the same as SETLS. SETLP adds
the assignment in the selected or default group and appends it to the lasting
file. SETPL is the same as SETLP.
LIST
displays a list of the specified variable name or names, from the selected or
default group, and their associated values. If no name is specified, all variables
in the selected or default group are listed.
STACK
places the values associated with the specified variable name or names, from
the selected or default group, LIFO in the program stack. The variable named
first in the command is the first retrieved from the stack. If a variable is not
found in the group, an empty string is stacked. The command has no effect if
the variable name is omitted.
PUT, PUTS, PUTP
PUT assigns the value of the S/REXX variable specified in name as a global
value in the selected or default global variable group. PUTS does the same,
and appends the value to the session file. PUTP does the same, but appends
the value to the lasting file.
Usage note: to be compatible with its VM/CMS implementation, the various
PUT commands do not perform a complete stem substitution. For example:
tab.m = ’Value of tab.m’
tab.k = ’Value of tab.k’
k = ’M’
/* k = ’m’ with OPTION MIXED */
say tab.k
/* Displays ’Value of tab.m’ */
’globalv put tab.k’ /* Saves ’Value of tab.k’
*/
GET
assigns values from the specified or default global variable group to the
specified S/REXX variable names. If no names are specified, GET does
nothing.
Usage note: to be compatible with its VM/CMS implementation, GET does
not perform a complete stem substitution. See the example above.
PURGE
clears the variables from the selected group in storage.xxxx. Used
without SELECT, PURGE clears all variables in all groups.
GRPLIST
displays a list of all groups.
SEDIT and S/REXX Reference Manual
Page 525
GLOBALV
NEW INSTRUCTIONS
GRPSTACK
stacks LIFO the names of all groups. An empty string delimiter indicates the
end of the stacked names.
The GLOBALV return codes have the following meanings:
0
1000024
1100000
1500000
1501000
1502000
1503000
1504000
1000004
1505000
Success.
No Function Specified on GLOBALV command.
I/O Error reading GLOBALV type files.
Invalid HOME or GLOBALVHOME.
I/O Error on initial.
I/O Error on lasting.
I/O Error on session.
I/O Error on storage.
Invalid argument.
Unable to lock file.
Examples:
’globalv select grp1 set var1 val_var1 var2 val_var2 var3’
places the ’val_vari’ strings into the grp1 group vari variables. The previous default
group is not changed.
’globalv select grp1’
sets grp1 as the default group.
’globalv get var2’
retrieves into the S/REXX var2 variable the previously saved val_var2 value.
Page 526
SEDIT and S/REXX Reference Manual
NEW INSTRUCTIONS
LOWER
LOWER - Lower Case Translation
LOWER {varlist}
translates the contents of the variables described by
varlist into lowercase.
It is not an error to include a non-initialized variable into varlist.
Example:
lower a b
MAKEBUF - Create Stack
MAKEBUF is not part of the S/REXX language, but for VM/CMS compatibility it is
implemented as an extension of the UNIX or WINDOWS environment. Therefore, it is
recommended to enclose it in quotes in order to prevent the normal S/REXX variable
substitution.
MAKEBUF format is:
MAKEBUF
creates a new stack buffer.
After MAKEBUF is executed, the rc variable contains the number of the newly created stack
buffer.
Note: To prevent an error message from being displayed when the MAKEBUF command
is executed, issue a TRACE OFF command first.
See Also: DESBUF, DROPBUF, SENTRIES
SEDIT and S/REXX Reference Manual
Page 527
OPTION
NEW INSTRUCTIONS
OPTION - Set Various Options
The OPTION instruction offers the following syntax:
OPTION
MIXED|UPPER|LOWER
SETENV|UNSETENV
LOAD|NOLOAD
GLOBALV|NOGLOBALV
Initial value:
UPPER UNSETENV LOAD GLOBALV
By default, the REXX language is case insensitive. All variables, labels and subroutines are
translated into uppercase before usage. Uninitialized variables return their name in
upper-case.
When OPTION LOWER is in effect, all variables, labels and subroutines are translated into
lowercase before usage. Uninitialized variables return their name in lower case.
When OPTION MIXED is in effect, capitalization is respected. For example, Var and var
are two different variables.
When OPTION SETENV is in effect, variables starting with a dollar ($) sign are treated as
UNIX or WINDOWS environment variables. In addition, $?var returns 1 (true) when the
var environment variable exists.
Example:
OPTION MIXED SETENV
$PATH = ’.:’$PATH
Aa = ’MyProg’
aa = ’param1’
call Proc Aa, aa
exit
Proc:procedure
parse arg v1, v2
v1 v2
/* Executes "MyProg param1", using a search
*/
return /* path starting with the "." current directory */
Although Proc is a procedure, $PATH, being an environment variable, has the same value
in Proc as in the main program.
OPTION NOLOAD prevents S/REXX from loading dynamically external routines.
When OPTION NOGLOBALV is in effect, the initial processing relative to the GLOBALV
command does not take place, and GLOBALV will not be recognized as an extension to the
UNIX, WINDOWS or SEDIT environment.
Page 528
SEDIT and S/REXX Reference Manual
NEW INSTRUCTIONS
PARSE
Notes: the OPTION statement is processed only at the initial program scanning. Once the
program is started, OPTION is ignored. Its settings cannot be changed during
execution.
S/REXX programs written in MIXED, LOWER or SETENV mode may be
incompatible with usual REXX implementation.
Within SEDIT, OPTION GLOBALV|NOGLOBALV is taken in account only within
the first S/REXX macro called, typically the profile.
PARSE - Parsing
For IBM compatibility, S/REXX has added the following extensions to the PARSE verb:
PARSE {UPPER} EXTERNAL {template}
is a synonym of the PARSE {UPPER} LINEIN {template} instruction.
PARSE {UPPER} NUMERIC {template}
The current numeric controls DIGITS FUZZ FORM are parsed with template.
Example:
parse
/* di
/* fu
/* fo
numeric di fu fo
receives 9 */
receives 0 */
receives SCIENTIFIC */
SEDIT and S/REXX Reference Manual
Page 529
SAYN
NEW INSTRUCTIONS
SAYN - Terminal Output
SAYN {expr}
displays expr without appending a newline
character at the end.
This instruction is similar to the SAY instruction. However, it allows the user to type a reply
on the same line expr has been displayed.
Example:
sayn "Do you really want to exit ? "
pull rep .
will lead to the following dialog:
Do you really want to exit ? no
SAYR - Terminal Output
SAYR {expr}
displays expr without appending a newline
character at the end, and starting on the first column.
This instruction is similar to the SAY instruction. However, it allows for example to display
a countdown that will not create a new line at each iteration.
Example:
do i = 15 to 1 by -1
sayr left(i, 5)
call sleep 1
end
say ’Done’
Note the use of the LEFT() function to assure a constant width for the displayed string.
Without it, "SAYR 9" used after "SAYR 10" would display "90".
Page 530
SEDIT and S/REXX Reference Manual
NEW INSTRUCTIONS
SAYX
SAYX - Displayed Execution
SAYX {expr}
displays expr before passing it to the default
environment.
SAYX expr is equivalent to the statement SAY expr followed by the statement expr.
SENTRIES - Query Stack
SENTRIES is not part of the S/REXX language, but for VM/CMS compatibility it is
implemented as an extension of the UNIX or WINDOWS environment. Therefore, it is
recommended to enclose it in quotes in order to prevent the normal S/REXX variable
substitution.
SENTRIES format is:
SENTRIES
sets the rc variable to the number of entries in the
current stack buffer.
Notes: To prevent an error message from being displayed when the SENTRIES command
is executed, issue a TRACE OFF command before.
Using the QUEUED() built-in function is a more efficient way to query the stack.
See Also: DESBUF, DROPBUF, MAKEBUF
SEDIT and S/REXX Reference Manual
Page 531
TRACE
NEW INSTRUCTIONS
TRACE - Debug Setting
S/REXX adds the following extensions to the TRACE verb:
inhibits command mode execution.
TRACE !
Commands passed to external environments such as UNIX, WINDOWS or SEDIT will be
displayed, but not executed.
As each command is displayed, the RC REXX variable is set to 0.
Note that commands entered manually in interactive debug mode are always executed.
Using the TRACE ! command a second time switches ON the command execution.
Example:
TRACE ?!i
switches interactive debug mode ON, inhibits command
execution, and displays intermediate results.
Warning:
When running S/REXX within SEDIT in a windowing environment such
as OPEN WINDOWS or MOTIF, all input and output operations are
redirected to the window SEDIT was started from.
In order to allow the input operations to execute properly, SEDIT must
run in the foreground.
Starting SEDIT in the background with a command like "xed &" or
"sedit" will make SEDIT hang every time a TRACE ? or a PULL
instruction is executed.
When running S/REXX within SEDIT on WINDOWS, all input and
output operations are redirected to a console window created by
S/REXX.This console window can be removed by the Special-Close
Console menubar item.
TRACE x
starts the RXD graphical debugger.
See Using the RXD Debugger on page 671 for more information.
Extended TRACE output
S/REXX displays more information during a TRACE output.
Consider the following example:
trace i
a = 2
str = "This is a"
id = 1
tab.a = substr(str||" string", id+1, 2)
Page 532
SEDIT and S/REXX Reference Manual
NEW INSTRUCTIONS
TRACE
The usual REXX implementation would display the following cryptic output:
5 *-*
>L>
6 *-*
>L>
7 *-*
>L>
8 *-*
>V>
>L>
>O>
>V>
>L>
>O>
>L>
>F>
a = 2
"2"
str = "This is a"
"This is a"
id = 1
"1"
tab.a = substr(str || " string",id + 1,2)
"This is a"
" string"
"This is a string"
"1"
"1"
"2"
"2"
"hi"
S/REXX will display:
5 *-* a = 2
>>> A <-- "2"
6 *-* str = "This is a"
>>> STR <-- "This is a"
7 *-* id = 1
>>> ID <-- "1"
8 *-*
>C>
>V>
>O>
>V>
>O>
>F>
>>>
tab.a = substr(str||" string", id+1, 2)
TAB.A --> "TAB.2"
STR --> "This is a"
"This is a" || " string" --> "This is a string"
ID --> "1"
"1" + "1" --> "2"
SUBSTR() --> "hi"
TAB.2 <-- "hi"
TRACE y
SEDIT and S/REXX Reference Manual
starts the RXD graphical debugger next time the user
sends an interrupt by typing Control-C (S/REXX
standalone scripts only).
Page 533
UPPER
NEW INSTRUCTIONS
UPPER - Upper Case Translation
UPPER {varlist}
translates the contents of the variables described by
varlist into uppercase.
It is not an error to include a non-initialized variable into varlist.
Example:
upper a b
UPPERW - Word Upper Case Translation
UPPERW {varlist}
translates the contents of the variables described by
varlist into uppercase. Only the first letter of
every word will be translated
It is not an error to include a non-initialized variable into varlist.
Example:
Page 534
a = ’this is a sentence’
upperw a /* a becomes "This Is A Sentence" */
SEDIT and S/REXX Reference Manual
BUILT-IN FUNCTIONS
S/REXX New or Extended Built-in Functions
This chapter describes modified or new built-in functions not described in Cowlishaw’s
book "The REXX Language".
ACOS - Arc Cosine
ACOS(arg) returns the radian arc cosine value of the argument arg in the range 0
to π.
ActivateKeyboardLayout - Switches to an input locale identifier (Windows Only)
ActivateKeyboardLayout(LocalName) loads and activates the
LocalName input locale identifier.
LocaName is a string similar to the "Win API Language Identifier Constants and
Strings" defined in the following page:
http://msdn.microsoft.com/en-us/library/windows/desktop/
dd318693%28v=vs.85%29.aspx
Examples:
call ActivateKeyboardLayout '00000409'
/* Activates the English keyboard */
call ActivateKeyboardLayout '0000080c'
/* Activates the French keyboard
*/
call ActivateKeyboardLayout '0000040D'
/* Activates the Hebrew keyboard
*/
ActivateKeyboardLayout returns the previous input locale identifier name in
case of success, and -1 in case of failure.
ActivateKeyboardLayout(0) returns the current locale without doing any
changes.
ARCH - Get Hardware Information
ARCH() returns a hardware dependent string described in Appendix B: Hardware
String on page 695.
SEDIT and S/REXX Reference Manual
Page 535
BUILT-IN FUNCTIONS
ARG - Returns Argument String
In addition to the standard arg() REXX features:
arg(0)
returns the name of the currently executed S/REXX program.
arg(N, ’c’)
returns the Nth argument passed to the main REXX program using
C-like parsing.
arg(N,’x’) returns the Nth argument passed to the main REXX program using
C-like parsing when the caller is the main REXX program, or
arg(N) when the caller is a subroutine. To be used by a program
that can be either used in standalone mode, or as a dynamically
loaded subroutine.
Consider the following test program:
#! /home/xed/srexx
say "Usual form: "arg(1)
Say "C-Like form: "arg(2, ’C’)
Typing (using an UNIX shell):
test ’1 2’ 3
would display:
Usual form: 1 2 3 4
C-Like form: 3
This parsing is useful to handle arguments containing embedded spaces. Using
PARSE ARG would not allow to distinguish for example between using "test ’1
2’ 3" and "test 1 ’2 3’".
ASIN - Arc Sine
ASIN(arg) returns the radian arc sine value of the argument arg in the range -π/2
to π/2.
ATAN - Arc Tangent
ATAN(arg) returns the radian arc tangent value of the argument arg in the range
-π/2 to π/2.
CHANGE - Change String
CHANGE(str, old, new{, icase}) changes the old string with the new
string within str, and returns the modified string.
Page 536
SEDIT and S/REXX Reference Manual
BUILT-IN FUNCTIONS
When icase is set to 1, old matching is done ignoring case.
SEDIT and S/REXX Reference Manual
Page 537
BUILT-IN FUNCTIONS
CHARIN - Read Character Input Stream
In addition to the standard CHARIN() REXX features, CHARIN(,1,NN) returns
NN characters read from the standard input without displaying them.
Example:
sayn 'Enter a 3 characters password: '
pass = charin(,1,3)
say
say 'The password is :"'pass'"'
say '-----------------'
sayn 'Enter a 3 characters password: '
pass = charin(,,3)
say
say 'The password is :"'pass'"'
When reading the standard input, CHARIN() sets the special RC REXX variable to
0 in case of success, and to the ’EOF’ uppercase string when the standard input is no
longer available. In that case, CHARIN() returns an empty string. This allows the use
of an S/REXX program as a standard input filter.
Consider the following test program:
#! /home/xed/srexx
do forever
val = charin()
if rc = ’EOF’ then exit
say ’"’upper(val)’"’
end
Typing (using an UNIX shell):
echo abc | test
would display:
"A"
"B"
"C"
"
"
Page 538
SEDIT and S/REXX Reference Manual
BUILT-IN FUNCTIONS
CHDIR - Change Directory
CHDIR(dir) makes dir the current directory.
The user may use the ~ .. directory meta characters to specify a location.
Examples:
call chdir
makes the home directory the current directory.
call chdir ’~’
has the same effect.
call chdir ’~/foo’
if the home directory is /users/john,
makes/users/john/foo the current
directory.
call chdir ’../foo’
if the current directory is /users/john,
makes /users/foo the current directory.
Notes:
The directory meta characters must be enclosed in quotes.
The CD instruction requires less typing for the same purpose.
On WINDOWS systems, the HOME environment variable is usually not
defined. In this case, the "~/" or "~\" directory shortcut is translated into
"C:\".
CLEAR or CLS - Clear the Screen
CLEAR() and CLS() clear the screen when possible.
These functions return 0 in case of success, or an error message in case of failure.
CLOSE_CONS - Close a Console
CLOSE_CONS()
CLOSE_CONS is specific to the wsrexx.exe WINDOWS S/REXX version.
CLOSE_CONS closes the console opened by OPEN_CONS().
SEDIT and S/REXX Reference Manual
Page 539
BUILT-IN FUNCTIONS
CONCAT - Concatenate Files
CONCAT(org, dest)
CONCAT appends the files described by the org string to the dest file.
org
is a string which identifies the filenames of the files to be used as data
input.
dest
CONCAT read each input file in sequence, and appends their content
to the dest file. If dest does not exists, it will be created first.
Example:
call concat "file1 c:\file2", "e:\result"
COS - Cosine
COS(ang) returns the cosine value of the radian argument ang.
COMMA - Add commas to a numerical string
COMMA(string)
If string is of a greater lenght than 6, will add commas every third position.
Example:
converts "23456789" into "23,456,789"
CP or COPY - Copy Files
CP(string{, DELTATS})
COPY(string{, DELTATS})
string
is a string which supports 3 formats:
"file1 file2"{, DELTATS}
CP copies the contents of file1 onto file2.
"file1 file2 ... directory"{, DELTATS}
Each filename is copied to the indicated directory; the basename of
the copy corresponds to that of the original. The destination directory
must already exist for the copy to succeed.
"directory_org directory_des"{, DELTATS}
The directory directory_des must not exist unless DELTATS is
provided. The directory_org directory is recursively copied to
directory_des.
CP preserves symbolic links.
If DELTATS is not provided, existing destination files are always overwritten.
If DELTATS is provided, CP() will overwrite files only if the size of the destination
is different from the size of the source, or if the modification time of the source is
greater than DELTATS seconds than the modification time of the destination.
Page 540
SEDIT and S/REXX Reference Manual
BUILT-IN FUNCTIONS
CP sets up two variables:
RC
is set to 0 in the case of a success, or to 1 in the case of a failure, on
any file to copy.
RESULT
is set to a string such as:
123 files copied
in the case of a success, or to a string with an error message
indicating the cause of the failure.
Examples:
call cp "test.srx test2.srx"
call cp "test1 test2 test3 .\backup"
call cp "c:\prog c:\prog.back"
call cp "c:\prog c:\prog.back",0
/* Will copy only modified or new files */
CPUID - Workstation CPU Identifier
CPUID({’n’})
CPUID() returns the cpu identifier as an integer. CPUID(’n’) returns the cpu
identifier in native form, which is hardware dependent. For example, on SUNs
stations, CPUID(’n’) returns an hexadecimal number.
CSH - Pass UNIX Command
CSH(cmd{, stem}) executes the UNIX command cmd using the C shell csh.
When stem is not provided, the cmd output will be placed in the stack. The user will
be able to read it using the parse pull command.
The queued() function may be used to return the number of lines in the stack.
When stem is provided, it must be a valid REXX name. It will be filled with the cmd
output.
Example:
call csh "df", tab
tab.0 will contain the number of lines sent back by df.
tab.1, tab.2, ... will contain the df output line by line.
See also the EXEC(), UNIX(), KSH() and TCSH() functions.
CUSERID, USERID - Get Userid
CUSERID(parm) returns the character login name of the user.
On UNIX systems, parm may be one of the following:
Login
returns the original login name, ignoring the use of the su UNIX
command. This is the default when parm is omitted.
Real
returns the effective login name, which can be modified by the use
of the su UNIX command.
SEDIT and S/REXX Reference Manual
Page 541
BUILT-IN FUNCTIONS
Example:
if userid(’r’) ~= ’root’ then
{ say ’I need to be root.’
exit 3
}
CVTAILS - Get Active Stems Tails
CWD("str") returns the tails of the all stem variables derived from str.
Example:
tab.1 = 1
tab.b = 3
say ’"’cvtails("tab")’"’
/* Displays "1 b" */
CWD, GETCWD, GETWD - Get Current Directory
CWD() returns the current directory.
C2O - Character to Octal
C2O(str)
C2O converts the encoding of the str string to its 3-digit octal representation. If str
is a null string, a null string is returned.
Examples:
say C2O(’123’)
say ’"’C2O(’’)’"’
/* Displays 061062063 */
/* Displays "" */
DATE - Get Current Date
DATE(’J’) returns the date in the YYDDD format.
Example:
say date(’j’)
/* 92012
Perhaps */
DATE(nn) where nn is a whole number returns the date in YYYY/MM/DD format,
considering that nn is the number of days elapsed since the base date 1 Jan 0001.
This reverts the behavior of the DATE(’b’) function.
Example:
date(date('b')+7) /* Same day next week date */
DATE(’L’) returns the date in the dd Month yyyy format.
DATE (parm, "dd/mm/yyyy")
returns the value coresponding to the dd/mm/yyyy date instead of using the current
day date.
DATE(’e4’) returns the date in the dd/mm/yyyy format.
Page 542
SEDIT and S/REXX Reference Manual
BUILT-IN FUNCTIONS
DEL or RM - Delete Files
DEL(ff)
RM(ff)
RM() and DEL() remove the ff files, and returns the full path names of the deleted
files.
ff may include the ~ .. UNIX or WINDOWS file meta characters. If a filename
contains blanks, it must be surrounded with quotes or double quotes.
When RM fails, it sets the rc variable to a non-zero value, and returns an error
message, such as:
RM() error: File does not exist
Examples:
say rm("~/foo ~/test")
could print: /user/john/foo /usr/john/test
call rm ’"/user/file with blanks"’
call del "’c:\Program Files\log’"
DIR or LS - List Files
LS({pat{, stem{, case}}})
DIR({pat{, stem{, case}}})
LS searches for the files matching the pat pattern string.
The RESULT variable will be set to the number of matches.
pat
describes the files to match. pat may start with a directory indicator
such as "/home" or "c:\Program Files\". Within pat, a "*"
character matches any string and a "?" character matches any
character.
stem
when stem is provided, it must be a valid REXX name.
RESULT and stem.0 will contain the number of matching
filenames.
stem.1, stem.2, ... will contain the matching filenames.
When stem is not provided, the matching filenames will be queued.
case
when case is not provided, it defaults to ’i’ on WINDOWS
systems, and to ’r’ on UNIX systems.
When case is set to ’i’, LS ignores the capitalization when matching
filenames.
When case is set to ’r’, LS respects the capitalization.
Example:
call ls ’c:\test\*.f’
call dir ’test???.bat’, tab, ’i’
do i = 1 to tab.0
say tab.i
/* Could print test001.bat*/
end i
SEDIT and S/REXX Reference Manual
Page 543
BUILT-IN FUNCTIONS
DY_ASCL - Add a Set of Strings to a Scrolled List
DY_ASCL(handle, nt_scl, stem, {l_stem}, {pos})
handle
is the number returned by the DY_END() function.
nt_scl
is the number returned by the DY_SCL() function.
stem
is a valid REXX symbol. The derived stem values (stem.1,
stem.2, etc...) will be used to fill the list.
l_stem
is the length of the list of strings. When not provided, stem.0 will
be used instead.
pos
is the position to insert the strings. When not provided, or when set
to 0, the strings will be added at the end of the list.
DY_BEEP - Sound the Alarm
CALL DY_BEEP
DY_BUTTON - Make a Dialog Button Item
nn = DY_BUTTON(x, y, str{, Rb, Gb, Bb, Rf, Gf, Bf})
nn
is the item number. When the user clicks on the button, the dialog
box callback, as defined by the DY_END() function, is called with
its second argument set to the string Bnn (such as B1, B2, etc...).
x
is the item column position. When x is set to 1, the item is displayed
on the left of the dialog box.
y
is the dialog box line position. When y is set to 1, the item is
displayed on the top of the dialog box.
str
is the string displayed within the button.
Rb, Gb, Bb are the optional background color RGB values. These are integers
between 0 and 255. The default MOTIF background color can be
set with the dialog*button*background X11 resource.
Rf, Gf, Bf are the optional foreground color RGB values. These are integers
between 0 and 255. The default MOTIF foreground color can be set
with the dialog*button*foreground X11 resource.
Note:
Page 544
Individually colored items are not supported by the xsrexx
OpenLook S/REXX version.
SEDIT and S/REXX Reference Manual
BUILT-IN FUNCTIONS
DY_BUTTON_COLOR - Change a Button Dialog Item Color
DY_BUTTON_COLOR(handle, nn, Rb, Gb, Bb, Rf, Gf, Bf})
handle
is the number returned by the DY_END() function.
nn
is the item number returned by the DY_BUTTON() function.
Rb, Gb, Bb are the background color RGB values. These are integers between 0
and 255. The default MOTIF background color can be set with the
dialog*button*background X11 resource.
Rf, Gf, Bf are the foreground color RGB values. These are integers between 0
and 255. The default MOTIF foreground color can be set with the
dialog*button*foreground X11 resource.
Note:
Individually colored items are not supported by the xsrexx
OpenLook S/REXX version.
DY_CH - Make a Choice Dialog Item
nt_ch = DY_CH({txt}, x_txt, y_txt,txt1, txt2, ....)
nt_ch
is the item number to be used by the DY_VCH() function.
txt
is the optional global label to be displayed.
x_txt
is the global label column position. When x_txt is set to 1, the label
is displayed on the left of the dialog box.
y_txt
is the global label line position. When y_txt is set to 1, the label is
displayed on the top of the dialog box.
txti
is the label of the sub-item i.
Example:
call dy_start()
nt_ch = dy_ch("Host:", 2, 1, "host0", "host1")
hnd = dy_end("#", 0, 0, 25, 6, "n")
dy_map(hnd)
displays:
SEDIT and S/REXX Reference Manual
Page 545
BUILT-IN FUNCTIONS
DY_CH_COLOR - Change a Choice Dialog Item Color
DY_CH_COLOR(handle, nt_ch, Rb, Gb, Bb, Rf, Gf, Bf})
handle
is the number returned by the DY_END() function.
nt_ch
is the item number returned by the DY_CH() function.
Rb, Gb, Bb are the background color RGB values. These are integers between 0
and 255. The default MOTIF background color can be set with the
dialog*choice*background X11 resource.
Rf, Gf, Bf are the foreground color RGB values. These are integers between 0
and 255. The default MOTIF foreground color can be set with the
dialog*choice*foreground X11 resource.
Note:
Individually colored items are not supported by the xsrexx
OpenLook S/REXX version.
DY_DESTROY - Destroy a Dialog Box
DY_DESTROY(handle) destroys the dialog box handle.
handle
is the number returned by the DY_END() function.
DY_DESTROY() must not be called inside the REXX subroutine callback defined by
the dy_start() function call.
DY_DSCL - Remove a Set of Strings from a Scrolled List
DY_DSCL(handle, nt_scl, pos, nb)
Page 546
handle
is the number returned by the DY_END() function.
nt_scl
is the number returned by the DY_SCL() function.
pos
is the position of the first string to be removed.
nb
is the number of strings to remove.
SEDIT and S/REXX Reference Manual
BUILT-IN FUNCTIONS
DY_END - End a Dialog Box
handle = DY_END("callback", x, y, ww, hh, "Grab"|"Ngrab"
{, Rb, Gb, Bb})
DY_END terminates the dialog box started with DY_START.
handle
is the dialog box number to be used with the various DY_XXX()
functions.
callback
when used in an SEDIT macro, callback is the SEDIT macro
called at every user action. See S/REXX Dialog Management within
SEDIT on page 631 for more details.
when used in a stand-alone REXX program, callback is the name
of a subroutine to be called at every user action. See S/REXX Dialog
Management on page 627 for more details.
callback receives two three arguments:
handle
reason
the dialog box handle.
Bi
Button i.
Fi
Top function key i.
Li
Left function key i.
Ri
Right function key i.
^cc
Control + cc character.
return
Return or Enter key.
focus
The mouse entered the dialog box.
SCi
Simple click on row scb of scrolled list
i.
DSCi
scb
Double click on row scb of scrolled list
i.
The row when clicking on a scrolled list.
x
is the dialog box column position. When x is set to 0, the dialog box
is horizontally centered regarding the SEDIT window position.
y
is the dialog box line position. When y is set to 0, the dialog box is
vertically centered regarding the SEDIT window position.
ww
is the dialog box width.
hh
is the dialog box height.
Grab
creates a transient dialog box. The user must enter a reply before
being able to use SEDIT again. The dialog box is unmapped when
the reply is entered.
Nograb
creates a non-transient dialog box. The box stays mapped until the
user unmaps it explicitly.
Rb, Gb, Bb are the background color RGB values. These are integers between 0
and 255. The default MOTIF background color can be set with the
dialog*background X11 resource.
SEDIT and S/REXX Reference Manual
Page 547
BUILT-IN FUNCTIONS
DY_FOCUS - Give a Dialog Input Item the Keyboard Focus
DY_FOCUS(handle, nn)
handle
is the number returned by the DY_END() function.
nn
is the number returned by the DY_INPUT() function.
DY_FONT - Set the Dialog Font
DY_FONT(fontname)
DY_FONT makes the various dialog items use the fontname font.
On Windows, the syntax of fontname is "Name%Modifier%Height%Width".
Notes:
When not specified, Modifier defaults to Regular, Height to
9 and Width to 15. If a font does not support the specified size,
S/REXX will chose the closest.
The modifier is localization specific. Bold used with an English
version of Windows will have to be replaced with Gras with a
French one.
Example:
call dy_font "Courier new%Regular%9%15"
DY_HEADER - Set the Dialog Box Header
DY_HEADER(handle, str)
Page 548
handle
is the number returned by the DY_END() function.
str
is the string to be displayed on top of the dialog box.
SEDIT and S/REXX Reference Manual
BUILT-IN FUNCTIONS
DY_INPUT - Make a Dialog Input Item
nn = DY_INPUT(x, y, len, {str}{, Rb, Gb, Bb, Rf, Gf, Bf})
nn
is the item number to be used by the DY_VINPUT() and the
DY_SINPUT() functions.
x
is the item column position. When x is set to 1, the item is displayed
on the left of the dialog box.
y
is the dialog box line position. When y is set to 1, the item is
displayed on the top of the dialog box.
len
is the item length.
str
when specified, initializes the input item.
Rb, Gb, Bb are the optional background color RGB values. These are integers
between 0 and 255. The default MOTIF background color can be
set with the dialog*input*background X11 resource.
Rf, Gf, Bf are the optional foreground color RGB values. These are integers
between 0 and 255. The default MOTIF foreground color can be set
with the dialog*input*foreground X11 resource.
Note:
Individually colored items are not supported by the xsrexx
OpenLook S/REXX version.
DY_INPUT_COLOR - Change an Input Dialog Item Color
DY_INPUT_COLOR(handle, nn, Rb, Gb, Bb, Rf, Gf, Bf})
handle
is the number returned by the DY_END() function.
nn
is the item number returned by the DY_INPUT() function.
Rb, Gb, Bb are the background color RGB values. These are integers between 0
and 255. The default MOTIF background color can be set with the
dialog*input*background X11 resource.
Rf, Gf, Bf are the foreground color RGB values. These are integers between 0
and 255. The default MOTIF foreground color can be set with the
dialog*input*foreground X11 resource.
Note:
Individually colored items are not supported by the xsrexx
OpenLook S/REXX version.
SEDIT and S/REXX Reference Manual
Page 549
BUILT-IN FUNCTIONS
DY_LABEL - Make a Dialog Label Item
nn = DY_LABEL(x, y, str{, Rb, Gb, Bb, Rf, Gf, Bf})
x
is the item column position. When x is set to 1, the item is displayed
on the left of the dialog box.
y
is the dialog box line position. When y is set to 1, the item is
displayed on the top of the dialog box.
str
is the string displayed.
Rb, Gb, Bb are the optional background color RGB values. These are integers
between 0 and 255. The default MOTIF background color can be
set with the dialog*label*background X11 resource.
Rf, Gf, Bf are the optional foreground color RGB values. These are integers
between 0 and 255. The default MOTIF foreground color can be set
with the dialog*label*foreground X11 resource.
Note:
Individually colored items are not supported by the xsrexx
OpenLook S/REXX version.
DY_LABEL_COLOR - Change a Label Dialog Item Color
DY_LABEL_COLOR(handle, nn, Rb, Gb, Bb, Rf, Gf, Bf})
handle
is the number returned by the DY_END() function.
nn
is the item number returned by the DY_LABEL() function.
Rb, Gb, Bb are the background color RGB values. These are integers between 0
and 255. The default MOTIF background color can be set with the
dialog*label*background X11 resource.
Rf, Gf, Bf are the foreground color RGB values. These are integers between 0
and 255. The default MOTIF foreground color can be set with the
dialog*label*foreground X11 resource.
Note:
Individually colored items are not supported by the xsrexx
OpenLook S/REXX version.
DY_MAP - Map a Dialog Box
DY_MAP(handle) makes the handle dialog box visible.
handle
Page 550
is the number returned by the DY_END() function.
SEDIT and S/REXX Reference Manual
BUILT-IN FUNCTIONS
DY_OPEN (UNIX) - Displays the Contents of a Directory
rc = DY_OPEN(x, y, ht, stem, {dir}, {filt_f}, {filt_d},
{label}, {lg_reg}{, Rb, Gb, Bb})
DY_OPEN displays the following dialog box:
File input zone
Directory input zone
Directories
Files
File filter input zone
Directory filter input zone
rc
is the return code. It will be set to 0 when the requested directory has
been successfully scanned.
x
is the dialog box column position. When x is set to 0, the dialog box
is horizontally centered regarding the screen when S/REXX is used
as a UNIX script, or centered regarding the SEDIT window position
when S/REXX is used as an SEDIT macro.
y
is the dialog box line position. When y is set to 0, the dialog box is
vertically centered regarding the screen when S/REXX is used as a
UNIX script, or centered regarding the SEDIT window position
when S/REXX is used as an SEDIT macro.
ht
is the height of the file and directories scrolling lists.
stem
must be a valid S/REXX variable name. stem.0 will contain the
number of selected files. stem.1, stem.2, etc..., will contain the
names of the selected files.
dir
is the initial directory to be scanned. When omitted, the current
directory will be scanned.
SEDIT and S/REXX Reference Manual
Page 551
BUILT-IN FUNCTIONS
filt_f
is the filter used to select which files are to be displayed. When
omitted, it defaults to *, which means any file. When the regular
expression switch is off, * means any set of characters. a*df*
would for example match a_123.dfte.
Several filters can be specified by using a ; separator.
*.c;*.h
Example:
filt_d
is the filter used to select which directories are to be displayed.
label
is the label to be displayed on the top of the dialog box.
lg_reg
when set to 1, toggles on the regular expression search. When
omitted, or set to 0, toggles off the regular expression search.
Rb, Gb, Bb are the background color RGB values. These are integers between 0
and 255. The default MOTIF background color can be set with the
dialog*background X11 resource.
A regular expression is a character string used to describe, in an extended way, a
string to be matched. It uses special characters, called meta characters to describe
the match to be done.
The meta characters are the following:
^
$
\<
\>
.
[]
\(
\)
*
matches only at the beginning of a line.
matches only at the end of a line.
matches only at the beginning of a word.
matches only at the end of a word.
matches any single character.
matches any character in a character class.
delimits the start of a subexpression. It is available for VI
compatibility, but has no special meaning.
delimits the end of a subexpression. It is available for VI
compatibility, but has no special meaning.
repeats the preceding 0 or more times.
If you want to use a meta character as an ordinary character, you must precede it with
a backslash (\) character.
Examples:
^af
matches the string "af" only at the beginning of a line.
af$
matches the string "af" only at the end of a line.
dc.......is
Page 552
SEDIT and S/REXX Reference Manual
BUILT-IN FUNCTIONS
matches the string "dc" followed by any 7 characters followed by the string "is".
[A-Z][a-z]
[A-Z]
[a-z]
means any character from A to Z.
means any character from a to z.
The whole expression above matches any alphabetical string starting with a capital
letter.
The string "File001" will be matched. "F001" will not.
Note that the meta characters are not treated when enclosed in brackets:
[.$]
matches the string ".$". Without brackets, the user should type:
\.\$
for the same match.
Supported User Actions
The user can perform the following actions:
• Clicking once with the left mouse button on a displayed file selects this file, and
displays its name in the file input zone.
• With the MOTIF version, holding the Shift key down while clicking extends
the selection to several contiguous files. Holding the Control key down extends
the selection to another, possibly non-contiguous, file.
• Double clicking on a file makes DY_OPEN return. stem will contain the name of
all the selected files.
• Clicking once with the left mouse button upon a displayed directory selects this
directory, and displays its name in the directory input zone.
• Double clicking on a displayed directory initiates a scan of the directory.
• Using the Return or Enter key when the keyboard focus is in the File input
zone makes DY_OPEN return. stem will contain the name of the file displayed in
that File input zone.
• Using the Return or Enter key when the keyboard focus is in the Directory
input zone initiates a scan of the directory displayed in that zone. When this
directory name does not start with a / or a ~, it will be considered as a subdirectory
of the previously scanned directory.
• Using the Return or Enter key when the keyboard focus is in the File or
Directory filter zone initiates a new scan of the previously scanned directory.
• Clicking on the OPEN button makes DY_OPEN return. stem will contain the
name of all the selected files.
• Clicking on the CANCEL button makes DY_OPEN return. stem.0 will contain
the 0 string.
SEDIT and S/REXX Reference Manual
Page 553
BUILT-IN FUNCTIONS
• Clicking on the SCAN button initiates a new scan of the previously scanned
directory.
The following /home/xed/xmac/dy_open.sedit macro is used by the
SEDIT text editor to open new files:
/*
* dy_open: opens a set of new files
*
* Syntax: DY_OPEN {dir}, {filt-file}, {filt-dir}, {lg_reg}
*
* dir: The directory to scan, or //last to open the last directory
*
scanned
*/
signal on novalue
option mixed setenv
parse arg dir, ff, fd, reg
if dir = '' then dir = cwd()
else
if dir = '//last' then
{ if $?last_dy_open_scanned then dir = $last_dy_open_scanned
else
dir = '.'
}
if ff = '' then ff = '*'
if fd = '' then fd = '*'
if reg = '' then reg = 0
trace off
call dy_open 0, 0, 10, sfi, dir, ff, fd, "xed - dir:"cwd(), reg
if result = 0 then
{ do i = 1 to sfi.0
'xed 'sfi.i
end i
if sfi.0 ~= 0 then $last_dy_open_scanned = fd(sfi.1)
}
else 'prompt Unable to scan 'dir
DY_FOLDER (WINDOWS) - Browses for a Folder
dir = DY_FOLDER({dir_start})
Page 554
DY_FOLDER
displays an extended WINDOWS dialog box, similar to the Open
File one, allowing the user to browse for a folder.
dir
is the user selected folder, or an empty string if the user pressed the
Cancel button.
dir_start
is an optional parameter specifyng the initially displayed folder.
SEDIT and S/REXX Reference Manual
BUILT-IN FUNCTIONS
DY_OPEN (WINDOWS) - Displays the Contents of a Directory
rc = DY_OPEN(x, y, ht, stem, {dir}, {filt_f}, {filt_d},
{label}, {lg_reg})
DY_OPEN displays the standard WINDOWS dialog box.
rc
is the return code. It will be set to 0 when the requested directory has
been successfully scanned.
x
unused.
y
unused.
ht
unused.
stem
must be a valid S/REXX variable name. stem.0 will contain the
number of selected files. stem.1, stem.2, etc..., will contain the
names of the selected files.
dir
is the initial directory to be scanned. When omitted, the current
directory will be scanned.
filt_f
is the filter used to select which files are to be displayed. When
omitted, it defaults to *, which means any file.
Several filters can be specified by using a ; separator.
Example:
*.c;*.h
filt_d
unused.
label
is the label to be displayed on the top of the dialog box.
lg_reg
unused.
DY_PRINTER - Set the Default Printer
rr = DY_PRINTER()
On WINDOWS systems, DY_PRINTER displays the standard PRINT dialog box.
The settings entered by the user will be used the next time this dialog box is displayed,
or by the EXECIO command when printing.
rr
is set to 1 when the user clicks on the OK button, and to 0 otherwise.
DY_PSCL - Set the First Displayed String1
DY_PSCL(handle, nt_scl, pos)
handle
is the number returned by the DY_END() function.
nt_scl
is the number returned by the DY_SCL() function.
pos
is the rank of the string to be displayed on top of the scrolled list. The
first string is the string number 1.
1. DY_PSCL is not supported by the OpenLook xsrexx version.
SEDIT and S/REXX Reference Manual
Page 555
BUILT-IN FUNCTIONS
DY_REFRESH - Redraw the Dialog Box
call DY_REFRESH
When an S/REXX macro is busy doing some processing, DY_REFRESH() can be
used periodically to redraw all the currently displayed dialog boxes.
DY_RSCL - Replace a String in a Scrolled List
DY_RSCL(handle, nt_scl, pos, string)
handle
is the number returned by the DY_END() function.
nt_scl
is the number returned by the DY_SCL() function.
pos
is the rank of the string to be replaced. The first string is the string
number 1.
string
is the new string.
DY_SCH - Set a Choice Value
DY_SCH(handle, nc, i)
handle
is the number returned by the DY_END() function.
nc
is the number returned by the DY_CH() function.
i
is the index of the sub-item to be displayed.
DY_SINPUT - Set a Dialog Input Item Value
DY_SINPUT(handle, n, str)
Page 556
handle
is the number returned by the DY_END() function.
n
is the number returned by the DY_INPUT() function.
str
is the string to be displayed.
SEDIT and S/REXX Reference Manual
BUILT-IN FUNCTIONS
DY_SCL - Make a Scrolled List Dialog Item
nt_scl = DY_SCL(x, y, la, ht, stem, {l_stem}, {type}
{, Rb, Gb, Bb, Rf, Gf, Bf})
nt_scl
is the item number, to be used by the various DY_xSCL() functions.
x
is the column position. When x is set to 1, the list is displayed
starting on the left of the dialog box.
y
is the line position. When y is set to 1, the list is displayed starting
on the top of the dialog box.
la
is the width of the list.
ht
is the number of lines displayed by the list.
stem
is a valid REXX symbol. The derived stem values (stem.1,
stem.2, etc...) will be used to fill the list.
l_stem
is the length of the list. When not provided, stem.0 is the default.
type
when type is the "Multiple" string, the list will permit multiple
selections. This is the default when type is not specified.
When type is the "Single" string, only one line can be selected.
Rb, Gb, Bb the optional background color RGB values. These are integers
between 0 and 255. The default MOTIF background color can be
set with the dialog*list*background X11 resource.
Rf, Gf, Bf the optional foreground color RGB values. These are integers
between 0 and 255. The default MOTIF foreground color can be set
with the dialog*list*foreground X11 resource.
Notes:
Individually colored items are not supported by the xsrexx
OpenLook S/REXX version.
The callback will receive different values when clicking or double
clicking on an item. See the DY_END description on page 547 for
more information.
Double clicking on an item within a GRAB dialog box unmaps the
dialog box. Simple clicking does not.
SEDIT and S/REXX Reference Manual
Page 557
BUILT-IN FUNCTIONS
Example:
the file {install-dir}/demo/demo_dy/dy_scl shows the use
of every DY_xSCL function:
option mixed setenv
call dy_start()
$dismiss
= dy_button(1, 1,
"DISMISS")
call csh 'ls ~', tab
$handle_scl1 = dy_scl(2, 4, 11, 10, tab, /* tab.0 */, 'm')
$transfer
$del
$top
$rep
$set
$add
=
=
=
=
=
=
dy_button(26,
dy_button(26,
dy_button(26,
dy_button(26,
dy_button(26,
dy_button(26,
4,
6,
8,
10,
12,
14,
"TRANFER")
"DELETE")
"TOP")
"REPLACE")
"SET")
"ADD")
$handle_scl2 = dy_scl(39, 4, 11, 10)
$handle_dy
= dy_end("dy_ex_cb", -25, -10, 67, 17.5, "n")
call dy_map $handle_dy
say
say '... Returned from dy_map(1)'
say
call dy_map $handle_dy
say
say '... Returned from dy_map(2)'
say
return
dy_ex_cb:procedure
parse arg handle reason
say 'dy_ex_cb: 'reason
select
when reason =
reason =
{ call
call
exit
}
Page 558
'F1' | ,
'B'$dismiss then
dy_unmap(handle)
dy_destroy(handle)
0
SEDIT and S/REXX Reference Manual
BUILT-IN FUNCTIONS
when reason = 'B'$transfer then
{ call do_it
return 0
}
when reason = 'B'$del then
{ call dy_vscl handle, $handle_scl1, num
if num.0 ~= 0 then call dy_dscl handle, $handle_scl1, num.1,
num.0
return 0
}
when reason = 'B'$top then
{ call dy_vscl handle, $handle_scl1, num
if num.0 ~= 0 then call dy_pscl handle, $handle_scl1, num.1
return 0
}
when reason = 'B'$rep then
{ call dy_vscl handle, $handle_scl1, num
if num.0 ~= 0 then call dy_rscl handle, $handle_scl1, num.1,
"New String"
return 0
}
when reason = 'B'$set then
{ call dy_sscl handle, $handle_scl1, 2, 1
return 0
}
when reason = 'B'$add then
{ strings.1 = 'Last'
call dy_ascl(handle, $handle_scl1, strings, 1, 0)
call dy_ascl(handle, $handle_scl2, strings, 1, 0)
return 0
}
when reason = 'focus' then
{ say '.... Focus'
return 0
}
otherwise return 0
end
do_it:procedure expose handle
say '--------------------------------------------'
l_num = dy_vscl(handle, $handle_scl1, num)
do i = 1 to num.0
say num.i
end
say
SEDIT and S/REXX Reference Manual
Page 559
BUILT-IN FUNCTIONS
l_num = dy_vscl(handle, $handle_scl1, num, strings)
do i = 1 to num.0
say num.i strings.i
end
call dy_ascl(handle, $handle_scl2, strings, strings.0, 0)
return
On UNIX systems, typing:
% cd /home/xed/demo/demo_dy
% ./dy_scl
displays:
On WINDOWS systems, type:
C:\> chdir "\Program Files\SEDIT\demo\demo_dy"
C:\> "\Program Files\SEDIT\wsrexx" dy_scl
Page 560
SEDIT and S/REXX Reference Manual
BUILT-IN FUNCTIONS
DY_SCL_COLOR - Change a Scrolled List Dialog Item Color
DY_SCL_COLOR(handle, nt_scl, Rb, Gb, Bb, Rf, Gf, Bf})
handle
is the number returned by the DY_END() function.
nt_scl
is the item number returned by the DY_SCL() function.
Rb, Gb, Bb are the background color RGB values. These are integers between 0
and 255. The default MOTIF background color can be set with the
dialog*list*background X11 resource.
Rf, Gf, Bf are the foreground color RGB values. These are integers between 0
and 255. The default MOTIF foreground color can be set with the
dialog*list*foreground X11 resource.
Note:
Individually colored items are not supported by the xsrexx
OpenLook S/REXX version.
DY_SLABEL - Set a Dialog Label Item Value
DY_SLABEL(handle, n, str)
handle
is the number returned by the DY_END() function.
n
is the number returned by the DY_LABEL() function.
str
is the string to be displayed.
DY_SSCL - Select or Unselect a String Within a Scrolled List
DY_SSCL(handle, nt_scl, pos, {set})
handle
is the number returned by the DY_END() function.
nt_scl
is the number returned by the DY_SCL() function.
pos
is the rank of the string to be selected or unselected. The first string
is the string number 1
set
when set to 1, or when not specified, the string is selected. When set
to 0, the string is unselected.
DY_START - Start a Dialog Box
DY_START() must be called before using the DY_INPUY(), DU_LABEL(),
DY_BUTON() and DY_TG() functions.
SEDIT and S/REXX Reference Manual
Page 561
BUILT-IN FUNCTIONS
DY_STG - Set a Dialog Toggle Value
DY_STG(handle, nt_g, nt, val)
Page 562
handle
is the number returned by the DY_END() function.
nt_g
is the number returned by the DY_TG() function.
nt
is the rank of the sub-item to be set to val.
val
is 0 (false) or 1 (true). The OpenLook version only responds to a 1
value.
SEDIT and S/REXX Reference Manual
BUILT-IN FUNCTIONS
DY_TG - Make a Dialog Toggle
nt_g = DY_TG({txt}, x_txt, y_txt,
x1, y1, txt1, set1{,
x2, y2, txt2, set2{,
..................
}})
nt_g
is the item number to be used by the DY_VTG() and the DY_STG()
functions.
txt
is the optional global label to be displayed.
x_txt
is the global label column position. When x_txt is set to 1, the label
is displayed on the left of the dialog box.
y_txt
is the global label line position. When y_txt is set to 1, the label is
displayed on the top of the dialog box.
xi
is the column position of the sub-item i.
yi
is the line position of the sub-item i. The SEDIT OpenLook version
stacks sub-items vertically or horizontally. The MOTIF version
respects precisely the (xi, yi) coordinates.
txti
is the label of the sub-item i.
seti
either 1 (true) or 0 (false).
Example:
call dy_start()
nt_g = dy_tg("toggle1:", 2, 1,
11, 1,
"string0", 1,
11, 2.5, "string1", 0,
11, 4,
"string2", 0)
hnd = dy_end("#", 0, 0, 25, 6, "n")
dy_map(hnd)
displays:
SEDIT and S/REXX Reference Manual
Page 563
BUILT-IN FUNCTIONS
DY_TG_COLOR - Change a Toggle Dialog Item Color
DY_TG_COLOR(handle, nt_g, Rb, Gb, Bb, Rf, Gf, Bf})
handle
is the number returned by the DY_END() function.
nt_g
is the item number returned by the DY_TG() function.
Rb, Gb, Bb are the background color RGB values. These are integers between 0
and 255. The default MOTIF background color can be set with the
dialog*toggle*background X11 resource.
Rf, Gf, Bf are the foreground color RGB values. These are integers between 0
and 255. The default MOTIF foreground color can be set with the
dialog*toggle*foreground X11 resource.
Note:
Individually colored items are not supported by the xsrexx
OpenLook S/REXX version.
DY_UNMAP - Unmap a Dialog Box
DY_UNMAP(handle) makes the handle dialog box invisible.
handle
is the number returned by the DY_END() function.
DY_VINPUT - Get a Dialog Input Item Value
str = DY_VINPUT(handle, nn)
str
is the contents of the nn input item.
handle
is the number returned by the DY_END() function.
nn
is the number returned by the DY_INPUT() function.
DY_VCH - Get a Dialog Choice Value
val = DY_VCH(handle, nt_ch)
Page 564
val
is the value of the CHOICE dialog item.
handle
is the number returned by the DY_END() function.
nt_ch
is the number returned by the DY_CH() function.
SEDIT and S/REXX Reference Manual
BUILT-IN FUNCTIONS
DY_VSCL - Retrieve a Scrolled List Ranks and Contents of the Selected Strings
l_num = DY_VSCL(handle, nt_scl, num, {cnt})
l_num
is the number of selected items.
handle
is the number returned by the DY_END() function.
nt_scl
is the number returned by the DY_SCL() function.
num
is a valid REXX symbol. The derived stem values (num.1, num.2,
etc...) will be filled with the rank of the selected items. num.0 will
contain the number of selected items.
cnt
is a valid REXX symbol. The derived stem values (cnt.1, cnt.2,
etc...) will be filled with the selected items. cnt.0 will contain the
number of selected items.
DY_VTG - Get a Dialog Toggle Item Value
val = DY_VTG(handle, nt_g, i)
val
is the logical value (0 or 1) of the sub-item i of the nt_g toggle
item.
handle
is the number returned by the DY_END() function.
nt_g
is the number returned by the DY_TG() function.
i
is the sub-item number.
DY_WARP - Set Mouse Handling
old = DY_WARP({str})
str
when set to "ON", S/REXX moves the mouse onto a GRAB dialog
box when it is displayed. When set to "OFF", the mouse position
remains unchanged.
old
is set to ON or OFF, according to the previous setting.
EXEC - Pass UNIX Command Directly
EXEC(cmd{, stem}) executes the UNIX command cmd directly.
S/REXX attempts to execute directly the cmd string passed without using any UNIX
shell. The PATH is not searched and the usual shell redirection ">" and pipe "|"
characters are not treated specifically. Shell meta characters like "*" are also passed
without expansion.
On WINDOWS systems, EXEC() is identical to the WINDOWS() built-in function.
When stem is not provided, the cmd output will be placed in the stack. The user will
be able to read it using the parse pull command.
The QUEUED()function may be used to return the number of lines in the stack.
SEDIT and S/REXX Reference Manual
Page 565
BUILT-IN FUNCTIONS
When stem is provided, it must me a valid REXX name. It will be filled with the cmd
output.
Example:
Note:
call exec "/bin/ls *", tab
/* lists a file actually named * */
tab.0 will contain the number of lines sent back by /bin/ls.
tab.1, tab.2, ... will contain the ls output line by line.
EXEC() not supporting the meta characters, use CSH() or KSH() to pass
a command such as call csh ’ls ~/foo*.c’
See also the EXECV(), UNIX(), CSH(), TCSH() and KSH() functions.
EXECV - Pass UNIX Program Directly
EXECV(cmd, {argv}, {stem}, {tee}) executes the UNIX program cmd
directly.
When argv is provided, it must be a valid REXX name. argv.0 is the number of
arguments to be passed to cmd. The derived argv.i stem values will be the
arguments. EXECV allows to easily handle arguments with embedded spaces.
When stem is not provided, the cmd output will be placed in the stack. The user will
be able to read it using the parse pull command.
The QUEUED()function may be used to return the number of lines in the stack.
When stem is provided, it must be a valid REXX name. It will be filled with the cmd
output.
When tee is set to 1, EXECV will display the output of the cmd program.
Note:
EXECV() not supporting the meta characters, use CSH() or KSH() to
pass a command such as call csh ’ls ~/foo*.c’
See also the EXEC(), UNIX(), CSH(), TCSH() and KSH() functions.
EXTERNALS - Pending Input
On UNIX systems, EXTERNALS() returns the number of characters available in the
standard input stream.
On WINDOWS systems, EXTERNALS() returns 0 when the standard input is
empty, and 1 otherwise.
Page 566
SEDIT and S/REXX Reference Manual
BUILT-IN FUNCTIONS
FD - Get File-Directory
FD(fname) returns the fname directory part.
Example:
a = fd("/usr/john/foo.c")
returns "/usr/john".
FILECONV - UNIX or WINDOWS File Conversion
FILECONV(string)
string
"Unix" or "Windows"
When string is set to UNIX (the default on UNIX systems), S/REXX considers
that a line in a file ends with a newline character.
When string is set to WINDOWS (the default on WINDOWS systems), S/REXX
considers that a line in a file ends either with a newline character or with a ^M
character followed by a newline character..
When writing to a file, S/REXX will terminate every line with a ^M character before
the newline character, and end the file with a ^Z character following the last newline
character.
Using FILECONV(’W’) on UNIX systems permits the reading of WINDOWS files
eliminating ^M and ^Z characters.
Using FILECONV(’U’) on WINDOWS systems permits the writing of files
without ^M and ^Z characters, making them easier to share with UNIX systems.
Example:
call fileconv ’u’
FLFILES - Get FLIST Files
call flfiles tab returns in the tab stem the full names of the files listed within
the current FLIST level. tab.0 contains the number of files returned, tab.i with
i varying from 1 to tab.0 contains the file names.
FN - Get Filename
FN(fname) returns the fname filename part.
Example:
a = fn("/usr/john/foo.c")
returns "foo".
SEDIT and S/REXX Reference Manual
Page 567
BUILT-IN FUNCTIONS
FOLLOW - Follow Symbolic Links
FOLLOW(file) checks if any component of file is a symbolic link, and replaces
it with the file to which the symbolic link points. The full pathname of the file will be
returned. If file is recursively linked to itself, or if the file directory component
does not exist, FOLLOW returns an empty string.
FOLLOW sets RC to zero in case of success. In case of error, FOLLOW returns an empty
string and sets RC and to -1.
Example:
Page 568
call chdir ’/users/john’
’ln -s ./somefile ./somefile.link’
say follow(’somefile.link’)
displays: /users/john/somefile
SEDIT and S/REXX Reference Manual
BUILT-IN FUNCTIONS
FORK - Spawn a New Process
FORK()
On UNIX systems, FORK() causes creation of a new process. The new process (child
process) is an exact copy of the calling process (parent process). The child process
inherits the variables and the programming state from its parent process. However, all
opened files are closed within the child process, and the child process cannot process
dialog boxes opened by the parent process. The child process of an SEDIT macro
cannot pass commands to SEDIT.
Upon successful completion, FORK() returns a value of 0 to the child process and
returns the process ID of the child process to the parent process. Otherwise, a value
of -1 is returned to the parent process.
On WINDOWS systems, a value of -1 is always returned.
Example:
father = getpid()
a = fork()
if a = 0 then
{ say ’Son: ’getpid() ’(Father is ’father’)’
do i = 1 to 5
say ’... Son’
call sleep 1
end
say ’Son: exiting’
exit
}
else
{ say ’Father: ’getpid() ’(son is ’a’)’
call usleep 500000
say ’Father: waitpid(,"N") = ’waitpid(a, ’n’)
say ’Father: waiting’
say ’Father: waitpid = ’waitpid(a)
say ’Father: exiting’
}
would display:
Father: 28159 (son is 28160)
Son: 28160 (Father is 28159)
... Son
Father: waitpid(,"N") = 0
Father: waiting
... Son
... Son
... Son
... Son
Son: exiting
Father: waitpid = 28160
Father: exiting
SEDIT and S/REXX Reference Manual
Page 569
BUILT-IN FUNCTIONS
FT - Get Filetype
FT(fname) returns the fname filetype part.
Example:
a = ft("/usr/john/foo.c")
returns ".c".
FWC - Format With Comma
FWC(number) returns number, adding commas every 3 digits if number uses
more than 6 digits.
Example:
Page 570
say fwc(123456789)
/* Displays 123,456,789 */
SEDIT and S/REXX Reference Manual
BUILT-IN FUNCTIONS
GetAdaptersInfo - Get Free Disk Space (Windows Only)
GetAdaptersInfo(st)retrieves network adapter information, using the WIN32
API GetAdaptersInfo() function call.
GetAdaptersInfo() fills a set of REXX stems derived from st, using similar
names to the ones described in the WIN32 IP_ADAPTER_INFO structure, and
returns the number of available network adapters.
Example:
nb = GetAdaptersInfo(stem)
say
do i = 1 to nb
say "--- Adapter "i
say
say "ComboIndex
= " stem.i.ComboIndex
say "AdapterName = " stem.i.AdapterName
say "AdapterDesc = " stem.i.AdapterDesc
say "AdapterAddr = " stem.i.AdapterAddr
say "Index
= " stem.i.Index
say "Type
= " stem.i.Type
say "IPAddress
= " stem.i.IPAddress
say "IPMask
= " stem.i.IPMask
say "Gateway
= " stem.i.Gateway
say "DHCPEnabled = " stem.i.DHCPEnabled
if stem.i.DHCPEnabled = 'Yes' then
{ say "LeaseObtained = " stem.i.LeaseObtained
say "LeaseExpires = " stem.i.LeaseExpires
}
say "HaveWins
= " stem.i.HaveWins
if stem.i.HaveWins = 'Yes' then
{ say "Primary WinsServer
= " stem.i.PrimaryWinsServer
say "Secondary WinsServer = " stem.i.SecondaryWinsServer
}
say
end
SEDIT and S/REXX Reference Manual
Page 571
BUILT-IN FUNCTIONS
could display:
--- Adapter 1
ComboIndex
=
AdapterName =
AdapterDesc =
AdapterAddr =
Index
=
Type
=
IPAddress
=
IPMask
=
Gateway
=
DHCPEnabled =
LeaseObtained =
LeaseExpires =
HaveWins
=
19
{75430922-9D29-4F31-B8AC-D48E3178F3D3}
TAP-Win32 Adapter V9
00-FF-75-43-09-22
19
Ethernet
0.0.0.0
0.0.0.0
0.0.0.0
Yes
Thu Jan 01 01:00:00 1970
Thu Jan 01 01:00:00 1970
No
--- Adapter 2
ComboIndex
AdapterName
AdapterDesc
AdapterAddr
Index
Type
IPAddress
IPMask
Gateway
DHCPEnabled
HaveWins
=
=
=
=
=
=
=
=
=
=
=
18
{2DC02017-53AB-4C70-B5D0-FB2925701E13}
Gigabit PCI Express Network Adapter #3
64-70-02-00-E6-71
18
Ethernet
192.9.200.16
255.255.255.0
192.9.200.200
No
No
GETDISKSPACE - Get Free Disk Space
GETDISKSPACE({mount_point}) returns a string containing in kbytes the
amount of disk space occupied by the mount_point file system, the amount of used
and available space, and the percentage of the file system’s total capacity used.
If mount_point is not specified, the root directory ("/" on UNIX systems, "c:"
on WINDOWS systems) will be used. mount_point can be any directory on
UNIX systems, and any drive letter ("c:") on WINDOWS systems.
An empty string is returned in case of error.
Page 572
Example:
say ’"’getdiskspace("/")’"’ could display
"288119 158610 100698 61"
Note:
GETDISKSPACE is not supported on Linux, SCO and SunOS
systems.
SEDIT and S/REXX Reference Manual
BUILT-IN FUNCTIONS
GETENV - Get Environment Variable
GETENV(var) returns the value of the var environment variable.
Example:
a = getenv("PATH")
See also the SETENV() function.
GETFILE - Get File Content
rc = GETFILE({start}, {end}, {stem})
Within SEDIT, GETFILE retrieves the contents of the current file.
start
is the first file line to be retrieved.When omitted, start defaults to
1.
end
is the last file line to be retrieved.When omitted, end defaults to the
lenght of the current file.
stem.0
the number of retrieved lines.
stem.i
the ith retrieved line content.
rc
the number of retrieved lines.
When stem is not provided, the GETFILE output will be placed in the stack.
Example:
call getfile 12, 666, tab
GETPID - Process Identifier
GETPID()
GETPID returns the current process number. Every process has a different process
number. This number can be used to create a unique filename.
HOSTNAME - Workstation Hostname
HOSTNAME()
HOSTNAME returns the name of the workstation.
INDEX - Find string
INDEX(haystack, needle {, start}{, icase})
When icase is set to 1, matching is done ignoring case.
ISMAIN - Determines if routine is MAIN one
Returns 1 if called as MAIN program, or 0 if called as subroutine.
SEDIT and S/REXX Reference Manual
Page 573
BUILT-IN FUNCTIONS
JUSTIFY - Justify String
JUSTIFY(string, len{, pad}) returns a string of length len.
The default pad value is the blank character.
string is first normalized. Multiple blanks are converted to single blanks, and
leading and trailing blanks are removed.
If the length of the normalized string is greater than len, string is then truncated
on the right and all trailing blanks are removed.
If the length of the normalized string is less than len, extra pad characters are then
added evenly from left to right to provide the required length, and the blanks between
words are replaced with the pad character.
Examples:
Page 574
justify('ONE THREE TWO',11,'-'):
'ONE-THREE-T'
justify("", 9, "+"):
'+++++++++'
justify("The red
shoe", 15):
'The
justify("The red
shoe", 15, "+"): 'The+++red++shoe'
red
shoe'
SEDIT and S/REXX Reference Manual
BUILT-IN FUNCTIONS
KILL - Terminate a Process
KILL(pid{, sig})
On UNIX systems, KILL() sends to the process whose process ID (returned by the
FORK() built-in function) is pid the signal sig. sig can be any number, or one of the
usual UNIX signal strings:
SIGALRM
SIGBUS
SIGCHLD
SIGCLD
SIGCONT
SIGEMT
SIGFPE
SIGHUP
SIGILL
SIGINT
SIGIO
SIGIOT
SIGKILL
SIGLOST
SIGPIPE
SIGPOLL
SIGPROF
SIGQUIT
SIGSEGV
SIGSTOP
SIGSYS
SIGTERM
SIGTRAP
SIGTSTP
SIGTTIN
SIGTTOU
SIGURG
SIGUSR1
SIGUSR2
SIGVTALRM
SIGWINCH
SIGXCPU
SIGXFSZ
The sig default value is SIGKILL, which will terminate the pid process.
The first 3 letters of sig can be omitted: ALRM is the same as SIGALRM.
Upon successful completion, a value of 0 is returned. Otherwise, a value of -1 is
returned.
On WINDOWS systems, KILL() always returns a value of -1.
KSH - Pass UNIX Command
KSH(cmd{, stem}) executes the UNIX command cmd using the Korn shell ksh.
When stem is not provided, the cmd output will be placed in the stack. The user will
be able to read it using the parse pull command.
The queued() function may be used to return the number of lines in the stack.
When stem is provided, it must be a valid REXX name. It will be filled with the cmd
output.
Example:
call ksh "df", tab
tab.0 will contain the number of lines sent back by df.
tab.1, tab.2, ... will contain the df output line by line.
See also the EXEC(), UNIX(), CSH() and TCSH() functions.
LINEIN, LINEOUT - Input / Output
The S/REXX LINEIN() and LINEOUT() functions comply with the standard
REXX LINEIN() and LINEOUT() functions as described in "The REXX
Programming Language".
The following peculiarities must be noted:
SEDIT and S/REXX Reference Manual
Page 575
BUILT-IN FUNCTIONS
The UNIX or WINDOWS file system does not know about lines, only about
characters. The lines delimiter is implied by the presence of the "0A"x newline
character on UNIX, and by the ^M character followed by the newline character on
WINDOWS.
At the first LINEIN() or LINEOUT() invocation, S/REXX scans the entire file and
memorizes the newline character positions, permitting an extremely fast line access
on subsequent calls.
When using the LINEOUT() function to write in the middle of a file, for example to
write a string at line10 of a 2000 line file, S/REXX does not truncate the file at line
10. Instead, it checks the string length, compares it to the original line 10 length, and
moves the remainder of the file either to the left or to the right, depending on whether
the new line is shorter (left) or longer (right) than the original line.
With large files, this process may take a while.
The filename parameter may include the ~ .. file meta characters.
When reading the standard input, LINEIN() sets the special RC REXX variable to
0 in case of success, and to the ’EOF’ uppercase string when the standard input is no
longer available. In that case, LINEIN() returns an empty string. This allows the use
of an S/REXX program as a standard input filter.
Consider the following test program:
#! /home/xed/srexx
do forever
val = linein()
if rc = ’EOF’ then exit
say upper(val)
end
Typing (using an UNIX shell):
echo abc | test
would display:
ABC
See Also: FILECONV
Page 576
SEDIT and S/REXX Reference Manual
BUILT-IN FUNCTIONS
LN
LN - Make Hard or Symbolic Links to File
LN(OldFile, NewFile{, ’h’|’s’})
LN creates a new directory entry (link) NewFile for the file specified by OldFile.
LN may be used to create both hard links (’h’) and symbolic links (’s’). A hard link
is a pointer to a file and is indistinguishable from the original directory entry. Any
changes to a file are effectively independent of the name used to reference the file.
Hard links may not span file systems.
A symbolic link is an indirect pointer to a file; its directory entry contains the name
of the file to which it is linked. Symbolic links may span file systems. On UNIX
systems, LN defaults to symbolic links when the third parameter is not specified. On
WINDOWS, creating symbolic requires administrator rights, so LN defaults to hard
links.
LN returns 0 in case of success, or an error message.
MKDIR - Make a Directory
MKDIR(dir) creates the dir directory, and returns the full dir pathname.
dir may include the ~ .. file meta characters.
When MKDIR fails, it sets the rc variable to a non-zero value, and returns an error
message, such as:
MKDIR() error: File exists
Example:
say mkdir("~/bin")
could print:
/user/john/bin
MKLISTFILES - Group a list of files
N = MKLISTFILES(dir, size, stem)
MKLISTFILES recursively scans the dir directory, grouping files in N sets of files,
in order for each set size to be as close as possible but lower than the size parameter.
Example:
N = MKLISTFILES("d:\Movies", 150*1000000000, tab)
groups the contents of the "d:\Movies" directory so that each set fits an LTO 5
tape.
tab.1.0
will be the number of files in the first set.
tab.1.1, tab.1.2, ...
will the be the file names of the fist fileset.
tab.1.1.0, tab.1.2.0, ...will be the size of the corresponding files.
tab.2.0
will be the number of files in the second set.
... and so on.
SEDIT and S/REXX Reference Manual
Page 577
LN
BUILT-IN FUNCTIONS
MV or RENAME - Rename a File
RENAME(file1, file2)
MV(file1, file2)
RENAME renames the file or directory file1 to file2.
RENAME sets up two variables:
RC
is set to 0 in the case of a success, or to the error number returned by
the system in the case of a failure.
RESULT
is set to the full pathname of file2 in the case of a success, or to a
string with an error message indicating the cause of the failure.
Example:
call rename "myfile", "myfile.old"
RESULT may contain for example:
c:\userfiles\myfile.old
OPEN_CONS - Open a Console
OPEN_CONS({title {,width{,height}})
OPEN_CONS is specific to the wsrexx.exe WINDOWS S/REXX version.
OPEN_CONS is used within the windowing wsrexx.exe version to open a standard
I/O console, similar to a DOS console. S/REXX automatically calls OPEN_CONS
when a SAY, SAYX, TRACE or PARSE PULL statement is issued and the console has
not been opened before.
Page 578
title
is a string to be displayed on top of the console.
width
is the width in characters unit of the console.
height
is the height in characters unit of the console.
Example:
call open_cons "MyApp", 80, 25
SEDIT and S/REXX Reference Manual
BUILT-IN FUNCTIONS
LN
PARG - Parse Argument
parg(argv, opt, tab) parses the argv argument string according to the
options defined by the opt string, saving the result into the tab stem.
An option is a string starting with a minus sign. A parameter is a string following an
option.
parg returns 0 when the argument string argv matches the options, 1 when the
number of parameters following any option does not match the number of parameters
defined by opt and 2 when an option is not defined.
Consider the following test program:
#! /home/xed/srexx
option mixed
opt = "-Wp 2 -help 0 -font 1"
parse arg argv
if parg(argv, opt, tab) ~= 0 then
{ say 'Invalid option.'
exit 1
}
do i = 1 to tab.0
select
when tab.i = 'help'
then call help_proc
when tab.i = 'font'
then
{ font = tab.font.1
say 'Font set to "'font'"'
}
when tab.i = 'Wp'
then
{ px = tab.Wp.1
py = tab.Wp.2
say 'Position set to "'px py'"'
}
end
end i
str = tab.i
say 'Final string: "'str'"'
exit
help_proc:
say "Help not yet available"
exit 1
The "-Wp 2 -help 0 -font 1" opt string has the following meaning:
The -Wp option must be followed by 2 parameters.
The -help option must be followed by no parameter.
The -font option must be followed by 1 parameter.
tab.0 gives the number of recognized options passed to the program. If n is
tab.0+1, tab.n gives the remaining argument string.
When the -Wp option is passed to the program, tab.Wp.1 and tab.Wp.2 give the
two words following the -Wp option in the argv argument string.
SEDIT and S/REXX Reference Manual
Page 579
LN
BUILT-IN FUNCTIONS
Examples:
% test -Wp 345 123 str1 str2 str3
Position set to "345 123"
Final string: "str1 str2 str3"
% test -help
Help not yet available
% test -font cour.b.18
Font set to "cour.b.18"
Final string: ""
%
When option mixed is not in effect, all options are translated into uppercase. In
this case, the test program would be:
#! /home/xed/srexx
opt = "-wp 2 -help 0 -font 1" /* Same as "-WP 2 -HELP 0 -FONT 1" */
parse arg argv
if parg(argv, opt, tab) ~= 0 then
{ say 'Invalid option.'
exit 1
}
do i = 1 to tab.0
select
when tab.i = 'HELP'
then call help_proc
when tab.i = 'FONT'
then
{ font = tab.font.1
say 'Font set to "'font'"'
}
when tab.i = 'WP'
then
{ px = tab.wp.1
py = tab.wp.2
say 'Position set to "'px py'"'
}
end
end i
str = tab.i
say 'Final string: "'str'"'
exit
help_proc:
say "Help not yet available"
exit 1
Page 580
SEDIT and S/REXX Reference Manual
BUILT-IN FUNCTIONS
LN
POS - Find string
POS(needle, haystack {, start}{, icase})
When icase is set to 1, matching is done ignoring case.
QPID - Query Process Death
QPID(pid)
On UNIX systems, QPID() returns 1 if the pid process is dead and 0 when it is
alive. pid is the process ID returned by the FORK() built-in command.
On WINDOWS systems, QPID() always returns -1.
RCHANGE - Change String using regular expressions
RCHANGE(str, regex, new{, icase}) changes the regex string with the
new string within str, and returns the modified string.
When icase is set to 1, regex matching is done ignoring case.
See the SEDIT RCHANGE command for a regex definition.
REGISTRY_DEL - Delete REGISTRY Key Contents
On WINDOWS systems, REGISTRY_DEL() is used to delete the contents of a
registry key, or the key itself.
WARNING:
DISRUPTING THE WINDOWS REGISTRY CAN
IRREPARABLY DAMAGE THE SYSTEM.
rc = REGISTRY_DEL(hkey, where{, name})
hkey
is the key root location in the registry. hkey can be one of the
following strings:
HKEY_CLASSES_ROOT
HKEY_CURRENT_USER
HKEY_LOCAL_MACHINE
HKEY_USERS
HKEY_CURRENT_CONFIG
HKEY_DYN_DATA
where
is the location of the key in the hkey tree.
name
when provided, name is the name of the subkey to be removed.
when not provided, the whole where key is removed. Note that on
WINDOWS systems, where must be empty in order to be
removed.
rc
is 0 when the call succeeds, or an error message.
Examples:
SEDIT and S/REXX Reference Manual
Page 581
LN
BUILT-IN FUNCTIONS
call registry_del("HKEY_LOCAL_MACHINE",,
"SOFTWARE\test", "dms")
call registry_del("HKEY_LOCAL_MACHINE",,
"SOFTWARE\test")
Page 582
SEDIT and S/REXX Reference Manual
BUILT-IN FUNCTIONS
LN
REGISTRY_GET - Retrieve REGISTRY Key Contents
On WINDOWS systems, REGISTRY_GET() is used to retrieve the contents of a
registry key.
val = REGISTRY_GET(hkey, where, name)
hkey
is the key root location in the registry. hkey can be one of the
following strings:
HKEY_CLASSES_ROOT
HKEY_CURRENT_USER
HKEY_LOCAL_MACHINE
HKEY_USERS
HKEY_CURRENT_CONFIG
HKEY_DYN_DATA
where
is the location of the key in the hkey tree.
name
is the name of the subkey. If name is the "" empty string, the default
value of the specified key location is retrieved.
val
is a string representing the contents of the key when the call succeds,
or an error message starting with the "REGISTRY_GET Error:"
string. REGISTRY_GET() returns the key value using a format
similar to the WINDOWS Registry Editor when using the Export
Registry File command.
REGISTRY_GET() understands the following WIN32 API type of
keys:
REG_BINARY:
val is in the "hex:xx,xx,xx,...." format.
REG_RESOURCE_LIST:
val is in the "hex(8):xx,xx,xx,...." format.
REG_FULL_RESOURCE_DESCRIPTOR:
val is in the "hex(9):xx,xx,xx,...." format.
REG_DWORD:
val is in the "dword:xxxxxxxx" format.
REG_DWORD_BIG_ENDIAN:
val is in the "hex(5):xx,xx,xx,...." format.
REG_LINK:
val is in the "hex(6):xx,xx,xx,...." format.
REG_MULTI_SZ:
val is in the "hex(7):xx,xx,xx,...." format.
REG_NONE:
SEDIT and S/REXX Reference Manual
Page 583
LN
BUILT-IN FUNCTIONS
val is in the "hex(0):xx,xx,xx,...." format.
REG_EXPAND_SZ:
val is in the "hex(2):xx,xx,xx,...." format.
REG_RESOURCE_REQUIREMENTS_LIST:
val is in the "hex(a):xx,xx,xx,...." format.
REG_SZ:
val is a string.
Examples:
say registry_get("HKEY_LOCAL_MACHINE",,
"HARDWARE\DESCRIPTION\System\CentralProcessor\0",,
"~MHz")
could display:
dword:00000109
say registry_get("HKEY_LOCAL_MACHINE",,
"SOFTWARE\Citrix\Client Management\ICA Client Update",,
"Default Database")
could display:
hex(2):25,53,79,73,74,65
REGISTRY_KEYS - REGISTRY Subkeys Enumeration
On WINDOWS systems, REGISTRY_KEYS() is used to enumerate subkeys of the
specified registry key.
rc = REGISTRY_KEYS(hkey, {where}, stem)
hkey
is the key root location in the registry. hkey can be one of the
following strings:
HKEY_CLASSES_ROOT
HKEY_CURRENT_USER
HKEY_LOCAL_MACHINE
HKEY_USERS
HKEY_CURRENT_CONFIG
HKEY_DYN_DATA
Page 584
where
is the location of the key in the hkey tree. When omitted, the whole
hkey tree is enumerated.
stem
is the name of a valid REXX name.
stem.0
will contain the number of enumerated subkeys.
stem.i
will contain the ith enumerated subkey.
SEDIT and S/REXX Reference Manual
BUILT-IN FUNCTIONS
rc
LN
is the number of enumerated subkeys when the call succeeds, or an
error message starting with the "REGISTRY_KEYS Error:"
string.
Example:
call registry_keys("HKEY_LOCAL_MACHINE",,
"SOFTWARE", tab)
do i = 1 to tab.0
say tab.i
end
SEDIT and S/REXX Reference Manual
Page 585
LN
BUILT-IN FUNCTIONS
REGISTRY_SET - Set REGISTRY Key Contents
On WINDOWS systems, REGISTRY_SET() is used to set the contents of a registry
key.
WARNING:
DISRUPTING THE WINDOWS REGISTRY CAN
IRREPARABLY DAMAGE THE SYSTEM.
val = REGISTRY_SET(hkey, where, name, cnt)
hkey
is the key root location in the registry. hkey can be one of the
following strings:
HKEY_CLASSES_ROOT
HKEY_CURRENT_USER
HKEY_LOCAL_MACHINE
HKEY_USERS
HKEY_CURRENT_CONFIG
HKEY_DYN_DATA
where
is the location of the key in the hkey tree.
name
is the name of the subkey. If name is the "" empty string, the default
value of the specified key location is set.
cnt
is a string representing the contents of the key. REGISTRY_SET()
uses a format similar to the WINDOWS Registry Editor when using
the Export Registry File command.
REGISTRY_SET() understands the following WIN32 API type of
keys:
REG_BINARY:
cnt is in the "hex:xx,xx,xx,...." format.
REG_RESOURCE_LIST:
cnt is in the "hex(8):xx,xx,xx,...." format.
REG_FULL_RESOURCE_DESCRIPTOR:
cnt is in the "hex(9):xx,xx,xx,...." format.
REG_DWORD:
cnt is in the "dword:xxxxxxxx" format.
REG_DWORD_BIG_ENDIAN:
cnt is in the "hex(5):xx,xx,xx,...." format.
REG_LINK:
cnt is in the "hex(6):xx,xx,xx,...." format.
REG_MULTI_SZ:
cnt is in the "hex(7):xx,xx,xx,...." format.
Page 586
SEDIT and S/REXX Reference Manual
BUILT-IN FUNCTIONS
LN
REG_NONE:
cnt is in the "hex(0):xx,xx,xx,...." format.
REG_EXPAND_SZ:
cnt is in the "hex(2):xx,xx,xx,...." format.
REG_RESOURCE_REQUIREMENTS_LIST:
cnt is in the "hex(a):xx,xx,xx,...." format.
REG_SZ:
cnt is a string not starting with hex:, dword: or hex(n):.
val
is 0 when REGISTRY_SET() succeeds, or an error message.
Example:
call registry_set("HKEY_LOCAL_MACHINE",,
"SOFTWARE\test", "dms", "hex(6):01,02,03")
REGISTRY_VALUES - REGISTRY Values Enumeration
On WINDOWS systems, REGISTRY_VALUES() is used to enumerate the values
of the specified registry key.
rc = REGISTRY_VALUES(hkey, where, stem)
hkey
is the key root location in the registry. hkey can be one of the
following strings:
HKEY_CLASSES_ROOT
HKEY_CURRENT_USER
HKEY_LOCAL_MACHINE
HKEY_USERS
HKEY_CURRENT_CONFIG
HKEY_DYN_DATA
where
is the location of the key in the hkey tree. When set to an empty
string, the hkey values are enumerated.
stem
is the name of a valid REXX name.
stem.0
will contain the number of enumerated values.
stem.i
will contain the ith enumerated values.
rc
is the number of enumerated values when the call succeeds, or an
error message starting with the "REGISTRY_VALUES Error:"
string.
Example:
call registry_values("HKEY_LOCAL_MACHINE",,
"SOFTWARE\Program Groups", tab)
do i = 1 to tab.0
say tab.i
end
SEDIT and S/REXX Reference Manual
Page 587
LN
BUILT-IN FUNCTIONS
RM / DEL / RECYCLE - Delete Files
DEL(ff)
RM(ff)
RECYCLE(ff)
RM() and DEL() remove the ff files, and returns the full path names of the deleted
files.
On WINDOWS systems, RECYCLE() moves the ff files or directories to the
recycle bin.
ff may include the ~ .. UNIX or WINDOWS file meta characters. If a filename
contains blanks, it must be surrounded with quotes or double quotes.
When RM fails, it sets the rc variable to a non-zero value, and returns an error
message, such as:
RM() error: File does not exist
Examples:
say rm("~/foo ~/test")
could print: /user/john/foo /usr/john/test
call rm ’"/user/file with blanks"’
call recycle "’c:\Program Files\log’"
RMDIR - Delete a Directory
RMDIR(dir{, "r"})
RMDIR removes the dir directory.
When the recursive "r" flag is not specified, dir must be empty.
When "r" is specified, RMDIR removes all of the dir files and subdirectories first.
RC
is set to 0 in case of success, or to 1 in case of failure.
RESULT
is set to the full pathname of dir in case of success, or to a string
with an error message indicating the cause of the failure.
Examples:
call rmdir "c:\foodir", "r"
call rmdir "/home/foodir", "r"
SCRIPT - Record Session
SCRIPT({filename {, ’a’}}
When SCRIPT is called with a filename parameter, everything printed on the
windows S/REXX was started from is written to filename. Unless the optional
’a’ parameter is specified, the filename file is overwritten.
When SCRIPT is called without parameters, the recording stops.
Example:
Page 588
call script ’~/logfile’, ’a’
say ’This will be recorded’
address unix ’df’ /* This will be recorded */
SEDIT and S/REXX Reference Manual
BUILT-IN FUNCTIONS
LN
call script
say ’This will not be recorded’
Note: SCRIPT is not supported on Windows 95/98.
SERVICE_CREATE - Create a Service
On WINDOWS systems, SERVICE_CREATE() is an interface to the WIN32
CreateService function. SERVICE_CREATE() accepts arguments similar to
the following CreateService arguments:
LPCTSTR
lpServiceName
// pointer to name of service to start
LPCTSTR
lpDisplayName
// pointer to display name
DWORD
dwDesiredAccess
// type of access to service
DWORD
dwServiceType
// type of service
DWORD
dwStartType
// when to start service
DWORD
dwErrorControl
// severity if service fails to start
LPCTSTR
lpBinaryPathName
// pointer to name of binary file
LPCTSTR
lpLoadOrderGroup
// pointer to name of load ordering group
LPCTSTR
lpDependencies
// pointer to array of dependency names
LPCTSTR
lpServiceStartName // pointer to account name of service
LPCTSTR
lpPassword
// pointer
account
to
password
for
service
See the Microsoft CreateService documentation for more information.
SERVICE_CREATE() returns 0 in case of success, or an explicit error message.
Example:
call service_create,
’SEDIT-SREXX License Server’,,
’SEDIT-SREXX License Server’,,
’SERVICE_ALL_ACCESS’,,
’SERVICE_WIN32_OWN_PROCESS|SERVICE_INTERACTIVE_PROCESS’,,
’SERVICE_AUTO_START’,,
’SERVICE_ERROR_NORMAL’,,
’c:\Program Files\SEDIT\xserv.exe’
SERVICE_DELETE - Delete a Service
SERVICE_DELETE(name)
name
the name of the service to be deleted.
On WINDOWS systems, SERVICE_DELETE() is an interface to the WIN32
DeleteService function.
See the Microsoft DeleteService documentation for more information.
SERVICE_DELETE() returns 0 in case of success, or an explicit error message.
SEDIT and S/REXX Reference Manual
Page 589
LN
BUILT-IN FUNCTIONS
SERVICE_STOP - Stop a Service
SERVICE_STOP(name)
name
the name of the service to be stopped.
On WINDOWS systems, SERVICE_STOP() is an interface to the WIN32
ControlService function.
See the Microsoft ControlService documentation for more information.
SERVICE_STOP() returns 0 in case of success, or an explicit error message.
SERVICE_START - Start a Service
SERVICE_START(name)
name
the name of the service to be started.
On WINDOWS systems, SERVICE_START() is an interface to the WIN32
StartService function.
See the Microsoft StartService documentation for more information.
SERVICE_START() returns 0 in case of success, or an explicit error message.
SERVICE_STATUS - Status of a Service
SERVICE_STATUS(name)
name
the name of the service to be queried.
On WINDOWS systems, SERVICE_STATUS() is an interface to the WIN32
QueryServiceStatus function.
See the Microsoft QueryServiceStatus documentation for more information.
SERVICE_STATUS() returns an explicit error message in case of failure, or one of
the following strings:
SERVICE_STOPPED
SERVICE_START_PENDING
SERVICE_STOP_PENDING
SERVICE_RUNNING
SERVICE_CONTINUE_PENDING
SERVICE_PAUSE_PENDING
SERVICE_PAUSED
SERVICE_DOES_NOT_EXIST
Page 590
SEDIT and S/REXX Reference Manual
BUILT-IN FUNCTIONS
LN
SetPriority - Sets the priority class for the current process (Windows only)
SetPriority(PriorityClass)
PriorityClass can be one of the following::
ABOVE_NORMAL_PRIORITY_CLASS
BELOW_NORMAL_PRIORITY_CLASS
HIGH_PRIORITY_CLASS
IDLE_PRIORITY_CLASS
NORMAL_PRIORITY_CLASS
PROCESS_MODE_BACKGROUND_BEGIN
PROCESS_MODE_BACKGROUND_END
REALTIME_PRIORITY_CLASS
See:
http://msdn.microsoft.com/en-us/library/windows/desktop/ms686219(v=
vs.85).aspx
for a description of each parameter value.
Example:
rc = SetPriority("PROCESS_MODE_BACKGROUND_BEGIN")
say 'rc = 'rc
rc = SetPriority("PROCESS_MODE_BACKGROUND_BEGIN")
say 'rc = 'rc
say 'result = 'result
would display:
rc = 0
rc = -1
result = The process is already in background processing
mode.
SEDIT and S/REXX Reference Manual
Page 591
LN
BUILT-IN FUNCTIONS
ShellExecute - Performs an operation on a specified file (Windows only)
ShellExecute({Operation},File,{Parameters},{Directory})
ShellExecute calls directly the Win32 ShellExecute() API.
Operation: A string that specifies the action to be performed. The set of available
verbs depends on the particular file or folder. The following verbs
are commonly used:
edit
Launches an editor and opens the document for
editing. If File is not a document file, the function
will fail.
explore
Explores a folder specified by File.
find
Initiates a search beginning in the directory specified
by Directory.
open
Opens the item specified by the File. File can be
for example a file, a folder, a WEB address.
print
Prints the file specified by File. If File is not a
document file, the function fails.
If Operation is not specified, the default verb is used, if available. If not, the open
verb is used. If neither verb is available, the system uses the first verb listed in the
registry.
File:
A string that specifies the file or object on which to execute the
specified verb.
Parameters:The parameters to be passed to the application.
Directory: A string that specifies the default (working) directory for the action.
If not specified, the current working directory is used. If a relative
path is provided at File, do not use a relative path for Directory.
Example:
call ShellExecute "open", "http://www.sedit.com"
Page 592
SEDIT and S/REXX Reference Manual
BUILT-IN FUNCTIONS
LN
SHGetKnownFolderPath - Retrieves the full path of a known folder (Windows only)
SHGetKnownFolderPath(RFID)
SHGetKnownFolderPath retrieves the full path of a known folder identified by
the folder's RFID. It returns -1 in case of error..
SHGetKnownFolderPath is similar to the Win API defined in the following
page:
http://msdn.microsoft.com/en-us/library/windows/desktop/bb762188(v=vs.85).aspx
RFID is a string similar to the Win API defined in the following page:
http://msdn.microsoft.com/en-us/library/bb762584(v=VS.85).aspx
RFID can be one of the following::
AdminTools
CDBurning
CommonAdminTools
CommonOEMLinks
CommonPrograms
CommonStartMenu
CommonStartup
CommonTemplates
Cookies
Documents
Desktop
Downloads
Favorites
Fonts
History
InternetCache
LocalAppData
LocalizedResourcesDir
Music
NetHood
Pictures
PrintHood
Profile
ProgramData
ProgramFiles
ProgramFilesX64
ProgramFilesCommon
ProgramFilesCommonX64
ProgramFilesCommonX86
Programs
PublicDownloads
PublicMusic
PublicPictures
PublicVideos
QuickLaunch
Recent
ResourceDir
RoamingAppData
SampleMusic
SamplePictures
SendTo
StartMenu
Startup
System
SystemX86
Templates
Videos
Windows
Example:
say ’"’SHGetKnownFolderPath('LocalAppData')’"’
/* Could display: "C:\Users\John\AppData\Local" */
SEDIT and S/REXX Reference Manual
Page 593
LN
BUILT-IN FUNCTIONS
SETENV, PUTENV - Set Environment Variable
SETENV(var, str) or PUTENV(var, str) assigns str to the var
environment variable.
Example:
call putenv "PATH", ".:/usr/bin:/bin"
See also the GETENV() function.
SIN - Sine
SIN(ang) returns the sine value of the radian argument ang.
SLEEP - Suspend Execution
SLEEP(sec) suspends execution for sec seconds.
SockAccept - Accept an Incoming Request
as = SockAccept(s{, ’stem.’}
as = accept(s{, ’stem.’}
accepts a connection request from a remote host.
as
a positive value indicates succes. as can then be used with
SockRecv() to retrieve the message sent by the remote host.
’stem.’
is an optional stem variable where the address that is bound to the as
socket is placed.
stem.family
is always ’AF_INET’ or ’PF_INET’.
stem.port
the port number assigned to the socket.
stem.addr
either ’INADDR_ANY’ or the internet address in dotted format
(nnn.nnn.nnn.nnn).
SockClose - Close a Socket
SockClose(s)
closesocket(s)
closes the s socket opened with the SockSocket() built-in.
Page 594
SEDIT and S/REXX Reference Manual
BUILT-IN FUNCTIONS
LN
SockBind - Bind a Socket
rc = SockBind(s, ’stem.’)
rc = bind(s, ’stem.’)
assigns a name to an unnamed socket.
rc
0 when SockBind() succeds.
s
specifies a socket.
’stem.’
is a stem variable containing the address that is to be bound to socket.
stem.family
must always be ’AF_INET’ or ’PF_INET’.
stem.port
the port number to be assigned to the socket. If port is set to 0, the
the system will assign an available port. SockGetSockName()
can be used to retrieve the port number assigned.
stem.addr
either ’INADDR_ANY’ or the internet address in dotted format
(nnn.nnn.nnn.nnn). On hosts with more than one network
interface (called multihomed hosts), a caller can select the interface
with which it is to bind.
SockBind() sets the errno variable to 0 in case of success, or to one of the
following error codes:
EACCES
the requested address is protected and the current user has inadequate
permission to access it.
EADDRINUSE the specified address is already in use.
EADDRNOTAVAIL
the specified address is not available on the local machine.
EBADF
s is not a valid descriptor.
EINVAL
the socket is already bound to an address.
ENOSR
there were insufficient STREAMS resources for the operation to
complete.
ENOTSOCK
s is a descriptor for a file, not a socket.
Example:
addr_family = ’AF_INET’
addr_port
= 1256
addr_addr
= ’INADDR_ANY’
rc = SockBind(sock_in, ’addr_’)
Note:
Using a stem name such as ’addr.’ may lead to unexpected
results. If for example the port REXX variable is assigned the
value of 12, addr.port will expand to addr.12, and the port
value assigned to addr.port will be impossible to retrieve. Use a
non-stemmed prefix such as addr_ to prevent this error.
SEDIT and S/REXX Reference Manual
Page 595
LN
BUILT-IN FUNCTIONS
SockConnect - Connect a Socket
rc = SockConnect(s, ’stem.’)
rc = connect(s, ’stem.’)
connects a socket to a host.
rc
0 when SockConnect() succeds.
s
specifies a socket.
’stem.’
is a stem variable containing the address of the remote socket to
which a connection is to be attempted.
stem.family
must always be ’AF_INET’ or ’PF_INET’.
stem.port
the port number assigned to the remote socket.
stem.addr
either ’INADDR_ANY’ or the internet address in dotted format
(nnn.nnn.nnn.nnn).
SockConnect sets the errno variable to 0 in case of success, or to one of the
following error codes:
EACCES
search permission is denied for a component of the path prefix of the
pathname in name.
EADDRINUSE the address is already in use.
EADDRNOTAVAIL
the specified address is not available on the remote machine.
EAFNOSUPPORT
addresses in the specified address family cannot be used with this
socket.
EALREADY
the socket is non-blocking and a previous connection attempt has not
yet been completed.
EBADF
s is not a valid descriptor.
ECONNREFUSED
the attempt to connect was forcefully rejected.
EINPROGRESS
the socket is non-blocking and the connection cannot be completed
immediately.
EINTR
the connection attempt was interrupted before any data arrived by the
delivery of a signal.
EIO
an I/O error occurred while reading from or writing to the file
system.
EISCONN
the socket is already connected.
ELOOP
too many symbolic links were encountered in translating the
pathname in name.
ENETUNREACH
the network is not reachable from this host.
Page 596
SEDIT and S/REXX Reference Manual
BUILT-IN FUNCTIONS
LN
ENOSR
there were insufficient STREAMS resources available to complete
the operation.
ENXIO
the server exited before the connection was complete.
ETIMEDOUT
connection establishment timed out without establishing a
connection.
Example:
addr_family = ’AF_INET’
addr_port
= 1256
addr_addr
= SockGetHostId()
rc = SockConnect(sock_out, ’addr_’)
Note:
Using a stem name such as ’addr.’ may lead to unexpected
results. If for example the port REXX variable is assigned the
value of 12, addr.port will expand to addr.12, and the port
value assigned to addr.port will be impossible to retrieve. Use a
non-stemmed prefix such as addr_ to prevent this error.
SockDropFuncs - Compatibility Function
SockDropFuncs() is provided for compatibility purposes. SockDropFuncs
does no perform any function.
SockGetHostByAddr - Search for Information for a Host
rc = SockGetHostByAddr(dotAddress, ’stem.’{, domain})
rc = gethostbyaddr(dotAddress, ’stem.’{, domain})
gets information about a specified host on the network using its dotted decimal
address.
rc
1 when SockGetHostByAddr() succeds, 0 in case of failure.
dotAddress
a string specifying the dotted decimal address of the host.
domain
the domain value. SockGetHostByAddr() only supports the
"AF_INET" value.
’stem.’
is a stem variable containing the information about the host.
stem.name
the standard name of the host.
stem.alias.0 number of aliases for this host.
stem.alias.1 First alias for this host.
stem.alias.n n’th alias for this host.
stem.addrtype
always "AF_INET".
stem.addr
the default dotted decimal address.
stem.addr.0
number of addresses for the name host.
stem.addr.1
first address for the name host.
stem.addr.n
n’th address for the name host.
SEDIT and S/REXX Reference Manual
Page 597
LN
BUILT-IN FUNCTIONS
SockGetHostByAddr() sets the h_errno variable to 0 in case of success, or to
one of the following error codes:
HOST_NOT_FOUND
TRY_AGAIN
NO_RECOVERY
NO_DATA
NO_ADDRESS
Example:
rc = SockGetHostByAddr(’192.9.200.1’, ’host.’)
say ’host.name = ’host.name
say ’host.alias.0 = ’host.alias.0
do i = 1 to host.alias.0
say ’host.alias.’i’ = ’host.alias.i
end
say ’host.addrtype = ’host.addrtype
say ’host.addr
= ’host.addr
say ’host.addr.0
= ’host.addr.0
do i = 1 to host.addr.0
say ’host.addr.’i’ = ’host.addr.i
end
SockGetHostByName - Search for Information for a Host
rc = SockGetHostByName(name, ’stem.’)
rc = gethostbyname(name, ’stem.’)
gets information about a specified host on the network using its name.
rc
1 when SockGetHostByName() succeds, 0 in case of failure.
name
a string specifying the name of the host.
’stem.’
is a stem variable containing the information about the host.
stem.name
the standard name of the host.
stem.alias.0 number of aliases for this host.
stem.alias.1 First alias for this host.
stem.alias.n n’th alias for this host.
stem.addrtype
always "AF_INET".
Page 598
stem.addr
the default dotted decimal address.
stem.addr.0
number of addresses for the name host.
stem.addr.1
first address for the name host.
stem.addr.n
n’th address for the name host.
SEDIT and S/REXX Reference Manual
BUILT-IN FUNCTIONS
LN
SockGetHostByName() sets the h_errno variable to 0 in case of success, or to
one of the following error codes:
HOST_NOT_FOUND
TRY_AGAIN
NO_RECOVERY
NO_DATA
NO_ADDRESS
Example:
rc = SockGetHostByName(hostname(), ’host.’)
say ’host.name = ’host.name
say ’host.alias.0 = ’host.alias.0
do i = 1 to host.alias.0
say ’host.alias.’i’ = ’host.alias.i
end
say ’host.addrtype = ’host.addrtype
say ’host.addr
= ’host.addr
say ’host.addr.0
= ’host.addr.0
do i = 1 to host.addr.0
say ’host.addr.’i’ = ’host.addr.i
end
SockGetHostId - Get the Dot Address of the Host
dotAddress = SockGetHostId()
dotAddress = gethostid()
retrieves the dot address of the local host in nnn.nnn.nnn.nnn format.
SockGetPeerName - Get the Name of the Connected Peer
rc = SockGetPeerName(s, ’stem.’)
rc = getpeername(s, ’stem.’)
retrieves information about the peer connected to the socket s in the ’stem.’ stem.
rc
0 when SockGetPeerName() succeds.
s
specifies a socket.
’stem.’
is a stem variable containing the address that is bound to the s socket.
stem.family
is always ’AF_INET’ or ’PF_INET’.
stem.port
the port number assigned to the socket. If the socket is not bound to
an address, stem.port is set to 0.
stem.addr
either ’INADDR_ANY’ or the internet address in dotted format
(nnn.nnn.nnn.nnn).
SockGetPeerName() sets the errno variable to 0 in case of success, or to one
of the following error codes:
EBADF
the argument s is not a valid file descriptor.
ENOMEM
there was insufficient memory available for the operation to
complete.
SEDIT and S/REXX Reference Manual
Page 599
LN
BUILT-IN FUNCTIONS
ENOSR
there were insufficient STREAMS resources available for the
operation to complete.
ENOTSOCK
the argument s is not a socket.
ENOTCONN
the socket s is not connected.
Example:
SockGetPeerName(s, ’addr_’)
say addr_family /* displays ’AF_INET’ */
say addr_port
/* could display 1256 */
say addr_addr
/* could display ’INADDR_ANY’ or
’192.9.200.1’ */
Note:
Using a stem name such as ’addr.’ may lead to unexpected
results. If for example the port REXX variable is assigned the
value of 12, addr.port will expand to addr.12, and the port
value assigned to addr.port will be impossible to retrieve. Use a
non-stemmed prefix such as addr_ to prevent this error.
SockGetSockName - Get the Current Socket Name
rc = SockGetSockName(s, ’stem.’)
rc = getsockname(s, ’stem.’)
retrieves information about the s socket in the ’stem.’ stem.
rc
0 when SockGetSockName() succeds.
s
specifies a socket.
’stem.’
is a stem variable containing the address that is bound to the s socket.
stem.family
is always ’AF_INET’ or ’PF_INET’.
stem.port
the port number assigned to the socket. If the socket is not bound to
an address, stem.port is set to 0.
stem.addr
either ’INADDR_ANY’ or the internet address in dotted format
(nnn.nnn.nnn.nnn).
SockGetSockName() sets the errno variable to 0 in case of success, or to one
of the following error codes:
Page 600
EBADF
the argument s is not a valid file descriptor.
ENOMEM
there was insufficient memory available for the operation to
complete.
ENOSR
there were insufficient STREAMS resources available for the
operation to complete.
ENOTSOCK
the argument s is not a socket.
SEDIT and S/REXX Reference Manual
BUILT-IN FUNCTIONS
LN
Example:
SockGetSockName(s, ’addr_’)
say addr_family /* displays ’AF_INET’ */
say addr_port
/* could display 1256 */
say addr_addr
/* could display ’INADDR_ANY’ or
’192.9.200.1’ */
Note:
Using a stem name such as ’addr.’ may lead to unexpected
results. If for example the port REXX variable is assigned the value
of 12, addr.port will expand to addr.12, and the port value
assigned to addr.port will be impossible to retrieve. Use a
non-stemmed prefix such as addr_ to prevent this error.
SockGetSockOpt - Get Socket Options
rc = SockGetSockOpt(s, level, optname, ’optval’)
rc = getsockopt(s, level, optname, ’optval’)
gets options associated with a socket.
rc
0 when SockGetSockOpt() succeds.
s
specifies a socket.
level
the protocol level. SockGetSockOpt() supports only the
"SOL_SOCKET" level.
optname
on UNIX systems, optname can be:
SO_DEBUG SO_REUSEADDR SO_KEEPALIVE
SO_DONTROUTE SO_LINGER SO_BROADCAST
SO_OOBINLINE SO_SNDBUF SO_RCVBUF SO_TYPE
SO_ERROR
On WINDOWS system, optname can be:
SO_DEBUG SO_REUSEADDR SO_KEEPALIVE
SO_DONTROUTE SO_LINGER SO_BROADCAST
SO_OOBINLINE SO_SNDBUF SO_RCVBUF SO_DONTLINGER
’optval’
the name of an S/REXX variable enclosed in quotes.
When optname is SO_LINGER, optval is filled with a string
including 2 integers. The first integer is a boolean flag describing the
linger status, and the second integer is the linger time.
SockGetSockOpt() sets the errno variable to 0 in case of success, or to one of
the following error codes:
EBADF
the argument s is not a valid file descriptor.
ENOMEM
there was insufficient memory available for the operation to
complete.
ENOPROTOOPT
the option is unknown at the level indicated.
ENOSR
there were insufficient STREAMS resources available for the
operation to complete.
ENOTSOCK
the argument s is not a socket.
SEDIT and S/REXX Reference Manual
Page 601
LN
BUILT-IN FUNCTIONS
Example:
rc = SockGetSockOpt(sock_out, "SOL_SOCKET", "SO_REUSEADDR", ’lg’)
if (lg = 1) then
SockInit - Compatibility Function
SockInit() is provided for compatibility purposes. SockInit() does not
perform any function.
SockIoctl - Perform Special Operations on Socket
rc = SockIoctl(s, codeop, ’var’)
rc = ioctl(s, codeop, ’var’)
sets socket attribute, or retrieves information.
rc
0 when SockIoctl() succeds.
s
specifies a socket.
codeop
the ioctl command to perform. codeop can be ’FIONBIO’ or
’FIONREAD’.
FIONBIO
sets or clears nonblocking input/output for the s socket. var must
be an integer. When var contains the value of 0, input/output on the
socket s are blocking. Otherwise, input/output on the socket s are
nonblocking.
FIONREAD
SockIoctl() stores in var the number of bytes available for
reading.
’var’
a REXX variable.
SockIoctl() sets the errno variable to 0 in case of success, or to one of the
following error codes:
EINVAL
request or codeop is not valid for this device.
EIO
some physical I/O error has occurred.
ENOLINK
s is on a remote machine and the link to that machine is no longer
active.
SockListen - Listen for Incoming Requests
rc = SockListen(s, backlog)
rc = listen(s, backlog)
completes the binding necessary for a socket to accept connections and creates a
connection request queue for incoming requests.
Page 602
rc
0 when SockListen() succeds.
s
specifies a socket.
backlog
the maximum length the queue of pending connections may grow to.
SEDIT and S/REXX Reference Manual
BUILT-IN FUNCTIONS
LN
SockListen() sets the errno variable to 0 in case of success, or to one of the
following error code:
EBADF
the argument s is not a valid file descriptor.
SockLoadFuncs - Compatibility Function
SockLoadFuncs() is provided for compatibility purposes. SockLoadFuncs()
does not perform any function.
SockPSock_Errno - Last Error Code
SockPSock_Errno({str}) prints the last error code set by a socket call.
Subsequent successful socket calls do not reset this error code.
When str is provided and is not empty, SockPSock_Errno()prints first str
followed by a colon and a space.
SockRecv - Receive Data
rc = SockRecv(s, ’var’, len{, flag})
rc = recv(s, ’var’, len{, flag})
receives data on a connected socket.
rc
-1 in case of failure or the length of the incoming data.
s
a connected socket. Generally, the return of the SockAccept()
function.
’var’
the name of a REXX variable the data will be received into.
len
the maximum length of the data to be read.
flag
a blank delimited list of options:
MSG_OOB reads any out-of-band data on the socket.
MSG_PEEK peeks at the data present on the socket; the data is
returned but not consumed, so that a subsequent receive operation
sees the same data.
SockRecv() sets the errno variable to 0 in case of success, or to one of the
following error codes:
EINTR
the operation was interrupted by delivery of a signal before any data
was available to be received.
EIO
an I/O error occurred while reading from or writing to the file
system.
ENOMEM
there was insufficient user memory available for the operation to
complete.
ENOSR
there were insufficient STREAMS resources available for the
operation to complete.
ENOTSOCK
s is not a socket.
SEDIT and S/REXX Reference Manual
Page 603
LN
BUILT-IN FUNCTIONS
ESTALE
a stale NFS file handle exists.
EWOULDBLOCK
the socket is marked non-blocking and the requested operation
would block.
SockRecvFrom - Receive Data
rc = SockRecvFrom(s, ’var’, len, {flag}, ’addr.’)
rc = recvfrom(s, ’var’, len, {flag}, ’addr.’)
receives data on a socket whether it is in a connected state or not.
rc
-1 in case of failure or the length of the incoming data.
s
specifies a socket.
’var’
the name of a REXX variable the data will be received into.
len
the maximum length of the data to be read.
flag
a blank delimited list of options:
MSG_OOB reads any out-of-band data on the socket.
MSG_PEEK peeks at the data present on the socket; the data is
returned but not consumed, so that a subsequent receive operation
sees the same data.
’addr.’
when provided, the source address of the message is filled into the
’addr.’ stem.
addr.family
is always ’AF_INET’.
addr.port
the port number assigned to the socket.
addr.addr
either ’INADDR_ANY’ or the internet address in dotted format
(nnn.nnn.nnn.nnn).
SockRecvFrom() sets the errno variable to 0 in case of success, or to one of the
following error codes:
EINTR
the operation was interrupted by delivery of a signal before any data
was available to be received.
EIO
an I/O error occurred while reading from or writing to the file
system.
ENOMEM
there was insufficient user memory available for the operation to
complete.
ENOSR
there were insufficient STREAMS resources available for the
operation to complete.
ENOTSOCK
s is not a socket.
ESTALE
a stale NFS file handle exists.
EWOULDBLOCK
the socket is marked non-blocking and the requested operation
would block.
Page 604
SEDIT and S/REXX Reference Manual
BUILT-IN FUNCTIONS
LN
SockSelect - Monitor Sockets
rc = SockSelect(’reads.’, ’writes.’, ’excepts.’ {,tt})
rc = select(’reads.’, ’writes.’, ’excepts.’ {,tt})
monitors the activity of the specified sockets.
rc
the number of ready sockets, or -1 in case of failure.
’reads.’
the stem specifying the sockets to be checked for readability.
When omitted, or specified as an empty string, no socket is
checked for readability.
reads.0
the number of sockets to be checked for readability.
reads.n
the n’th socket to be checked for readability.
’writes.’
the stem specifying the sockets to be checked for readiness for
writing.When omitted, or specified as an empty string, no socket
is checked for readiness for writing.
writes.0
the number of sockets to be checked for readiness for writing.
writes.n
the n’th socket to be checked for readiness for writing.
’excepts.’
the stem specifying the sockets to be checked for exceptional
pending conditions (out-of-band data in the receive buffer). When
omitted, or specified as an empty string, no socket is checked for
exceptional pending conditions.
excepts.0
the number of sockets to be checked for exceptional pending
conditions.
excepts.n
the n’th socket to be checked for exceptional pending conditions.
tt
the timeout amount in seconds before SockSelect() returns
when no socket is ready. When tt is set to 0, SockSelect()
does not wait before returning. If no timeout value is passed, or if
tt is an empty string (""), SockSelect() does not return
until one socket becomes ready.
SockSelect() sets the errno variable to 0 in case of success, or to one of the
following error codes:
EBADF
the argument s is not a valid file descriptor.
EINTR
a signal was delivered before any of the selected events occurred, or
the time limit expired.
Example:
sock_in = SockSocket("AF_INET", "SOCK_STREAM", 0)
sock_out = SockSocket("AF_INET", "SOCK_STREAM", 0)
do forever
reads.0 = 1
reads.1 = sock_in
writes.0 = 1
writes.1 = sock_out
excepts.0 = 2
excepts.1 = sock_in
excepts.2 = sock_out
call SockSelect ’reads.’, ’writes.’, ’excepts.’, 1.5
do i = 1 to reads.0
SEDIT and S/REXX Reference Manual
Page 605
LN
BUILT-IN FUNCTIONS
say
end
do i =
say
end
do i =
say
end
end
reads.i ’is ready for reading’
1 to writes.0
writes.i ’is ready for writing’
1 to excepts.0
excepts.i ’is exceptional’
SockSend - Send Data
rc = SockSend(s, data{, flags})
rc = send(s, ’data’{, flags})
sends data on a connected socket.
rc
-1 in case of failure or the number of bytes sent.
data
the data to be sent.
flags
is an optional blank delimited list of options:
MSG_OOB
Sends out-of-band data on sockets that support
SOCK_STREAM communication.
MSG_DONTROUTE
The SO_DONTROUTE option is turned on for the duration
of the operation. This is usually used only by diagnostic or
routing programs.
SockSend() sets the errno variable to 0 in case of success, or to one of the
following error codes:
EBADF
s is an invalid file descriptor.
EINTR
the operation was interrupted by delivery of a signal before any data
could be buffered to be sent.
EMSGSIZE
the socket requires that message be sent atomically, and the message
was too long.
ENOMEM
there was insufficient memory available to complete the operation.
ENOSR
there were insufficient STREAMS resources available for the
operation to complete.
ENOTSOCK
s is not a socket.
EWOULDBLOCK
the socket is marked non-blocking and the requested operation
would block.
Page 606
SEDIT and S/REXX Reference Manual
BUILT-IN FUNCTIONS
LN
SockSendTo - Send Data
rc = SockSendTo(s, data, {flags}, ’addr’)
rc = sendto(s, ’data’, {flags}, ’addr’)
sends data on a socket whether it is in a connected state or not.
rc
-1 in case of failure or the number of bytes sent.
data
the data to be sent.
flags
is an optional blank delimited list of options:
MSG_OOB
Sends out-of-band data on sockets that support
SOCK_STREAM communication.
MSG_DONTROUTE
The SO_DONTROUTE option is turned on for the duration
of the operation. This is usually used only by diagnostic or
routing programs.
’addr’
the name of a REXX variable containing the destination address.
addr.family
must always be ’AF_INET’ or ’PF_INET’.
addr.port
the port number assigned to the socket.
addr.addr
either ’INADDR_ANY’ or the internet address in dotted format
(nnn.nnn.nnn.nnn).
SockSendTo() sets the errno variable to 0 in case of success, or to one of the
following error codes:
EBADF
s is an invalid file descriptor.
EINTR
the operation was interrupted by delivery of a signal before any data
could be buffered to be sent.
EMSGSIZE
the socket requires that the message be sent atomically, and the
message was too long.
ENOMEM
there was insufficient memory available to complete the operation.
ENOSR
there were insufficient STREAMS resources available for the
operation to complete.
ENOTSOCK
s is not a socket.
EWOULDBLOCK
the socket is marked non-blocking and the requested operation
would block.
SEDIT and S/REXX Reference Manual
Page 607
LN
BUILT-IN FUNCTIONS
SockSetSockOpt - Set Socket Options
rc = SockSetSockOpt(s, level, optname{, optval})
rc = setsockopt(s, level, optname{, optval})
sets options associated with a socket.
rc
0 when SockSetSockOpt succeds.
s
specifies a socket.
level
the protocol level. SockSetSockOpt() supports only the
"SOL_SOCKET" level.
optname
optname and any specified options optval are passed
uninterpreted to the appropriate protocol module for interpretation.
On UNIX systems, optname can be:
SO_DEBUG SO_REUSEADDR SO_KEEPALIVE
SO_DONTROUTE SO_LINGER SO_BROADCAST
SO_OOBINLINE SO_SNDBUF SO_RCVBUF SO_TYPE
SO_ERROR
On WINDOWS system, optname can be:
SO_DEBUG SO_REUSEADDR SO_KEEPALIVE
SO_DONTROUTE SO_LINGER SO_BROADCAST
SO_OOBINLINE SO_SNDBUF SO_RCVBUF SO_DONTLINGER
optval
may be a string or a number.
When optname is SO_LINGER, optval must be a string
including 2 integers. The first integer is a boolean flag enabling the
linger feature, and the second integer is the linger time.
SockSetSockOpt() sets the errno variable to 0 in case of success, or to one of
the following error codes:
EBADF
the argument s is not a valid file descriptor.
ENOMEM
there was insufficient memory available for the operation to
complete.
ENOPROTOOPT
the option is unknown at the level indicated.
ENOSR
there were insufficient STREAMS resources available for the
operation to complete.
ENOTSOCK
the argument s is not a socket.
Examples:
rc = SockSetSockOpt(sock_out, "SOL_SOCKET", "SO_REUSEADDR", 1)
rc = SockSetSockOpt(sock_out, "SOL_SOCKET", "SO_LINGER", "1 2")
Page 608
SEDIT and S/REXX Reference Manual
BUILT-IN FUNCTIONS
LN
SockShutDown - Close a Socket
SockShutDown(s, how)
shutdown(s, how)
shuts down all or part of a full duplex connection.
s
a socket.
how
0
1
2
no more data can be received on the socket s.
no more output to be allowed on the socket s.
no more data can be sent or received on socket s.
SockShutDown() sets the errno variable to 0 in case of success, or to one of the
following error codes:
EBADF
s is not a valid file descriptor.
ENOMEM
there was insufficient user memory available for the operation to
complete.
ENOSR
there were insufficient STREAMS resources available for the
operation to complete.
ENOTCONN
the specified socket is not connected.
ENOTSOCK
s is not a socket.
SockSocket - Create a Socket
s = SockSocket(domain, type, protocol)
s = socket(domain, type, protocol)
creates an endpoint for communication and returns a socket descriptor representing
the endpoint.
s
a returned socket.
domain
specifies a communications domain within which communication
will take place. SockSocket supports only the "AF_INET"
(identical to "PF_INET") domain.
type
The socket has the indicated type, which specifies the
communication semantics. type may be "SOCK_STREAM",
"SOCK_DGRAM", or "SOCK_RAW"
protocol
is the protocol family which should be used. protocol may be
"IPPROTO_UDP", "IPPROTO_TCP", or a whole number
(generally 0).
SockSocket sets the errno variable to 0 in case of success, or to one of the
following error codes:
EACCES
permission to create a socket of the specified type and/or protoco l is
denied.
EMFILE
the per-process descriptor table is full.
ENOMEM
insufficient user memory is available.
SEDIT and S/REXX Reference Manual
Page 609
LN
BUILT-IN FUNCTIONS
ENOSR
There were insufficient STREAMS resources available to complete
the operation.
EPROTONOSUPPORT
The protocol type or the specified protocol is not supported within
this domain.
SockSoClose - Close a Socket
SockSoClose(s) closes the s socket opened with the SockSocket() built-in.
SockSock_Errno - Last Error Code
str = SockSock_Errno() returns the last error code set by a socket call.
Subsequent successful socket calls do not reset this error code.
SockVersion - Version Number of Socket Library
SockVersion() returns the version number of the S/REXX Socket library.
Page 610
SEDIT and S/REXX Reference Manual
BUILT-IN FUNCTIONS
LN
SORT - Sort a List
SORT(tab, desc, start, end)
tab
is a valid REXX symbol. The derived stem values (tab.1, tab.2,
etc...) will be sorted accordingly to the desc string.
desc
is a string describing how to sort tab.
desc is a list of paired columns, which may be preceded with
Ascending, Descending, N or n, which indicates the order in
which to sort the field and the type of field, and all subsequent fields,
until another Ascending or Descending or N or n parameter is
encountered.
N indicates a numerical field to be sorted in ascending order.
n indicates a numerical field to be sorted in descending order.
Ascending, regardless of the case, indicates an alphanumeric field
to be sorted in ascending order.
Descending, regardless of the case, indicates an alphanumeric
field to be sorted in descending order.
X indicates a field to be sorted in natural ascending order. See the
SEDIT SORT command for a description of natural order sorting.
x indicates a field to be sorted in natural descending order.
Z indicates a field to be sorted in natural ascending order while
ignoring the case.
z indicates a field to be sorted in natural descending order while
ignoring the case.
An asterisk * as a second column indicates the end of the string to be
sorted.
start
indicates the rank of the first stem to be sorted. When not specified,
it defaults to 1.
end
indicates the rank of the last stem to be sorted. When not specified,
it defaults to tab.0.
Examples:
call sort list, "a 1 12 d 13 24 N 25 *", 2, 13
call sort list, "X 1 12 d 13 24 N 25 *", 2, 13
SEDIT and S/REXX Reference Manual
Page 611
LN
BUILT-IN FUNCTIONS
STATE / LSTATE - Query File State
STATE(fname{, option})and LSTATE(fname{, option})return 1 when
the file fname matches option, and 0 otherwise.
The LSTATE() function obtains file attributes similar to STATE(), except when the
named file is a symbolic link; in that case LSTATE() returns information about the
link, while STATE() returns information about the file the link references.
fname may include the ~ .. UNIX or WINDOWS file meta characters.
option may be one of the following letters, or the word corresponding to the letter:
"d"
"e"
"f"
"l"
"o"
"r"
"s"
"w"
"x"
"z"
"p"
"n"
"g"
"y"
"Directory" matches a directory.
"Exists"
matches an existing file. This is the default when
option is not supplied.
"File"
matches a plain file. Special files, like symbolic links or
sockets, return 0.
"Link"
matches a symbolic link.
"Owned"
matches a file owned by the current user. Always
returns 1 on WINDOWS systems.
"Read"
matches a file which can be read by the current user.
"Size"
returns the file size.
"Write"
matches a file which can be written by the current user.
"eXecute"
matches a file with execute permission. Always returns
1 on WINDOWS systems.
"Zero"
matches a zero length file.
"stamP"
returns a string in dd/mm/yyyy hh:mm:ss format
indicating the time of last modification.
"owNer"
returns the name of the owner of the file.
"Group"
returns the name of the group of the file. Always returns
an empty string on WINDOWS systems.
"sYstem"
returns a value which uniquely identifies the file system
that contains the file.
Examples:
if state("~/MyFile") then call MyRoutine
MyRoutine will be called when ~/MyFile exists.
owner = state("MyFile", "n")
owner = state("MyFile", "owner")
Notes:
On WINDOWS systems, fname may be surrounded with quotes.
When the information query succeeds, STATE() and LSTATE()
set the RC REXX variable to 0.
When the query fails, STATE() and LSTATE() return 0, and set
the RC REXX variable to a string describing the reason the query
failed.
Page 612
SEDIT and S/REXX Reference Manual
BUILT-IN FUNCTIONS
LN
STIME - Set System Time
stime(str) sets the system time according to the str string which must be in
’dd/mm/yyyy hh:mm:ss’ format. stime returns 0 when the call succeeds.
Example:
call stime ’25/1/2001 12:03:24’
STREAM - Compatibility Function
stream() is a compatibility function, which always returns the ready string, and
performs no action.
SUBDIRS - Find Subdirectories
SUBDIRS(root, {stem}, {rec})
root
is the root directory to be scanned for subdirectories.
stem
when stem is not provided, the SUBDIRS output will be placed in
the stack. The user will be able to read it using the parse pull
command.
The queued() function may be used to return the number of lines
in the stack.
When stem is provided, it must be a valid REXX name. It will be
filled with the SUBDIRS output. stem.0 will contain the number
of subdirectories found.
rec
when not specified, or specified as the "nr" string, only the first level
subdirectories names are returned.
When specified as the "r" string, every subdirectory will be
recursively scanned, and all the nested subdirectories names will be
returned.
Example:
call subdirs "~", tab, "r"
do i = 1 to tab.0
say tab.i
end
SysCls - Clear the Screen
SysCls() clears the screen when possible.
SysCls() returns 0 in case of success, or an error message in case of failure.
SEDIT and S/REXX Reference Manual
Page 613
LN
BUILT-IN FUNCTIONS
SysFileDelete - Delete File
SysFileDelete(file) removes the file file. file may include the ~ ..
UNIX or WINDOWS file meta characters.
Notes:
SysFileDelete()removes one file at a time. To remove several
files with one call, use the RM() or the DEL() subroutine.
RM() and DEL() need quotes when the name of the file to erase
contains blanks. SysFileDelete() does not.
Return Codes:
0
2
3
4
5
6
7
8
108
999
File deleted successfully.
File not found.
Path not found.
Too many symbolic links were encountered in translating path.
Access denied or busy.
Components of path require hopping to multiple remote machines
and the file system does not allow it.
Path points to a remote machine and the link to that machine is no
longer active.
The length of the path argument is too long.
Read-only filesystem.
Unknown error.
SysFileSearch - Scan File
SysFileSearch(str, file, ’stem.’{, opt})
searches the file file to find all lines containing the str string. file may include
the ~ .. UNIX or WINDOWS file meta characters.
str
the string to match.
file
the file to search.
’stem.’
the name of a stem variable used to return the result of the search.
stem.0
the number of matching lines.
stem.i
the contents of a matching line. When opt contains the N option,
stem.i contains the line number.
opt
an optional string containing one of the following one-character
options:
N
C
returns the file line numbers.
conducts a case-sensitive search.
By default, the search is case-insensitive without line numbers.
Return Codes:
0
3
4
Page 614
Successful.
Error opening file.
Error reading file.
SEDIT and S/REXX Reference Manual
BUILT-IN FUNCTIONS
LN
Example:
call SysFileSearch ’spool’, ’/etc/passwd’, ’stem.’, ’n’
do i = 1 to stem.0
say stem.i
end
could print:
7 lp:x:71:8:Line Printer Admin:/usr/spool/lp:
10 nuucp:x:9:9:uucp Admin:/var/spool/uucppublic
SysFileTree - Scan Directory
SysFileTree(filespec, ’stem.’, {opt})
searches the directory described by filespec for matching files.
filespec
can be one of the following:
a dir directory
all the files in the dir directory matching opt will be
returned. dir may include the ~ .. UNIX or WINDOWS
file meta characters.
an expr search string
all files matching expr and opt in the current directory
will be returned. When opt does not specify a regular
expression search, expr can include the * and ? special
meta characters. * matches any set of characters. ? matches
any (one) character.
dir/expr
all files matching expr and opt in the dir directory will
be returned.
a null ("") string
all files matching opt in the current directory will be
returned.
’stem.’
the name of a stem variable used to return the result of the search.
stem.0
the number of matching files.
stem.i
a matching file.
SEDIT and S/REXX Reference Manual
Page 615
LN
BUILT-IN FUNCTIONS
opt
an optional string containing one of the following one-character
options:
F
D
B
S
T
L
O
I
R
G
Search only for files.
Search only for directories
Search for both directories and files. This is the
default.
Search subdirectories recursively.
Return the time and date in YY/MM/DD/HH/MM
format.
Return the time and date in
YYYY-MM-DD HH:MM:SS format.
Return only the file name. The default is to return the
string in the example below.
Ignore case. This is the default on WINDOWS
systems.
Respect case. This is the default on UNIX systems.
filespec is a regular expression. See page 368
for a regular expression definition. Note that on
WINDOWS systems, the \ regular expression
escape character cannot be used. Instead of using for
example \. (meaning "."), use [.].
SysFileTree() returns 0 in case of success, or an explicit error message such as
"Error Opening Directory xxxxx" in case of failure.
Examples:
call SysFileTree ’/usr/include/*io*.h’, ’stem.’
do i = 1 to stem.0
say stem.i
end
could print:
04/24/96
04/24/96
04/24/96
03:18
03:18
19:18
2317
1025
11868
-rw-r--r-- /usr/include/aio.h
-rw-r--r-- /usr/include/cpio.h
-rw-r--r-- /usr/include/stdio.h
call SysFileTree ’C:\WTSRV\[2-3][.]dll’, ’stem.’, ’g’
do i = 1 to stem.0
say stem.i
end
could print:
04/29/96
08/24/98
06/11/97
08/23/98
05/09/98
Page 616
12:13
10:00
00:06
13:32
14:04
21648
52224
104448
77312
24336
---A---A---A---A---A-
C:\WTSRV\ctl3dv2.dll
C:\WTSRV\scnlib32.dll
C:\WTSRV\TWAIN32.DLL
C:\WTSRV\TWAIN_32.DLL
C:\WTSRV\vmmreg32.dll
SEDIT and S/REXX Reference Manual
BUILT-IN FUNCTIONS
LN
SysGetKey - Read Character Input Stream
SysGetKey() is a synonym of the CHARIN() built-in described page 538.
SysGetKey()and CHARIN() do not need the Enter key to be pressed before
returning.
SysMkDir - Delete a Directory
SysMkDir(dir)creates the specified directory.
dir may include the ~ .. UNIX or WINDOWS file meta characters.
Return Codes:
0
3
4
5
6
7
8
87
108
206
999
Success.
Path not found.
Too many symbolic links were encountered in translating path.
Access Denied.
Components of path require hopping to multiple remote machines
and the file system does not allow it.
Path points to a remote machine and the link to that machine is no
longer active.
I/O error.
Already exists.
Read-only filesystem.
File name too long or no space left on device.
Unknown error.
SysRmDir - Delete a Directory
SysRmDir(dir)
SysRmDir() removes the dir directory. dir must be empty. See the RMDIR()
built-in function to remove recursively non-empty directories.
dir may include the ~ .. UNIX or WINDOWS file meta characters.
Return Codes:
0
3
4
5
6
7
8
9
10
Success.
Path not found.
Too many symbolic links were encountered in translating path.
Access Denied.
Components of path require hopping to multiple remote machines
and the file system does not allow it.
Path points to a remote machine and the link to that machine is no
longer active.
I/O error
The directory to be removed is the mount point for a mounted file
system.
The directory to be removed is the current directory.
SEDIT and S/REXX Reference Manual
Page 617
LN
BUILT-IN FUNCTIONS
108
206
999
Read-only filesystem.
File name too long or no space left on device.
Unknown error.
SysSearchPath - Search Files in Path
rf = SysSearchPath(’PATH’, file{, exec} {, ’stem.’)
SysSearchPath() searches for the file file within the directories described by
the environment variable PATH. The PATH directories are separated by a colon (’:’)
on UNIX systems, and by a semi-colon (’;’) on WINDOWS systems.
rf
the full file specification of the first file in the path matching file.
exec
0 (the default) or 1. On UNIX systems, when exec is set to 1,
SysSearchPath() only finds files with at least one of the "user",
"group" and "other" execute permission flags set to on.
’stem.’
when specified, SysSearchPath() stores all the files matching
file in the stem. variable.
stem.0
the number of matching files.
stem.i
a matching file.
Examples:
call SysSearchPath "PATH", ’csh’, 1, "stem."
do i = 1 to stem.0
say stem.i
end
say ’result = ’result
could print:
/usr/bin/csh
/bin/csh
result = /usr/bin/csh
SysSetPriority - Change the Priority
SysSetPriority(class, delta)changes the priority of the current process.
On UNIX systems:
Page 618
class
the type of priority to change:
0
no changes.
1
the scheduling priority of the process.
2
the scheduling priority of the process group.
3
the scheduling priority of the user.
delta
the delta (positive or negative) applied to the process priority. The
process default priority is 0, and can vary between -20 and +20. Only
the superuser can lower the priority. Lower priorities cause more
favorable scheduling.
SEDIT and S/REXX Reference Manual
BUILT-IN FUNCTIONS
LN
On WINDOWS systems:
class
the type of priority to set:
0
1
2
3
4
delta
no changes.
IDLE_PRIORITY_CLASS: specify this class for a
process whose threads run only when the system is
idle. The threads of the process are preempted by the
threads of any process running in a higher priority
class. An example is a screen saver. The idle-priority
class is inherited by child processes.
NORMAL_PRIORITY_CLASS: specify this class for
a process with no special scheduling needs.
HIGH_PRIORITY_CLASS: specify this class for a
process that performs time-critical tasks that must be
executed immediately. The threads of the process
preempt the threads of normal or idle priority class
processes. Use extreme care when using the
high-priority class, because a high-priority class
application can use nearly all available CPU time.
REALTIME_PRIORITY_CLASS: specify this class
for a process that has the highest possible priority. The
threads of the process preempt the threads of all other
processes, including operating system processes
performing important tasks. For example, a real-time
process that executes for more than a very brief
interval can cause disk caches not to flush or cause the
mouse to be unresponsive.
ignored.
Return Codes:
0
1
2
307
Success.
Unable to get current priority.
Unable to set priority.
Invalid priority class.
Note:
SysSetPriority() is not supported on SCO systems.
SysSleep - Suspend Execution
SysSleep(sec) suspends execution for sec seconds. See also the SLEEP() and
USLEEP() built-ins.
SEDIT and S/REXX Reference Manual
Page 619
LN
BUILT-IN FUNCTIONS
SYSTEM - Passes string to SHELL (Unix Only)
SYSTEM(cmd) causes "cmd" to be given to the shell as input, as if "cmd" had been
typed as a command at a terminal. S/REXX waits until the shell has completed, then
returns the exit status of the shell.
SysTempFileName - Make a Unique File Name
SysTempFileName(filespec, {, filter})
returns a name for a file or directory which does not exists.
filespec
can be a tmp template for a filename, or a dir directory name
followed by a tmp template for a file name. When dir is not
provided or is invalid, it defaults to the /tmp directory on UNIX
systems, and to the C:/temp directory on WINDOWS systems.
filter
the filter character used in tmp. Each filter character in tmp is
replaced with a random numerical value. Then, tmp is appended a
random 6 characters string.
SysTempFileName() returns an empty string in case of error.
Examples:
say SysTempFileName("/usr/test??", "?")
say SysTempFileName("?foo??", "?")
say SysTempFileName("", "?")
could print:
/usr/test48a002b4
/tmp/1foo95a002b4
/tmp/a002b4
SysVersion - Operating System Description
SysVersion() returns a string describing the operating system, such as:
AIX 2 3 000012627700
IRIX 5.3 11091812 IP22
OSF1 V4.0 464 alpha
HP-UX B.10.10 A 9000/710
SunOS 4.1.3_U1 2 sun4m
SunOS 5.5 Generic i86pc
SunOS 5.5.1 Generic_103640-14 sun4u
WINDOWS 4.0 build 1381 Service Pack 3
Linux 2.0.32 #1 Wed Nov 19 00:46:45 EST 1997 i586
Page 620
SEDIT and S/REXX Reference Manual
BUILT-IN FUNCTIONS
LN
TAN - Tangent
TAN(ang) returns the tangent value of the radian argument ang.
TBADD - Insert Table Line
nb_line = TBADD(li{, arg1{, arg2 {...}}}) inserts a line after the
line li in the currently opened table, filling it with the arguments provided.
When no argument is provided, the new line will be an empty line.
TBADD returns the table length.
Examples:
nb_line = tbadd 12
call tbadd 12, "Item 1",,"Item 3"
See S/REXX ISPF-like Tables on page 637 for more information about the table
functions.
TBCLOSE - Close Current Table
TBCLOSE closes the opened table currently. All modified data will be lost.
TBDEL - Delete Table Line
nb_line = TBDEL(li) deletes the line li in the currently opened table.
TBDEL returns the table length.
TBDISPL - Display Table
TBDISPL(li, stem) displays the current table starting at line li, filling stem
with the following information:
stem.0
The stem size (8 here).
stem.1
A keyword indicating the user action:
return
the Return key.
Fi
The i top function key.
Li
The i left function key.
Ri
The i right function key.
Bi
The i mouse button.
^x
The Control-x action.
stem.2
The cursor line file related position, or 0 if the cursor
is not on a )MODEL data field location.
stem.3
The cursor column file related position, or 0 if the
cursor is not on a )MODEL data field location.
SEDIT and S/REXX Reference Manual
Page 621
LN
BUILT-IN FUNCTIONS
stem.4
The mouse line file related position, or 0 if the mouse
is not on a )MODEL data field location.
stem.5
The mouse column file related position, or 0 if the
mouse is not on a )MODEL data field location.
stem.6
The last displayed line.
stem.7
The number of lines which can be displayed, according
to the panel layout and the screen size.
stem.8
The number of lines in the current loaded table.
TBGET - Get Table Line
TBGET(li) updates the input variables described in the )MODEL section with the
table data at line li.
TBOPEN - Open a Table
nb_line = TBOPEN(fi, pa{, sep} {,mode}) opens the fi file using the
pa panel. The separator in use to parse the file will be sep, or the ’09’x tabulation
character by default.
When the optional mode parameter is the ’r’ string, the table is opened in read-only
mode. When mode is omitted, or set to the ’w’ string, the table is opened in read-write
mode.
TBOPEN returns the table length.
When no argument is provided, the new line will be an empty line.
Example:
nb_line=tbopen ’~/data’,’~/data.panel’,’;’
TBPUT - Update Table Line
TBPUT(li{, arg1{, arg2 {...}}}) updates the current table at line li
with the argi arguments, or with existing REXX variables whose names are
described in the )MODEL section when argi is not supplied.
Examples:
Page 622
call tbput 12, "Item 1",,"Item 3".
call tbput 12
SEDIT and S/REXX Reference Manual
BUILT-IN FUNCTIONS
LN
TBSAVE - Save Table
TBSAVE saves the current table content in the file described by the last TBOPEN call.
TCSH - Pass UNIX Command
TCSH(cmd{, stem}) executes the UNIX command cmd using the tcsh shell .
When stem is not provided, the cmd output will be placed in the stack. The user will
be able to read it using the parse pull command.
The queued() function may be used to return the number of lines in the stack.
When stem is provided, it must be a valid REXX name. It will be filled with the cmd
output.
Example:
call tcsh "df", tab
tab.0 will contain the number of lines sent back by df.
tab.1, tab.2, ... will contain the df output line by line.
See also the EXEC(), UNIX(), CSH() and KSH() functions.
TEE - Pass UNIX Command
TEE(cmd{, stem}) executes the UNIX or WINDOWS command cmd,
displaying intermediate results on the standard output.
The arguments are the same as for the UNIX() or WINDOWS() built-in function.
UNIX or SH - Pass UNIX Command
UNIX(cmd{, stem}) executes the UNIX command cmd using the Bourne shell
sh.
On WINDOWS systems, UNIX() is identical to the WINDOWS() built-in function.
When stem is not provided, the cmd output will be placed in the stack. The user will
be able to read it using the parse pull command.
The queued() function may be used to return the number of lines in the stack.
When stem is provided, it must me a valid REXX name. It will be filled with the cmd
output.
Example:
Note:
call unix "df", tab
(or call sh "df", tab)
tab.0 will contain the number of lines sent back by df.
tab.1, tab.2, ... will contain the df output line by line.
sh does not support the ~ meta character. Use csh() or ksh() to pass a
command such as call csh ’ls ~/foo*.c’
See also the EXEC(), CSH(), TCSH() and KSH() functions.
SEDIT and S/REXX Reference Manual
Page 623
LN
BUILT-IN FUNCTIONS
UNSETENV - Remove Environment Variable
UNSETENV(var) removes the environment variable var.
Example:
call unsetenv "PATH"
/* Not recommended!
commands will fail */
Without
PATH,
most
See also the SETENV() function.
USLEEP - Suspend Execution
USLEEP(usec) suspends execution for usec microseconds.
UTIME - Change File Timestamp
UTIME(file, jj, mm, yyyy, hh, mm, ss) sets the file timestamp
accordingly to the jj/mm/yyyy hh:mm:ss date.
UTIME returns 0 in case of success, or an error message.
Example:
call utime ’~/.cshrc’,12,1,2002,23,55,36
say state(’~/.cshrc’, ’stamp’)
/* displays: 12/01/2002 23:55:36 */
VALUE - Set or Retrieve a Variable
VALUE(symb {,expr}) returns the value of the symb S/REXX variable.
When the expr expression is specified, expr will be assigned to symb.
If symb refers to an uninitialized variable, the default value of that variable is always
returned, regardless of the NOVALUE condition which is never raised.
Examples:
tr = 4
say value(’tr’)
/* Displays "4"
*/
call value ’tab.’tr, 2**8 /* Sets tab.4 to 256 */
VERSION- Windowing Identifier
VERSION() returns the current windowing identifier:
xview
motif
windows
a null string ("")
Page 624
when running the Open Windows xsrexx version.
when running the MOTIF msrexx version.
when running the WINDOWS version.
when running the non-windowing srexx version.
SEDIT and S/REXX Reference Manual
BUILT-IN FUNCTIONS
LN
WAITPID - Wait for a Process Termination
WAITPID(pid{, "N"})
On UNIX systems, WAITPID(pid) suspends the calling process until one of the
specified children terminates; if a child process terminated prior to the call to
WAITPID(), return is immediate. pid specifies a set of child processes for which
status is requested.
If pid is equal to -1, status is requested for any child process.
If pid is greater than 0, it specifies the process ID (returned by the FORK() built-in
function) of the child process for which status is requested.
If WAITPID() returns because the status of a child process is available, this function
returns a value equal to the process ID of the child process for which status is reported.
The optional "N" parameter passed to WAITPID() specifies that WAITPID() must
not suspend the calling process. A value of 0 is returned when none of the processes
specified with the pid argument have terminated.
A value of -1 is returned in case of error.
On WINDOWS systems, WAITPID() always returns a value of -1.
WINDOWS - Pass WINDOWS Command
WINDOWS(cmd{, stem})
On WINDOWS systems, WINDOWS() executes the WINDOWS command cmd.
On UNIX systems, WINDOWS() is identical to the UNIX() built-in function.
When stem is not provided, the cmd output will be placed in the stack. The user will
be able to read it using the parse pull command.
The queued() function may be used to return the number of lines in the stack.
When stem is provided, it must me a valid REXX name. It will be filled with the cmd
output.
Example:
Note:
call windows "dir", tab
tab.0 will contain the number of lines sent back by dir.
tab.1, tab.2, ... will contain the dir output line by line.
When using the wsrexx.exe windowing version of S/REXX, calling
DOS like commands such as dir will make a temporary console appear.
To list files, the DIR() built-in function would be more effective.
SEDIT and S/REXX Reference Manual
Page 625
LN
BUILT-IN FUNCTIONS
WIPE - Wipe Files
WIPE(ff)
With modern methods of recovery for data stored on magnetic media, such as
Magnetic Force Microscopy (MFM), simply overwriting a file with 0s, for example,
is not sufficient to prevent unwanted access to that file. These methods can in fact be
used to read the previous state of the portion of the disk which has been wiped with a
unique simple pattern.
WIPE() overwrites the ff file with 40 different patterns selected to prevent the
recovery of the initial state of that file, and then erases the file.
WIPE() returns the full path names of the deleted files.
ff may include the ~ .. UNIX or WINDOWS file meta characters. If a filename
contains blanks, it must be surrounded with quotes or double quotes.
When WIPE fails, it sets the rc variable to a non-zero value, and returns an error
message, such as:
RM() error: File does not exist
Examples:
say wipe("~/foo ~/test")
could print: /user/john/foo /usr/john/test
XHOME - Installation Directory
XHOME() returns the installation directory. Usually /home/xed on UNIX, and
C:\Program Files\SEDIT on WINDOWS.
Page 626
SEDIT and S/REXX Reference Manual
DIALOG MANAGEMENT
LN
S/REXX Dialog Management
S/REXX permits the creation of OpenLook, MOTIF or WINDOWS dialog panels.
To create OpenLook panels, the S/REXX program must start with:
#! /home/xed/xsrexx
To create MOTIF panels, the S/REXX program must start with:
#! /home/xed/msrexx
When OpenLook is not supported, xsrexx is the same as msrexx, so in a UNIX
multi-platform environment, always using xsrexx will present no problems.
To create WINDOWS panels, the S/REXX either srexx.exe or wsrexx.exe.
For example:
C:\> wsrexx myprog
OpenLook Specifics
Individually colored items are not supported by the xsrexx OpenLook S/REXX version.
Scroll lists do not support multiple selections.
WINDOWS Specifics
Individually colored items are not supported by the wsrexx S/REXX version.
Dialog boxes do not emit a FOCUS message and do not respond to function keys.
DY_PSCL() does not perform any action.
SEDIT and S/REXX Reference Manual
Page 627
LN
DIALOG MANAGEMENT
Consider the following /home/xed/demo/demo_dy/dy_tar macro:
#! /home/xed/xsrexx
signal on novalue
option mixed setenv
call dy_start()
$quit = dy_button(1, 1, "Quit")
call dy_label 14, 1.3, 'From Directory:'
$dir = dy_input(30, 1.3, 28)
$tape = dy_tg('Tape Selection:', 14, 5, 32, 4.5, "nrst4", 1, 40, 4.5,,
"nrst5", 0)
$start = dy_button(26.5, 10, "Start TAR")
$handle_dy_ex = dy_end("proc", 2, 3.5, 61, 12.5, "n")
call dy_map $handle_dy_ex
exit
proc:
parse arg handle reason
select
when reason = 'F1' | reason = 'B'$quit | reason = '^c'
then
{ call dy_unmap(handle)
exit 0
}
when reason = 'B'$start | reason = 'return' then
{ if do_it() = 0 then exit 0
}
otherwise return 0
end
return
do_it:
dir = dy_vinput(handle, $dir)
if ~state(dir, 'd') then
{ call dy_start()
call dy_label 2, 5, '"'dir'" is not a valid directory.'
call dy_button 26.5, 10, "Restart"
$prompt = dy_end("foo", 2, 3.5, 61, 12.5, "g")
call dy_map $prompt
call dy_destroy $prompt
return 1
}
select
when 1 = dy_vtg(handle, $tape, 1) then tape = 'nrst4'
when 1 = dy_vtg(handle, $tape, 2) then tape = 'nrst5'
end
cd dir
say 'dy_tar could perform the following commands:'
say
say '
cd 'cwd()
say '
tar -cvf /dev/'tape '.'
say
return 0
foo:
return
Page 628
SEDIT and S/REXX Reference Manual
DIALOG MANAGEMENT
LN
Calling this macro by typing dy_exch will display the following dialog box:
This macro asks for a directory name and a tape device, and will display (without executing
them) the UNIX commands needed to tar the directory using the chosen tape device.
option mixed setenv
allows the user to create environment variables such as $tape. These variables are
shared with procedure subroutines.
call dy_start()
starts a dialog box.
$quit = dy_button(1, 1,
"Quit")
creates the Quit button on column 1, line 1. The $quit variable receives the
button number for future use.
call dy_label 14, 1.3, 'From Directory:'
creates the From Directory label.
$dir = dy_input(30, 1.3, 28))
creates the input field in column 30, line 1.3. The $dir variable receives the input
field number for future use.
$tape = dy_tg('Tape Selection:', 14, 5, 32, 4.5,,
"nrst4", 1, 40, 4.5, "nrst5", 0)
creates the Tape Selection toggle in column 14, line 5, setting it to the nrst4
value.
SEDIT and S/REXX Reference Manual
Page 629
LN
DIALOG MANAGEMENT
$handle_dy_ex = dy_end("proc", 2, 3.5, 61, 12.5, "n")
ends the current dialog box. The dialog box will be located at column 2, line 3.5,
starting from the position where the dialog box is centered regarding the whole
screen.
It will be 61 columns wide and 12.5 lines high. "n" means the dialog box will be
persistent. The user will have to dismiss it explicitly by clicking the Quit button,
or by selecting the dialog box window Quit (or Close if the MOTIF MWM
window manager is running) item.
proc is the name of the S/REXX subroutine to be called every time the user issues
an action within the dialog box.
call dy_map $handle_dy_ex
maps the dialog box. dy_map() will return on 2 cases: the user selects the dialog
box window Quit (or Close if the MOTIF MWM window manager is running)
item, or when the proc call back subroutine issues a dy_unmap() call.
select
when reason = 'F1' | reason = 'B'$quit | reason = '^c'
{ call dy_unmap(handle)
exit 0
}
then
when the users clicks on the Quit button, or hits the F1 or ^c key, proc unmaps
the dialog box and exits.
when reason = 'B'$start | reason = 'return' then
when the user clicks on the Start TAR button, proc call the do_it()
subroutine.
dir = dy_vinput(handle, $dir)
reads the directory input field.
select
when 1 = dy_vtg(handle, $tape, 1) then tape = 'nrst4'
when 1 = dy_vtg(handle, $tape, 2) then tape = 'nrst5'
end
reads the tape select toggle.
Page 630
SEDIT and S/REXX Reference Manual
DIALOG MANAGEMENT
LN
S/REXX Dialog Management within SEDIT
Within SEDIT, S/REXX permits the creation of OpenLook or MOTIF dialog panels.
Consider the following /home/xed/demo/demo_dy/dy_exch.sedit macro:
option mixed setenv
'extract/zone/case/line/size/nbfile'
if nbfile.1 = 0 then
{ 'prompt Open a file first'
exit 0
}
if ~$?handle_dy_ex then
{ call dy_start()
$dismiss_dy_ex = dy_button(1, 1,
"DISMISS")
call dy_label 14, 1.3, 'EXCHANGE THIS:'
$exc_dy_ex = dy_input(29, 1.3, 29)
call dy_label 14, 3.3, '
WITH THIS:'
$with_dy_ex = dy_input(29, 3.3, 29)
call dy_label 5, 6, 'From Column:'
$fromc_dy_ex = dy_input(18, 6, 10, zone.1)
call dy_label 30, 6, 'To Column:'
$toc_dy_ex = dy_input(42, 6, 10, zone.2)
call dy_label 5, 8, ' From Line:'
$froml_dy_ex = dy_input(18, 8, 10, line.1)
call dy_label 30, 8, ' To Line:'
$tol_dy_ex = dy_input(42, 8, 10, size.1)
if case.2 = 'respect' then fl = 1
else
fl = 0
$case_dy_ex = dy_tg(,,,5, 11, "Consider Case", fl)
$word_dy_ex = dy_tg(,,,30, 11, "Whole Word", 0)
$do_dy_ex = dy_button(26.5, 15, "DO IT")
$handle_dy_ex = dy_end("dy_ex_cb", 2, 3.5, 61, 17.5, "n")
}
else 'dy_ex_set'
/* sets the dialog box values */
call dy_map $handle_dy_ex
SEDIT and S/REXX Reference Manual
Page 631
LN
DIALOG MANAGEMENT
Calling this macro by typing dy_exch will display the following dialog box:
This macro allows the user to enter a string str1 in the EXCHANGE THIS input field, and
a second string str2 in the WITH THIS input field. Clicking on the DO IT button will
make SEDIT change every string str1 with the string str2, and str2 with str1.
option mixed setenv
allows the user to create environment variables such as $handle_dy_ex. These
variables are retained between macro calls.
if ~$?handle_dy_ex then
allows the user to test if the $handle_dy_ex variable exists. If not, this is the first
time the macro is called, and the dialog box must be created.
call dy_start()
starts a dialog box.
$dismiss_dy_ex = dy_button(1, 1,
"DISMISS")
creates the DISMISS button on column 1, line 1. The $dismiss_dy_ex variable
receives the button number for future use.
call dy_label 14, 1.3, 'EXCHANGE THIS:'
creates the EXCHANGE THIS label.
Page 632
SEDIT and S/REXX Reference Manual
DIALOG MANAGEMENT
LN
$exc_dy_ex = dy_input(29, 1.3, 29)
creates the first input field in column 29, line 1.3. The $exc_dy_ex variable
receives the input field number for future use.
$case_dy_ex = dy_tg(,,,5, 11, "Consider Case", fl)
creates the Consider Case toggle in column 5, line 11, setting it to the fl value,
which reflects the current CASE setting. The first 3 arguments are omitted, since this
toggle does not need a global label.
$handle_dy_ex = dy_end("dy_ex_cb", 2, 3.5, 61, 17.5, "n")
ends the current dialog box. The dialog box will be located at column 2, line 3.5,
starting from the position where the dialog box is centered regarding the SEDIT
window.
It will be 61 columns wide and 17.5 lines high. "n" means the dialog box will be
persistent. The user will have to dismiss it explicitly by clicking the DISMISS
button, or by selecting the dialog box window Quit (or Close if the MOTIF MWM
window manager is running) item.
dy_ex_cb is the name of the S/REXX macro to be called every time the user
issues an action within the dialog box.
else 'dy_ex_set'
when the dialog box has already been created, the user can call the dy_ex_set
S/REXX macro to update the displayed values according to the current file.
call dy_map $handle_dy_ex
maps the dialog box.
The /home/xed/demo/demo_dy/dy_ex_cb.sedit macro is the following:
'extract/nbfile'
parse arg handle reason
select
when reason = 'F1' | ,
reason = 'B'$dismiss_dy_ex
{ call dy_unmap(handle)
exit 0
}
when reason = 'B'$do_dy_ex then
{ if nbfile.1 = 0 then
{ 'prompt Open a file first'
exit 0
}
call do_it
exit 0
}
SEDIT and S/REXX Reference Manual
then
Page 633
LN
DIALOG MANAGEMENT
when reason = 'focus' then
{ if nbfile.1 ~= 0 then 'dy_ex_set'
/* sets the "dy_exch" dialog box values */
exit 0
}
otherwise exit 0
end
do_it:
col1 = dy_vinput(handle, $fromc_dy_ex)
col2 = dy_vinput(handle, $toc_dy_ex)
line1 = dy_vinput(handle, $froml_dy_ex)
line2 = dy_vinput(handle, $tol_dy_ex)
str1 = dy_vinput(handle, $exc_dy_ex)
str2 = dy_vinput(handle, $with_dy_ex)
/*
* Testing full world
*/
if dy_vtg(handle, $word_dy_ex, 1) then
{ cmd = 'command cn'
ff = '\'
}
else
{ cmd = 'command change'
ff = '/'
}
call test str1, ff
call test str2, ff
'preserve'
':'line1
'zone 'col1 col2
/*
* We look for a character which does not belong to str1 and str2
*/
'sep off'
'arbchar off'
do i = 47 to 255
sep = d2c(i)
if 0 = pos(sep, str1) & 0 = pos(sep, str2) then leave i
end i
if i = 256 then
{ 'prompt No possible separator.'
'restore'
exit 0
}
/*
* Testing case
*/
if dy_vtg(handle, $case_dy_ex, 1) then 'case r'
else
'case i'
lines = line2-line1+1
cmd||sep||str1||sep||'..ööööö..@@@@@..ööööö'||sep lines '*'
cmd||sep||str2||sep||str1||sep||lines '*'
cmd||sep||'..ööööö..@@@@@..ööööö'||sep||str2||sep lines '*'
Page 634
SEDIT and S/REXX Reference Manual
DIALOG MANAGEMENT
LN
'restore'
return
/*
* We see if str can be found
*/
test:procedure
parse arg str, ff
'extract/line'
trace off
ff||str
if rc = 0 then
{ ':'line.1
return
}
'prompt String "'str'" not found.'
'msg'
exit 0
when reason = 'focus' then
{ if nbfile.1 ~= 0 then 'dy_ex_set'
when the mouse enters the dialog box window, this callback macro is called with
the second argument reason set to the word focus.
In this case, the macro calls the dy_ex_set macro:
option mixed setenv
'extract/zone/case/line/size'
call dy_sinput $handle_dy_ex, $fromc_dy_ex, zone.1
call dy_sinput $handle_dy_ex, $toc_dy_ex,
zone.2
call dy_sinput $handle_dy_ex, $froml_dy_ex, line.1
call dy_sinput $handle_dy_ex, $tol_dy_ex,
size.1
if case.2 = 'respect' then fl = 1
else
fl = 0
call dy_stg $handle_dy_ex, $case_dy_ex, 1, fl
dy_ex_set sets the Columns and Lines input field according to the current file
zone setting, to the current line and to the file length.
The Consider Word toggle is set according to the CASE setting.
SEDIT and S/REXX Reference Manual
Page 635
LN
DIALOG MANAGEMENT
select
when reason = 'F1' | ,
reason = 'B'$dismiss_dy_ex
{ call dy_unmap(handle)
then
when the user clicks on the DISMISS button, or hits the F1 key, dy_ex_cb
unmaps the dialog box. The dialog box still exists, but is invisible.
when reason = 'B'$do_dy_ex then
when the user clicks on the DO IT button, dy_ex_cb reads the various input fields,
and executes the following SEDIT commands:
zone col1 col2
to restrict the search to the specified
columns.
case i
when the Consider Case toggle is OFF.
:line1
to set the current line to the From Line
field specified starting line.
change/str1/..??..@@@@@..??/ lines *
changes the first specified string to a string
not likely to be found in the file.
change/str2/str1/ lines *
changes the second specified string to the
first string.
change/..??..@@@@@..??/str2
changes what was the first string to the
second string.
When the Whole Word toggle is ON, dy_ex_cb uses the CN command instead of
the CHANGE command.
Page 636
SEDIT and S/REXX Reference Manual
ISPF-LIKE TABLES
LN
S/REXX ISPF-like Tables
When running as SEDIT macros, S/REXX programs have the ability to display data files
in a formatted way called a table.
A data file has rows and columns. Every row is separated from the previous row by a
newline character, as in ordinary text files.
Every column is separated by an arbitrary character within a line. The default separator is a
tabulation. However, for better legibility within this manual, the ; character will be used as
a separator.
The directory /home/xed/demo/demo_table contains various table example files:
/home/xed/demo/demo_table/test_tbl.data:
Line
Line
Line
Line
1
2;Item2;Item3;Item4;5;6;7;8
3;Item2
4;Item2;Item3
Line
Line
Line
Line
Line
Line
Line
Line
Line
6;Item2;Item3;Item4
7;Item2;Item3
8;Item2
9;Item2;Item3;Item4
10;Item2;Item3;Item4
11;Item2;Item3;Item4
12;Item2;Item3;Item4
13;Item2;Item3;Item4
14;Item2;Item3;Item4
This file contains 14 lines. Line 1 is one column wide, line 3 is two columns wide, etc.
SEDIT and S/REXX Reference Manual
Page 637
LN
ISPF-LIKE TABLES
/home/xed/demo/demo_table/test_tbl.panel:
)ATTR default(+%_)
^ type(output) intens(high) color(black) Hightlight(reverse)
" type(output) intens(low) color(black) Hightlight(normal)
$ type(text) intens(low) color(red) Hightlight(normal)
@ type(input) intens(zero) color(red) Hightlight(underline)
& type(num) intens(low) color(red) Hightlight(underline)
)BODY expand(//)
%/-/ edit table /-/
%
$COMMAND ====>_ZCMD
%
^DATE
$
^TIME $
%
+SEL
VOLSER
UNIT
SIZE
+/-/
)model
_SEL
+ _VOLSER
+
_UNIT
+
_SIZE
"trail $
)TRAIL expand(//)
%
$COMMAND ====>&ZCMDBOT
$/ /F1:Quit
F3:Save/ /
)BUTTON
Quit
Save
Add
Del
Exit
This file describes the overall formatted screen layout by using 5 sections.
1) The )ATTR section
This section maps a single character to a specific screen field type.
The field attributes may be the following:
Page 638
TYPE(param)
Text matches a read-only output field.
Output matches a read-only output field. It must
contain a valid REXX variable whose content will be
used to update the field.
Input matches an input field.
Num matches an input field allowing only numerical
characters.
INTENS(param)
High matches double intensity display.
Low matches normal display.
Zero matches no display.
SEDIT and S/REXX Reference Manual
ISPF-LIKE TABLES
LN
specifies the field display color. See the SEDIT
color command for a complete list of all available
colors.
Normal matches no highlight.
Underline matches an underlined field.
Reverse matches a reverse video field.
COLOR(param)
HIGHLIGHT(param)
When specifying default(+%_), the following default characters will be in
use:
+
2)
%
_
TYPE
Text
Text
Input
INTENS
Low
Low
Low
COLOR
Black
Red
Red
HIGHTLIGHT
Normal
Normal
Normal
The )BODY section
This section describes a leading fixed part of the screen, which may be used to
visually describe the MODEL section, or to create input fields where the user may
type commands.
The expand(//) syntax forces S/REXX to expand the characters within the //
separators to match the screen width.
For example, the "%/-/
edit table /-/" entry makes S/REXX display:
------------------------
edit table ------------------------
An input entry, such as "_ZCMD" must contain a valid S/REXX variable symbol.
If the user fills the corresponding displayed field, the S/REXX variable (ZCMD in
this example) will be updated in the following way:
3)
ZCMD.0
0 when no data has been typed in.
1 when data has been typed in.
ZCMD.1
The typed in data.
The )MODEL section
This section describes the screen layout used to display the data.
An input entry, such as "_SEL" must contain a valid S/REXX variable symbol.
This variable will be updated by the TBGET() built-in function in the same way
the )BODY variables are.
SEDIT and S/REXX Reference Manual
Page 639
LN
ISPF-LIKE TABLES
4)
The )TRAIL section
This section describes a trailing fixed part of the screen, which may be used in the
same way the )BODY section is.
5)
The )BUTTON section
Each line of this section will be displayed as a button.
Page 640
SEDIT and S/REXX Reference Manual
ISPF-LIKE TABLES
LN
/home/xed/demo/demo_table/test_tbl.sedit:
parse arg trail
if trail = '' then trail = '+'
call tbclose
'extract/xhome'
file = xhome.1'/demo/demo_table/test_tbl.data'
panel = xhome.1'/demo/demo_table/test_tbl.panel'
line = 1
nb_line = tbopen(file, panel, ';')
/*
* Initial displayed values
*/
date
= date('e')
time
= time()
zcmd
= ''
zcmdbot = '1.25'
do cntl = 1
call tbdispl line, rr
nb_line = rr.8
if ZCMD ~= ''
then
{ ZCMD = lower(strip(ZCMD))
select
when ZCMD = 'top' then
{ line = 1
iterate cntl
}
when ZCMD = 'bot' then
{ line = nb_line
iterate cntl
}
when left(ZCMD, 1) = 'e' then
{ parse var ZCMD 'e' ltr
if datatype(ltr, 'w') & ltr > 0 & ltr <= nb_line then
{ call tbget ltr
size = ''
unit = ''
volser = ''
sel = ''
call tbput ltr
}
else 'prompt Invalid line number'
iterate cntl
}
when left(ZCMD, 1) = 'r' then
{ parse var ZCMD 'r' ltr
if datatype(ltr, 'w') & ltr > 0 & ltr <= nb_line then
{ call tbget ltr
call tbput ltr, size, unit, volser, sel
}
else 'prompt Invalid line number'
iterate cntl
}
when datatype(ZCMD, 'w') then
{ line = max(ZCMD, 1)
line = min(line, nb_line)
iterate cntl
}
SEDIT and S/REXX Reference Manual
Page 641
LN
ISPF-LIKE TABLES
otherwise nop
end
}
if ZCMDBOT ~= '' then say 'ZCMDBOT = 'ZCMDBOT
do ll = line to rr.6
call tbget ll
end
select
when rr.1 = 'F1' | rr.1 = 'B1' then leave cntl
when rr.1 = 'F8'
then line = rr.6
when rr.1 = 'F7'
then line = Max(1, 1+line - rr.7)
when rr.1 = 'F3' | rr.1 = 'B2' then call tbsave
when rr.1 = 'F15' then
{ call tbsave
leave cntl
}
when rr.1 = 'B3' then nb_line = tbadd(line)
when rr.1 = 'B4' then nb_line = tbdel(line)
when rr.1 = 'B5' then
{ trace off
'prompt Really Quit ?'
trace e
if rc = 0 then 'exit'
else iterate cntl
}
when rr.1 = '^=' & rr.2 ~= 0 then
{ call tbget rr.2
call tbadd rr.2, sel, volser, unit, size
iterate cntl
}
when rr.1 = '^a' & rr.2 ~= 0 then
{ call tbadd rr.2
iterate cntl
}
when rr.1 = '^d' & rr.2 ~= 0 then
{ call tbdel rr.2
iterate cntl
}
otherwise nop
end
end
call tbclose
This macro shows how to use the various built-in table functions.
call tbclose
closes a previously opened table.
Page 642
SEDIT and S/REXX Reference Manual
ISPF-LIKE TABLES
LN
nb_line = tbopen(file, panel, ';')
opens the "file" file using the "panel" panel. The separator in use to parse "file" will
be the third ";" parameter.
tbopen returns the file number of lines.
call tbdispl line, rr
displays the table, starting at line "line", and waits for user action.
The following panel will be displayed:
The "rr" stem will be used to return the following information:
rr.0
The rr size (8 here).
rr.1
A keyword indicating the user action:
return
the Return key.
Fi
The i top function key.
Li
The i left function key.
Ri
The i right function key.
Bi
The i mouse button.
^x
The Control-x action.
rr.2
The cursor line file related position, or 0 if the cursor
is not on a )MODEL data field location.
SEDIT and S/REXX Reference Manual
Page 643
LN
ISPF-LIKE TABLES
rr.3
The cursor column file related position, or 0 if the
cursor is not on a )MODEL data field location.
rr.4
The mouse line file related position, or 0 if the mouse
is not on a )MODEL data field location.
rr.5
The mouse column file related position, or 0 if the
mouse is not on a )MODEL data field location.
rr.6
The last displayed line.
rr.7
The number of lines which can be displayed, according
to the panel layout and the screen size.
rr.8
The number of lines of the current loaded table.
call tgbet ltr
updates the SEL, VOLSER, UNIT, and SIZE variables described in the )MODEL section,
according to the modifications entered by the user.
call tbput ltr
uses the SEL, VOLSER, UNIT, and SIZE variables described in the )MODEL section to
update the currently opened table.
call tbsave
saves the currently opened table content in the file described by the last tbopen call.
nb_line = tbadd(line)
adds an empty line after line "line", and updates nb_line with the total number of lines
of the current table.
Page 644
SEDIT and S/REXX Reference Manual
ISPF-LIKE TABLES
LN
call tbadd rr.2, sel, volser, unit, size
adds a line after line "rr.2", using the contents of the variables sel, volser, unit and
size.
nb_line = tbdel(line)
deletes line "line", and updates nb_line with the total number of lines in the current
table.
This macro is designed to execute the following actions:
F1
F3
F7
F8
^=
^a
^d
Quit without saving the changes.
Saves the current table.
Scrolls up.
Scrolls down.
Duplicates the cursor line.
Inserts 1 line at the cursor location.
Deletes 1 line at the cursor location.
The following commands may be entered in the ZCMD field:
top
bot
r i
i
Selects the first line as the current line.
Selects the last line as the current line.
Reverts the contents of the line i.
Makes the i line the current line.
In addition, the user may click on the following buttons:
Quit
Save
Add
Del
Exit
Quit without saving the changes.
Saves the current table.
Inserts 1 line at the current line location.
Deletes 1 line at the current line location.
Terminates the current SEDIT session.
The default SEDIT profile.sedit initialization file loads the test_tbl macro, so
the user may start it by simply typing test_tbl in the command field.
SEDIT and S/REXX Reference Manual
Page 645
LN
Page 646
ISPF-LIKE TABLES
SEDIT and S/REXX Reference Manual
PROGRAMMING INTERFACE
LN
S/REXX Programming Interface
This chapter describes how to imbed the S/REXX language into C applications, and how to
add user-supplied built-in functions.
Creating a New Address Environment
The following routines are provided:
•
•
•
•
•
•
•
•
•
•
env_rx
exit_rx
getval_rx
pull_rx
push_rx
queue_rx
queued_rx
run_rx
setval_rx
stop_rx
initiates a host command environment.
cleans up before exiting.
gets an S/REXX variable.
extracts the first available External Data Queue item.
adds a string on top of the External Data Queue.
adds a string to the External Data Queue.
queries the External Data Queue length.
runs an S/REXX program from C.
sets an S/REXX variable.
stops the currently active S/REXX program.
To use these routines two files are required:
{install-dir}/lib/arch/libsr.o
{install-dir}/include/srexx.h
where arch is the hardware dependent string described in Appendix B: Hardware String
on page 695.
A typical makefile on an IBM RS/6000 resembles the following:
ARCH
CCLIB
CCPATH
CC
demo1:
=
=
=
=
ibm
/home/xed/lib/$(ARCH)
/home/xed/include
cc -O
demo1.c
$(CCLIB)/libsr.o $(CCPATH)/srexx.h
$(CC) -o demo1 demo1.c $(CCLIB)/libsr.o -I$(CCPATH)
-lbsd -lc -lm
Note that the lbsd library is required on IBMs RS/6000 only.
All C examples described in this section are provided in the
{install-dir}/home/demo/demo_sr directory.
SEDIT and S/REXX Reference Manual
Page 647
ENV_RX
PROGRAMMING INTERFACE
ENV_RX - Initiate a Host Command Environment
void env_rx(name, fns, lg_def)
char *name;
int (*fns)();
int lg_def;
void env_rx2(name, fns, lg_def, parm)
char *name, *parm;
int (*fns)();
int lg_def;
The function fns will be called every time the S/REXX program will issue a command to
the name environment. name is a NULL terminated string which will be translated into
upper case by env_rx before use.
If the name environment already exists, it will be updated.
If fns is a NULL pointer, a previous name environment will be deleted.
If lg_def is set to 1, name will become the default environment.
env_rx2 can be used instead of env_rx to pass an arbitrary parm parameter to fns.
fns will receive a NULL terminated string containing the command and its length:
int fns(string, l_string, parm)
char *string, *parm;
int l_string;
parm is the arbitrary parameter passed to env_rx2. When env_rx has been used to
create the host command environment, parm will be set to NULL.
Note that when it is first called, env_rx or env_rx2 will also create the standard
S/REXX UNIX or WINDOWS environment.
Page 648
SEDIT and S/REXX Reference Manual
PROGRAMMING INTERFACE
ENV_RX
Example:
A C demo1.c program:
#include <stdio.h>
#include "srexx.h"
int call_back(string, len)
char *string;
int len;
{
printf ("call_back: received '%s'\n", string);
return(0);
}
main()
{
int rc;
env_rx("MyEnv", call_back, 0); /* MyEnv tranlated */
rc = run_rx("r_demo1", "../..", NULL, NULL, NULL);
exit_rx(rc); /* exit_rx() cleans up before exiting */
}
An r_demo1 S/REXX program called by the demo1 program:
address myenv 12**5.56
To compile and execute this program, issue the following commands:
C{foo}% cd {install-dir}/demo/demo_sr
C{demo_sr}% make demo1
cc
-O
-o
demo1
demo1.c
../../lib/sun4/libsr.o
-I../../include -lc -lm
9.1u 1.4s 0:10 96% 0+900k 3+63io 0pf+0w
C{demo_sr}% demo1
call_back: received "1000570.58"
C{demo_sr}%
where {install-dir} is the actual S/REXX installation directory.
SEDIT and S/REXX Reference Manual
Page 649
ENV_RX
PROGRAMMING INTERFACE
EXIT_RX - Cleans up and Exits
void exit_rx(rc)
int rc;
exit_rx() performs the necesary clean up before exiting with the rc return code. In
particular, exit_rx() releases a floating license in use.
Page 650
SEDIT and S/REXX Reference Manual
PROGRAMMING INTERFACE
GETVAL_RX
GETVAL_RX - Get an S/REXX Variable
void getval_rx(res, len, name, l_name)
char **res, *name;
int *len, l_name;
name is a string which must contain a valid S/REXX symbol name with a length of
l_name.
*res will be allocated with a NULL terminated string which is the contents of name. *len
will receive the *res length.
It is the responsibility of the caller to free *res after usage.
Example:
A C demo2.c program:
#include <stdio.h>
#include "srexx.h"
int call_back(name, ll)
char *name;
{
char *res;
int len;
getval_rx(&res, &len, name, ll);
printf ("call_back: %s = \"%s\"\n", name, res);
free(res);
return(0);
}
main()
{
int rc;
env_rx("MyEnv", call_back, 1);
rc = run_rx("r_demo2", "/home/xed", NULL, NULL, NULL);
exit_rx(rc); /* exit_rx() cleans up before exiting */
}
SEDIT and S/REXX Reference Manual
Page 651
GETVAL_RX
PROGRAMMING INTERFACE
An r_demo2 S/REXX program called by the demo2 program:
i = "1"
j = 2
tab.i.j = 'This is tab.1.2'
"i"
"j"
"tab.i.j"
"tab.1.3"
To compile and execute this program, issue the following commands:
C{foo}% cd {install-dir}/demo/demo_sr
C{demo_sr}% make demo2
cc
-O
-o
demo2
demo2.c
../../lib/sun4/libsr.o
-I../../include -lc -lm
6.4u 1.8s 0:10 79% 0+852k 94+61io 124pf+0w
C{demo_sr}% demo2
call_back: i = "1"
call_back: j = "2"
call_back: tab.i.j = "This is tab.1.2"
call_back: tab.1.3 = "TAB.1.3"
C{demo_sr}%
where {install-dir} is the actual S/REXX installation directory.
Page 652
SEDIT and S/REXX Reference Manual
PROGRAMMING INTERFACE
PULL_RX
PULL_RX - Extract External Data Queue Item
void pull_rx(res, len)
char **res;
int *len;
*res will be allocated with a NULL terminated string holding the first external data queue
(or stack) item content. *len will receive the *res length.
If the external data queue is empty, *res will be set to NULL.
It is the responsibility of the caller to free *res after usage.
Example:
A C demo3.c program:
#include <stdio.h>
int call_back(string, ll)
char *string;
/* ARGSUSED */
{
char *res;
int len;
pull_rx(&res, &len);
if (res)
{ printf ("call_back: \"%s\" was in the stack (length
= %d).\n", res, len);
free(res);
}
else
printf ("call_back: stack empty.\n");
return(0);
}
main()
{
int rc;
env_rx("MyEnv", call_back, 1);
rc = run_rx("r_demo3", "/home/xed", NULL, NULL, NULL);
exit_rx(rc); /* exit_rx() cleans up before exiting */
}
SEDIT and S/REXX Reference Manual
Page 653
PULL_RX
PROGRAMMING INTERFACE
An r_demo3 S/REXX program called by the demo3 program:
''
queue
queue
queue
queue
''
''
''
''
''
''
'String 1'
'String 2 '
'String 3 '
To compile and execute this program, issue the following commands:
C{foo}% cd {install-dir}/demo/demo_sr
C{demo_sr}% make demo3
cc
-O
-o
demo3
demo3.c
../../lib/sun4/libsr.o
-I../../include -lc -lm
8.9u 1.6s 0:11 94% 0+896k 2+67io 0pf+0w
C{demo_sr}% demo3
call_back: stack empty.
call_back: "" was in the stack (length = 0).
call_back: "String 1" was in the stack (length = 8).
call_back: "String 2 " was in the stack (length = 9).
call_back: "String 3 " was in the stack (length = 10).
call_back: stack empty.
C{demo_sr}%
where {install-dir} is the actual S/REXX installation directory.
Page 654
SEDIT and S/REXX Reference Manual
PROGRAMMING INTERFACE
PUSH_RX
PUSH_RX - Add a String on Top of the External Data Queue
void push_rx(str, len)
char *str;
int len;
The str string, whose length is given by len, is added on top the External Data Queue (or
stack). str does not need to be a NULL terminated string.
Example: see the demo4.c example on page page 656.
SEDIT and S/REXX Reference Manual
Page 655
QUEUE_RX
PROGRAMMING INTERFACE
QUEUE_RX - Add a String to the External Data Queue
void queue_rx(str, len)
char *str;
int len;
The str string, whose length is given by len, is added to the External Data Queue (or
stack). str does not need to be a NULL terminated string.
Example:
A C demo4.c program:
#include <stdio.h>
int push(string, len)
char *string;
int len;
{ push_rx(string, len);
printf ("push: \"%s\" has been pushed.\n", string);
return(0);
}
int queue(string, len)
char *string;
int len;
{ queue_rx(string, len);
printf ("queue: \"%s\" has been queued.\n", string);
return(0);
}
main()
{ int rc;
env_rx("push", push, 1);
env_rx("queue", queue, 1);
rc = run_rx("r_demo4", "/home/xed", NULL, NULL, NULL);
exit_rx(rc); /* exit_rx() cleans up before exiting */
}
An r_demo4 S/REXX program called by the demo4 program:
address queue 'This will be queued'
address push 'This will be pushed'
parse pull a
say a
parse pull a
say a
Page 656
SEDIT and S/REXX Reference Manual
PROGRAMMING INTERFACE
QUEUE_RX
To compile and execute this program, issue the following commands:
C{foo}% cd {install-dir}/demo/demo_sr
C{demo_sr}% make demo4
cc
-O
-o
demo4
demo4.c
../../lib/sun4/libsr.o
-I../../include -lc -lm
9.1u 1.5s 0:11 95% 0+900k 1+68io 0pf+0w
C{demo_sr}% demo4
queue: "This will be queued" has been queued.
push: "This will be pushed" has been pushed.
This will be pushed
This will be queued
C{demo_sr}%
where {install-dir} is the actual S/REXX installation directory.
SEDIT and S/REXX Reference Manual
Page 657
QUEUED_RX
PROGRAMMING INTERFACE
QUEUED_RX - Query External Data Queue Length
int queued_rx()
queued_rx returns the external data queue (or stack) length.
Example:
A C demo5.c program:
#include <stdio.h>
int call_back(string, len)
char *string;
/* ARGSUSED */
{
printf ("call_back: stack length = %d\n", queued_rx());
return(0);
}
main()
{
int rc;
env_rx("MyEnv", call_back, 1);
rc = run_rx("r_demo5", "/home/xed", NULL, NULL, NULL);
exit_rx(rc); /* exit_rx() cleans up before exiting */
}
An r_demo5 S/REXX program called by the demo5 program:
''
queue '1'
queue '2'
queue '3'
''
pull .
pull .
pull .
''
Page 658
SEDIT and S/REXX Reference Manual
PROGRAMMING INTERFACE
QUEUED_RX
To compile and execute this program, issue the following commands:
C{foo}% cd {install-dir}/demo/demo_sr
C{demo_sr}% make demo5
cc
-O
-o
demo5
demo5.c
../../lib/sun4/libsr.o
-I../../include -lc -lm
8.8u 2.0s 0:13 82% 0+876k 44+71io 81pf+0w
C{demo_sr}% demo5
call_back: stack length = 0
call_back: stack length = 3
call_back: stack length = 0
C{demo_sr}%
where {install-dir} is the actual S/REXX installation directory.
SEDIT and S/REXX Reference Manual
Page 659
RUN_RX
PROGRAMMING INTERFACE
RUN_RX - Run an S/REXX Program
#include "rexx.h"
int run_rx(args, inst, ss, ret_str, len_ret_str)
char *args, *inst, **ret_str;
SAV_COMP **ss;
int *len_ret_str;
args is a NULL terminated string which starts with a filename related to an S/REXX
program, optionally followed by the argument to be passed to this program.
inst is a NULL terminated string indicating the S/REXX installation directory, which
must contain a passwds file with a valid password identifying the cpu on which run_rx
will execute. If inst is NULL, run_rx will attempt to use a REXXHOME environment
variable instead. In this case, before using run_rx, the user must issue a command such
as "setenv REXXHOME /home/xed" (C-Shell) or
"export REXXHOME=/home/xed" (Korn Shell).
On WINDOWS systems, inst can optionally contain the name of the .exe module to be
used when the REXX CALL clause is used with OPTION NOLOAD in effect:
#
define INST "C:\\Program Files\\SEDIT\\srexx.new.exe"
rc = run_rx(args, INST, NULL, NULL, NULL);
ss is a pointer to a structure which will be filled with the compiled form of the args
S/REXX program, or a NULL pointer if this save is not to be performed.
If ss is not a NULL pointer, it must be set to zero before the first run_rx call. Subsequent
run_rx calls will use the ss compiled form instead of compiling the args program every
time, saving a substantial amount of time. Note that run_rx will notice if the args
program has been externally modified between two successive calls, and automatically
compile it again.
If ret_str is not a NULL pointer, ret_str will be filled with an allocated NULL
terminated string containing the string passed to the S/REXX EXIT statement, if any.
len_ret_str will contain the ret_str length.
It is the responsibility of the caller to free *ret_str after usage.
Page 660
SEDIT and S/REXX Reference Manual
PROGRAMMING INTERFACE
RUN_RX
Example:
A C demo6.c program:
#include <stdio.h>
#include "srexx.h"
int call_back(string, len)
char *string;
{ printf ("call_back: received \"%s\"\n", string);
return(0);
}
void dsp(exit_value, len_exit_value, rc)
char *exit_value;
int len_exit_value, rc;
{ if (exit_value)
{ printf ("demo6: exit_value = \"%s\", len = %d\n",
exit_value, len_exit_value);
free(exit_value);
}
printf ("demo6: return code = %d\n", rc);
}
main()
{ char *exit_value;
SAV_COMP *compiled;
int len_exit_value, rc;
env_rx("MyEnv", call_back, 1);
/*
* Compiled form not saved
*/
run_rx("r_demo6", "/home/xed", NULL, NULL, NULL);
/*
* Compiled form saved
*/
compiled = NULL;
/* **** MANDATORY **** */
rc = run_rx("r_demo6", "/home/xed", &compiled,
&exit_value, &len_exit_value);
dsp(exit_value, len_exit_value, rc);
/*
* run_rx() will use the previous compiled form
*/
rc = run_rx("r_demo6 1", "/home/xed", &compiled,
&exit_value, &len_exit_value);
dsp(exit_value, len_exit_value, rc);
/*
* run_rx() will recompile r_demo6 because we modify it
*/
system("touch r_demo6");
rc = run_rx("r_demo6 2", "/home/xed", &compiled,
&exit_value, &len_exit_value);
dsp(exit_value, len_exit_value, rc);
rc = run_rx("r_demo6 3", "/home/xed", &compiled,
&exit_value, &len_exit_value);
dsp(exit_value, len_exit_value, rc);
exit_rx(rc); /* exit_rx() cleans up before exiting */
}
SEDIT and S/REXX Reference Manual
Page 661
RUN_RX
PROGRAMMING INTERFACE
An r_demo6 S/REXX program called by the demo6 program:
parse arg what .
say
say '*************************************'
say 'demo6: called with "'what'" argument.'
'Sent to the MYENV callback routine'
select
when what
when what
when what
otherwise
end
= 1 then exit
= 2 then exit 12**1.001
= 3 then return 'Exit String'
nop
To compile and execute this program, issue the following commands:
C{foo}% cd {install-dir}/demo/demo_sr
C{demo_sr}% make demo6
cc -O -o demo6 demo6.c ../../lib/sun4/libsr.o -I../../include -lc -lm
9.1u 1.6s 0:12 84% 0+880k 49+67io 82pf+0w
C{demo_sr}% demo6
*************************************
demo6: called with "" argument.
call_back: received "Sent to the MYENV callback routine"
*************************************
demo6: called with "" argument.
call_back: received "Sent to the MYENV callback routine"
demo6: return code = 0
*************************************
demo6: called with "1" argument.
call_back: received "Sent to the MYENV callback routine"
demo6: return code = 0
*************************************
demo6: called with "2" argument.
call_back: received "Sent to the MYENV callback routine"
demo6: exit_value = "12.029856", len = 9
demo6: return code = 12
*************************************
demo6: called with "3" argument.
call_back: received "Sent to the MYENV callback routine"
demo6: exit_value = "Exit String", len = 11
demo6: return code = 1165519220
C{demo_sr}%
where {install-dir} is the actual S/REXX installation directory.
Page 662
SEDIT and S/REXX Reference Manual
PROGRAMMING INTERFACE
SETVAL_RX
SETVAL_RX - Set an S/REXX Variable.
void setval_rx(symb, l_symb, str, l_str)
char *symb, *str;
int l_symb, l_str;
symb is a character string which must contain a valid S/REXX name. l_symb is its length.
str is a character string to be assigned to symb. l_str is its length.
Example:
A C demo7.c program:
#include <stdio.h>
int call_back(string, len)
char *string;
{
printf ("call_back: received \"%s\"\n", string);
setval_rx(string, len, "Value assigned", 14);
return(0);
}
main()
{
int rc;
env_rx("MyEnv", call_back, 1);
rc = run_rx("r_demo7", "../..", NULL, NULL, NULL);
exit_rx(rc); /* exit_rx() cleans up before exiting */
}
An r_demo7 S/REXX program called by the demo7 program:
say 'val = 'val
'val'
say 'val = 'val
SEDIT and S/REXX Reference Manual
Page 663
SETVAL_RX
PROGRAMMING INTERFACE
To compile and execute this program, issue the following commands:
C{foo}% cd {install-dir}/demo/demo_sr
C{demo_sr}% make demo7
cc
-O
-o
demo7
demo7.c
../../lib/sun4/libsr.o
-I../../include -lc -lm
9.1u 1.4s 0:11 95% 0+904k 12+58io 12pf+0w
C{demo_sr}% demo7
val = VAL
call_back: received "val"
val = Value assigned
C{demo_sr}%
where {install-dir} is the actual S/REXX installation directory.
Page 664
SEDIT and S/REXX Reference Manual
PROGRAMMING INTERFACE
SETVAL_RX
STOP_RX - Stop an S/REXX Program.
void stop_rx(str, l_str, rc)
char *str;
int l_str, rc;
stop_rx will make S/REXX behave as if the statement "EXIT STR" had been entered.
run_rx will return to its caller with a rc return code. l_str is str length. str may be
NULL, which will simulate a simple "EXIT" statement.
Example:
A C demo8.c program:
#include <stdio.h>
int call_back(string, len)
char *string;
int len;
{
printf ("call_back: received \"%s\"\n", string);
stop_rx(string, len, 12);
return(0);
}
main()
{
char *exit_value;
int len_exit_value, rc;
env_rx("MyEnv", call_back, 1);
rc = run_rx("r_demo8", "/home/xed", NULL, &exit_value,
&len_exit_value);
if (exit_value)
printf ("demo8: exit_value = \"%s\"\n", exit_value);
exit_rx(rc); /* exit_rx() cleans up before exiting */
}
An r_demo8 S/REXX program called by the demo7 program:
say 'demo8 started'
'exiting'
say 'Not displayed'
SEDIT and S/REXX Reference Manual
Page 665
SETVAL_RX
PROGRAMMING INTERFACE
To compile and execute this program, issue the following commands:
C{foo}% cd {install-dir}/demo/demo_sr
C{demo_sr}% make demo8
cc
-O
-o
demo8
demo8.c
../../lib/sun4/libsr.o
-I../../include -lc -lm
6.6u 1.5s 0:08 95% 0+868k 3+62io 0pf+0w
C{demo_sr}% demo8
demo8 started
call_back: received "exiting"
demo8: exit_value = "exiting"
C{demo_sr}%
where {install-dir} is the actual S/REXX installation directory.
Page 666
SEDIT and S/REXX Reference Manual
PROGRAMMING INTERFACE
SETVAL_RX
Adding Built-in Functions
It is possible to add built-in functions by modifying and compiling the rx_add_on.c
example supplied in the {install-dir}/demo/demo_built directory.
A typical makefile on an IBM RS/6000 is shown below:
ARCH
CCLIB
CCPATH
CC
FILES
=
=
=
=
=
ibm
../../lib/$(ARCH)
../../include
cc -O
$(CCLIB)/libsr.o $(CCLIB)/srexx.o
srexx2:
rx_add_on.o $(FILES) $(CCPATH)/srexx.h
$(CC) -o srexx2 rx_add_on.o $(FILES) -I$(CCPATH)
-lbsd -lc -lm
rx_add_on.o:
rx_add_on.c $(CCPATH)/srexx.h
$(CC) -c rx_add_on.c -I$(CCPATH)
clean:
rm srexx2 rx_add_on.o
Note that the lbsd library is required on IBMs RS/6000 only.
This makefile creates a srexx2 module, which incorporates two new built-in functions
described in the rx_add_on.c file.
rx_add_on must start with the following statements:
#include <stdio.h>
#include "srexx.h"
#define NB 2
static ITEM *bu_left2(),
*bu_pi2();
static BUILT bb[NB] =
{ "left2" , 0, bu_left2,
"pi2"
, 0, bu_pi2
};
void rx_add_on()
{
rx_add_on1(bb, NB);
}
These statements defines NB new built-in functions. They will be named left2 and pi2.
The C functions bu_left2() and bu_pi2() will be called by the S/REXX interpreter
when the left2 and pi2 built-in functions will be used.
pi2(N) returns the first N π decimals.
SEDIT and S/REXX Reference Manual
Page 667
SETVAL_RX
PROGRAMMING INTERFACE
left2 is a simple copy of the standard left function. It demonstrates the use of various
internal subroutines:
rx_nbfa(args, its, nb_its)
LEX *args;
ITEM ***its;
int *nb_its;
The first call within a built-in function must be rx_nbfa, which computes the supplied
arguments.
The number of arguments passed to the routine will be stored in *nb_its. The actual
arguments will be stored in the ITEM array *its.
The following is an example of an ITEM structure:
typedef struct str
{ char *str;
int len;
} STR;
typedef struct item
{ enum { IT_DB, IT_STR } type;
union
{ STR str;
double db;
} val;
int prec;
} ITEM;
It may be either a string STR structure, or a double.
The it2str function allows the user to convert an ITEM value into a string, regardless of
its initial content:
void it2str(it, v_it, l_it, ind)
ITEM *it;
char **v_it;
int *l_it, ind;
it2str uses 10 static internal buffers to store the data. ind indicates which buffer is to
be used, and may be the constant values ST1, ST2, ... ST10 defined in the srexx.h
include file.
Page 668
SEDIT and S/REXX Reference Manual
PROGRAMMING INTERFACE
SETVAL_RX
For example:
it2str(its[0], &arg1, &len1, ST1);
stores the its[0] content in character format into arg1.
The functions malloc_a(), realloc_a() and strdupa() must be used in
replacement for the standard C library functions malloc(), realloc() and
strdup(). They cleanly abort the srexx process when no more memory is available.
The rx_round function rounds a double value to a specified value:
double rx_round(val, nd)
double val;
int nd;
The rx_bu_err function cleanly aborts any built-in function which receives an erroneous
argument:
void rx_bu_err(args, its, nb_its, ierr, mes)
LEX *args;
ITEM **its;
int ierr;
char *mes;
its are the arguments computed by the rx_nbfa function. mes is an error message to be
displayed. When no message is to be displayed, mes may be replaced by the NULL
statement.
free_it allows the user to free the storage allocated by the rx_nbfa function:
for (i=0; i<nb_its; i++) free_it(&its[i]);
free(its);
SEDIT and S/REXX Reference Manual
Page 669
SETVAL_RX
Page 670
PROGRAMMING INTERFACE
SEDIT and S/REXX Reference Manual
RXD DEBUGGER
ENTERING
Using the RXD Debugger
rxd is a graphical debugger which is licensed separately.
Entering RXD Explicitly
To enter rxd explicitly on UNIX systems, type:
/home/xed/rxd test1 args
This starts rxd, which will run the test1 S/REXX program, passing to it the args
optional arguments.
To enter rxd explicitly on WINDOWS systems, type:
cd c:\Program Files\SEDIT
rxd test1 args
or use the S/REXX Debugger icon located in the SEDIT folder.
No modification of the program is necessary to start the debugger.
Entering RXD Implicitly
To enter rxd implicitly, add the following statement within the S/REXX program to
debug:
trace x
This method is the only way to debug an SEDIT macro.
SEDIT and S/REXX Reference Manual
Page 671
ENTERING
RXD DEBUGGER
rxd will initiate and display the following window:
1
2
3
4
5
6
7
8
9
10
11
12
13
14
15
16
17
18
19
RUN
parse pull tab.1
say 'tab.1 is "'tab.1'"' /* left(tab.1, 3) */
say 'Line 7'
say 'Line 8'
call aa
exit
aa:
procedure expose tab.
say 'aa'
call bb
return
bb:
procedure
rep = 'Inside bb'
say 'bb'
return
CONT
STEP
NEXT
STEPOUT PRINT
WHERE
UP
DOWN
STATUS
Source area
I/O area
Command area
Stop column
Page 672
SEDIT and S/REXX Reference Manual
RXD DEBUGGER
COMMANDS
The I/O area is used by the REXX process to display its output, and permits the user to enter
a string to be sent to the REXX process (a response to a PULL statement for example).
This input is modifiable using the editing keys, until it is sent to the REXX process by
hitting the Return or Enter key. Therefore, it is not possible to use the REXX
charin() function to read one character at a time.
The command area is used to enter the following rxd commands:
alias new old
new will be a synonym to the old command.
alias new "old"allows the user to specify a synonym ending with a ";". For
example:
alias cwd "say cwd();"
alias
displays all the defined synonyms.
down
moves down the call stack one level.
cont
continues execution.
delete numline removes a stop at line numline.
delete all
removes all the stops.
kill
terminates the REXX process.
list proc
displays in the source area the proc procedure.
next
continues execution, and pauses at the next statement within the
same stack level. This enables subroutines to be skipped over.
print var
prints the variable var.
print expr
executes the interpret say expr statement within the
REXX process, and displays the result in the I/O window.
Within the expr statement, two variables are defined to access
the selection:
.sel becomes the current selection.
.selw becomes the REXX variable containing the selection. For
example, to print tab.1, select one letter in the word tab and
click on the print button, which is assigned to the command
print .selw.
run {args}
when args is not specified, run terminates the current REXX
process, and restarts it with the arguments used for the previous
run. When specified, args are the new process arguments.
rerun {args}
is similar to the run command. When args is omitted, no
argument is passed to the REXX process.
sav_stat file
saves the stops location in the specified file.
source file
reads the specified file, and executes every line.
set
set function keys. See using the ’using the set command’ section.
status
displays the stops.
step
continues execution, and pauses at the next statement.
stepout
continues execution, and pauses after exiting the current
SEDIT and S/REXX Reference Manual
Page 673
CUSTOMIZING
RXD DEBUGGER
subroutine.
stop at line
sets a stop at the specified line.
stop in proc
sets a stop at the beginning of the proc procedure. proc does not
need to be loaded.
unalias new
removes the new synonym.
up
moves up the call stack one level.
upcmd n
shrinks n lines the command line subwindow.
upsource n
shrinks n lines the source subwindow.
where
displays the call stack.
expr;
sends the expr expression to the REXX process to be interpreted.
^c
typing Control-c interrupts the REXX process. An empty DO
loop or a parse pull statement cannot be interrupted.
The I/O and command areas can be edited using the following keys:
Arrow UP
progressively displays the previous commands in a reverse
chronological sequence.
Arrow DOWN
progressively displays the previous commands in a chronological
sequence.
Arrow LEFT
moves the cursor to the left.
Arrow RIGHT
moves the cursor to the right.
Insert or ^i
switches insert and replace mode.
Home or ^h
moves the cursor to the start of the line.
End or ^e
moves the cursor to the end of the line.
Escape or L3
erases the characters following the cursor.
F3 or L6
saves the selection into an internal buffer named the shelf.
F4 or L8
pastes the shelf content at the cursor location.
Mouse 2
pastes the current selection at the cursor location.
Setting Stops
When the mouse enters the stop area, the mouse cursor shape becomes circular.
Clicking with the first mouse button sets a stop at the specified line location. Clicking on a
line where a stop is displayed removes the stop.
Customizing RXD
When initializing, rxd searches for a .rxdinit file in the current directory, the user’s
home directory and the S/REXX installation directory.
This file may contain the following elements:
back_command xx xx xx
Page 674
SEDIT and S/REXX Reference Manual
RXD DEBUGGER
CUSTOMIZING
The command subwindow background color, where xx xx xx
corresponds to the RED/GREEN/BLUE value, which is a number
in the range 0 to 255.
windows ht1 ht2 ht3
On UNIX systems, the relative sizes of the source window, the
I/O window and the command window.
For example, windows 50 35 15 specifies that the source
window occupies 50% of the total windows height, the I/O
windows occupies 35%, and the command window the remaining
15%.
On WINDOWS systems, the relative sizes are memorized when
rxd exits, and the memorized values are used the next time rxd
is started.
back_source xx xx xx
The source subwindow background color.
back_panel xx xx xx
The button subwindow background color.
back_io xx xx xx
The I/O subwindow background color.
back_prefix xx xx xx
The color in use to display the line numbers.
back_current xx xx xx
The color to display the line where the REXX process is stopped.
back_up xx xx xx
The color to display a line after a UP command.
back_cursor xx xx xx
The cursor color.
foreground xx xx xx
The foreground color.
SEDIT and S/REXX Reference Manual
Page 675
CUSTOMIZING
RXD DEBUGGER
font fnt
On UNIX systems, the general font.
dy_font fnt
The font to be used by the buttons.
geometry hhxll+xx+yy
On UNIX systems, the height (hh) in units of characters, the
width (ll) in units of characters, and the position (xx, yy) in
pixel units of the rxd window starting at the upper-left corner.
On WINDOWS systems, these values are memorized when rxd
exits, and the memorized values are used next time rxd is started.
button dis cmd
Creates a button labelled dis, which will execute the cmd
command.
mbutton dis "dis1:cm1" "dis2:cmd2" ......
On UNIX systems, creates a menu button labelled dis.
When the first mouse button is used upon this button, cmd1 is
executed. When the third mouse button is used, a menu with the
dis1, dis2, ... labels is displayed, permitting the choice
amongst the cmd1, cmd2, ... commands to be executed.
In addition, any command, such as alias, may be used within .rxdinit.
An example is provided in the {install-dir}/.rxdinit file.
The following options may be used when starting rxd in explicit mode on UNIX systems:
-Ww or -width
-Wh or -height
-Wf or -font
-dy_font
-display
-Wp or -position
-WP or -icon_position
columns
lines
fontname
fontname
display
x y
x y
the number of columns.
the number of lines.
the font to be used at initialization.
the font to be used by the buttons.
the X11 display to be used.
the RXD window location.
the RXD icon location.
These options override the settings described in the .rxdinit file.
Page 676
SEDIT and S/REXX Reference Manual
RXD DEBUGGER
CUSTOMIZING
Using the Function Keys
The default function keys setting is the following:
F3
s_copy copies the selection into the internal buffer named
shelf.
F4
s_paste pastes the shelf contents at the cursor location.
F5
cont continues execution.
F10
next continues execution, and pauses at the next statement
within the same stack level. This enables subroutines to be
skipped over.
F11
step continues execution, and pauses at the next statement.
F12
stepout continues execution, and pauses after exiting the
current subroutine.
S-F5
run terminates the current REXX process, and restarts it
with the arguments used for the previous run.
S-F11
stepout
L3
eof
L6
s_copy
L8
s_paste
^c
break interrupts the REXX process. An empty DO loop or a
parse pull statement cannot be interrupted.
^i
upsource -1 shrinks 1 line the source subwindow.
^k
kill terminates the REXX process.
^o
upcmd 1 shrinks 1 line the command line subwindow.
^p
upcmd -1 expands 1 line the command line subwindow.
^u
upsource 1 expands 1 line the source subwindow.
^v
s_paste
The set command can be used to change the functions keys action.
SET
|
|
|
|
{S-} {C-} {M-}
{S-} {C-} {M-}
Fk
Rk
Lk
^cc
{string}
affects string to the given function key.
Without arguments, set displays the function keys setting.
SEDIT and S/REXX Reference Manual
Page 677
CUSTOMIZING
Page 678
RXD DEBUGGER
SEDIT and S/REXX Reference Manual
Appendix A: keyboard layouts
Appendix A: Keyboard Layouts
SUN APL Keyboard Layout
SEDIT and S/REXX Reference Manual
Page 679
Appendix A: keyboard layouts
SUN Type 3 Keyboard 3270 Simulation Layout
EOF
INS
CAPS
Page 680
APL
SEDIT and S/REXX Reference Manual
Appendix A: keyboard layouts
SUN Type 4 Keyboard 3270 Simulation Layout
EOF
APL
CAPS
SEDIT and S/REXX Reference Manual
Page 681
Appendix A: keyboard layouts
SUN Type 5 Keyboard Layout
When using a type 5 Sun keyboard with OpenWindows 3.x, most of the right Ri keys are
not available.
To modify the layout for one particular user, the user must have a ~/.xinitrc file.
If this file does not exist, issue the following command:
% cp $OPENWINHOME/lib/Xinitrc ~/.xinitrc
Then, insert the following command in the user’s ~/.xinitrc file before the last wait
statement in this file:
xmodmap /home/xed/keyboard/key5.remap
When using Solaris 2.4 and OpenWindows 3.4 (and above), use:
xmodmap /home/xed/keyboard/key5-4.remap
This will map the keyboard in the following way for all users:
R1
R2
R3
R4
R7
R9
R6
R13
R15
R5
R6
R11
The numerical keypad will always be active, and the Compose key will be assigned the
previous SUN type 4 keyboard LineFeed character, which is used by SEDIT as the 3270
Up-Field function.
The AltGraph key will be assigned the 3270 Down-Field function.
Control-AltGraph enters the linefeed command separator.
If you need to use the Compose key for other applications, please edit the key5.remap
file, and remove the line related to the Compose key.
Page 682
SEDIT and S/REXX Reference Manual
Appendix A: keyboard layouts
SUN
SUN Keyboard Mapping
L2
L3
Shift-L3
L4
Shift-L4
L6
L8
L9
L10
F1
Control-F1
F2
F3
Shift-F3
Control-F3
F4
F5
Shift-F5
F6
Shift-F6
F7
META-F7
F8
META-F8
F9
Shift-F9
F10
F12
R1
S-R1
S-R2 or S-F11
S-R3 or S-F12
Control-R5
C-Left-Arrow
C-Right-Arrow
Control-a
Control-c
Control-C
Control-d
Control-f
Control-g
Control-G
Control-h
Control-l
Control-n
Control-p
Control-r
Control-u
Control-U
MAtch
Erase end of field (3270 EOF)
Erase all field (3270 EAF)
UNDO
REDO
S_COPY
S_PASTE
S_FIND
S_CUT
Quit
FLQuit
C_EXT
Save
File
FLFile
C_SPLIT
SWitch
ISWitch
C_ENDLine
C_ENDCURL
BAckward
S_LSHIFT
FORward
S_RSHIFT
?
?I
CURsor Home
=
COMPLete
COMPLete Reverse
TOP
Bot
filter $xhome/filters/$arch/toggle_comment
prevword
nextword
C_LINEAdd
smart_comp $name 0
smart_comp $name 1
C_LINEDel
f
smart_compd $name 0
smart_compd $name 1
C_SCRH
S_Lower
f $fn *
shell lpr -h $name &
Tree
S_Upper
S_Upper WORD
SEDIT and S/REXX Reference Manual
Page 683
SUN
Appendix A: keyboard layouts
Control-v
Control-w
Control-x
Control-z
Control-Control-=
Page 684
C_SCRV
C_SCRJ
S_Xed
Left 0
NEXTerror
C_Dup
SEDIT and S/REXX Reference Manual
Appendix A: keyboard layouts
IBM
IBM, Silicon Graphics and PCs Keyboard Mapping
Escape
Control-Escape
F1
F2
F3
F4
F5
Shift-F5
F6
Shift-F6
F7
META-F7
F8
META-F7
F9
Shift-F9
F10
F11
Shift-F11
F12
R1
Control-R1
R2
S-R2
R3
Control-R6
C-Left-Arrow
C-Right-Arrow
Shift-R3
Shift-R6
Shift-R9
Control-R3
Control-a
Control-c
Control-C
Control-d
Control-f
Control-g
Control-G
Control-h
Control-l
Control-m
Control-n
Control-p
Control-r
Control-s
Control-u
Control-U
Control-v
Erase end of field (3270 EOF)
Erase all field (3270 EAF)
S_FIND
S_CUT
S_COPY
S_PASTE
SWitch
ISWitch
C_ENDLine
C_ENDCURL
BAckward
S_LSHIFT
FORward
S_RSHIFT
?
?I
CURsor Home
UNDO
REDO
=
Quit
FLQuit
COMPLete
COMPLete Reverse
Save
filter $xhome/filters/$arch/toggle_comment
prevword
nextword
File
TOP
Bot
FLFile
C_LINEAdd
smart_comp $name 0
smart_comp $name 1
C_LINEDel
f
smart_compd $name 0
smart_compd $name 1
C_SCRH
S_Lower
MAtch
f $fn *
shell lpr -h $name &
Tree
C_SPLIT
S_Upper
S_Upper WORD
C_SCRV
SEDIT and S/REXX Reference Manual
Page 685
IBM
Appendix A: keyboard layouts
Control-w
Control-x
Control-z
Control-Control-=
Page 686
C_SCRJ
S_Xed
Left 0
NEXTerror
C_Dup
SEDIT and S/REXX Reference Manual
Appendix A: keyboard layouts
DEC
DEC/COMPAQ/HP TRUE64 Station Keyboard Mapping
F1
F2
F3
F4
F5
F6
F7
F8
F9
F10
F11
F12
F13
S-F13
F14
F15
F16
S-F5
S-F6
S-F7
S-F8
S-F9
S-F11
S-F15
S-F16
C-F7
C-F8
C-F10
C-F16
META-F7
META-F8
R7
R9
S-R7
S-R9
C-Left-Arrow
C-Right-Arrow
L1
L2
C-L1
L3
S-L3
^^=
^C
^G
^N
^a
^c
s_find
s_cut
s_copy
s_paste
switch
c_endline
backward
forward
?
cursor home
undo
=
Erase end of field (3270 EOF)
Erase all field (3270 EAF)
filter $xhome/filters/dec/toggle_comment
help
save
iswitch
c_endcurl
pgup
pgdown
?i
redo
help task
file
left40
right40
delay.home
flfile
S_LSHIFT
S_RSHIFT
backward
forward
top
bot
prevword
nextword
quit
match
flquit
COMPLete
COMPLete Reverse
nexterror
c_dup
smart_comp $name 1
smart_compd $name 1
f $fn * $fd
c_lineadd
smart_comp $name 0
SEDIT and S/REXX Reference Manual
Page 687
DEC
Appendix A: keyboard layouts
^d
^e
^f
^g
^h
^l
^n
^p
^r
^s
^t
^u
^v
^w
^x
^z
Page 688
c_linedel
c_apltrace
flist
smart_compd $name 0
c_scrh
s_lower
f $fn *
shell lpr $name &
tree
c_split
tree
s_upper
c_scrv
c_scrj
s_xed
left0
SEDIT and S/REXX Reference Manual
Appendix A: keyboard layouts
HP
HP Keyboard Mapping
F1
F2
F3
F4
F5
F6
F7
F8
F9
F10
F11
F12
S-F1
S-F5
S-F6
S-F7
S-F8
S-F9
S-F10
S-F11
S-F12
C-F1
C-F7
C-F8
C-F10
M-F1
R1
R2
R9
R11
S-R2
S-R9
S-R11
C-R1
C-R2
C-R9
C-Left-Arrow
C-Right-Arrow
L1
Shift-L1
L6
Shift-L6
^^=
^C
^G
^N
^X
^a
^c
^d
s_find
s_cut
s_copy
s_paste
switch
c_endline
backward
forward
?
home
undo
=
s_find
iswitch
c_endcurl
pgup
pgdown
?i
home
redo
bot
s_find
left40
right40
delay.home
s_find
quit
save
backward
forward
file
top
bot
flquit
flfile
filter $xhome/filters/hp/toggle_comment
prevword
nextword
Erase end of field (3270 EOF)
Erase all field (3270 EAF)
complete
complete Reverse
nexterror
c_dup
smart_comp $name 1
smart_compd $name 1
f $fn * $fd
s_man
c_lineadd
smart_comp $name 0
c_linedel
SEDIT and S/REXX Reference Manual
Page 689
HP
Appendix A: keyboard layouts
^e
^f
^g
^h
^l
^m
^n
^p
^r
^s
^t
^u
^v
^w
^x
^z
Page 690
c_apltrace
f
smart_compd $name 0
c_scrh
s_lower
match
f $fn *
shell lp $name &
tree
c_split
tree
s_upper
c_scrv
c_scrj
s_xed
left0
SEDIT and S/REXX Reference Manual
Appendix A: keyboard layouts
WINDOWS
WINDOWS Keyboard Mapping
Escape
Shift-Escape
F1
F2
F3
F4
F5
F6
F7
F8
F9
F10
F11
F12
S-F1
S-F2
S-F3
S-F5
S-F6
S-F7
S-F8
S-F9
S-F11
C-F1
C-F3
C-F7
C-F8
C-F10
META-F7
META-F8
R1
R2
R5
R6
R7
R9
C-Left-Arrow
C-Right-Arrow
s_R1
S-R2
S-R6
S-R9
C-R1
C-R6
^a
^c
^d
^f
^h
Erase end of field (3270 EOF)
Erase all field (3270 EAF)
S_FIND
C_LINEADD
SAVE
C_SPLIT
SWITCH
C_ENDLINE
BACKWARD
FORWARD
?
HOME
UNDO
=
S_FIND
C_EXT
FILE
ISWITCH
C_ENDCURL
PGUP
PGDOWN
?I
REDO
S_FIND
FLFILE
LEFT40
RIGHT40
DELAY.HOME
S_LSHIFT
S_RSHIFT
AQUIT
COMPLETE
C_STARTLINE
BACKWARD
C_ENDLINE
FORWARD
PREVWORD
NEXTWORD
FLQUIT
COMPLETE REVERSE
TOP
BOT
FLQUIT
FILTER $xhome\filters\wnt\toggle_comment
S_SET ALL
S_COPY
C_LINEDEL
FLIST
C_SCRH
SEDIT and S/REXX Reference Manual
Page 691
WINDOWS
^l
^m
^n
^p
^q
^r
^s
^t
^u
^v
^w
^x
^z
^C
^F
^G
^H
^L
^M
^N
^R
^V
^X
^^=
Page 692
Appendix A: keyboard layouts
S_LOWER
MATCH
F "$fn" *
PRINTFILE
AQUIT
TREE
DY_SAVE
TREE
S_UPPER
S_PASTE SHELF
C_SCRJ
S_CUT
UNDO
smart_comp $name 0
FLOW
smart_compd $name 0
S_HELP
LEFTADJUST
MATCH CURSOR
F "$fn" * "$fd"
RIGHTADJUST
S_PASTE SHELF OVERLAY
S_XED
NEXTERROR
C_DUP
SEDIT and S/REXX Reference Manual
Appendix A: keyboard layouts
Character Mode
Character Mode Terminals Mapping
Escape
F1
F2
F3
F4
F5
F6
F7
F8
F9
F10
F11
F12
Control-a
Control-b
Control-c
Control-d
Control-e
Control-f
Control-g
Control-h
Control-i
Control-j
Control-l
Control-m
Control-n
Control-o
Control-p
Control-r
Control-t
Control-u
Control-v
Control-w
Control-x
Control-y
Control-z
Erase end of field (3270 EOF)
Quit
NEXTerror
Save
C_SPLIT
SWitch
C_ENDLine
BAckward
FORward
?
CURsor Home
UNDO
=
C_LINEAdd
C_STARTS
smart_comp $name 0
C_LINEDel
C_ENDS
f
smart_compd $name 0
Backspace
NEXT-FIELD
UP-FIELD
command separator
Return or Enter
C_ENDSR
S_COpy
shell lpr -h $name &
REFRESH Clear
enters the tab character
S_Upper
C_SCRV
C_SCRJ
S_Xed
S_Paste
Left 0
SEDIT and S/REXX Reference Manual
Page 693
Character Mode
Page 694
Appendix A: keyboard layouts
SEDIT and S/REXX Reference Manual
Appendix B: Hardware string
Appendix B: Hardware String
Within this manual, arch or $arch is the following hardware dependent string:
SUN SunOS
sun4
SUN Solaris (sparc)
SUN Solaris (PCs)
IBM RS/6000
Hewlett Packard
sparc
i86pc
ibm
hp
SiliconGraphics
SCO PC systems
Linux PC systems
sgi
sco
linux
Unixware PC systems
DEC/COMPAQ/HP Alpha
systems
Siemens RM systems
Windows systems
SEDIT and S/REXX Reference Manual
uxw
TRUE64 alpha
sinix
wnt
Page 695
Appendix B: Hardware string
Page 696
SEDIT and S/REXX Reference Manual
SEDIT RELEASE NOTES
SEDIT Release Notes
This appendix highlights SEDIT enhancements since the release of version 3.50
The 3.60 File Editor Enhancements
New Commands
•
•
•
•
•
•
•
•
•
•
•
•
•
•
•
•
•
•
•
•
•
•
•
•
•
•
•
•
•
•
•
ARBCHAR
DOSFILE
DOSSAVE
DUPLICAT
DY_ALL
DY_EXCLUDE
DY_FIND
DY_FONT
DY_OPEN
DY_SAVE
DY_SHOW
ESCAPEDELAY
EXCLUDE
FLATH
HEX
ISOCONV
MBUTTON
METAKEY
MODE TOPLINE
MODE CURSOR
MODE GET
PRESERVE
READSCREEN
RELOAD
RESTORE
SHOW
SOS INS
SOS BAKSPACE
S_HELP
XTESTCHARS
WRAP
Miscellaneous
• $ command substitution can be escaped with a backslash. See Avoiding Variable
Substitution on page 150.
• All directory related commands accept the ~user C-Shell syntax: typing
SEDIT and S/REXX Reference Manual
Page 697
SEDIT RELEASE NOTES
•
•
•
•
•
•
•
•
•
•
•
•
•
•
•
cd ~john will switch to john’s home directory, as described in the
/etc/passwd file.
Error messages are displayed on a specific field.
New ARBCHAR/ENVIRON/FILE/MATCH/WRAP EXTRACT operands.
The UNDO command accepts a parameter.
The Ch command is renamed Change. CHANGE allows the user to insert a string in
the first zone column, and supports hexadecimal specification when HEX is ON.
The SCh command is renamed SChange.
The TOP OF FILE line is a virtual 0 line, allowing the user to insert data before the
first line in the file. Since this is an incompatible change with the previous SEDIT
release, the MODE command allows the user to set the TOP OF FILE line to 1.
The AUTOI command is renamed AUTOIndent.
The MODE Change command is renamed into MODE CHange.
The SET command allows the user to program the keyboard arrow keys.
The VERIFY command allows the user to enable the new fullshift mode.
The GET command allows the user to specify the number of lines to be inserted.
The GET_PANEL command allows the user to specify a field intensity, a cursor
location and a refresh mode.
The SAVE and FILE commands respect the owner and the group of the saved file.
The MOTIF version returns the focus keyboard to the window that had the focus at
SEDIT initialization.
S/REXX MOTIF and OPENLOOK dialog facilities.
The 3.60 Directory Editor Enhancements
• The length of the filename zone is variable, allowing full display of longer file names.
• The file related permissions display may be switched off by typing ^a, or by using
the SEDIT FLATH command.
• New DIFF built-in command.
The 3.60 Tree Editor Enhancements
• New button SCAN ALL.
• Initial scanning hides subdirectories belonging to different file systems.
Page 698
SEDIT and S/REXX Reference Manual
SEDIT RELEASE NOTES
The 4.0 File Editor Enhancements
New or Enhanced Commands
• ALL
• AQUIT
• BACKWARD
• BOUNDS
• BUILTIN
• CAPS
• CANCEL
• CHANGE
•CLEARERRORS
• CN
• COLOR * and COLOR CURSOR
• COPY
• COUNT
• CTLCHAR
• CREATE
• DELETE
• DUPLICAT
• EDIT
• END
• EXCLUDE
• FIND
• FINDUP
• FORWARD
• HELP
• HEXTYPE
• HISTORY
• IMPCMSCP
• LASTLORC
• LOCATE
• LOWERCAS
• MACRO
• MODE
• MOVE
• MOUSEMODE
• NFIND
• NFINDUP
• NUMBER
• POINT
• PQUIT
• PREFIX
• PRESERVE
• PRINTSCREEN
• RESERVE
SEDIT and S/REXX Reference Manual
Page 699
SEDIT RELEASE NOTES
• PUT
• QUIT
• READ
•READSCREEN
• REPEAT
• RESTORE
• RESERVED
• SET
• SC
• SCN
• SELECT
• SHIFT
• SPAN
• STACK
• STAY
• S_PASTE
• UPPERCAS
• VARBLANK
• VERIFY
• XCSHELL
• XKSHELL
Miscellaneous
• New /CTLCHAR/IMPCMSCP/MACRO/NUMBER/POINT/PREFIX/RESERVED
/SOURCE/SPAN/VARBLANK/STAY/ENTER/LASTLORC/NBSCOPE/MOUSEMO
DE/CMDLINE EXTRACT operands.
• EXTRACT/SELECTION/ returns a different set of values.
• EXTRACT VERIFY returns 3 strings instead of 2.
• VERIFY accepts ON and OFF as parameter.
• PRESERVE and RESTORE save and restore new settings.
• A logical operator within an ALL target must be enclosed within delimiters. The
previous SEDIT release accepted a search string such as "/str|/str2". You must
now type "/str/|/str2".
• DISplay is renamed into DISPlay.
• Left is renamed LEft.
• MOde renamed MODe.
• MEnu renamed MENu.
• Put renamed PUT.
• SHell renamed SHEll.
• SETP without parameters frees the last window line.
• General XEDIT targets. * is now a target that cannot be used as a comment within an
internal macro: the user will have to edit all its previous internal macros, and
replace the * comment sign with the # comment sign.
• The various CHANGE commands are no longer restricted by the VERIFY setting.
• Commands and macros are parsed up to the first non-alphabetic character.
"SCREEN1" is treated as "SCREEN 1". In order to call macros ending with a
Page 700
SEDIT and S/REXX Reference Manual
SEDIT RELEASE NOTES
•
•
•
•
•
•
•
•
•
•
•
•
•
•
•
•
•
numerical character, such as set_sun_t5, the new MACRO command must be
used. Entering "set_sun_t5" will fail. The user must enter "MACRO
set_sun_t5" instead.
When more than one message is issued from a macro, SEDIT creates a new file in
the editing ring displaying all the messages.
The /home/xed/xedit scrip allows the user to start SEDIT using the
/home/xed/prof_xedit.sedit profile, which initializes SEDIT with the
same default settings as XEDIT default settings.
The -p option allows the use of shortened profile names: "sedit -p foo" is the
same as "sedit -p foo.sedit".
The CURLINE command accepts an optional ON keyword.
The XED command is renamed into XEDit.
RXD graphical debugger support.
The NEXT and UP commands return 1 when the end or top of a file is reached.
QUIT is now the same as QQUIT. However, the standard profile file makes QUIT a
synonym to the new AQUIT command, which performs in the same way as the QUIT
command under SEDIT 3.60.
The SET command permits the user to define the ENTER key, and recognize the
XEDIT AFTER/ONLY/IGNORE/BEFORE keywords. Note that SET F1 string is
now treated as SET F1 BEFORE string. The previous SEDIT release treated all
key definitions as ONLY definitions. To define the same key action as SEDIT 3.60,
the user should enter SET F1 ONLY string.
In earlier versions, QUERY was ignored since every SEDIT command without
parameters returned its status. In this release, QUERY is defined in the same way as
in XEDIT and accepts a limited number of parameters, the same ones as XEDIT
QUERY.
The NEXTERROR command finds the lines in error even when the user adds or
deletes lines.
GET_PANEL saves the mouse position in the MOUSE environment variable, and the
cursor position in the CURSOR environment variable.
PRINTSCREEN allows the user to specify a default printer.
HELP supports S/REXX help files.
LINUX support.
The -np option suppresses the profile execution at initialization.
The -font option accepts a fontname starting with a -.
The 4.0 Directory Editor Enhancements
• The file size field is larger.
• New ^xx commands.
The 4.0 Tree Editor Enhancements
• TREESCANLEVEL command.
SEDIT and S/REXX Reference Manual
Page 701
SEDIT RELEASE NOTES
The 4.10 File Editor Enhancements
New or Enhanced Commands
•
•
•
•
•
•
•
•
•
•
•
•
•
•
•
•
•
•
•
•
•
•
•
•
•
•
•
•
•
CENTER
CHANGE
COLOR
DY_OPEN
DY_SAVE
FOLLOW
FLOW
FORMAT
GET
LEFTADJUST
MARGINS
MATCH
MODE
MOUSEMODE
NUMBER
NUMBER_SCREEN
PREFIX
PREFIX_SCREEN
PRINTSCREEN
PUT
RFLIST
RIGHTADJUST
SCALE
SCALE_SCREEN
SYNTAX
TABLINE
TABLINE_SCREEN
VERIFY
VERIFY_SCREEN
Miscellaneous
• New /FORMAT/MARGINS/ EXTRACT operands.
• SEDIT supports 62 colors.
• The background and foreground colors are no longer set by modifying the BLACK
and WHITE colors. Use COLOR BACKGROUND R G B and COLOR FOREGROUND
R G B for that purpose. This is an incompatible change with previous SEDIT
releases. The user will have to edit all its previous macros using the COLOR
WHITE or COLOR BLACK commands.
• Syntax coloring.
• The /NUMBER/PREFIX/SCALE/TABLINE/ZONE/ settings are both file and
view dependent.
• Text formatting capabilities.
• When the screen is split with the ’screen N’ or ’screen N V’ command, this
Page 702
SEDIT and S/REXX Reference Manual
SEDIT RELEASE NOTES
•
•
•
•
•
•
•
•
•
command will be applied automatically every time the window is resized.
MOUSEMODE FULLMOTIF assigns the cursor motion function to the first mouse
button.
PENDING prefix commands are displayed in the function keys help field.
The userid is displayed at the top of the SEDIT window.
MODE EXPAND ON ENV makes SEDIT search for UNIX environment variables
within commands. MODE EXPAND OFF disables completely any variable
substitution.
Used with ARBCHAR and ZONE, the CHANGE command can remove a set of
columns.
The PUT and GET commands can be used with native UNIX file names.
C_ENDLINE extends the line if necessary.
Directory symbolic link resolving can be disabled with the FOLLOW command.
SUN’s SunView and IBM’s WORKBENCH are no longer supported.
The 4.10 Directory Editor Enhancements
• Better pattern matching, with ? meta character support.
• Regular expression pattern matching.
The 4.10 Tree Editor Enhancements
• TREE supports the Home, End, PageUp and PageDown function keys.
• The PRINTSCREEN command changes the default TREE printer and printing
daemon.
SEDIT and S/REXX Reference Manual
Page 703
SEDIT RELEASE NOTES
The 4.20 File Editor Enhancements
New or Enhanced Commands
•
•
•
•
•
•
•
•
•
•
•
•
•
•
•
•
•
•
ACCESS
BACKUP
DRELEASE
DY_LASTFILES
FD
FLDATE
FLPP
FN
FORMAT
FT
GLOBALCASE
LASTFILES
POWERINPUT
PRINTFILE
RELEASE
SCKEYS changes the confirmation keys used by SCHANGE.
SHOWPATH
SHOWCDPATH
Miscellaneous
• SAVE error messages are displayed in the editing ring.
• When MOUSEMODE is set to MOTIF or FULLMOTIF, rectangular selections can be
pasted with the second mouse button.
• PRIntscreen renamed into PRINTScreen.
• The backup string (% by default) can be changed with the BACKUP command.
• The SHIFT command, and the <, >, <<, and >> prefix commands affect text from
the left zone column.
• When the STRING keyword is not used in a SYNTAX file, the quote and double
quotes characters are not treated as the start of a string.
• WINDOWS NT and WINDOWS 95 support.
• The POWERINPUT mode supports characters inserted in the middle of a line.
• The search for a file in the path does not stop when finding a directory with the same
name as the requested file.
• C_LINEADD scrolls down one line when the cursor is on the last displayed line.
• S/REXX macros are enabled without an S/REXX license.
Page 704
SEDIT and S/REXX Reference Manual
SEDIT RELEASE NOTES
The 4.20 Directory Editor Enhancements
• FLIST displays a ".." string. Clicking on it initiates a new FLIST level upon the
parent directory.
• Shift-F2 and ^M generate an SEDIT file with the full names of the files displayed
within FLIST.
• FLIST can display dates in US format.
The 4.20 Tree Editor Enhancements
• ^s (and FIND on Sun keyboards) searches for a directory.
• The UP and DOWN arrow keys scroll the view.
SEDIT and S/REXX Reference Manual
Page 705
SEDIT RELEASE NOTES
The 4.30 File Editor Enhancements
New or Enhanced Commands
•
•
•
•
•
•
•
•
•
•
•
•
•
•
•
•
•
C_ENDSALL
DY_FILL
LINECOL
MBUTTON
MENU
MENUBAR
NEXTWORD
PREVWORD
PRINTFILE
RELOAD
REPEATDELAY
SET
SORT
SOS
S_SET
STAMPDELAY
VISIBLE
Miscellaneous
• New /VISIBLE/ EXTRACT operands.
• Alt-cc (or Meta-cc) keys can be programmed.
• The line and column corresponding to the cursor position are displayed, as well as the
hexadecimal value of the character on the screen.
• Files describing a menu can reference another file.
• PRINTFILE prints only the visible part of the file defined with the ALL command.
• SORT sorts only the visible part of the file defined with the ALL command.
• Pressing the first button mouse on the field located between the prefix fields and the
data fields selects a whole line.
• O and OO prefix commands.
Page 706
SEDIT and S/REXX Reference Manual
SEDIT RELEASE NOTES
The 4.30 Directory Editor Enhancements
• ? displays the last command.
• The total size of the displayed files is displayed on the first line.
The 4.30 Tree Editor Enhancements
• New CLONE menu option.
SEDIT and S/REXX Reference Manual
Page 707
SEDIT RELEASE NOTES
The 4.40 File Editor Enhancements
New or Enhanced Commands
•
•
•
•
•
•
•
•
•
•
•
•
•
•
•
•
•
•
•
•
•
•
•
•
•
•
•
AUTOBIN
BEEP
BINARY
CASE
CHANGE
CURSOR
CN
EXIT
EXTRACT
FLOW
FMACRO
KEEPBLANKS
POWERINPUT
RCHANGE
SCHANGE
SCN
SET
SHBLANK
SRCHANGE
SORT
SYNONYM (QUERY SYNONYM)
SYNTAX for COBOL files (SEDIT 4.40B and above)
VERIFY_KSAVE
VERIFY_SSAVE
VERIFY_SAVE
XBIN
XKB
Miscellaneous
• The SORT and the various CHANGE commands case sensitivity is tailored by the
CASE command.
• Binary files editing.
• New /BINARY/KEEPBLANKS/RMATCH/SHBLANK/SYNONYM EXTRACT
operands.
• An internal or S/REXX macro can use the NULL character.
• The POWERINPUT mode has been enhanced, and is now a file related setting.
• xinfo is a graphical utility, and can be used on remote clients.
• The license server is supported on WINDOWS NT systems.
• The EXTRACT command can be replaced with the extract built-ins, such as the
arbchar.0() built-in. See Using EXTRACT on page 144 for more information.
• EXTRACT/CMDLINE/ also returns the command line content.
• EXTRACT/CURSOR/ also returns the line position of the cursor in the file when the
cursor is on the corresponding prefix field.
Page 708
SEDIT and S/REXX Reference Manual
SEDIT RELEASE NOTES
• CURSOR can place the cursor at the start of a prefix field.
• Function keys can be specified with several modifiers held down, and SET uses
symbolic names like LeftArrow. See the SET command.
• Bookmarking with the ^nn keys. See the section Using Function Keys for more
information.
• KEDIT-like keyboard personality with the kedit command (UNIX) or icon
(WINDOWS).
• S/REXX syntax error messages are displayed within the SEDIT window.
The 4.40 Directory Editor Enhancements
• XBIN and XKB commands.
• The file size field is no longer limited to 2 Gb.
• S/REXX macros (see page 478).
SEDIT and S/REXX Reference Manual
Page 709
SEDIT RELEASE NOTES
The 4.50 File Editor Enhancements
New or Enhanced Commands
• DFLIST
• FFLIST
• MESSAGESDIR
• RECYCLE
• SAVECLEARUNDO
• SET ? displays all the editor settings.
• SHOWHISTORY
• SORTRING
• SOS INSERT
• STATUS
• S_COPY
• S_PASTE
• XCSHELL
• XKSHELL
• XSHELL
• XSHELLMAX
•XSHOWHISTORY
Miscellaneous
•
•
•
•
-batch option. See Using the BATCH Option on page 146.
New /INSERT/XSHELL/WIDTH/ EXTRACT operand.
The command field extends automatically to 2 lines when needed.
The history commands can search for commands starting with a given letter.
The 4.50 Directory Editor Enhancements
• On WINDOWS systems, when RECYCLE is ON, removing files places them in the
recycle bin.
• The command fields expand to 2 lines when needed.
• Sorting files is done in reversed order when using the shift key.
• Control-HOME and Control-END scroll to the first and last file.
• On WINDOWS systems, the HOME and END keys move the cursor to the start and
the end of the typed string. See FLIST function keys description page 464 to achieve
the same functionality on UNIX systems.
• WIPE macro.
• DFLIST only displays directories.
• FFLIST only displays non-directories.
The 4.50 Tree Editor Enhancements
• On WINDOWS systems, when RECYCLE is ON, removing files or directories places
them in the recycle bin.
Page 710
SEDIT and S/REXX Reference Manual
SEDIT RELEASE NOTES
The 4.60 File Editor Enhancements
New or Enhanced Commands
•EXTRACT
•FONT
Miscellaneous
• New /FONT/CLIPBOARD/ EXTRACT operand.
• Clicking with the first mouse button on the scale line changes the first VERIFY
setting to the corresponding column. This allows to scroll the file display to the right
up to this column.
• with non-US keyboards, it is necessary to remove the default right ALT key
"down_field" assignment.
This is achieved by adding in the profile the "set down_field" command after
the architecture dependent "set_xxx" keyboard setting macro has been called. On
IBM stations for example, the keyboard setting macro is "set_ibm".
Using "set down_field" replaces the obsolete
"setenv SEDIT_META_ON_RIGHT" syntax.
• Files with a large number of lines (100,000+) load much faster.
The 4.60 Directory Editor Enhancements
• The CP, MV and DIFF commands used without arguments bring the filename,
filetype and the = sign on the corresponding command line, allowing easy editing.
• BOTTOM and TOP commands.
The 4.70 File Editor Enhancements
New or Enhanced Commands
• ALT
• EXTRACT/SELECT/
• COLOR EDITED
•LIMIT
• SELECTALL
Miscellaneous
• A large file is a file larger than 2,147,483,647 bytes. SEDIT supports large files on
the operating systems displayed when typing HELP LARGEFILES.
The 4.70 Directory Editor Enhancements
• A large file is a file larger than 2,147,483,647 bytes. SEDIT supports large files on
the operating systems displayed when typing HELP LARGEFILES, and FLIST
displays correctly large files length.
The 4.70 Tree Editor Enhancements
• WIPE menu option.
SEDIT and S/REXX Reference Manual
Page 711
SEDIT RELEASE NOTES
The 4.80 File Editor Enhancements
New or Enhanced Commands
• EXTRACT /REClevel/XEDlast/
• NSORT
• WINSHRinktofit
Miscellaneous
• .With files like "aaa.bbbb.c", the filename is "aaa.bbbb" and the filetype is
"c".
The 4.80 Directory Editor Enhancements
• .With files like "aaa.bbbb.c", the filename is "aaa.bbbb" and the filetype is
"c".
The 5.00 File Editor Enhancements
New or Enhanced Commands
•
•
•
•
•
•
•
•
MOUSEMODE
PRINTFILE (WINDOWS, SEDIT 5.01)
RTLF
SHELLEXT
SYNTAX
WHEEL
PRNOPAR (WINDOWS, SEDIT 5.05)
RTLF no longer useful (WINDOWS, SEDIT 5.05)
Miscellaneous
•
•
•
•
•
•
•
Mouse wheel support (WINDOWS).
"variable object" in SYNTAX file.
CD menubar item (WINDOWS).
FLIST -> Browse menubar item (WINDOWS).
64 bit Version (WINDOWS).
Symbolic links support on WINDOWS (SEDIT 5.01).
UNC Name Syntax (file names similar to "\\server\share\file_path")
supported on Windows (SEDIT 5.04).
The 5.00 Directory Editor Enhancements
• .O command
• WINDOWS default execute on clicking files whose filetype is defined by
SHELLEXT
Page 712
SEDIT and S/REXX Reference Manual
S/REXX RELEASE NOTES
S/REXX Release Notes
This appendix highlights S/REXX enhancements since the release of version 1.0.
1.10 Enhancements
Enhanced Built-in Functions
• ARG
• CHARIN
• DATE
Miscellaneous
• ISPF-like tables.
• Programming Interface.
• { and } support.
1.20 Enhancements
New or Extended Instructions
• DO
• EXECIO
• OPTION
New Built-in Functions
•
•
•
•
•
•
•
•
•
•
•
•
•
•
•
•
•
•
DY_BUTTON
DY_DESTROY
DY_END
DY_INPUT
DY_LABEL
DY_MAP
DY_SINPUT
DY_START
DY_STG
DY_TG
DY_UNMAP
DY_VINPUT
DY_VTG
MKDIR
RM
TEE
SLEEP
USLEEP
SEDIT and S/REXX Reference Manual
Page 713
S/REXX RELEASE NOTES
Enhanced Built-in Functions
• STATE
Miscellaneous
• When SIGNAL ON NOVALUE is in effect, and a variable which has not been assigned
a value is used, an error 71 occurs when the NOVALUE label is not defined.
• Floating S/REXX licenses.
• VM/CMS EXECIO support.
• Dialog management.
• ccsr allows the user to compile a program.
2.00 Enhancements
New or Extended Instructions
• ADDRESS
has been extended to include the C shell or the Korn shell as command
destinations.
•OPTION
New Built-in Functions
•CHANGE
• CSH
• DY_CH
• DY_VCH
• KSH
• SH
• TEEC
• TEEK
Miscellaneous
•
•
•
•
Page 714
Bracket indexing.
RXD graphical debugger support.
The dialog boxes can be used in standalone REXX shells.
CUSERID() accepts a parameter.
SEDIT and S/REXX Reference Manual
S/REXX RELEASE NOTES
2.10 Enhancements
New or Enhanced Built-in Functions
•
•
•
•
•
•
•
•
•
•
•
•
•
•
•
•
•
•
•
•
•
•
•
DY_ASCL
DY_BEEP
DY_BUTTON
DY_BUTTON_COLOR
DY_CH_COLOR
DY_DSCL
DY_FOCUS
DY_INPUT
DY_INPUT_COLOR
DY_LABEL
DY_LABEL_COLOR
DY_OPEN
DY_PSCL
DY_RSCL
DY_SCL
DY_SCL_COLOR
DY_SSCL
DY_TG_COLOR
DY_VSCL
SORT
SUBDIRS
TBOPEN
TCSH
Miscellaneous
• Dialog scrolled lists.
• When OPTION NOLOAD is in effect, S/REXX searches for external subroutines, and
executes them in a different subprocess. See Using OPTION NOLOAD on page 501.
• The .srexxrc and sedit.srexxrc files tailor the default settings. See Setting
Default Options for SEDIT REXX Macros on page 502.
• MOTIF dialog items can be colored individually.
• The DISKI and DISKD EXECIO options allow the insertion and removal of lines
from a file.
• ADDRESS supports the tcsh option.
• The license server is supported on WINDOWS NT systems.
SEDIT and S/REXX Reference Manual
Page 715
S/REXX RELEASE NOTES
2.20 Enhancements
New or Enhanced Built-in Functions
•
•
•
•
•
•
•
•
•
•
•
•
•
CLOSE_CONS
CONCAT
CP or COPY
DEL or RM
DIR or LS
DY_PRINTER
DY_SLABEL
DY_WARP
FILECONV
GETPID
MV or RENAME
OPEN_CONS
RMDIR
Miscellaneous
• The PATH environment variable is parsed every time an external routine is called.
• WINDOWS NT and WINDOWS 95 support.
• Specific double click reason code for scrolled lists.
2.30 Enhancements
New or Enhanced Built-in Functions
•
•
•
•
•
•
•
•
•
•
•
•
•
•
•
•
•
•
Page 716
ACOS
ASIN
ATAB
COS
CVTAILS
DATE
DESBUF
DROPBUF
DY_END
DY_OPEN
DY_SCH
EXECIO
MAKEBUF
SENTRIES
SIN
STATE
SCRIPT
TAN
SEDIT and S/REXX Reference Manual
S/REXX RELEASE NOTES
Miscellaneous
•
•
•
•
env_rx2() new programming interface.
RENAME() and MV() work across file systems.
The background color can be specified with DY_END() and DY_OPEN().
The C API applies to the MOTIF msrexx or the WINDOWS wsrexx.exe
version.
2.40 Enhancements
New or Enhanced Built-in Functions
•
•
•
•
•
•
•
•
•
•
•
•
•
•
•
•
•
•
•
•
•
•
•
•
•
•
•
•
•
•
•
•
•
•
•
•
ACCEPT
BIND
C2O
CHARIN
CLEAR
CLOSESOCKET
CLS
CONNECT
CPUID
DATE
FOLLOW
FORK
FLFILES
GETFILE
GETHOSTBYADDR
GETHOSTBYNAME
GETHOSTID
GETPEERNAME
GETSOCKNAME
GETSOCKOPT
IOCTL
KILL
LINEIN
LISTEN
QPID
RECV
RECVFROM
REGISTRY_DEL
REGISTRY_GET
REGISTRY_KEYS
REGISTRY_SET
REGISTRY_VALUES
SELECT
SEND
SENDTO
SERVICE_CREATE
SEDIT and S/REXX Reference Manual
Page 717
S/REXX RELEASE NOTES
•
•
•
•
•
•
•
•
•
•
•
•
•
•
•
•
•
•
•
•
•
•
•
•
•
•
•
•
•
•
•
•
•
•
•
•
•
•
•
•
•
•
•
•
•
•
Page 718
SERVICE_DELETE
SERVICE_START
SERVICE_STATUS
SERVICE_STOP
SETSOCKOPT
SHUTDOWN
SOCKAC52CEPT
SOCKBIND
SOCKCLOSE
SOCKCONNECT
SOCKDROPFUNCS
SOCKET
SOCKGETHOSTBYADDR
SOCKGETHOSTBYNAME
SOCKGETHOSTID
SOCKGETPEERNAME
SOCKGETSOCKNAME
SOCKGETSOCKOPT
SOCKINIT
SOCKIOCTL
SOCKLISTEN
SOCKLOADFUNCS
SOCKPSOCK_ERRNO
SOCKRECV
SOCKRECVFROM
SOCKSELECT
SOCKSEND
SOCKSENDTO
SOCKSETSOCKOPT
SOCKSHUTDOWN
SOCKSOCKET
SOCKSOCK_ERRNO
SOCKSOCLOSE
SOCKVERSION
STATE
STIME
SYSCLS
SYSFILEDELETE
SYSFILESEARCH
SYSFILETREE
SYSGETKEY
SYSMKDIR
SYSRMDIR
SYSSEARCHPATH
SYSSETPRIORITY
SYSSLEEP
SEDIT and S/REXX Reference Manual
S/REXX RELEASE NOTES
•
•
•
•
•
SYSTEMPFILENAME
SYSVERSION
UTIME
VERSION
WAITPID
Miscellaneous
• The S/REXX Debugger supports function keys, and various new commands.
• The S/REXX Debugger runs on WINDOWS systems.
• On WINDOWS systems, the EXECIO PRINT command and the dialog box
management are supported by both srexx.exe and wsrexx.exe.
• An S/REXX program can be used as a standard input filter. See the LINEIN() and
CHARIN() functions for more information.
2.50 Enhancements
New or Enhanced Built-in Functions
•
•
•
•
•
•
DY_HEADER
DY_REFRESH
DY_OPEN: several filters can be specified by using a ; separator.
KILL
RECYCLE
WIPE
Miscellaneous
• GLOBALV support.
• OPTION GLOBALV NOGLOBALV.
• The WINDOWS environment supports the ASSOC CLS COPY DEL ERASE FTYPE
MD MOVE RD REN RENAME START TIME TYPE VER VERIFY VOL DOS
commands.
• On WINDOWS systems, anysrexx.exe and anywsrexx.exe can be used for
automatic execution of an S/REXX program.
• srexx fname searches fname in the PATH.
2.60 Enhancements
New or Enhanced Built-in Functions
• EXEC
• GETDISKSPACE
• LSTATE (see the STATE() built-in)
Miscellaneous
• ADDRESS EXEC
• The WINDOWS environment also supports the DIR DOS commands.
• "123"[4:] returns an empty string instead of reporting an index error.
SEDIT and S/REXX Reference Manual
Page 719
S/REXX RELEASE NOTES
2.70 Enhancements
Miscellaneous
• When the query to the system succeeds, STATE() and LSTATE() set the RC REXX
variable to 0.
When the query fails, STATE() and LSTATE() return 0, and set RC to a string
describing the error.
2.80 Enhancements
New or Enhanced Instruction
• SAYR
• TRACE
• UPPERW
New or Enhanced Built-in Functions
•
•
•
•
•
ARG
EXECV
FWC
LN
FN and FT:
with files like "aaa.bbbb.c", the filename is "aaa.bbbb" and the
filetype is "c".
• SORT
Miscellaneous
• When the query to the system succeeds, STATE() and LSTATE() set the RC REXX
variable to 0.
When the query fails, STATE() and LSTATE() return 0, and set RC to a string
describing the error.
• "CALL SORT TAB" does not return an error if tab.0 is 0
3.00 Enhancements
New or Enhanced Built-in Functions
•
•
•
•
•
•
•
•
•
•
•
•
Page 720
ActivateKeyboardLayout (S/REXX 3.02)
ARG
CHANGE
COMMA
GetAdaptersInfo (S/REXX 3.01)
INDEX
LN (S/REXX 3.01)
ISMAIN
MKLISTFILES
POS
RCHANGE
SYSTEM
SEDIT and S/REXX Reference Manual
S/REXX RELEASE NOTES
• ShellExecute
• DY_FOLDER
Miscellaneous
• Symbolic links support (S/REXX 3.01).
• UNC Name Syntax (file names similar to "\\server\share\file_path")
supported on Windows (S/REXX 3.03).
SEDIT and S/REXX Reference Manual
Page 721
S/REXX RELEASE NOTES
Page 722
SEDIT and S/REXX Reference Manual
Index
Index
B
Symbols
! special meaning in mainframe procedures
.cshrc 2, 462
.exe
executing on WINDOWS 468
.srexxrc 502, 505
{ using 507
} using 507
/etc/group 331
/etc/passwd 331
/home/xed 1, 15, 447
% backup file ending with 158
~ on Windows 32, 37, 514, 521
$cdpath 2
3270 simulation layout 680, 681
497
A
adding a directory to the path 151
adding a line 59, 65, 71, 77, 83,
95, 107, 152,
214, 683, 685, 687, 689, 693
address 512, 513, 647
APL
compressing 197
displaying a nested array 44
displaying a stop 211, 416
displaying a trace 211, 433
editing UNIX files 54
inserting an object 280
keyboard layout 679
keyboard mode 42
passing command to 154
saving in ./APLOBJ 375
setting a stop 211, 416
setting a trace 211, 433
APLOBJ 375
aquit
initial synonym value 349, 418
arbitrary character 150, 155, 251
arch 141, 149, 244, 245, 535, 647, 667, 695
arrow keys 390
ASCII terminals 8, 132, 212, 213, 216, 344, 345,
356
ASCII terminals and reverse video characters
auto-binary feature 156
autoexpand feature 156
auto-indent feature 157, 394
automounted directories
not displaying the real name 276
auto-repeat delay 360
autosave 158
SEDIT and S/REXX Reference Manual
291
background color 2
backquotes 507
backspace
setting the key for ASCII terminals 396
backup file 158
backup string 158
batch 46, 49, 146
beep 159, 292
beeping 544
binary files
detecting 156
editing 445, 448
setting mode 160
blanks
backup string with 158
directories with 151, 166, 217, 260, 460
files with 275, 279, 446
bracket indexing 508
button color 545
buttons 52, 162, 313, 436
Bye macro 135
C
C 194
C++ 194
caps-lock key 42
case 164, 165
global file case handling 285
handling during a search 165
ccsr 495, 714
cdpath 2, 151, 166, 217, 224, 246
centerline 169, 170, 171
change directory 514, 539
changing
file directory 260
filename 275
filetype 279
changing a name 380
changing a string 173, 182, 350, 377, 411
changing an hexadecimal target 288
changing default options 502, 505
changing directory 166, 217
changing the backup string 158
changing the time and date 613
choice color 546
clearing the screen 356, 539, 613
closing the WINDOWS console 101, 181
cobol 337, 419, 420
codecenter 489
Page 723
Index
color
disabling/enabling 184
resetcolor macro 190
reverse video 190
setting the background 2
setting the buttons 7
setting the field colors 184
setting the menu 7
setting the popups 7
setting the RGB value 184
setting the scrollbars 7
the directory editor 185
the tree editor 185
using a grey scale monitor 2
command field 52
command line
restoring 181, 210, 292, 454, 455
retrieving the location 246
setting the position 181
command line options (UNIX) 46
command line options (WINDOWS) 49
comment 455
commenting C programs 264
compatibility issues 31
compiling 59, 65, 71, 77, 83, 84, 90,
rxd 674
SEDIT (UNIX) 39
SEDIT (WINDOWS)
D
data field 51
date format within FLIST 271
date, changing 613
debugger 532, 533, 671
delay 220
delete directories 588, 617
delete files 543, 588
deleting a directory 484
deleting a line 59, 65, 71, 77,
95, 102,
192, 329
compiling an S/REXX program 495, 714
completion 196
concatenate files 540
console 142, 532
closing the WINDOWS console 101, 181
console window 142, 181, 532, 539, 578
control character 207, 362
control-line-feed key 132, 149, 302, 388, 394, 682
copying a line 108, 110, 115, 198
copying files 540
counting string occurrences 200
cpu id 4, 541
ctags 205
current line 52, 209
cursor
duplicating cursor line 212
ending a rectangular selection 213
ending a selection 212, 213
ending a selection at the end of the line 213
moving between screens 407
moving in a macro 210
moving to the command line 58, 63, 69, 76, 82,
95, 97, 181, 210, 220, 292, 687,
693
moving to the end of line 57, 63, 69, 75, 81, 95,
683, 685, 693
moving to the next word 329
moving to the previous word 341
starting a selection 216
Customizing 674
customizing
Page 724
40
84, 95, 107, 116,
214, 683, 688, 689, 693
deleting the selection on WINDOWS 127
desbuf 514
dialog management 46, 544, 546, 549, 561, 563,
564, 627, 631, 676
direct input field 52
directory editor 459
directory listing 543
displaying the line/column indication 301
do 515
dos
saving a compatible file 261, 375
DOS commands 513
DOS files 262
dosfile 261
dossave 375
down field 41
Down-Field 41, 95, 97, 132, 394, 682
dropbuf 516
dy_lastfiles 228, 298
dy_printer 518, 555
dynamic loading 499, 503
E
editing multiple files 54
END key 465
end key 390
env_rx 648
env_rx2 648
environment 648
erase EOF key 42, 56, 62,
70, 75, 80, 87, 94, 97,
687, 689, 693
erasing a file 475
EUROPEAN date format within FLIST 271
ex_end 139
ex_ini 138
ex_sedit.h 138
exec 512, 565, 566
execio 517
executing a WINDOWS .exe command 468
exiting SEDIT 99, 242, 323, 324
external procedures 499, 503
SEDIT and S/REXX Reference Manual
Index
extract 138, 144
extract2 139
F
FD 460
ffile 261
field
moving from one to another 41
file case handling 285
file conversion 262, 567
file directory
changing 260
definition 459
getting 567
filename
changing 275
definition 459
getting 567
filename completion 196
filetype
changing 279
definition 459
getting 570
filling a rectangular area 228
FLIST 103, 220, 271, 272, 365, 459
getting file names 567
FLIST permissions display 270, 463, 468
FN 459
fonts
APL font 42
selecting with FONt command 276
setting the dialog 228, 548
using specials 3, 6
formatting a number with commas 570
formatting text 168, 277, 300, 311, 366
FORTRAN 194
fortran
shifting 111
free_extract 139
FT 459
fullscreen interface 281, 362
fullshift mode 440, 441
function keys 389
customizing 39, 40
seeing 393
hardware string 141, 149, 244, 245, 535, 647, 695
Hebrew Fonts 367
help 286, 423
help key 103, 390
heterogeneous network 26
hexadecimal display 289, 440
hexadecimal target 288
history 291, 450, 454, 455
home
3270 simulation 42
command 292
home key 390, 465
HOME on Windows 32, 37, 514, 521
hostid 4, 17
hostname 573
I
indexing 508
input color 549
inserting data from a file 280
install 16
installation directory 1, 12, 15, 19,
invsel macro 140
ISPF command
BOUNDS 161
BUILTIN 161
CANCEL 162
CAPS 164
CHANGE 175
COPY 199
CREATE 203
DELETE 219
EDIT 237
END 238
EXCLUDE 239
FIND 266
LOCATE 307
RCHANGE 351
REPLACE 361
RESET 364
RFIND 365
ISPF compatibility mode 36, 105,
626
114, 322, 325,
475
ISPF mode starting script
36
K
G
global file case handling 285
globalv 523, 528
GRAB dialog box 547, 557
grey scale monitor 2
group 331
H
hard link
577
SEDIT and S/REXX Reference Manual
kedit 44
KEDIT mode 48
kedit mode 87
key5.remap file 682
keyboard
DEC 68
disabling the DOWN FIELD function
HP 74
IBM 62
layout 679
395
Page 725
Index
mapping a native DEC 6
mapping a Sun type 3 or 4 6
mapping a Sun type 5 682
mapping an HP PC like 6
mapping with the menu buttons 101
modes 42
redefinition 295
setting the mapping 6
Silicon Graphics 62
SUN 56
using a 12 top keys keyboard 295
using ASCII terminals 8
using the right ALT key to enter special characters
with a non-US keyboard 395, 711
WINDOWS 80
WINDOWS in KEDIT mode 87
keyboard focus 548
kfile 261
ksave 375
L
label color 550
large files 301, 461
left function keys on a sun keyboard 56, 391
libex.a 138
license server
configuring a heterogeneous network 26
installing 21
killing and restarting 28
reserving licenses 26
starting 23
using an alternate 26
limiting file size 301
line-feed key 96, 132, 149, 394, 682
locate a name 454
locate a string 180, 265, 269, 304, 330
locating an hexadecimal target 288
lowercase translation 60, 66, 72, 78, 85, 90,
423
M
Page 726
132, 320, 389, 394,
697
mkdir 577
mkesc 8
mkitab 23
MKLISTFILES 577
mktrans 296
motif
mouse mode 126
resources 7
mouse 565
cancelling a selection in Motif mode 126
cancelling a selection in OpenLook mode 123, 127
making a linear selection 123, 127
making a rectangular selection 125, 128
Motif mode 126
scrolling 53
setting the buttons 326
mouse mode 326
extracting 251
FullMotif 327
Motif 126
OpenLook 123, 326
OPENLOOKW 326
moving a line 112, 116, 327
moving cursor between screens 407
msrexx 624, 627
N
natural order sorting 404,
next_field 41, 407
NIS 331
-noauto option 49, 242
NSORT 404
number 332
number_screen 332
LSTATE 612
macro commands
external 134
internal 133
loading 285
overriding 191
prefix 119
purging 348
retrieving information from
S/REXX 142, 478
variable substitution 133
macros within FLIST 478
make 131
error scanning 329
makebuf 527, 531
96,
makefile 647, 667
man 310, 424
Martin Pool 404
menu buttons 98, 313
menu buttons for FLIST 467
menubar 98
menus 52, 104, 314, 483
merging lines 318
message field 51
meta key 43, 53, 123, 127,
611
O
134, 243
octal converstion 542
open a console 578
opening a file 99, 428, 446
opening a file by using a C or fortran name
operators 497
option noload 501
options
xrm 7, 46
options (UNIX) 46
205
SEDIT and S/REXX Reference Manual
Index
options (WINDOWS) 49
overlaying 118
owner of a file 612
P
pass UNIX command with S/REXX
541, 565, 566,
623
pass WINDOWS command with S/REXX 625
passing a command to UNIX or WINDOWS with
FLIST 477
passing multiples commands 149, 302, 388
passwd 331
passwds file 5, 13, 20
password 3, 16, 21, 26
path 151, 357
adding a directory with ACC command 151
scanning with HASH command 285
searching it for a file 45, 295, 314
setting 2
PATH environment variable 2
pause key 390
pdf
UNIX command 1
PDF compatibility mode 1
PDF Exactly 47
PDF Mode 47
pdf starting script 36
pdfcancel 162
pdfchange 175
pdfcopy 199
pdfdelete 219
pdfexclude 239
pdffind 266
pdflocate 307
pdfprof.sedit 37, 39, 40
pdfreplace 361
pending commands 114
power input mode 336
prefix 339
Prefix commands
" 110
"" or ’’ 116
>, < 111
>> , << 117
A 107
CC 115
D 107
DD 116
E 111
G 110
L 119
M 112
MM 116
O 118
OO 118
parsing 105
PP 116
SEDIT and S/REXX Reference Manual
PU 109
S 113
SCALE 113
TABL 113
U 119
X 112
XX 117
prefix field 51
prefix macro
arguments 121
creating a synonym 119, 339
getting the source name 121
using an external macro 121
prefix_screen 339
prev_field 41, 395, 407
printing
changing the default screen printer 344
changing the default screen printer daemon 344
changing the default TREE printer 344
the current file 342, 343
the screen 43, 344, 345
the tree 484
printscreen key 390
process
getting the process ID 573
killing 575
querying 581
spawning 569
waiting to terminate 625
process identifier 573
process number 573
prof_pdf.sedit 1, 2, 37, 47
prof_xedit.sedit 1, 2, 32, 47
profile 146
prof_pdf.sedit PDF like profile 37
prof_xedit.sedit XEDIT like profile 32, 701
reprofile 134, 142
suppressing with the -np option 46, 49
PROFILE.sedit 1, 2, 296, 390
profile.sedit 1, 2, 6, 31, 38, 46, 47, 48, 49, 68, 74,
98, 119, 126, 133, 134, 136, 142, 157,
184, 194, 244, 253, 264, 291, 296, 297,
320, 323, 396, 398, 451, 467, 481, 490,
701
psedit starting script 36
pxed starting script 36
Q
quit
initial synonym value 349, 418
quitting a file 57, 64, 70, 76, 94, 349
quitting all files 162
R
recording an S/REXX session 588
recycle bin 356, 475, 484, 588
Page 727
Index
redoing 130, 356
refreshing the screen 356
registry
deleting key 581
retrieving key 583
setting key 586
regular expressions 153, 193, 230, 234, 350, 365,
368, 371, 411, 459, 616
reload 358, 414
disabling automatic 358
remove directories 588, 617
removing a directory 484
removing the selection on WINDOWS 127
rename file 578
repainting the screen 356
reprofile 34, 38, 134, 142, 338, 457
resources 7
restart.x macro file 136
retrieve selection 425
reverse video 190
reverse video mode 421
REXX
macro commands 142
right function keys 11, 56, 62, 68, 74, 80,
rxd 532, 533, 671
94
S
saber 371, 372, 373
saving a file 57, 64, 70, 76, 94, 99, 261, 375, 442
scale 376
scale line 113, 376
scale_screen 376
SCHANGE
changing the confirmation keys 379
scrollbar 385
scrolled list 544, 546, 555, 556, 557, 561, 565
scrolled list color 544, 549, 550, 557, 561
scrolling 53, 58, 63, 69, 70, 75, 81, 95, 158, 278,
328, 339, 433, 437
scrolling vertically 299, 365
scrolllock key 390
sedit 494, 509, 532, 637
UNIX command 44
sedit.lastfiles 298
sedit.srexxrc 502
seditid 4, 17
seditusers file 26
selection 123, 127
cancelling 123, 127
linear 123, 127
moving to an other window 125
moving to XTERM 125
overlaying 124, 128
rectangular 125, 128
removing 127
retrieve 425
setting an APL stop on selected lines 416
Page 728
setting an APL trace on selected lines 433
whole lines 125, 128
selective change 35, 380
changing the confirmation keys 378, 379,
381,
412
112, 113, 117, 153, 184, 221,
239, 382, 386, 387, 399, 402
selective line editing 153
sends 138
set_sun_t 310
set_unix 50, 127
selective editing
setting
the background color 2
the number of columns 46, 49, 676
the number of lines 46, 49, 676
the RXD icon position 676
the RXD window location 676
the SEDIT icon position 46
the SEDIT window location 46, 49
setup 12, 19
shell command 400
shift-return in directory editor 460
SINIX 6
size limit 301
SLIP connection 238
smart_comp 59, 65, 71, 77, 83, 90, 95,
194, 683,
685, 693
smart_compd 194, 683, 685, 693
sorting 611
sorting a file 404
sorting the ring 405
sounding the alarm 544
spelling 101, 409
splitting a line 57, 66, 72, 78, 85, 95
splitting the screen 60, 66, 72, 78, 85, 96, 383
ssave 375
stack
clearing 514
creating 527, 531
getting 653
length 658
query 531
removing 516
setting 655, 656
status field 51
subdirectories 613
switching between file and directory editor 461
switching between files 55, 57, 63, 69, 75, 81,
95,
293
symbolic link 577
preventing following 276
solving 568
symbolic name 113, 179, 335
symbolic name for a Ri function key
390
SEDIT and S/REXX Reference Manual
Index
symbols
synonym 191, 418
syntax coloring 419
sysinfo 4, 17
T
table
)ATTR section 638
)BODY section 639
)BUTTON section 640
)MODEL section 639
)TRAIL section 640
adding a line 621, 645
closing 621, 642
deleting a line 621, 645
displaying 621, 643
getting a line 622, 644
opening 622, 643
saving 623, 644
updating 622
tabline 113, 430
tabline_screen 430
tabulations
displaying the tabline 113, 430
entering 41
expanding 43, 429
setting 43, 431
tags 205
text formatting 457
time stamp of a file 612
time, changing 613
time-out for function keys 360
toggle color 564
toolbar 101, 432
trailing blank
disabling automatic removal 294
displaying the last one 399
tree 103, 434
commands 481
switching to 434, 466
treescanlevel 434, 481
TRUE64 17, 68, 396, 687, 695
U
U file symbol 263
uname 4, 17
undoing 56, 63, 69, 76, 82, 87, 90, 95, 130, 375,
436
UNIX commands 292, 400, 443, 448, 449
UNIX files 262
UNIX keyboard layout on WINDOWS 50
UNIXWARE 6, 64
Up-Field 41, 96, 97, 132, 394, 682, 693
uppercase first letter only translation 428
uppercase translation 59, 65, 71, 78, 84, 428
SEDIT and S/REXX Reference Manual
US date format within FLIST 271
uumac prefix command macro 119
V
VARBLANK 439
variable
getting 651
setting 663
variable substitution 133, 149, 155
verify 305, 370, 440, 453, 454
verify_ksave 442
verify_screen 440
verify_ssave 442
W
W file symbol 263
warning beep 159
window position 46, 49
window size 46, 49
WINDOWS 80, 98, 127, 181, 188, 232, 236, 251,
262
WINDOWS ADDRESS environment
WINDOWS file 262
wiping files 475, 484, 626
wordwrap 440
workstation hostname 573
wsrexx 494, 627
wsrexx.exe 627
513
X
xc 54
XCDPATH 217
XCDPATH environment variable 2
xe 54
xedit
UNIX command 1, 32
XEDIT compatibility mode 1, 157, 322, 323, 324
XEDIT Exactly 47
XEDIT Mode 47
xedit starting script 32
xeditprof.sedit 32, 39, 40
XF 1, 44
xf 54
xh 54
xi 54
xinfo 27, 29
xm 54
xmac macro directory 1, 31, 119, 131, 133, 135,
143, 172, 190, 194, 374, 397
xmodmap 682
xp 54
XPATH environment variable
xs 54
xsdown 29
xserv
2
Page 729
Index
configuring a heterogeneous network 26
installing 21
killing and restarting 28
restarting 28
xsrexx 624, 627
xt 54
XTERM
moving selections 57, 63, 68, 75, 87, 125
xx 54
Y
yellow pages
ypcat 331
331
Z
174, 183, 305, 351, 370, 378, 381, 412,
452, 453, 454
zone_screen 452
zone
Page 730
SEDIT and S/REXX Reference Manual