Transcript
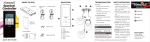
Desktop Memory/RAM Installation
Remove the outer casing. This is normally done
by removing the screws that hold it in place. If in
doubt, please consult your user manual.
Apply a firm, even push to ensure the memory is
fully seated in the slot. You should hear the clips
either side snap back into place.
What do I need?
! Clear Workspace
! Screwdriver
What do I do?
Make sure the computer is completely shut down
and switched off.
To prevent potential damage to the memory
from anti-static electricity, it is a good idea to
discharge yourself first. This can be done by
simply touching a grounded metal object such as
a radiator.
Lay the computer flat on its side. Inside you will
see the motherboard, which all the main
components are plugged into.
Refit the outer casing, by carefully aligning and
screwing back into position. Plug the cables back
in and turn the computer on.
Locate the memory slots where the existing
memory is installed. Gently move any cables
blocking access to the slots to one side.
If you are replacing any existing memory, gently
pull the clips away from the memory module.
Gently lift the module to pull it out of the slot.
If you are installing the new module into an
empty slot, simply pull the clips apart ready to
accept it.
First, unplug every cable from the back of your
computer, making a note of which cable goes
where.
Take the new memory you are about to install,
hold it by the edges and locate the notch. Line
this up with the notch on the slot and carefully
insert the memory.
Everything should be running smoothly and
quicker than before.