1
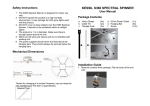
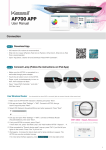
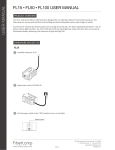
NAVIGATION
INSIDE THE BOX
Spectral
Controller
• Controller
• Micro USB
Cable
TROUBLESHOOTING
E
• Unit Link Cable
G
F
No Power
.
•Double check that all ports
and cables are properly
D
.
connected.
•Plug the controller into to an
alternative wall outlet.
No Light Response
.
•Double check unit link cable
H
B
A
I
• Magnetic
.
connection.
•Double check units are plugged
into correct port.
Back Plate
• Power Adaptor
• Nylon anchor (X2)
Power Supply Specifications
C
• Screws (X2)
Quick Start Guide
H
A
B
C
D
E
F
G
H
I
Return
Enter
Direction Pad
Display Screen
Port 1
Port 2
Micro-USB Slot
Input
Output
DC in
Power consumption 1W maximum
H
Input Voltage
5VDC +-5%
Listed power supply
Input
90-264 VAC 47-63 Hz
Output 5VDC,2000mA maximum
SAFETY INSTRUCTIONS
1 DO NOT use a power supply
outside the specifications.
This is a fire hazard and may
lead to unit failure.
2 DO NOT use outdoors. This
unit is intended for indoor use
only.
3 DO NOT expose unit to an
extremely humid environment
or submerse unit in water. This
may lead to unit failure.
4 DO NOT cover or place objects
on the power supply. The power
supply should not be contained
in an airtight space.
5 DO NOT mount over open water.
6 ENSURE that the back plate is
correctly mounted to a steady
surface. Incorrect mounting
can result in detachment of
the plate and controller.
For further assistance, contact Kessil customer service at (510) 620-5250.
Kessil Lighting
A DiCon Brand
1689 Regatta Blvd,
Richmond, CA 94804
(510) 620-5250
GETTING STARTED
Step
1 Connect
. Insert the microUSB head of the cable into the
microUSB slot (G).
. Insert the USB head of the cable into the
power adaptor.
. Assemble the power adaptor by screwing the
plug head into the adaptor body.
. Plug the adaptor into a wall outlet to power the
controller.
. Connect the lights to the controller using the
unit link cable.
For more detailed setup information, please visit www.kessil.com.
Step
2 Set Up
. Use the direction pad (C) to
navigate to the Settings tab.
. Press to access the settings.
. Set the Time & Date.
. Press to return to the main
menu.
Step
3 Manual Configuration
. Navigate to the Manual tab.
. Press to enter manual mode.
. Adjust the color and intensity on the two
bars. This can be done individually for
each port or both at the same time.
. Press
to return to the main menu.
Step
4 Program
. Navigate to the Program tab.
. Press to enter program mode.
. Select Quick Set to create a custom light schedule.
i Adjust intensity and color at each time point.
ii Review your cycle with preview mode.
iii Make sure to save when finished.
. Select Acclimation to set an acclimation schedule.
Step
5 Port Settings
. Navigate to Port Set tab.
. Press to enter port settings.
. Set the desired schedule for each
port.
Step
6 Mounting
. Use the screws provided to mount
the magnetic back plate to a
wooden surface.
. If mounting to a wall, pre-drill two
1/4" (6.5mm) holes and insert nylon
anchors before screwing the plate in.
i Set the length of acclimation and starting intensity.
ii Specify the color and intensity schedule you want the
acclimation to follow.
iii Save when finished.
. Press
to return to the main menu.
You're Finished !