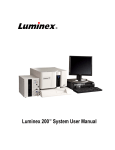
1
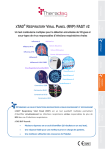
®
xTAG Bloodstream
Pathogen Panel (BPP)
For Research Use Only.
Not for use in diagnostic procedures.
®
™
®
For use with Luminex 100/200 and MAGPIX Systems.
Refer to the “Reagents Supplied with xTAG Bloodstream Pathogen Panel” table in the
Materials Provided section for reagent storage conditions.
A paper copy is available on request.
Kit Components
Luminex
X039B0425
xTAG® Bloodstream Pathogen Panel Kit Reagents
48
xTAG® Data Analysis Software LSM
S036-0270
Luminex Molecular Diagnostics, Inc.
439 University Ave.
Toronto, ON, Canada
M5G 1Y8
Technical Support
International Toll Free: +800 2939 4959
North America Toll Free: 1-877-785-2323
Direct Phone: +1 512-381-4397
Email: [email protected]
www.luminexcorp.com
MLD-039-FKT-001 Rev A
Effective Date: November 2012
xTAG® Bloodstream Pathogen Panel (BPP)
ii
For Research Use Only. Not for use in
diagnostic procedures.
Table of Contents
Materials Provided .................................................................................................................................1
Reagents Supplied with the xTAG® Bloodstream Pathogen Panel and Storage Conditions ........1
Software Supplied ...........................................................................................................................1
Materials Required But Not Provided ....................................................................................................2
Reagents .........................................................................................................................................2
Equipment .......................................................................................................................................2
Consumables ..................................................................................................................................2
Operating System ...........................................................................................................................3
Downloading the Software Accessory Package .............................................................................3
Instructions for Installing Data Acquisition Protocols ......................................................................4
Summary and Explanation of the Test ..................................................................................................4
Method Overview ..................................................................................................................................5
Warnings and Precautions ...................................................................................................................6
Sample Storage and Preparation ..........................................................................................................7
Assay Procedure ...................................................................................................................................7
Assay Controls ................................................................................................................................7
Multiplex PCR .................................................................................................................................8
Instrument Preparation for Data Acquisition .................................................................................10
Reporter Preparation and Bead Hybridization ..............................................................................11
Data Acquisition ............................................................................................................................13
Data Analysis ......................................................................................................................................13
Installing TDAS LSM and the Assay Configuration File ................................................................13
Analyzing the Data with TDAS LSM .............................................................................................14
Re-run Scenarios ................................................................................................................................15
Re-test Recommendations Prior to Data Acquisition ....................................................................15
Re-test Recommendations After Data Acquisition ........................................................................15
Procedural Limitations .........................................................................................................................16
Limited Product Warranty ....................................................................................................................17
Notice to Recipients about Licenses ...................................................................................................17
Trademarks Information ......................................................................................................................18
End User License Agreement for TDAS ..............................................................................................18
Key to Symbols ...................................................................................................................................18
iii
xTAG® Bloodstream Pathogen Panel (BPP)
iv
For Research Use Only. Not for use in
diagnostic procedures.
Materials Provided
The following table outlines reagents supplied in the kit and their storage conditions.
Reagents Supplied with the xTAG® Bloodstream Pathogen
Panel and Storage Conditions
Reagent
Volume for 24 Tests
Storage Conditions
xTAG BPP Primer Mix
144 µL x 1 vial
Store at -25°C to -15°C upon
receipt in a non-frost-free
freezer.
xTAG® BPP Bead Mix
960 µL x 1 vial
Store at -25°C to -15°C
protected from light on receipt.
®
Store at 2°C to 8°C protected
from light after first use.
xTAG® Reporter Buffer
12.0 mL x 1 vial
Store at -25°C to -15°C on
receipt.
Store at 2°C to 8°C after first
use.
xTAG® 0.22 SAPE
188 µL x 1 vial
Store at 2°C to 8°C protected
from light upon receipt. Do not
freeze.
For a copy of the Material Safety Data Sheet/Safety Data Sheet (MSDS/SDS), contact
Luminex Technical Support. Contact information is listed on page ii.
NOTE: Exercise caution when handling components. Do not use the kit or
any kit components past the expiry date indicated on the kit carton
label.
NOTE: Repeated freeze-thaw cycles (up to 5) do not compromise the
integrity of the xTAG BPP Kit.
Software Supplied
xTAG Data Analysis Software LSM (TDAS LSM) is provided on the TDAS CD. An assayspecific software accessory package is available for download from the Luminex Support
website.
1
Materials Required But Not Provided
Reagents
• QIAGEN® HotStarTaq DNA Polymerase Kit (QIAGEN, 203203) or equivalent
• Rhizobium radiobacter freeze-dried strain; culture after receipt, could be used as an
internal control
• Rhizobium radiobacter genomic DNA (ATCC® 33970D-5) could be used as a run control
• DNase-/RNase-free Water (Life Technologies, 10977-023) or equivalent
• MoBio BiOstic™ Bacteremia DNA Isolation Kit; Cat No. 12240-50
Equipment
• Luminex® system (Luminex 100/200™ or MAGPIX including xPONENT® software,
calibrators, verifiers and controls)
• NucliSENS® easyMAG® (bioMérieux, 280130-280135) or equivalent
• Mini centrifuge (InterScience, C-1301) or equivalent
• Multichannel pipettes (0.5-10 μL, 5-50 μL, 50-200 μL)
• Pipettes (P10, P100, P200, P1000, P5000)
• Pipetting aid
• Racks for 1.5 mL and 0.5 mL microcentrifuge tubes
• Racks for 0.2 mL thin wall tubes for PCR
• Sonicator bath (Ultrasonic Cleaner, Cole-Parmer®, A-08849-00) or equivalent
• Thermal cycler for 0.2 mL thin wall PCR tubes and 96-well plates
• Vortex
Consumables
• 0.2 mL thin wall polypropylene tubes for PCR (appropriate for thermal cycler)
• 0.5 mL or 1.5 mL sterile polypropylene microcentrifuge tubes
• 25 mL pipettes
• Costar® Thermowell® thin-wall polycarbonate 96-well microtitre plates (Corning Cat. No.
6509) or equivalent
• 15 mL polypropylene tubes (Falcon® tubes) or Borosilicate glass tubes (5 or 10 mL)
• 50 mL polypropylene tubes (Falcon tubes) or equivalent.
• Microseal® to cover 96-well plate (Bio-Rad Cat. No. MSA5001)
• Parafilm ® M (American Can Company)
• Aerosol resistant tips for pipettes
• Reservoir basins
• Disposable powder-free gloves
xTAG® Bloodstream Pathogen Panel (BPP)
2
For Research Use Only. Not for use in
diagnostic procedures.
Operating System
• Operating System: Microsoft® Windows® XP or Windows® 7
• CPU: Pentium® 4 - 1 GHz or better
• Memory: 256 MB or more of RAM
• Disk Space: at least 1 gigabyte (GB) of free space
• CD-ROM: 24x or faster CD/DVD drive
• Monitor: CRT or LCD monitor with resolution of 1024 x 768 or better
Downloading the Software Accessory Package
NOTE: For CD Catalogue Number S036-0270 only.
NOTE: If you are not a registered RUO assay customer, contact Luminex
Support. Contact information is listed on page ii.
A software accessory package for use with this assay, typically containing xPONENT data
acquisition protocols and TDAS LSM assay configuration file, may be downloaded from the
Luminex Support website at www.luminexcorp.com.
1.
Open a web browser and go to https://esupport.luminexcorp.com/OA_HTML/jtflogin.jsp.
On the website www.luminexcorp.com, this login page can be found at Support >
Technical Support Overview > Support Login.
2.
On the Luminex Login page, enter your User ID and Password.
3.
On the iSupport page, select the Support tab located below the top menu.
4.
Ensure that the search criteria are left as All Categories using All of the words. Enter
"RUO" into the text field next to Search Solutions, then click the Search button.
NOTE: If you are not a registered RUO assay customer, searching for the
keyword "RUO" will not provide any matching results. Please contact
Luminex Support to register as an RUO assay customer.
5.
In the list of search results, under Title, select xTAG BPP RUO Software Accessory
Package to open the assay-specific page.
6.
Under Attachments, ensure that the description indicates the RUO assay that you are
searching for. Select the ZIP file (with .zip as the file extension) under Name and save/
download the file to your computer.
7.
Extract the files from the downloaded ZIP file. Ensure that the appropriate xPONENT
data acquisition protocol(s) are saved to a location that is accessible by the Luminex
computer, and that the TDAS LSM assay configuration file(s) are saved to a location that
is accessible by the appropriate version of TDAS LSM.
NOTE: The xPONENT data acquisition protocols (*.lxt) and TDAS LSM
assay configuration files (*.ldtc) provided by Luminex are prepopulated with default values for a variety of parameters. To change
the parameter values, please refer to the applicable xPONENT User
Manual and/or TDAS LSM - AssayGen User Manual for instructions.
For Research Use Only. Not for use in diagnostic procedures.
3
Instructions for Installing Data Acquisition Protocols
If the appropriate protocols are already installed on the computer controlling the Luminex
system where the assay is being run, skip the following steps.
1.
Access the computer that controls the Luminex system on which the assay will be run.
2.
Start the Luminex xPONENT software.
3.
From within the Luminex xPONENT software, select the Protocols menu.
4.
On the Protocols page, open the Protocols tab, then select Import. This launches the
Open dialog box.
5.
In the Open dialog, browse to the folder where the xPONENT data acquisition protocols
are located:
a. For the Luminex 100/200 System with Luminex xPONENT software version 3.1, select
the xTAG BPP 24-plex (LX)[1].lxt protocol file, then click Open.
b. For the MAGPIX System with Luminex xPONENT 4.1 or 4.2, select the xTAG BPP 24plex (MP)[1].lxt protocol file, then click Open.
Summary and Explanation of the Test
The xTAG Bloodstream Pathogen Panel is a qualitative nucleic acid multiplex test that
provides simultaneous detection and identification of 20 pathogens, including seven grampositive bacteria, eight gram-negative bacteria and five fungal targets. The panel also detects
three commonly observed antibiotic resistance markers, mecA, vanA and vanB. An internal
or run control (Rhizobium radiobacter) can be added to either the samples prior to extraction
or included in the run as run control. xTAG Bloodstream Pathogen Panel targets are listed
below.
TABLE 1.
Pathogen Targets in xTAG Bloodstream Pathogen Panel RUO
Assay
Gram-positive (7)
Enterococcus faecalis
Enterococcus faecium
Staphylococcus aureus
Staphylococcus epidermidis
Streptococcus pneumoniae
Staphylococcus spp.
Streptococcus spp.
Gram-negative (8)
Acinetobacter baumanii
Enterobacter aerogenes
Enterobacter cloacae
Escherichia coli
xTAG® Bloodstream Pathogen Panel (BPP)
4
For Research Use Only. Not for use in
diagnostic procedures.
TABLE 1.
Pathogen Targets in xTAG Bloodstream Pathogen Panel RUO
Assay Continued
Klebsiella oxytoca
Klebsiella pneumoniae
Pseudomonas aeruginosa
Serratia marcescens
Fungi (5)
Candida albicans
Candida glabrata
Candida krusei
Candida parapsilosis
Candida tropicalis
Resistance markers (3)
mecA
vanA
vanB
Internal control (1)
Rhizobium radiobacter (Agrobacterium
tumefaciens)
Method Overview
The xTAG Bloodstream Pathogen Panel (xTAG BPP) incorporates a single multiplex
amplification reaction with Luminex Molecular Diagnostics' proprietary universal tag sorting
system on the Luminex 100/200 or MAGPIX instrument. The assay also detects an internal
control (Rhizobium radiobacter) which is added to each sample prior to extraction. This
control can also be used as a run control, which is added as a separate sample at the PCR
step. xTAG BPP assay overview is illustrated in Figure 1.
For each sample, two (2) µL of extracted DNA is amplified in a single multiplex (24-plex)
reaction. Each target or internal run control in the sample results in PCR amplicons ranging
from 81 to 197 bp (not including the 24-mer tag). A two (2) µL aliquot of the PCR product is
then added to a hybridization/detection reaction containing the universal array (MagPlex
Bead Mix) and the Streptavidin-R-Phycoerythrin conjugate (Reporter Solution). Each
Luminex bead population detects a specific target or assay control through a highly specific
anti-tag/tag hybridization. Following the incubation of the PCR products with the bead mix
and reporter, the hybridization/detection reactions are then sorted and read on the Luminex
instrument. Signal (median fluorescence intensity, MFI) is generated for each bead
population (target or assay control). These fluorescence values are then analyzed to
establish the presence or absence of targets and/or controls in each sample tested.
The data generated by the Luminex instrument can be analyzed by the xTAG Data Analysis
Software for xTAG BPP (TDAS LSM) to provide a report summarizing which pathogens are
present in the sample, if any. Detailed reports with raw data are also available.
For Research Use Only. Not for use in diagnostic procedures.
5
FIGURE 1.
xTAG Bloodstream Pathogen Panel Assay Overview
Warnings and Precautions
1.
In the event of damage to the protective packaging, consult the Material Safety Data
Sheet/Safety Data Sheet (MSDS/SDS) for instructions.
2.
For Research Use Only. Not for use in diagnostic procedures.
3.
Care should be taken when handling, storing, and disposing of potentially infectious
materials. Suitable barrier protection, including gloves and protective eyewear, against
potential pathogens during all stages of xTAG Bloodstream Pathogen Panel use is
recommended. Adherence to appropriate regional and local biosafety and biohazard
guidelines or regulations is recommended when working with any samples or primary cell
lines where the presence of an infectious agent may be present. Gloves and protective
eyewear should be worn at all times. Handle waste disposal in accordance with accepted
medical practice and applicable regulations.
4.
Assign separate areas for pre- and post-PCR activities as a precaution against carryover
contamination. Fresh, clean gloves must be worn in each area and must be changed
before leaving that area.
5.
Do not pipette by mouth.
6.
For sample extraction steps, use the procedure provided with the sample extraction
system.
xTAG® Bloodstream Pathogen Panel (BPP)
6
For Research Use Only. Not for use in
diagnostic procedures.
7.
Perform the procedure given in this package insert as described. Any deviation from the
outlined protocols may result in assay failure or cause erroneous results.
8.
Release testing for the xTAG BPP has been performed for the individual lots. Do not
interchange kit components from different kit lots. Kit lots are identified on the kit carton
label.
Sample Storage and Preparation
Standard precautions should be taken with regards to sample collection, handling and
storage prior to extraction (refer to the latest edition of the CLSI MM13 Guideline).
Samples can be stored between 2°C and 8°C for up to 48 hours after collection. If the sample
is not going to be tested within 48 hours of collection, Luminex recommends that they be
stored at -80°C.
Luminex recommends that the pathogen DNA be extracted from blood culture sample using
one of the commercially available kits designed for this purpose (e.g. Biomérieux, NucliSENS
easyMAG automated system, MoBio BiOstic Bacteremia DNA Isolation Kit). Because DNA
extraction protocols can vary widely, the purity and concentration of the resultant nucleic acid
can also be highly variable. Luminex recommends that DNA be prepared to a target
concentration of 50-250pg/μL for optimum results.
To incorporate Rhizobium radiobacter as internal/extraction control, Luminex recommends
first determining the appropriate dilution factor of the Rhizobium radiobacter culture material.
For example, the culture stock could be diluted in DNAse/RNAse-free water in order to
prepare a dilution series, (e.g., 1:10, 1:100, 1:1000, etc.). Then, add no more than 10 µL of
the diluted culture series to the desired extraction system. Luminex recommends using the
dilution factor that gives a MFI range between 2000 and 4000 MFI as the internal/extraction
control with blood culture samples.
Rhizobium radiobacter can also be used as a run control by testing the extracted DNA as a
sample. For this purpose, Luminex recommends 100 to 500 pg DNA as input for the BPP
test.
Assay Procedure
Follow the instructions below for optimal assay performance. Use separate areas for pre- and
post-PCR activities to avoid carry-over contamination.
NOTE: Luminex recommends that the multiplex PCR and bead hybridization
procedures be completed within the same day. If necessary, the
PCR products may be stored at 2°C to 8°C for up to 24 hours.
Assay Controls
Good laboratory practice recommends the use of positive and negative controls to assure
functionality of reagents and proper performance of the assay procedure. Positive and
negative controls are intended to monitor for substantial reagent failure. Controls used with
Bloodstream Pathogen Panel are described in detail in this section.
For Research Use Only. Not for use in diagnostic procedures.
7
Negative Amplification / Detection Control (DNase-/RNase-free water) - The last sample
on the plate must be a negative control. Include at least one negative control with each run of
the xTAG Bloodstream Pathogen Panel. By default, TDAS LSM considers the last sample
read on the plate to be the primary negative control. If you use multiple negative controls,
intersperse them throughout the run (e.g., at the beginning, middle, and end of the plate).
Internal and Run Controls Luminex recommends that you routinely include internal and run controls in each assay. The
control detected by xTAG Bloodstream Pathogen Panel (in addition to the fungal, grampositive and gram-negative targets) is Rhizobium radiobacter. This internal control is added
to each sample prior to extraction. This internal control allows the user to ascertain whether
the extraction and PCR steps of the assay are functioning properly. Failure to generate a
PRES (present) call for Rhizobium radiobacter indicates a failure at either the extraction step,
and/or the PCR amplification step and may be indicative of the presence of amplification
inhibitors, which can lead to false negative results. The control can also be used as a run
control. Failure to generate a PRES (present) call for Rhizobium radiobacter indicates a
failure at the PCR amplification step.
The amount (or dilution factor) for each new preparation of Rhizobium radiobacter intended
as internal control should be determined prior to use with the sample and tested with the BPP
assay. Refer to Sample Storage and Preparation on how to prepare the Rhizobium
radiobacter sample.
External Controls (Positive Controls for Target Analytes) - Known strains of the targeted
fungal and bacterial pathogens should be included in routine quality control procedures
("external controls"). These external controls are analyte positive controls and should be
included with each batch of samples. External controls should be prepared, extracted and
tested in the same manner as samples. Results from external controls should be examined
before the results of the samples. If a given analyte positive or negative control does not
perform as expected, all results for that analyte in the batch of samples are invalid and the
samples should be re-run.
Multiplex PCR
NOTE: Perform PCR set-up in the pre-PCR area.
NOTE: Pre-program the thermal cycler used for the PCR reaction as below
(step 10).
NOTE: Pre-heat the thermal cycler to 95°C.
The following procedure is for a single PCR reaction. It can be modified to analyze a larger
number of samples as needed by multiplying the volumes by the number of samples being
run. When calculating the master mix (MM) volumes for multiple reactions, include a
minimum of 10 percent overage to account for pipetting variability. At least one negative
control should be included in every PCR set-up. To use the xTAG data analysis software,
TDAS LSM, the last tube in the set-up should be a negative control.
1.
Thaw and bring to room temperature the xTAG BPP Primer Mix, the QIAGEN
HotStarTaq 10X PCR Buffer with 15mM MgCl2 and the QIAGEN 25mM MgCl2. Vortex
the tubes for 2 to 5 seconds to mix reagents and centrifuge (2 to 5 seconds) to bring
reagents to bottom of the tubes.
xTAG® Bloodstream Pathogen Panel (BPP)
8
For Research Use Only. Not for use in
diagnostic procedures.
2.
Remove the QIAGEN HotStarTaq (enzyme) from the freezer when ready to use and
return back to the freezer immediately after use (alternatively, you can keep it on a
freezer block). Mix by inverting and flicking the tube and centrifuge 2 to 5 seconds to
settle reagents to the bottom.
3.
Label the appropriate number of 0.2 mL PCR tubes. Include at least one tube for the
negative control (water).
4.
Label a 1.5 mL microcentrifuge tube as 'MM'. Add the reagents in the following order:
Reagent
Volume for One Reaction
DNase-/RNase-free Water
15.0 µL
QIAGEN 10X PCR Buffer with 15 mM MgCl2
3.8 µL
QIAGEN 25mM MgCl2
0.8 µL
xTAG BPP Primer Mix
3.0 µL
QIAGEN HotStarTaq DNA Polymerase
0.4 µL
Total Volume
23.0 µL
5.
Vortex the PCR Master Mix for 2 to 5 seconds to mix reagents and centrifuge (2 to 5
seconds) to settle reagents to the bottom of the tube.
6.
Aliquot 23.0 µL of the PCR Master Mix into each labeled 0.2 mL PCR tubes.
7.
Add 2.0 µL of appropriate extracted nucleic acid sample into each labeled tube. Cap tube
immediately after addition of sample.
8.
For the PCR negative control(s), add 2.0 µL of DNase-/RNase-free water to the tube. To
use TDAS LSM, the last tube should be a negative control.
NOTE: If samples are added to the side of the tubes, centrifuge (2 to 5
seconds) to bring the sample to the bottom of the tube, before
proceeding to step 9.
9.
Vortex tubes for 2 to 5 seconds to mix reagents and then centrifuge (2 to 5 seconds) to
settle reagents to the bottom of the tubes. Ensure no bubbles are present in each
reaction tube.
NOTE: If bubbles are present, they can easily be removed by flicking the
tube with your finger. Centrifuge (2 to 5 seconds) to settle the
reagents to the bottom of the tubes.
For Research Use Only. Not for use in diagnostic procedures.
9
10. Place tubes in pre-heated (95°C) thermal cycler and cycle using the following conditions:
NOTE: The thermal cycler temperature should be set as BLOCK
Temperature with the heated lid enabled.
NOTE: The thermal cycler should be preheated to 95°C.
*Recommended thermal cycler ramp speeds:
ABI: 9600 setting
Bio-Rad (DNA Engine, C1000 or S1000): 1.5°C/sec
Eppendorf: 25% of Max Ramp Speed (1.5°C/sec)
11. Store Multiplex Reaction tubes at 2 to 8°C until ready to use (for a maximum of 24
hours).
Instrument Preparation for Data Acquisition
NOTE: Luminex recommends that the instrument preparation for data
acquisition be completed prior to bead hybridization.
Luminex recommends that a wash step be carried out for the Luminex 100/200 system or the
MAGPIX instrument prior to the Data Acquisition procedure.
For information about instrument probe height adjustment and calibration/verification, refer to
the appropriate user manual. For the Luminex 100/200 System, refer to the Luminex 200
User Manual or xPONENT 3.1 Software Manual. For the Luminex MAGPIX System, refer to
the xPONENT for MAGPIX Software User Manual.
1.
Turn on the Luminex analyzer and start the Luminex xPONENT software.
2.
To set the plate heater temperature:
a. On the Maintenance menu, click Probe & Heater.
b. Click the On button to turn on the Plate Heater and set the temperature to 45°C.
c. Click Apply.
xTAG® Bloodstream Pathogen Panel (BPP)
10
For Research Use Only. Not for use in
diagnostic procedures.
NOTE: Before a run starts, ensure that the temperature on the Luminex
plate heater block has reached 45°C, so that all readings are
carried out at 45°C.
3.
To create and save a new batch:
a. On the Batches menu, click New Batch from Existing Protocol. For protocol
installation, refer to the Instructions for Installing Data Acquisition Protocols section.
b. Fill in the Batch Name information by providing a date, batch description and operator
name.
c. Navigate to select the xTAG BPP 24-plex (LX) protocol for the Luminex 100/200
System or the xTAG BPP 24-plex (MP) protocol for the MAGPIX System. Click Next.
d. Select the appropriate wells where the samples will be analyzed and then click
Unknown. The selected wells are highlighted.
NOTE: If the first sample is not in well A1, select the appropriate starting well
(as described in the Luminex software user manual).
e. Enter an appropriate sample ID, for example, by using the number of samples or
sample identification information. You can also import a sample ID by clicking Import
List.
NOTE: To ensure accurate data acquisition, use care when entering sample
identification information.
DO NOT USE DOUBLE QUOTES. See Luminex software user manual.
f. Click Save. The batch is now saved as a pending batch and ready to run.
Reporter Preparation and Bead Hybridization
The following steps describe how to perform the bead hybridization step for the xTAG
Bloodstream Pathogen Panel. The reporter solution is prepared as a 75-fold dilution of the
SAPE reporter (xTAG 0.22 SAPE) in Reporter Buffer.
NOTE: The beads are light sensitive. Limit bead exposure to light at all times
during the set-up of the hybridization reaction.
NOTE: Perform bead hybridization in the post-PCR area.
NOTE: Pre-program the thermal cycler used for the hybridization/detection
step as below (step 12).
NOTE: Pre-heat the thermal cycler to 45°C. Set thermal cycler
temperature as BLOCK Temperature with the heated lid
enabled.
NOTE: Do not denature the PCR products prior to the hybridization/
detection step.
NOTE: The temperature of the Luminex XY heater block should be set to
45°C ten minutes before the completion of the hybridization/detection
step.
For Research Use Only. Not for use in diagnostic procedures.
11
NOTE: Once thawed, beads should be stored at 2°C to 8°C and protected
from light.
1.
Thaw and bring to room temperature the xTAG BPP Bead Mix and xTAG Reporter Buffer
provided with the xTAG BPP kit. Vortex the xTAG Reporter Buffer for 2 to 5 seconds.
2.
Vortex the xTAG 0.22 SAPE for 2 to 5 seconds.
3.
To prepare the reporter solution, dilute the SAPE 75-fold with xTAG Reporter Buffer in a
borosilicate glass or polypropylene tube. When preparing the dilution(s), measure the
volumes accurately. Each sample requires 90.0 μL of diluted reporter solution. Example
calculations of volumes (including overages) for the hybridization reactions are provided
below:
Recommended Volumes for the Preparation of Diluted SA-PE for the Hybridization
Reaction
Number of Hybridization
Reactions
Volume of xTAG Reporter
Buffer (mL)
Volume of xTAG 0.22 SA-PE
(µL)
8
1332
18
16
2664
36
24
3552
48
48
5550
75
4.
Cover the borosilicate glass with Parafilm, or cap the polypropylene tube, and vortex for
10 seconds to mix. Protect the reporter solution from light until ready to use.
5.
Cut and label the appropriate number of wells from a Costar 96-well microtitre plate for
the hybridization/detection reaction.
6.
Vortex the xTAG BPP Bead Mix for 10 seconds and sonicate for 10 seconds to disperse
the beads. Repeat this step.
7.
Aliquot 20.0 µL of the xTAG BPP Bead Mix into each well.
8.
Vortex the tubes of PCR products (carried out in the Multiplex PCR section) for 2 to 5
seconds and centrifuge for 2 to 5 seconds to settle reagents to the bottom of the tube.
9.
Aliquot 2.0 µL of the PCR product into the correspondingly labeled wells containing the
added xTAG BPP bead mix. Pipette up and down 2 to 3 times to mix sample (avoid
cross-contamination between wells).
10. Transfer the reporter solution (prepared in step 3) into a reservoir basin and using an
appropriate 8-channel pipette, add 90.0 µL of the reporter solution into each well
(containing Bead Mix and PCR products). Gently pipette up and down 5 times to mix
(being careful not to have any cross-contamination between wells).
11. Cover the wells with a Microseal ‘A’ Film.
xTAG® Bloodstream Pathogen Panel (BPP)
12
For Research Use Only. Not for use in
diagnostic procedures.
12. Place tubes in a thermal cycler programmed as follows:
NOTE: The thermal cycler temperature should be set as BLOCK
Temperature with the heated lid enabled.
NOTE: The thermal cycler should be pre-heated to 45°C.
13. Store the xTAG BPP Bead Mix, xTAG 0.22 SAPE, the xTAG Reporter Buffer at 2°C to
8°C after use.
Data Acquisition
NOTE: Prior to this step, the plate heater should have been heated to 45°C
as described in the Instrument Preparation for Data Acquisition
section.
1.
At the end of the 45 minute incubation of the samples, remove the Microseal 'A' film from
the wells/plate, and place wells/plate on Luminex XYP heater block, which has been
heated to 45°C, and then click Retract to retract the holder.
2.
Select the batch from the pending batches list and click Run Batch.
3.
After the last sample is read, ensure that the batch data is exported.
4.
Remove the plate/wells from the heater block and turn OFF the heater temperature.
5.
Wash and soak the Luminex instrument, following the standard procedures described in
the Luminex hardware user manual.
Data Analysis
The xTAG Data Analysis Software LSM (TDAS LSM) in conjunction with the applicable assay
configuration file provides data analysis to aid in determining the presence or absence of
nucleic acid based on the pathogens probed by the kit. Refer to Downloading the Software
Accessory Package section for instruction to obtain the assay configuration file for xTAG BPP
assay. Use of this software is described in detail in the TDAS LSM User Manual provided on
the CD. Installing TDAS LSM automatically installs AssayGen. AssayGen is a tool for use in
creating or modifying assay configurations for specific analysis parameters for each assay,
such as the assay name, associations between the analytes, targets and panels, the call
names and the threshold values. Refer to the TDAS LSM - AssayGen User Manual provided
on the CD for more information.
Installing TDAS LSM and the Assay Configuration File
NOTE: Skip this section if the proper version of TDAS LSM and the
applicable assay configuration file are already installed.
For Research Use Only. Not for use in diagnostic procedures.
13
NOTE: Please ensure that you have sufficient Windows administrative
privileges to install software onto your computer prior to proceeding.
To install the software:
1.
Ensure that your computer is running Windows XP or Windows 7.
2.
Insert the TDAS LSM CD into the CD drive of the computer.
3.
Use My Computer to browse the CD drive.
4.
Double-click the TDAS LSM set-up executable / icon.
5.
Follow the on-screen instructions to complete the installation–please note the following:
a. In the Registration dialog, enter the Institution Name. If a license file was provided to
you by Luminex, follow the instructions from Luminex Support to import the license.
Otherwise, click Next to proceed with using the default license for the installation.
b. During the installation of TDAS LSM, AssayGen will also be installed. AssayGen is a
standalone program, but it runs in conjunction with TDAS LSM.
6.
The installation is successful if an Information dialog box appears stating ‘The
installation completed successfully’. Click OK.
7.
For CD Catalogue Number S036-0270, install the applicable assay configuration file by
performing the following; otherwise, skip to the next step.
a. Launch TDAS LSM.
b. In the main menu, select Assay > Manage Assay… to launch the Manage Assays
dialog.
c. Click Install… at the bottom of the dialog to bring up the Select Assays dialog.
d. In the left panel of the dialog, browse to the location where the TDAS LSM assay
configuration file (with .ldtc as the file extension) is saved. See Downloading the
Software Accessory Package section.
e. After selecting the folder that contains the assay configuration file, the right panel of
the dialog displays the assay name and version.
f. Select the checkbox next to the assay name xTAG® BPP (RUO) with the appropriate
version.
g. If there are previously installed assays with the same name, determine whether you
want to replace or retain the previously installed version(s) of the same assay in TDAS
LSM. Click the corresponding cell under the Retain previous column to switch
between N to replace all previously installed versions of the same assay and Y to
retain them all.
h. Click OK to install the selected assay. If you have chosen to replace any previously
installed assays, you will be prompted to confirm this action. Click OK in the
confirmation dialog to continue or Cancel to go back to the Select Assays dialog to
make changes.
i. Click Finish once the assay is installed, then select Close to close the dialog.
8.
In the main menu, select Admin > Licensing…. Ensure that the xTAG® BPP (RUO)
feature is licensed. If this feature is not licensed or the license is expired, please contact
Luminex to obtain a valid license. Contact information is listed on page ii.
Analyzing the Data with TDAS LSM
The TDAS LSM User Manual provided on the CD describes detailed use of the software.
xTAG® Bloodstream Pathogen Panel (BPP)
14
For Research Use Only. Not for use in
diagnostic procedures.
1.
Verify that the Luminex output file generated using the appropriate data acquisition
protocol is accessible by the computer that TDAS LSM is installed on.
2.
Launch TDAS LSM if it has not been running.
3.
Select File then Open from the main menu.
4.
Browse and select the Luminex output file. Ensure that TDAS LSM has recognized the
selected file as an xTAG® BPP (RUO) assay data file.
5.
Click Open to view the results.
Re-run Scenarios
The following scenarios warrant an allowable re-run of one or more samples, starting at
various steps in the procedure. These scenarios are outlined below.
Re-test Recommendations Prior to Data Acquisition
Master Mix Error
If an error in formulating a master mix (for PCR or bead hybridization) is discovered after that
step is initiated, retest at the affected step.
Thermal Cycler Error
If an error in the thermal cycler program is noticed after a particular step (PCR or bead
hybridization) is initiated, retest at the affected step.
Re-run at PCR Step
Re-run if an inadvertent deviation to, or error in, the protocol at this step is noted and
documented. For example:
• an error in pipetting
• sample evaporation during the PCR step
NOTE: Discard the original PCR reaction and re-test the individual sample
from the PCR step.
Re-run at Bead Hybridization Step
Re-run if an inadvertent deviation to, or error in, the protocol at this step is noted and
documented. For example:
• an error in pipetting
• sample evaporation during the bead hybridization step is observed
NOTE: Discard the original bead hybridization reaction and re-test the
individual sample from the bead hybridization step (prior to the
reporter hybridization step).
Re-test Recommendations After Data Acquisition
A problem in the plate reading step can occur for an individual sample. For example:
For Research Use Only. Not for use in diagnostic procedures.
15
• Low bead count
• Plate failure
• ‘Sample empty’ – no sample present
• Elevated negative control
A re-run of the affected samples from the bead hybridization stage is recommended.
Samples can be re-run from the PCR step at the laboratory’s discretion.
Elevated Negative Control
TDAS LSM designates a primary negative control (or background) sample for the data
analysis of each run, which is, by default, the last read on the plate or the last identified
negative controls. If the MFI for the primary negative control used by TDAS LSM falls above
the specified thresholds, then TDAS LSM cannot analyze the plate. This situation can
indicate that carryover contamination has occurred. You can change the selected primary
negative control sample to another negative control sample by either:
• right-clicking the desired negative control sample in the summary view, then choosing the
Mark as Primary Negative Control menu item from the pop-up menu, or
• selecting the desired negative control sample in the summary view, then choosing the
Sample | Mark as Primary Negative Control menu item from the main menu.
If all of the negative controls fall above the specified TDAS LSM negative control thresholds,
the complete assay (all samples on plate) should be re-run, starting at the PCR step.
NOTE: The use of unopened vials of reagents and water is recommended if
contamination is suspected.
Procedural Limitations
1.
The detection of bacterial and fungal sequences is dependent upon proper sample
collection, handling, transportation, storage and preparation (including extraction). Failure
to observe proper procedures in any of these steps can lead to incorrect results.
2.
As with any hybridization-based assay, underlying polymorphisms in the primer-binding
regions can affect the targets being detected and subsequently the calls made.
3.
Because DNA extraction protocols can vary widely, the purity and concentration of the
resultant nucleic acid can also be highly variable. Luminex recommends that DNA be
prepared to a target concentration of 50-250pg/µL for optimum results.
4.
Enterobacter cloacae : the xTAG BPP assay was designed to detect E. cloacae
ATCC13047; other strains have not been tested and may or may not be detected.
5.
There is a risk of false negative values due to the presence of strain/species sequence
variability in the targets of the assay, procedural errors, amplification inhibitors in
samples, or inadequate numbers of organisms for amplification.
6.
There is a risk of false negative values resulting from improperly collected, transported or
handled samples.
7.
There is a risk of false positive values resulting from cross-contamination by target
organisms, their nucleic acids or amplified product, or from non-specific signals in the
assay.
xTAG® Bloodstream Pathogen Panel (BPP)
16
For Research Use Only. Not for use in
diagnostic procedures.
Limited Product Warranty
Luminex Molecular Diagnostics, Inc. warrants that the materials sold meet Luminex Molecular
Diagnostics specifications from the time of shipment until the expiration date, if stored under
the recommended conditions. THE TERMS, REPRESENTATIONS, WARRANTIES AND
CONDITIONS SET FORTH HEREIN ARE IN LIEU OF ALL OTHER EXPRESS, IMPLIED OR
STATUTORY TERMS, REPRESENTATIONS, WARRANTIES OR CONDITIONS,
INCLUDING, WITHOUT LIMITATION, ANY TERM, REPRESENTATION, WARRANTY OR
CONDITION OF MERCHANTABILITY, FITNESS FOR A PARTICULAR PURPOSE OR
NON-INFRINGEMENT AND ALL OTHER SUCH TERMS, REPRESENTATIONS,
WARRANTIES OR CONDITIONS ARE HEREBY EXPRESSLY DISCLAIMED. LUMINEX
MOLECULAR DIAGNOSTICS WILL NOT BE LIABLE UNDER ANY CIRCUMSTANCES FOR
ANY LOSS, DAMAGE, COSTS OR EXPENSE WHATSOEVER, INCLUDING SPECIAL,
CONSEQUENTIAL OR INCIDENTAL DAMAGES, WHETHER ARISING IN CONTRACT,
TORT OR OTHERWISE, SUFFERED BY ANYONE ARISING FROM, RELATED TO OR
CONNECTED WITH THE USE OR MISUSE OF THE PRODUCT, INCLUDING, BUT IN NO
WAY LIMITING THE GENERALITY OF THE FOREGOING, ANY LOSS, DAMAGE, COSTS
OR EXPENSE WHATSOEVER ARISING FROM, RELATED TO OR CONNECTED WITH
ANY TEST OR TESTS CONDUCTED WITH THE PRODUCT, excepting that Luminex
Molecular Diagnostics may at its sole option, and in any event no later than one year after the
original purchase of the Product from Luminex Molecular Diagnostics, agree to provide the
original purchaser of the Product with a replacement Product if Luminex Molecular
Diagnostics in its sole discretion is satisfied that such Product contains a defect in material or
workmanship. As a condition thereof, Luminex Molecular Diagnostics must receive notice by
registered mail of any claim that the Product is defective within 30 days after the defect
became apparent. Luminex Molecular Diagnostics has based the price of its Product on this
limited warranty and limited liability and the price would be much higher if further liability
coverage were required. This warranty and limitation of liability may not be altered or
amended except in writing executed by Luminex Molecular Diagnostics.
Notice to Recipients about Licenses
By opening the packaging containing the xTAG reagents or using this kit in any manner, you
are consenting and agreeing to be bound by the following terms and conditions. You are also
agreeing that the following terms and conditions constitute a legally valid and binding contract
that is enforceable against you. If you do not agree to all the terms and conditions set forth
below, you must promptly return this Kit for a full refund prior to using it in any manner.
This product is covered, in whole or in part, or made by processes covered by one or more of
the following patents: US 6,514,295, US 6,599,331, US 6,632,526, US 6,929,859, US 7,445,
844, US 7,718,262 and US 7,645,868, and foreign counterparts thereof. You, the customer,
acquire the right under Luminex Corporation's patent rights to use this Kit or any portion of
this Kit, including without limitation the microsphere beads contained herein, only with
Luminex Corporation's fluorescent analytical test instrumentation marketed by Luminex. You,
the customer, shall not reverse engineer, decompile, disassemble or modify the Kit.
Luminex Molecular Diagnostics, Inc. has licensed the rights to sell products for nucleic acid
analysis under U.S. Patent Nos. 5,582,989, and 5,525,494, including related applications and
foreign counterparts thereof.
For Research Use Only. Not for use in diagnostic procedures.
17
The purchaser of this kit is granted the rights under this license to use the contents of this kit
to perform nucleic acid analyses and to sell the results of this analysis if desired. No other
rights or licenses are granted to the purchaser of this kit to perform any other analyses or
acts other than those permitted under this provision .
Trademarks Information
The following are trademarks of Luminex Corporation: Luminex®, xMAP®, xTAG®,
xPONENT®, Luminex® 100/200™, and MAGPIX®.
All other trademarks, including Costar®, Thermowell®, EasyMag™, Falcon®, Galaxy™, ColeParmer®, Microseal®, QIAGEN®, Vista®, Microsoft® Windows®, Pentium® and Dell® are
trademarks of their respective companies.
©
Luminex Corporation, 2012. All rights reserved. No part of this publication may be
reproduced, transmitted, transcribed, or translated into any language or computer language,
in any form or by any means without prior express, written consent of Luminex Corporation.
End User License Agreement for TDAS
Refer to the applicable TDAS LSM Software User Manual for the software’s end user license
agreement.
Key to Symbols
Batch Code
Use by date
Catalog(ue) Number
Protect from light (keep
away from sunlight)
Manufacturer
Caution. Consult
accompanying
documents
xTAG® Bloodstream Pathogen Panel (BPP)
18
For Research Use Only. Not for use in
diagnostic procedures.
TABLE .
Continued
Consult instructions for
use
Contains sufficient for
<n> tests
Temperature Limitation
For Research Use Only. Not for use in diagnostic procedures.
19
xTAG® Bloodstream Pathogen Panel (BPP)
20
For Research Use Only. Not for use in
diagnostic procedures.
Luminex Molecular Diagnostics, Inc.
439 University Ave.
Toronto, ON, Canada
M5G 1Y8
Technical Support
International Toll Free: +800 2939 4959
North America Toll Free: 1-877-785-2323
Direct Phone: +1 512-381-4397
Email: [email protected]
www.luminexcorp.com
MLD-039-FKT-001 Rev A
Effective Date: November 2012
21