1
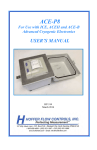
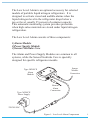
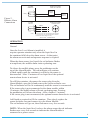
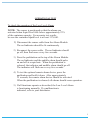
TAYLOR WHARTON
LOW LEVEL ALARM
Type: M284CE
For Liquid Nitrogen Refrigerators
SAFETY
Before using this accessory it is essential that you read the Handle with Care booklet (TW-10)
provided with the unit. This details safety precautions that must be read and
understood before using the equipment.
Do not touch liquid or cold metal surfaces with your bare skin.
The liquid nitrogen used in cryogenic refrigerators
is extremely cold: -320°F ( -196°C). Exposure of skin or eyes to liquid, cold gas,
or frosted parts could result in a severe frostbite-like injury.
Use only the necktube core provided with this accessory or the
one originally supplied with the refrigerator.
A tight fitting plug or stopper will cause a pressure increase in
the container that may damage the container and/or cause personal injury.
1
The Low Level Alarm is an optional accessory for selected
models of portable liquid nitrogen refrigerators. It is
designed to activate visual and audible alarms when the
liquid nitrogen level in the refrigerator drops below a
pre-set level, usually 25 percent of container capacity.
This automatic monitoring system provides protection
when high-value materials are stored under liquid nitrogen
refrigeration.
The Low Level Alarm consists of three components:
1)Alarm Module
2)Power Supply Module
3)Sensor/Necktube Core
The Alarm and Power Supply Modules are common to all
systems, while the Sensor/Necktube Core is specially
designed for specific refrigerator models.
Sensor
Module
Connection
Type: M284CE
Alarm
Module
Remote
Alarm
Connection
Type: M286CE
Power Supply
220/240 VAC
Figure 1: Low Level Alarm Components
2
INSTALLATION
There is no need to empty the refrigerator before installing
the Low Level Alarm. In fact, the container will need to be
at least 25% full of liquid nitrogen to properly test the
Alarm after the installation is completed.
The Alarm Module (Figure 1) mounts on top of the refrigerator
lid, using adhesive velcro strips. Ensure that the lid is
clean and dry before proceeding.
Do not allow the Module to touch the lid until it is in the
exact spot for proper mounting; once the strip sticks, it
can not be moved. Carefully centre the Module over the
name plate on the refrigerator lid. Be sure that the connectors
are toward the hinge side of the lid. Remove the protective
covering from the adhesive strips on the back of the Alarm
Module. Press the Module firmly into place.
Open the refrigerator lid and remove the existing necktube core.
Slowly insert the Alarm Sensor necktube straight down into
the refrigerator. Handle the sensor carefully to avoid possible
damage to the probe. Route the sensor cable out through the
lid hinge opening. Check that the wire is not pinched
under the lid when it is closed.
Insert the sensor cable plug into the socket on the Alarm Module.
Connect the module power cable to the power supply.
Connect the power cord to a suitable AC power outlet.
NOTE: The power supply is factory set to use the alarm with 220 / 240 VAC.
The installation of the Low Level Alarm is now complete.
Perform the test procedure described under 'Operation'.
NOTE: If a remote alarm device is to be used,
see Figure 2 for connection details.
A cable connector for the remote alarm is supplied.
3
ALARM
MODULE
REMOTE ALARM
TYPICAL CIRCUIT
1
Remote
Alarm
2
Relay
AC
Power
Source
3
Figure 2.
Remote Alarm
Connections
ALARM
RELAY
REMOTE ALARM
CONNECTOR
1
GREY
2
ORANGE
3
VIOLET
NOTE:
3
1
2
1) Contacts 1 and 2 are closed during normal operation.
2) Contacts 2 and 3 are closed during alarm condition.
3) Maximum contact ratings for relay:
50V AC/DC, 2 AMPS MAX
OPERATION
General
Once the Low Level Alarm is installed, it
requires operator attention only when the liquid level in
the container falls below the alarm sensor. At that point,
the alarms are activated and operator response is required.
When the alarm senses low liquid, the red indicator flashes
at a rapid rate, the audible alarm emits a pulsating tone.
To silence the audible alarm, press the pushbutton on the
top of the Alarm Module. The red indicator will continue
to flash rapidly until the container is refilled or the sensor is
disconnected. After 15 minutes of low liquid level the optional
remote alarm device is activated.
To refill the container, disconnect the sensor plug from the
Alarm Module, open the lid and remove the sensor necktube core.
The red indicator will be lit continuously until the sensor is reconnected.
If the sensor plug is not reconnected to the alarm module within
15 minutes, the audible alarm will emit a pulsating tone. Pressing
the pushbutton will silence the alarm. After a further 15 minutes,
if the sensor plug is not reconnected, the optional remote alarm device is activated.
Add liquid as required to fill the container. Then slowly replace the
sensor necktube core and connect it to the Alarm Module.
The red indicator will go out, then flash once every few seconds.
NOTE: When the liquid level is above the alarm sensor the red indicator
flashes once every few seconds to indicate the Alarm Module is
connected to a power source.
4
OPERATIONAL TEST
To check the operation of the Low Level Alarm.
NOTE: The sensor is positioned so that the alarms are
activated when liquid level falls below approximately 25%
of the container capacity. For accurate test results,
be sure the container liquid level is at least 33% full.
1) Disconnect the sensor cable from the Alarm Module.
The red indicator should be lit continuously
2) Reconnect the sensor cable. The red indicator should
go off, then flash once every few seconds.
3) Press the pushbutton on the top of the Alarm Module.
The red indicator and the audible alarm should pulse
on and off at a rapid rate. When the pushbutton is
released, the indicator and audible alarm should go off.
The indicator will flash once every few seconds.
4) To test the optional remote alarm device, press the
pushbutton and hold it down. After approximately
15 seconds, the remote alarm device should be activated.
When the pushbutton is released, all alarms should cease operation.
5) If all functions operate as described, the Low Level Alarm
is functioning normally. If a malfunction is
indicated, refer to your distributor.
5
![TSD Series -40C ULT User Manual [EN]](http://vs1.manualzilla.com/store/data/005634658_1-66c9db561a67486106446026c707a26c-150x150.png)