1
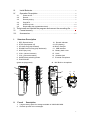
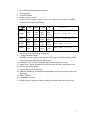
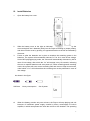
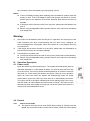
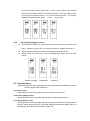
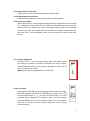
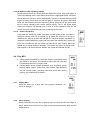
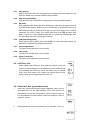
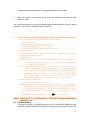
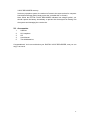
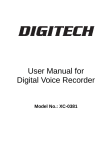
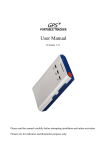
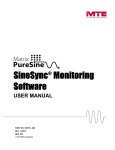
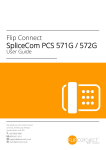
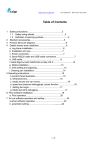
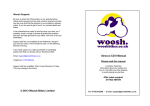
Digital Voice Recorder User Manual 1 Preface Thanks for your using digital voice recorder! For you to operate it proficiently as soon as possible, we have equipped complete manual for users, from which you can know the introductions to the relative products, using methods, system setting and safety precautions. Before using your digital voice recorder, you must read all relative materials carefully so that you can use it better. We had carefully edited this manual and thought the information in it was true and reliable. However, errors or missing could not be avoided completely, we excuse ourselves to you and your opinions will be warmly welcome. All information rights in this manual shall be reserved. Any copy or photography shall not be allowed without the approval in advance Contents I. Structure Description ........................................................................................................ 3 II. Function Description ......................................................................................................... 3 2 III. IV. Install Batteries............................................................................................................ 5 Operation Description............................................................................................... 6 4.1. 4.2. 4.3. 4.4. 4.5. 4.6. Power on/off ............................................................................................................ 6 Record ...................................................................................................................... 6 Record playing ........................................................................................................ 7 Play MP3.................................................................................................................. 9 HOLD key lock ...................................................................................................... 10 Removable disk (upload/download) .................................................................. 10 V. Tools install and Update the program and convert the recording file ........... 12 VI. Format memory ........................................................................................................ 11 VII. Accessories ................................................................................................................ 12 I. Structure Description 1 REC Record button 2 STOP (Stop/power off) 3 UP Next song (skip forward) 4 DOWN Previous song (skip backward) 5 HOLD (key lock) 6 VOL+ (volume increase) 7 VOL- (volume decrease) 8 MODE Mode switching button 9 PLAY/PAUSE (power on/play/pause) 10 Record Indicator 11 LCD (display) 12 Built-in trumpet 13 USB interface 14 Battery back cover 15 Hook 16 Headset jack 17 External microphone 18 MIC Built-in microphone 1 10 6 11 7 8 2 3 4 12 17 16 13 18 9 5 14 15 II. Function Description 1. 2. Large memory space for storage available in 32M//64M/128M. Record up to 99 voice messages. 3 3. 4. 5. 6. 7. MP3, WMA and ADPCN format support. Blue backlight. Record indication. MUSIC playing function. Choose voice activate function or not , SP and LP record format available , record time as follows respectively: 00/SP 00/LP 01/SP 01/LP 8. 9. 10. 11. 12. 13. 14. 15. 16. 17. 128MB 256MB 512MB 1GB 480 960 1920 3840 minute minute minute minute 4320 8640 17280 minute minute minute minute 480 960 1920 3840 minute minute minute minute 2160 4320 8640 17280 minute minute minute minute 2160 Remarks Without“VOX”Function Without“VOX”Function With“VOX”Function With“VOX”Function Loop mode Nor (no loop) One (loop one) All (loop all). 7 playing balance modes: NATURL (normal) ROCK (rock and roll) POP (pop) CLASSOL (classic) SOFT (soft) JAZZ (jazz) DBB (dynamic bass boost). Repeating mode (A→B): Repeatedly play certain segment of a song. Delete music: delete existing MP3 music files and voice files, individually or all. Record and record playing, Volume adjustment in 32 levels. USB connectable for uploading and downloading voice files (including music and MP3 song) Built-in speaker. Low battery indication. HOLD key lock: Under any mode, enabling the HOLD switch will lock all keys. 4 III. Install Batteries 1. Open the battery box cover. 2. Slide the battery cover to the right as indicated 3. by the arrow and place the 2 batteries (AAA) into the Player according to proper polarity, and then re-fit the cover by pushing it in opposite direction to the left as indicated by the arrow. Power on after the batteries are in place to examine the remaining power in the batteries. The system will automatically indicate “Lo” for 2s in case of low voltage. Under MP3 playing/playing mode, the volume will automatically decrease by half in case of low voltage, after which the “Lo” will emerge every 10 seconds, indicating the user to replace batteries until auto power off; under recording/pause recording mode, the system will save current recording files and return to stop record mode, under which a “Lo” will indicate that the recording can not be performed in case of low voltage. As shown in the figure Sufficient 4. Heavy consumption Out of power When the battery remains only two columns, the Player will stop playing and exit because of insufficient power supply caused by heavy consumption of built-in amplifier, in which case please turn down the volume or use headset. The operating 5 time of battery varies from battery type and playing volume. Notes: If the LCD displays nothing after replacing with new batteries, please check the polarity in time. If the LCD displays nothing still though the polarity is correct, please take out the batteries and contact specified after-services as soon as possible. If the player will be leaved unused for a long time, please take the batteries out from it. Before using rechargeable battery, please read the user manual for the battery and charger first. Warning: 1) 2) 3) IV. Never take out the batteries when the Player is in operation; and never pull out the USB connecting line when communicating with PC while “busy” displayed, or, serious damages such as program chaos, fail to power on, even program loss may be resulted in!!! If the player will be leaved unused for a long time, please take out the batteries to prevent PCB corrosion due to battery leakage. Considerations on battery use: If the player will be leaved unused for a long time, please take out the batteries. Before using rechargeable battery, please read the user manual for the battery and charger first. Operation Description 4.1. Power on/off Open the HOLD key before powering on. The system will automatically boot up after been powered on. Under power off status, you need to press the PLAY key for 2s to boot up. The memory space will be displayed for 2s, and then enter into idle mode (i.e. record mode), as shown in the figure. If there is no key operation within 2m under idle mode, the system will automatically power off. Under normal status, press the STOP key more than 2s to automatically shut down. The upper row 00 in the figure indicates that current playing song is the 0 one, and the lower row F00 indicates the total number of songs. The lower row will alternatively show total number of songs and current song time when there is a record file or downloaded MP3 music. 4.2. Record 4.2.1 Select record mode The system will enter record mode (DVR) after booting up. Shortly press the MODE key under MP3 mode to select record mode. Under stop record status 6 and record mode, shortly press VOL+ or VOL- key to select voice activate function and recording modes: LP is long-time record , SP is short-time record, 00 is not voice activate function , 01 is voice activate function . The system displays the following, then press “mode” key to enter. 4.2.2. Recording/pausing/stop record Shortly press the REC key under record mode to start record, as shown in the figure.(Before recording ,the “InIt” will be showing on display for few time.) Shortly press the REC key under recording status to pause record. Shortly press the STOP key under recording/pause record status to stop record. Before recording initialization recording 4.3. Record playing (Record playing includes: playing, pause, stop, skip forward, skip backward, select, volume, loop and A-B repeating) 4.3.1 Play record Shortly press the PLAY key under stop record status to play record. 4.3.2 Pause playing record Shortly press the PLAY key under playing status to pause playing record. 4.3.3 Stop playing record Shortly press the PLAY key under stop/pause playing record status to begin/resume playing; shortly press the STOP key under playing record/pause playing status to stop playing, and hold the key to directly power off. 7 4.3.4 Skip forward record files Long press the UP key under playing status to skip forward. 4.3.5 Skip backward record files Long press the DOWN key under playing status to skip backward. 4.3.6 Select record files Shortly press UP key under playing/stop playing status to play/select next record file. If it is already the last record file, the system will play/select the first record file; Shortly press the DOWN key under playing/stop playing status to play/select previous record file. If it is already the first record file, the system will play/select the last record file. It will automatically stop at the last record file when all files are played. 4.3.7 Volume adjustment Press the VOL+ or VOL-key under playing status, the digital volume will change in increase or decrease. Hold these two keys to rapidly increase/decrease volume. The volume is adjustable in a scope of 32 levels, as shown in the figure. ●Note: EQ mode is not applicable to record mode! 4.3.8 Loop mode Shortly press the MODE key during playing to enter loop mode option. After rEP displayed, press the UP or DOWN key to select: ALL ( ) to loop all record files, 1 ( ) to record one record files, or, no icon indication will be displayed if you select no loop. To exit this setting, press the MODE key to enter next setting. If there is no key operation within 8s, the system will save current setting and exit to playing record file status. 8 4.3.9 (A-B) Record file repeating settings During playing record file, shortly press the MODE key under loop mode option to enter A-B repeating mode, under which the A-B icon is highlighted and A- will flicker. Shortly press the UP key to select starting point, now the A- will stop flickering and B begins to flicker, shortly press the UP key again to select the end point, after which the B will stop flickering and start repeating. Shortly press the UP key for the third time to cancel repeating and resume normal playing. The A- will flicker again, waiting for selecting new starting point. If there is no key operation within 8s, the system will save current setting and exit to playing record status. 4.3.10 Delete record files Long press the MODE key under stop status to enter delete mode, as shown in the figure: shortly press UP or DOWN key to delete the directory, PLAY key to delete the file, and the system will indicate (Er asE) that deletion completed. To delete all, hold the MODE key again and the system will indicate (All?); press the PLAY key to delete all and the system will indicate (Er asE). Shortly press the MODE key to cancel deletion operation. The system will return to record mode after deletion. If all record files are deleted, the system will indicate 00-F00. 4.4. Play MP3 1) 2) Shortly press the MODE key under idle mode to select MP3 mode (as shown in the figure). 01 indicates to select the first song and F05 indicates there are 5 songs in total. Playing MP3 includes multiple operations such as playing, pause playing, adjust volume, delete files, skip forward, skip backward and set up loop mode, repeating mode and sound effect during playing, etc, respectively as follows: 4.4.1 Playing MP3 Press the PLAY key to play with time progress displayed, as shown in the figure. 4.4.2 Pause playing Shortly press the PLAY key during playing to pause when the MP3 icon begin to flicker. Shortly press the PLAY key again to resume playing and the MP3 icon will stop flickering. 9 4.4.3 Stop playing Shortly press the STOP key during playing to stop playing, under which you can press the MODE key to switch between various modes. 4.4.4 Skip forward/backward Long press the UP or DOWN key during playing to skip forward/backward. 4.4.5 EQ mode During playing MP3, shortly press the MODE key under the loop mode options to enter EQ mode options. Press the UP or DOWN key to select EQ mode: 00 is NATURAL (normal), 01 is ROCK (rock and roll), 02 is POP (pop), 03 is CLASSIC (classical), 04 is SOFT (soft), 05 is JAZZ (jazz) and 06 is DBB (dynamic bass boost). If there is no key operation within 8s, the system will automatically save current setting and return to playing MP3 status. 4.4.6 (A-B) Repeating setting During playing MP3, shortly press the MODE key under EQ mode option, the same as the operation of repeating record files. 4.4.7 Volume adjustment The same as the operation of record mode. 4.4.8 Loop mode The same as the operation of record mode. 4.4.9 Delete record files The same as the operation of record mode. 4.5. HOLD key lock When enabling the HOLD key, the system will indicate “Hold” and restore to original display. No key operation will be response now until disabling the HOLD key. When the HOLD key is enabled under shut down status, the system will indicate HOLD when trying to boot up by long pressing the PLAY key. 4.6. Removable disk (upload/download) 1 Under any circumstance except system upgrading, when insert a removable disk into the USB interface of PC, the system will immediately interrupt current operation, trying to connect with the PC. Disk operation is ready when the disk icon emerges in the PC operation system. 2 Upload/download: When removable disk is detected, you may 10 upload/download (in the manner of copy) MP3/WMA files or other files. 3 When the USB is in idle status, shortly press the MODE key to switch to MP3 operation mode. The system will indicate “busy” during data transmitting between the disk and PC. Never disconnect at this time, or a data loss may be caused. V. Tools install and Update the program and convert the recording file 1、 There are four functions of the Tools into the CD-ROM, following: 1) Using of WIN98 drive. 2) Deal with the U-disk encrypting and formatting. 3) Update the program of the voice recorder 4) Convert the recording file and play it into the computer。 2、 Tools install process: CD disk insert to CD -ROM, Click the “ setup.exe ” file,and click “next。 。。 finish” , the tools have installed successful。 3、 Update the program: Explain:When the voice recorder isn’t running, this may be caused by program losses due to incorrect operation, in which case you may carry out troubleshooting according to the following steps: Steps:ET-880 connect PC from USB,PC shows U disk after 2 sec.,Click and turn on “Start-----All Programs----- Mp3 Player Utilities 1.47------Mp3 Player Update Tool” with the mouse ----display a picture following----- choose update file(into CD-ROM’s update document ) -------click “start” -------display dialog box-------click “accept”-------before 2 sec. Pull out the record pen on the computer and reconnect it -------in the end of the voice recorder format. 4、 Record file converted and played 1) Copy the recording file into your computer 2) ET-880 connect PC from USB,PC shows U disk after 2 sec.,Click and turn on “Start-----All Programs----- Mp3 Player Utilities 1.47------ Sound Convert Tool” ------ display a picture following -------open to need file that you put it copy the record file of ACT format into your computer ------- click “convert”-------save a WAV format file to your computer------- click “ ”go to be playing. Remark:Converted WAV file that the player of offering of the operating system or support WAV too. VI. Format memory To format the memory, you should insert the DITITAL VOICE RECORDER into the computer’s USB interface and enter USB connecting mode to format the DITITAL 11 VOICE RECORDER memory. Under any operation system, the method of format is the same as that for computer hard disks and floppy disk (namely select the “movable disk” to format). Note: When the DITITAL VOICE RECORDER indicates low voltage symbol, you should replace the battery immediately to prevent the electrolyte from flowing into the system and damaging the core device. VII. Accessories 1. 2. 3. 4. 5. USB line Hi-fi earphone CD User Manual Two AAA batteries. Congratulations! You have troubleshot your DIGITAL VOICE RECORDER, now you can enjoy it as usual. 12