1
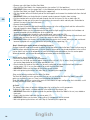
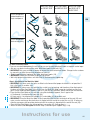
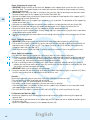
www.maxi-cosi.com
Maxi-Cosi Mobi
GB
N
Instructions for use/Warranty
IMPORTANT: Keep for future reference
Bruksanvisning/Garanti
ADVARSEL: Ta vare på bruksanvisningen til
senere bruk
Bruksanvisning/Garanti
VIKTIGT: Spara på denna för framtida bruk
FIN Käyttöohjeet/Takuu
TÄRKEÄÄ: Säilytä myöhempää käyttöä varten
S
The safe world of Maxi-Cosi
Maxi-Cosi Mobi
GB
Instructions for use / Warranty
N
Bruksanvisning / Garanti
19 - 30
S
Bruksanvisning / Garanti
31 - 42
FIN
Käyttöohje / Takuu
43 - 54
Contents
7 - 18
2
1
2
3
4
5
6
7
8
9
10
11
12
13
14
15
16
2
1
Illustrations
3
17
18
19
20
21
22
23
24
25
26
27
28
1
2
29
30
31
3
32
1
1
2
2
Illustrations
4
3
33
1
34
35
36
39
40
43
44
1
2
37
38
1
1
2
2
1
41
42
2
1
2
3
45
46
47
48
1
1
2
2
3 4
2
2
1
Illustrations
1
5
49
50
51
53
54
55
Illustrations
52
6
Dear parents
Congratulations on your purchase of the Maxi-Cosi Mobi.
Safety, user-friendliness, comfort and design were given top priority during all stages of the development of
the Maxi-Cosi Mobi. This product meets the most stringent safety regulations. The Maxi-Cosi Mobi offers
maximum safety only when used in accordance with these instructions.
GB
Continuous research by our development team, supported by intensive contact and consultation with test
persons and customers, ensures that we are kept fully up-to-date in the field of child safety. Therefore, if
you have any questions concerning the use of the Maxi-Cosi Mobi, please do not hesitate to contact us.
Dorel
LEGEND
1.
2.
3.
4.
5.
6.
7.
8.
9.
10.
11.
Removable cover
Shell
Base
Belt yoke
User manual
Tetherset
Control button support leg
Foot support leg
Support leg
Belt portion loop
Dashboard supports
12.
13.
14.
15.
16.
17.
18.
19.
20.
21.
22.
Harness slots
Belt pads
Belt buckle
Adjustment button
Adjuster belt
Positioning handle
Frame
Shoulder belt
Belt hook
Car kit
Metal attachment hooks
English
7
CONTENTS
1.
2.
2.1
2.2
3.
GB
3.1
3.2
3.3
4.
4.1
4.2
4.3
5.
6.
7.
8.
9.
10.
11.
IMPORTANT: READ FIRST! . . . . . . . . . . . . . . . . . . . . . . . . . . . . . . . . . . . . . . . . . . . . . . . .8
INSTALLING AND REMOVING THE MAXI-COSI MOBI . . . . . . . . . . . . . . . . . . . . . . . . . . .9
Installing the Maxi-Cosi Mobi . . . . . . . . . . . . . . . . . . . . . . . . . . . . . . . . . . . . . . . . . . . . . .9
Removing the Maxi-Cosi Mobi . . . . . . . . . . . . . . . . . . . . . . . . . . . . . . . . . . . . . . . . . . . . .12
PLACING AND SECURING YOUR CHILD . . . . . . . . . . . . . . . . . . . . . . . . . . . . . . . . . . . . .13
Use of the harness system: closing and tightening the harness . . . . . . . . . . . . . . . . . . . .13
Seat positions (adjusting the seat into sitting and reclining positions) . . . . . . . . . . . . . .13
Removing your child . . . . . . . . . . . . . . . . . . . . . . . . . . . . . . . . . . . . . . . . . . . . . . . . . . . . .14
MAINTENANCE AND CLEANING . . . . . . . . . . . . . . . . . . . . . . . . . . . . . . . . . . . . . . . . . . . .14
General . . . . . . . . . . . . . . . . . . . . . . . . . . . . . . . . . . . . . . . . . . . . . . . . . . . . . . . . . . . . . . .14
Seat cover . . . . . . . . . . . . . . . . . . . . . . . . . . . . . . . . . . . . . . . . . . . . . . . . . . . . . . . . . . . . .14
Belt buckle functioning and cleaning . . . . . . . . . . . . . . . . . . . . . . . . . . . . . . . . . . . . . . . .15
GENERAL INSTRUCTIONS . . . . . . . . . . . . . . . . . . . . . . . . . . . . . . . . . . . . . . . . . . . . . . . .15
ACCESSORIES . . . . . . . . . . . . . . . . . . . . . . . . . . . . . . . . . . . . . . . . . . . . . . . . . . . . . . . . .16
WASTE SEPARATION . . . . . . . . . . . . . . . . . . . . . . . . . . . . . . . . . . . . . . . . . . . . . . . . . . . .16
NEXT STAGE CHILD RESTRAINTS (RECOMMENDED) . . . . . . . . . . . . . . . . . . . . . . . . . . .17
CAR FITTING LIST . . . . . . . . . . . . . . . . . . . . . . . . . . . . . . . . . . . . . . . . . . . . . . . . . . . . . .17
WARRANTY . . . . . . . . . . . . . . . . . . . . . . . . . . . . . . . . . . . . . . . . . . . . . . . . . . . . . . . . . . .17
QUESTIONS . . . . . . . . . . . . . . . . . . . . . . . . . . . . . . . . . . . . . . . . . . . . . . . . . . . . . . . . . . .18
1. IMPORTANT: READ FIRST!
The Maxi-Cosi Mobi is for rearward-facing use only. Do not use it forward facing!
Read this user manual carefully and save it for future reference in the space provided at the bottom of the
Maxi-Cosi Mobi. Failure to follow the instructions contained in this manual could result in serious injury to
your child.
Use original accessories and manufacturer-approved parts only. Do not make any changes to this product.
If you have any problems or complaints, contact your retailer or importer.
The Maxi-Cosi Mobi has been approved according to the latest regulations in the ECE R 44/04, the
European standard for child restraints, and can be used for children aged approximately 9 months to
around 5 years (Group 1+2: 9 to 25 kg). The Maxi-Cosi Mobi is designated as "semi-universal" and
therefore suitable for installation on the seats of specific types of cars, as included in the Car List (see
Chapter 9: Car List).
Approval according to ECE R 44/04
Maxi-Cosi Mobi
8
Group
Body Weight
Age
1+2
9 – 25 kg
9 months – around 5 years
English
2. INSTALLING AND REMOVING THE MAXI-COSI MOBI
The Maxi-Cosi Mobi can be installed with an automatic 3-point or 2-point safety belt in combination with
the tethers and support leg. To check whether your car is suitable for installing the Maxi-Cosi Mobi with
tethers and support leg, see Chapter 9: Car list.
• Installed with 3-point
safety belt
• Installed with static 2-point
safety belt
Yes
• On passenger seat
• On left/right side of the back seat
• In the middle position of the back seat
Yes
Yes
Yes
• Rearward-facing
• Forward-facing
• Belt routing marking
GB
Yes
Yes
No
Blue
• Frontal airbag
• Side airbag
No
Yes
Never use the Maxi-Cosi Mobi on seats equipped with frontal airbags! This does not apply to side
airbags. Frontal airbags must be switched off when the car seat is in the front passenger seat. The
manufacturer advises that frontal airbags will be switched off or disabled by an official car-brand-dealer.
The Maxi-Cosi Mobi is only suitable for use in the listed vehicles fitted with dynamic 3-point or static
2-point safety belts, approved in accordance with ECE Regulation No. 16 or equivalent standard.
The proper threading of the seat belt is essential to your child’s safety. The seat belt must be threaded along
the blue markings on the Maxi-Cosi Mobi. Never thread the belt in any other way!
2.1 Installing the Maxi-Cosi Mobi
Step 1: Adapting the harnesses to your child
Before installing the Maxi-Cosi Mobi, you will need to determine the proper height of the shoulder belts for
your child. The Maxi-Cosi Mobi has 3 slots for the shoulder belts. Smaller children should use the lowest
slots, while older children should use the top slots. Use the middle slot for children of medium height,
making sure the slot used is not below the child’s shoulders.
1
2
3
4
• Loosen the shoulder belts by pressing the adjustment button and pulling the shoulder belts towards you (1).
• IMPORTANT! Do not pull on the belt pads.
• Release the belt buckle by pressing the red button on the buckle (2). Drape the belts over the belt hooks
on the shell and flip away the belt buckle (3).
• Position your child in the Maxi-Cosi Mobi with his back straight up against the backrest.
• Adjust the height of the shoulder belts to a suitable height for your child (4).
• IMPORTANT! The correct height of the shoulder belts is attained when the belt disappears into the shell
slightly above the shoulders of the child.
Instructions for use
9
5
6
GB
7
8
9
10
11
12
• Remove your child from the Maxi-Cosi Mobi.
• Place the Maxi-Cosi Mobi in the sleeping position (see section 3.2: Seat positions)
• IMPORTANT! Make sure the support leg is in the folded-out position to enable you to access the back of
the Maxi-Cosi Mobi (see Step 5; Positioning the support leg).
• Pull the shoulder belts until the belt yoke on the back appears and remove the shoulder belts from the belt
yoke (5).
• IMPORTANT! Make sure the belt buckle is locked in order to prevent the belts from twisting.
• Pull the shoulder belts out of the belt pads through the shell and cover. Do this on both sides (6).
• TIP! Loosen the top part of the cover to make it easier to remove the belts and belt pads. Remember to
reattach the cover to the shell afterwards (7).
• Remove the belt pads (8).
• From the front, thread one belt pad through the correct slot in the cover and shell and then rethread this
belt pad through the back through the adjacent slot (9).
• IMPORTANT! Make sure the strap between the belt pads lies tight against the plastic shell and does not
become entangled with the belt portion of the support leg.
• Thread the shoulder belts through the adjusted belt pads, cover and shell (10).
• Attach the shoulder belts to the belt yoke and check to make sure the 3 red stitching on the belt ends and
the belt yoke are facing the shell (11) (if not, this means the belts are twisted).
• IMPORTANT! Make sure the belts are threaded along the plastic shell, remain behind the rods and do not
become entangled with and stay behind the belt portion of the support leg (12).
Step 2: Checking for anchor points or installing the car kit
Remove the elastic band from around the tethers and let the tethers drop to the floor. There are three ways to
hook the tethers onto the anchor points in the car. Specific anchor points may already be present in the car that
can be used. If not, the car kit components or metal attachment hooks provided can serve as anchor points.
Whenever possible, use the most forward positioned anchor points to attach the tethers.
13 14
15
Anchor points already present in the car
• Check the passenger seat rails for anchor points.
In some cars, the child seat anchor points are part of the rail itself (13). In others, there are metal child
seat anchor loops bolted to the rail, often painted blue (14).
• Check whether the hooks of the tether can be easily connected to and disconnected from the present
anchor points (15). If so, use these points to anchor the Maxi-Cosi Mobi.
• IMPORTANT! Make sure the straps of the tethers are not twisted.
• Wait with tightening the tethers until after Step 4; Positioning the support leg.
Extra anchor points provided with the Maxi-Cosi Mobi
The Maxi-Cosi Mobi has extra anchor points that you can use to tether the Maxi-Cosi Mobi if no anchor
points are available in your car. There are several options for doing this.
Study the bottom of the car seat and the seat rails and choose the right configuration for installation; car kit
or metal attachment hooks (both included).
16
17
10
a) Car kit
The (below) chart shows all possible configurations for installing the car kit components.
To obtain the right length, a suitable opening in the tether must be chosen (16).
• IMPORTANT! Determine the length based on the position of the Maxi-Cosi Mobi in the car (rear, middle or
front seat).
• Simply hook the tether hook onto the anchor point (17).
• IMPORTANT! Make sure the tether straps and car kit components are not twisted.
• Wait with tightening the tethers until after Step 4; Positioning the support leg.
English
Maxi-Cosi Mobi
on FRONT SEAT
Maxi-Cosi Mobi Maxi-Cosi Mobi
on MIDDLE SEAT on REAR LEFT/
RIGHT SEAT
Car kit components
braided together as
single component
1
GB
2
3
Car kit components
attached separately
2x
1
2
3
18
19
20
21 22
23 24
25
17 19
b) Metal attachment hooks
If you can see a bolt holding down the seat rail you can use the metal attachment hooks as separate anchor loops.
• Ask your car dealer to connect the metal attachment hooks to the bolt (18).
• IMPORTANT! Ask your certified car dealer to connect the metal attachment hooks. Changes to the car done
by yourself can affect the warranty conditions of your car.
• Simply hook the tether hook onto the metal attachment hooks (19).
• IMPORTANT! Make sure the tether straps are not twisted.
• Wait with tightening the tethers until after Step 4; Positioning the support leg.
Step 3: Installation of the Maxi-Cosi Mobi
• IMPORTANT! On some seats, the belts are fitted so far forward that proper installation is not possible. If
this is the case, try another seat.
• IMPORTANT! In some cases, the buckle of the car belt may be too long and therefore sit too high against
the base of the Maxi-Cosi Mobi. If this is the case, the Maxi-Cosi Mobi cannot be installed securely and
you’ll have to choose another position in the car. If you have any questions, please contact the manufacturer.
• Place the Maxi-Cosi Mobi on the seat and, using the dashboard supports, lean it against the:
a) Dashboard, if installed on the front seat (20).
b) Front seat(s) if installed on the left/right (21) and middle (22) of the back seat.
• IMPORTANT! Place the Maxi-Cosi Mobi as far as possible with the front to the back of the seat (23) and
make sure the marking on the plastic base is aligned with the end of the seat of the car (24). If necessary,
slide the passenger seat forward or backward until the marking is aligned with the end of the seat (25).
• Place the Maxi-Cosi Mobi in the sitting position (see section 4.2: Seat positions).
• Attach the tethers; Do not tighten until after Step 4; Positioning the support leg (17/19).
Instructions for use
11
26
27
GB
28
29
30
31
26
32
33 34
35
33 34
36
37
Step 4: Positioning the support leg
• IMPORTANT! When installing on the back seat, always use the support leg to ensure the safe use of the
Maxi-Cosi Mobi. The support leg does not need to be used when installing on the passenger seat (leaning
against the dashboard).
• IMPORTANT! If the Maxi-Cosi Mobi is installed on the back seat, slide the passenger seat forward in order
to create enough space for the support leg of the Maxi-Cosi Mobi (26).
• Fold out the support leg by removing the magnet using the loop on the belt portion of the support leg (27).
The support leg will now fold itself out.
• IMPORTANT! Make sure the support leg is folded out as far as possible. The belt portion of the support leg
should now be tight (28).
• Hold onto the support leg under the control button and press the control button with your thumb (29).
• Keep the button pressed and move the support leg downwards until it reaches the floor of the car.
• Release the control button and "click" the support leg into the locked position (30).
• Check to make sure the support leg is securely locked and stays in position by trying to move it up or down
without pressing the control button.
• Slide the passenger seat backwards again to create enough room for the legs of the passenger on the front
seat (31).
Step 5: Tightening the tethers
• IMPORTANT! Slide the passenger seat to the front to make it possible to tighten the tethers (26).
• Pull the tethers as tightly as possible first on the side most far from the door by pulling the tether with the
loop downwards as hard as you can (32). Then tighten the other side (32,2) and give extra tightness by
strapping it down with your foot (32,3).
• Check to make sure the Maxi-Cosi Mobi is securely and firmly installed in the car by pulling on the seat.
Step 6: Safety belt installation
• The Maxi-Cosi Mobi can be installed with a dynamic 3-point or a static 2-point safety belt:
a) If you’re installing the Maxi-Cosi Mobi with a dynamic 3-point safety belt, hold the lap and shoulder belt
(33), thread them between the steel frame and the plastic base (34) and click the seat belt into the car
seat buckle (35). Also see the blue markings for proper belt routing.
b) If you’re installing the Maxi-Cosi Mobi with a static 2-point safety belt, hold the lap belt (33), thread it
between the steel frame and the plastic base (34) and click the seat belt into the car seat buckle (36). Also
see the blue markings for proper belt routing.
• IMPORTANT! Make sure the seat belts are not twisted.
• Using the shoulder belt, pull everything to the front of the Maxi-Cosi Mobi as tightly as possible (37). Make
sure the arrow continues to be aligned with the end of the car seat.
Checklist …
To ensure the optimum safety of your child, check after installation to make sure that…
• The seat belts are as tight as possible and not twisted.
• If the car kit is used, it is attached properly and not twisted.
• The tethers are not twisted, are properly secured, and as tight as possible.
• If the Maxi-Cosi Mobi is installed on the back seat, the support leg is folded out as far as possible, locked
and supported against the floor of the car.
• The entire Maxi-Cosi Mobi is installed securely and firmly in the car (check by pulling on the seat).
38
39
40
12
2.2 Removing the Maxi-Cosi Mobi
• Restore the support leg to its start position by pressing the control button and moving the support leg
upwards (38).
• Using the loop on the belt portion of the support leg, pull the support leg into its folded-up position against
the plastic base (39).
• Secure the support leg by placing it in the appropriate place (40).
English
41
42
• Loosen the tethers by pushing the silver button (41,1), pushing the part with the silver button upward
(41,2) and pulling on the belt with the hook attached (41,3) (keep silver button pushed in).
TIP: First push the car seat down to lighten the tension of the tethers.
• Release the tether-hooks from the anchor points. (Possibly roll them up and bind them together with an
elastic band.)
• Loosen the car seat belt and remove it from between the plastic base and steel frame (42).
• IMPORTANT! If the Maxi-Cosi Mobi is installed on the back seat, hold onto it while uninstalling to make
sure it does not tip over.
• Remove the Maxi-Cosi Mobi from the car.
GB
3. PLACING AND SECURING YOUR CHILD
3.1 Use of the harness system: closing and tightening the harness
Once the shoulder belts are adjusted to the proper height as described in section 2.1, Step 1 and your child
has been placed in the seat, you can now secure your child in the seat.
43
44
45
46
• Slide the buckle sections together and "click" them into the belt buckle (43).
• IMPORTANT! Position the lap belt part of the harness system as low as possible in order to safely support
your child’s hips (44).
• Pull the shoulder belts tight (45,1) and remove any remaining slack from the harness system by pulling the
belts tightly using the adjuster belt (45,2).
• IMPORTANT! Make sure you can fit only one finger between the harnesses and your child (46). The tighter
the belts are around your child, the better the protection.
• IMPORTANT! Make sure the belt pads are positioned properly against your child’s shoulders.
• IMPORTANT! Make sure the belts are not twisted.
• If you are unable to click the buckle sections into the buckle, release the buckle by pressing the red button
and try again.
If you are unable to fasten the harness belts properly or pull them tight, contact your supplier immediately
and do not use the Maxi-Cosi Mobi under any circumstances.
Always use the belt pads, as they are essential to your child’s safety.
Instruct your child to never play with the belt buckle.
47
48
3.2 Seat positions (adjusting the seat into sitting and reclining positions)
The Maxi-Cosi Mobi can be adjusted to 4 different positions (47).
• Pull the positioning handle under the front of the seat upwards, and then pull or push the seat forwards or
backwards (48).
• Release the positioning handle in the desired position and push until you hear a "click".
• IMPORTANT! Check to make sure the Maxi-Cosi Mobi is securely locked in the desired position by pulling on it.
Checklist…
To ensure the optimal safety of your child, check before every trip to make sure that…
• The entire Maxi-Cosi Mobi is installed securely and firmly in the car using the belts, tether set and car kit (if used).
• If installed on the front seat, that the Maxi-Cosi Mobi is leaning properly against the dashboard.
• If installed on the back seat, that the Maxi-Cosi Mobi is leaning properly on the folded-out support leg.
• The height of the shoulder belts is suitable for your child.
• The belts are not twisted.
• The belt pads are positioned properly against your child’s shoulders.
• Your child is securely fastened with the harnesses, and the belt buckle is locked properly.
• The belts of the Maxi-Cosi Mobi are not damaged. If so, do not use the Maxi-Cosi Mobi under any
circumstances and contact your retailer or importer immediately.
Instructions for use
13
2
3
3.3 Removing your child
• Place the Maxi-Cosi Mobi in the sitting position (also see section 3.2: Seat positions).
• Release the belt buckle by pressing the red button on the buckle (2). Drape the belts over the belt hooks
on the shell and flip away the belt buckle (3).
• Remove your child from the Maxi-Cosi Mobi.
4. MAINTENANCE AND CLEANING
GB
4.1 General
• IMPORTANT! Remove the Maxi-Cosi Mobi from the car before cleaning.
• Use lukewarm water, soap and a rag to clean the plastic parts of the seat. Do not use abrasive cleaners.
• Clean the steel parts using a damp cloth.
• IMPORTANT! Never use lubricants, not even for the moving parts on the Maxi-Cosi Mobi.
5
6
8
49
50
4.2 Seat cover
A. Removing the seat cover
• IMPORTANT! Make sure the belt buckle is locked in order to prevent the belts from twisting.
• Place the Maxi-Cosi Mobi in the sleeping position (see section 3.2: Seat positions).
• Pull the shoulder belts until the belt yoke on the back appears and remove the shoulder belts
from the belt yoke (5).
• Pull the shoulder belts out of the belt pads through the shell and cover. Do this on both sides (6).
• TIP! Loosen the top part of the cover to make it easier to remove the belts and belt pads.
• Remove the belt pads (8).
• Loosen the cover (49).
• Pull the belts, belt pads, buckle sections and belt buckle through the openings in the cover (50).
• Remove the cover.
B. Cleaning the seat cover
• The cover and belt pads should be washed by hand (maximum of 30˚C).
Do not place them in the dryer. Also see the care instructions on the cover itself.
Tip: It is advisable to buy an extra cover when purchasing the Maxi-Cosi Mobi so that you can continue to
use the Maxi-Cosi Mobi at all times, even when washing or drying the cover.
51
52
9
10
11
12
14
C. Reattaching the seat cover
• Place the cover back on the Maxi-Cosi Mobi.
• Thread the belt buckle and shoulder belts through the cover (51).
• Reattach the cover all around by fastening it to the hooks (52).
• Reattach the belt pads (9).
• IMPORTANT! Make sure the strap between the belt pads lies tight against the plastic shell and does not
become entangled with the belt portion of the support leg.
• Thread the shoulder belts through the belt pads, cover and shell (10).
• Attach the shoulder belts to the belt yoke and check to make sure the 3 red stitching on the belt ends and
the belt yoke are facing the shell (11) (if not, this means the belts are twisted).
• IMPORTANT! Make sure the belts are threaded along the plastic shell, remain behind the rods and do not
become entangled with and stay behind the belt portion of the support leg (12).
• Check the functioning of the harness system.
English
4.3 Belt buckle functioning and cleaning
The proper functioning of the belt buckle contributes substantially to the safety of your child. The most
common reason that the buckle does not function properly is because it is dirty (from dust, grime, food
particles, etc.). The following is a list of possible of function failures and possible solutions.
A. Problems
• When opening the belt buckle, the buckle sections are released slowly.
• The belt buckle can only be opened with considerable force.
• It is difficult to click the buckle sections into the buckle (too much resistance).
• The buckle sections do not lock into the belt buckle (they are released again immediately).
• There is no "click" sound when locking the buckle sections into the belt buckle.
53
54
55
GB
B. Cleaning the belt buckle to solve the problem
Removing the belt buckle
• Release the buckle by pressing the red button.
• Remove the belt buckle pad (53).
• Place the Maxi-Cosi Mobi in the reclining position (see section 4.2: Seat positions).
• Hold the metal clasp under the shell, tilt it and remove the belt buckle (54).
Cleaning the belt buckle
• Rinse the belt buckle thoroughly under the tap and let it dry completely (55).
• IMPORTANT! Do not use lubricants!
Reattaching the belt buckle
• Push the metal clasp through the opening of the shell and tilt it so that the belt buckle is in the proper
position.
• IMPORTANT! Check to make sure the belt buckle stays in place by pulling on it forcefully.
• Reattach the belt buckle pad.
If you are unable to close the belt buckle or if you are unsure whether you have solved the problem
correctly, contact your retailer or importer immediately (see back of the instruction manual). Do not use the
Maxi-Cosi Mobi under any circumstances!
5. GENERAL INSTRUCTIONS
Always pay close attention to the following…
• Prior to purchase, check to make sure the seat fits properly in your car.
• Always use the seat, even on short trips, as this is when most accidents occur.
• Only use the Maxi-Cosi Mobi in a car and not at home, in an airplane, boat or other recreational vehicle.
The child restraint is approved for car travel only.
• The seat must always be secured with the seat belt, tethers and, if installed on the back seat, with the
support leg, even when not in use. A loose seat could injure other passengers in a sudden stop or crash.
• Never use the Maxi-Cosi Mobi without its cover. Do not replace the cover with a cover other than the one
supplied by the manufacturer, as the cover contributes to the safety of the seat.
• Always cover up the Maxi-Cosi Mobi when the car is parked in the sun, as plastic and metal parts may
become extremely hot and discolour the fabric.
• To avoid damage to the fabric, do not remove the logos on the cover.
• Make sure that the Maxi-Cosi Mobi does not become wedged by or overloaded with heavy luggage,
adjustable seats or slamming the car door.
• Make sure that all luggage and objects likely to cause injury in the event of an accident (on the rear
window shelf for instance) are secured properly.
• If the back seat of the vehicle can be folded forward, make sure the seat back locks are fully locked before
placing a child in the Maxi-Cosi Mobi on the back seat of the vehicle.
• Take short breaks on longer trips to give your child some freedom of movement.
Instructions for use
15
• Never leave your child unattended in the car.
• Save the instruction manual for future reference in the space provided under the Maxi-Cosi Mobi.
• Never use a second-hand product, as you can never be certain what has happened to it.
The safety of the car seat can only be guaranteed by the manufacturer when used by the original owner.
• Replace the Maxi-Cosi Mobi after an accident, as the seat may become unsafe due to damage that is not
readily apparent.
• The manufacturer has taken into consideration the fact that car seats may cause indentations in car
upholstery. This is unavoidable, however, due to the prescribed safety standards, and because the car seat
must be installed tightly in order to protect your child. Dorel is not liable for any damage that may occur
to the car upholstery as a result of this.
GB
And it goes without saying…
• Set a good example and always wear your seat belt!
6. ACCESSORIES
Sun canopy
Cup holder
Playtray
Summer cover
7. WASTE SEPARATION
If cared for properly, Maxi-Cosi Mobi can be used for 2 children or approximately 8 years. However, plastics
do deteriorate with age and exposure to extreme temperatures. Please check the date of manufacture
(stamped in the shell) before using a Maxi-Cosi Mobi that has been stored for a longer period.
Once your child has outgrown the seat, we recommend that you discontinue using it and discard it as waste.
For reasons of environmental protection, we ask that you separate the waste generated by the Maxi-Cosi
Mobi from the purchase (packaging) to the moment of discarding (product parts), and dispose of it properly.
Keep all plastic packaging away from children to avoid the risk of suffocation.
Packaging
Product parts
16
Cardboard box
Plastic bag
Fabric cover
Plastic parts
Metal parts
Tether/harnesses
Belt buckle
English
Paper waste
Household waste
Household waste
appropriate recycling container
Container for metal
Container for polyester
Household waste
8. NEXT STAGE CHILD RESTRAINTS (RECOMMENDED)
Approved according to ECE R 44/04
Type of child restraint
Group
Body Weight
Age
GB
2+3
15 to 36 kg
3,5 to 12 years old
2+3
15 to 36 kg
3,5 to 12 years old
Maxi-Cosi Rodi XR
Maxi-Cosi Rodi SPS
9. CAR FITTING LIST
The Maxi-Cosi Mobi is designated as “semi-universal” and therefore suitable for installation in certain
types of cars. These types have been compiled in a list. This list is subject to change and additions. For
an up-to-date version of the car fitting list, please look at the popsheet added to this product and/or retail
outlet for the Maxi-Cosi Mobi, where you can inquire about the suitability of the Maxi-Cosi Mobi for your
specific car. An up-to-date car fitting list is included with purchase of the Maxi-Cosi Mobi.
10. WARRANTY
We guarantee that this product was manufactured in accordance with the current European safety
requirements and quality standards which are applicable to this product, and that this product is free from
defects in workmanship and material at the time of purchase. During the production process the product
was subjected to various quality checks. If this product, despite our efforts, shows a material/manufacturing
fault within the warranty period of 24 months, (with normal use as described in the user instructions) we
will comply with the warranty terms and conditions. In this case please contact your dealer. For extensive
information on applying the warranty terms and conditions, you can contact the dealer or look on our
website: www.maxi-cosi.com.
The warranty is not valid in the following cases:
• In case of a use or purpose other than described in the manual.
• If the product is submitted for repair through a dealer that is not authorized by us.
• If the product is not supplied to the manufacturer with the original purchase receipt (via the retailer and/or
importer).
• If repairs were carried out by third parties or a dealer that is not authorized by us.
• If the defect is the result of improper or careless use or maintenance, negligence or impact damage to the
fabric cover and/or frame.
• If the parts show normal wear and tear that may be expected from daily use of a product (wheels, rotating
and moving parts etc.)
Warranty
17
Date of effect:
The warranty becomes effective on the date the product is purchased.
Warranty term:
The warranty period applies for a period of 24 consecutive months. The warranty only applies for the first
owner and is not transferable.
What to do in case of defects:
After purchasing the product, keep the purchase receipt. The date of purchase must be clearly visible on the
receipt. Should problems or defects arise please contact your retailer. Exchanging or taking back the
product cannot be requested. Repairs do not give entitlement to extension of the warranty. Products that
are returned directly to the manufacturer are not eligible for warranty.
GB
This Warranty Clause conforms to European Directive 99/44/EG of 25 May 1999.
11. QUESTIONS
If you have any questions, please contact your retailer or importer (see back of instruction manual).
Make sure you have the following information on hand when calling:
• Serial number at the bottom of the orange sticker (at the back of the Maxi-Cosi Mobi)
• Make and type of car and seat on which the Maxi-Cosi Mobi is installed
• Your child’s age and weight
18
Warranty